
Тормозит Windows 11 по разным причинам, но на всё есть свое решение. В данном материале создатель «Блога системного администратора» Игорь Позняев предлагает разобраться с проблемой и рассказывает об эффективных способах её исправления.
Повреждены файлы ОС — поправим в командной строке
Системные файлы Windows могли повредиться при работе. Из-за ошибок, неправильных действий пользователя и по разным другим причинам. Или же из-за установки проблемного софта, а также «игрушек». Итог печален — ноутбук или настольный ПК тормозит или система загружается очень долго. Поступим как ИТ-шники — поправим системные файлы в командной строке. Применим штатные утилиты Windows 11, которые проверят системные файлы, а затем исправят.
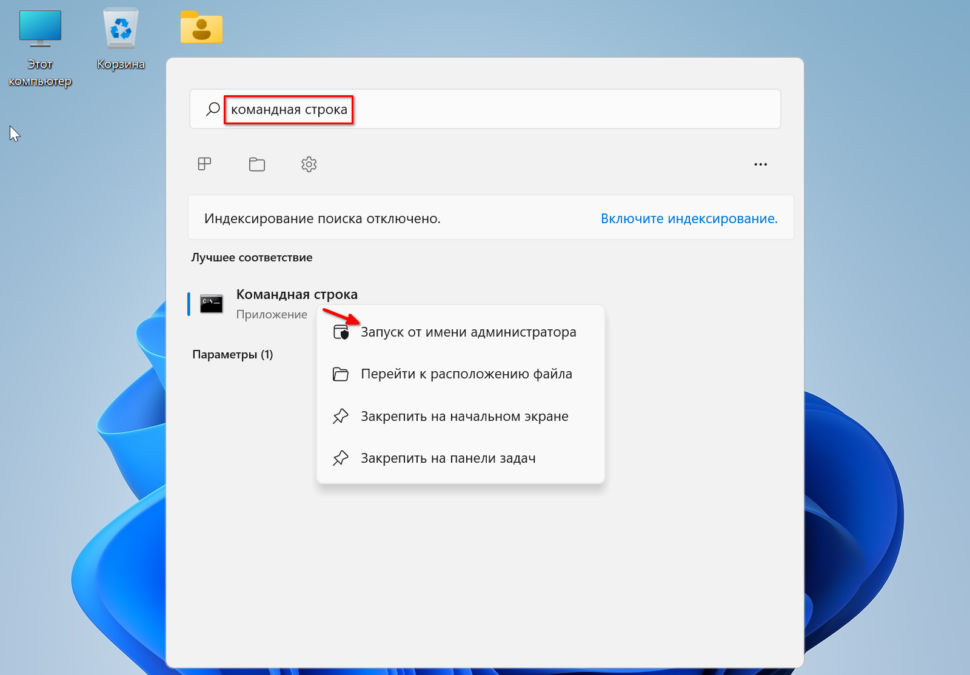
Откройте окно поиска системы — используйте сочетание клавиш Win+S. Наберите в поисковой строке:
командная строка
Кликните правой кнопкой мыши по найденному приложению. Запустите командную строку с правами админа.
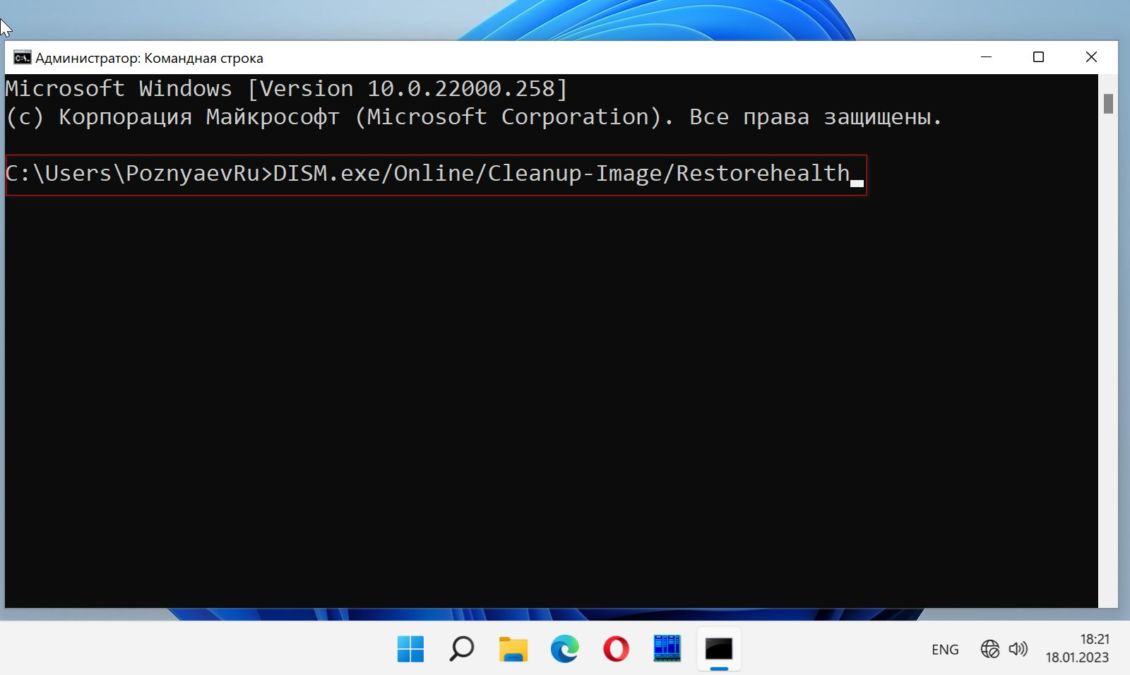
Начните с команды восстановления работоспособности DISM:
DISM.exe/Online/Cleanup-Image/Restorehealth
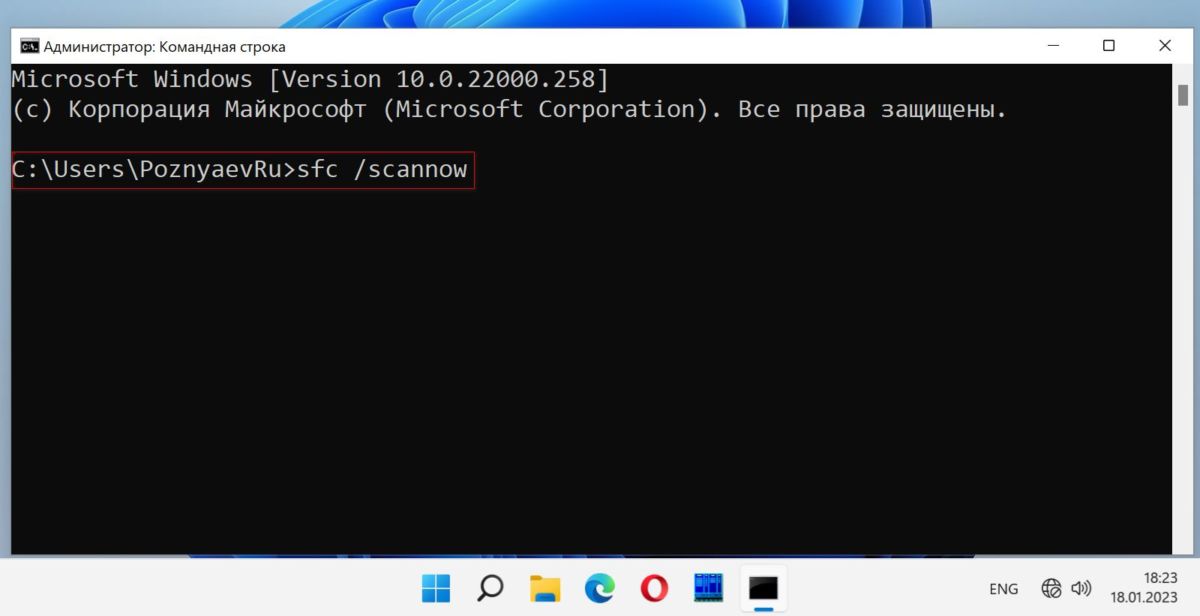
Затем: sfc /scannow. Утилита выявит поврежденные файлы. Заменит исправными из хранилища. Процесс потребует времени. Наберитесь терпения и не прерывайте.
Когда процесс завершен — закройте командную строку и перезагрузите компьютер.
Поддерживайте ОС в актуальном состоянии. Microsoft регулярно выпускает накопительные обновления системы. Повышают безопасность Windows. Исправляют известные ошибки. Способствуют сохранению высокой эффективности и производительности.
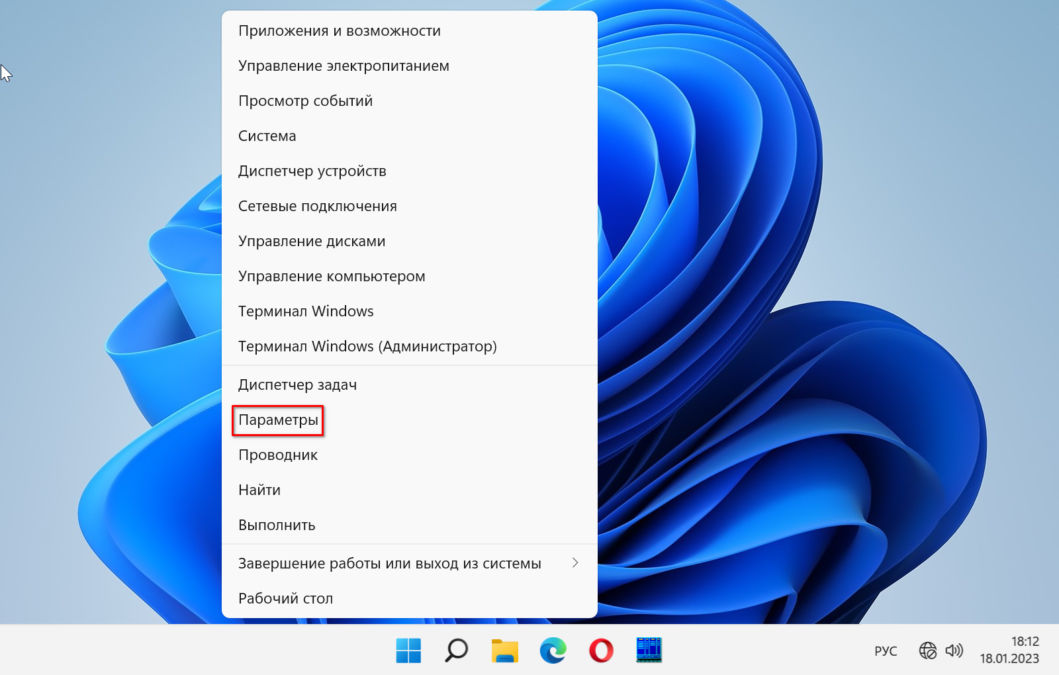
Кликните правой кнопкой мыши на «Пуске». Затем — по пункту «Параметры» для перехода к настройкам ОС.
Откройте на левой панели группу параметров «Центр обновления Windows». Кликните по «Проверить наличие обновлений».
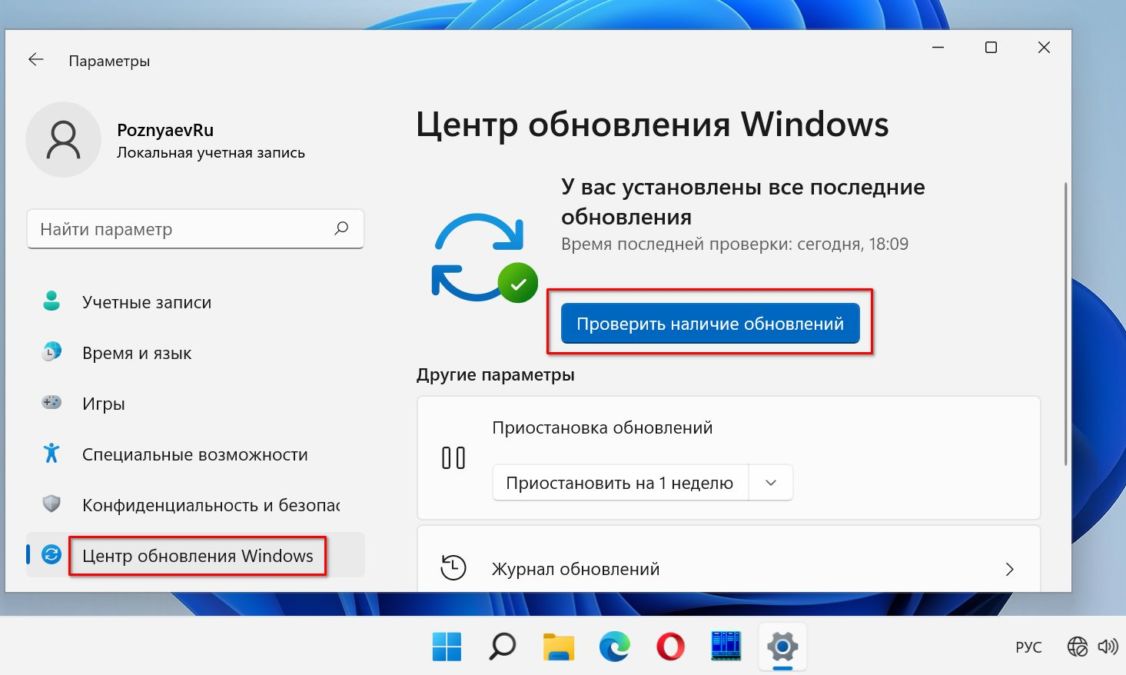
Если доступны свежие обновления — загрузите.
Включите контроль памяти
Временные ненужные файлы замедляют работу компьютера. Включите функцию Контроль памяти, которая регулярно удаляет ненужные файлы, включая предыдущие установочные, временные файлы из приложений и многое другое с вашего ПК. И повышает производительность компьютера.
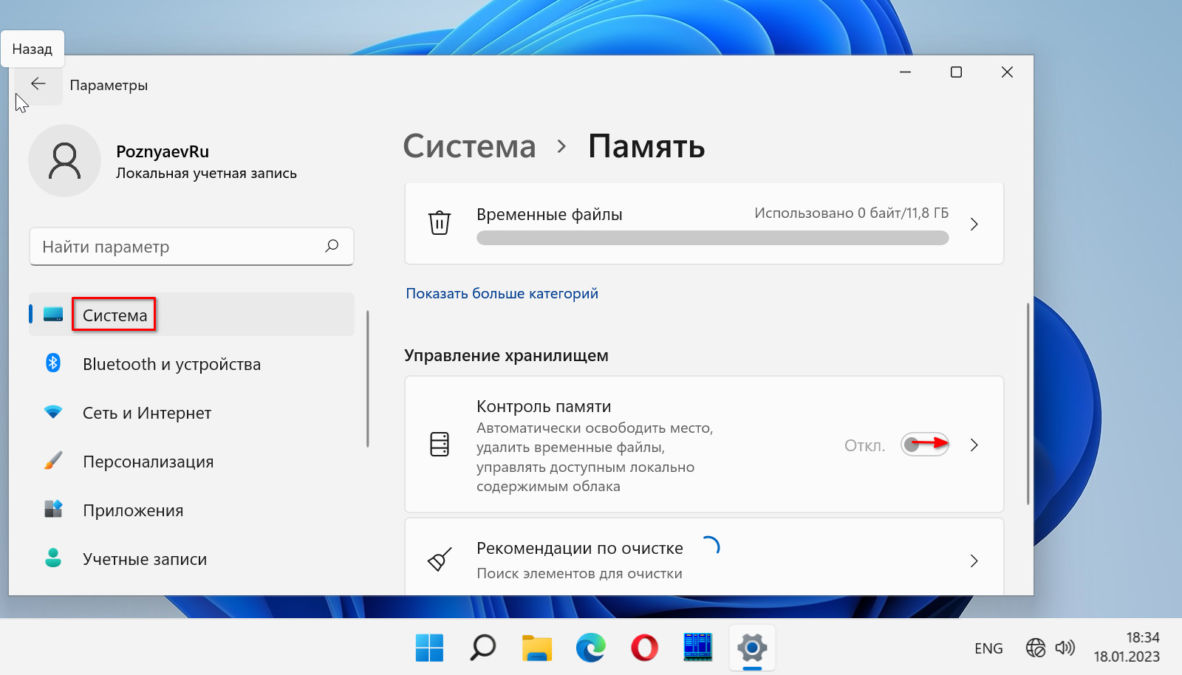
Нажмите Win+I на клавиатуре. В левой панели «Параметров» выберите раздел «Система». Кликните по плитке «Память». Прокрутите до надписи «Управлении хранилищем». Включите опцию «Контроль памяти» — сместите переключатель вправо.
Почистите Автозагрузку от лишних программ
Вместе с Windows 11 запускается ряд приложений и служб. Вы можете даже не знать о них. Такой софт зачастую полез в Автозагрузку при установке. Итогом становится длительная загрузка системы. Удалите лишний софт из Автозагрузки.
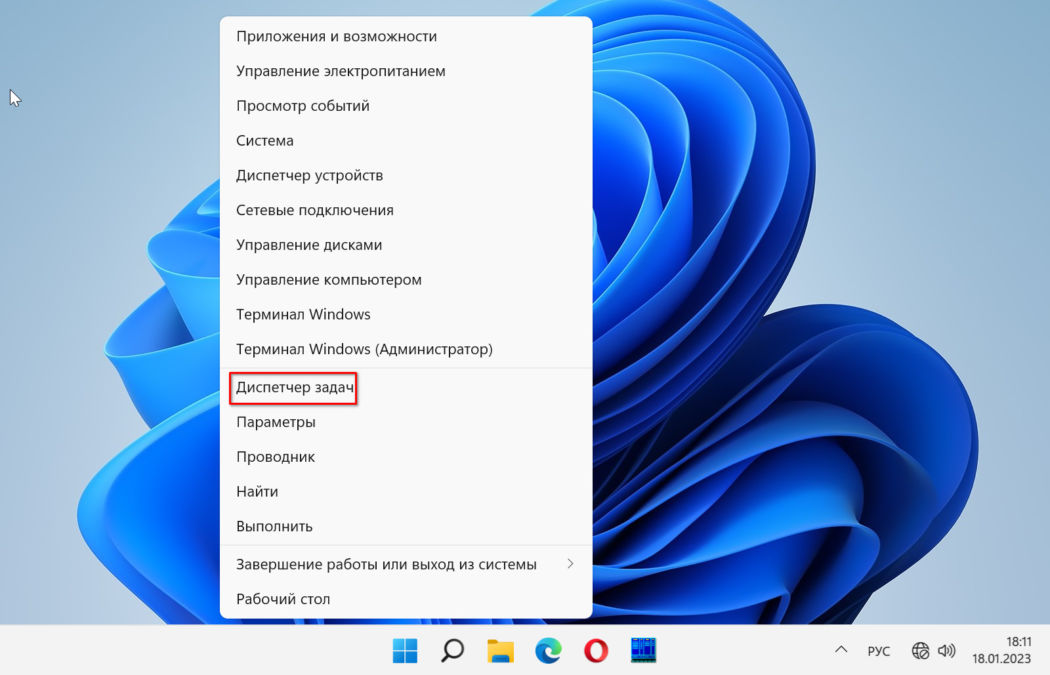
Кликните правой кнопкой мыши по «Пуску». Кликните по «Диспетчеру задач» в меню.
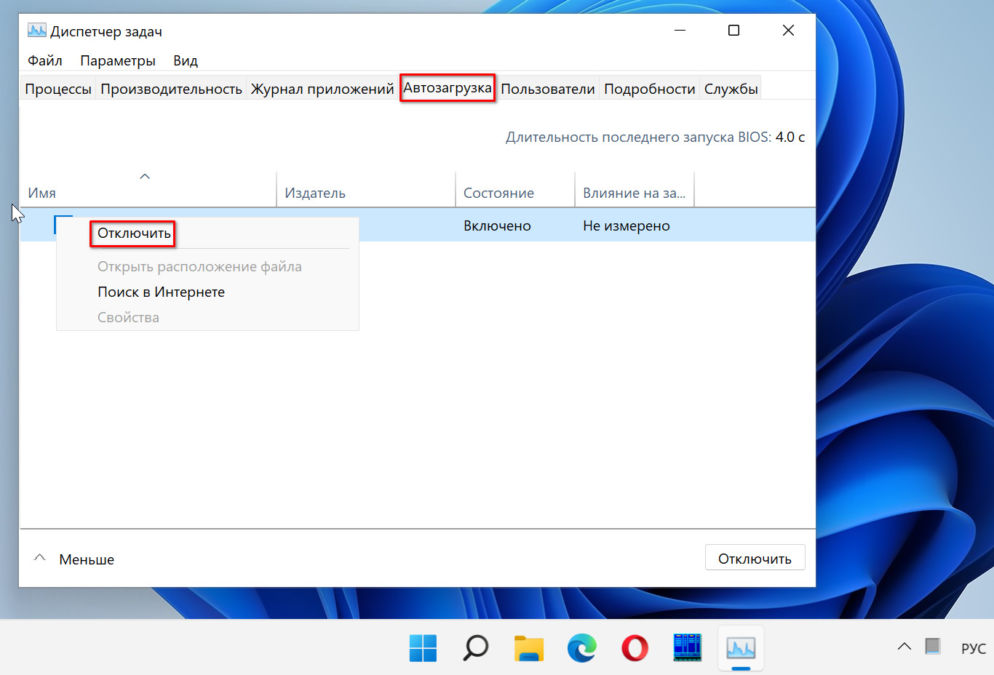
Нужная вам вкладка диспетчера — «Автозагрузка». Содержит перечень программ и служб, которые запускаются при каждом старте системы. Правой кнопкой мыши кликните на программе, которую хотите «выкинуть» из Автозагрузки. Выберите «Отключить». Повторите действие для каждого приложения, если не желаете, чтобы оно стартовало вместе с Windows.
Несвежий драйвер графики
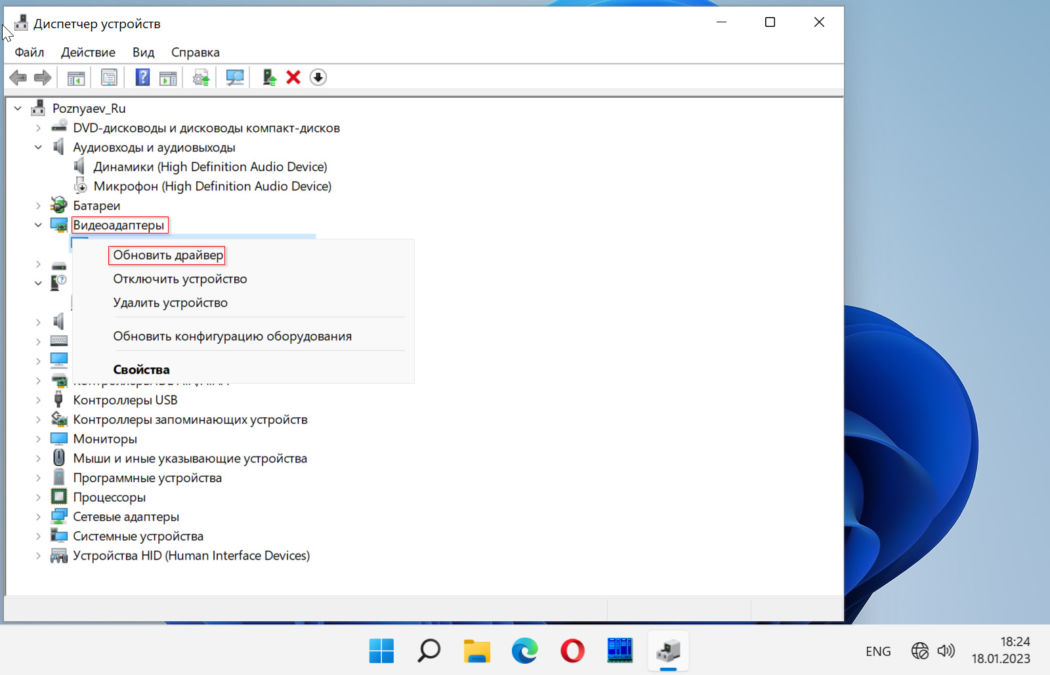
Старые драйверы ведут к уйме проблем на ПК. Из-за них могут возникать синие экраны (BSOD). А Windows 11 периодически виснет. Заметили, что система стала грузиться дольше, чем прежде? Игры тормозят или работают с проблемами? Не исключено, что виной тому древний драйвер видеоадаптера. Нажмите одновременно клавиши Win+X. Из меню перейдите в «Диспетчер устройств».

Перейдите в категорию «Видеоадаптеры». Кликните правой кнопкой мыши графическую карту, которую вы используете. Выберите «Обновить драйвер».
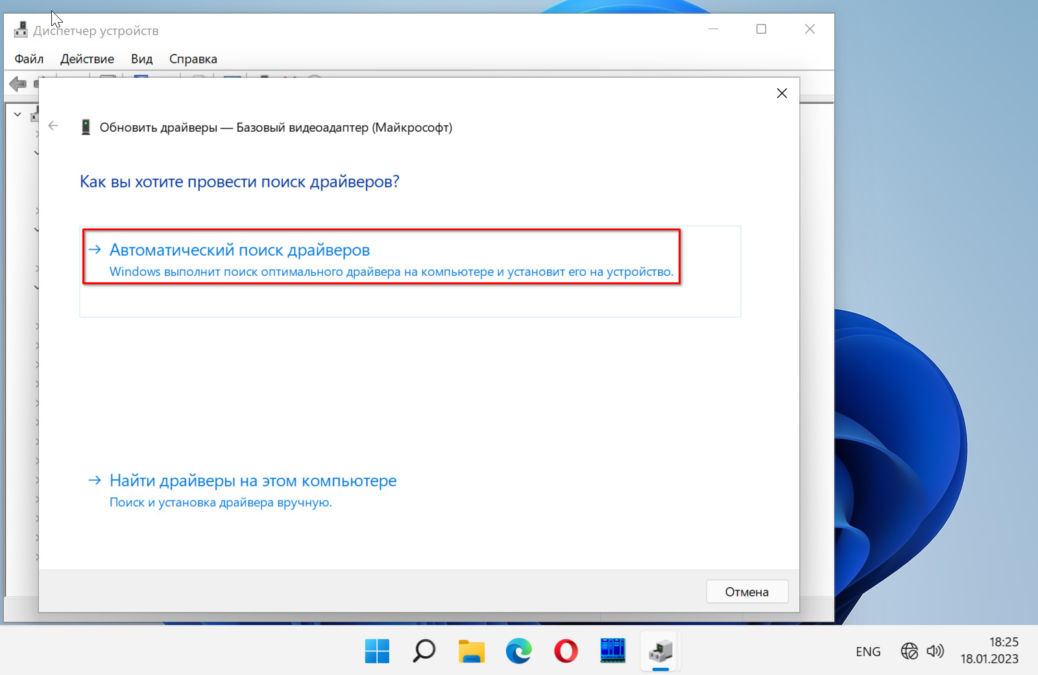
Произведите «Автоматический поиск драйверов».
Умный софт проверит наличие свежих обновлений драйверов. Если есть обновление — автоматически загрузит и поставит на ваш ПК последнюю версию.
Это простой вариант, но если вы знаете точную модель своей видеокарты и версию операционной системы, то можете скачать самый свежий драйвер с официального сайта производителя и установить его. Во время установки отметив галочкой пункт «Чистая установка». Всего три производителя графики: Nvidia, AMD и Intel.
Выполните чистую загрузку Windows 11
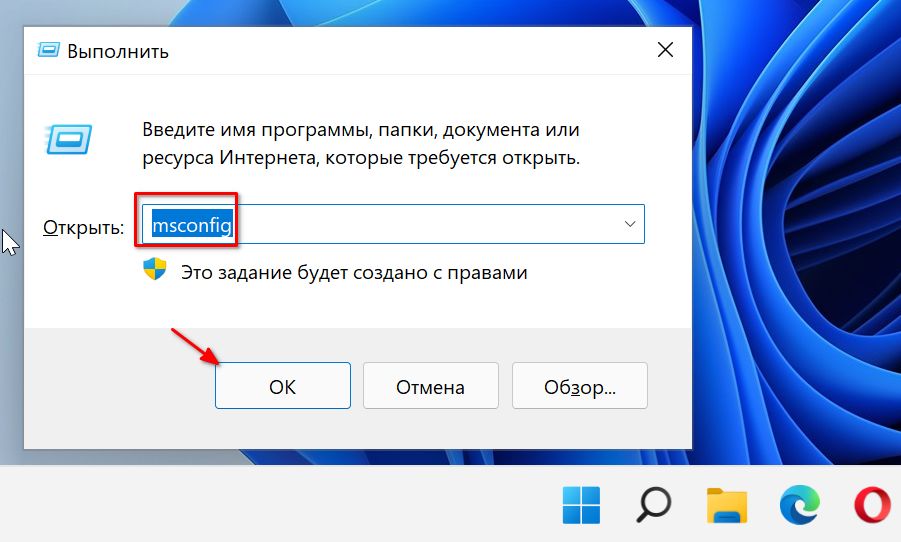
Выполните чистую загрузку — загрузите без стороннего софта и сервисов. Запуск ОС в данном режиме поможет вам выявить программные компоненты, которые отвечают за медленный запуск системы. Нажмите клавиши Win+R. Введите msconfig в строке «Открыть:» диалогового окна «Выполить». Кликните «ОК» в нижней части окна.
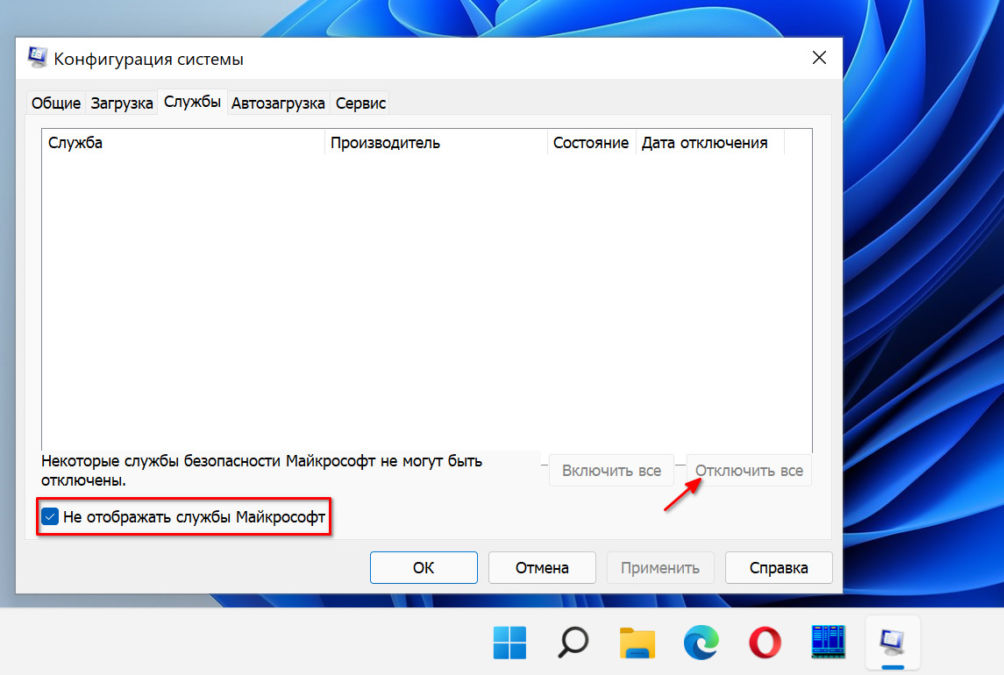
Стартует окно «Конфигурация системы». Нужная вам вкладка — «Службы». Активируйте опцию «Не отображать службы Microsoft». Нажмите «Отключить все».
Следующим шагом откройте «Автозагрузку». Кликните ссылку «Открыть диспетчер задач».
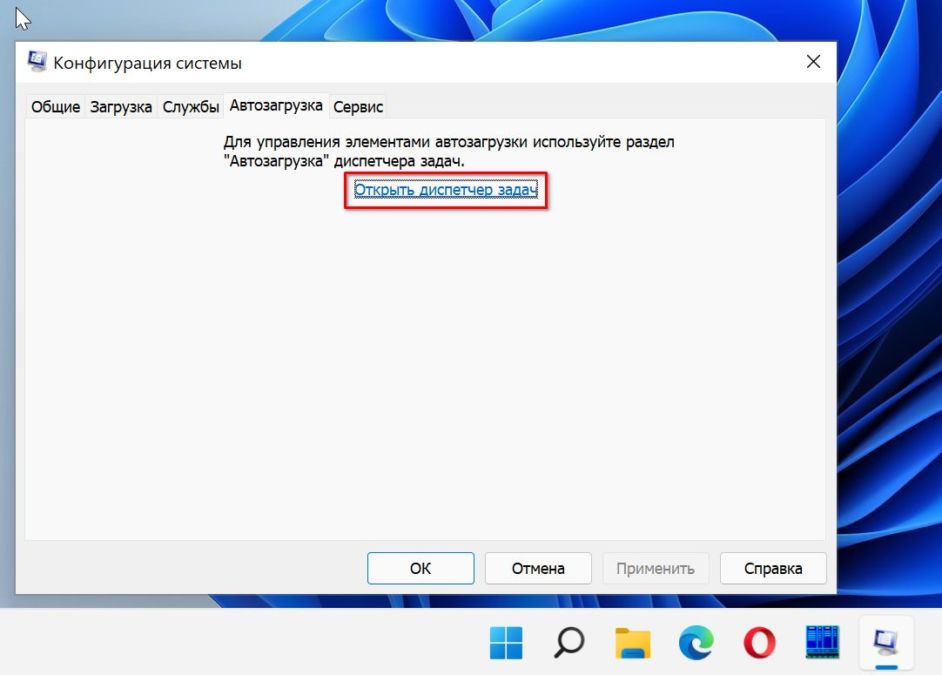
Кликните правой кнопкой мыши приложения, которые вы не хотите открывать во время запуска. Выберите «Отключить» для каждого.

Выйдите из диспетчера задач и перезагрузите компьютер. ПК запускается только с основными службами. Если вы заметили, что чистая загрузка улучшает время загрузки — повторяйте процесс. Поочередно подключайте программы и службы. В конечном итоге — выявите тот программный компонент, который вызвал медленную загрузку.
Избавьте ОС от вирусов
Систему могли поразить вирусы или вредоносный софт. В итоге ОС работает неправильно и может медленно загружаться. А также тормозят игры и приложения. Проверьте систему антивирусом. Применяйте проверенное стороннее антивирусное ПО регулярно. Сканируйте ОС на присутствие вредоносного софта. Очищайте и система будет максимально продуктивна. Можете применять и встроенную программу — Защитника Windows.
Самыми оптимальными бесплатными решениями по праву считаются Kaspersky Virus Removal Tool и Dr.Web CureIt!. Они не нуждаются в установке и могут сканировать систему параллельно с вашим антивирусом. Но имейте в виду, что оптимальнее запускать утилиты в безопасном режиме.
Используйте SSD вместо HDD
А теперь главный совет. Если вы все еще используете старый жесткий диск, пришло время заменить его на твердотельный накопитель. SSD намного быстрее, чем HDD. Уточните у технических специалистов сервиса, можно ли установить SSD на ваш ПК.
Обновите Windows 11
Если у вас не настроено автоматическое обновление Windows, то поставить апдейт всегда можно сделать вручную. Свежее обновление может не только исправить ошибки системы, которые могли приводить к ухудшению игрового опыта, но и повысить производительность. Поэтому не стоит пренебрегать обновлениями.
Для этого перейдите в «Настройки» — «Центр обновления Windows». Нажмите «Проверить наличие обновлений». Если они имеются, то установите доступные обновления и перезагрузите ПК, чтобы они вступили в силу.
Кажется, пора обновляться
Апдейт займет некоторое время, поэтому учитывайте это, если решили заняться вопросом оптимизации незадолго до матча в CS с друзьями.
Настройте параметры питания
Еще один способ — это оптимизировать питание. Точнее, даже наоборот: из режима оптимального потребления энергии перевести ПК в режим максимальной производительности. Это повысит эффективность работы компьютера за счет повышенного потребления электроэнергии.
Для этого перейдите в «Параметры», затем «Система», затем в «Питание и батарея». Переведите режим питания в «Максимальная производительность».
При питании от батареи лучше перевести обратно
Если набор таких параметров недоступен, нажмите сочетание Win + X и выберите «Терминал (Администратор)».
Затем введите в консоль команду powercfg -duplicatescheme e9a42b02-d5df-448d-aa00-03f14749eb61 и нажмите на Enter.
После чего найдите «Панель управления» через поиск по системе и перейдите по пути: «Оборудование и звук» — «Электропитание». Либо нажмите Win + R, введите команду control powercfg.cpl и нажмите Enter. Откроется тот же самый раздел, просто чуть быстрее.
Параметры электропитания
Переведите ПК в режим высокой производительности и перезагрузите компьютер. Преимущественно настройка питания актуальна для ноутбуков, так как они более чувствительны к энергопотреблению. Прирост производительности будет зависеть от игры и модели видеокарты. Если это высокопроизводительный графический ускоритель, рост мощности может составить 5–10% или больше, — опять же, все индивидуально. Для настольных ПК может быть меньше.
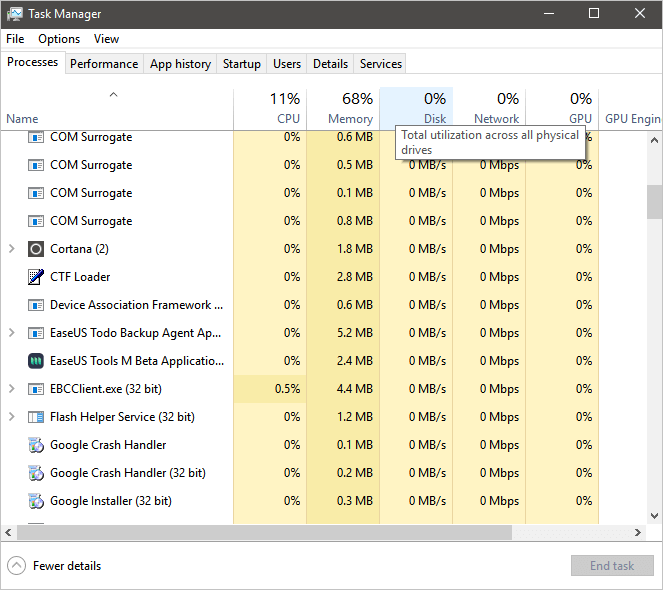
Отключите фоновые приложения
В Windows одновременно с игрой может работать огромное количество фоновых процессов. Какие-то из них необходимы, например системные процессы самой операционной системы или клиент Steam, через который игра была запущена. Другие, напротив, никакой полезной функции в момент игры не несут, но оперативную память занимают и влияют на работу процессора. Вот их и можно отключить на время игры или навсегда.
Нажмите Ctrl + Shift + Esc, чтобы открыть «Диспетчер задач». Далее перейдите на вкладку «Автозагрузка» — там вы увидите все программы, которые работают в фоне. Выключите ненужные приложения правой кнопкой мыши и затем нажмите «Отключить».
Меню автозагрузки в диспетчере задач
Чтобы все изменения вступили в силу, перезагрузите ПК. После этого неважные во время игры программы не будут нагружать систему в фоновом режиме.
Отключите функции безопасности, влияющие на производительность
Функции безопасности, разумеется, важны и необходимы для комфортной работы с ПК. Однако когда на первом месте стоит игровой опыт, некоторые функции, влияющие на производительность, можно отключить. Нас интересуют два параметра: целостность памяти и виртуальная машина.
Чтобы отключить целостность памяти, нужно перейти в «Параметры» — «Обновление и безопасность» — «Безопасность Windows» — «Безопасность устройства». В этом разделе найдите пункт «Изоляция ядра» и нажмите на «Сведения об изоляции ядра».
Здесь нам нужна только «Изоляция»
После чего отключите ее, что даст небольшой прирост FPS в играх.
Отключаем и переходим к следующему этапу
Чтобы отключить виртуализацию, которая также забирает себе часть ресурсов системы, откройте «Пуск», введите «Компоненты Windows» и выберите «Включить или отключить функции Windows» в списке результатов. В открывшемся окне «Компоненты Windows» найдите и снимите флажок «Платформа виртуальной машины».
Снимите галочку и нажмите ОК
Далее перезагрузите ПК, чтобы изменения вступили в силу. Однако учитывайте, что это актуально, только если вы не используете виртуальные машины по типу VirtualBox или VMWare. В противном случае выключать не стоит.
Со временем быстродействие ОС может снизиться по ряду причин. Многие советуют переустанавливать Windows раз в год, но есть и более «щадящие» способы ускорения работы. О них мы расскажем в данном материале.
В идеале нужно выполнить все нижеперечисленные действия.
Чаще перезагружайте ОС
Это банальные и самые распространенные рекомендации, но это не делает их менее полезными. Многие пользователи стационарных компьютеров часто не выключают их неделями или даже месяцами, просто переводя устройства в режим сна, когда они заканчивают работу. Так действительно можно делать, однако это ускоряет износ компонентов и лучше все же давать устройству отдохнуть, если вы не планируете его использовать более двух часов. Выключение или перезагрузка освобождают оперативную память от всех приложений и процессов, которые могли влиять на быстродействие.
Обновление операционной системы, в свою очередь, также помогает ускорить работу устройства, поскольку инженеры той же Microsoft регулярно находят способы лучше оптимизировать исполнение различных процессов, что сделает компьютер более стабильным.
Как обновить Windows 11:
- Перейдите в «Параметры»;
- Выберите «Центр обновления Windows»;
- Нажмите на «Проверить наличие обновлений».
Даже если у вас установлена последняя версия операционной системы, простая перезагрузка никогда не повредит.

Источник изображения: CQ
Отключите автоматическую загрузку малоиспользуемых программ
Чем дольше вы пользуетесь своим компьютером, тем больше различных программ вы на него устанавливаете. Нередко бывает так, что определенные приложения остаются на вашем ПК даже после того, как надобность в них отпала. Или же вы просто стали ими реже пользоваться, но они все равно продолжают запускаться вместе со стартом Windows, удлиняя время загрузки и расходуя вычислительные ресурсы.
Чтобы проверить, какие из приложений работают в фоновом режиме и загружаются вместе с операционной системой, вам нужно:
- Запустите диспетчер задач комбинацией «CTRL+Shift+Esc»
- Выберите пункт «Автозагрузка приложений»
- В появившемся меню вы увидите все приложения и то, насколько высокое влияние они оказывают на быстродействие устройства и скорость загрузки
В этом же меню вы можете вручную отключить неиспользуемые приложения, кликнув по ним правой кнопкой мыши.

Источник изображения: CQ
Вы также можете отключить автоматическую загрузку через основные настройки:
- Перейдите в «Параметры»
- Выберите «Приложения»
- Откройте «Автозагрузка»
В данном разделе вам будет представлен список всех приложений, который можно также отсортировать по текущему состоянию и влиянию на запуск.

Источник изображения: CQ
Измените режим производительности
Ноутбуки и стационарные компьютеры позволяют выбрать режим питания, позволяющий оптимизировать быстродействие устройства в зависимости от потребностей пользователя. Чтобы изменить режим, вам нужно:
- Перейдите в «Параметры»
- Выберите «Питание и батарея»
- В появившемся меню кликните на «Режим питания»
На ноутбуках режим производительности помогает не только повлиять на быстродействие операционной системы, но также увеличить время работы между зарядками.

Источник изображения: CQ
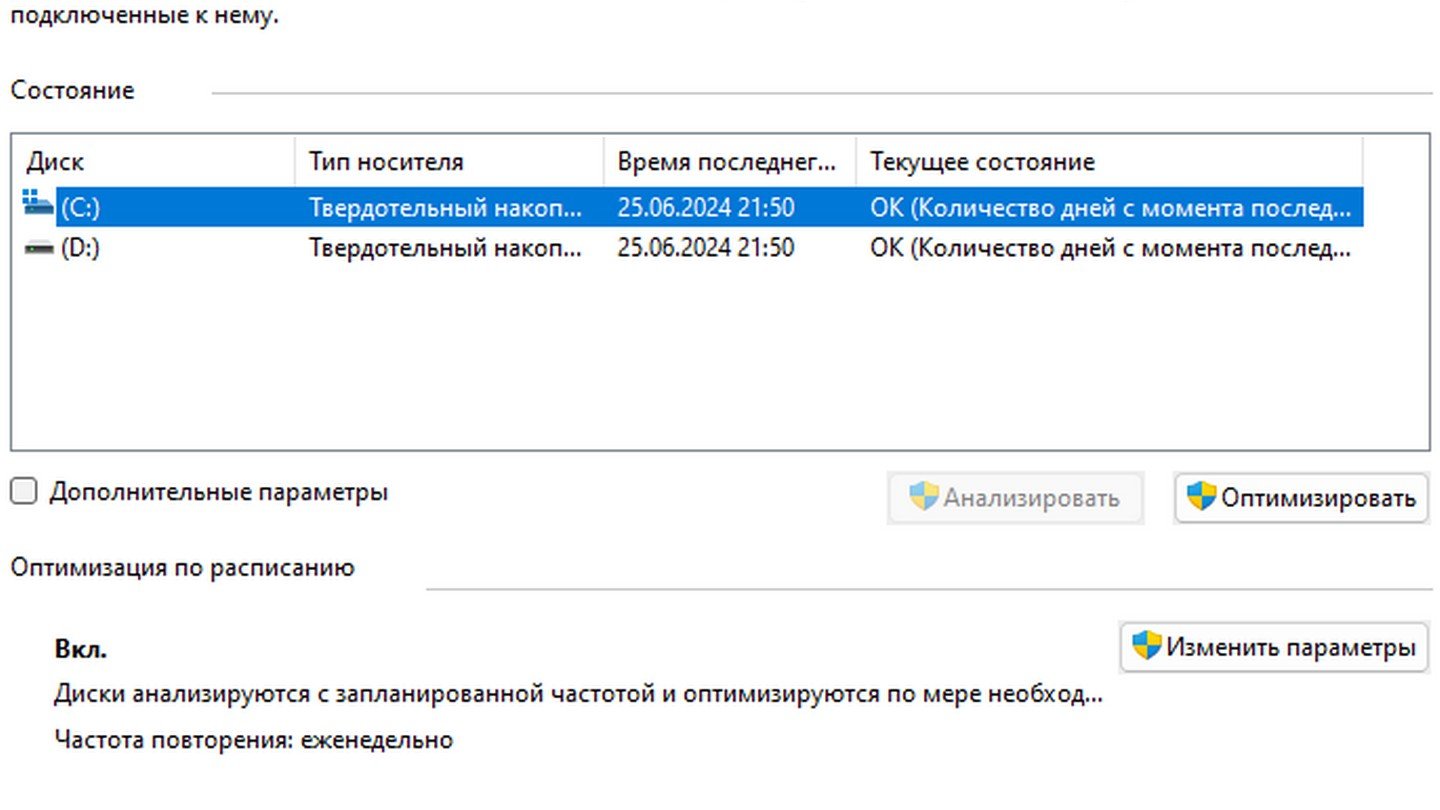
Выполните дефрагментацию накопителя с ОС
Со временем различные файлы на жестком диске могут оказаться разбросанными, что приведет к замедлению работы системы. Этого можно избежать, если время от времени проводить дефрагментацию накопителя. Для этого нужно:
- Кликните по иконке Windows
- Вбейте в поисковой строке «Дефрагментация»
- Выбрав накопитель, нажмите на «Оптимизировать»
Следует отметить, что хотя использование дефрагментации помогает ускорить работу системы, ее нежелательно делать, если вы используете твердотельный (SSD) накопитель, поскольку она сокращает срок его службы.
Источник изображения: CQ
Увеличьте объем ОЗУ или перейдите на SSD
Добавление оперативной памяти может серьезно ускорить работу системы, как и переход на твердотельный накопитель. Для сравнения, скорость чтения/записи среднестатистического жесткого диска составляет порядка 100 мб/с, когда твердотельный накопитель может работать на скорости до 500 мб/с. Пятикратный прирост скорости будет сразу заметен в том, как быстро запускается не только сама операционная система, но и то, насколько резво работают приложения.
Отключите автоматический перезапуск фоновых приложений
Windows 11 обычно самостоятельно перезапускает некоторые фоновые приложения, когда вы заходите в систему под своим профилем. На производительных системах работа этой функции практически незаметна, когда на более старых компьютерах ее отключение может повысить скорость работы Windows 11.
- Перейдите в «Параметры»;
- Выберите «Учетные записи»;
- В появившемся меню выключите опцию «Автоматически сохранять мои перезапускаемые приложения из системы и перезапускать их при повторном входе».

Источник изображения: CQ
Удалите неиспользуемые приложения
Удаление неиспользуемых приложений – так называемого Bloatware – может повысить производительность системы и освободить место на накопителе. Процесс довольно простой:
- Перейдите в «Параметры»;
- Выберите «Приложения»;
- В появившемся меню вы можете посмотреть все установленные на компьютере приложения и удалить их.

Источник изображения: CQ
Удалите временные файлы
Временные файлы создаются приложениями в процессе работы, позволяя им быстрее выполнять определенные задачи. Даже если вы перестанете пользоваться определенными приложениями, созданные ими файлы останутся в памяти системы.
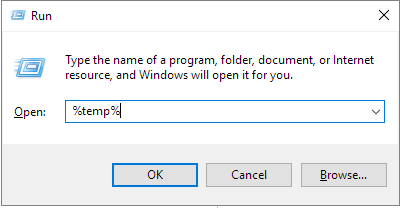
- Откройте окно «Выполнить» комбинацией «Win+R»;
- Вбейте «%temp%» и нажмите «Ok».
Команда отправит вас в папку с временными файлами, которую вы затем сможете отчистить вручную.
Воспользуйтесь функцией «Контроль памяти»
Windows 11 умеет самостоятельно следить за состоянием памяти и удалять временные файлы, освобождая тем самым память и увеличивая быстродействие. Функция обычно включается автоматически после установки операционной системы. Вы также можете проверить ее статус следующим образом:
- Перейдите в «Параметры»;
- Выберите «Система»;
- Нажмите на «Память».
Переключатель функции «Контроль памяти» должен быть переведен в положение «Вкл.»

Источник изображения: CQ
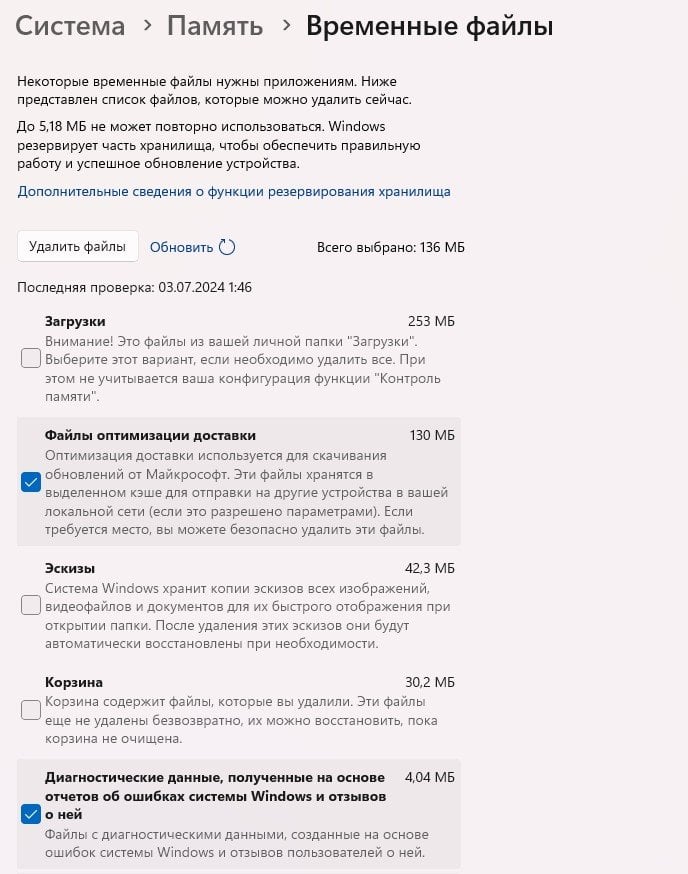
Освободите пространство на диске
Тоже довольно распространенный совет, которым все же не стоит пренебрегать. Неиспользуемые системой файлы занимают место, которое могло бы ускорить работу устройства.
Очень часто дисковое пространство оказывается занято файлами от Windows 10, оставшимися после обновления до Windows 11. Чтобы их удалить, необходимо:
- Перейдите в «Параметры»;
- Выберите «Система»;
- Нажмите на «Память».
В появившемся меню выберите опцию «Временные файлы», а затем удалите «Загрузки».
Источник изображения: CQ
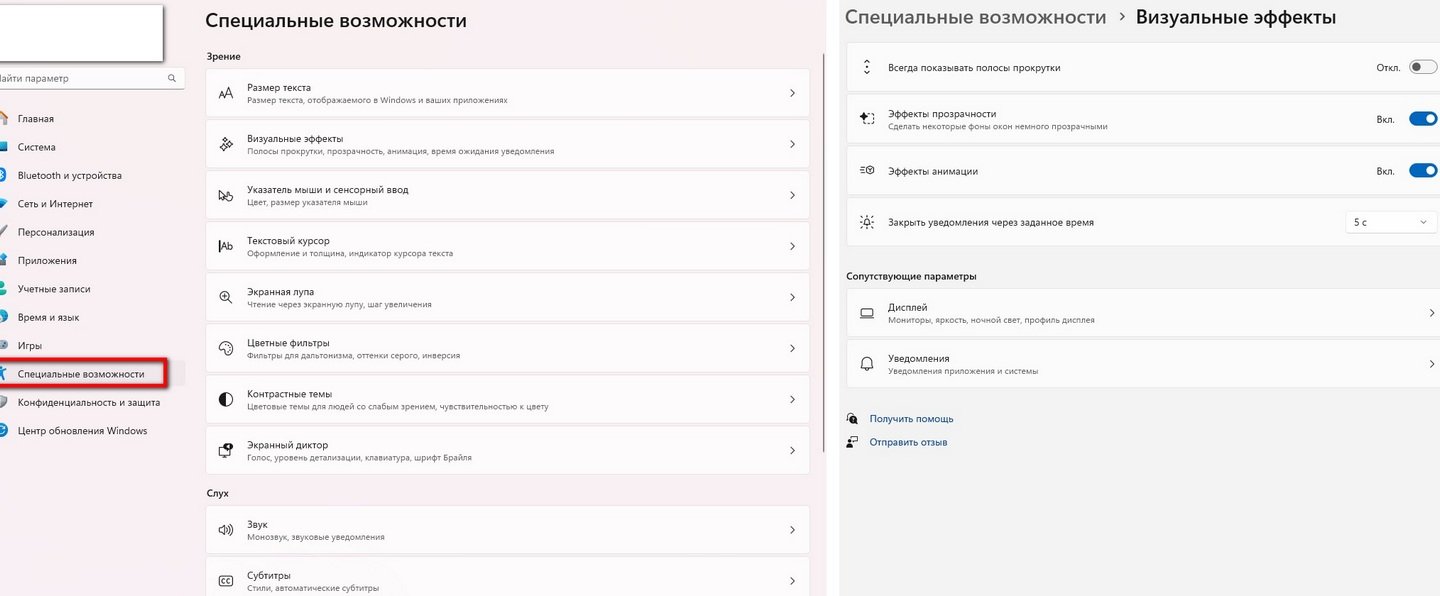
Отключите анимации и визуальные эффекты
Вполне закономерно, что всякие красивые визуальные эффекты и яркие анимации загружают систему. Если на производительных устройствах с мощными видеокартами и процессорами это практически незаметно, то на более слабых ПК можно пожертвовать плавными переходами между опциями и папками ради производительности. Для отключения анимации нужно:
- Перейдите в «Параметры»;
- Выберите «Специальные возможности»;
- Нажмите на «Визуальные эффекты».
В данном меню можно выключить некоторые эффекты, а заодно настроить сопутствующие параметры дисплея.
Источник изображения: CQ
Вы также можете перейти в расширенные параметры, нажав на иконку Windows и вбив в поисковой строке «Просмотр расширенных параметров системы».

Источник изображения: CQ
Отключите уведомления и подсказки
Пользуясь различными мессенджерами и офисными приложениями вы будете часто получать всевозможные уведомления. Они, как правило, не только отвлекают от рабочего процесса, но и влияют на производительность, поэтому их можно частично отключить. Для отключения уведомлений нужно:
- Перейдите в «Параметры»;
- Выберите «Система»;
- Нажмите на «Уведомления».
В появившемся меню можно настроить режим различных параметров уведомлений или вовсе отключить их для отдельных приложений.

Источник изображения: CQ
Отключить приложения, работающие в фоновом режиме
Если вдаваться в технические подробности, то на вашем ПК в фоновом режиме стабильно работают сразу несколько приложений, однако далеко не всегда они исполняют какие-то действительно важные процессы, хотя и расходуют вычислительные ресурсы. Чтобы их отключить:
- Нажмите правой кнопкой мыши по иконке Windows;
- Выберите пункт «Установленные приложения».
В появившемся меню будут представлены все установленные на устройстве приложения. Выберите то, которое считаете лишним и нажмите на три точки в углу. Перейдя в меню приложения, вы можете задать разрешение для его работы в фоновом режиме.

Источник изображения: CQ
Отключите игровой режим
Используемым для работы с офисными документами и просмотра фильмов компьютерам не очень то и нужен включенный игровой режим, ведь он держит включенными в фоне различные приложения Xbox и функцию DVR. Чтобы его отключить:
- Перейдите в «Параметры»;
- Выберите «Игры»;
- Нажмите на «Игровой режим».
Переведите переключатель в положение «Выкл.»
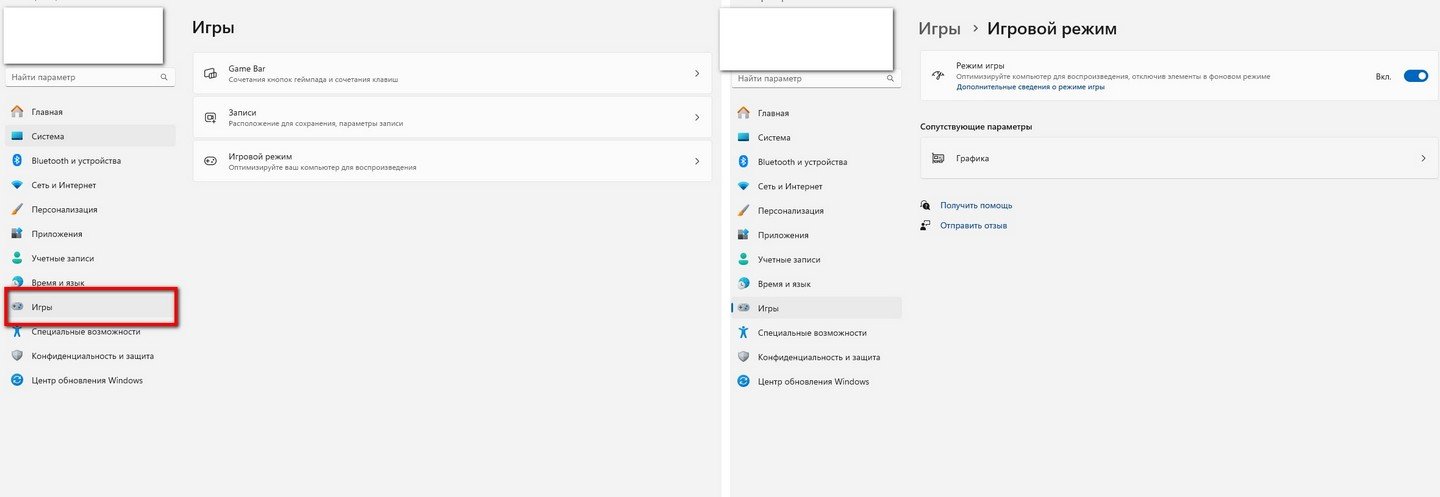
Источник изображения: CQ
Откажитесь от установки ПО из сомнительных источников
Устанавливайте программы только от надежных источников и посещайте сайты только с действительными сертификатами безопасности. Это, возможно, самый простой совет в данной подборке.
Заглавное фото: Windows Blog
Microsoft has lately released the much-awaited Windows 11, which is the successor to Windows 10. It is still under test. However, its Windows Insider program is now available for developers. Though Windows 11 brings a whole new design haul along with some improved features, some users are experiencing Windows 11 slow performance after installing it.
Windows 11 has grown into a mature operating system since October 5, 2021 and it takes over 26.52% of Windows market share worldwide (by StatCounter). While enjoying a new digital life in this operating system, some users also came across Windows 11 performance issues, including Windows 11 slow boot, Windows 11 slow startup or after update, fast battery consumption, overheating of the computer, and many others.
So, if you are also facing Windows 11 slow performance, as in the two cases here, follow this article, and we’ll walk you around effective ways to fix the issue of how to solve the Windows 11 slow issue:
Case 1: My pc became extremely slow out of a sudden and now it’s pretty much not working…-from Microsoft
Case 2: Windows 11 suddenly became (very) slow…-from Reddit
So, let’s begin!
Possible Reasons for Windows 11 Performing Slow
Windows 11 is indeed a major release of the Windows operating system developed by Microsoft. But if you are bothered by windows 11 slow performance, there could be multiple reasons behind it. It is worth mentioning here that even if the PC or laptop that you own can support the latest Windows 11 version, the system may still require some extra hardware or resources to boost the performance. Why is Windows 11 so slow? Here are some common issues listed which can lead to windows 11 slow performance on your PC or laptop:
- Issues with the hard disk
- Issues with the background running startup tasks
- System drive having low disk space
- Usage of HDD instead of SSD
- Outdated operating system
- Outdated graphics card drivers
- Conflicts in security programs
- Wrongly installed or corrupted Windows software
- Insufficient RAM
- PC or laptop with lower specification
8 Effective Ways to Fix Windows 11 Running Slow
Now that you already know what could be the reason for your windows 11 slow boot, it is essential for you to know about some effective methods which can help you in speeding up Windows 11. So, let’s discuss the troubleshooting guide for getting rid of windows 11 slow performance. All the methods shown below have instructions, so to achieve effective results, make sure to follow them in a particular order.
1. Disable Startup Programs
2. Turn off Fast Startup
3. Increase C drive space
4. Update Graphics Drivers
5. Delete Temporary Files
6. Run Windows Update Troubleshooter
7. Migrate Windows 11 to SSD
8. Go Back to Windows 10 and Wait for the Next Stable Windows 11
Video Guide
If you think these methods are helpful for you to fix Windows 11 running slow, you can share the guide to help more people in need!
1. Disable Startup Programs to Speed Up Windows 11 Slow Performance
Often it is tested that several unnecessary programs or applications can happen to reduce the load time in your Windows PC or laptop while booting it up. So, in order to get away with the issue of windows 11 slow boot, ensure to disable all the unwanted applications and programs from the Startup tab. Here is how you can do:
Step 1: Press the «Ctrl + Shift + Esc» keys together and open the «Task Manager».
Step 2: Tap on the «Startup» tab and click on the applications or services that you want to disable.
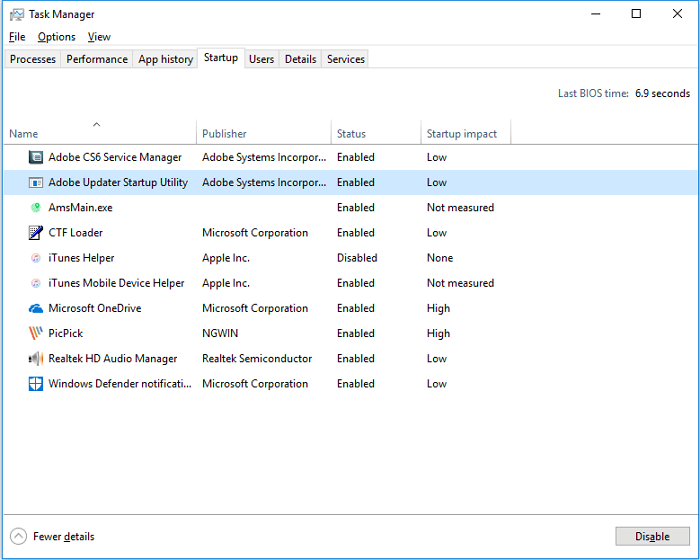
Step 3: Finally, click on the «Disable» button.
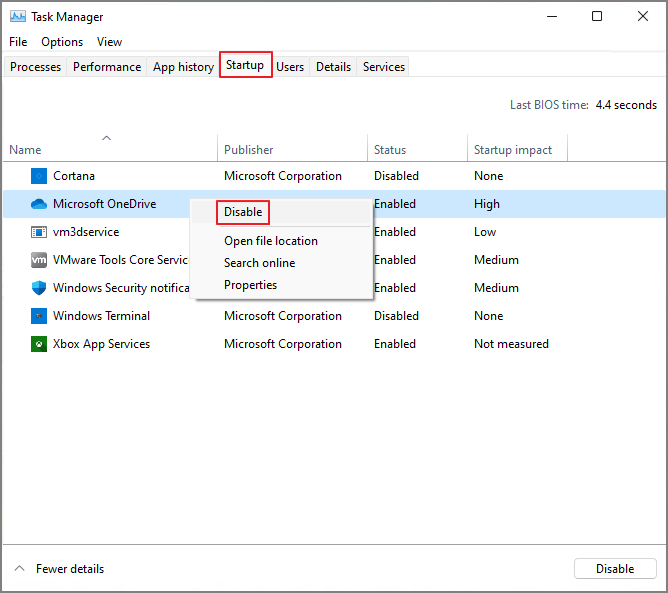
You can repeat the same steps for all the applications and programs to disable them. After you are done disabling them, restart your computer and check if the problem of windows 11 slow boot is solved.
2. Turn off Fast Startup to Fix Windows 11 Slow
Windows 11 operating system comes with a built-in Turn on Fast Startup function. You can use it to enhance the boot-up timing of your system. However, oftentimes you can experience the problem of windows 11 slow boot if you have this option enabled. Thus you can consider turning off the Fast Startup option to order to improve the performance of your system. To turn off the Fast Startup option, do the following:
Step 1: On the search icon, write «Control Panel» and click on it.
Step 2: Tap on the «Hardware and Sound» option and choose the «Power Option.» Alternatively, if you can’t find the power option directly, then type «Power Options» from the Control Panel search bar.
Step 3: Select the «Choose what the power button does» option. If the «Turn on fast startup» is enabled, uncheck the box to turn it off.
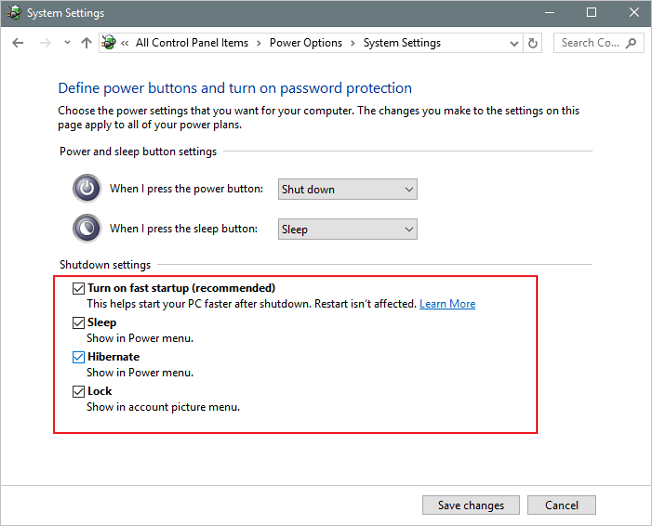
Step 4: Tap on the «Save Changes» option.
Restart your computer and see if you’re able to fix the windows 11 slow performance problem.
3. Increase C Drive Space — Use EaseUS Partition Master «Allocate space» or «Resize/move.»
If none of the above-mentioned ways helped you in solving the issue of windows 11 slow boot, then try to increase C drive space. To do this, you can completely rely on the EaseUS Partition Master. You can use its «Allocate space» or «Resize/move» option to increase the space in the C drive.
Here is what you need to follow:
Extend System C drive with unallocated space
- 1. Right-click on the System C: drive and select «Resize/Move».
- 2. Drag the system partition end into the unallocated space so to add it to the C: drive. And click «OK».
- 3. Click «Execute Task» and «Apply» to execute the operations and extend the C drive.
Bonus Features You May Also Like in EaseUS Partition Master:
— EaseUS Partition Master —
Your Smart Windows 11 Update Disk Manager
- MBR to GPT Converter, Make Disk Ready for Windows 11.
- Migrate Windows 11 to New SSD in 1-Click.
- Handy to Extend or Combine Partitions in Windows 11.
- Clone and Upgrade Disks without Data Loss.
4. Windows 11 Very Slow? Update Graphics Drivers
When it is about the slow performance of Windows 11, an old graphics card driver on your PC or laptop can also lead to the issue of windows 11 slow performance. To avoid such issues, it is advised to keep the graphics driver updated. To do it, follow these steps:
Automated Way: Update Graphics Driver with Software:
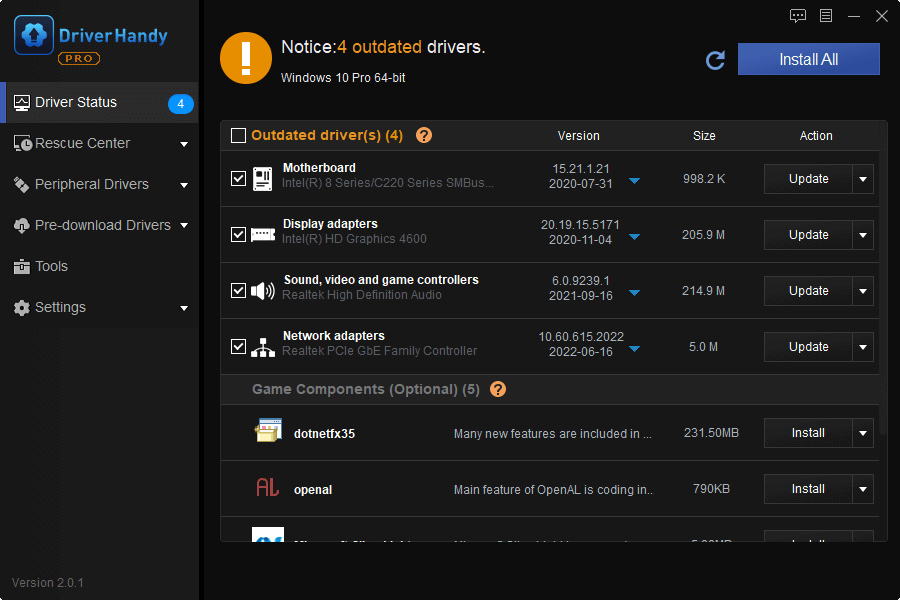
EaseUS DriverHandy is one such tool any levels of worldwide users can apply this software to update the drivers of their computers with the latest drivers in simple clicks. EaseUS DriverHandy is an all-in-one Windows driver manager, and it detects if there are any outdated or corrupted drivers and then updates them.
Download and install EaseUS DriverHandy and update your drivers with a single click.
Step 1. Open EaseUS DriverHandy and click «Scan.»
Step 2. Click «Update» to keep all drivers updated.
Update Graphics Driver Manually:
Step 1: By pressing the «Windows + X» keys, open the «Quick Start Menu».
Step 2: Tap on the «Device Manager» option and double-click on the «Display adapters» option.
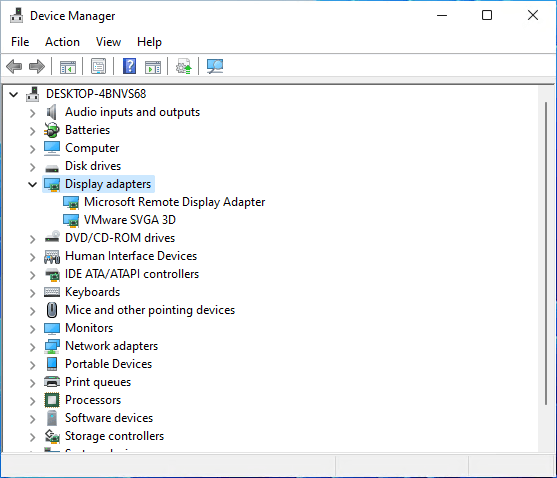
Step 3: Right-click on the graphics card you are running on your PC or laptop.
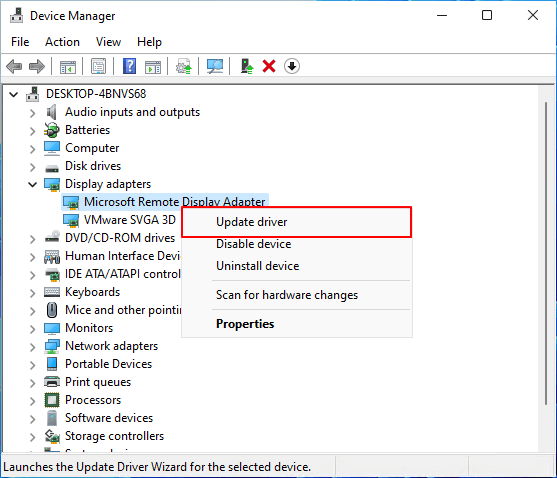
Step 4: Choose the «Update driver» option and select the «Search automatically for drivers» option.
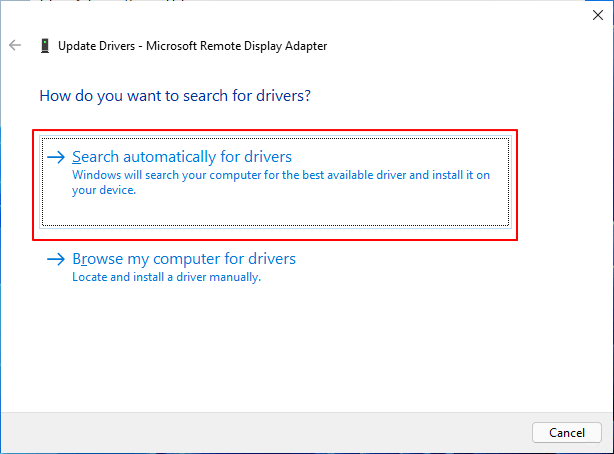
Step 5: If there’s any update available for the graphics card, it will automatically download and install its updated version.
After this, make sure to restart your computer in order to apply changes.
5. Delete Temporary Files to Check Windows 11 Performance Issue
As the name goes, temporary files are developed by the Windows operating system in the memory whenever a task is being performed. It allows the computer to keep things smooth and quick for the users when they try to perform the same task again. Corrupted or old temporary files can lead to the issue of windows 11 slow performance. To delete the temporary files from your laptop or computer, do the following:
Step 1: By pressing the «Windows + R» keys together, open the «Run» dialog box.
Step 2: Here, type «%temp%» and press the Enter button to access the «Temp folder» from C: drive.
Step 3: By pressing the «Ctrl + A» keys to select the temp files. Press the «Delete» key to remove the temporary files.
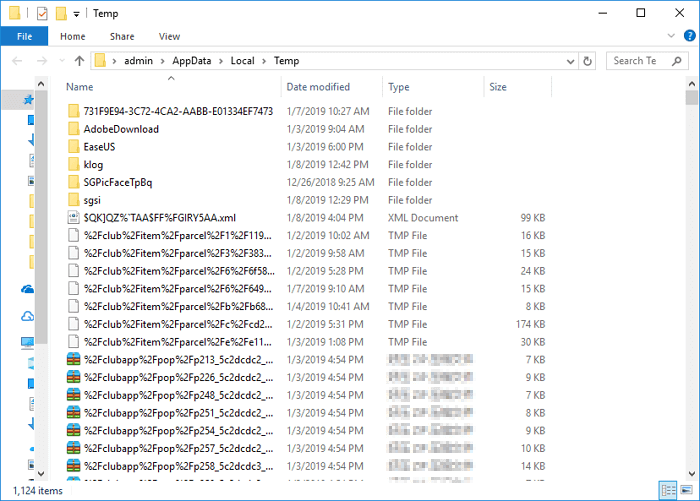
Step 4: If a dialog box appears, click on the «Do this for all current items» option and tap the «Continue» button.
Note: Wait for the deletion process, and if some temporary files are not getting deleted, then skip those files.
After you are done removing the temporary files, restart your PC or laptop to check if the problem of windows 11 slow performance is solved.
6. Run Windows Update Troubleshooter
If you are still facing issues like windows 11 slow boot, then you can consider running the Windows Update Troubleshooter in order to see if there is anything wrong with the update or not. To run Windows Update Troubleshooter, follow the below-listed instructions:
Step 1: Press the «Windows + I» keys together to access the «Windows Settings».
Step 2: Click on the «Update and Security» option.
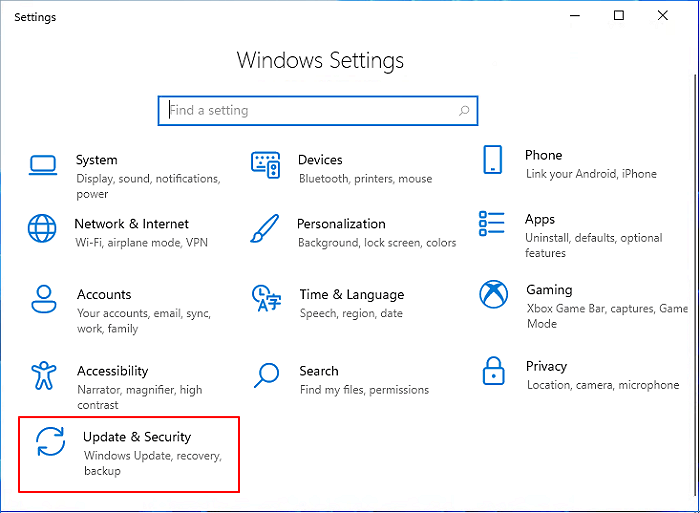
Step 3: Click on the «Troubleshoot» option from the right pane, then choose the «Other troubleshooter» option.
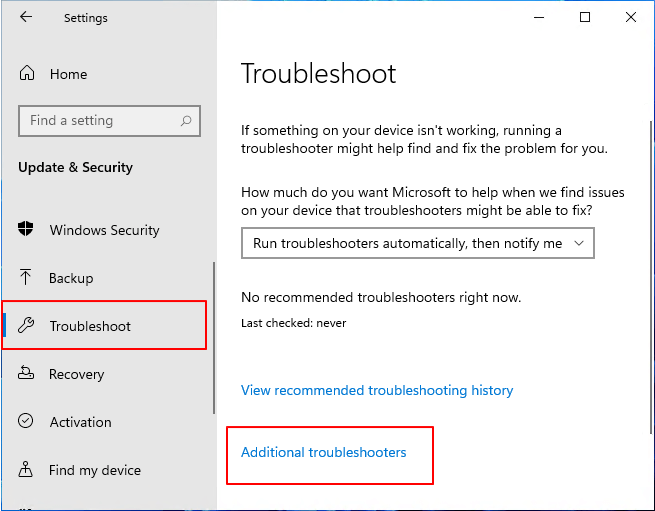
Step 4: And click on the «Run» option right by «Windows Update».

Wait for the system to begin diagnosis automatically and check certain things on the PC. If there’s an issue, look for its troubleshooting method on the web to fix it.
7. Migrate Windows 11 to SSD — use EaseUS Partition Master «migrate OS.»
If the windows 11 slow performance persists, try to migrate the Windows 11 operating system to SSD. It will improve the performance and boot timing of your PC. For this, you can use the «Migrate OS» feature of the EaseUS Partition Master tool. It is a brilliant tool that will help you in making the migration of the operating system easy.
To migrate OS to SSD:
Steps to migrate OS to HDD/SSD:
- Run EaseUS Partition Master, and select «Clone» from the left menu.
- Check «Migrate OS» and click «Next».
- Select the SSD or HDD as the destination disk and click «Next».
- Check Warning: the data and partitions on the target disk will be deleted. Make sure that you’ve backed up important data in advance. If not, do it now.
- Then click «Yes».
- Preview the layout of your target disk. Then click «Start» to start migrating your OS to a new disk.
- After this, click «Reboot Now» or «Done» to determine if you want to reboot the computer from the new disk immediately.
«Reboot Now» means to keep the changes instantly, while «Done» means you need to restart the computer later manually.

Note: The operation of migrating OS to SSD or HDD will delete and remove existing partitions and data on your target disk when there is not enough unallocated space on the target disk. If you saved important data there, back up them to an external hard drive in advance.
8. Go Back to Windows 10 and Wait for the Next Stable Windows 11
Finally, if you are still struggling with the Windows 11 slow boot problem, then it will be beneficial for you to go back to the previous version of the Windows OS.
Microsoft has officially notified that Windows 11 will finally come on October 5th. It will be your last resort, and do execute it, follow these steps:
Note: Returning to Windows 10 may not an one-size-for-all method. Some users are experienced Windows 10 running slow issue.
Other Windows 10 slow issue:
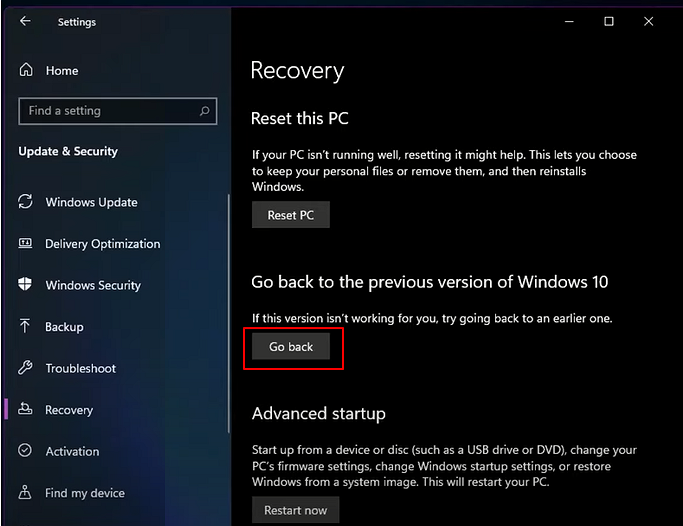
Step 1. Go to Settings, click System and Recovery.
Step 2. Click Go back next to the Previous version of Windows.
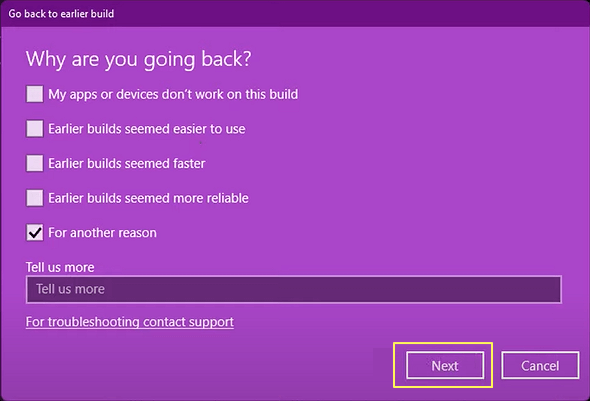
Step 3. Check the reasons why you want to uninstall when prompted.
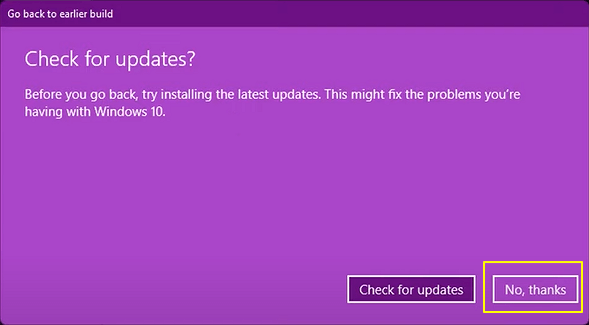
Step 4. Click No, thanks when asked to check for updates instead of rolling back.
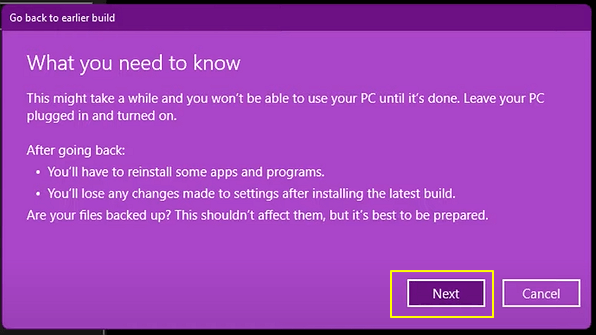
Step 5. When a «What you need to know» window pops up, click Next to continue.
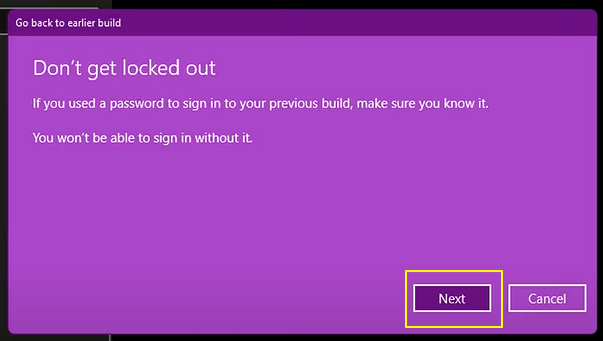
Step 6. Click Next again when it warns you to remember your password from Windows 10. (Keep your password remembered.)
Step 7. Click Go back to an earlier build.
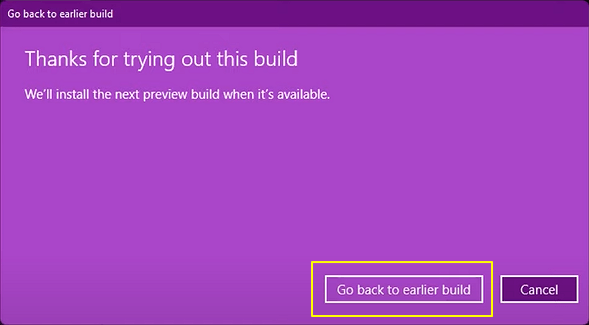
As soon as you finish the procedure, restart your PC or laptop to find out if the windows 11 slow performance issue is fixed or not.
Video Guide — How to Fix Windows 11 Slow and Lagging Problem [FAST]
Here is a great video that shows you how to quickly fix Windows 11 running slow.
Conclusion
That’s it for how you can improve the Windows 11 slow performance. This guide is also suitable for Dell laptop running slow error. You can go ahead and try any of the methods listed above to enhance the performance and boot timing of your system. However, if you are hunting for a quick-fix and an effective method, try and use EaseUS Partition Master as a daily disk partition management tool for achieving the best user experience on Windows 11.
1. Why Is Windows 11 So Laggy?
If you feel Windows 11 running slow or freezing, the reasons could come from low system storage or running too many programs at the same time.
2. Will Windows 11 Slow Down My PC?
Windows 11 is faster than Windows 10. However, some users is experiencing slow performance issue due to low disk storage or outdated drivers. Don’t worry. It can be fixed easily.
3. How Can I Make Windows 11 Faster?
To fast fix Windows laggy problem, a useful disk manager, EaseUS Partition Master, works to increase c drive space or migrate OS to another drive. Other quick fixes: disable startup programs, turn off fast startup, and delete temporary files.
Microsoft has certainly made some improvements with the release of Windows 11 OS. However, some common issues users face with Windows 10 aren’t fully optimized. Like the previous versions, the new-gen OS – Windows 11, is not immune to sluggishness or slowdowns. Thankfully, one can easily fix this problem. This article covers the proven and Microsoft-recommended ways to fix Windows 11 slow issue. However, before that, let’s consider the factors contributing to system sluggishness.
What Makes Windows 11 Slow?
Multiple factors can cause Windows 11 to be laggy or slow. These factors can range from malfunctioning hardware/software to a virus attack on your system. Here, we’ve listed the most common ones as follows:
- Windows 11 is set to the best visuals
- Unwanted startup services
- Use of HDD instead of SSD
- Outdated device drivers
- Faulty or aging hard drive
- Lack of space on system drives
- Temporary files available on the system in bulk
- Outdated OS
- Buggy software installed
- Insufficient RAM
How to Fix Windows 11 Slow Issue?
Since there could be many possible reasons behind Windows 11 slow issue, we’ve crafted the DIY (Do-it-yourself) methods accordingly. You can follow the instructions to speed up Windows 11 quickly. Let’s begin!
Caution: Be careful of those ‘Speed up your PC’ advertisements that make you install third-party registry cleaners. These programs can expose your system to malware, causing further damage to your already slow PC. Moreover, backup your system regularly and keep data recovery software handy to prevent data loss if any mishap occurs.
#1 Restart your system
Sometimes, when your system becomes sluggish or hangs, try rebooting your PC or laptop. It will help you terminate the programs running in the background that may slow down your Windows 11. Go to Start, right-click on it, and choose Shut down or Sign out > Restart.
The system will reboot, and hopefully, it will run alright. After restarting your system, proceed with the below methods.
#2 Run Program Compatibility Troubleshooter
Sometimes, some incompatible programs may cause the system to run slowly. Fortunately, Windows comes with a built-in Program Compatibility Troubleshooter. This tool checks the program’s compatibility with your system and fixes the issues to help your system run smoothly. Here are the steps to run the program compatibility troubleshooter:
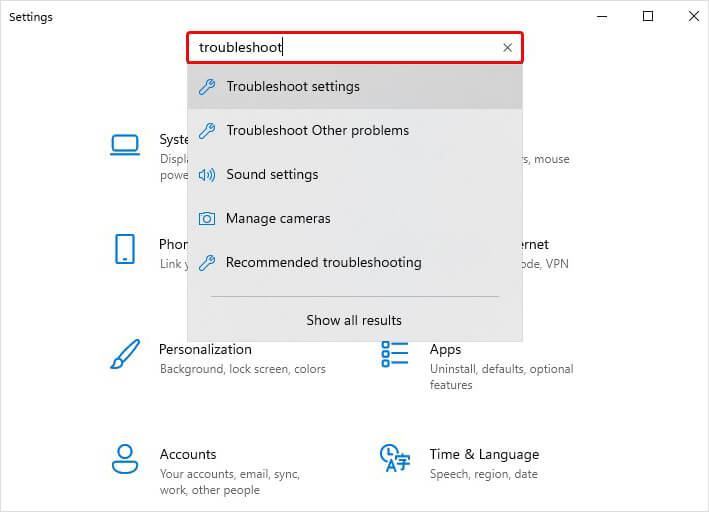
- Open Settings by pressing Windows + I and then type Troubleshoot in the Search bar.
- Select Troubleshoot settings from the visible options.
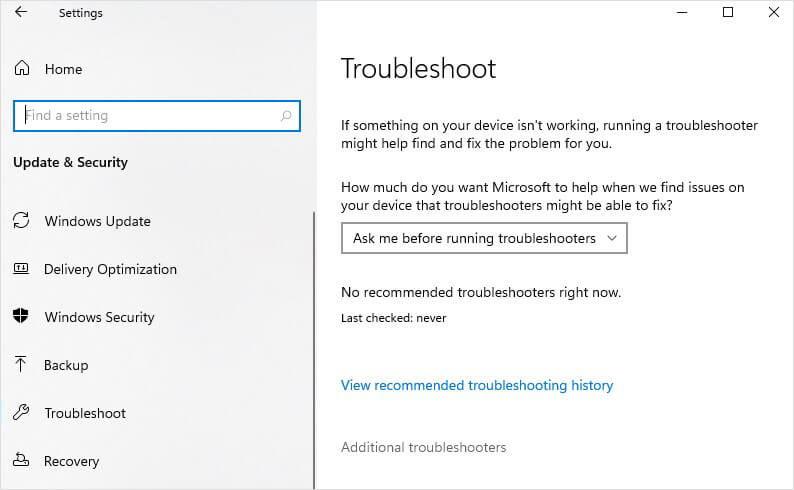
- Next, click Additional troubleshooters.
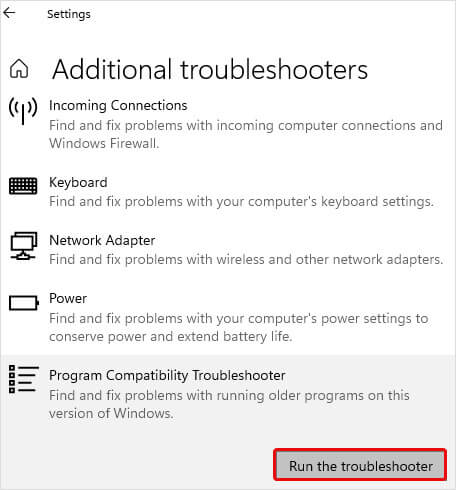
- On the next prompt, scroll down, and under Find and fix other problems, search for Program Compatibility Troubleshooter > Run the troubleshooter.
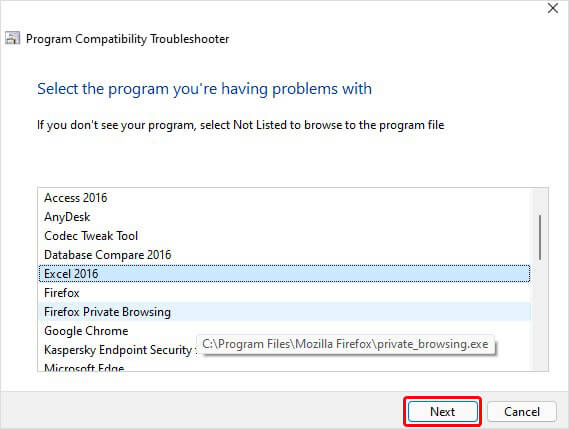
- You’ll see the list of programs. Select the one with which you’re facing issues and click Next.
- Afterward, you can choose ‘Try recommended settings’ or ‘Troubleshoot Program.’
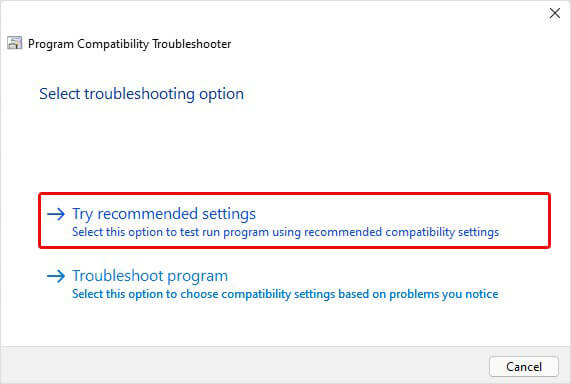
- Based on your selection, you’ll see further instructions; follow them to complete the process.
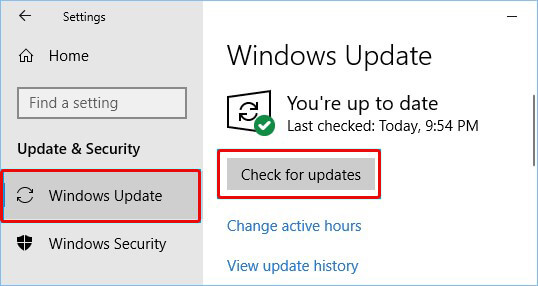
#3 Ensure you have the latest Windows Updates Installed
Missing important Windows updates or broken files may cause several system errors and affect system performance. To speed up Windows 11, you must ensure that you have the latest Windows updates installed for Windows and device drivers. To do so, follow the given steps:
- Go to Start, right-click on it, and select Settings.
- Next, follow Update & Security > Windows Update > Check for updates.
#4 Disable/Remove Unnecessary Startup Apps/Services
Several programs run automatically in the background when you boot your system, causing your system to respond slowly. You can remove or disable the programs you don’t often use from Startup to solve Windows 11 laggy issue. Follow the given steps:
- Open Settings with the above-stated instructions and then follow Apps > Startup.
- Select the program you don’t want to run automatically on boot and turn it off.
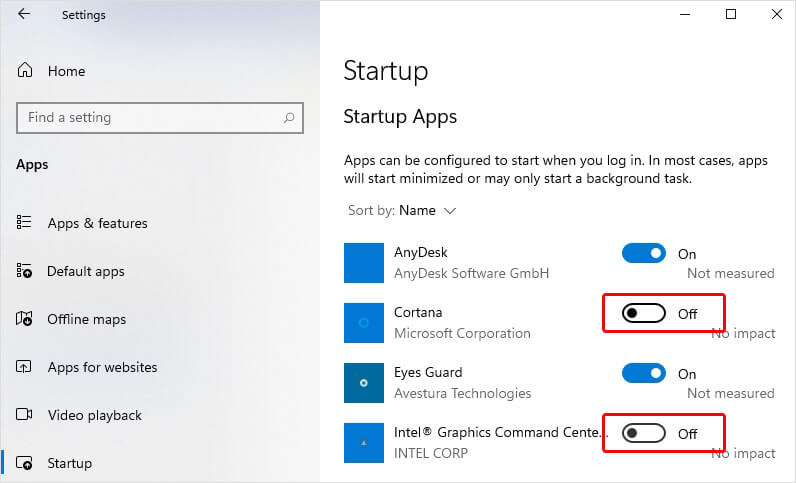
- Once done, reboot your system and check if Windows 11 slow startup issues are resolved and the system loads quickly.
#5 Free your system from junk files
Your system may have junk files or temporary files in a lot. They are quite easy to overlook as something that may consume a lot of space on your disk. But if too many junk files are available, they may contribute to Windows 11 slow performance. So you can remove them and boost your system performance. To delete junk or temporary files from your system, follow the given steps:
- Press Windows + R; it will open the Run dialog box.
- In the box, type %temp% and hit Enter.
- It will open the Temporary Files Folder. Select all the files and type Shift + Del to delete these files from your system. Click Yes to confirm.
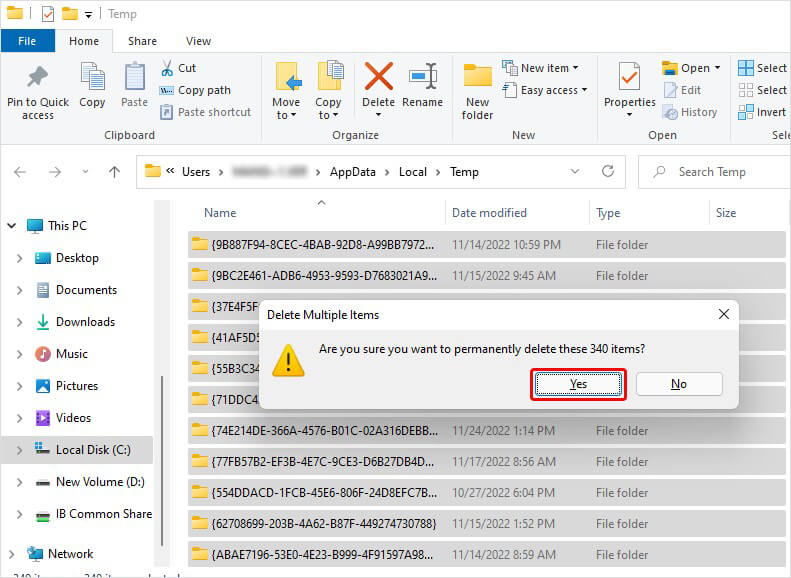
- Once done, close the window.
#6 Ensure your System is managing the page file size
A paging file is an area in a hard disk that acts as a memory for Windows. You can manage the page file size to speed up Windows 11. Follow the given steps:
- Go to Windows Search, type Advanced System and select View Advanced system settings.
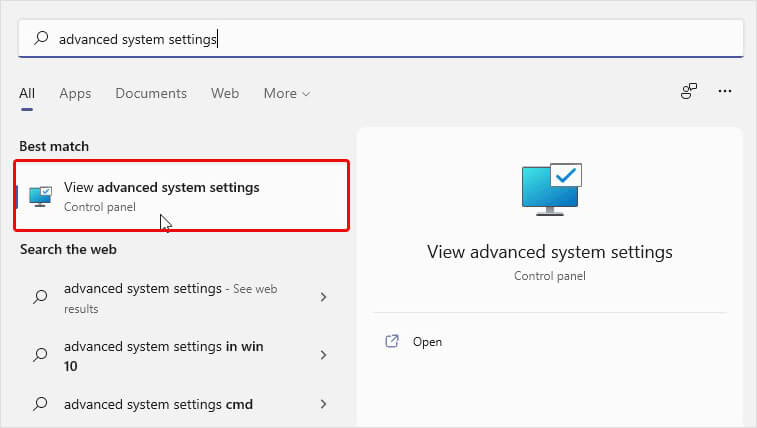
- On the next prompt, move to the Advanced tab and click Settings in the Performance area.
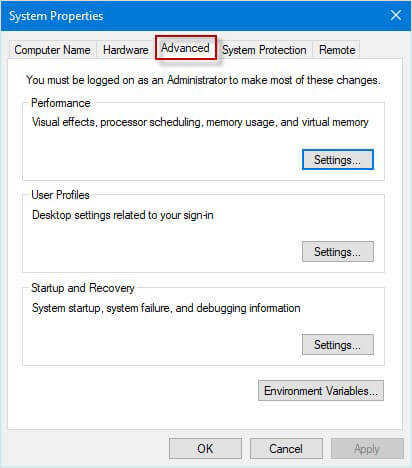
- Afterward, select the Advanced tab in Performance Options and click on Change in the Virtual memory area.
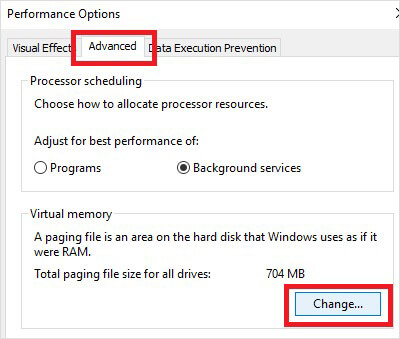
- Now, check the box beside Automatically manage paging file size for all drives > OK.
- Reboot your system and see if it is working fine now.
#7 Check for Available Space on your Disk
Windows 11 slow issue can also occur if you don’t have enough disk space available on your system. To resolve this, you need to remove unnecessary data to boost your system performance. Follow the given steps:
Run Disk Cleanup:
- Go to Windows Search, type Disk Cleanup, and open it.
- Select the boxes against the options/files you want to delete, and then click OK.
- You can also click the Cleanup system files option and select the files to remove.
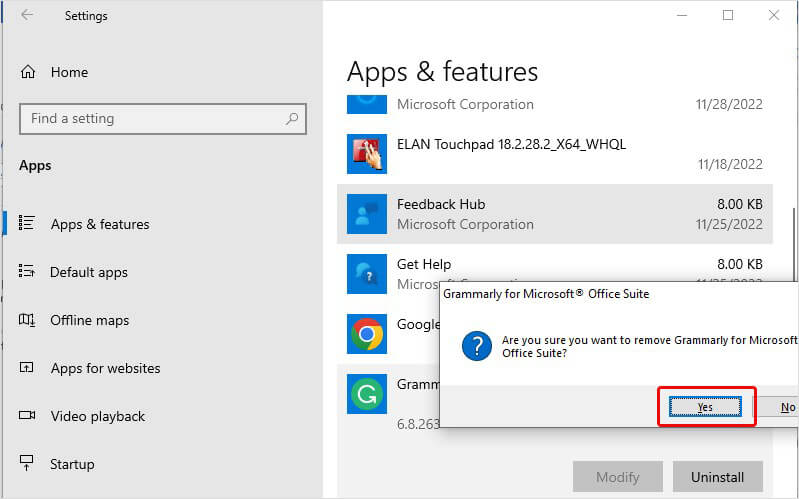
Uninstall Unwanted Apps:
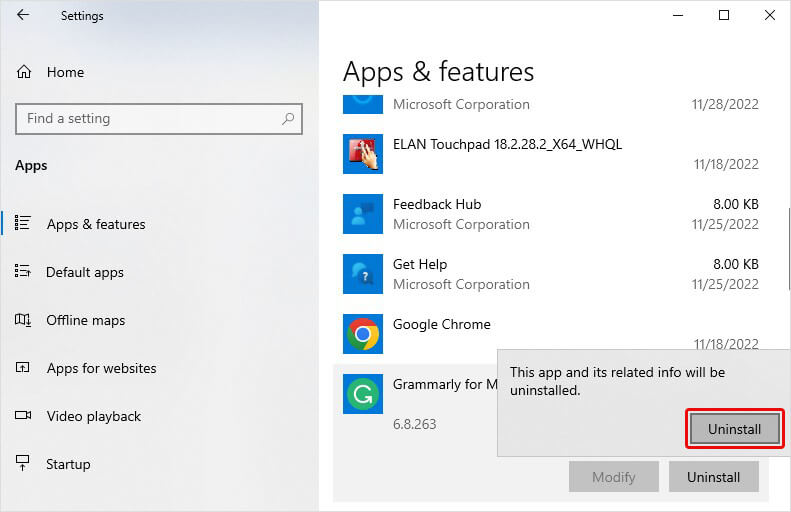
- Open Settings by pressing Windows + I and then follow Apps > Apps & features.
- Select the application you hardly use or don’t use at all. Click Uninstall.

- A pop-up will appear; click Uninstall to proceed.
- Click Yes to confirm the uninstallation.
#8 Disable unnecessary Visual effects
Windows 11 contains many visual effects, including shadow effects and animations while opening and closing the system, but they can be disabled or turned off. To do so, follow the given steps:
Disable Visual Effects:
- Open Windows Search, type Adjust the appearance and then click Adjust the appearance and performance of Windows.
- On the next prompt, follow Visual effects > Custom.
- Select the options you don’t want to keep running and click Apply.
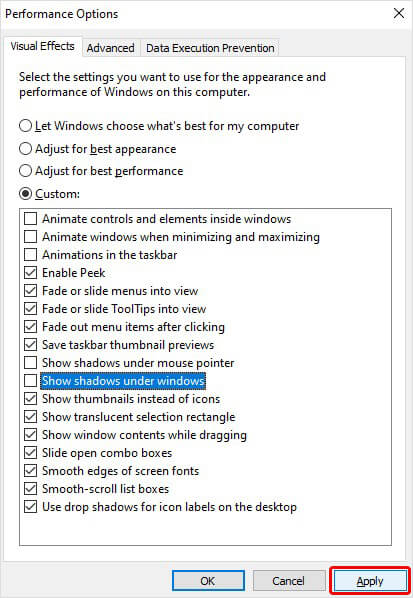
- Restart the system and check if it helps fix the “Windows 11 very slow” issue.
Adjust the Performance:
- Go to Windows Search, type Performance, and then click Adjust the appearance and performance of Windows.
- Next, under the Visual Effects tab, select Adjust for best performance > Apply.
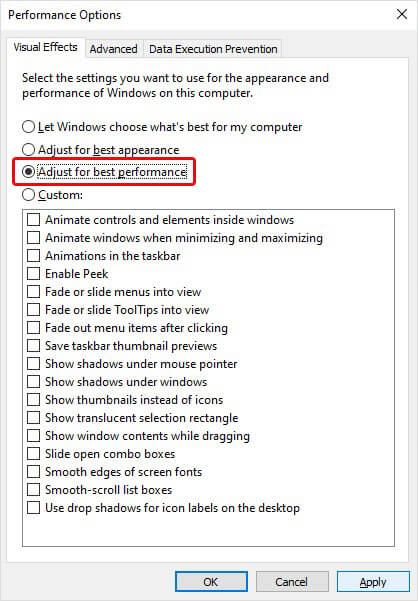
- Reboot your system and check if it boosts your system performance.
#9 Pause OneDrive Syncing
When you set up your system, you can choose where your files should be saved by default. You can save them on your system or OneDrive and sync files between locations. If you choose to sync files to OneDrive, it will let you access your files on a machine or device and let you be sure that your files are backed up. Unfortunately, syncing your files between the system and OneDrive can slow down your system. Hence, try giving OneDrive syncing a pause and see if it helps. To do so, follow the given steps:
- On Taskbar, look for OneDrive and open it.
- Go for Help & Settings > Pause syncing and then choose the pause duration.
Reboot your system and notice if your system performance is better.
#10 Scan your PC for malware
One possible reason for your Windows 11 running very slow is malware or virus attacks on the system. If your system is infected or has malicious software installed, it could run slowly or lag. Additionally, you may experience unusual activities on your system, like several programs running or closing automatically, files disappearing, etc. You can scan your system for malware infection using Windows Security feature. Follow the steps mentioned below:
- Open Settings by pressing Windows + I and then follow Update & Security > Windows Security > Virus & threat Protection > Quick scan.
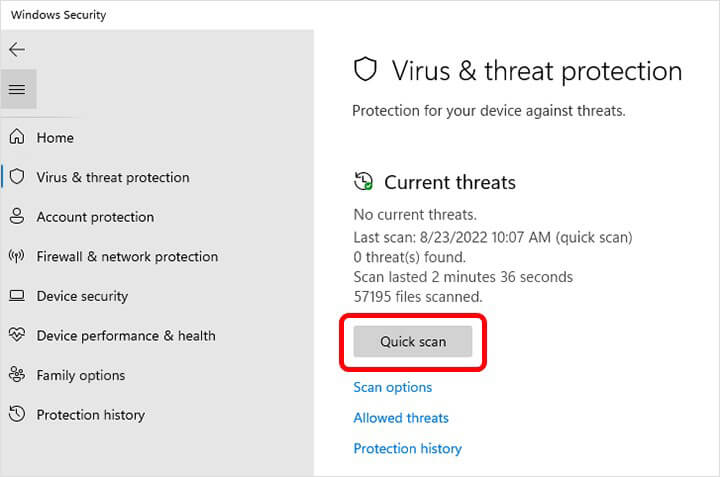
- Once the scanning is done, run an advanced scan or contact Microsoft Support as per the results & recommendations of the scan.
#11 Perform System Restore
You can perform a system restore if the Windows 11 slow issue isn’t solved after all the above methods. Running System Restore helps restore your system to a previous working or default state. However, returning to an older or default configuration will remove all the changes related to the device manager, such as drivers, settings, files, apps, updates, and more. Therefore, you can back up your system data and other important stuff before proceeding with this method. To perform System Restore, follow the given steps:
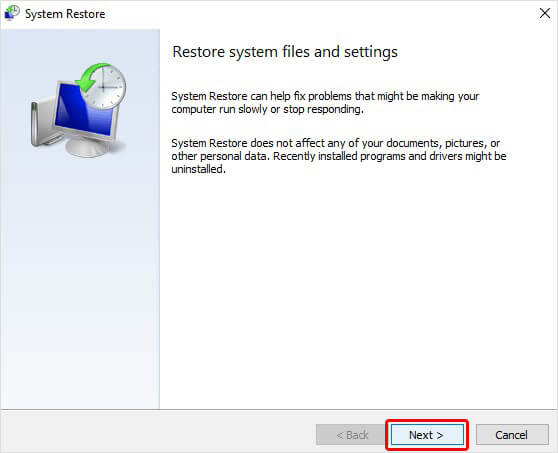
- Open Windows Search, type Create a restore point and click Open.
- On the System Properties window, move to the System Protection tab and click System Restore.

- Click Next on the Restore files and settings window by selecting the recommended restore point or choosing a different one.
- After that, select the restore point and click Scan for affected programs.
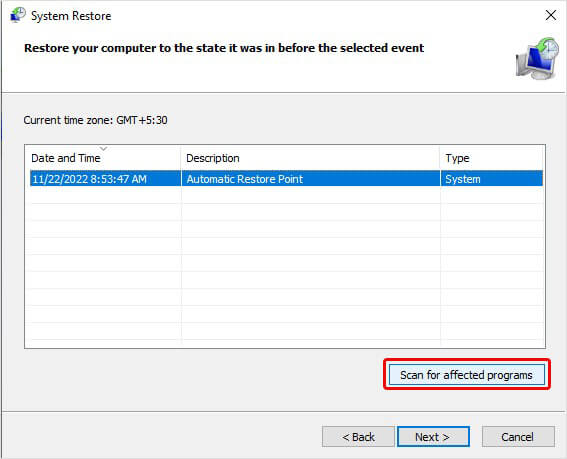
- It will show you the list of programs affected during the process.
- Click Close > Next > Finish to complete the process.
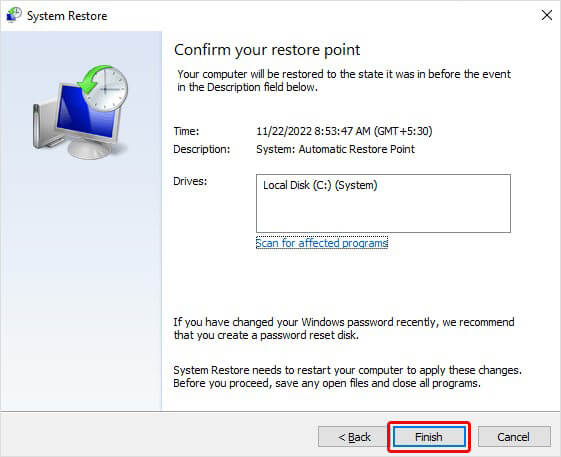
- Once the process is completed, reboot your system and check if your system performance is better now.
#12 Reinstall Windows 11
If your Windows 11 is running slow due to some software issue or OS problem, you may reinstall the Windows. It will help you fix slowness issues and speed up Windows 11. However, reinstalling Windows may cause data loss. Therefore, it’s advised to back up your data stored on the system and reinstall Windows 11.
Speeding up Windows 11 is easy when you follow the right tactics and practices. All the methods discussed above will certainly help you fix Windows 11 slow issue. You can try them out and see what works best for you.
Was this article helpful?
FAQs
Will switch back to Windows 10 help the System’s slow performance?
The slow performance issue is with both Windows 10 and Windows 11 versions. However, if your system is not compatible with Windows 11, you may not be able to run it on your system and may have issues. Moreover, you can perform the above fixes for Windows 10.
Does Windows installation delete everything from the system?
Performing a clean installation of Windows 11 with installation media on your system removes all your files, drivers, apps, customization, or changes made to system settings along with the partitions created on your system hard drive currently being used for recovery drive.
How do I recover data after reinstalling Windows?
The easiest way to retrieve data after reinstalling Windows is back up. If you’ve backed up your system before Windows reinstallation, you can easily use that to get back your access to data. If no backup is available, you’d still be able to restore data with powerful data recovery software, such as Stellar Data Recovery for Windows. It is a DIY data recovery software that helps retrieve files, folders, documents, emails, and other data from formatted or corrupted drives or computers.