
Item Preview
There Is No Preview Available For This Item
This item does not appear to have any files that can be experienced on Archive.org.
Please download files in this item to interact with them on your computer.
Show all files
119
Views
1
Favorite
DOWNLOAD OPTIONS
Uploaded by
Unknown
on
SIMILAR ITEMS (based on metadata)
Like every other OS, Windows 10X is also one of the most anticipated upcoming OS. Microsoft has revamped its previous generation Windows OS, re-envisioned from ground up for foldable devices. In February, Microsoft released its first preview of the Windows 10X emulator. The emulator is available to download for developers, but anyone can download it and taste the features of the upcoming Windows 10X. If you’re an enthusiastic person like me and want to get access to the newest Windows OS. Then, here’s the step by step guide by which you can Install Windows 10X Emulator on Windows 10 PC.
Before diving into the process, let’s take a sneak peek at the features of Windows 10X OS. Windows 10X made to provide a lightweight experience. It pops up with clean, minimal, and intuitive UI changes to the Microsoft Surface Neo and other portable devices. The newer OS brings new navigation gestures, a bunch of UI changes to the apps and system, the new Action Center, File Explorer, and more. And luckily, you can get access to all the features of the upcoming Windows 10X on your Windows 10 PC.
As for now, the newer OS is under testing, which means It is not as stable as stable build, but it is suitable for regular use and preview. Although the Windows 10X Emulator is available for anyone, still there are some system requirements that you can check before heading over to the process. Here are the requirements.
Windows 10X Emulator System Requirements
Software Requirements
- Make sure that your system is running on Windows 10 Pro, Enterprise, or Education (x64) build 10.0.19555 or later from the Windows Insider Program.
- Enable Microsoft Hyper-V with GPU-PV.
Hardware Requirements
These are the minimum system requirements that you need if you want to taste Windows 10X features.
- Processor: Intel chipset with at least four cores and virtualization support (It will not work on AMD processor).
- RAM: 8GB or more
- Drive: 15GB or more storage required (SSD recommended)
- Graphics: Discrete video card with support for DirectX 11 and WDDM 2.4 graphics.
If your system meets all the system requirements of the Windows 10X emulator, then you can dive into the installation process. Before installing the Windows 10X emulator, you need to update your Windows 10 to the latest release and Enable Microsoft Hyper-V component.
Install Windows 10 Preview
Note: Before upgrading your Windows to the latest Windows 10 preview build, make sure to take a complete backup.
- Open the start menu and click on Settings.
- Under Settings, click on Update & Security.
- Now, head over to the Windows Insider Program available in the sidebar.
- Now, click on the Get started button and link your Microsoft account.

- Once done, click on the continue button.
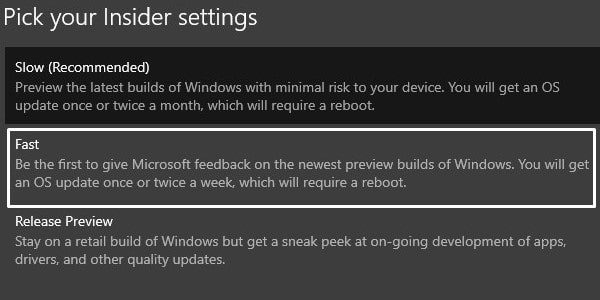
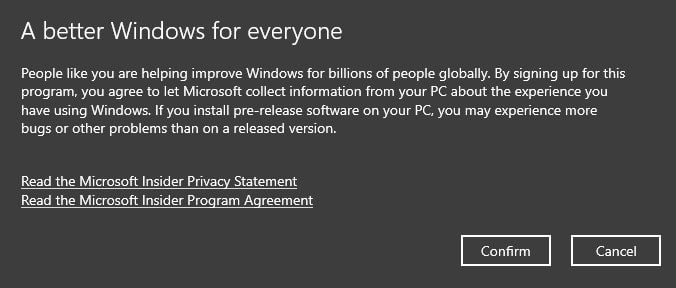
- Choose Fast options, under “Pick your Insider settings” and then click on the confirm button again and again.
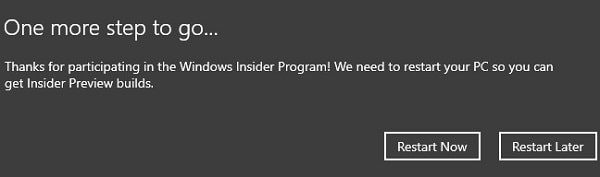
- Once done, click on the Restart button.
- After the restart, Open the Settings again and check for the updates.
- Upgrade your Windows to the latest build and restart your system.

After upgrading your Windows 10 to the latest build, you can install the Windows 10X Emulator Image from the Windows Store. But before doing this, make sure to enable the Hyper-V component.
Enable Hyper-V Component
Make sure to enable Hyper-V, It allows your system to create virtual machines (basically, It enables you to sideload Windows 10X OS on the same hardware for parallel use).
Check the Hyper-V support
- Open the start menu and search for Command Prompt.
- Open Command Prompt and Enter this command
systeminfo.exe
- It will show you whether your system has Hyper-V access or not. Make sure that the results are listed as Yes, under the Hyper-V Requirements section.

If it shows yes, then your system has Hyper-V access. Here’s how you can enable it on your system.
- Open the start menu and then Settings.
- Click on the Apps and click on Programs and Features option available in the sidebar.
- Now click on the Turn Windows features on or off option.
- Here you need to check the Hyper-V option box.
- Once done, save the settings and restart your system.
Now you can download and install Windows 10X Emulator image on your Windows 10 PC. Here are the steps.
How to Install Windows 10X Emulator
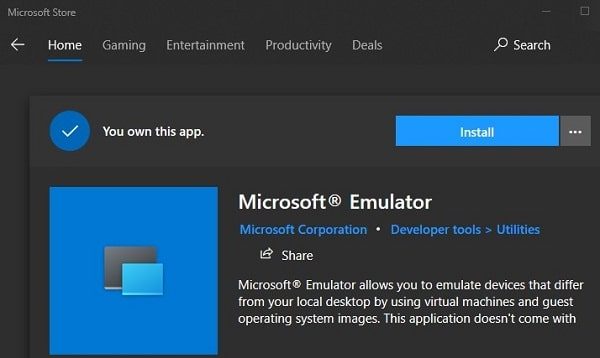
Note: Before downloading the Windows 10X Emulator image file, you need to install Microsoft Emulator on your system.
- Open Windows Store and search for Microsoft Emulator.
- Click on Microsoft Emulator.
- Now click on Get (or Install) button.
- That’s it.


After installing the Microsoft Emulator application. You need to download the image file. Here are the steps.
- Open Windows Store and search for Windows 10X Emulator Image.
- Select the image file from the search results.
- Click on it and then tap on the Install button.
- That’s it.

All done? Now, head over to the start menu and search for Microsoft Emulator. Here you need to click on the start button. It will boot up the Windows 10X Emulator. Now you can start using Windows 10X on your Windows 10 PC.
You May Also Like – How to Get Windows 10X File Explorer on Windows 10
If you’ve any queries, then you can leave the comments in the comment box. Also, share this article with your friends.
More Related Articles:
- Download Windows 10X Wallpapers
- Download Microsoft Surface Book 3 Wallpapers
- How to Take a Long Screenshot on PC
- How to Enable & Setup Dark Mode on Windows 10
В конце прошлого года Microsoft представила операционную систему Windows 10X для работы на своих мобильных устройствах с двумя экранами, таких как Surface Neo. Позже был выпущен эмулятор и образ этой операционной системы, который можно было запустить только в Windows 10 Insider Preview новее определенной версии, теперь же эмулятор доступен и на любом компьютере с Windows 10 с установленными последними обновлениями.
В этом обзоре о том, как установить эмулятор Windows 10X на своем компьютере и кратко о том, что можно увидеть в новой операционной системе, доступных настройках и некоторых других нюансах. Также может быть интересным: Лучшие эмуляторы Android для Windows.
- Установка эмулятора и образа Windows 10X
- Операционная система Windows 10X
- Видео обзор
Установка эмулятора и образа Windows 10X
Для установки эмулятора Windows 10X достаточно выполнить следующие шаги:
- Зайдите в магазин приложений Microsoft Store, в поиске введите emulator.
- В результатах обратите внимание на пункт Microsoft Emulator — его устанавливаем первым.

- Также в результатах будет несколько образов Windows 10X, устанавливаем последнюю версию.

На этом процесс установки завершен и можно запускать приложение Microsoft Emulator из меню «Пуск».
В приложении вы увидите список образов Windows 10X (скорее всего, лишь один образ), для запуска нажимаем «Start». Не забудьте, что для работы эмулятора требуется включить виртуализацию, а при появлении ошибки после нажатия Start, нажмите кнопку «Retry».

Операционная система Windows 10X
После запуска эмулятора, через некоторое время загрузки вы увидите «рабочий стол» Windows 10X, разделенный на два экрана, на нем — лишь панель задач (разворачивается при наведении указателя мыши), на которой кнопка «Пуск» с меню с новыми иконками приложений и кнопка просмотра задач.

Полный список установленных приложений можно увидеть, нажав «Show All» в меню. Кстати, установить русский язык интерфейса через параметры у меня не удалось, но язык ввода устанавливается.
Такие вещи как «Параметры» или «Центр безопасности Windows» почти ничем не отличаются от таковых на вашем компьютере с Windows 10, при этом стандартных интерфейсов наподобие «Панель управления» уже нет.

Если заглянуть в проводник, которых здесь целых два экземпляра (обычный и Бета, второй у меня не запустился), вы увидите, что у пользователя есть доступ лишь к собственным папкам, таким как «Документы», «Загрузки» и подобные, остальная файловая система скрыта и недоступна. При этом другие папки и «Диск C» всё-таки присутствует в системе, но получить к нему доступ не получится (показано в видео).
Сама Windows 10X предназначена для мобильных устройств, но, в отличие от других мобильных ОС позволяет запускать приложения не только из соответствующего магазина приложений, но и обычные программы Windows. Я проверил запуск Rufus — в итоге, программа запустилась, хотя и происходило это очень медленно (судя по процессу, внутри Windows 10X запускается отдельный эмулятор для таких приложений).

Если в панели слева от окна эмулятора нажать по кнопке с двумя стрелками, а затем перейти на вкладку «Orientation», вы можете поэкспериментировать с разными режимами работы двух экранного мобильного устройства и посмотреть, как будет вести себя эмулятор.

Пожалуй, пока это всё. Добавить могу лишь то, что синие экраны BSOD в Windows 10X выглядят так же, как и в обычной 10-ке, разве что разделены на два экрана:

Видео обзор Windows 10X
Подводя итог: даже не представляю, какое будущее ждет эту операционную систему (Windows Phone сначала казалась многообещающей, но её уже нет, будет ли с Windows 10X иначе — не факт, на мой взгляд) и не знаю, пригодится ли кому-нибудь этот материал, но, если захочется поэкспериментировать с Windows 10X — почему бы и нет.
Windows 10X is a new edition of Microsoft Windows. That specially-designed for dual-screen devices like Microsoft’s Surface Neo. And, this new version of Windows will likely to come for all devices one day. In Windows 10X, all applications will work, as they do on Windows 10 home and professional versions. Basically, It’s not an entirely new OS, it is based on Windows Core OS. And, it is well optimized to provide faster user-experience. Because as per Microsoft, Windows 10X will take less than 90 seconds to install a big OS update. Also, applications installed by you will not mess with system files in Windows 10X. So, you will get better protection from rootkit-like malware. To make OS lightweight, Microsoft removed many things like live tiles. So overall, you will get faster updates, improved security, and more battery life.
Well, If you want to test Windows 10X now, then you don’t have to wait much longer. Because Microsoft has released Windows 10X Emulator for Windows 10. Though, the emulator is available for developers only. But, anyone can test it on their Windows 10 PC. Only, if your device meets the minimum requirements.
Install Windows 10X Emulator on Windows 10.
Windows 10X Emulator Requirements.
Installing Windows 10X Emulator isn’t rocket science. Because, it’s available on Microsoft Store, anyone can install with few clicks. But, to make it run on your computer, there are few software and hardware requirements.
Hardware Requirements.
- Processor – Intel Processor with at least four cores and virtualization support.
- RAM – 8GB minimum. (16Gb recommended.)
- Storage – 15-20 GB or more space. Use SSD for faster user-experience. (Windows 10X Emulator Image size is around 8GB.)
- Discrete graphics card required with DirectX 11 and WDDM 2.4 graphics.
Note: As of now, Emulator only supports Intel Processors. So, if you’re using an AMD processor, then it will not work.
How to check Processor core count in Windows 10.
You can simply use CPU-Z software to find out your Computer’s hardware Information. Alternatively, do open the task manager, click on Performance tab > CPU. Here you can find out cores count. (Or, press Ctrl+Shift+Esc)
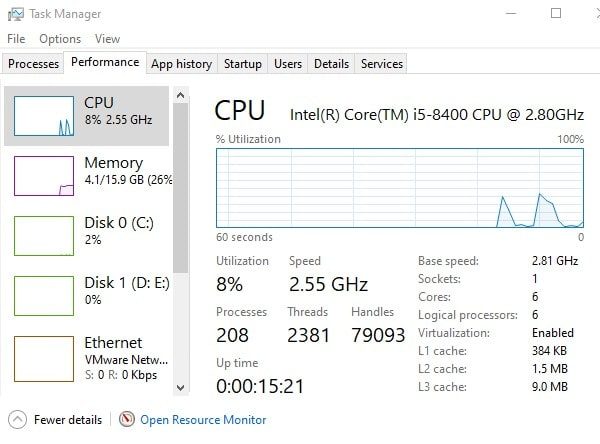
As you can see, I am using 6 core intel i5-8400 processor. So, Windows 10X emulator will easily run on my PC.
Software Requirements.
- Windows 10 version 19500.0 or higher. (x64) (You have to join Windows Insider Program and install a latest fast build of it.)
- Microsoft Hyper-V with GPU-PV. (For hardware-accelerated tasks.)
Important: Make sure that hardware-assisted virtualization, Second Level Address Translation (SLAT), and Hardware-based Data Execution Prevention (DEP) are enabled in BIOS or UEFI.
If you already using the latest Windows Insider Preview build, and, your device meets all requirements. Then, you can skip the steps, and can follow instructions to install Microsoft Emulator and Windows 10X Emulator Image.
Install the latest Windows 10 Preview Build.
Windows 10X emulator uses technology that currently under development. So, you have to install the latest preview build available in the fast ring. After that, you have to enable the Hyper-V virtualization from Windows Features.
Important: If you don’t know, Windows 10 Insider Preview is basically a pre-release build of Windows. That gets released for developers for testing purposes. And, after you upgrade, you may not able to rollback. The installation also can be failed, so create a full backup before proceeding.
If you have made your mind to Install Windows 10 Preview Build and test Windows 10X Emulator, then follow these steps.
(Join Windows Insider Program.)
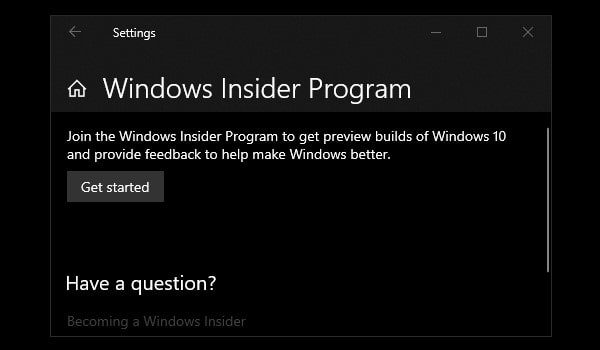
1. Open Windows 10 Settings App. (Press Windows + I Hotkey.)
2. Click on Update & Security > Windows Insider Program. (From left pane.)
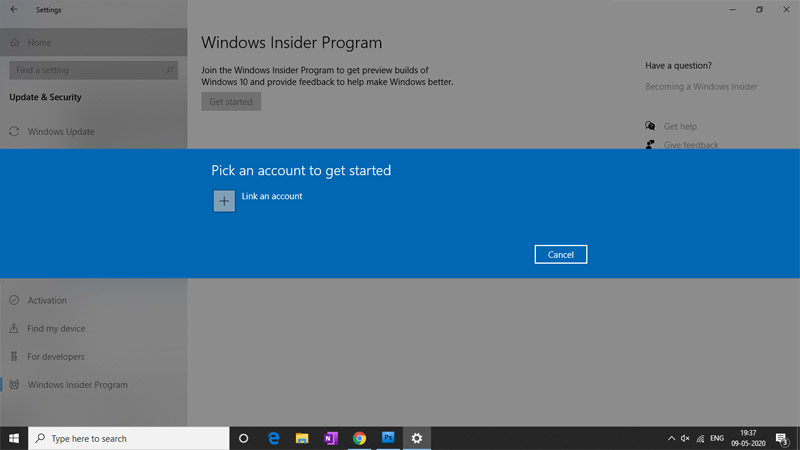
3. Click on “Get Started”.
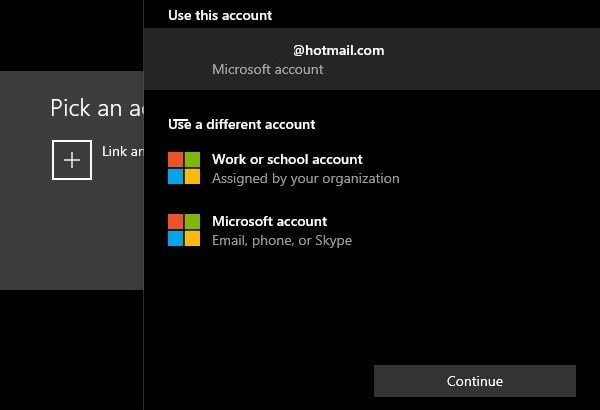
4. To get insider build updates, you have to join through your Microsoft Account. Click on Link an Account.

And, Select your Microsoft Account from the list. Click on “Continue”.
5. Pick your insider settings page will appear, select the fast option. Because the build required for Emulator is available only in “fast”. Click on Confirm.
6. Once Again click on Confirm.
After that, the restart option will appear. Click on “Restart Now”.
Download and Install Windows 10 Insider Preview latest build.
After restarting the Windows, do open the Windows Update page (Settings > Update & Security.). And, click on the “check for updates” button.
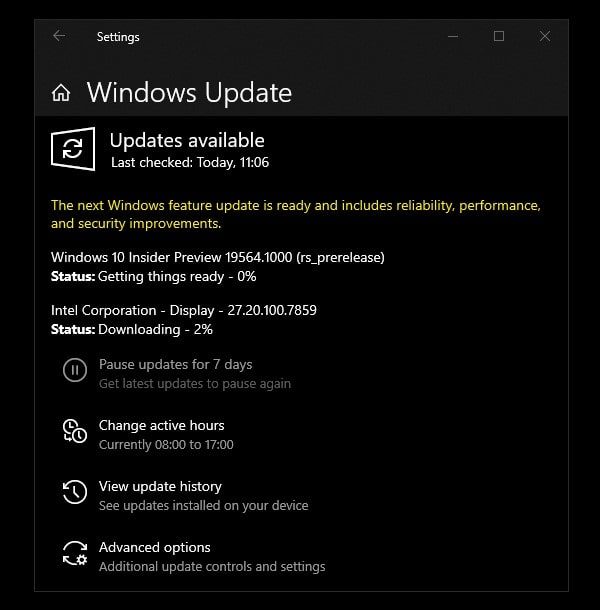
That’s it, Windows will now download and install the latest Insider Preview Build for you. As you can see, I got a 19564.1000 preview build update. That is higher from Windows 10 version 19500.0 required build. It will enable you to install Windows 10X Emulator Image download. If you try to install in Windows version 1909, the install button will not work.
Enable Microsoft Hyper-V Component.
Hyper-V is a virtualization technology available on Windows 10’s Education, Enterprise and Pro. It allows us to create a virtual machine and run a different operating system. Hyper-V also required to run Windows 10X Emulator in Windows 10.
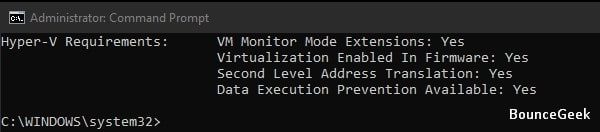
Check Hyper-V Support.
1. Open Command Prompt as Administrator. (Search “CMD” in Windows 10 search box. Right-click on Command Prompt, and, click on “Run as administrator.)
2. Type the following command and press enter.
systeminfo.exe

3. If in Hyper-V Requirements section. Results are Yes then you can run Hyper-V. (And, if it shows no, then you have to enable it manually.)
Enable Hyper-V Support.
1. Go to Settings App > Apps.
2. Under Related Settings, click on “Program and Features”.
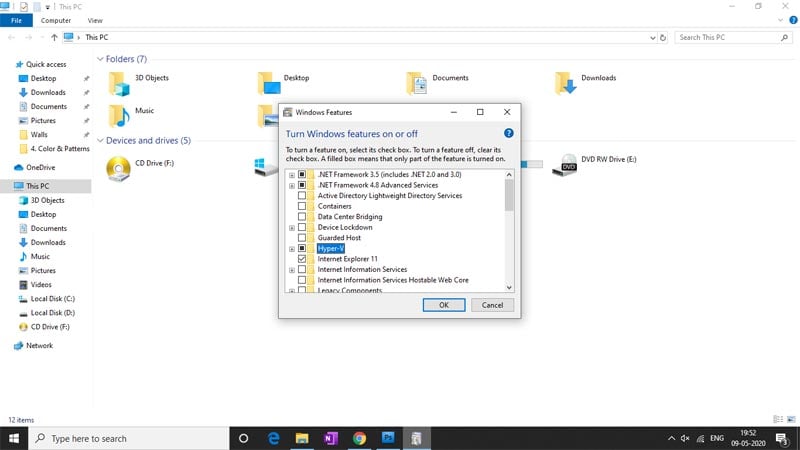
3. Click on “Turn Windows features on or off”. (From the left pane of the control panel.)
4. In Windows Features Window, look for Hyper-V. Enable it and click on OK. After that, restart Windows. That’s it, now your computer is ready to run Windows 10X Emulator.
Install Microsoft Windows 10X Emulator.
1. Open Microsoft Store, and, search for “Microsoft Emulator”.
2. Select the application from search results. Click on Get > Install. (Emulator size is less than 30MB.)
3. After installing Emulator, search for “Windows 10X Emulator Image”.
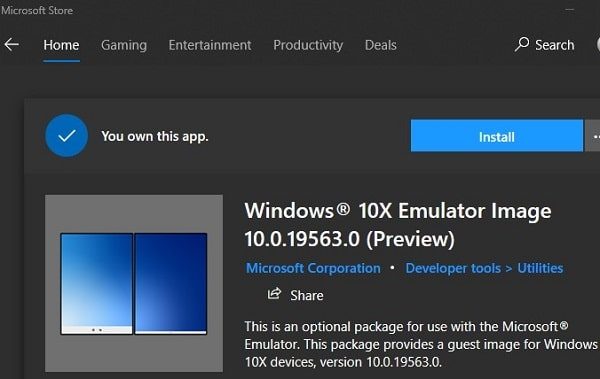
4. Click on the emulator image from search results. Click on Get and then Install. (This will take time because image size is around 8GB.)
After installing Windows 10X testing Image. Microsoft Emulator will detect it automatically.
So, Do open Microsoft Emulator, you can see Windows 10X Emulator in it. Click on “Start”. That’s it, Emulator will now launch. On the right side controllers will appear. That will let you take screenshots, control volume, navigate and turn off the emulator.
Microsoft rolled out the official Windows 10X Emulator so that users can install and test the apps in an early stage. Here is the minimum system requirements for Windows 10X Emulator, and how to install Windows 10X Emulator on Windows 10.
Manufacturers have reached such a point from where they need a magic box to obtain a list of features for the next device. Nowadays, companies are concentrating on the foldable devices and so is Microsoft. Microsoft announces an operating system for their foldable devices or dual-screen devices. That operating system is called Windows 10X, and it is not built on Android platform. If you want to test Windows 10X before the actual launch or if you are a developer, who needs to test his/her apps, you should follow this tutorial.
Windows 10X Emulator minimum hardware and software requirements
As you are going to run an emulator, you should have some specific hardware and software requirements. It runs on Windows 10 but you should know about all the other requirements to run it fluently. Otherwise, you may get lagging issues after running it on your PC.
Hardware requirements for Windows 10X Emulator
Processor: Intel processor or CPU with minimum 4 cores.
RAM: 8 GB of RAM (Emulator uses 4GB of RAM). 16GB of RAM is recommended.
Storage: Minimum 15 GB free storage for vhdx + diff disk. SSD is recommended.
Graphics: Dedicated graphics is recommended. DirectX 11.0 or later/WDDM 2.4 graphics driver or later.
Apart from these, you should enable these settings in the BIOS: Hardware-assisted virtualization, Second Level Address Translation (SLAT), and Hardware-based Data Execution Prevention (DEP).
Software requirements for Windows 10X Emulator
You must have 64-bit of Windows 10 Pro, Enterprise, or Education. Also, this emulator is compatible with Windows Insider Preview build 10.0.19555 or later. Therefore, if you are using an older version of Windows 10 Insider Preview, it is recommended to update your PC to the latest version.
Also, you need to enable Hyper-V in your PC. Otherwise, you cannot run this emulator on your Windows 10 PC.
How to install Windows 10X Emulator on Windows 10
Here is how to install Windows 10X Emulator on Windows 10-
- Open Microsoft Store and search for Microsoft Emulator.
- Click the Get button to download Microsoft Emulator on Windows 10.
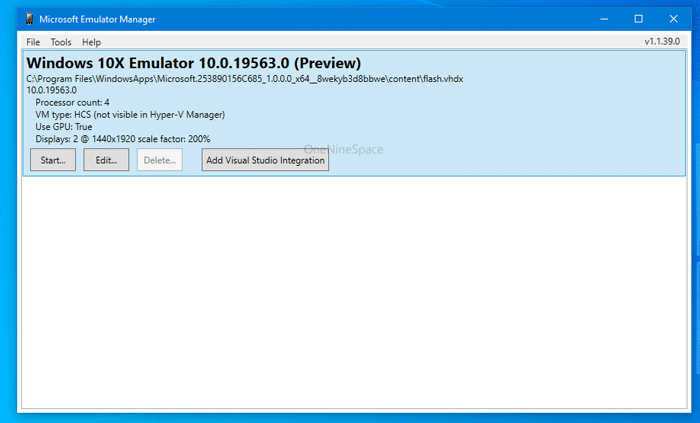
- Search for Windows 10X Emulator Image 10.0.19563.0 (Preview) and download it.
- Open the Microsoft Emulator Manager.
- Click the Start button.

- Run Windows 10X Emulator on Windows 10.


From here you can use it like a normal Windows 10X running device. There are few things you should know about this process and everything is mentioned below.
Check Hyper-V support and Second Level Address Translation support
Hyper-V and Second Level Address Translation (SLAT) are required to run Microsoft Emulator on Windows 10 and Hyper-V is an in-built feature of Windows 10. To check if your CPU supports them, you need to run a command. For that, you need to run elevated Command Prompt, and enter this command-
systeminfo.exe
You can find a label called Hyper-V Requriements. You should see all the positive results. If anything is showing as NO, you cannot run this emulator.
How to turn on Hyper-V on Windows 10?
Step 1: Click the Start Menu, and type Turn Windows features on or off and click on the respective result. It should open the Windows Features window.
Step 2: Make a tick in the Hyper-V checkbox and click the OK button.
Step 3: Restart your computer when it asks you to do.
Alternatively, you can open Windows Settings > Apps and click on the Programs and Features button. After that, you can follow the same instructions as mentions above.
[XDE:019] You do not have permission to run the emulator
![[XDE:019] You do not have permission to run the emulator](https://www.oneninespace.com/wp-content/uploads/2020/02/You-do-not-have-permission-to-run-the-emulator.jpg)
If you are getting [XDE:019] You do not have permission to run the emulator error while running the Microsoft Emulator on Windows 10, you need to click the Retry button. It will gain the permission and run the emulator without another error.
That’s it! It is how you can install Windows 10X emulator on Windows 10 Insider Preview. If you are going to develop some apps for Windows 10X, you should get started with the official documentation. You can download the Microsoft Emulator from here and the Windows 10X Emulator Image from here.
Sudip Majhi
The article, you are reading, is written by Sudip, who starts and ends the day with computer. He contributes to some top media publications after gathering 12 years of experience in content writing in technology field. Email him to say hello!