
Are you also facing the issue where AMD drivers don’t install? Well, you might not be the only one facing such an issue. As AMD is one of the most commonly used chipsets in today’s generation computers and even creates its drivers which are ultimately the pivotal component of your system known to enhance its performance and operations.
To maximize the performance of AMD hardware, you must install and routinely update of these drivers. Typically, Windows are known to take care of such updates through its automatic feature however, inability to perform it can often lead to AMD drivers not installing error which can be frustrating so the objective of this article will be to look for ways to resolve this error in Windows 11 or 10. See – Fix AMD fTPM Stutter and Audio Problem.
AMD Drivers won’t install in Windows 10 and 11
Here is how to fix AMD Drivers won’t install in Windows 11 or 10 –
Way-1: Remove all AMD Drivers
If you are having trouble and encountering the AMD drivers not installing error it means that it’s time to remove all the current AMD drivers. To perform this function check out the ways mentioned below:
- Press Windows key, type control, and then select Control Panel.
- Click on Programs and Features.
- Select – AMD Catalyst Install Manager.
- Click on Change.
- An AMD Catalyst Install Manager InstallShield window will appear; click Next.
- Click Next.
- Now, select Express Uninstall ALL AMD Software when asked.
- On User account control prompt select Yes.
- Click on All versions.
- After the process started, select Remove.
- Click on – Finish.
- When prompted, select Yes to restart the system and finish the uninstallation.
Once the application has finished removing all AMD drivers, the display should seem as if a regular VGA driver had been installed. Afterward, you would be able to install your AMD Catalyst drivers properly after restarting their setup once again.
In case of residual data backup, we recommend utilizing a reliable driver uninstaller. A professional tool can rapidly scan your system for all installed drivers and allow you to pick one or more for simultaneous removal.
Way-2: Run System File Checker (SFC) and DISM
When Windows won’t let you install AMD drivers, System File Checker (SFC) is a program included with all current versions known to repair corrupt system files. Whereas, Deployment Image Servicing and Management program aka DISM is used to service Windows images and resolve errors like AMD Drivers won’t install. These are the steps check them out here:
SFC
- Click Start and then type CMD.
- Select Run as Administrator after right-clicking on Command Prompt.
- Enter
sfc /scannowinto the command prompt window.
- Windows will begin searching all system files to restore them and complete the task in a few minutes.
DISM
- After that enter the following command, as shown below
Dism /Online /Cleanup-Image /RestoreHealth
- The scan will take some time, and any problems found will be restored via the command prompt.
If the error still exists with AMD chipset drivers not installing then move on to the next way.
Way-3: Turn off Windows Defender Firewall
Windows defender firewall with its vigilant programming and traits looks for malware and suspicious behavior as it tries to protect Windows 11 or 10. However, doing the same has a bad impact on other driver performances like the one mentioned above leading to showing AMD Drivers won’t install error.
- Press Windows + S.
- Type – Windows Defender Firewall and click on the same from result.
- Click “Turn Windows Defender Firewall on or off” from the existing window.
- Go to Private network settings.
- Check – Disable Windows Defender Firewall (Not recommended).
- Now go to Public network settings.
- Select – “Disable Windows Defender Firewall (Not recommended)”.
- Click OK to save changes.
If you are unable to install or update your drivers using any of the above methods and installed a third party antivirus suite then consider temporarily disabling the “anti-virus” and Firewall.
Antivirus applications are notoriously incompatible with Windows upgrades. And driver upgrades might not perform any better. To turn off, right-click on the icons in the System tray on Taskbar and select Disable for 10 minutes.
Alternatively, you may remove it and replace the same with a superior pro version of the program that does not interfere with essential tasks.
Way-4: Use Compatibility Mode to Install AMD Drivers
As the name suggests compatibility mode provides the perfect settings and platform which gels with the drivers and system and prevents frequent errors that portray messages like AMD drivers not installing. Check out the steps to initiate this mode:
- Right-click on AMD Drivers and select – Show more options.
- Select – Troubleshoot compatibility.
- On the Program compatibility troubleshooter, click on Try recommended settings.
- Choose Test the program.
- Follow guidelines shown on the installation wizard to complete the process.
If compatibility mode is unable to provide you relief from this can’t install AMD graphics driver Windows 10 or 11 error then move on to the next fix without any delay.
Way-5: Look Out for Visual C++ File Status
Installing and running AMD drivers on Windows has a prerequisite of Microsoft Visual C++ Redistributable package. Ensure that this package is not broken as it could be the lead reason for showing you the error, AMD Drivers won’t install. So follow these steps to resolve it:
- Press Winkey + I.
- Select Apps.
- Click on Instaled apps.
- You will see a list of programs installed on your computer. Microsoft Visual C++ Redistributable packages app should be also available.
- Note the versions of all the packages and go to Microsoft’s download page for the packages. Make sure that the latest version is installed.
- If the edition is old then click on the 3 dots menu and select Uninstall.
- Confirm the prompt and remove the package.
- Download the latest Microsoft Visual C++ Redistributable packages on your PC.
- Then, install the downloaded packages once again.
Way-6: Determine if recently installed software is not creating a problem
Determine whether a recent software installation is not faulty for AMD Drivers won’t install error. If found then try removing it and restarting the computer.
The applications we install can cause problems when they are incompatible with other software or when they interfere with drivers or processes. If such an issue arises, uninstalling the most recent program is the best course of action.
Way-7: Keep Third-Party Antivirus Program updated
You need to ensure that the antivirus software installed on your computer is up-to-date and does not obstruct the installation of AMD drivers by hindering it in any sort.
Thus, you could either look for antivirus software updates or disable it till you install the AMD drivers and then re-install it.
Way-8: Use Device Manager to update or reinstall AMD Driver
AMD driver install crash Windows 10/11 error can be solved conventionally, just by installing a new AMD driver by following the steps mentioned below:
- Right-click the Start button and select Device Manager.
- To update the driver for your AMD graphics card, expand the Display adapters folder, then right-click the device.
- Select – Update driver.
- Choose – Search automatically for best driver.
- Restart the computer and check if the error still persists.
- In case the issue continues again launch the Device Manager.
- Right-click on the graphics card (AMD) under Display adapters.
- Select Uninstall and confirm the popup.
- Reboot the system.
- If this process fails to repair the problem install the latest version of driver from AMD official website.
Go for solutions to – Fix AuthenticAMD.sys BSOD Blue Screen Error in Windows 10 or 11.
Way-9: Roll back the driver to the previous version
Installing or upgrading to a new version of Windows may update some of erroneous drivers automatically causing this problem. Some users over various community panels have claimed that they were able to solve the issue of AMD Chipset drivers not installing by reverting to an older version of the display card driver.
As a result, rather than upgrading the graphics card driver, you can resolve the issue by downgrading it. Here are the actions you may take to do this:
- Right-click the Start button and then pick Device Manager from the context menu.
- In the Device Manager window, expand the Display adapters by double clicking on it.
- Then, right-click on the problematic adapter (AMD) and choose Properties.
- Verify that the Roll Back Driver option is active on the Driver tab.
- If it does, clicking on it may lead you to the correct version.
We believe these 9 ways should be enough to fix AMD drivers won’t install errors in your Windows 11 or 10.
Methods:
Way-1: Remove all AMD Drivers
Way-2: Try Running SFC and DISM
Way-3: Turn off Windows Defender Firewall
Way-4: Use Compatibility Mode to Install AMD Drivers
Way-5: Look Out for Visual C++ File Status
Way-6: Determine if recently installed software is not creating a problem
Way-7: Keep Third-Party Antivirus Program updated
Way-8: Use Device Manager to update or reinstall AMD Driver
Way-9: Roll back the driver to the previous version
That’s all!!
Как установить драйвер Radeon ATI x1600 Pro (PCI) на windows 10
Скачайте последний драйвер с официального сайта (самый новый для висты).
Отключите проверку обязательной подписи файлов в windows. (ищите инструкцию в инете как это сделать)
Выставьте режим совместимости в свойствах setup на Vista SP2 (второй пакет обновлений) и можете поставить галочку запуск от имени администратора.
Установку можете делать быструю, или же устанавливать через диспетчер устройств — видеоадаптер — драйвер обновить — выполнить поиск на этом компьютере — выбрать драйвер из списка доступных драйверов — установить с диска и указываете в распакованной папке ваш драйвер \10-2_legacy_vista32-64_dd_ccc\Packages\Drivers\Display\LH6A_INF\CH_95951.inf
При этом способе openGl работает на windows 10 старее версии 1909.
Если новее нужно заменить файлы (указал ниже какие).
proffy писал(а):
Оформлю инструкцию по установке старых версий Catalyst в Windows 10:
Можете добавить в инструкцию.
Но у меня не получилось openGL запустить, ниже подробней:
uch93166 писал(а):
правда пришлось восстанавливать работу OpenGL
Я пробовал разные версии 6,14,10,13399 и 8545 и ту из шапки 11672
Копировал в c:\Windows\SysWOW64\atioglxx.dll
Но при попытке зарегистрировать dll через cmd
%windir%\System32\regsvr32.exe /u Atioglxx.dll
%windir%\System32\regsvr32.exe /i Atioglxx.dll
для 64 бит
%windir%\SysWoW64\regsvr32.exe /u Atioglxx.dll
%windir%\SysWoW64\regsvr32.exe /i Atioglxx.dll
пишет
Модуль загружен но точка входа не найдена
или не удалось загрузить модуль
Furmark говорит что нету openGL 2
Что интересно, на другом windows 10 сразу заработал open gl.
Может это потому, что с версии вин10 1909 opengl32.dll встроенный в систему по умолчанию, и он как раз несовместим с тем?
Есть идея заменить системные файлы, чтобы вернуть opengl на совместимый, потому что если скопировать opengl32.dll со старой windows 10 то он не работает.
Решение для windows 10 1909 или новее
Удалите старый драйвер.
Затем нужно заменить файлы
c:\Windows\System32\glu32.dll
c:\Windows\System32\opengl32.dll
c:\Windows\SysWOW64\glu32.dll
c:\Windows\SysWOW64\opengl32.dll
На файлы от виндовс 10 версии 1903:
(glu32.dll и opengl32.dll версии 10.0.18362.1 от 19,03,2019)
Это можно сделать с помощью загрузочной флешки с файловым менеджером или windows PE. (AdminPE или hirens boot cd)
Еще можно с помощью утилиты run as trusted installer от winaero запустить тотал коммандер с повышенными правами системы (если прав администратора не достаточно).
Сохраните оригинальные файлы, в случае чего (0x000021 BSOD если система не грузится даже в безопасном режиме) можно так же удалить видеодрайвер c:\Windows\System32\drivers\atikmdag.sys
Ну и устанавливаете драйвер с совместимостью vista sp2 и от имени админа как писал выше.
Если после установки драйвера пишет «ошибка Невозможно загрузить файл или сборку Mom implementation», можете удалить Catalyst Control Center.
Последний раз редактировалось konstantinqq 14:12 21.06.2022, всего редактировалось 15 раз(а).
Все способы:
- Почему не устанавливаются драйвера
- NVIDIA
- AMD
- Intel
- Ноутбуки
- Windows 10
- Вопросы и ответы: 31
Ситуации с невозможностью установки драйвера на видеокарту встречаются очень часто. Такие проблемы всегда требуют немедленного решения, поскольку без драйвера вместо видеокарты мы имеем просто немного весьма дорогостоящих железок.
Причин, почему программное обеспечение отказывается устанавливаться, достаточно много. Разберем основные.
Почему не устанавливаются драйвера
- Первая и самая распространенная у новичков причина – невнимательность. Это значит, что, возможно, Вы пытаетесь установить не подходящий к оборудованию или к операционной системе драйвер. ПО в таких случаях может «ругаться» на то, что система не отвечает минимальным требованиям, либо на отсутствие необходимого оборудования.

Решением проблемы может стать поиск актуального программного обеспечения вручную на сайтах производителей оборудования.
Подробнее: Узнаем, какой драйвер нужен для видеокарты
- Вторая причина – неисправность видеокарты. Именно физическая поломка адаптера – это первое, на что должно пасть подозрение, поскольку в этом случае может быть потрачено большое количество времени и сил на решение проблемы, а результата не будет.
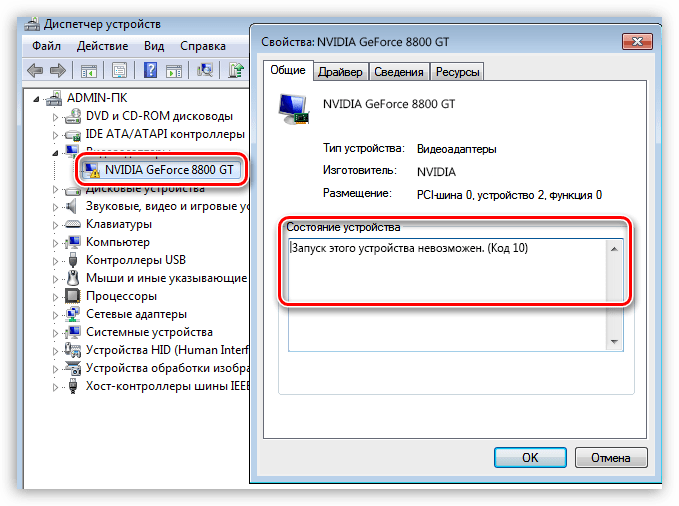
Первый признак неисправности адаптера – наличие ошибок с кодами 10 или 43 в его свойствах в «Диспетчере устройств».

Подробнее:
Ошибка видеокарты: это устройство было остановлено (код 43)
Исправляем ошибку видеокарты с кодом 10Проверка на исправность происходит просто: видеокарта подключается к другому компьютеру. Если ситуация повторяется, значит налицо поломка.
Подробнее: Поиск и устранение неисправностей видеокарты
Еще одна аппаратная причина – выход из строя слота PCI-E. Особенно часто такое наблюдается, если ГПУ не имеет дополнительного питания, из чего следует, что вся нагрузка ложится на слот. Проверка аналогичная: пробуем подключить карту к другому разъему (если есть), либо находим рабочее устройство и проверяем с ее помощью работоспособность PCI-E.
- Одна из неочевидных причин – отсутствие или несовместимость вспомогательного ПО, такого, как .NET Framework. Это программная среда, в которой работает некоторое программное обеспечение. Например, Панель управления NVIDIA не запустится, если .NET Framework не установлен или устарел.
Решение простое: установить последнюю версию программной среды. Скачать последнюю версию пакета можно на официальном сайте Microsoft.
Подробнее: Как обновить .NET Framework
- Далее идут различные «софтовые» причины. Это, в основном, оставшиеся в системе старые драйверы или их остатки, некорректные установки другого программного обеспечения для чипсета и встроенного видео (в ноутбуках).
Подробнее: Не устанавливается драйвер на видеокарту NVIDIA: причины и решение
- Особняком стоят ноутбуки. Все драйверы лэптопов разработаны специально для данного девайса и другое ПО может быть попросту несовместимым с другим софтом или железом ноута.
Далее поговорим о причинах и решениях подробнее.
NVIDIA
Программное обеспечение «зеленых», при всей простоте использования («установил и пользуйся»), может быть довольно чувствительным к различным системным факторам, таким как ошибки, конфликты ПО, некорректная установка или деинсталляция предыдущих редакций или дополнительного софта.
Подробнее: Разбор ошибок при установке драйверов NVIDIA
AMD
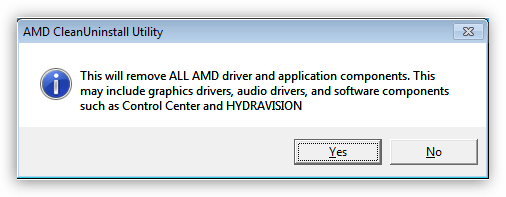
Главная проблема при установке драйверов от «красных» — присутствие старого программного обеспечения. Именно по этой причине ПО AMD может отказаться устанавливаться в систему. Выход прост: перед инсталляцией нового софта нужно полностью удалить старый. Проще всего это сделать при помощи официальной программы AMD Clean Uninstall.
Скачать AMD Clean Uninstall
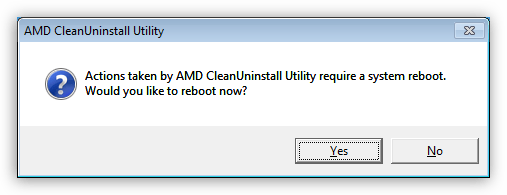
- После запуска скачанной утилиты появится окно с предупреждением, что сейчас будут удалены все компоненты AMD.

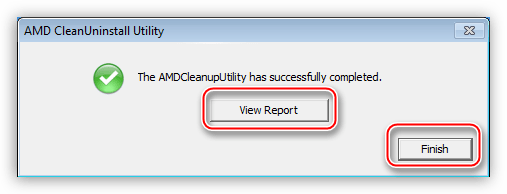
- После нажатия кнопки ОК программа будет свернута в системный трей и процесс удаления будет происходить в фоновом режиме.
Проверить, работает ли утилита, можно, наведя курсор на ее иконку в лотке.
- По завершению процесса мы можем просмотреть отчет о проделанной работе, нажав на кнопку «View Report», либо завершить работу программы кнопкой «Finish».

- Завершающим шагом будет перезагрузка системы, после чего можно устанавливать новые драйвера AMD.

Обратите внимание, что данное действие полностью удалит из системы компоненты AMD, то есть, не только программу для дисплея, но и другое ПО. Если Вы пользуетесь платформой от Intel, то способ Вам подходит. Если же Ваша система построена на базе AMD, то лучше воспользоваться другой программой под названием Display Driver Uninstaller. Как пользоваться этим софтом, можно прочитать в данной статье.
Intel
Проблемы с установкой драйверов на встроенную графику от Intel встречаются довольно редко и в основном носят комплексный характер, то есть, являются следствием некорректной инсталляции другого программного обеспечения, в частности, для чипсета. Такое чаще всего встречается во время обновления софта на ноутбуках, о чем мы поговорим ниже.
Ноутбуки
В данном разделе поговорим о порядке установки драйверов на ноутбук, так как именно здесь кроется «корень зла». Главной ошибкой при решении проблем с программным обеспечением ноутов является «перебирание», то есть попытки установить разное ПО, если «это не заработало». Именно такие советы можно получить на некоторых форумах: «а этот ставил?», «вот этот еще попробуй». Результатом таких действий в большинстве случаев становится потеря времени и синий экран смерти.
Разберем частный случай с лэптопом Lenovo, на котором установлена видеокарта AMD и встроенное графическое ядро Intel.
Как уже было сказано выше, необходимо соблюдать очередность инсталляции ПО.
- В первую очередь устанавливаем драйвер для набора микросхем материнской платы (чипсета).
- Затем ставим программное обеспечение для встроенной графики Intel.
- Последним устанавливается драйвер для дискретной видеокарты.
Итак, приступим.
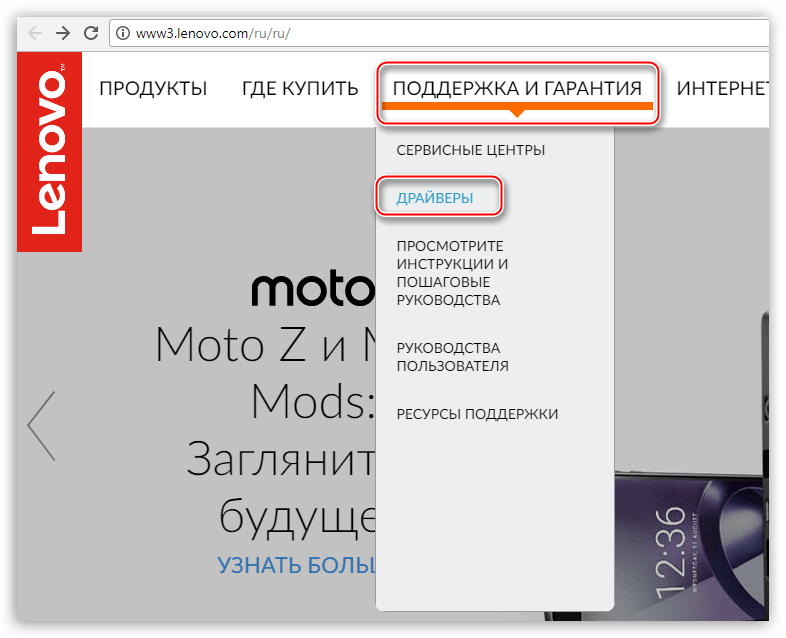
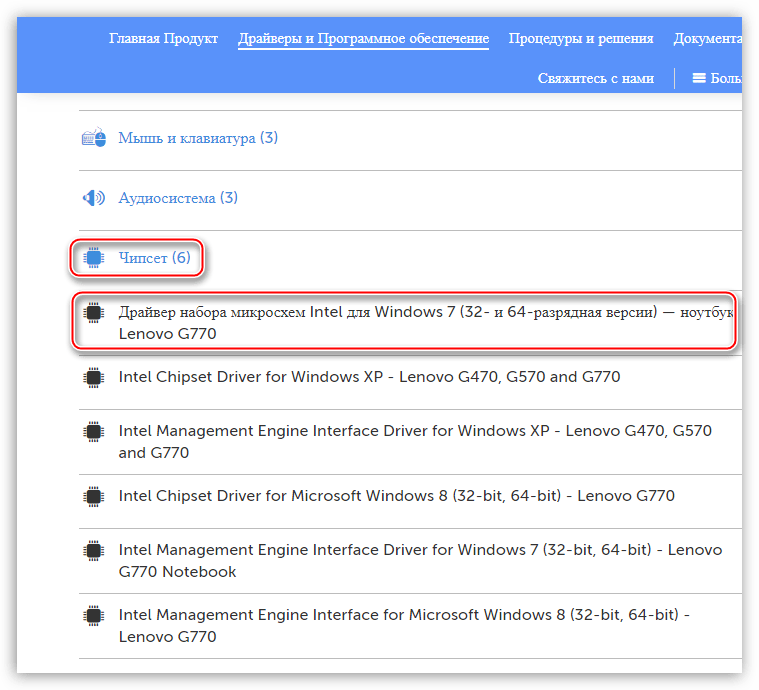
- Переходим на официальный сайт Леново, находим ссылку «Драйверы» в меню «Поддержка и гарантия».

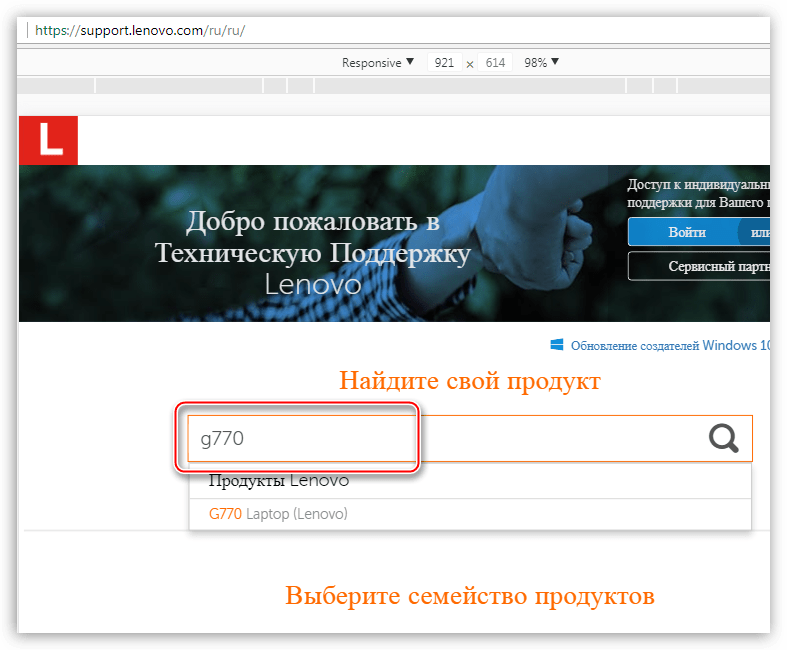
- На следующей странице вводим модель нашего ноута и нажимаем ENTER.

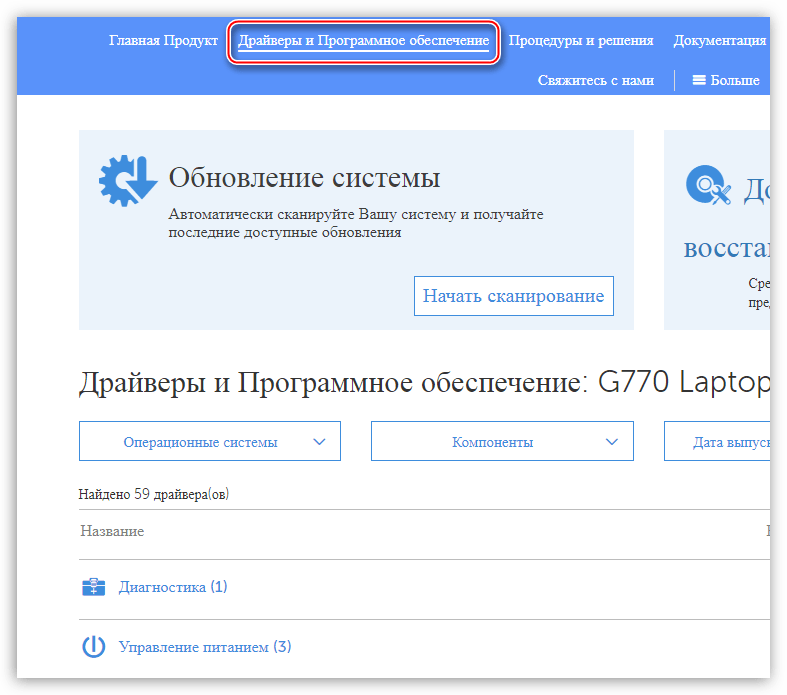
- Далее необходимо перейти по ссылке «Драйверы и программное обеспечение».

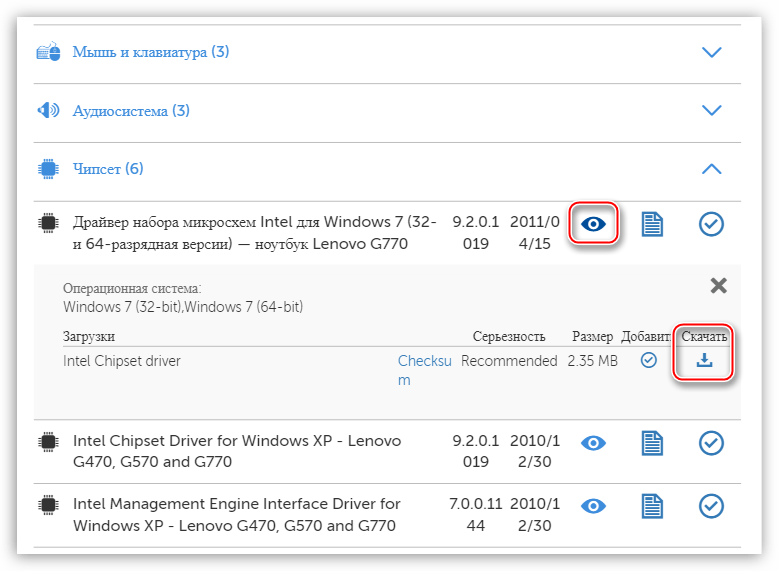
- Прокручиваем страницу вниз и находим блок с названием «Чипсет». Открываем список и находим драйвер для нашей операционной системы.

- Нажимаем на значок глаза напротив названия ПО, а затем жмем на ссылку «Скачать».

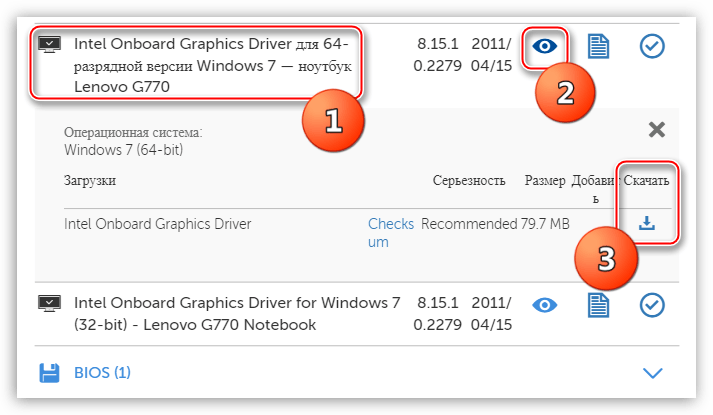
- Таким же образом скачиваем программное обеспечение для встроенного видеоядра Intel. Находится оно в блоке «Дисплей и видеокарты».

- Теперь устанавливаем по очереди драйвер для чипсета, а затем для интегрированного графического ядра. После каждой установки в обязательном порядке следует перезагрузка.
- Завершающим шагом будет установка программного обеспечения для дискретной видеокарты. Здесь уже можно воспользоваться ПО, скачанным вручную с официального сайта AMD или NVIDIA.
Windows 10
Желание разработчиков Microsoft автоматизировать все и вся часто приводит к некоторым неудобствам. Например, в «десятке» предусмотрено обновление драйверов видеокарты через стандартный центр обновлений Windows. Попытки установить программное обеспечение вручную могут приводить к ошибкам, вплоть до невозможности инсталляции. Поскольку драйвер — это набор системных файлов, то ОС таким образом «ограждает» нас от неправильного с ее точки зрения софта.
Выход здесь один: вручную проверить наличие обновлений и установить драйвер.
Подробнее: Обновление Windows 10 до последней версии
Как видите, ничего страшного в установке драйверов нет, главное соблюдать несложные правила и систематизировать действия.
Наша группа в TelegramПолезные советы и помощь
kingfish
MVP
- Mark as New
- Bookmark
- Subscribe
- Mute
- Subscribe to RSS Feed
- Permalink
- Report Inappropriate Content
04-30-2021
04:40 PM
Put a copy of AMD exe/start in the ‘startup’ folder then reboot.
0
Likes
Reply
Todeskult
In response to kingfish
Adept I
- Mark as New
- Bookmark
- Subscribe
- Mute
- Subscribe to RSS Feed
- Permalink
- Report Inappropriate Content
04-30-2021
05:13 PM
What you mean by AMD exe ? There’s no such file in the system. Afaik «RadeonSoftware.exe» starts the app, but somehow it’s not during the startup. I have already bug reported this to AMD, meanwhile I have added it to «Run» registry folder of HKEY_CURRENT_USER tree.
0
Likes
Reply
kingfish
In response to Todeskult
MVP
- Mark as New
- Bookmark
- Subscribe
- Mute
- Subscribe to RSS Feed
- Permalink
- Report Inappropriate Content
04-30-2021
05:36 PM
https://www.techulator.com/resources/3018-How-to-add-programs-to-startup-in-Windows-7.aspx
0
Likes
Reply
Todeskult
In response to kingfish
Adept I
- Mark as New
- Bookmark
- Subscribe
- Mute
- Subscribe to RSS Feed
- Permalink
- Report Inappropriate Content
04-30-2021
05:47 PM
Oh, I know it will work but not entirely correct: the app will start in foreground, instead being minimized / visible only in system tray.
0
Likes
Reply
kingfish
In response to Todeskult
MVP
- Mark as New
- Bookmark
- Subscribe
- Mute
- Subscribe to RSS Feed
- Permalink
- Report Inappropriate Content
04-30-2021
06:07 PM
I have win7 and a RX580….this works for me. I don’t care if I have to close the app on start up.
0
Likes
Reply
Todeskult
In response to kingfish
Adept I
- Mark as New
- Bookmark
- Subscribe
- Mute
- Subscribe to RSS Feed
- Permalink
- Report Inappropriate Content
04-30-2021
06:50 PM
OK, it looks like I have fixed it by doing some Google research:
Have added the following string to [HKEY_CURRENT_USER\Software\Microsoft\Windows\CurrentVersion\Run]:
«C:\Program Files\AMD\CNext\CNext\RadeonSoftware.exe\» atlogon
3
Likes
Reply
KingYIEH
In response to Todeskult
Adept I
- Mark as New
- Bookmark
- Subscribe
- Mute
- Subscribe to RSS Feed
- Permalink
- Report Inappropriate Content
04-27-2023
04:39 AM
Dude you are a legend
0
Likes
Reply
Sebula
In response to Todeskult
Journeyman III
- Mark as New
- Bookmark
- Subscribe
- Mute
- Subscribe to RSS Feed
- Permalink
- Report Inappropriate Content
06-19-2023
04:42 PM
Hi I’m a little nervous of registry edits. Is that what this is? If so could you explain in a couple steps where to put this in? tyty
Mine stopped after I had to do a reinstall.
0
Likes
Reply
G7
In response to Todeskult
Adept I
- Mark as New
- Bookmark
- Subscribe
- Mute
- Subscribe to RSS Feed
- Permalink
- Report Inappropriate Content
10-12-2024
03:32 AM
Works Great!!!!
0
Likes
Reply
SeismicForce
Adept III
- Mark as New
- Bookmark
- Subscribe
- Mute
- Subscribe to RSS Feed
- Permalink
- Report Inappropriate Content
04-27-2023
07:20 AM
Wouldn’t this exe start minimized instead of using RadeonSoftware.exe?
C:\Program Files\AMD\CNext\CNext\LauncherRSXRuntime.exe
At least it works via the Startup folder method. I’ll try it later and see.
AMD RX 6950 XT 16GB Reference GPU
0
Likes
Reply
Quick Tips
- You will need an administrator account to fix this problem.
- AMD Radeon Software is the same as AMD Adrenalin Edition.
- Create a Restore point before making changes to the Registry.
Fix 1: Run AMD Radeon Software With Admin Privileges
If your AMD Adrenalin software is not working or opening, one of the initial fixes to perform is to run it as an administrator to ensure there is no restriction.
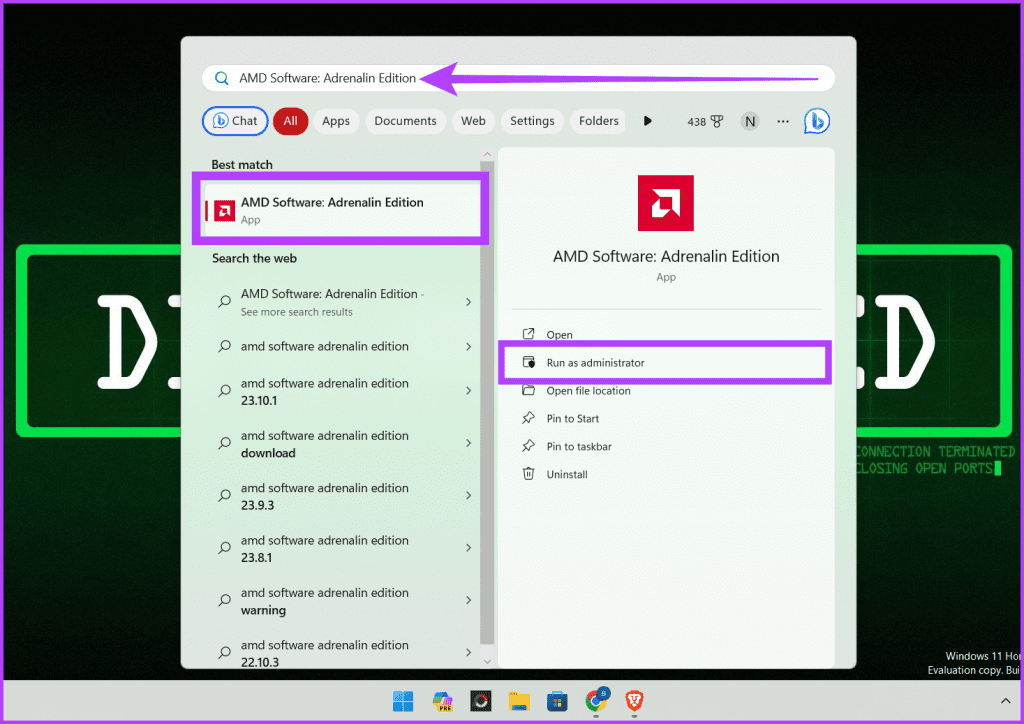
Step 1: Press Win + S and type AMD Software: Adrenalin Edition.
Step 2: Once it appears on the list, click Run as administrator. In the UAC prompt, choose Yes.
If you open the software often, create a shortcut to launch it with admin permission or create a task to launch after the PC starts with the required permission.
Fix 2: Terminate Radeon Software Processes
If the AMD Radeon Software is running in the background but not responding, opening the app will make it look as if it is not opening. It’s best to terminate the app and relaunch it.
Step 1: Launch the Task Manager by pressing Ctrl + Shift + Esc and switch to the Processes tab.
Step 2: Locate the AMD software in the Apps section; right-click on it and choose End Task to stop it.
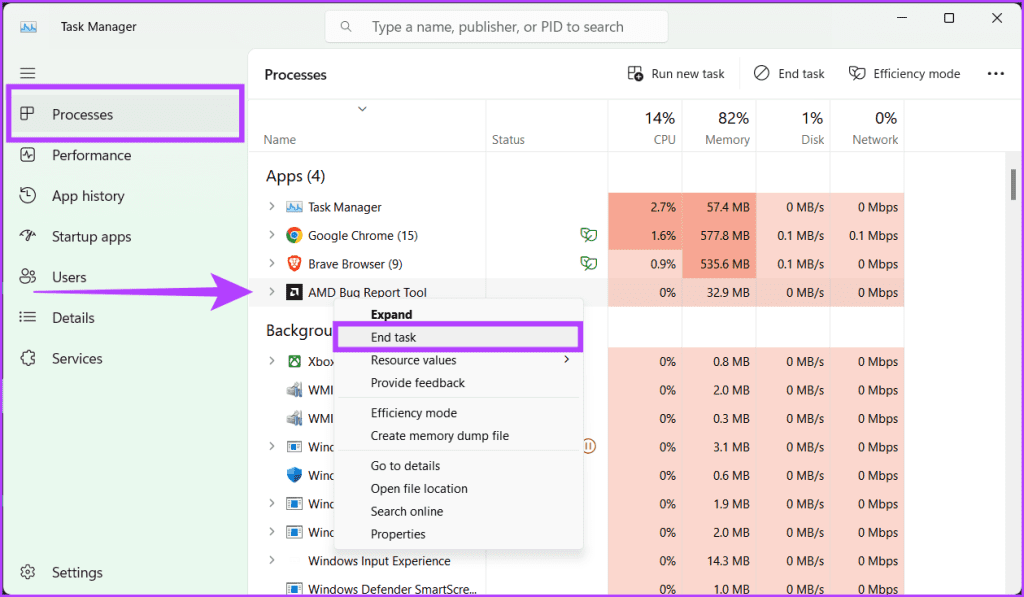
Step 3: Check the Background processes section for any AMD-related processes and close them by right-clicking and choosing End Task.
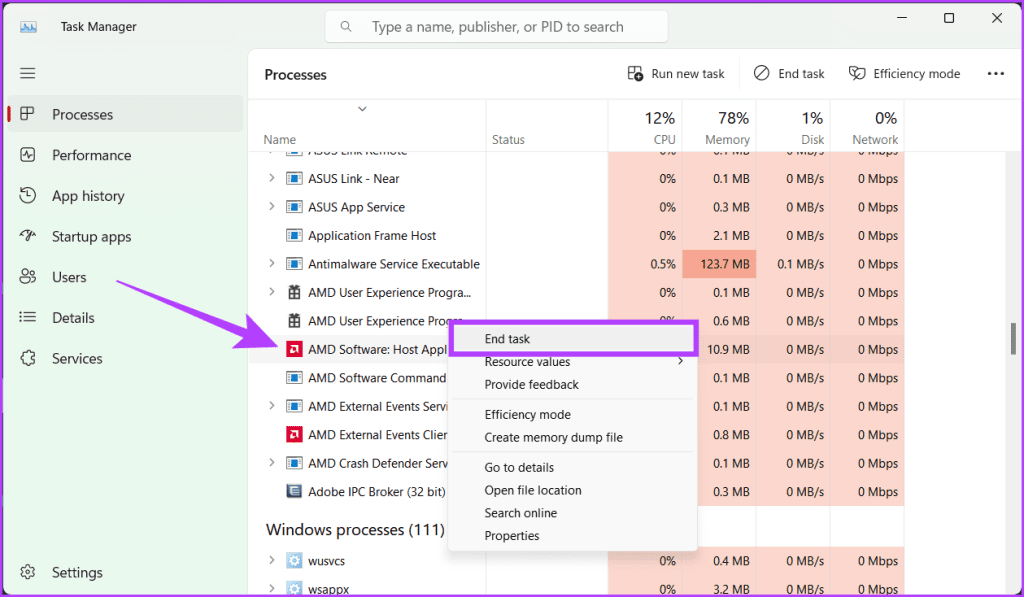
Step 4: Relaunch the AMD Radeon Software, which should start fresh without glitches.
Fix 3: Update or Reinstall the Graphics Driver
The driver may be outdated, so the first check is to update it by downloading it from the AMD driver page and then running the installer.
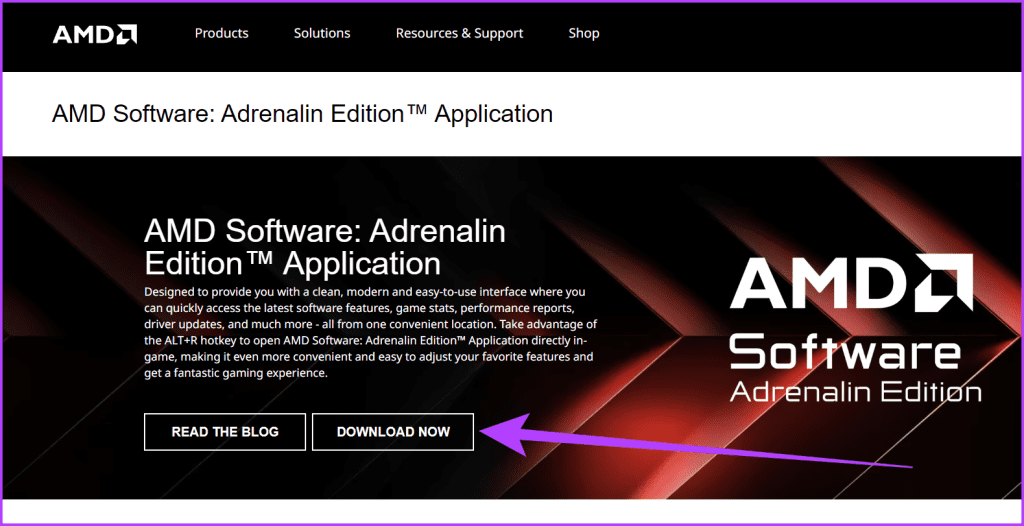
If this doesn’t solve the problem, uninstall the driver and reinstall everything.
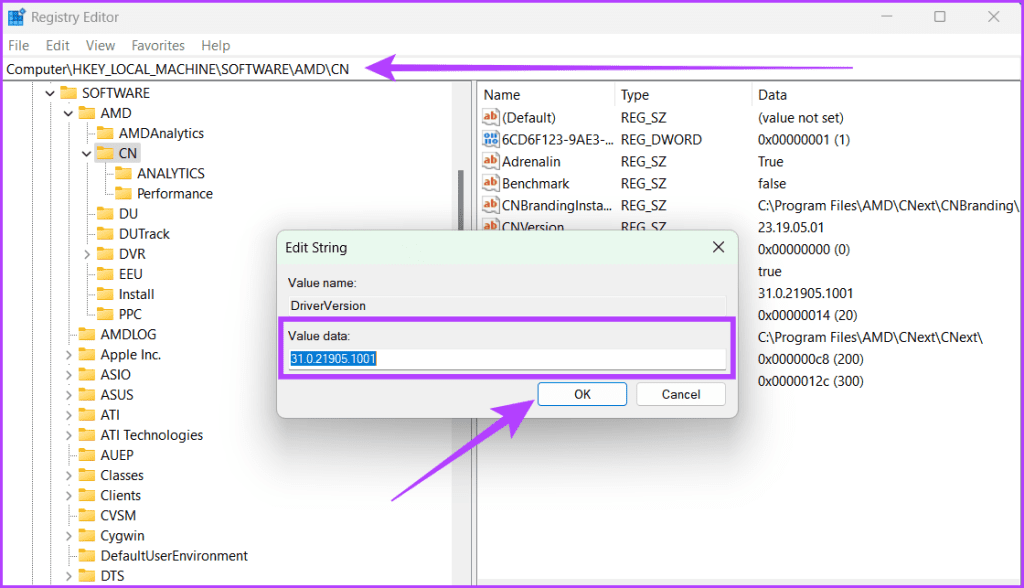
Fix 4: Modify CN Registry Key
Modifying the CN Registry Key is a quick and effective fix for the AMD Radeon software not working on Windows error. This method involves editing a specific registry entry to synchronize the software’s version with the installed drivers.
This mismatch often causes the software to malfunction, preventing you from accessing its features.
Step 1: Press Windows + X on your keyboard and select Device Manager. If prompted, select yes to launch the app and make modifications.
Alternatively, you can right-click the Windows icon and choose Device Manager.
Step 2: Expand the Display adapters listing and double-click on AMD Radeon.

Step 3: Go to the Driver tab. Copy the number next to the Driver version and close the properties window and the Device Manager tool.

Step 4: Open Registry Editor using the Start menu and navigate to the below-mentioned path:
HKEY_LOCAL_MACHINE\SOFTWARE\AMD\CN
Step 5: Double-click the DriverVersion string on the pane’s right side. Hit backspace on your keyboard to clear the existing data.
Step 6: Paste the driver version number in that box and click OK to save changes.
Fix 5: Delete CN Folder
The CN folder contains the configuration files and settings for the Radeon Software, and if it gets corrupted or misconfigured, the software will malfunction. However, deleting this folder can reset the Radeon software’s default settings, eliminating any glitches or conflicts causing the issue.
Step 1: Open the Run box by pressing the Windows + R key on your keyboard.
Step 2: Type %localappdata% and click OK.
Step 3: Head to the AMD folder, select the CN folder, and click the Delete button (trash icon).
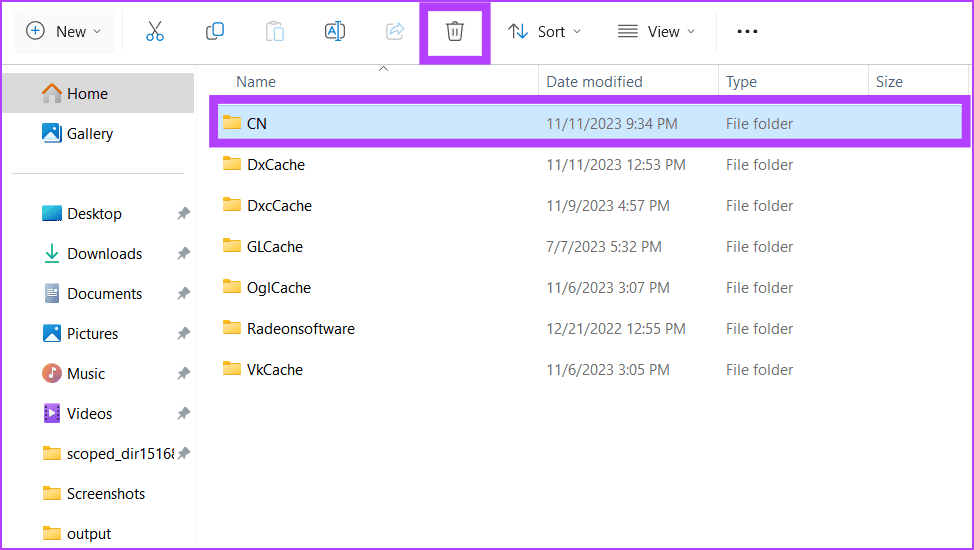
Restart your PC and relaunch the AMD Radeon software, and it will rebuild the CN folder.
Fix 6: Rebuild Radeon Profiles
AMD Radeon profiles in Windows are predefined settings that can be applied to your AMD Radeon graphics card to optimize its performance for specific tasks or applications.
However, if you’re facing issues with your software and don’t want to delete the entire CN folder from your computer, rebuilding the Radeon profile from scratch is a good option.
Step 1: Open the Run prompt, type %localappdata%/AMD/CN, and click OK.
Step 2: Select gmdb.blb and delete the file.

Fix 7: Rename Epic Games Launcher Log Files
Many forum users have reported that renaming the log file in the Epic Games launcher can fix the issue.
Step 1: Close all instances of Epic Games Launcher.
Step 2: Go to the following folder location in File Explorer:
explorer%localappdata%\EpicGamesLauncher\SavedStep 3: Rename the Logs folder to anything else like Logsbk, and open the Radeon Software.
It should work if the reason for you was AMD Radeon Graphics software interfering with the Epic Games launcher.
Was this helpful?
Thanks for your feedback!
The article above may contain affiliate links which help support Guiding Tech. The content remains unbiased and authentic and will never affect our editorial integrity.