
Дотошные пользователи Windows 10 могли заметить, что при установке jpeg изображения в качестве обоев рабочего стола, качество изображения несколько ухудшается по сравнению с оригинальной картинкой. Особенно сильно увеличение количества артефактов изображения заметно на больших мониторах. Проблема, в общем, не нова и наблюдалась еще в Windows 7 и в Windows 8, в которых также качество изображения снижается на 15%. Но только в Windows 10 появилась возможность управления этим поведением системы.
При установке jpeg изображения в качестве обоев рабочего стола, Windows автоматически уменьшает его качество до 85%. Соответственно уменьшается и размер файла. Делается это для того, чтобы уменьшить количество выделяемой памяти под обои и для экономии места на диске. Таким образом, MS пытается достичь оптимального компромисса между качеством картинки, размером изображения и производительностью системы.
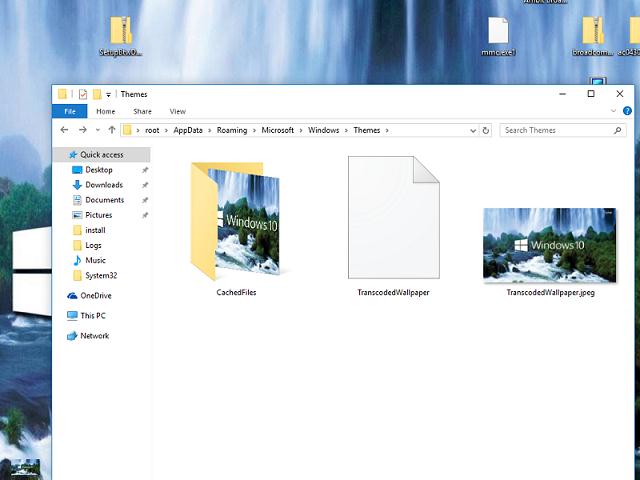
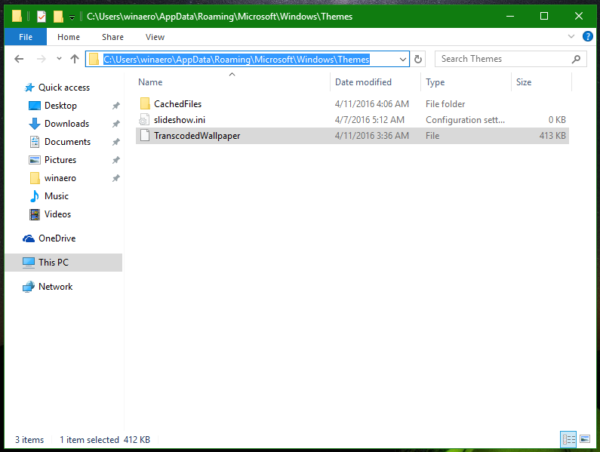
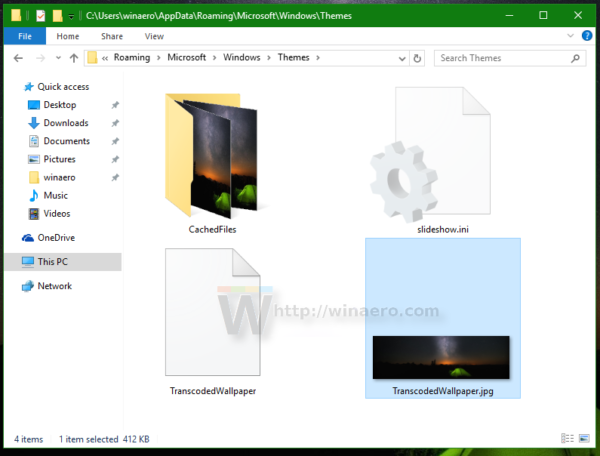
Система хранит сконвертированный файл в каталоге C:\Users\%username%\AppData\Roaming\Microsoft\Windows\Themes\ в файле с именем TranscodedWallpaper. Если изменить расширение данного файла на *.jpg, можно будет посмотреть используемую в качестве обоев картинку.
Управлять степенью сжатия изображения можно только через реестр.
- Откройте редактор реестра (regedit.exe)
- Перейдите в ветку HKEY_CURRENT_USER\Control Panel\Desktop
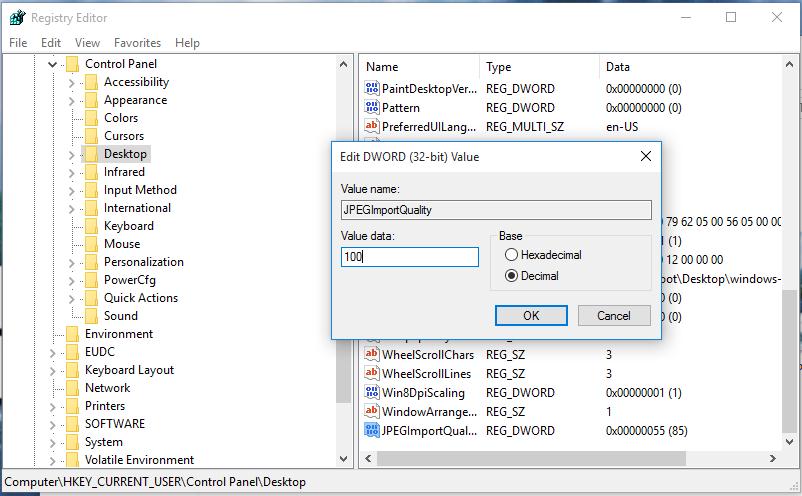
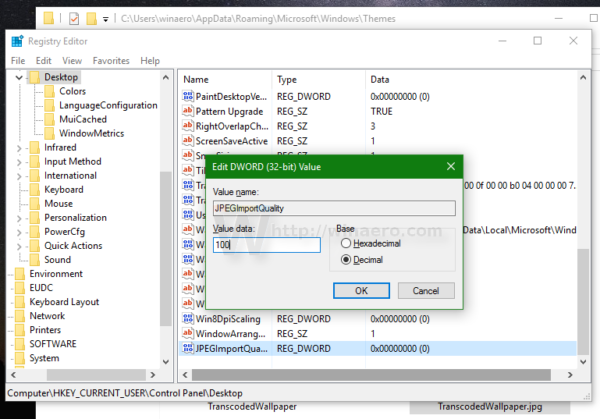
- Создайте новый параметр типа 32-bit DWORD с именем JPEGImportQuality
- Значение этого параметра может быть между 60 и 100 (в десятичной системе). Значение 100 означает использование максимального качества обоев рабочего стола (без компрессии). По-умолчанию система использует значение 85.

- Выполните выход из системы
- После входа, установите нужную картинку в качестве фона рабочего стола. Она должна отображаться без сжатия.
Примечание. В Windows 7/8 данный ключ реестра работать не будет. В качестве обходного решения можно заменить файл TranscodedWallpaper оригинальным файлом изображения (100% качество). Также нужно заменить файл в каталоге CachedFiles . Имя используемого файла фона можно определить по имени, в котором должно содержаться текущее разрешение экрана, например, CachedImage_1280_1024_POS4.jpg.
In case you don’t know, Windows 10 reduces the quality of JPEG images you set as the desktop background. If you compare the original image and the wallpaper, you can see that the wallpaper has minor JPEG artifacts. The issue is not new to Windows 10 — Windows 8 and Windows 7 are also affected by this issue. But Windows 10 is the first version where a solution is available. Let’s see how to disable wallpaper JPEG quality reduction in Windows 10.
First, let me explain why Windows does this. When you are setting a JPEG image as the Desktop background, Windows reduces its quality to 85%. This allows the operating system to save RAM while showing the Desktop background image, when cycling wallpapers during the Desktop slideshow. It also saves disk space and the image will be processed faster because it’s smaller in size. The processed image will be stored in the following file:
C:\Users\your_user_name\AppData\Roaming\Microsoft\Windows\Themes\TranscodedWallpaper
You can add a JPG extension to the file name and open it in your favorite image viewer to see it.
By default, the processed image quality is reduced to 85%. Microsoft considers this value as a compromise between the image quality and the file size.
In Windows 10, this value can be changed. While there is no GUI for this feature, it can be done via a Registry tweak.
To disable wallpaper JPEG quality reduction in Windows 10, do the following.
- Open Registry Editor.
- Go to the following Registry key:
HKEY_CURRENT_USER\Control Panel\Desktop
Tip: See How to jump to the desired Registry key with one click.
- Create a new 32-bit DWORD value here called JPEGImportQuality and set its value data from anywhere between 60 to 100 in decimals. A lower value means lower image quality. A value of 100 means maximum quality without any compression. 100 is the most suitable value for users who are not happy with the default image quality, which is 85.

Note: Even if you are running 64-bit Windows, you still need to create a 32-bit DWORD value.
- Sign out from your user account and sign in back in Windows 10.
- Now, set the desired wallpaper once again to make Windows 10 use the new image quality setting.
You are done. To avoid manual Registry editing, you can do the following.
You can either download ready-to-use Registry files from here:
Download Registry Files
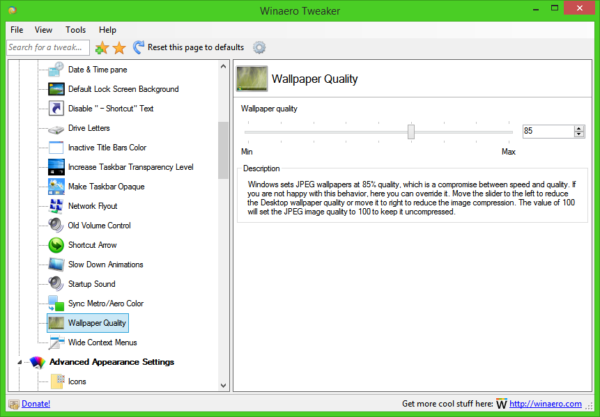
Or an easier way is to use my freeware app Winaero Tweaker. With Winaero Tweaker 0.5.0.5, you will be able to adjust the wallpaper image quality easily using the following user interface:
That’s it.
Support us
Winaero greatly relies on your support. You can help the site keep bringing you interesting and useful content and software by using these options:
If you like this article, please share it using the buttons below. It won’t take a lot from you, but it will help us grow. Thanks for your support!
- Компьютеры
- Cancel
Windows 10 автоматически сжимает изображения обоев и уменьшает его до 85% от исходного. Это немного повышает производительность, но часто сильно сказывается на качестве картинки. Если у вас большой монитор с хорошими характеристиками (а так же мощный компьютер), то сжатие имеет смысл отключить. Для этого:
Оригинал: http://levashove.ru/kak-uluchshit-kachestvo-fona-rabochego-stola-v-windows-10/
- Нажмите Win + R, чтобы открыть окно «Выполнить».
- Введите
regeditи нажмите Enter, чтобы открыть редактор реестра. - Перейдите к разделу
HKEY_CURRENT_USER\Control Panel\Desktop. - На правой панели щелкните правой кнопкой мыши и создайте новый 32-битный параметр DWORD.
- Назовите его JPEGImportQuality.
- Значение этого параметра лежит между 60 и 100. По умолчанию это значение равно 85 — сжатие составляет 85%. Установите значение 100.
- Нажмите кнопку ОК и закройте редактор.
- Перезагрузите компьютер.
- Установите изображение, которое вы хотели бы использовать в качестве обоев.

Кстати, Windows 10 хранит все фоновые изображения в C:\Users\%username%\AppData\Roaming\Micr. Для того, чтобы открыть их для просмотра, измените расширение нужного файла на .jpg.
Disable Desktop Wallpaper JPEG Quality Reduction in Windows 10: Whenever you set a JPEG image as desktop wallpaper you might have noticed that the desktop wallpaper isn’t as sharp as the original image, in short, the quality of the image is not same. This is because whenever you set a JPEG as wallpaper, Windows 10 automatically compresses and reduces the quality of the original image before setting it as the desktop wallpaper. This is done by the operating system in order to save disk space and improve the performance of Windows while displaying the desktop wallpaper image.
When you set a JPEG image as the desktop wallpaper or slideshow, the operating system imports the reduce quality of the original image and store it as the TranscodedWallpaper file in the %AppData%\Microsoft\Windows\Themes folder. Once this happens, Windows uses this image file from the TranscodedWallpaper file cache to set the desktop background.

Now, this feature is very important for a PC with moderate specifications but if you have excellent hardware then this doesn’t make sense as you can have the full HD wallpaper without any quality reduction as your desktop wallpaper. Unfortunately, Windows 10 doesn’t offer a method to disable the JPG wallpaper quality reduction in Settings but a registry fix can help you to disable this automatic image compression. So without wasting any time let’s see How to Disable Desktop Animated Wallpaper JPEG Quality Reduction in Windows 10 with the help of the below-listed tutorial.
Make sure to create a restore point just in case something goes wrong.
1.Press Windows Key + R then type regedit and hit Enter to open Registry Editor.
2.Navigate to the following registry key:
HKEY_CURRENT_USER\Control Panel\Desktop
3.Right-click on Desktop then select New > DWORD (32-bit) Value.

Note: Even if you are on a 64-bit Windows, you still need to create the 32-bit DWORD.
4.Name this newly created DWORD as JPEGImportQuality and hit Enter.

5.Now double-click on JPEGImportQuality DWORD and make sure the select Decimal under Base.
6.Next, under value data field change the value to 100 and click OK.
Note: By default value is 85 which means that the image compression is set to 85%, a lower value means lower image quality. A value of 100 indicates a very high-quality wallpaper with no image compression.
7.Once finished, close Registry Editor.
8.Again set the desired wallpaper to make sure Windows uses the new image quality.
9.Reboot your PC to save changes.
If in future, you need to revert the changes then simply navigate to HKEY_CURRENT_USER\Control Panel\Desktop then right-click on JPEGImportQuality DWORD and select Delete. Also, keep in mind that the above settings are valid only for JPEG image files. If you’re using a PNG file to set the desktop background then you don’t need to change any settings as Windows 10 doesn’t compress PNG files.

Recommended:
- Disable Desktop Background Image in Windows 10
- Remove the Internet Explorer icon from Desktop in Windows 10
- Prevent User From Changing Desktop Icons in Windows 10
- How to Change Desktop Wallpaper in Windows 10
That’s it you have successfully learned How to Disable Desktop Wallpaper JPEG Quality Reduction in Windows 10 but if you still have any queries regarding this tutorial then feel free to ask them in the comment’s section.