
Removing a yellow border on Windows 10 is not as daunting as it might seem. Often, this border is caused by features like Windows Narrator or high contrast settings. To remove it, you can check your ease of access settings, turn off the Narrator, or adjust your display settings. Follow the simple steps below, and you’ll have your screen back to normal in no time.
The following steps provide a detailed guide to getting rid of that pesky yellow border around your screen on Windows 10. Whether it’s caused by accessibility features or display settings, these steps will help you tackle it head-on.
Step 1: Open Settings
Head to your computer’s settings by clicking on the Start Menu and selecting the gear icon.
This is the main hub where you can adjust various settings on your computer. Think of it as the control center for personalizing and optimizing your Windows experience.
Step 2: Navigate to Ease of Access
Within the settings menu, choose the “Ease of Access” option.
The Ease of Access settings are designed to help users with disabilities, but they sometimes alter visual settings like screen borders.
Step 3: Turn Off Narrator
In the Ease of Access settings, go to the Narrator section and toggle it off.
The Narrator can sometimes trigger a yellow border. If it’s turned on, shutting it down might instantly fix your problem.
Step 4: Check High Contrast Settings
Still under Ease of Access, click on “High Contrast” and make sure it’s turned off.
High contrast settings could be another culprit. While it’s helpful for readability, it might be causing the yellow border.
Step 5: Restart Your Computer
Finally, restart your computer to apply the changes.
Restarting ensures all the new settings are implemented correctly. It’s like giving your computer a fresh start.
Once you’ve completed these steps, your screen should return to its normal appearance without the yellow border. Your computer should look just the way it did before the border appeared.
Tips for Removing Yellow Border Windows 10
- Always check the Ease of Access settings first, as they’re the most common source of the yellow border.
- If the border persists, double-check your display settings for any unusual adjustments.
- Keep your Windows 10 updated to ensure you have the latest features and bug fixes.
- Use a different user account to see if the problem is specific to your account.
- Consider running a malware scan, as some visual changes can be caused by malicious software.
Frequently Asked Questions
Why does my Windows 10 have a yellow border?
The yellow border often signals accessibility features like Windows Narrator or high contrast settings, which are designed to improve usability for those with disabilities.
How do I know if the Narrator is causing the yellow border?
Check the Ease of Access settings under the Narrator section. If it’s on, turning it off might solve the issue.
Can a yellow border be caused by a display issue?
Yes, sometimes your display settings might be misconfigured or incompatible with certain software, leading to visual anomalies like a yellow border.
What should I do if the border doesn’t disappear after following the steps?
Try running a system scan for malware or reach out to Microsoft Support for further assistance.
Could a recent Windows update cause the yellow border?
It’s possible if the update included changes to accessibility or display settings. Checking and adjusting these settings might help.
Summary
- Open Settings.
- Navigate to Ease of Access.
- Turn Off Narrator.
- Check High Contrast Settings.
- Restart Your Computer.
Conclusion
In the world of Windows 10, a yellow border can be a surprising and sometimes pesky issue. But as you’ve seen, it’s often linked to accessibility features designed to make computing easier for everyone. By following these straightforward steps, you can easily eliminate this visual hiccup and enjoy a seamless experience. Technology is like a puzzle, and solving these little quirks can be quite satisfying.
Remember, the Ease of Access settings, while incredibly useful, can sometimes change the way your computer looks. Always take a moment to check these settings first if you notice any unusual display changes.
If the yellow border persists or returns, don’t hesitate to reach out for more help. You might even consider diving deeper into the world of Windows 10 features to explore what else your computer can do. In the end, maintaining your system not only keeps it running smoothly but also ensures you’re getting the best performance possible. Happy computing!
Matt Jacobs has been working as an IT consultant for small businesses since receiving his Master’s degree in 2003. While he still does some consulting work, his primary focus now is on creating technology support content for SupportYourTech.com.
His work can be found on many websites and focuses on topics such as Microsoft Office, Apple devices, Android devices, Photoshop, and more.
8 Ways to Fix Yellow Border from Windows 10 or 11 Screen
Windows 10 and Windows 11 have been widely embraced by users around the world for their user-friendly interfaces and robust functionalities. However, occasional glitches can often trouble users, hampering their experience. One such annoyance is the yellow border that appears on the screen. In this comprehensive guide, we will explore eight effective methods to troubleshoot and resolve the yellow border issue on your Windows 10 or 11 systems.
Understanding the Yellow Border Issue
Before diving into the solutions, it’s essential to understand what the yellow border represents. There can be several reasons for its appearance, such as misconfigured display settings, driver issues, hardware problems, or software conflicts. Recognizing the underlying cause is the first step towards a proper solution.
Method 1: Adjust Display Settings
Misconfigured display settings can often cause visual irregularities. Here’s how to adjust them:
- Right-click on the Desktop: Click on an empty area of your desktop and select «Display settings».
- Screen Resolution: Ensure that the screen resolution is set to the recommended (or native) resolution of your monitor.
- Display Orientation: Check the display orientation and make sure it is set to «Landscape».
- Scaling: Ensure that the scaling percentage is set to 100% for optimal display clarity.
- Multiple Displays: If you’re using multiple screens, ensure the settings for each display are correctly configured.
After making these adjustments, restart your computer to see if the yellow border issue persists.
Method 2: Update Graphics Drivers
Outdated or incompatible graphics drivers can lead to display anomalies, including yellow borders. Here’s how to ensure your graphics drivers are up to date:
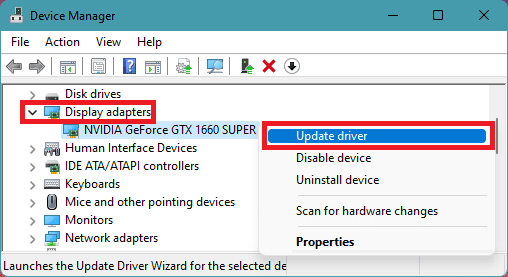
- Device Manager: Right-click on the Start button, select «Device Manager».
- Display Adapters: Expand «Display adapters» to find your graphics card.
- Update Driver: Right-click on your graphics card and select «Update driver».
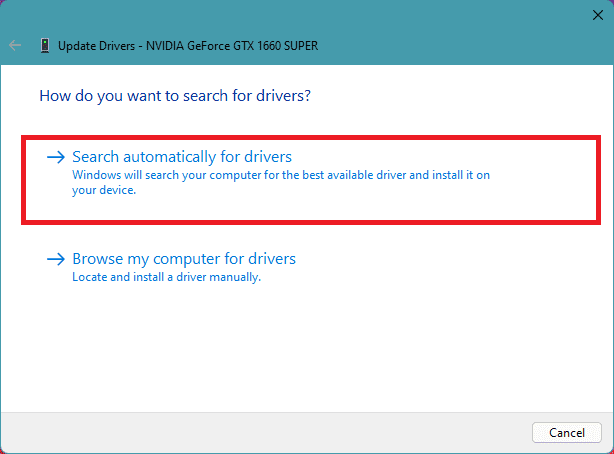
- Search Automatically: Choose the option to search automatically for updated driver software.
If any updates are found, install them and restart your PC. In some cases, you may need to visit the manufacturer’s website for the latest driver if the auto-update does not resolve the issue.
Method 3: Check for Windows Updates
Keeping your Windows operating system up to date is crucial for optimal performance and stability. Microsoft regularly issues updates that fix bugs, including display issues. Here’s how to check for updates:
- Settings: Press the Windows key + I to open the Settings app.
- Update & Security: Click on «Update & Security».
- Check for Updates: In the Windows Update tab, click on «Check for updates».
If updates are available, install them and restart your computer. After the restart, check if the yellow border is still present.
Method 4: Disable Hardware Acceleration
Hardware acceleration is designed to enhance performance, but it might cause display issues in some cases. Disabling it can be a temporary fix for the yellow border problem:
- Browser Settings (if applicable): In web browsers like Chrome or Firefox, navigate to Settings and find the hardware acceleration option. Disable it if it’s enabled.
- Application Settings: Many applications offer a hardware acceleration option. Check the settings of the applications you frequently use and disable hardware acceleration if available.
After making the adjustments, restart the applications or the PC entirely and observe whether the yellow border persists.
Method 5: Adjust Color Calibration
Color calibration issues might also lead to unwanted borders on your screen. Follow these steps to calibrate your display:
- Search for Calibrate Display Color: Type «Calibrate display color» in the Windows search bar and select the corresponding option.
- Follow the Wizard: Windows will open a Display Color Calibration wizard. Follow the on-screen instructions to adjust gamma, brightness, contrast, and color balance.
- Complete Calibration: After completing the calibration, Windows will prompt you to save your calibration. Ensure you do so.
Check if the yellow border has diminished or disappeared after completing the calibration.
Method 6: Check for Monitor Issues
While many yellow border issues stem from software or driver conflicts, hardware problems cannot be overlooked. Here’s how to diagnose potential monitor issues:
- Inspect Connections: Ensure all cables (HDMI, DisplayPort, etc.) are firmly connected. Sometimes, loose cables can result in display issues.
- Test with Another Monitor: If possible, connect your computer to a different monitor. If the yellow border disappears, your original monitor might have a hardware issue.
- Monitor Settings: Many monitors have built-in settings for picture and display adjustments. Access these settings via the monitor buttons and ensure everything is configured correctly.
If your monitor shows consistent problems, it may be time to consult with a technician or consider a replacement.
Method 7: Reinstall Graphics Drivers
If updating your graphics drivers doesn’t solve the issue, a complete reinstallation might be necessary. Here’s how to do that:
- Device Manager: Open Device Manager again by right-clicking the Start button.
- Uninstall Driver: Right-click on your graphics card under «Display adapters» and select «Uninstall device». Confirm that you want to uninstall the device.
- Restart: Restart your computer. Windows should automatically reinstall the graphics driver upon reboot.
- Manual Installation: If Windows doesn’t reinstall the drivers, download the latest driver from the manufacturer’s website and install it manually.
Once you’ve reinstalled the drivers, reboot your PC to see if the yellow border has been resolved.
Method 8: Perform a System Restore
If all else fails, performing a system restore to a previous state could be your last resort. This step can undo any recent changes that may have led to the yellow border issue:
- Type «System Restore»: In the Windows search bar, type «System Restore» and select «Create a restore point».
- System Restore Button: In the System Properties window, click on the «System Restore» button.
- Follow Instructions: Choose a restore point before the problem began and follow the on-screen instructions to perform the restoration.
Please note that any applications or programs installed after the restore point will be erased, so ensure to back up any important data.
Conclusion
The appearance of a yellow border on your Windows 10 or 11 screen can be a frustrating experience, but it’s often solvable with a few tweaks and troubleshooting steps. By following the methods outlined in this article, you should be able to determine the cause of the issue and take appropriate action to resolve it. Remember that persistent hardware problems may require professional assistance. With patience and careful consideration, you can restore your screen to normalcy and continue enjoying the full capabilities of your Windows operating system.
Since the release of Windows 11 22H2, Microsoft has been rolling out a series of updates to enhance the operating system’s privacy and security features, and address any known glitches to optimize the user experience. However, a recent update has unfortunately caused widespread problems, with many users experiencing a persistent yellow border around their screens.
If you’re one of the many affected by this frustrating issue and seeking a solution to remove the border, you’re in the right place. This post will guide you through the recent changes in Windows 11 and provide clear instructions on how to eliminate the yellow border if you’re experiencing any bugs.
Below are steps to remove the yellow border around the screen edges on Windows.
1. Kill Snipping tool process
If you have closed the Snipping tool but the yellow border is still there then you should consider killing the Snipping tool background process manually from the Task Manager.
1. Open the Task Manager on your Windows PC. You can either search for it or can press Ctrl + Shift + Esc on your keyboard.
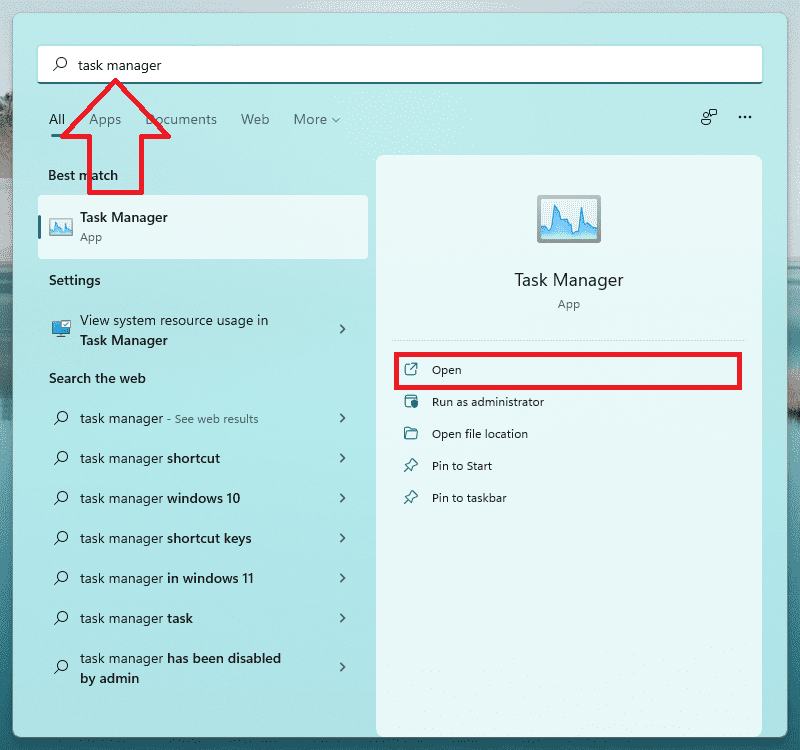
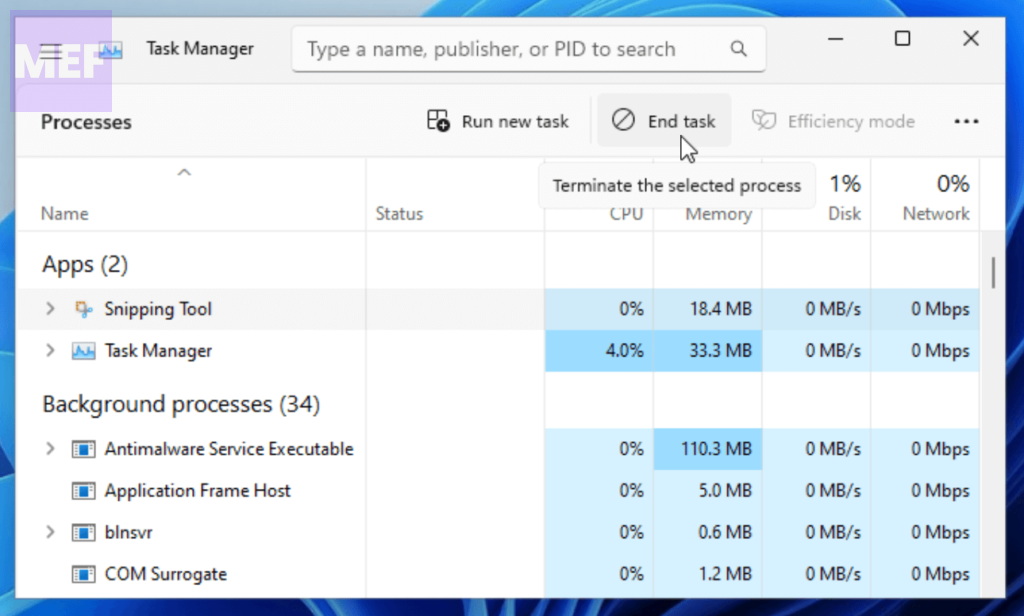
2. Look for the Snipping tool process and select it by clicking on it.
3. Finally, click on the End Task button to kill the process.
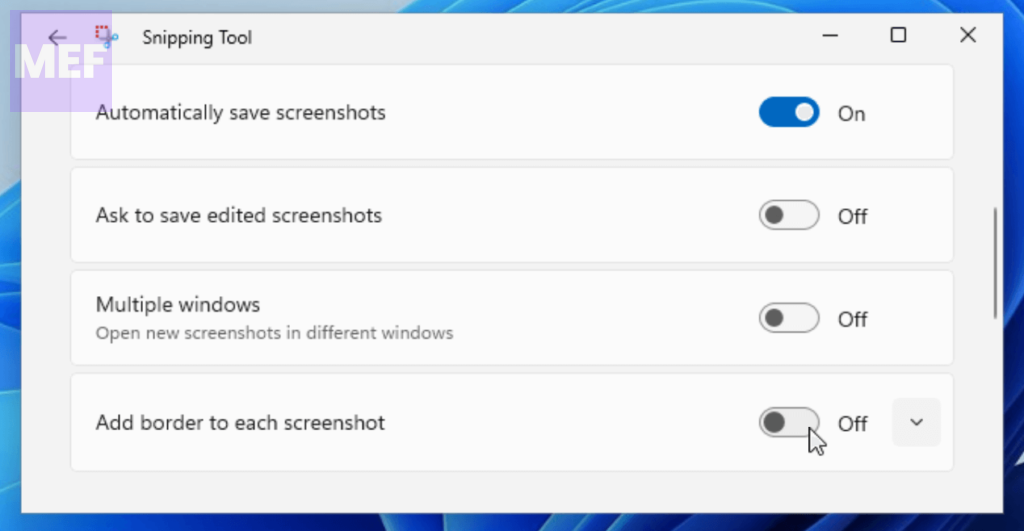
2. Turn off Border in Snipping Tool
If you are annoyed by the yellow borders while using the Snipping tool, then you can disable it by turning off the borders feature.
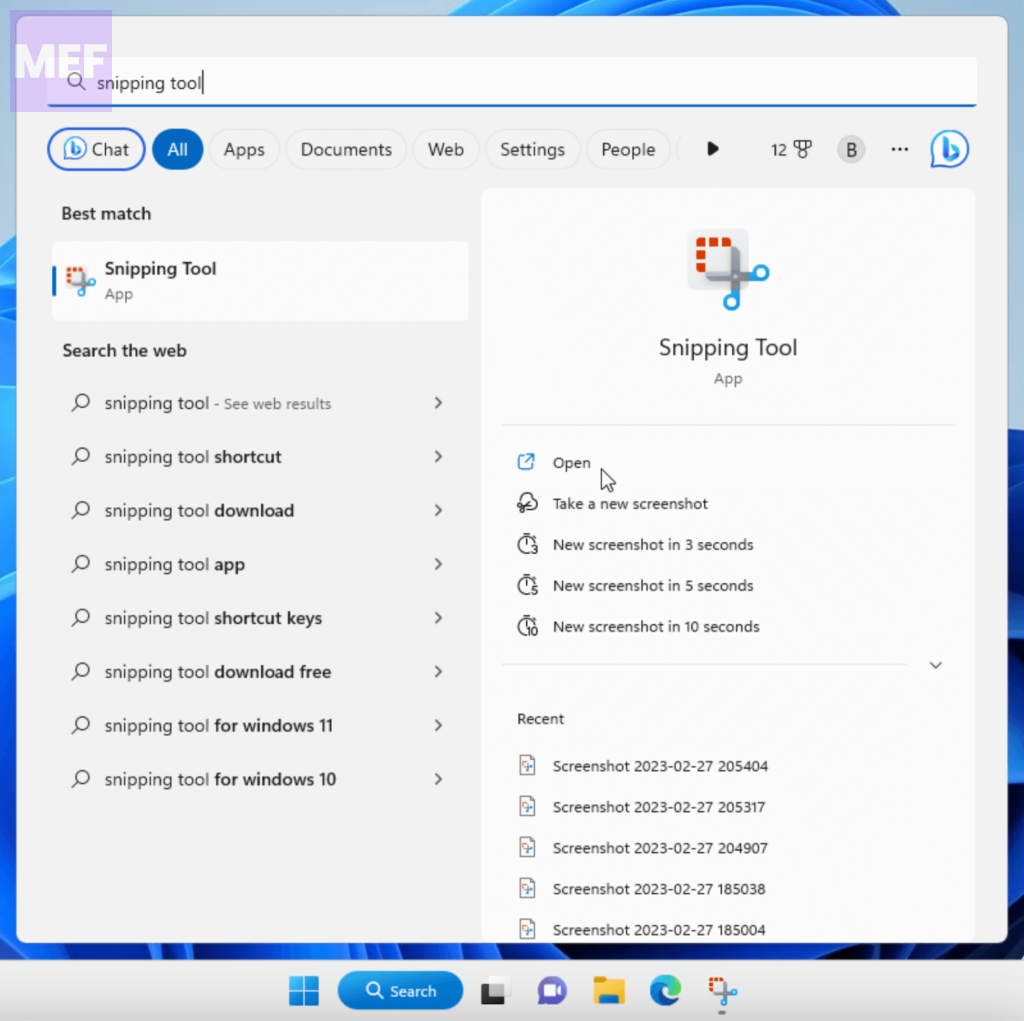
1. Search and open the Snipping tool.
2. Click on the three dots in the top-right corner of the snipping tool window and select Settings.
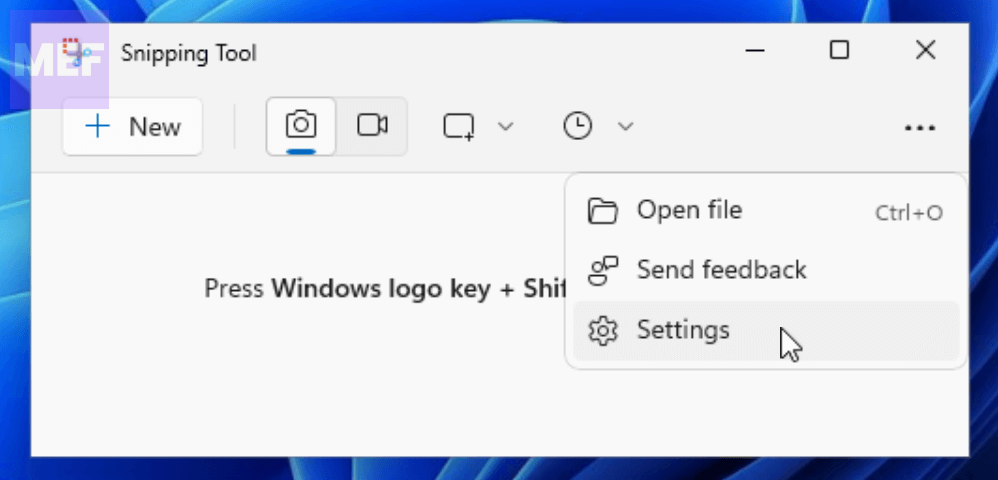
3. Here, toggle off the switch for the “Add border to each screenshot” option.
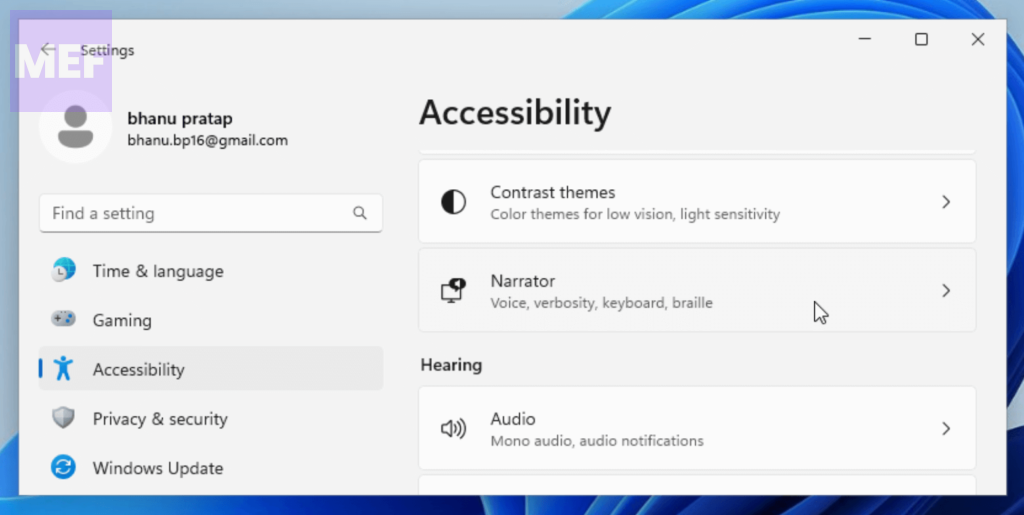
3. Turn off the Narrator
The narrator feature can also add colored borders to the Windows screen and other UI layouts. In that case, you should disable the Narrator feature.
1. Open the Setting on your Windows PC. Either press Win + I or directly search for settings in the windows search bar.
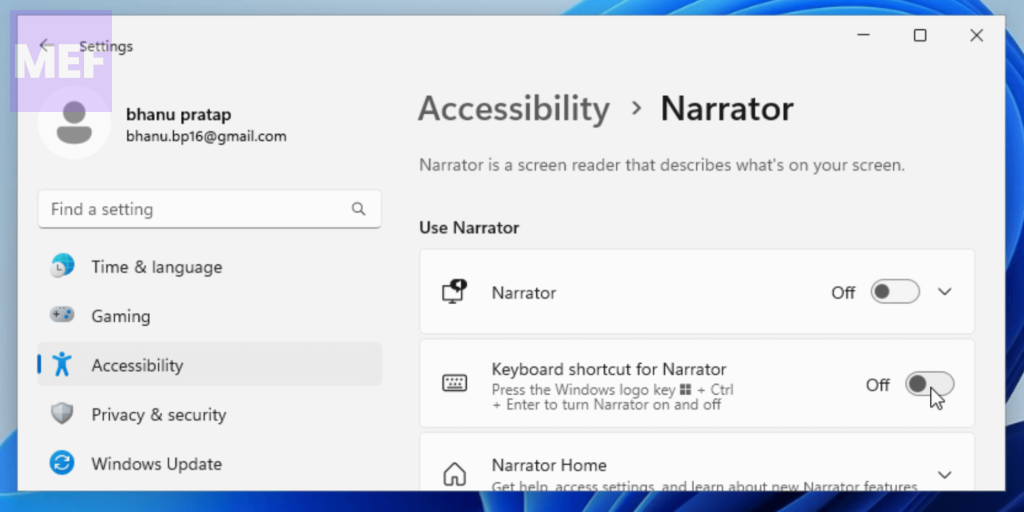
2. Click on the Accessibility tab in the left pane and go to Narrator from the right.
3. Now, toggle off the switch for the Narrator option and the Keyboard shortcut for Narrator option to ensure it doesn’t get triggered via any keyboard shortcut.
4. Update OBS
Many Windows users are annoyed by the yellow border while capturing the screen using the OBS software. This happens due to the privacy feature that has been added in Windows, adding a yellow border to the portion that is being captured to aware the user about the capture.
But this has been resolved by the OBS team in its latest version of the software. So if the yellow borders in the OBS screen capture was your concern, then consider updating the OBS to v29 or later.
You can enable auto updates on your OBS Software as well. To do so, follow the below steps:
1. Click on the File option on the top-left of the OBS windows and go to Settings.
2. Switch to the General tab from the left and checkmark the “Automatically check for updates on startup” option under the Updates section.
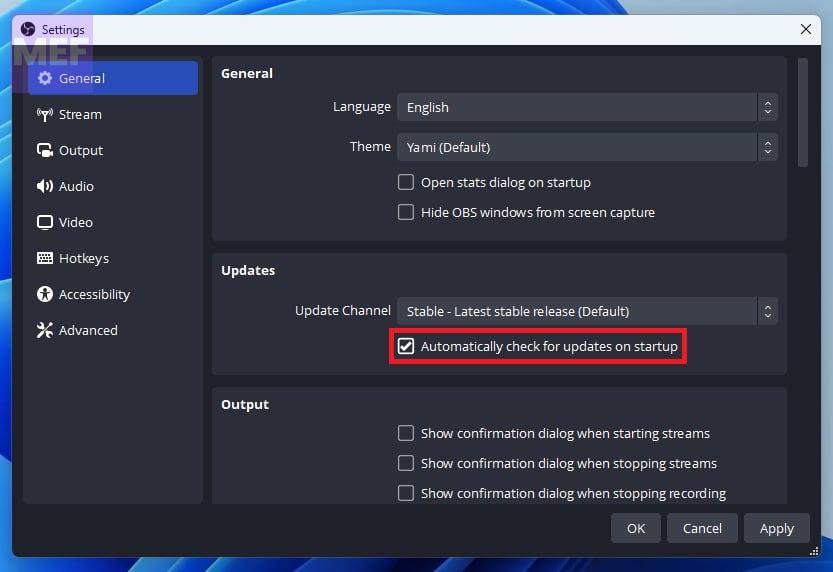
3. Finally, click on OK to save the change.
5. Use a Non-UWP Screen recorder
UWP applications have been known to activate the Capture API, which we previously discussed, as a privacy measure by displaying a yellow border around the screen. However, certain issues and glitches may arise, preventing your preferred application from properly terminating the Capture API.
As a result, you may experience a persistent yellow border around your screen. To resolve this problem, it is recommended that you uninstall the affected application and switch to one of the alternative options e.g. Fluent Screen Recorder. These alternatives do not use UWP apps and can effectively capture your screen without the yellow border issue.
6. Update/Reinstall GPU Driver
Outdated or problematic GPU drivers can also cause issues with the display output. Hence it is highly advised to update or reinstall the GU drivers.
1. Open the Device Manager on your Windows PC. You can either search for it or can open it by right-clicking on the Start.
2. In the Device Manager window, click on the Display adapters option to expand it.
3. Right-click on your display device and select Update driver.
4. Select the “Search automatically for drivers” option and install the update if any found.
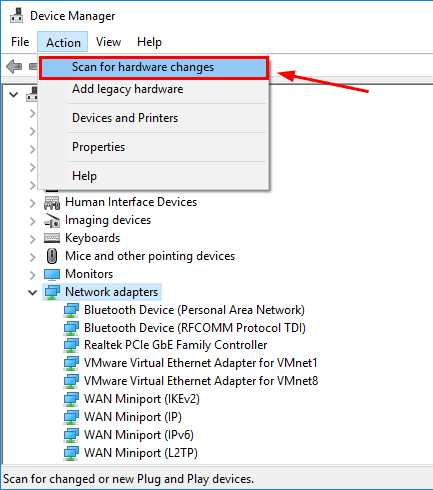
5. If there is no update found, then again right-click on the display device and this time select Uninstall device.
6. Again click on Uninstall to confirm the action.
7. Lastly, click on the Action option from the top and select Scan for hardware changes. This will re-install the uninstalled driver and will probably fix the issue.
7. Check System Files
Corrupted or missing system files is a pretty common cause of issues like the one we are discussing in this fixing guide. You can use the Windows SFC and DISM Scan, in order to fix the system files’ integrity.
1. Search for Command Prompt in the windows search bar and click on the Run as administrator option.
2. In the elevated cmd window, execute the following command to run the System File Check (SFC) Scan:
sfc /scannow

3. Once the SFC Snc completes, execute the following command to run the DISM Scan:
DISM /Online /Cleanup-Image /restorehealth
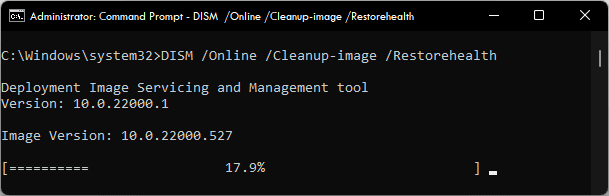
4. Lastly, reboot your PC.
8. Scan your PC
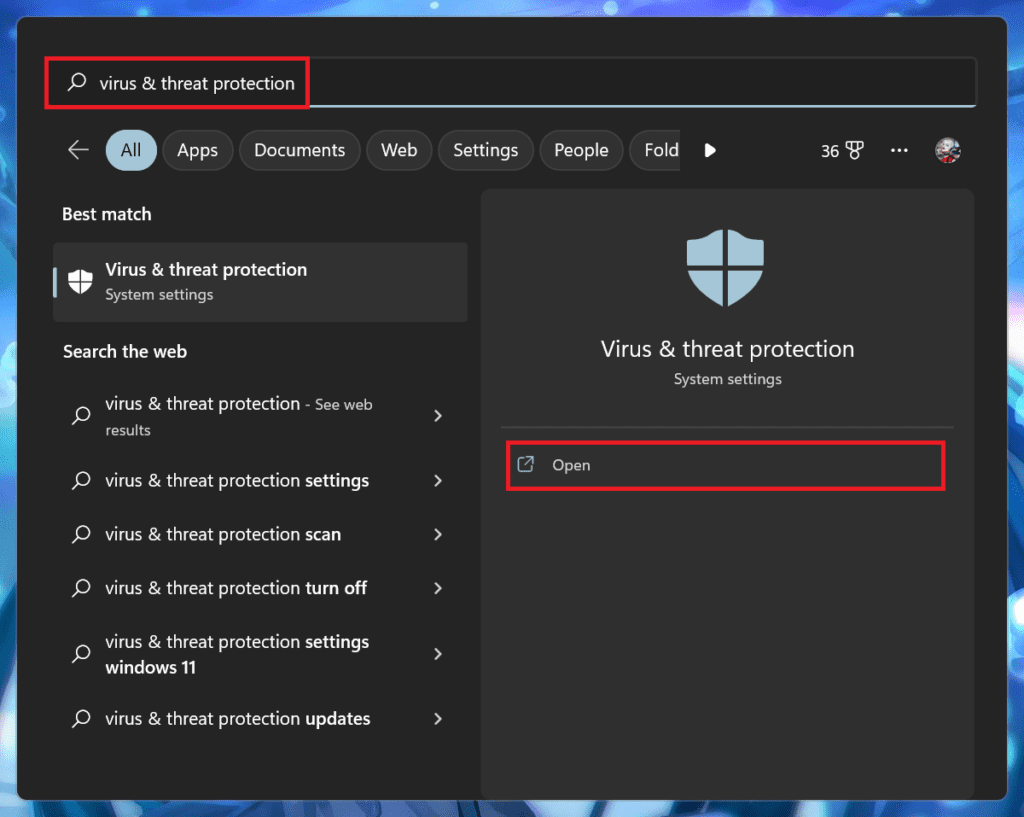
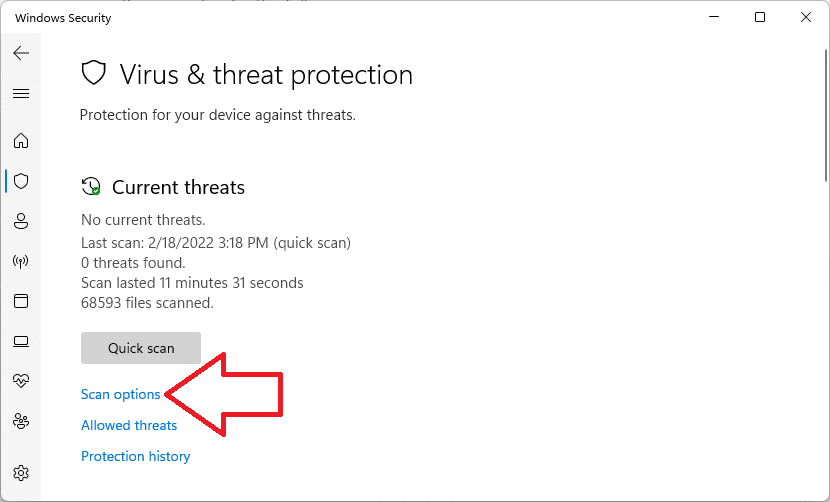
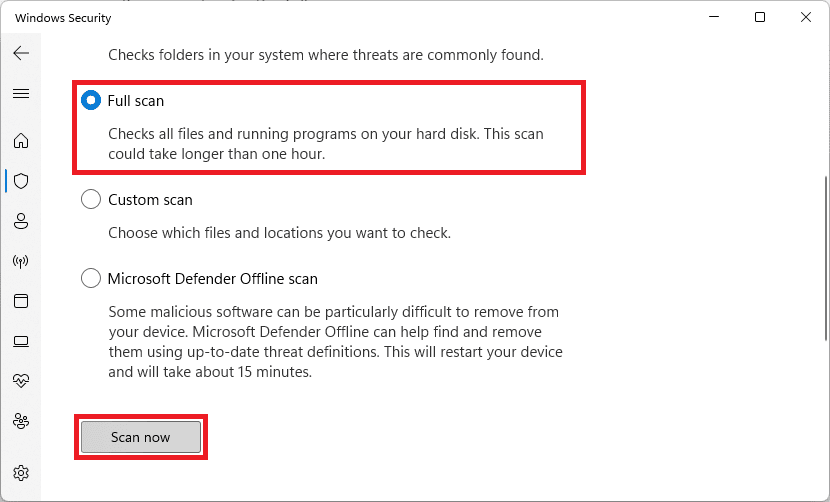
Malicious programs or processes running on the Windows system can pose weird issues like a yellow screen border. with that said, consider running a full scan of your PC using Windows Security.
1. Search for Virus & threat protection and open the same from the search results.
2. In the Windows Security window, click on Scan options located under the Quick Scan button.
3. Finally, set the radio button to Full Scan and click the Scan now button.
Pro Tip: You can also use a dedicated tool called Restoro to fix this issue.
Once the scan is complete, delete the suspicious files or third-party programs containing viruses or malware from your PC or laptop and reboot. Afterward, restart your device and check if the issue is resolved
Display problems can pose significant obstacles, particularly when you need to share your screen or deliver a presentation in a professional environment. Such issues can undermine your presentation and, in severe cases, impede your ability to complete the task at hand.
Fortunately, the post above provides practical solutions to address the yellow border around your screen quickly and without difficulty. By following the steps outlined in the post, you can easily eliminate the problem and restore your display’s optimal performance.
Also Read:
- 5 Ways to Turn Off Keyboard Sound on Windows 11
- 10 Ways to Fix “User Profile Service Failed the Sign-in” in Windows 11
- Should you turn SpeedStep On or Off for Gaming & Normal Use?
- 3 Ways to Get Classic File Explorer with Ribbon on Windows 11
- How to Fix the “We are unable to get your account information” issue in Minecraft
How to Remove the Yellow Border in Windows 10
If you’re seeing a pesky yellow border around your Windows 10 screen, it can be annoying. This border usually appears due to high contrast settings or display settings. By following some simple steps, you can remove this yellow border and get back to a normal display in no time.
Step by Step Tutorial on Removing Yellow Border in Windows 10
We’re going to walk you through some straightforward steps to remove that yellow border. We’ll check your display settings, high contrast settings, and some additional display options.
Step 1: Open Settings
First, open the Settings app by clicking on the Start menu and selecting the gear icon.
You can also press the Windows key + I to quickly open the Settings app. This is where you’ll find all the necessary options to adjust your display settings.
Step 2: Navigate to Ease of Access
Second, in the Settings app, click on «Ease of Access.»
This section is where you can adjust accessibility settings, including high contrast. It’s crucial to check this area because high contrast settings often cause the yellow border.
Step 3: Click on High Contrast
Third, under Ease of Access, select «High Contrast» from the left-hand menu.
Here, you’ll see a toggle switch for turning high contrast on or off. If it’s switched on, you might notice a yellow border as part of the high contrast theme.
Step 4: Turn Off High Contrast
Fourth, if the high contrast is enabled, turn it off by switching the toggle to the off position.
Turning off high contrast should immediately remove the yellow border. If the border persists, you might need to restart your computer for the changes to take effect.
Step 5: Adjust Display Settings
Finally, if turning off high contrast doesn’t resolve the issue, navigate to «Display» settings in the main Settings menu.
Here, you can adjust your display settings. Sometimes, incorrect display settings can cause color issues, including a yellow border.
After following these steps, the yellow border should be gone, and your display should be back to normal. If you still see the border, you may need to update your graphics driver or check for any Windows updates.
Tips on Removing Yellow Border in Windows 10
- Check your color filters: In the Ease of Access settings, there’s an option for color filters. Make sure it’s off or set to the default setting.
- Update graphics drivers: Outdated graphics drivers can often cause display issues. Make sure your graphics drivers are up to date.
- Reboot your computer: After making changes, always restart your computer to ensure the settings take effect.
- Check for Windows updates: Sometimes, bugs causing display issues are fixed in updates. Make sure your system is fully updated.
- Reset display settings: If all else fails, you can reset your display settings to default. This can often resolve stubborn issues.
Frequently Asked Questions
Why do I have a yellow border on my screen?
The yellow border is usually caused by high contrast settings or display settings that have been altered. It can also be due to specific applications that change color settings.
How do I open the Settings app quickly?
You can open the Settings app quickly by pressing the Windows key + I on your keyboard.
What if turning off high contrast doesn’t work?
If turning off high contrast doesn’t work, check your display settings, update your graphics drivers, and make sure your system is fully updated.
Can outdated graphics drivers cause a yellow border?
Yes, outdated graphics drivers can cause display issues, including a yellow border. Always keep your graphics drivers up to date.
Are there any risks in changing these settings?
No, changing these settings should not pose any risks to your system. They are standard accessibility and display settings within Windows 10.
Summary of Steps
- Open Settings
- Navigate to Ease of Access
- Click on High Contrast
- Turn Off High Contrast
- Adjust Display Settings
Conclusion
Removing the yellow border in Windows 10 is a relatively simple task, but it can make a world of difference in your user experience. High contrast settings are often the culprit, but it’s always a good idea to check your display settings and keep your drivers up to date. By following the steps outlined in this guide, you should be able to remove that annoying yellow border and enjoy a normal display once again.
Remember, the settings we discussed are there to help make your computer easier to use, so don’t hesitate to adjust them as needed. If you found this guide helpful, make sure to share it with others who might be facing the same issue. Happy computing!
Kermit Matthews is a freelance writer based in Philadelphia, Pennsylvania with more than a decade of experience writing technology guides. He has a Bachelor’s and Master’s degree in Computer Science and has spent much of his professional career in IT management.
He specializes in writing content about iPhones, Android devices, Microsoft Office, and many other popular applications and devices.
Read his full bio here.
Have you ever encountered a yellow border around your screen while using Windows 10 or 11? This issue can be quite frustrating and can disrupt your workflow. In this article, we will discuss the possible causes of this problem and provide solutions to fix it.
The yellow border around the screen is a common issue that Windows users face. This problem can occur due to various reasons, such as outdated graphics drivers, incorrect display settings, or hardware issues. If you are experiencing this issue, don’t worry, as there are several ways to fix it.
First, let’s discuss some of the possible causes of the yellow border around the screen on Windows 10 or 11:
-
Outdated Graphics Drivers: One of the most common reasons for the yellow border around the screen is outdated graphics drivers. Graphics drivers are essential for the proper functioning of your display, and outdated drivers can cause various display issues, including the yellow border problem.
-
Incorrect Display Settings: Another common cause of the yellow border around the screen is incorrect display settings. If your display settings are not configured correctly, it can lead to display issues like the yellow border problem.
-
Hardware Issues: In some cases, hardware issues can also cause the yellow border around the screen. Faulty hardware components, such as the graphics card or monitor, can lead to display problems.
Now that we have discussed the possible causes of the yellow border around the screen let’s move on to the solutions to fix this issue:
-
Update Graphics Drivers: The first step to fix the yellow border around the screen is to update your graphics drivers. You can update your drivers manually by visiting the manufacturer’s website and downloading the latest drivers for your graphics card. Alternatively, you can use third-party driver update software to automatically update your drivers.
-
Adjust Display Settings: If updating your graphics drivers does not fix the yellow border problem, you can try adjusting your display settings. Go to the Control Panel, select Display, and then click on Adjust Resolution. Here, you can change the resolution and refresh rate to see if it resolves the issue.
-
Check Hardware Connections: If the yellow border around the screen persists, it is essential to check your hardware connections. Make sure that all cables are securely connected to your computer and monitor. If you are using a graphics card, ensure that it is properly seated in the motherboard.
-
Run Hardware Diagnostics: If you suspect that hardware issues are causing the yellow border around the screen, you can run hardware diagnostics to identify any problems. Most computers have built-in diagnostics tools that can help you troubleshoot hardware issues.
-
Reset Display Settings: If none of the above solutions work, you can try resetting your display settings to default. Go to the Control Panel, select Display, and then click on Reset to default. This will revert your display settings to their original configuration and may fix the yellow border problem.
In conclusion, the yellow border around the screen on Windows 10 or 11 can be a frustrating issue, but it is not insurmountable. By following the solutions provided in this article, you can fix this problem and get back to using your computer without any display issues. Remember to keep your graphics drivers updated, adjust your display settings, check hardware connections, run hardware diagnostics, and reset display settings if needed. With these steps, you should be able to resolve the yellow border around the screen problem and enjoy a seamless computing experience.