

You don’t have to have two different computers to use Linux and Windows 10. It’s possible to have a Linux distro installed on a computer with Windows 10 preinstalled.
In this article, I will show you how to dual boot Windows 10 and the popular Ubuntu Linux distro. But before that, you have to install Ubuntu on your Windows 10 PC.
Before you go through this process, you must backup your files. That’s because installing an OS is a risky process. Sometimes it can overwrite the existing OS and delete all your files.
N.B.: Most of the processes in this article take time to get done, so you need to be patient.
What We’ll Cover – A step-by-step Guide to Dual-Booting Windows 10 and Linux
- Prerequisites
- How to Partition your Hard Drive for Ubuntu
- How to Optimize your Hard Drive for More Partition Space (Optional)
- How to Download Ubuntu in ISO Image Format
- How to Make an Ubuntu (Linux) Bootable USB Drive
- How to Install Ubuntu Linux Distro along with Windows 10
- Now You Can Dual Boot Ubuntu and Windows 10
- Conclusion
Prerequisites
Most importantly, there are some things you must have in place if you want to use (and dual boot) Ubuntu and Windows 10 on the same PC:
- A computer preinstalled with Windows 10
- A partitioned hard drive
- A BIOS in UEFI mode (Unified Extensible Firmware Interface)
- An empty USB drive of at least 4Gig for creating a bootable disk
- An internet connection to download Ubuntu ISO image (the Linux distro) and Rufus (a bootable drive creation tool)
How to Check If Your PC BIOS is in UEFI Mode
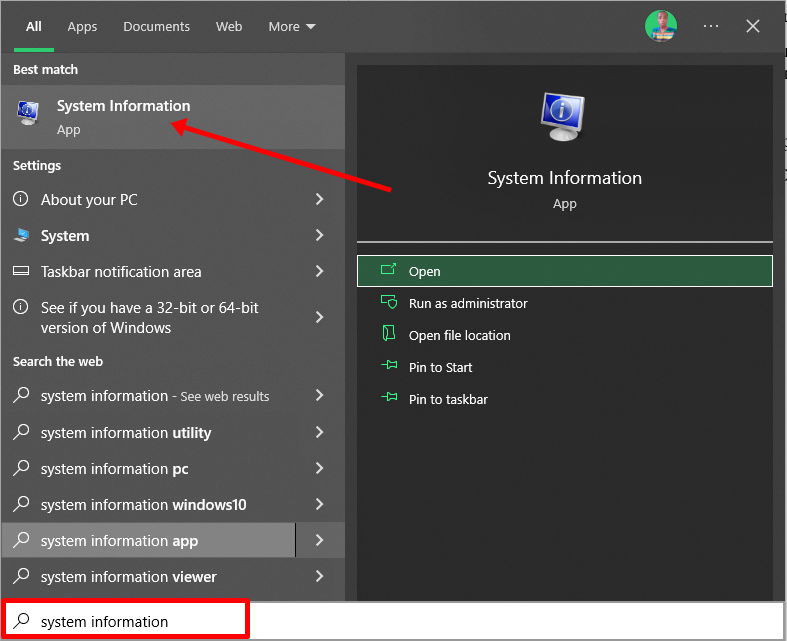
To check if your PC BIOS comes in UEFI mode, search for “system information” and hit ENTER.
Look under BIOS mode to confirm that your PC BIOS mode comes as UEFI.
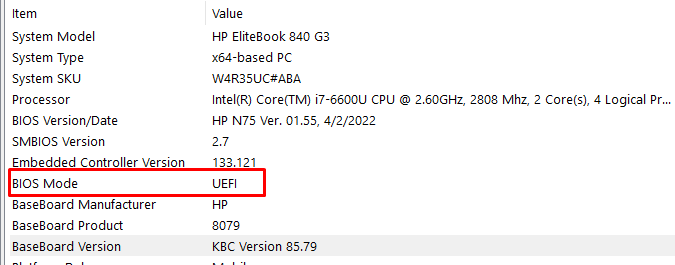
If your PC BIOS is not in UEFI mode, the two operating systems won’t see each other. You can learn more about the difference between these two modes here.
How to Partition your Hard Drive for Ubuntu
You have to partition your hard drive because you must set aside at least 20Gig for Ubuntu to live in and boot from.
To partition your hard drive, follow the steps below:
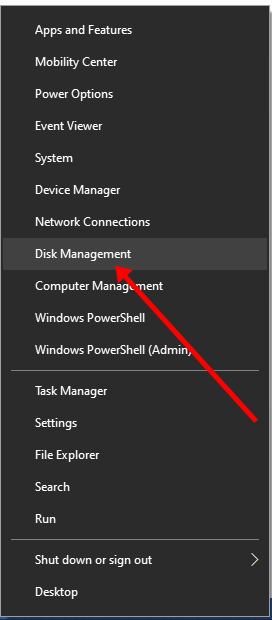
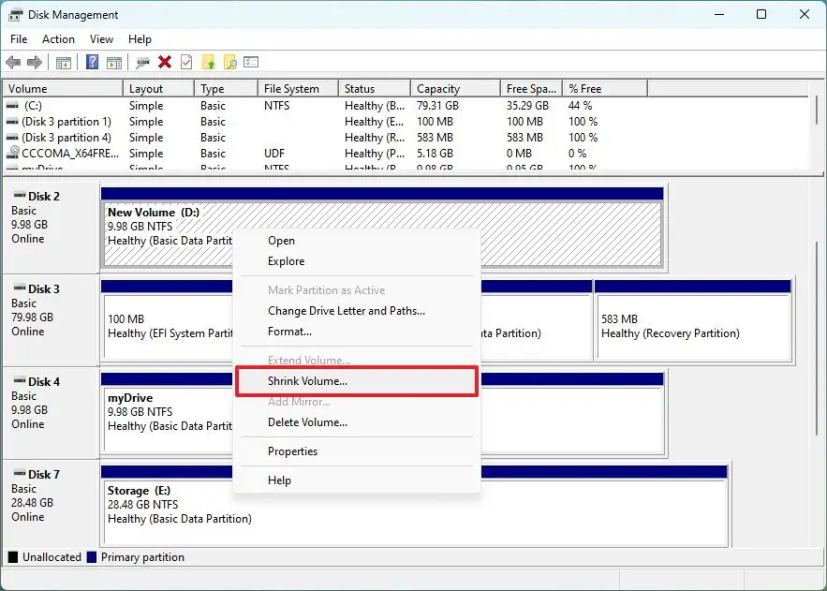
Step 1: Right-click on Start and select “Disk Management”.
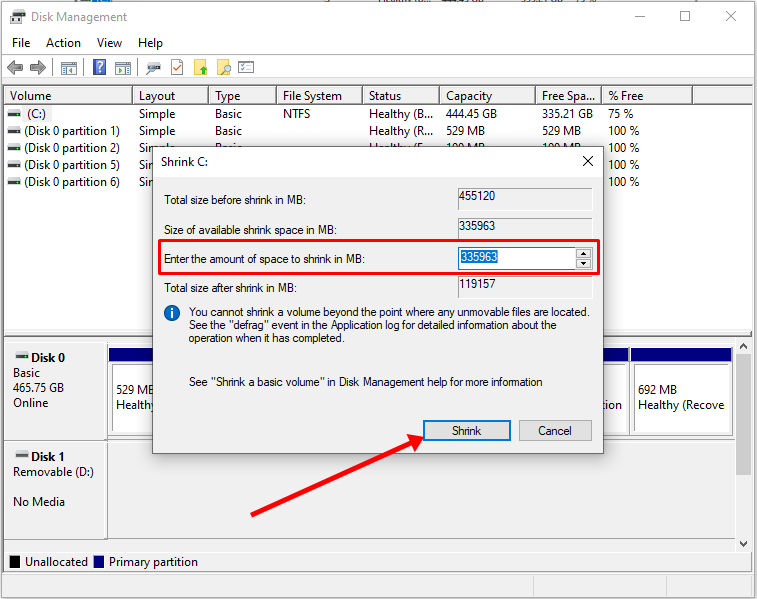
Step 2: Right-click on your C drive and select shrink volume.
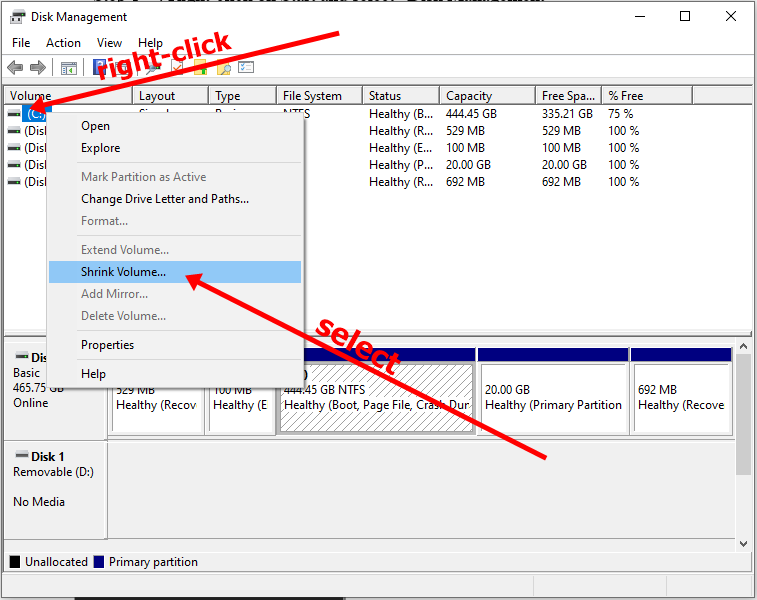
Step 3: Select at least (20000) 20Gig for Ubuntu and click “Shrink”. IT can take some time to complete, so be patient.
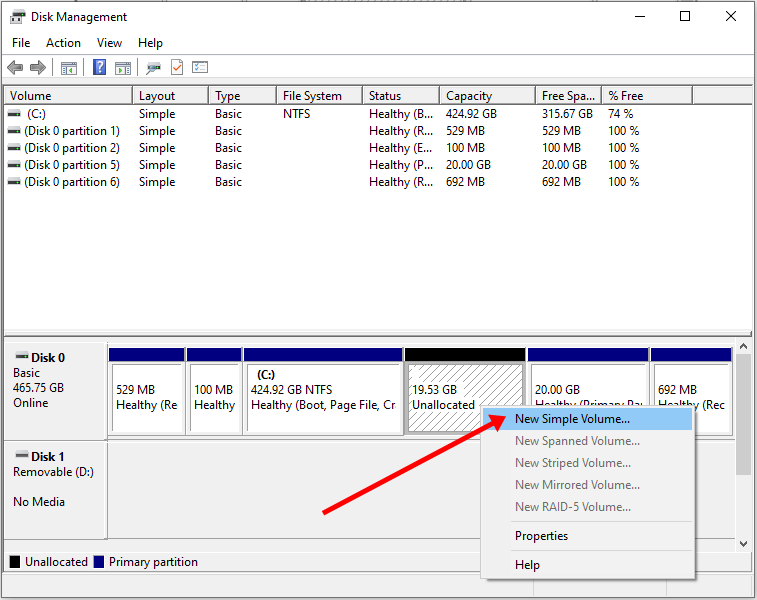
Step 4 (optional): You can go ahead and assign a letter to the new volume. Right-click on the unallocated space and select “New Simple Volume”.
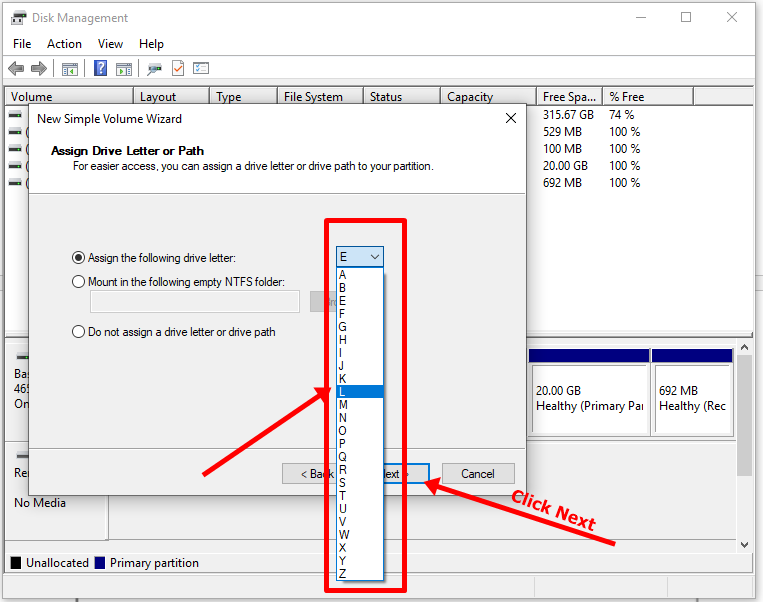
Step 5: Follow the wizard and assign a letter to the drive, then follow the rest of it.
After completing the wizard, the drive should be listed on your computer.
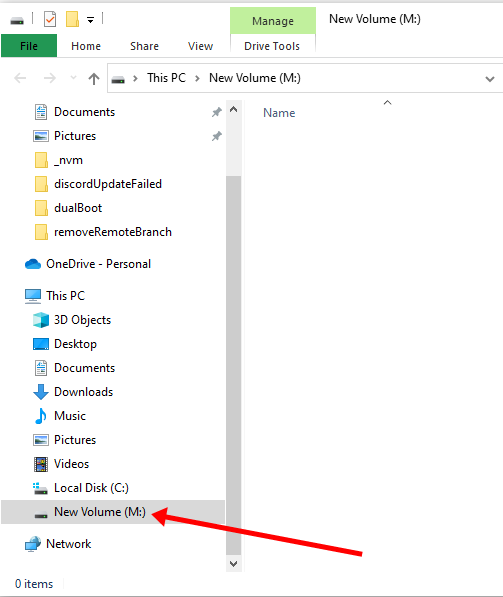
Congrats! You’ve successfully partitioned your hard drive.
N.B.: If you have a lot of free space in your hard drive but your PC still didn’t give you up to 20Gig partition space, then you need to optimize your PC’s hard drive. Proceed to the next section of this article to do that.
How to Optimize your Hard Drive for More Partition Space (Optional)
The common purpose of hard disk optimization is to speed up your computer during boot time and make it run smoother.
At the same time, the process will defragment the hard disk and make free space more available for partitioning.
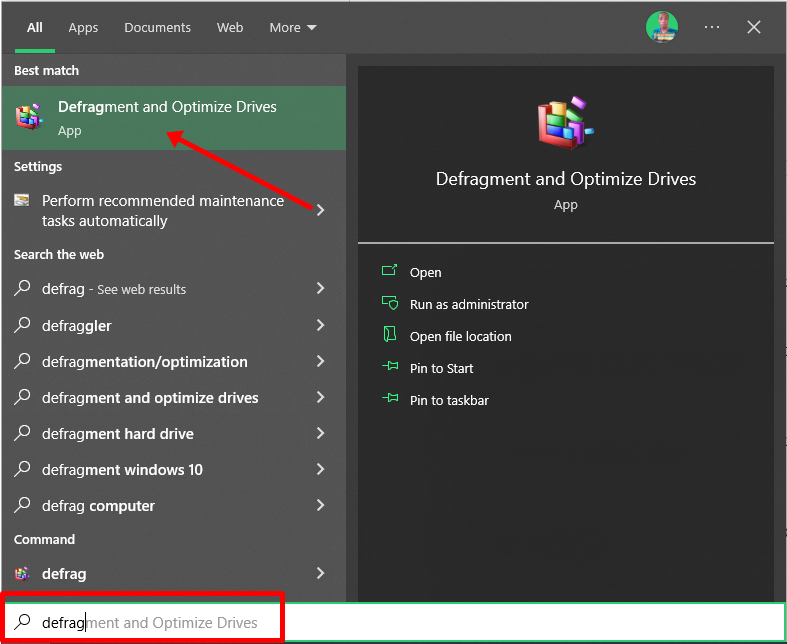
To optimize your hard drive, click Start (Windows logo key), search for “defrag” and select “Defragment and Optimize Drives”.
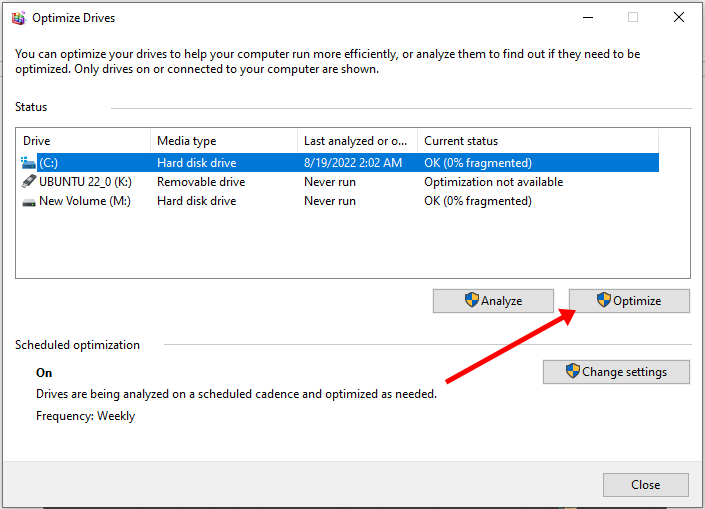
Make sure your C drive is highlighted, then click “Optimize”.
After you’ve been able to set aside at least 20Gig for Ubuntu by partitioning your hard drive, then it’s time to download Ubuntu and make a bootable USB.
How to Download Ubuntu in ISO Image Format
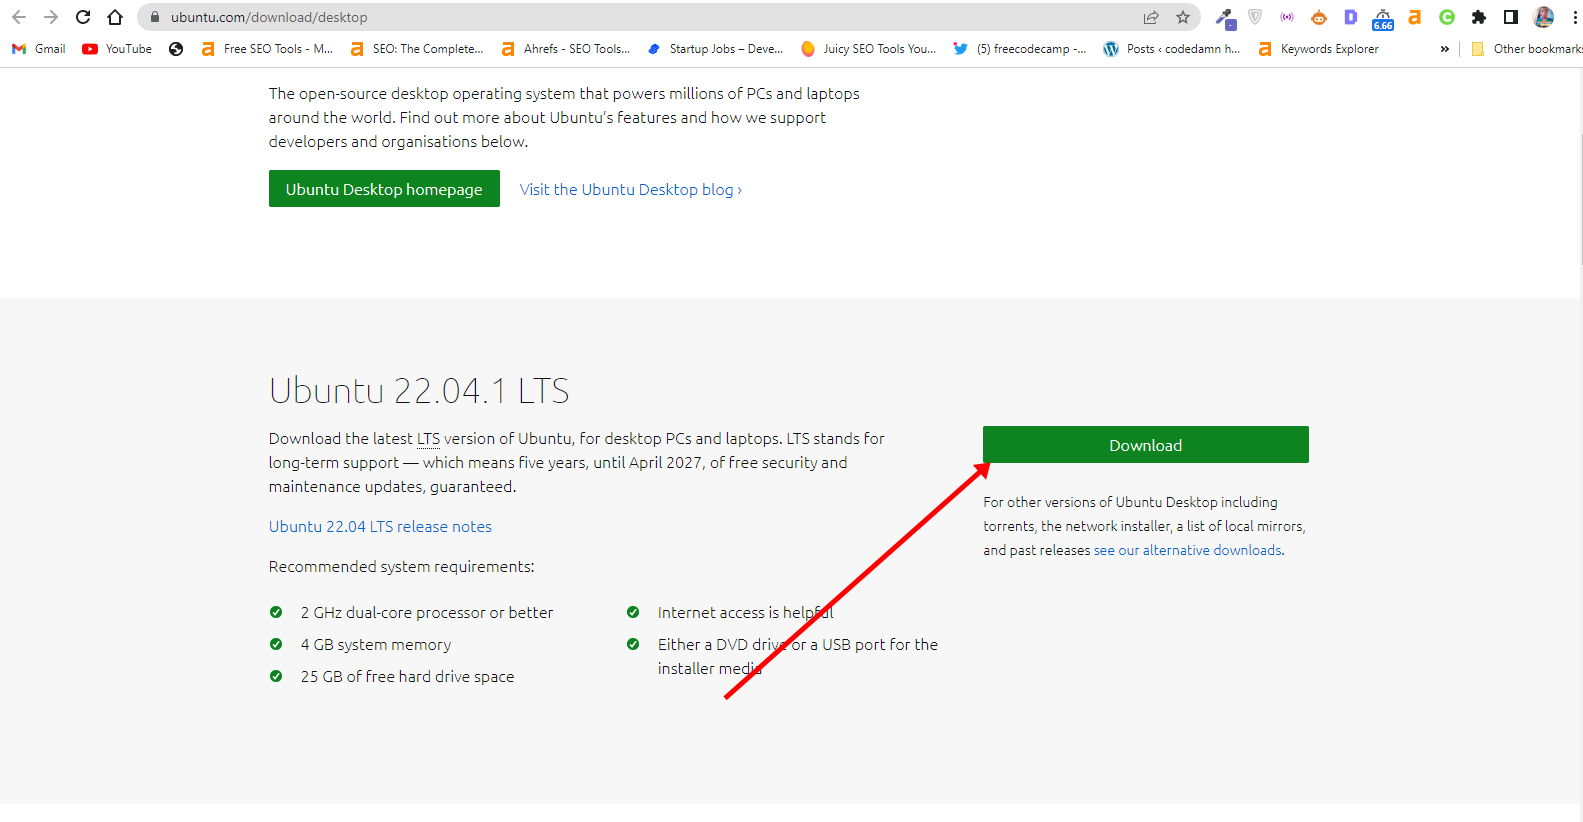
The next thing is to download Ubuntu in ISO image format so you can install Ubuntu. You can download it from the Ubuntu distro website.
After downloading Ubuntu, don’t do anything with it yet. You need to make a bootable USB and put it in there. That’s how you’ll be able to use it.
The reason you can’t install Ubuntu just like that is that it doesn’t come as an executable. It comes in form of ISO (optical disk image). That means you have to find a disk to put it in before it can work.
The next part of this guide shows how you can put the downloaded Ubuntu ISO on a USB stick.
How to Make an Ubuntu (Linux) Bootable USB Drive
You won’t be able to make a bootable USB drive for Ubuntu by just placing the downloaded ISO image in it. Follow these steps to get it done:
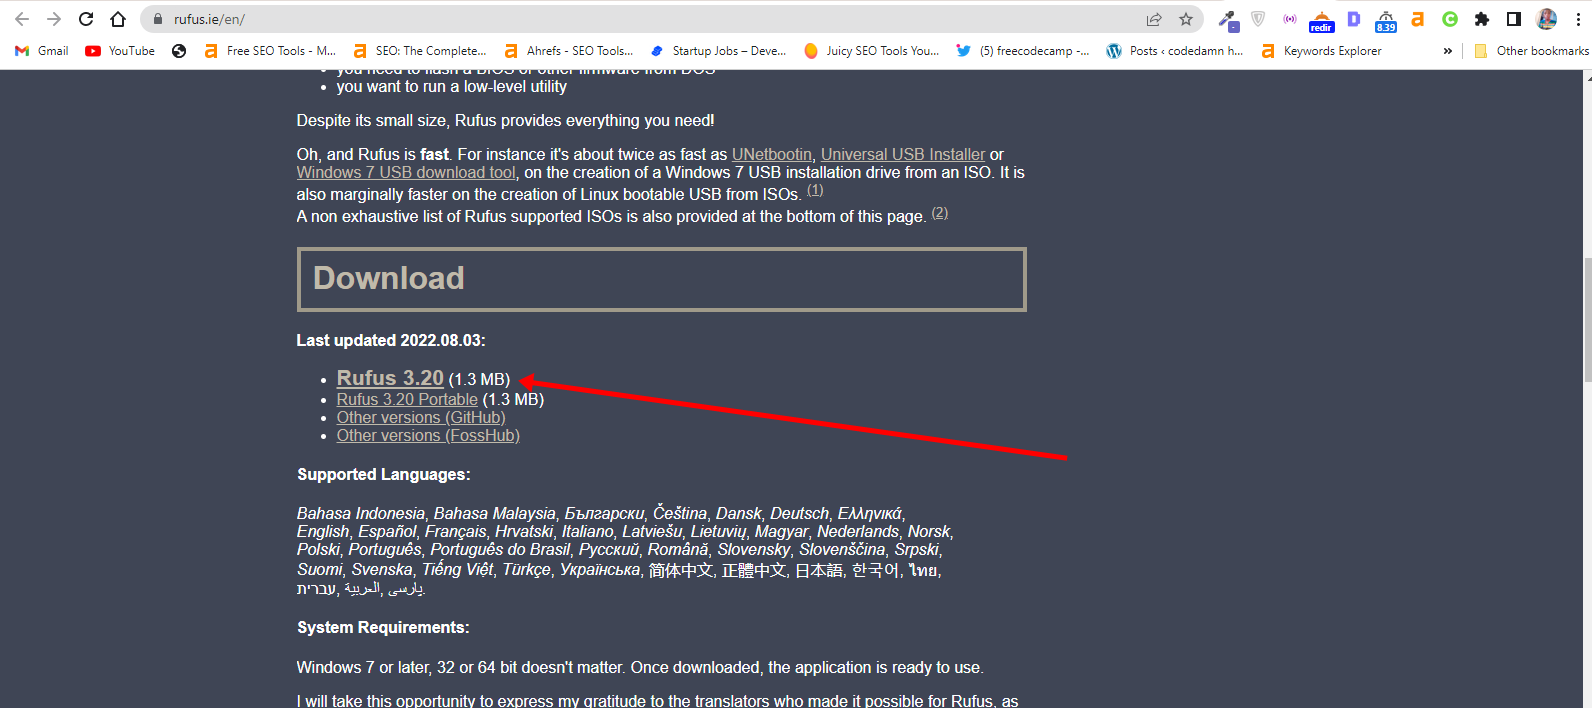
Step 1: You need to download a bootable USB drive creation tool like Rufus. You can download Rufus from their website.
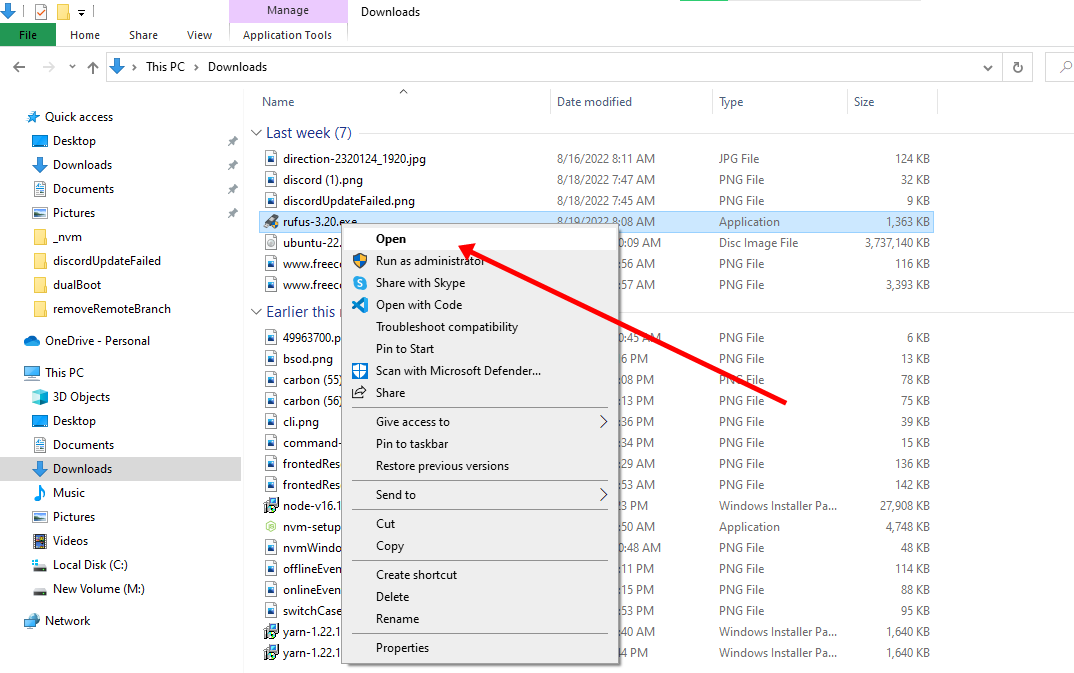
Step 2: Insert the empty USB drive into your Windows 10 PC. Right-click on Rufus and select “Open”.
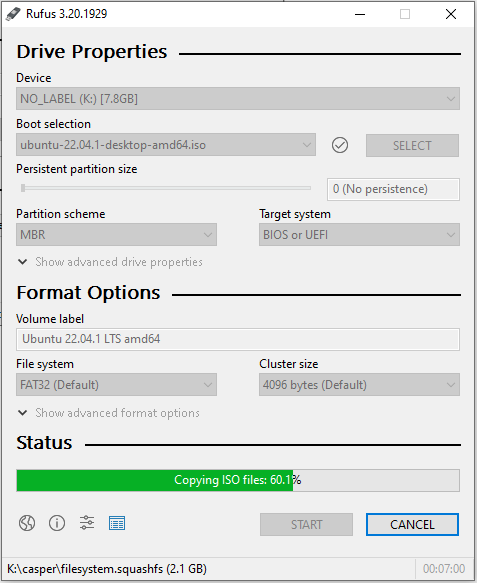
Step 3: Under “Device”, select your USB drive. And under “Boot selection”, click the “Select” button and select the Ubuntu ISO file you downloaded
Step 4: Leave every other thing as default and click the “START” button to start burning the Ubuntu distro to the drive.

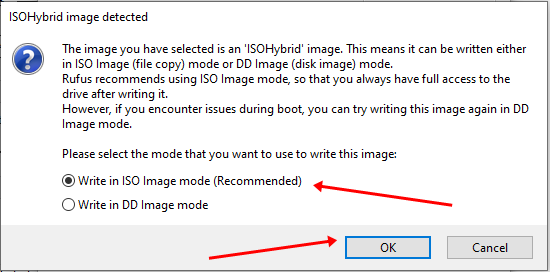
Step 5: Click OK to start the process.
Once the process is done, you should see “READY” on a green background. Click the Close button. Its time to install Ubuntu.
Congrats! Now you have a bootable drive with which you can install Linux.
The next step is to install the Ubuntu distro on your Windows 10 PC. To do this, you have to boot your PC from the bootable USB drive you created.
How to Install Ubuntu Linux Distro along with Windows 10
Step 1: Ensure the bootable drive is inserted into your Windows 10 PC
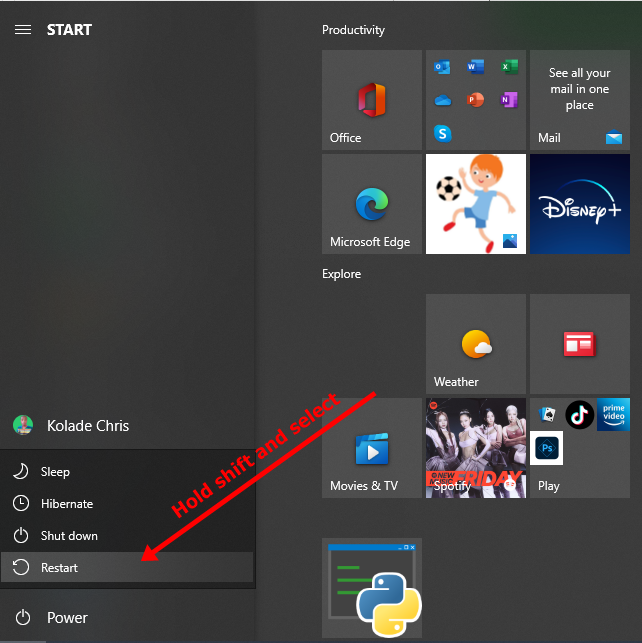
Step 2: Right-click on Start, hold SHIFT, and select Restart.
Step 2: Select “Use a Device”.
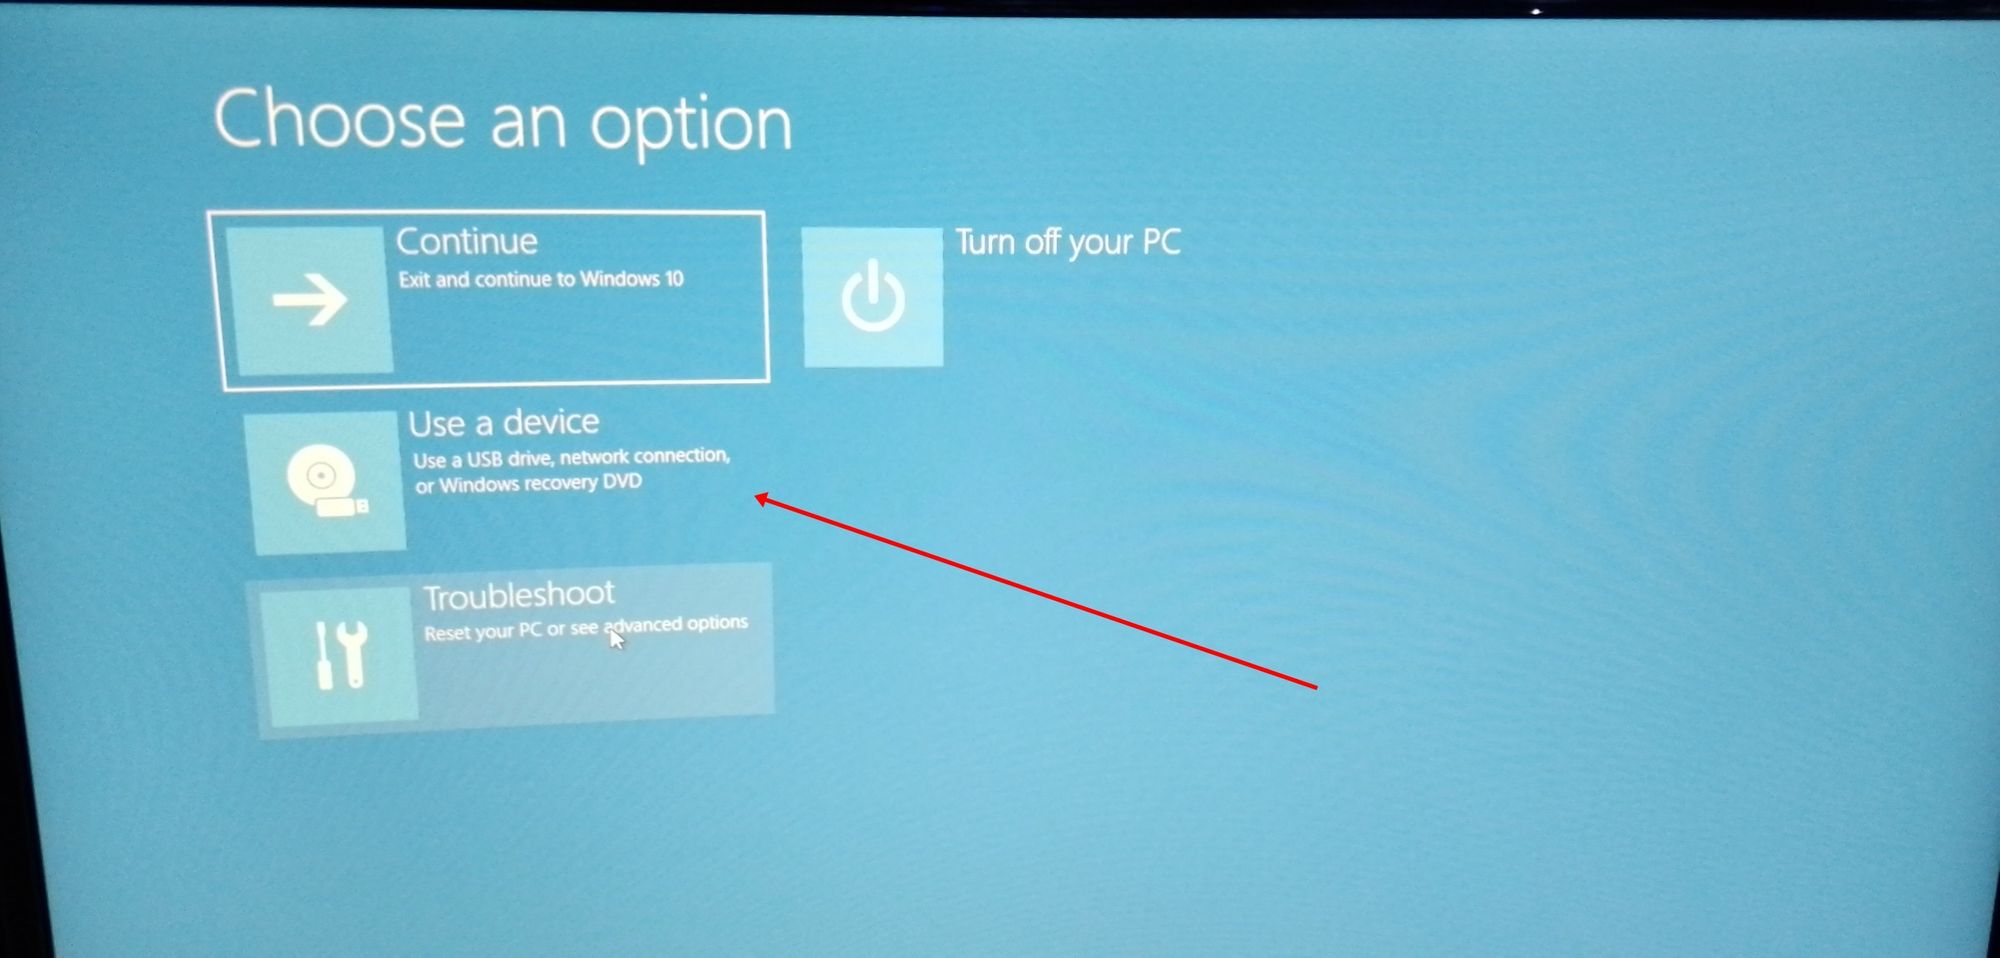
Step 3: On the next screen, you should see several devices you can boot from.
You may see the bootable drive as the name of the USB brand.
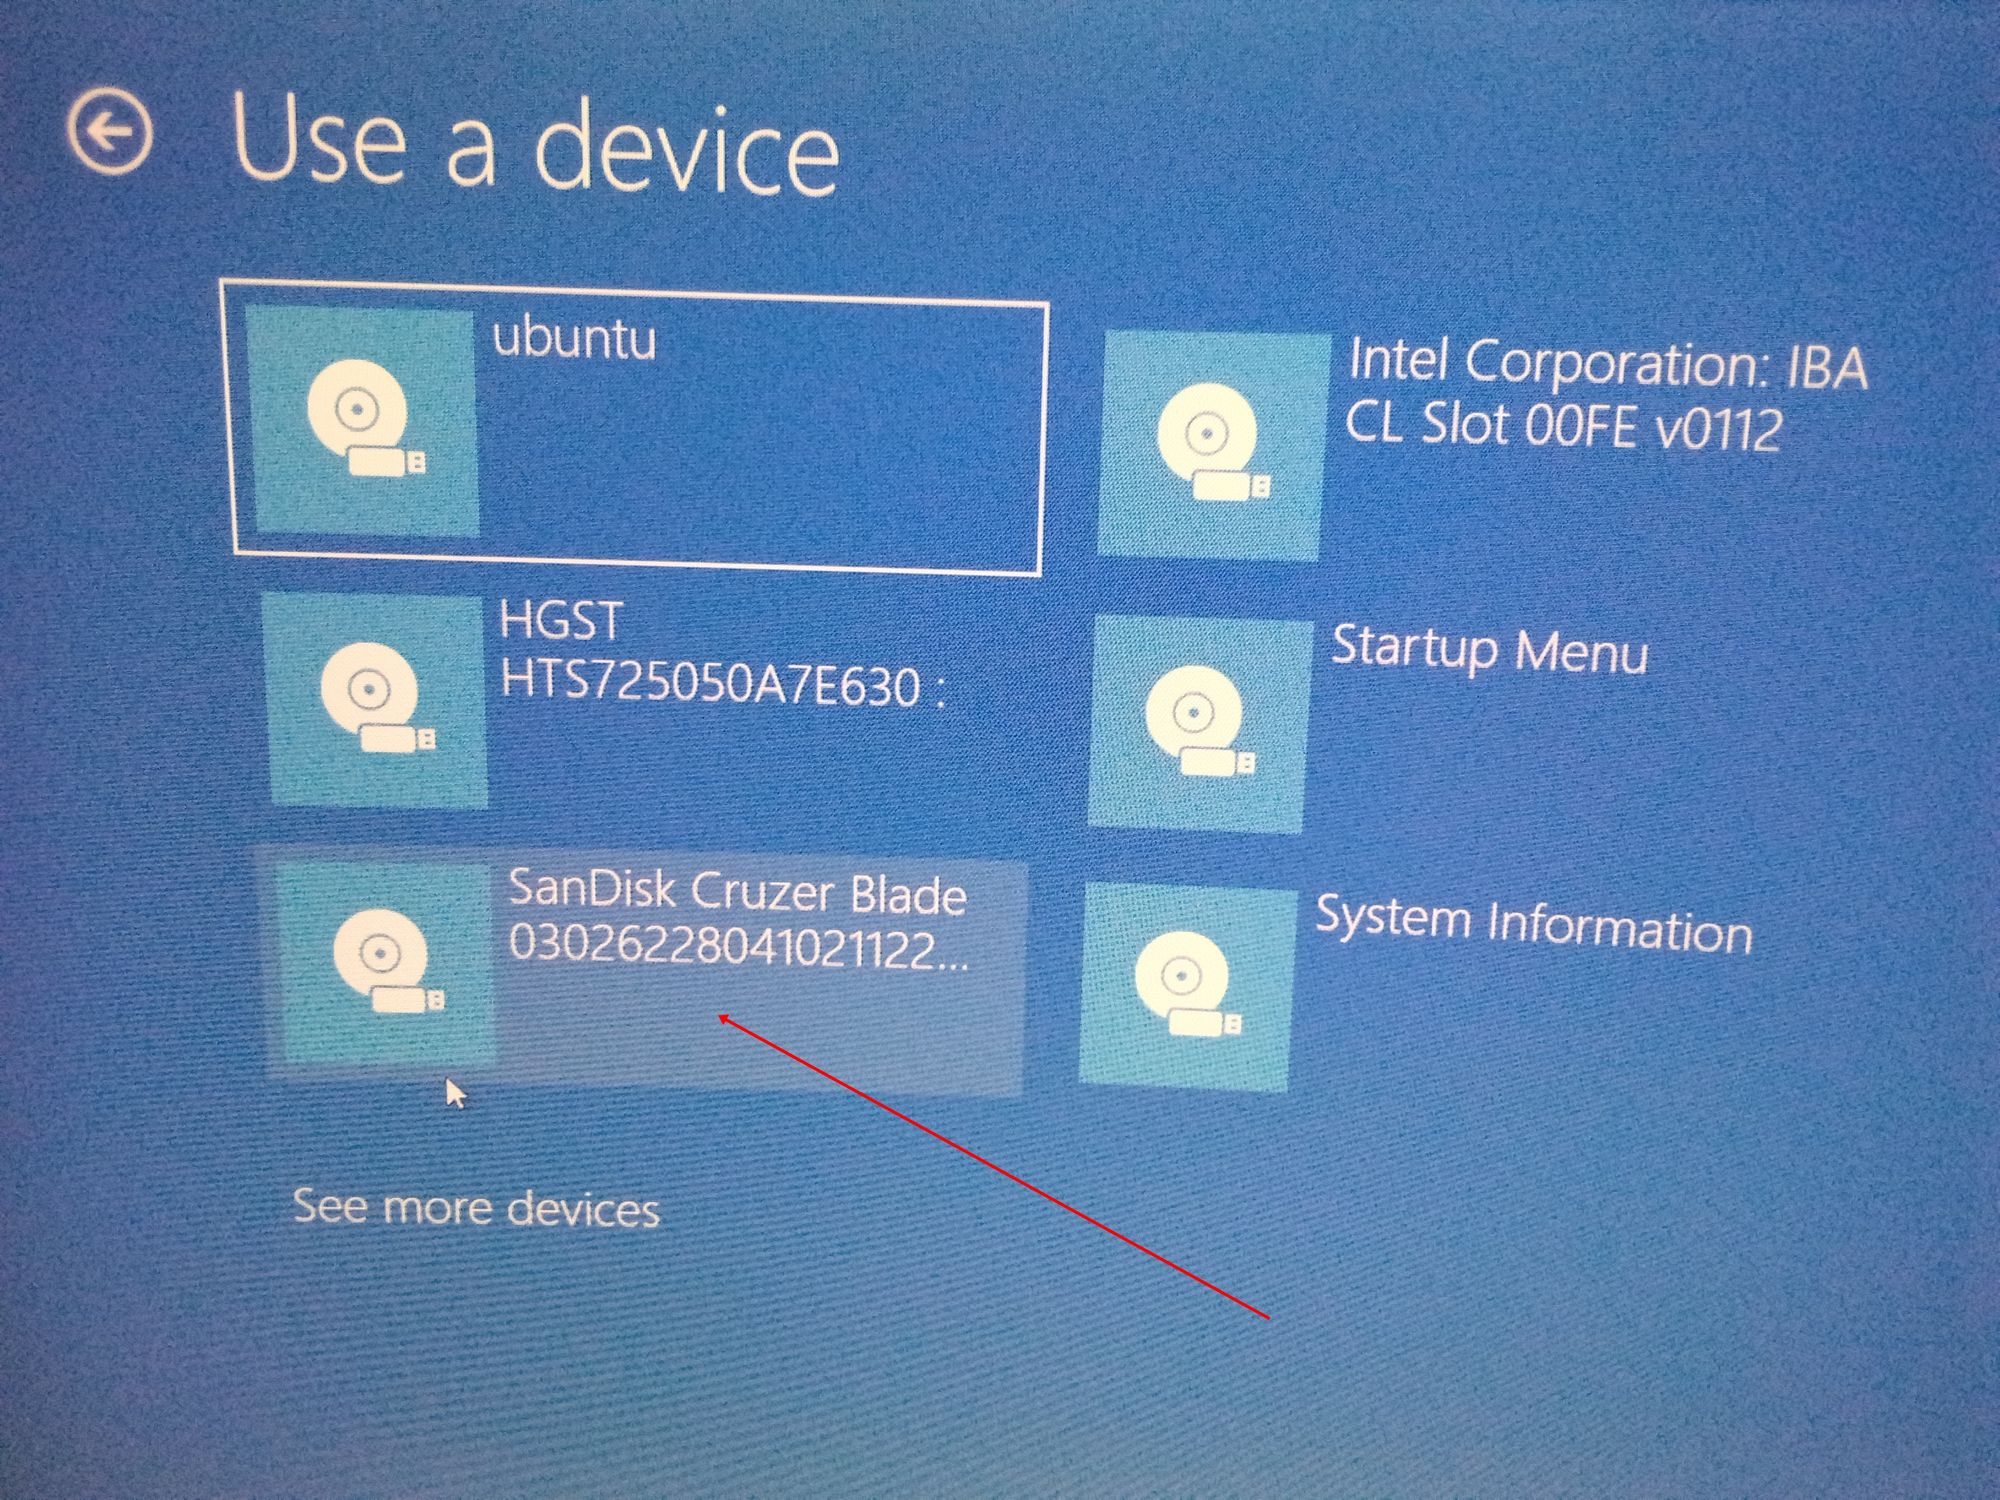
It’s possible to see it as “Ubuntu” too. Some other times, you might not see it, so you need to click on “See more devices».
If you still cannot see your bootable drive, head over to your boot menu by getting into BIOS. You will see it there.
N.B.: You should be very careful while making changes in BIOS. Whatever you do there has a lasting effect on your computer. If you are not sure of what you’re doing there, you should contact an IT professional.
Step 4: Choose «Install Ubuntu». You can also try it before installing it.
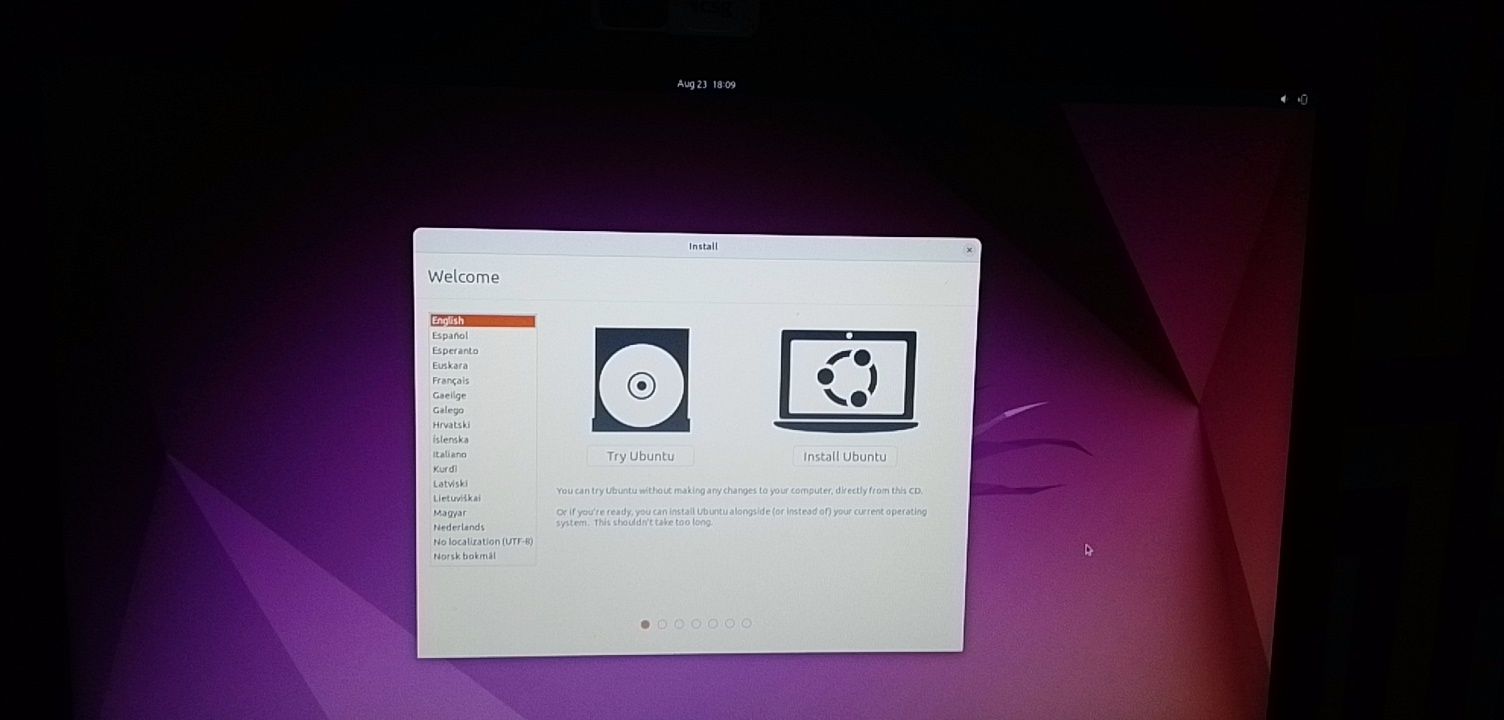
Follow other prompts of the installation wizard and make sure you don’t replace your Windows 10 OS installation with Ubuntu. This is why I suggested you back up all your files.
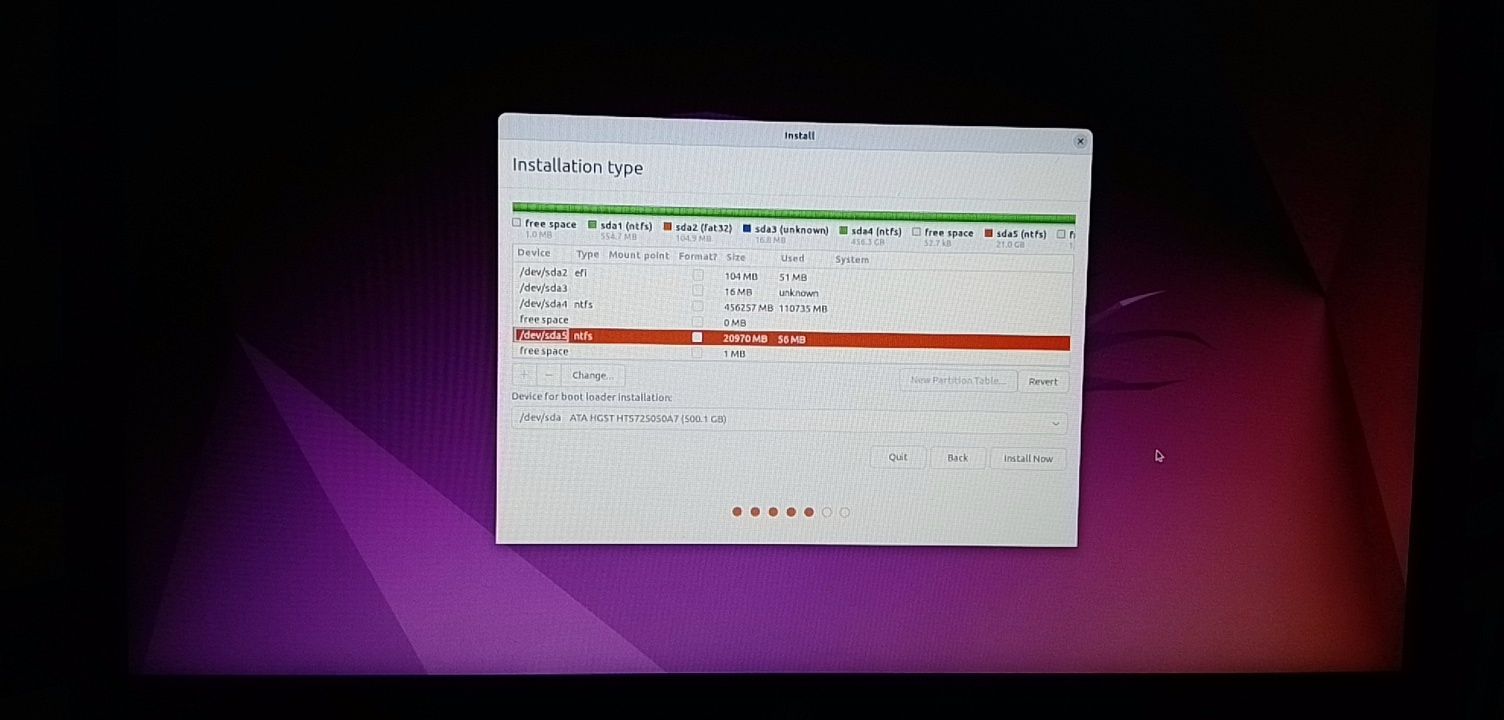
When you get to the point to select the partition you made, scroll to the partition you made earlier and press ENTER.
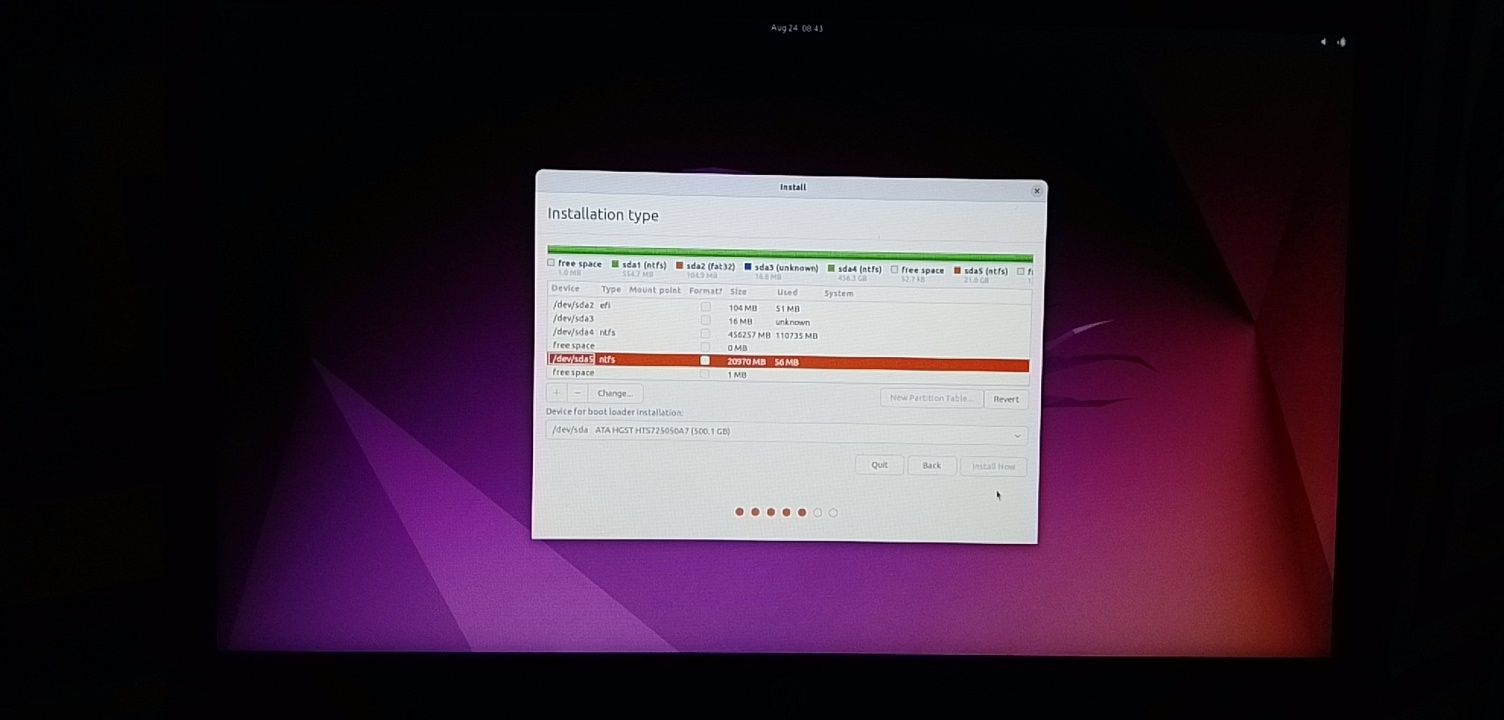
Click OK to select all the space in the partition.
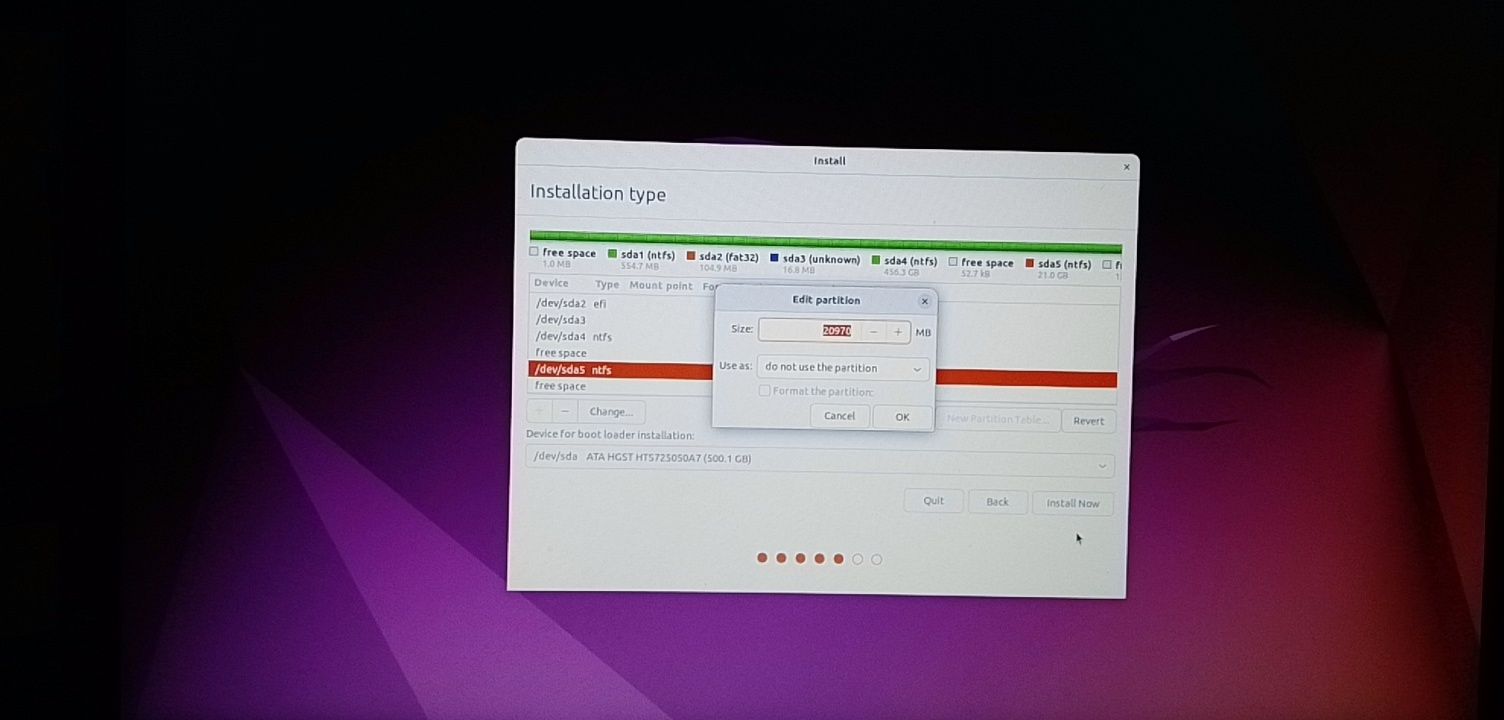
This time around, the “Install now” button will not be greyed out anymore.
Follow other prompts until Ubuntu starts installing.
After the installation is done, Ubuntu will prompt you to remove the bootable drive and press ENTER to reboot your Computer.
Now You Can Dual Boot Ubuntu and Windows 10
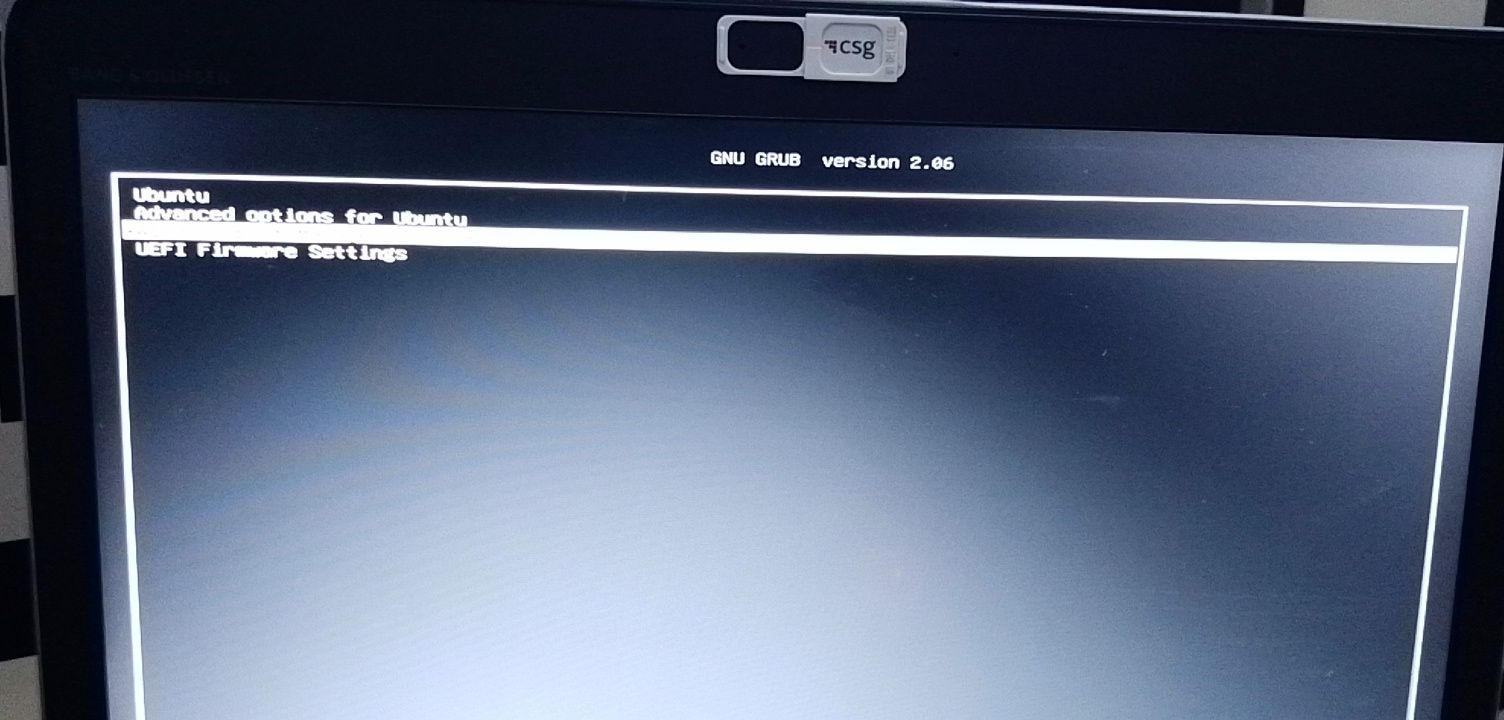
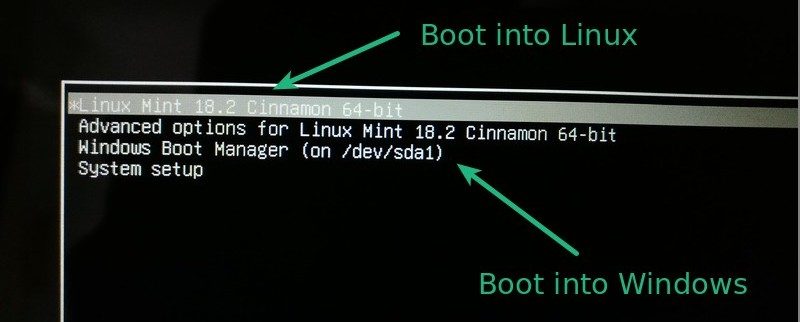
Immediately after you reboot the computer, you should see a screen that looks as shown below:
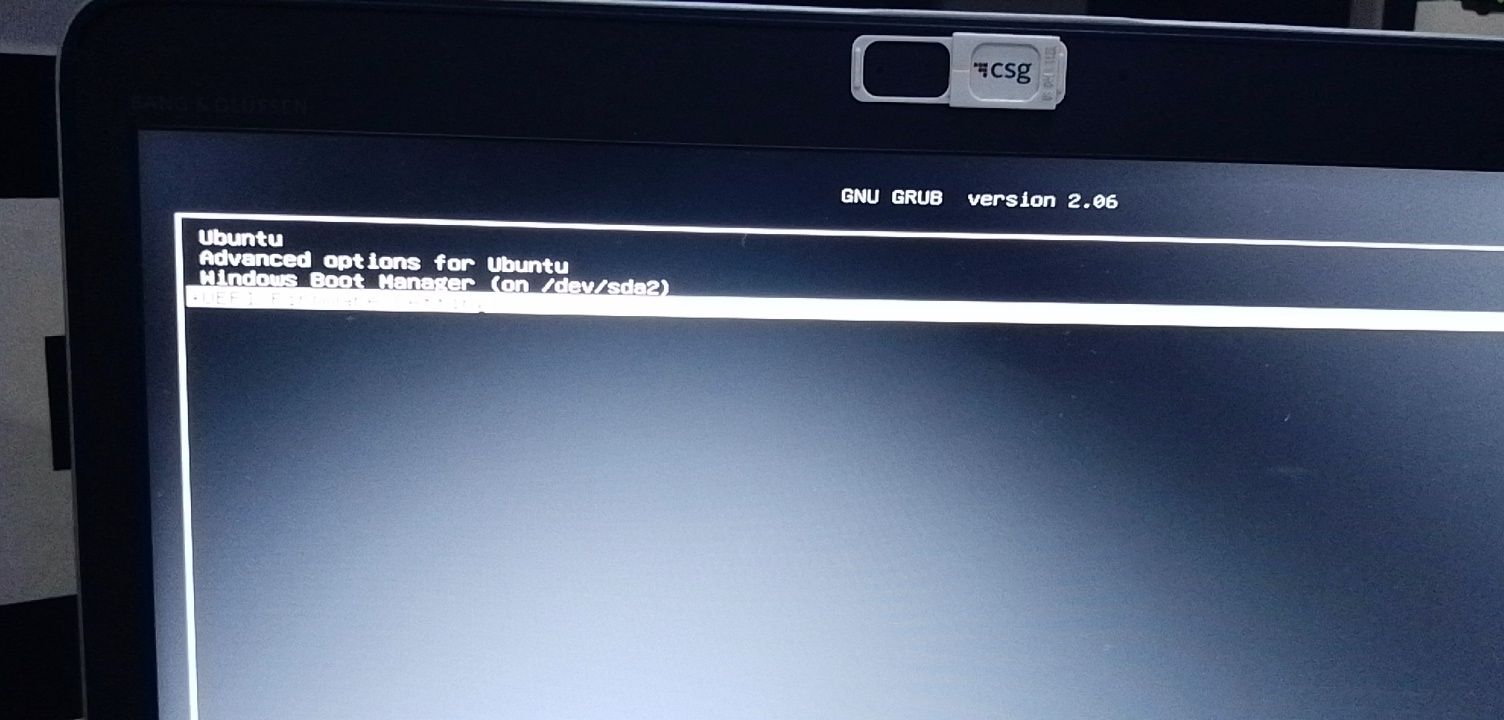
Now, you can select which one to boot into between Ubuntu and Windows 10.
To boot into Ubuntu, select Ubuntu. And to boot into Windows 10, select Windows boot manager.
You can also get into your BIOS from the same place by choosing UEFI Firmware Settings.
Conclusion
I hope this article helps you dual boot Ubuntu and Windows 10 on your computer.
The ultimate aim of this article was to show you how to dual boot Ubuntu and Windows 10.
But the article went beyond that to show you how to:
- check if your PC’s BIOS is in UEFI mode
- partition your hard drive
- optimize your hard drive
- make a bootable USB drive
- install Ubuntu Linux Distro along with Windows on your Windows 10 PC.
If you find this article helpful, kindly share it with your friends and family.
Learn to code for free. freeCodeCamp’s open source curriculum has helped more than 40,000 people get jobs as developers. Get started

So you have decided to switch to Linux. Good decision! And if you chose to use Linux Mint, that’s even a better decision.
Linux Mint is one of the best Linux distributions for beginners. Using Linux Mint is fairly easy and installing Linux Mint is no rocket science either. In this tutorial, we’ll see how to install Linux Mint along side Windows.
Before that, let me recap you a few things about installing Linux Mint. There are a few ways you can start using any Linux based operating system.
- Use Linux inside Windows in a virtual machine: This runs a Linux OS like any other application within Windows. This is also one of the safest ways to get a feel of Linux. However, this will utilize your system resources and if you have less than 4Gb of RAM, I won’t advise using it extensively.
- Use a live version of Linux: In this method, you put Linux on a USB or DVD and you boot from it. This is usually slow and your changes done to the Linux system are (normally) not saved. This is particularly useful if you just want to see what Linux feels like.
- Remove Windows and Linux: If you have backed up your data and have a recovery or installation disk of Windows ready with you or if you are determined that you are not going back to Windows, you can remove Windows completely and use only Linux.
- Install Linux alongside Windows: This method is called dual booting Linux with Windows. Here, you install Linux on a system that already has Windows. And when your system powers up, you can choose if you want to use Windows or Linux. This involves touching the disk partition and sometimes boot order. Absolute beginners often find it complicated but this is the best way to use Linux and Windows together in one system. And in this article, we’ll see how to dual boot Linux Mint with Windows 10.
Will dual booting Linux with Windows slow down your system?
I was asked this question several times in the Linux Users Group. So, the short answer is no. Dual booting Linux and Windows won’t slow your system in any way.
The only delay is in boot time because you get 10 seconds of buffer time to select between Linux and Windows. Once you have booted into either Linux or Windows, it will work the same as if it is the only OS in the system. No impact on the usability of your system.
In other words, dual boot won’t slow down your system.
Install Linux Mint in dual boot with Windows
Before we proceed to see the procedure to dual boot Linux Mint with Windows, let me give you some optional yet recommended safety instructions:
- Back up your data: You are going to touch disk partitions. Normally, it’s not a big issue but just in case if you touched wrong partition etc, you may lose data. So my advice is to back up your important files, documents, music, movies etc to an external disk or cloud, whichever suits you.
- Have a boot repair disk (optional): If your boot gets messed up, you can try to repair it with boot repair disk. If you have an extra USB or CD, you can use that to create boot repair disk.
- Have a live or recovery disk of Windows ready (optional): If your boot gets messed up and despite all efforts, you ended with an unbootable system, you can use the Windows disk to reinstall Windows.
I am not discouraging you. I am asking you to be prepared for the worst case scenario.
Remember that this article applies to computers that have Windows 10 already installed on the system. You are installing Linux Mint on an already installed Windows system, not the other way around.
I have created a detailed video tutorial on installing Linux Mint alongside Windows 10. You can refer to it if you want to see all the steps in even more detail. I also advise you to subscribe to our YouTube channel for more Linux tutorials.
Follow the steps below to install Linux Mint in dual boot with Windows:
Step 1: Create a live USB or disk
Go to Linux Mint website and download ISO file. This ISO file is the disk image that you can burn to a USB or DVD.
There are several versions of Linux Mint available. The default is Cinnamon. If your computer supports 64 bit, go with 64 bit Linux Mint Cinnamon. If you know about other desktop environments, you can make your mind and choose whichever Mint version you want.
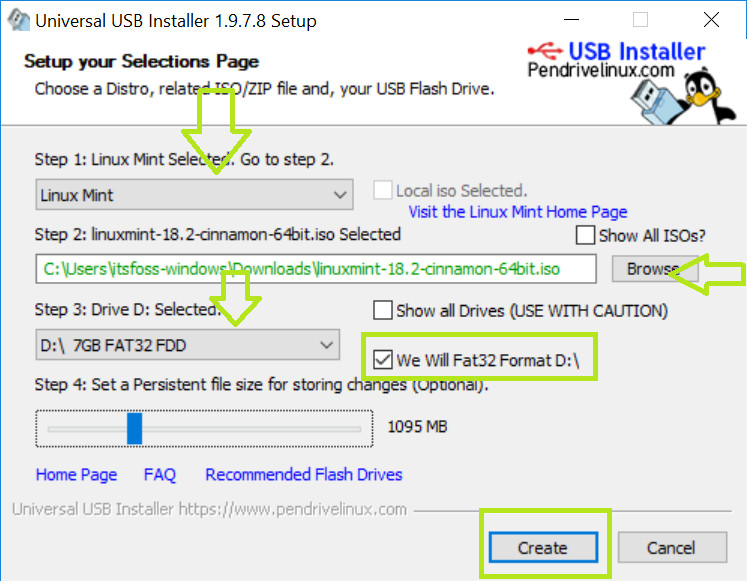
Once you have downloaded the Linux Mint ISO, you need a tool to write the image to a disk. I recommend using a free tool called Universal USB Installer in Windows:
Download Universal USB Installer
It’s an executable exe file. Just double click on it to run the software and browse it to the ISO. Make sure that you have your USB key plugged in:
If you need more hints, here is a screenshot tutorial on how to create a live USB for Linux.
Step 2: Make a new partition for Linux Mint
This is where you have to be cautious. If you have multiple partitions (not the recovery ones), you can either use one of them or create a new partition from an existing partition.
Your existing data will be safe if you have enough free space. Typically, you install Linux in under 15 GB, however, if disk space is not a concern, I advise using 40-60 GB at least. This way you can have more space at your disposal for downloading and keeping various files.
In Windows, go to start menu and type ‘partition’. This will bring up Disk Management utility. Now carefully select the disk in which you’ll make some free space by shrinking the volume:
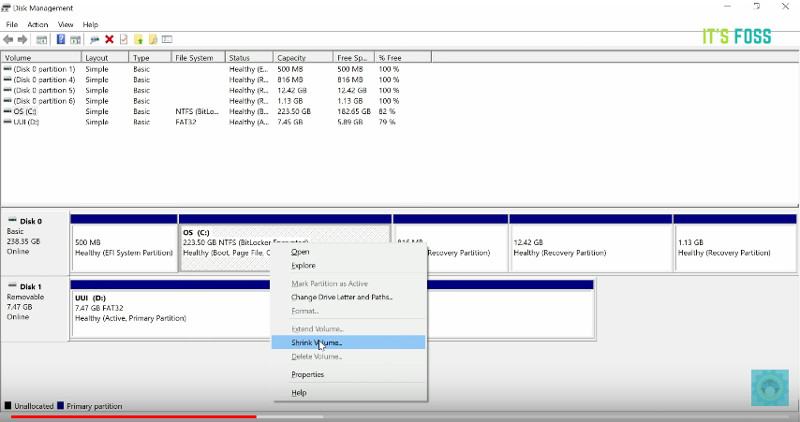
In my case, I only had the C Drive with 223 GB of space on it. So I shrunk it to make 110 GB of free partition on it. I recommend watching the video to see the exact steps you need more hint.
Step 3: Boot in to live USB
Plug the live USB or disk into the computer and restart the computer. While booting the computer press F10 or F12 function key (defers from computer to computer) to go to the boot menu. Now, choose the option to boot from USB or Removable Media.
📋
If your computer is not allowing you to boot from a live USB, you may have to disable secure boot. Most modern systems with Windows should NOT need this step, especially with Linux Mint or Ubuntu.
Step 4: Start the installation
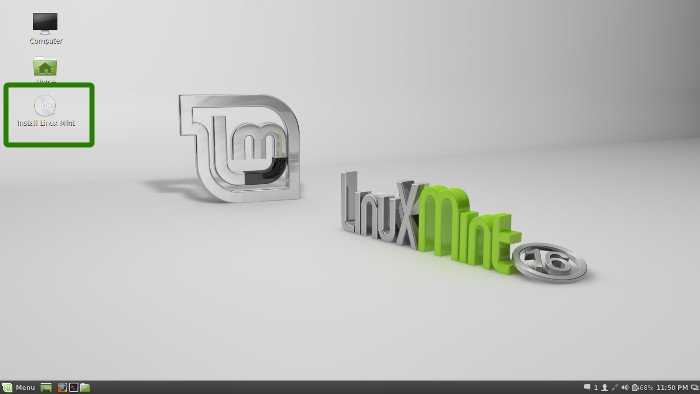
It takes some time to boot from the live USB or disk. Have some patience. Once it boots in to the live disk, you’ll be provided to Try Linux Mint or Install Linux Mint. Even if you choose to try it, you can find the install option on the desktop:
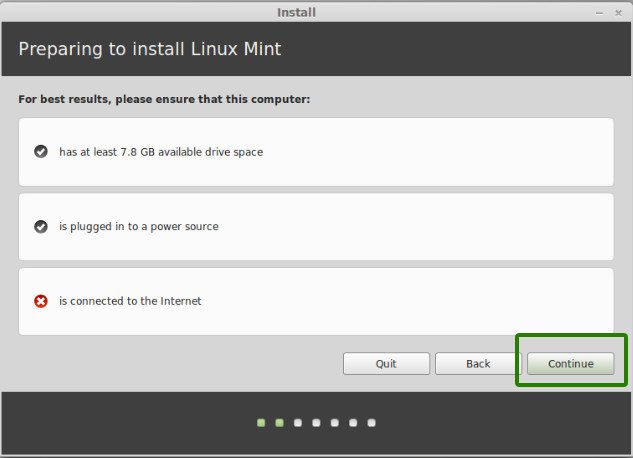
In next few screens, you’ll be asked to choose the language of the operating system. It will then do some checks on available space, battery and Internet connection.
Step 5: Prepare the partition
This is the most important part of the whole installation. Where to install Linux Mint?
💡
If you see the option to Install Linux Mint alongside Windows, you can select that. Linux Mint will handle things on its own. If you do that, skip step 5 and step 6.
But as mentioned before, I prefer separate partitions for Windows and Linux. Windows is already installed here, we’ll prepare a new partition for Linux Mint. In the Installation Type window, choose Something Else:
Step 6: Create root, swap and home
Since you already created a new partition in Windows, it’s time to install Linux Mint on it. Now, there are several ways to do it.
If you want to keep things simple, just go with a single root partition and it will contain everything (swap, home, boot) under it.
But here, I’ll show you my favorite way and that is to have a root, a Swap and a Home.
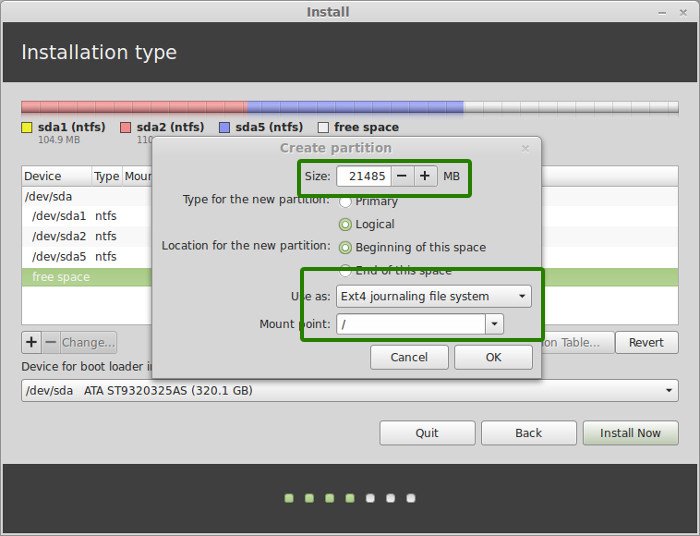
Create a root partition first. Choose the free space available and click on +.
Here, choose the size of the root. Root is like your C drive in Windows. Installed software, updates and other system files are under this root partition. Home partition is for your personal documents, music, downloads etc.
If you have total 100 GB at disposal, give 30 GB to root. In any case, don’t give it less than 15 GB because if root runs out of space, your system will slow down and you’ll run into issues.
I opted to have 20 GB, choose ext4 file system, and mount point as / (i.e. root):
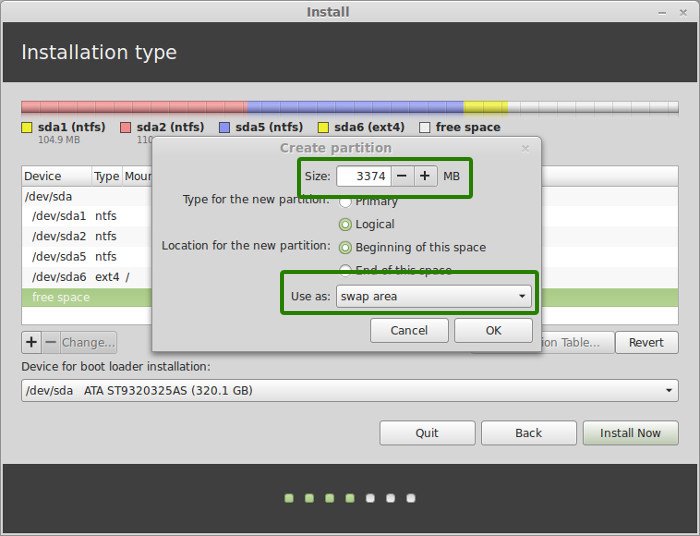
Now, next is to create the swap partition. Now the question is what should be the swap size for Linux Mint installation?
The answer depends upon your RAM size, your needs, available disk space and whether you would use hibernation or not. You can use the below suggestion:
- RAM less than 2 GB: Swap should be double the size of RAM
- RAM between 2 to 4 GB: Swap should be RAM size + 2 GB
- RAM between 6 GB to 8 GB: Swap should be size of RAM
- RAM more than 8 GB: Swap should be half the size of RAM or less
Don’t spend too much time thinking about swap. It is helpful for systems with less memory. For system with more than 8 GB of RAM and SSD, the less the swap, the better it is.
Newer version of Linux Mint utilize Swap file. It creates a special file under root and utilizes it as swap area. You can have both swap partition and swap file in a system.
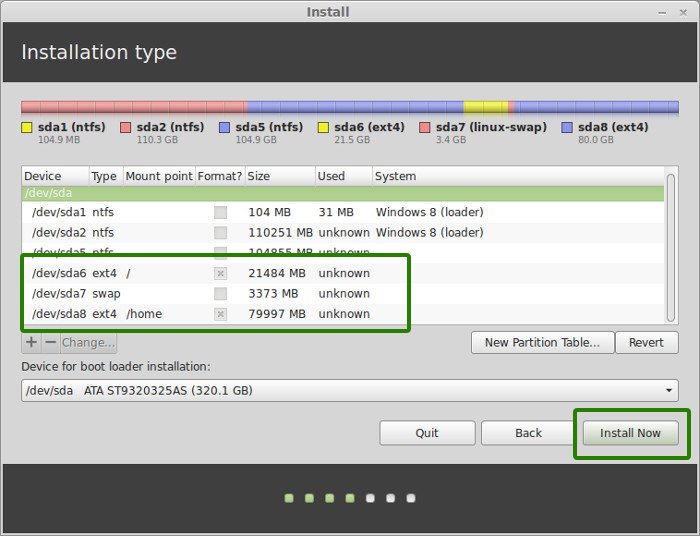
The next step is to create Home. Try to allocate the maximum size to Home because this is where you’ll be downloading and keeping the files.

Once you have created Root, Swap and Home partitions, click on Install Now button.
Step 7: Follow the trivial instructions
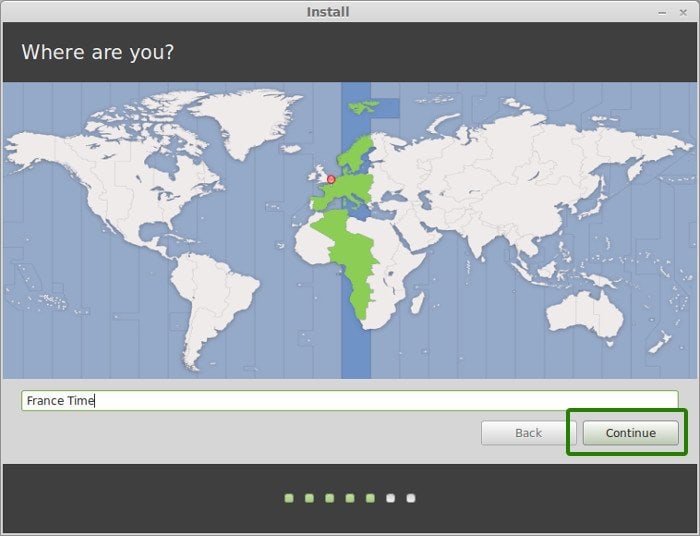
Technically, you have crossed the main hurdle if you reached this point successfully. Now, you will be taken through a number of screens to select options like keyboard layout, login credentials etc. You don’t need to be a genius to figure out what to do here afterward. I have attached screenshots for reference purposes here.
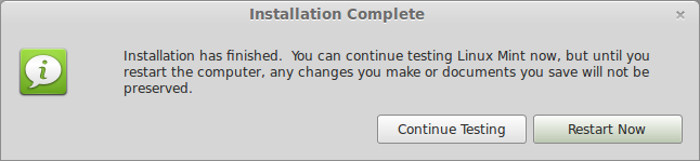
Once the installation is over, you will be presented with the option to keep trying live version or to restart the system.
And that would be it. On next boot, you will see the option of Linux Mint on the grub screen. And thus you can enjoy the beautiful and beginner-friendly Linux distribution. I hope you found this guide to Linux Mint dual boot with Windows helpful.
Here are a few common troubleshooting you might have to do after dual booting Linux Mint:
- Fix Grub Not Showing For Windows 10 Linux Dual Boot
- Fix No Bootable Device Found Error After Installing Ubuntu
- error: no such partition grub rescue in Ubuntu Linux
- Fix Minimal BASH like line editing is supported GRUB Error In Linux
I strongly advise you to read things to do after installing Linux Mint so that you can have a good start.
If you want to remove, you can follow this guide to uninstall Linux Mint from Windows 8 dual boot.
If you have questions, suggestions or a word of thanks, feel free to drop a comment. Stay tuned for more Linux Mint tutorials. Ciao 
This guide provides a step-by-step process for installing and dual booting Arch Linux alongside Windows 10 or Windows 11.
Table of Contents
- Preparation
- Installation Process
- Fixing Windows Boot Menu Entry
- Additional Resources
- Author
Preparation:
I. Download Files:
- Download the latest Arch Linux ISO file from the official website.
- Download a tool like Rufus to create a bootable USB drive.
II. Create a Bootable USB Drive:
- Insert a USB drive with at least 8GB of space.
- Open Rufus and select the downloaded Arch Linux ISO file.
- Partition scheme:
- UEFI System: Select GPT partition scheme.
- Legacy System: Select MBR partition scheme.
- Leave the rest of the settings as default and click on «Start».
III. Prepare Windows Partition:
- Right-click on the Start menu and select «Disk Management».
- Locate your main Windows partition (usually the largest disk).
- Right-click on the partition and select «Shrink Volume».
- Allocate at least 40GB of free space for Arch Linux.
Installation Process:
I. Boot into Arch Linux:
- Restart your system and press the key to enter the boot menu (usually F12 or Escape).
- Select your USB drive to boot into Arch Linux.
- Disable Secure Boot (if applicable):
- If your system has Secure Boot enabled, you’ll need to disable it from the BIOS settings to boot Arch Linux successfully.
II. Connect to Wi-Fi (if applicable):
- Use the
iwctlcommand to list available Wi-Fi networks and connect to your desired network.
iwctl
# Scan for networks:
iwctl scan
# Connect to a network:
iwctl station <interface_name> connect <network_name>
# Enter password:
iwctl station <interface_name> set-key <password>
# Verify connection:
ping -c 2 google.com
III. Partitioning the Disk:
- List your disk partitions using:
lsblk- Identify your main disk (e.g.,
/dev/sda).
- Identify your main disk (e.g.,
- Use cfdisk to create partitions:
sudo cfdisk /dev/<your_main_disk_number> - Create the following partitions:
- EFI Partition (UEFI only): Size: 300MB, Type: EFI System
- Swap Partition: Size: Equal to your RAM size, Type: Linux swap
- Root Partition: Remaining free space, Type: Linux file system
- Write the changes made to the partitions.
IV. Formatting Partitions:
- Format the EFI partition (UEFI only):
mkfs.fat -F32 /dev/<efi_partition_name> - Format the root partition:
mkfs.ext4 /dev/<root_partition_name> - Format the swap partition:
mkswap /dev/<swap_partition_name>
V. Mounting Partitions:
- Mount the root partition:
mount /dev/<root_partition_name> /mnt - Mount the EFI partition (UEFI only):
mount /dev/<efi_partition_name> /boot/efi
VI. Installing Base System Packages:
- Install essential packages:
pacman -S base base-devel linux linux-headers linux-firmware nano networkmanager networkmanager-applet wireless-tools bluez bluez-utils git
VII. Generating fstab File:
- Generate the fstab file:
genfstab /mnt >> /mnt/etc/fstab
VIII. Entering the Installed System:
- Enter the installed system:
arch-chroot /mnt
IX. Configuring Time Zone and Locale:
- Set the time zone:
ln -sf /usr/share/zoneinfo/<your_region>/<your_city> /etc/localtime
- Synchronize system time:
hwclock --systohc - Configure locale:
- Uncomment your desired language in
/etc/locale.gen. - Generate the locale file:
locale-gen - Set hostname:
echo "<your_hostname>" > /etc/hostname - Edit the
/etc/hostsfile usingnano.
- Uncomment your desired language in
X. Creating Username and Password:
- Set root password:
passwd - Add a new user:
useradd -m <username> - Set password for the new user:
passwd <username> - Add the user to the wheel group for administrative privileges:
usermod -aG wheel <username>
XI. Enabling sudo Privileges:
- Edit the
/etc/sudoersfile using nano and uncomment the line:wheel ALL=(ALL) ALL
XII. Installing Bootloader:
- Install bootloader and additional packages:
pacman -S grub os-prober ntfs-3g - Identify your main disk number using
lsblk. - Install grub on a UEFI system:
- If you encounter an error, install
efibootmgrusingpacman -S efibootmgrand rerun the previous command.
- If you encounter an error, install
grub-install --target=x86_64-efi --efi-directory=/boot --bootloader-id=grub
- Install grub on a legacy system:
grub-install --target=i386-pc /dev/<your_main_disk_number>
XIII. Generating Grub Configuration File:
- Generate the grub configuration file:
grub-mkconfig -o /boot/grub/grub.cfg
XIV. Installing Display and Audio Drivers:
- Install video and audio drivers:
pacman -S xfce4 xfce4-goodies - For Nvidia graphics cards, additionally install:
pacman -S nvidia nvidia-utils nvidia-settings
XV. Enabling Services at Startup:
- Enable network manager and bluetooth services:
systemctl enable networkmanager bluetooth
XVI. Installing Desktop Environment:
- Choose and install your preferred desktop environment:
- Gnome:
pacman -S gnome - KDE:
pacman -S plasma kde-applications - XFCE:
pacman -S xfce4 xfce4-goodies
- Gnome:
XVII. Enabling Display Manager:
- Enable the display manager corresponding to your desktop environment:
- Gnome:
systemctl enable gdm - KDE:
systemctl enable sddm - XFCE:
systemctl enable lightdm- If lightdm is not installed, install it using:
pacman -S lightdm lightdm-gtk-greeter - Enable it:
systemctl enable lightdm
- If lightdm is not installed, install it using:
- Gnome:
XVIII. Exiting and Rebooting:
- Exit the chroot environment:
exit - Reboot the system:
reboot
Fixing Windows Boot Menu Entry (if not appearing):
I. Boot into Arch Linux.
II. Identify Windows Partition: lsblk
III. Mount Windows Partition:
mount /dev/<windows_partition_name> /mnt/windows
IV. Edit /etc/default/grub:
- Edit the file using nano.
- Uncomment the line:
GRUB_DISABLE_OS_PROBER
V. Regenerate Grub Configuration:
grub-mkconfig -o /boot/grub/grub.cfg
VI. Reboot the system.
Additional Resources
Official Arch Linux Resources:
-
Arch Linux Wiki: The official Arch Linux Wiki is an incredibly comprehensive resource for all things Arch, including detailed installation guides, troubleshooting tips, and configuration options: wiki.archlinux.org.
-
Arch Linux Forums: The Arch Linux forums are a vibrant community where you can ask questions, get help from experienced users, and stay updated on the latest developments: bbs.archlinux.org.
Additional Tutorials and Guides:
- Video Tutorials: Many excellent video tutorials exist online that provide visual guidance through the installation process. Search for «Arch Linux dual boot Windows 10/11» on platforms like YouTube to find helpful resources.
- I recommend this awesome video by Sandip Sky.
Troubleshooting and Support:
-
Reddit Community: The r/archlinux subreddit is a great place to find answers to common problems, share experiences, and connect with other Arch Linux users: reddit.com/r/archlinux.
-
Comments in this Gist: Feel free to leave comments directly in this Gist if you have any questions or encounter specific difficulties.
-
Contact Me: Feel free to contact me directly through X.
Author
Yousef Saeed:
GitHub
LinkedIn
X
Installing Linux alongside Windows 10 in a dual boot setup is a great way to enjoy the perks of both operating systems on one machine. The process involves partitioning your hard drive, creating a bootable Linux USB, and installing Linux. This guide walks you through the entire journey, from preparing your system to switching between Windows and Linux seamlessly.
This guide will help you install Linux on your Windows 10 system without wiping your existing data. You’ll end up with a machine capable of running both operating systems, choosing which one to boot at startup.
Step 1: Backup Your Data
First step, always back up your important files.
Before diving into any installation, it’s crucial to back up your important data. This ensures that if anything goes wrong during the installation, you won’t lose important files or documents.
Step 2: Create Space for Linux
Second step, shrink your current Windows partition to make room for Linux.
Open the Disk Management tool in Windows, then right-click on your primary partition and select “Shrink Volume.” Allocate enough space for Linux, typically 20-50GB, depending on your needs.
Step 3: Download a Linux Distribution
Third step, download your preferred Linux distribution ISO file.
Popular options include Ubuntu, Fedora, and Mint. Visit the official website of your chosen Linux distribution and download the ISO file.
Step 4: Create a Bootable USB Drive
Fourth step, make a bootable USB drive with the downloaded Linux ISO.
Use a tool like Rufus or Etcher to create a bootable USB drive. Insert the USB drive into your computer, open the tool, and follow the instructions to burn the Linux ISO onto the USB.
Step 5: Disable Secure Boot
Fifth step, disable secure boot in your BIOS settings.
Restart your computer and enter the BIOS/UEFI settings. Navigate to the security tab and disable “Secure Boot,” as it can prevent Linux from booting correctly.
Step 6: Boot from the USB Drive
Sixth step, restart your computer and boot from the USB drive.
Change the boot order in your BIOS/UEFI settings, so your computer boots from the USB drive. Save and exit, which will reboot your computer into the Linux installation environment.
Step 7: Install Linux
Seventh step, follow the on-screen instructions to install Linux.
Begin the installation process. When prompted, choose the option to install Linux alongside Windows. Be careful with partitions, selecting the space you freed earlier for Linux.
After completing these steps, your computer will restart, and you’ll be greeted by a boot menu every time you turn on your machine. This menu allows you to choose whether you want to run Windows 10 or your new Linux OS.
Tips for Installing Linux on Windows 10 Dual Boot
- Ensure Compatibility: Before installation, check that your hardware is compatible with the Linux distribution you want to install.
- Understand Partitions: Familiarize yourself with partition concepts. Knowing how much space to allocate can make your dual boot experience smoother.
- Check BIOS/UEFI Settings: Some systems might require additional BIOS/UEFI changes, like enabling Legacy Boot.
- Keep Installation Tools Handy: Keep your bootable USB and any necessary tools nearby in case you need to troubleshoot.
- Use a Stable Distribution: If you’re new to Linux, use a stable and widely supported distribution like Ubuntu for fewer hassles.
Frequently Asked Questions
Will dual booting slow down my computer?
Dual booting itself doesn’t slow down your computer. However, keep an eye on disk space so that both systems have enough room to operate efficiently.
Can I remove Linux later if I don’t like it?
Yes, you can remove Linux and reclaim the space for Windows. Use a partition tool to delete the Linux partitions and extend your Windows partition.
Do I need a separate license for Linux?
No, Linux is open-source software, and most distributions are free to download and use without a license.
Will I lose access to my Windows files?
No, Linux can read and write to Windows partitions, so you can access your Windows files while using Linux.
How can I switch back to Windows after booting into Linux?
Restart your computer, and at the boot menu, choose the Windows option to switch back.
Summary
- Backup your data.
- Create space for Linux.
- Download a Linux distribution.
- Create a bootable USB drive.
- Disable secure boot.
- Boot from the USB drive.
- Install Linux.
Conclusion
Setting up a Linux and Windows 10 dual boot system may seem daunting at first, but it’s a rewarding process that opens up a world of flexibility and exploration. Whether you’re a developer seeking a versatile environment or a curious learner wanting to experiment with Linux, dual booting is a great way to have the best of both worlds on a single machine. Taking the time to follow each step carefully ensures a smooth installation process. And remember, the world of Linux isn’t just an operating system—it’s a community ready to welcome you with open arms. Dive in, explore, and make the most of your dual boot setup. Happy computing!
Matt Jacobs has been working as an IT consultant for small businesses since receiving his Master’s degree in 2003. While he still does some consulting work, his primary focus now is on creating technology support content for SupportYourTech.com.
His work can be found on many websites and focuses on topics such as Microsoft Office, Apple devices, Android devices, Photoshop, and more.
If you have a computer running Windows 11 (or 10), you can set up a dual-boot configuration with Linux Mint, and in this guide, I’ll explain the steps to complete this process.
Although you can run Linux Mint (and other distributions) alongside Windows 11 using the Windows Subsystem for Linux (WSL) or a virtual machine, it’s also possible to install this distro in a dual-boot system to have full access to the hardware capabilities.
Or, if you’re still using Windows 10, you can configure a dual-boot system to test Linux Mint as the replacement operating system, as Windows 10 will retire on October 14, 2025.
In this guide, I will explain how to set up a dual-boot system using Windows and Mint. (You can follow these instructions to dual-boot Windows 11 and Ubuntu.)
Warning: It’s important to note that even though it’s safe to use this process to install Linux alongside Windows, creating a full backup of your computer before proceeding in case you need to roll back is still recommended.
Setting up a dual-boot system involves three main steps. First, create a Linux Mint bootable USB drive. Next, shrink the current Windows installation to allocate space for Linux. Finally, install Linux Mint alongside Windows 11 (or 10) on the same computer.
If your computer uses drive encryption, it’s recommended that you temporarily disable BitLocker before proceeding. Once Linux is installed, you can re-enable BitLocker.
- Create Linux Mint USB bootable media
- Shrink Windows 11 partition
- Dual-boot Windows 11 and Linux Mint
Create Linux Mint USB bootable media
The easiest way to create a bootable USB drive that works with both BIOS and UEFI systems is by using the Rufus tool. Rufus is user-friendly and widely recommended for this purpose.
To create a bootable Linux USB drive, follow these steps:
-
Open the Linux Mint download page.
-
Click the Download button for the Cinnamon Edition.

-
Click the download link closer to your location under the “Download mirrors” section.
-
Save the ISO file on your computer.
-
Open the Rufus website.
-
Click the link to download the latest version under the “Download” section.
-
Choose the USB flash drive from the “Device” setting.
-
Double-click the executable to launch the tool.
-
Click the Select button.

-
Select the Linux Mint ISO file.
-
Click the Open button.
-
Continue with the default settings after the download.
-
(Optional) Specify a name for the drive under the “Volume label” setting.
-
Click the Start button.
-
Click the OK button with the default option.

-
Click the Yes button.

-
Click the OK button.


After completing the steps, you can proceed with the steps below to create a dual-boot system with Linux Mint and Windows 11.
Alternatively, you can use the Ventoy utility to make any installation media bootable by dragging and dropping the ISO file into a USB flash drive.
Shrink Windows 11 partition
Although the Linux Mint setup has the option to install alongside Windows 11 (or 10), this feature may not always work. For that reason, you may want to manually shrink the Windows partition to create space to install the Linux distro.
Alternatively, you can use a secondary internal drive for the Linux Mint setup. This approach keeps each operating system on a separate physical drive, avoiding the need to modify the existing drive partition and reducing the risk of accidental data loss.
If your device does not currently have an operating system installed, perform a clean installation of Windows 11 (or use these steps for Windows 10). Once the installation is complete, proceed with the instructions below to set up a dual-boot configuration.
To shrink a partition on Windows 11 or 10 using Disk Management, follow these steps:
-
Open Start.
-
Search for Create and format hard disk partitions and click the top result to open the Disk Management console.
-
Right-click the drive you want to change its partition size and select the Shrink Volume option.

-
Confirm the amount of space to shrink the partition (in megabytes).
Quick note: Linux Mint requires at least 20GB of available space, but the rule of thumb is to reserve at least 100GB.
-
Click the Shrink button.

Once you complete the steps, you’ll have a smaller partition and some unallocated space to install Linux Mint.
Dual-boot Windows 11 and Linux Mint
After shrinking the system partition and creating a bootable Linux Mint installer, you can proceed with the dual-boot installation
To dual-boot Windows 11 and Linux Mint, follow these steps:
-
Start the PC with the Linux Mint USB flash drive.
Quick Tip: If your computer is not starting into the setup, you may need to access the system BIOS to change the boot settings to start from USB. Typically, you can change these settings by pressing one of the functions (for example, F2, F8, F12), Delete, or ESC key. However, check your computer manufacturer’s support website for more details.
-
Select the “Start Linux Mint” option and press Enter.

-
Double-click the “Install Linux Mint” icon on the desktop.

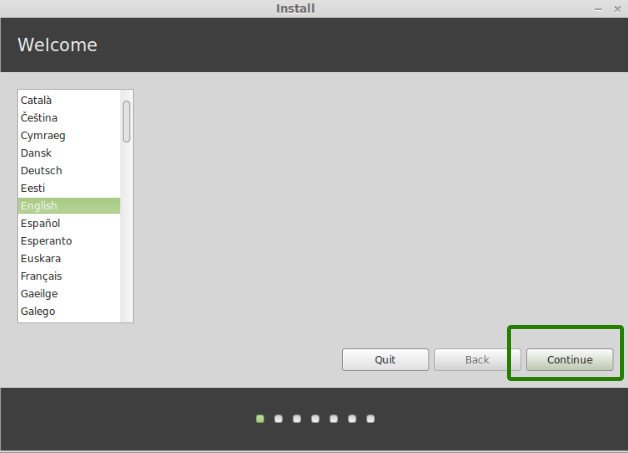
-
Select the installation language.
-
Click the Continue button.
-
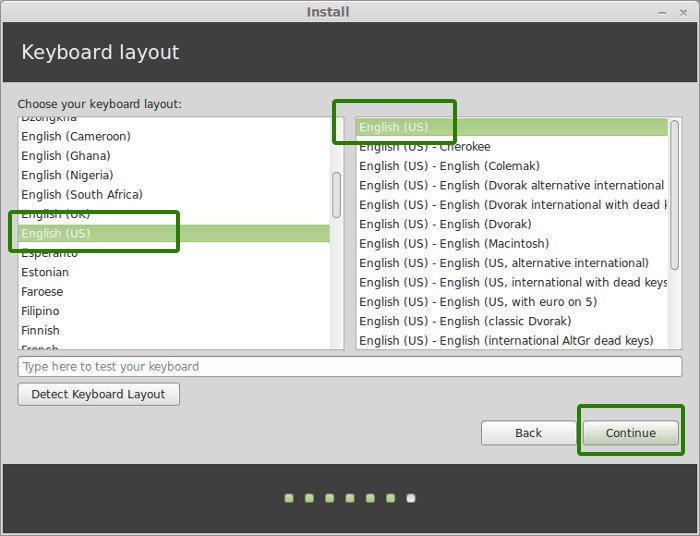
Select the keyboard layout.
-
Click the Continue button.
-
(Optional) Check the “Install multimedia codecs” option.
-
Click the Continue button.
-
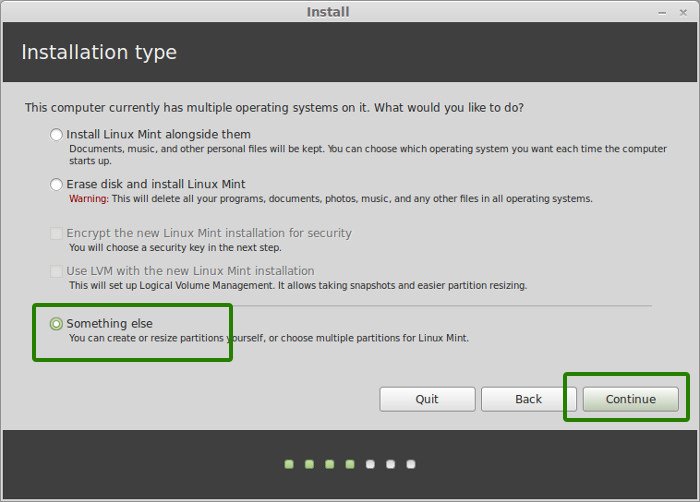
Select the “Something else” option on the “Installation type” page.
-
Click the Continue button.
-
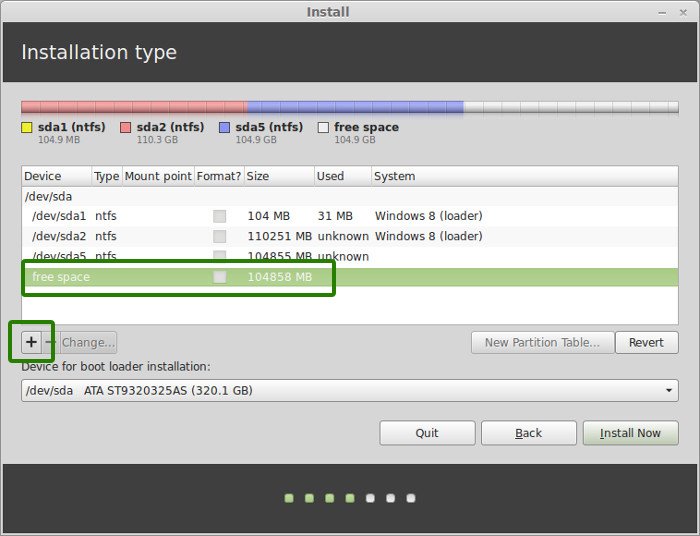
Select the free space option, which is the unallocated space created with the Disk Management tool on Windows 11.
-
Click the “+” (plus) button to open the partition wizard.
-
Select the “/” option in the “Mount point” setting. Otherwise, you will receive the “no root file system is defined” error during a Linux Mint installation.
-
Click the OK button to create a Linux Mint-compatible partition with the total remaining space using the default settings.
-
Click the Install now button.
-
Click the Continue button.
-
Select your region.
-
Click the Continue button.
-
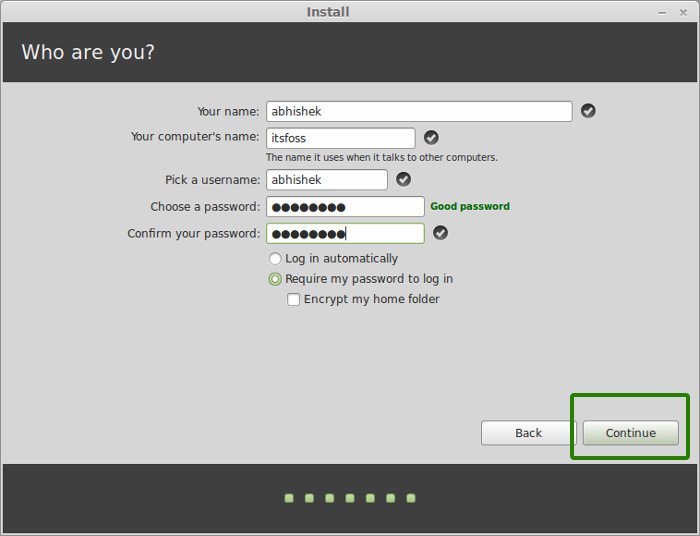
Create a local account for the Linux Mint installation.
-
Click the Continue button.
-
Click the Restart now button.
-
Disconnect the USB flash drive from the computer and press Enter.


Once you complete the steps, Linux Mint will install on your device alongside Windows 11 (or 10).
It’s important to note that since you are installing Linux as the second operating system, the Linux Mint installation will make the GRUB (Grand Unified Bootloader) the default experience.

Also, this setup will make the Linux Mint the default operating system. If you want to start the computer on Windows 11 (or Windows 10), you will have to select the “Windows Boot Manager” option.