
Applies ToWindows 11 Windows 10
Windows 11 позволяет выбрать время и способ получения последних обновлений, чтобы обеспечить бесперебойную и безопасную работу устройства. Если вы не готовы получить рекомендованные обновления, можно временно приостановить загрузку и установку обновлений.
-
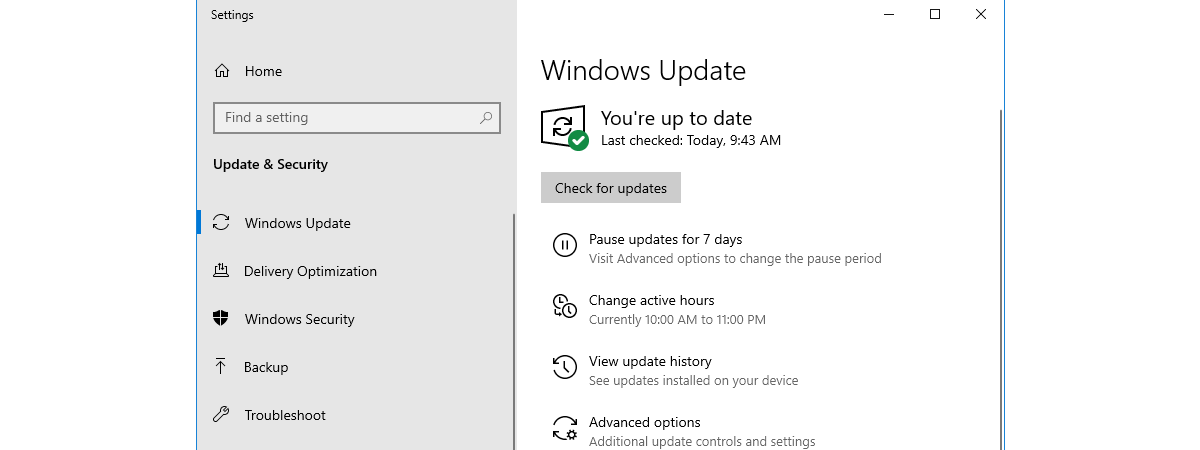
Выберите Пуск > Параметры > Центр обновления Windows .
-
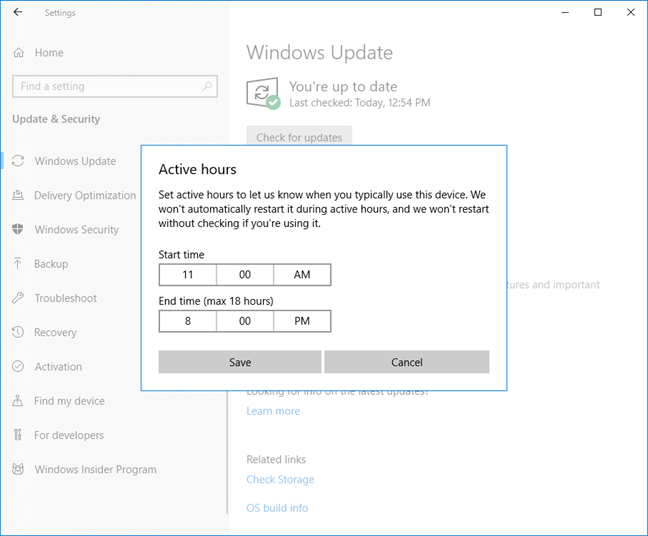
Выберите время, на которое вы хотите приостановить работу.
Примечание: По достижении предела приостановки, вам потребуется установить последние обновления, перед тем как вы сможете опять приостановить их скачивание и установку.
Чтобы завершить установку обновлений, необходимо перезагрузить устройство. Если отображается запрос на перезагрузку устройства, но вы не хотите прерывать работу, запланируйте перезагрузку на более удобное время.
-
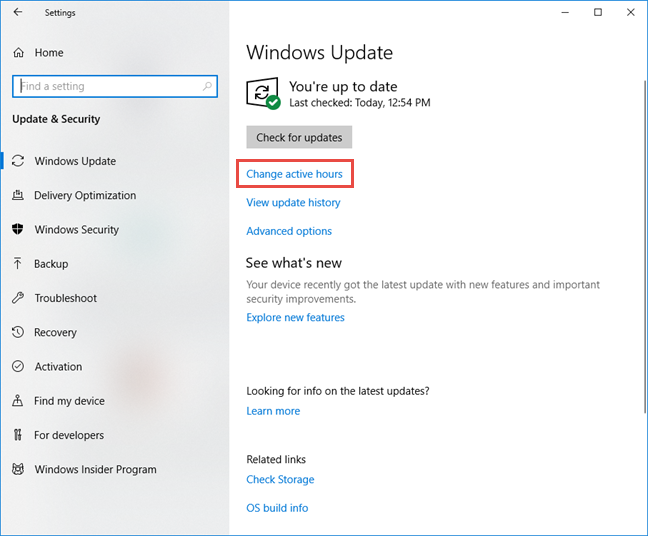
Выберите Пуск > Параметры > Центр обновления Windows .
-
Выберите Запланировать перезагрузку и укажите удобное для вас время.
Открыть клиентский компонент Центра обновления Windows
Нужна дополнительная помощь?
Нужны дополнительные параметры?
Изучите преимущества подписки, просмотрите учебные курсы, узнайте, как защитить свое устройство и т. д.
Добрый день, у нас в компании очень много пк на windows 10 и каждый раз, когда microsoft выпускают обновления все компы начинают массово их скачивать, тем самым знатно подгружая канал (не надо мне говорить про настройку сетевого оборудования)
Скажите пожалуйста, как и где указать время скачивания и установки обновлений ?
Я знаю, где указывается время, когда можно установить обновления, но где указать время для скачиваний обновлений нет
СПАСИБО.
-
Вопрос задан
-
978 просмотров
как временное решение — в настройках апдейта есть опция скачивать через локалку, если есть комп с этим апдейтом в сети. это поможет снизить нагрузку на внешний канал.

Как вариант, не совсем «корпоративное» решение, но всё же:
Windows Update MiniTool — wumt
Install or remove Windows Updates by using this straightforward application that also lets you hide some of the available updates
IMPORTANT NOTICE Windows Updates are Microsoft’s way to ensure that everybody receives all available bug fixes, patches or enhancements on time. While it is undoubtedly useful to install them, sometimes these updates might come in a bad moment, e.g. when you are in a hurry or are busy working, so you simply postpone them. If you want to make sure that you do not forget about the postponed updates, you can use Windows Update MiniTool, as it allows you to download and install them when you choose. Portable app for managing Windows Updates This application features a straightforward layout that makes it as intuitively as possible for all users to enjoy its feature-set. Since it is portable, it does not require any installation on the host PC, so you can start working with it as soon as you download it. Nonetheless, it needs to be emphasized that you can only download updates for the current computer, meaning that you cannot grab them for another workstation you might also own. Look for new updates, and then download or install them Once you launch Windows Update MiniTool, you can search for available updates, as well as explore or remove the ones you have previously installed. After you get the list with the new updates, you have two options: download them and install at a later time or download and install immediately. Due to this application, you can also hide some of the offered updates, so they are no longer displayed in the main window list. Change the default behavior for future Windows Updates Windows Update MiniTool can also come in handy when you want to alter the standard behavior for Windows Updates. As such, you can disable them, set them to be installed automatically, or set them to be downloaded only. They can also trigger only a notification, or they can run in a scheduled mode. All in all, this application can prove to be a nifty solution for all those who want more control over the Windows Updates that get installed on their computer
Как настроить время скачивания и установки обновлений на windows 10?
Смотрите тут -www.oszone.net/27827
Хотя если компьютеров много, то гораздо грамотнее будет поднять wsus — это не сложно, зато обновления будут грузиться один раз для всех, а так в любом случае у вас каждая машина себе будет качать отдельно.
Пригласить эксперта
wsus сервер и настройка gpo спасет отца русской демократии
-
Показать ещё
Загружается…
Минуточку внимания
Select Start > Settings > Update & Security > Windows Update . Select Schedule the restart and choose a time that’s convenient for you. Note: You can set active hours to make sure your device only restarts for updates when you’re not using your PC. Get updates when you’re away from your PC with active hours in Windows.
How do I change Windows Update hours?
- Select Start > Settings > Update & Security > Windows Update , then select Change active hours.
- Turn on Automatically adjust active hours for this device based on activity.
How do I change Windows Update frequency?
To turn on Automatic Updates yourself, follow these steps:
- Click Start, click Run, type wscui. cpl, and then click OK.
- Click Automatic Updates.
- The following options are available: Automatic (recommended) This option lets you select the day and the time that updates are automatically downloaded and installed.
How do I change Windows Update settings in Windows 10?
Open the Start menu, then select All Programs at the bottom. Select Windows Update. Select Change Settings. For Important updates, select Install updates automatically.
How do I change the pause Windows 10 Update?
Navigate to Settings > Update & Security > Windows Update. Click the “Pause updates for 7 days” option here. Windows won’t automatically download or install updates for the next 7 days. You can click “Pause updates for 7 days” again to add more time to the pause period.
Can Windows Update during active hours?
Windows will only automatically install updates and restart during the hours of midnight to 6 AM. Note that your active hours must be between 1 and 18 hours. You can’t go above 18 hours. You also can’t set different active hours on different days, so you can’t specify different active hours for weekdays and weekends.
How do I turn off active hours?
Click on Update & Security. Click on Windows Update. Click the Change active hours option. Turn off the Automatically adjust active hours for this device based on activity toggle switch.
Will there be a Windows 11?
Starting today, October 5th, Microsoft is rolling out the new Windows 11 to eligible devices. Earlier this year, Microsoft announced the new flagship update to its operating system: Windows 11.
Will Windows 10 automatically update Windows 11?
As a free replacement for Windows 10, your PC will upgrade to Windows 11 automatically. If it doesn’t meet the hardware requirements, your PC will remain on Windows 10 until hardware support expires. At that point, you should really upgrade both your PC’s hardware as well as the operating system.
How often do you have to update Windows 10?
once every six months
Microsoft also releases big, major versions of Windows 10 once every six months. It calls these “feature updates.” They include lots of changes and improvements.
How long does the Windows 10 20H2 update take?
approximately 30-45 minutes
Feature updates take approximately 30-45 minutes on average, longer than traditional Windows updates. ITS recommends beginning the update when you are not working, such as at the end of the workday. If Windows 10 20H2 is not installed by September 8, the update will run automatically at 5:30 p.m. on that day.
Should I turn off Windows 10 updates?
As a general rule of thumb, I’d never recommend disabling updates because security patches are essential. But the situation with Windows 10 has become intolerable.Moreover, if you’re running any version of Windows 10 other than the Home edition, you can disable updates completely right now.
How can I speed up my laptop with Windows 10?
Here are seven ways you can speed up your Windows 10 computer right now.
- Reduce the amount of apps that open at startup.
- Uninstall bloatware and other unwanted programs.
- Disable Windows special effects.
- Turn off window transparency.
- Run your computer at full power.
- Keep Windows up to date.
How do I stop Windows from updating constantly?
How to disable automatic updates with Settings
- Open Settings.
- Click on Update & Security.
- Click on Windows Update.
- Click the Advanced options button. Source: Windows Central.
- Under the “Pause updates” section, use the drop-down menu and select how long to disable updates. Source: Windows Central.
How long can you pause Windows 10 updates?
35 days
Note: you can only pause updates for up to 35 days, after which you’ll have to update your device before you can pause the updates again.
How do I stop a Windows Update in Progress?
To stop the service, follow these instructions:
- Press the Windows logo key + R combination to open the Run dialog box.
- Type in “services.
- When the services window opens, scroll down the list to locate “Windows Update”.
- Right-click on it and choose Stop.
- Wait for the process to complete and then close the window.
Can I leave Windows 10 to update overnight?
In Windows 10, Microsoft automatically downloads your updates and restarts your computer to install them, but with Active Hours, you can automatically set the times you do NOT want it to update.Select Update & security > Windows Updates. 2. Click Active Hours at the bottom of the Windows Update screen.
What are Windows 10 active hours?
It’s called active hours. Active hours are a time range you can set to let your PC know when you’re usually using your device, so it won’t restart automatically during those times.
When did Windows 11 come out?
October 5, 2021
Windows 11 was released to the general public on October 5, 2021. That initial release was version number 22000.194, which was first released as a cumulative update to members of the Windows Insider Program on September 16, 2021.
How do I turn off active hours in Windows 2016?
Disable Windows Server Updates Active Hours
- Open Windows Powershell by right click > run as administrator.
- Type: SCONFIG and hit enter.
- Press 5 (Windows Update Settings)
- Press D (Download Only mode)
- Close Powershell. If you were to run SCONFIG again your option 5) should look like this:
How do I turn off active hours in Windows Server 2019?
In Windows 10, and perhaps on Windows Server 2019, use these steps:
- Open Settings > Update & Security > Windows Update.
- Toggle of “Automatically adjust active hours for this device based on activity”
- Click Change.
- Set your hours and click Save.
Все способы:
- Смена периода активности
- Установка обновлений
- Расширенные настройки обновления
- Удаление обновлений
- Отключение автообновлений
- Вопросы и ответы: 0
Для ручного изменения некоторых параметров обновления на компьютере с Windows 10 в первую очередь необходимо убедиться, что функция активна, иначе настроить ее не получится. Ранее мы писали о том, как правильно включить проверку и установку апдейтов для операционки.
Подробнее: Методы активации автообновления в Windows 10
Смена периода активности
В предустановленном приложении «Параметры» Windows 10 есть раздел, где осуществляется настройка временного периода как проверки новых обновлений, так и непосредственной интеграции в систему, а также некоторые другие дополнительные параметры. Для начала разберем, как вручную настроить время автоматических обновлений:
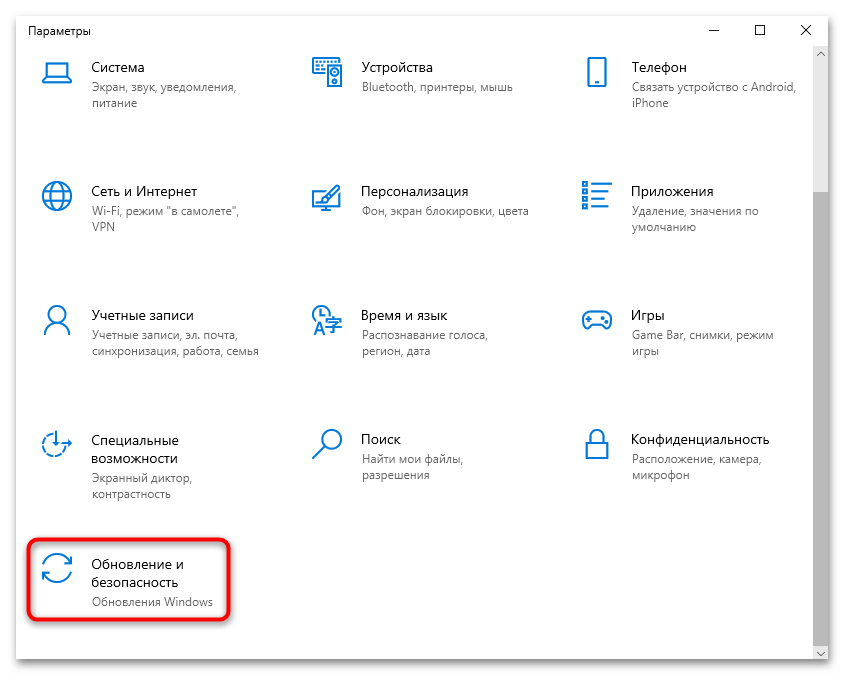
- Нажмите на кнопку «Пуск», затем выберите запуск системных «Параметров» — значок, стилизованный под шестерню.
- Выберите раздел «Обновление и безопасность».
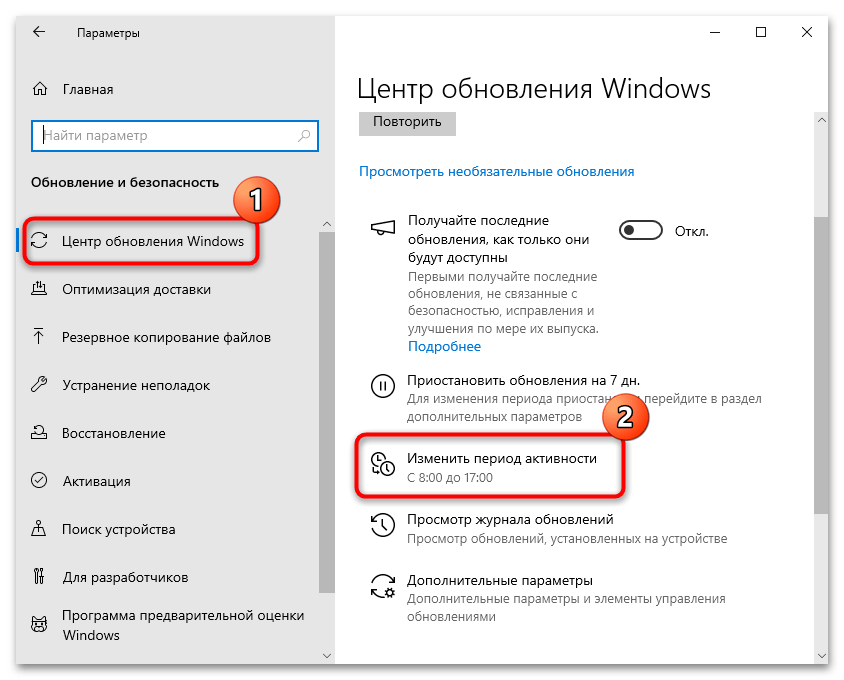
- Если потребуется, переключитесь на вкладку «Центр обновления Windows» на панели слева, затем кликните по строке «Изменить период активности».
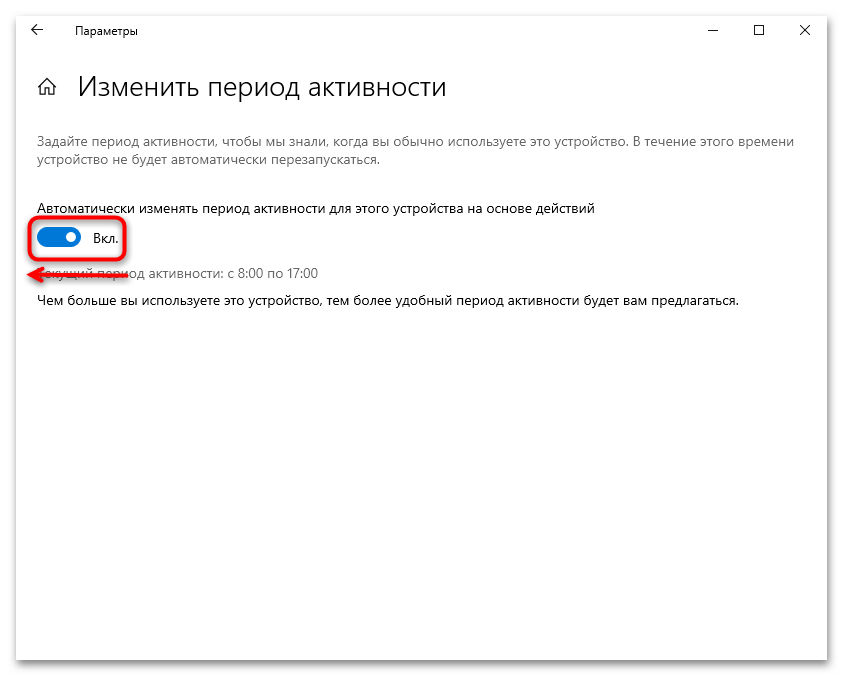
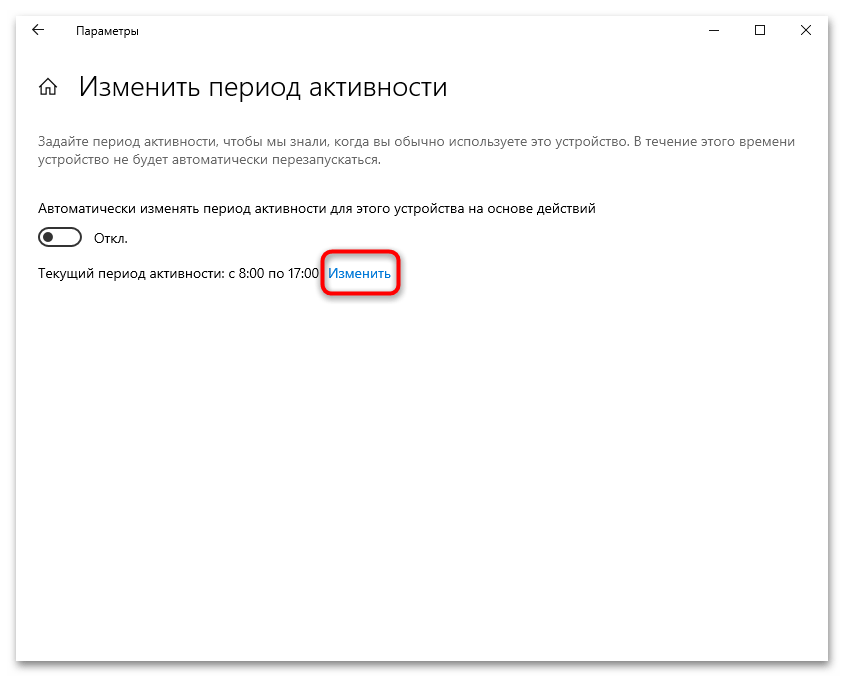
- По умолчанию установлен параметр «Автоматически изменять период активности для этого устройства на основе действий», при котором операционная система на основе анализа использования компьютером самостоятельно определяет наиболее подходящее время для проверки и скачивания апдейтов. Чтобы выставить персональные параметры, переведите переключатель в неактивное состояние.
- Ниже, рядом с текущим периодам активности, появится новая кнопка – «Изменить». Кликните по ней.
- В следующем окне нужно выбрать время вашей активности – то есть период, когда вы обычно используете компьютер. Вручную укажите время начала и окончания активности, затем нажмите на кнопку «Сохранить».

В тот временной отрезок, который выходит за рамки указанного времени, и будет осуществляться автоматическое сканирование на наличие новых обновлений и установка апдейтов.
Также предлагается готовый вариант периода активности, который основывается на пользовательских действиях. Можно выбрать и его, если он вам подходит, таким образом настройка осуществится всего за один клик.
Также в Windows 10 есть возможность временно отключить обновления на 7 и более дней. В результате система в это время не будет даже пытаться проверить наличие обновлений и тем более скачивать их. Всего возможно приостановить их на 35 дней, после чего функция станет недоступна.
Установка обновлений
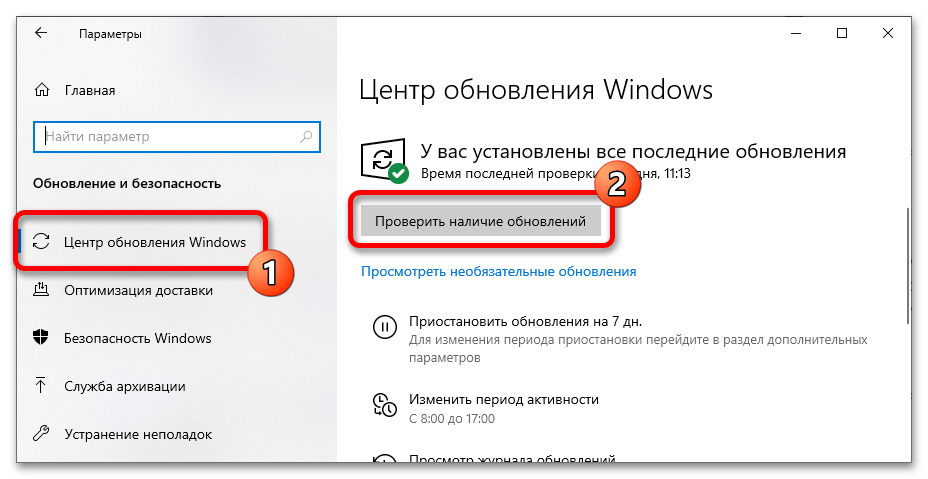
В Windows 10 есть параметры выбора установки уже скачанных обновлений. Также вы можете вручную запустить проверку на наличие актуальных апдейтов – для этого в главном окне «Обновления и безопасности» достаточно нажать на соответствующую кнопку.
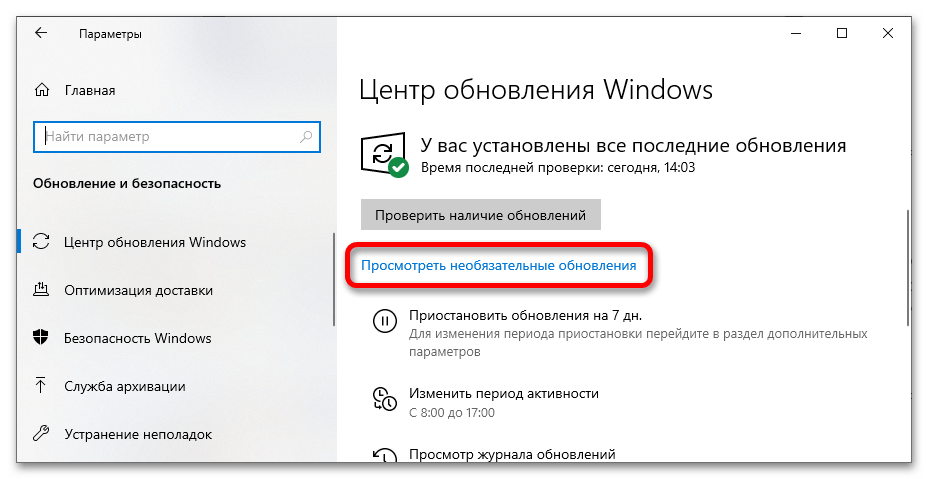
Если актуальное программное обеспечение найдено, можно вручную запустить его загрузку, но вот уже после скачивания есть несколько дополнительных параметров, в том числе выбор необязательных обновлений для загрузки и планирования времени перезагрузки системы. Если присутствуют необязательные апдейты, их можно посмотреть в соответствующем разделе, который появится. Здесь есть возможность выбрать, какие из них скачивать и устанавливать.
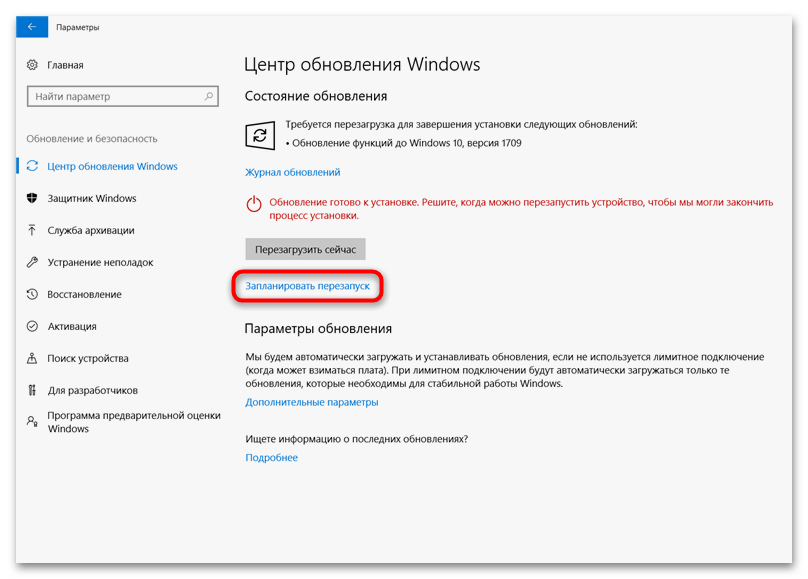
После того как все обновления были скачаны и установлены, именно сейчас можно запланировать перезапуск системы, кликнув по соответствующей кнопке. Это пригодится, если в данный момент нет возможности перезапуска, потому как, например, вы выполняете важную работу на компьютере. В следующем окне предлагается выбрать время и день, когда компьютер будет перезагружен для того, чтобы апдейты вступили в силу.
Расширенные настройки обновления
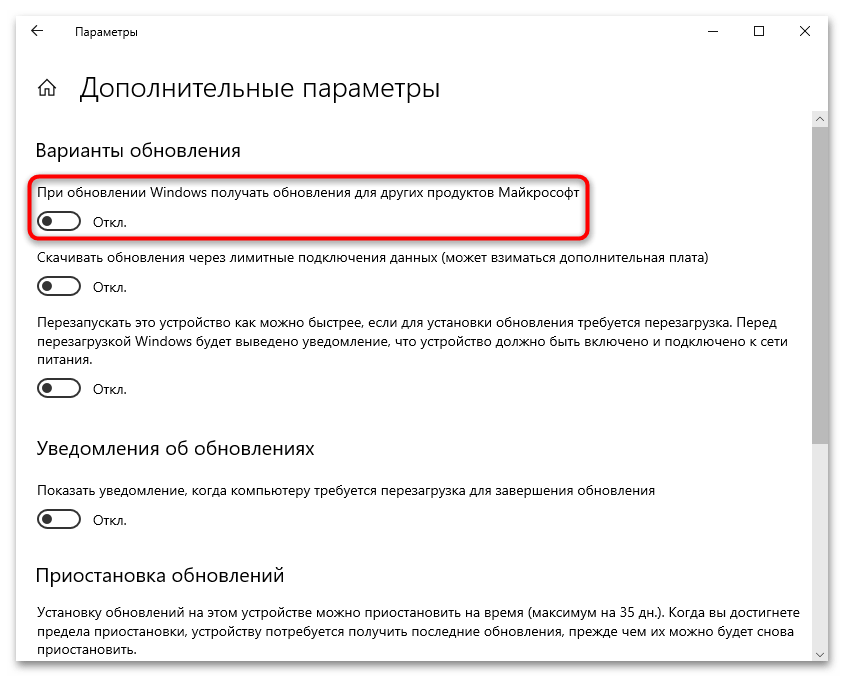
Помимо выбора времени для обновлений, в Windows 10 предусматривается ряд дополнительных параметров, в частности настройка перезапуска после инсталляции апдейтов и включение получения других продуктов от компании Microsoft. Разберем расширенные настройки более подробно:
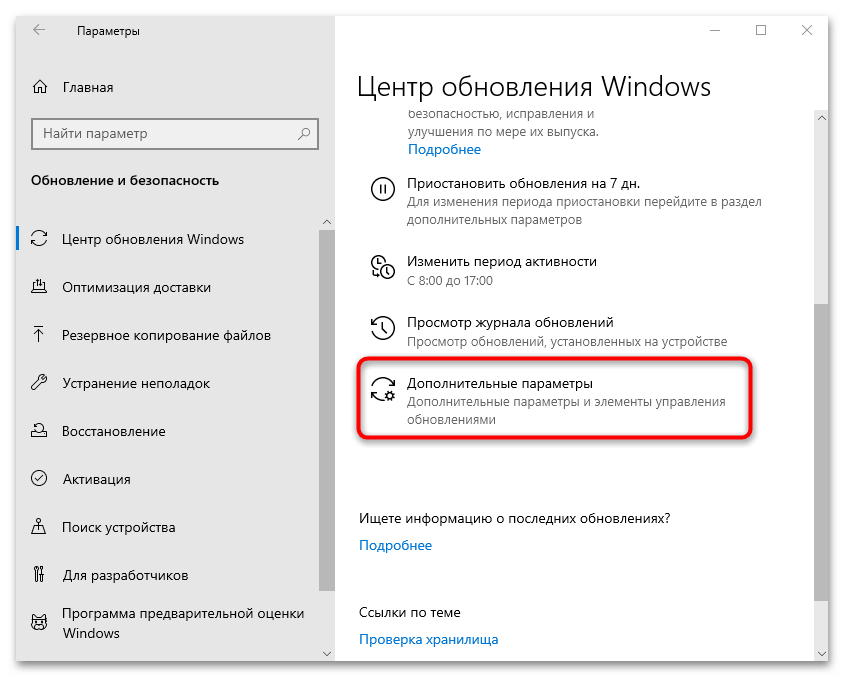
- В соответствующем разделе штатных «Параметров» («Обновление и безопасность») щелкните по строке «Дополнительные параметры».
- В этом окне станут доступны варианты обновления. По умолчанию дополнительные опции отключены, но пользователь может активировать любой из них на свое усмотрение. Так, например, после включения опции «При обновлении Windows получать обновления для других продуктов Майкрософт» будут скачиваться и необязательные апдейты (из которых, к слову, также можно выбрать, что именно инсталлировать). К ним относятся различные обновления для базовых драйверов, фирменного софта и другое.
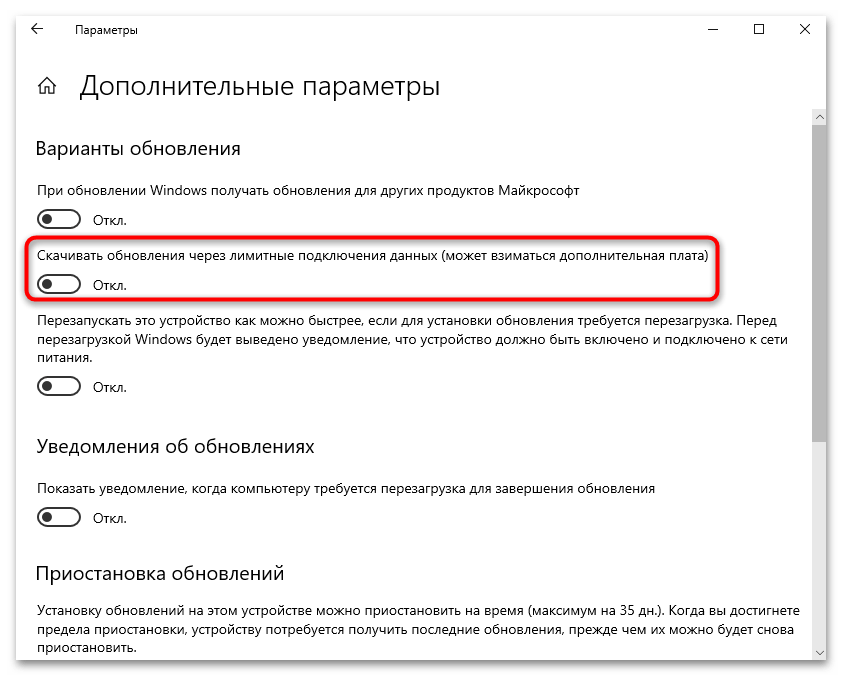
- Изначально скачивание обновлений через лимитные подключения (3G/4G-модемы и не безлимитные тарифы) отключено, поскольку в большинстве случаев апдейты весят довольно много, за что может взиматься дополнительная плата оператора связи. Если же вас не беспокоит данный пункт либо в целях экономии трафика на системном уровне активен лимит потребления, тогда можете включить данную возможность.
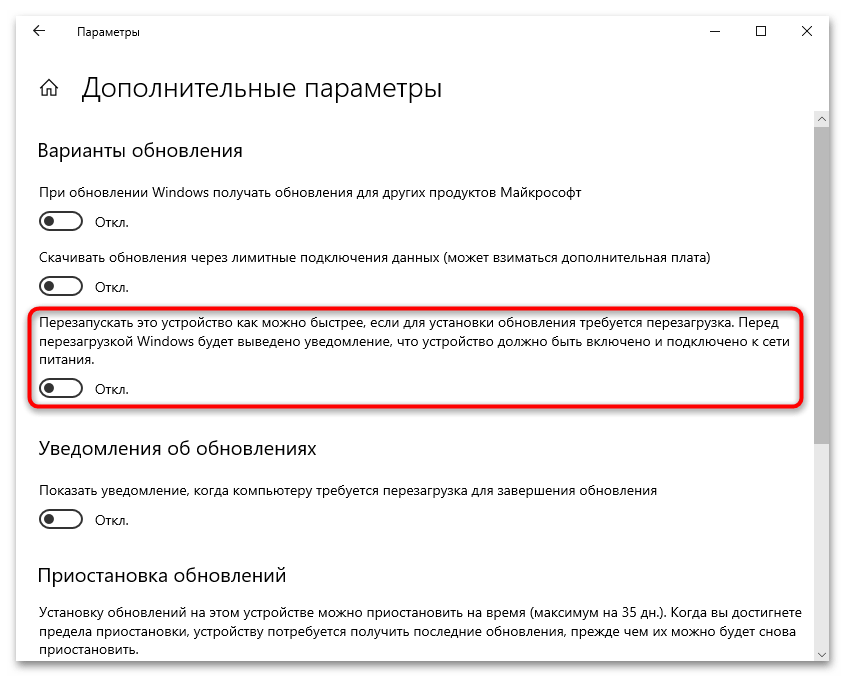
- Следующий параметр, отвечающий за автоматический перезапуск компьютера после установки обновлений, также отключен. Но если хотите, чтобы обновления вступали в силу как можно быстрее, этот пункт также можно активировать. Перед перезагрузкой отобразится соответствующее уведомление, чтобы успеть завершить работу программ.
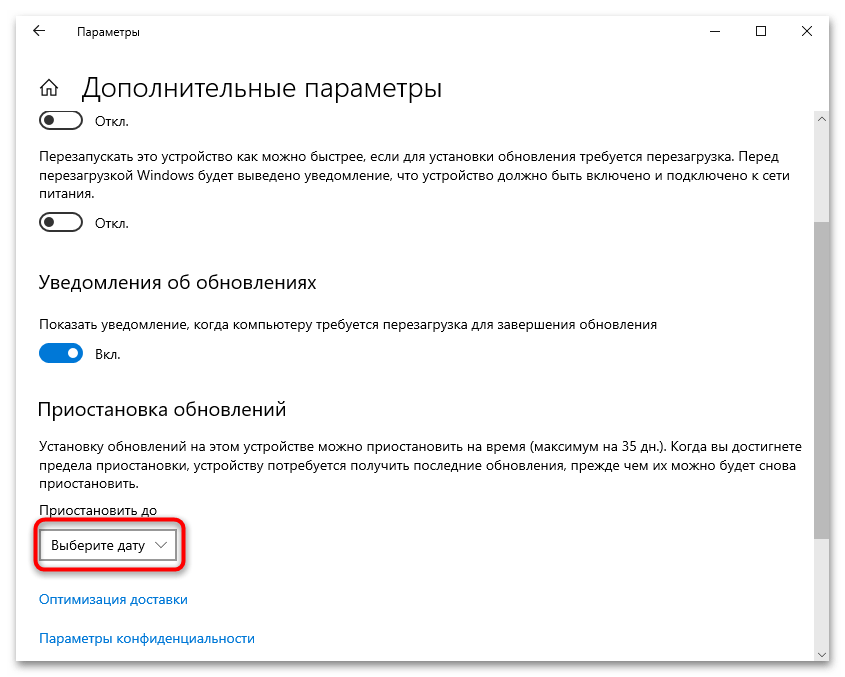
- В блоке «Уведомления об обновлениях» включается оповещение о том, что компьютер необходимо перезагрузить после инсталляции обновлений. По умолчанию такие уведомления не поступают.
- Также в окне с расширенными настройками можно выбрать дату, до которой Windows 10 не будет получать обновления и устанавливать их без пользователя. Если в предыдущем окне можно выбрать приостановку на 7 дней, то здесь выбирается больший временной период (но все так же – до 35 дней).

Удаление обновлений
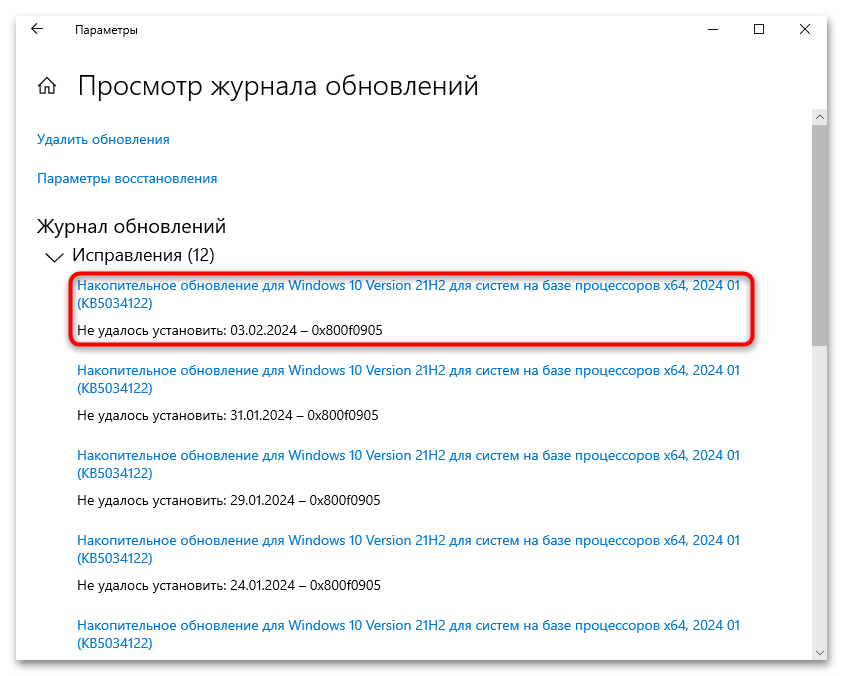
В разделе «Обновление и безопасность» встроен «Журнал обновлений», с помощью которого можно посмотреть список того, что было установлено, и узнать подробную информацию.
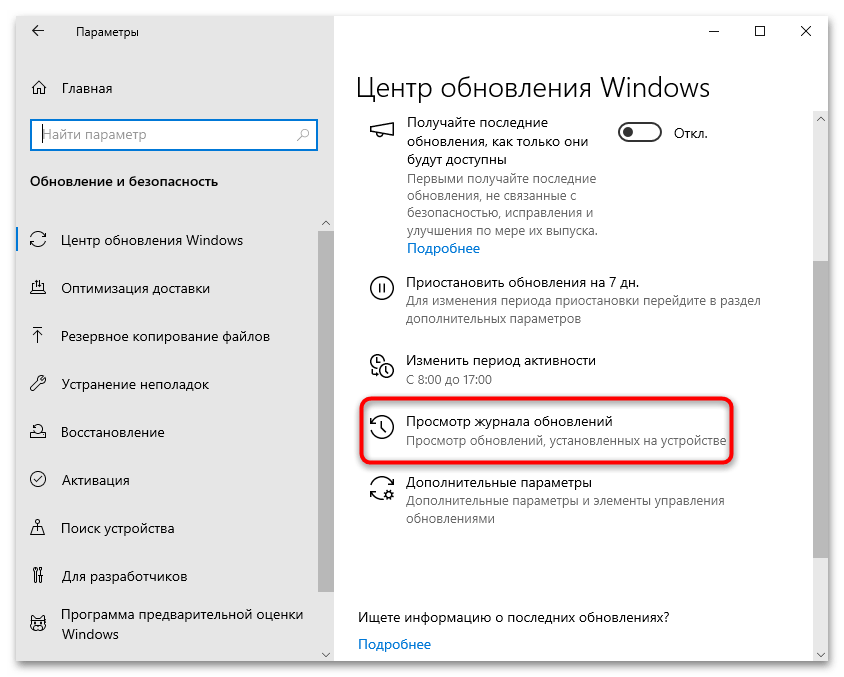
Здесь отображается название обновлений и дата их инсталляции. Чтобы увидеть более детальные сведения о том или ином апдейте, например какие исправления и изменения он внес, достаточно кликнуть по его названию. Через браузер вы попадете на страницу официального сайта Microsoft, где и сможете ознакомиться со всеми сведениями.
При необходимости практически любое обновление можно удалить. Для этого нажмите на ссылку «Удалить обновления».
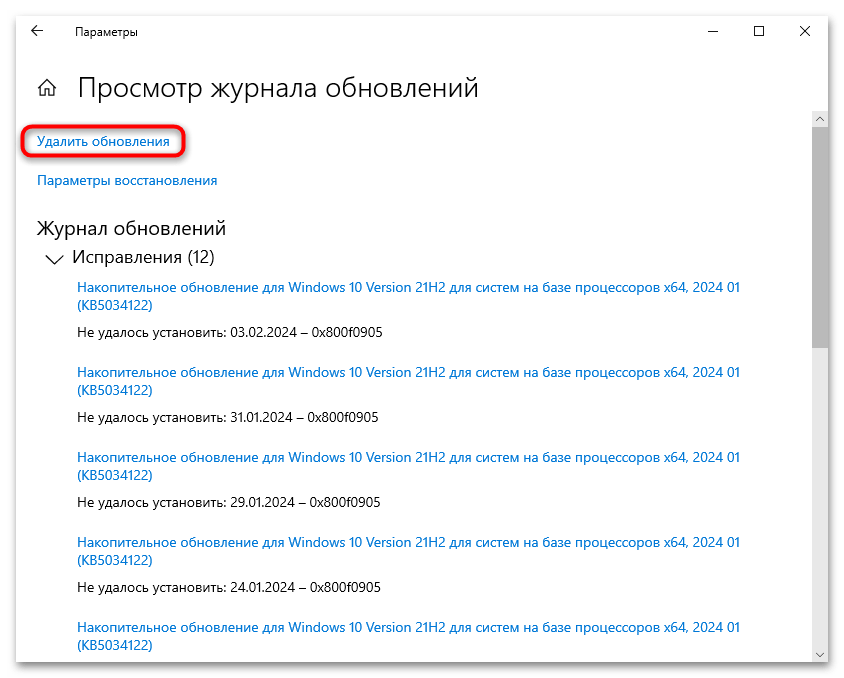
После отобразится список апдейтов через классическое приложение «Панель управления». Чтобы деинсталлировать любой из пунктов, кликните по нему левой кнопкой мыши и выберите соответствующую кнопку.
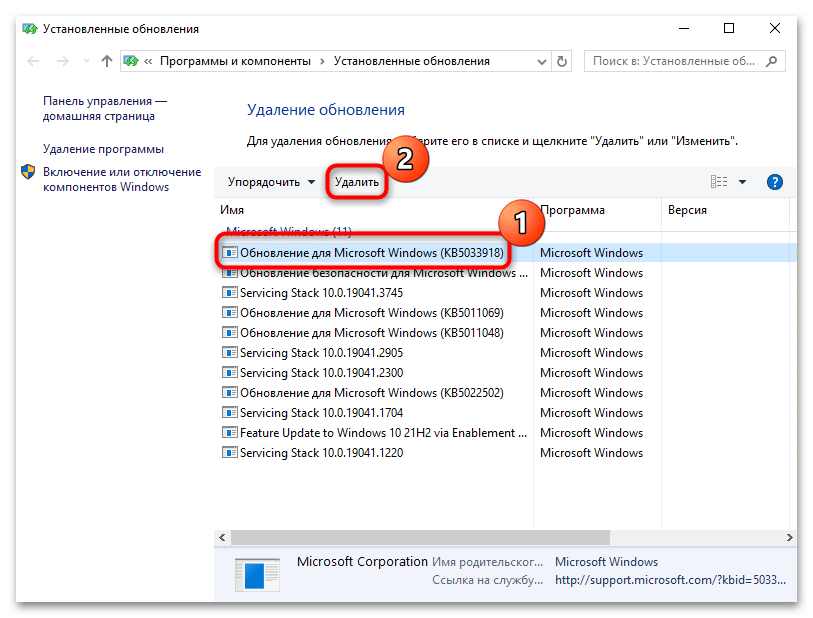
О методах удаления обновлений в операционной системе Windows 10 (помимо «Панели управления»), есть и другие способы, о которых можете прочитать в нашем отдельном материале.
Подробнее: Удаление обновлений в Windows 10
Отключение автообновлений
Приостановка получения обновлений в Windows 10, которую мы упоминали выше в статье, несет временный характер, поскольку рано или поздно произойдет принудительная установка апдейтов, что в некоторых случаях необходимо для стабильной и корректной работы операционки. Но есть и альтернативные методы, которые позволят полностью деактивировать скачивание и установку актуальной версии программного обеспечения. Например, можно отключить службы, отвечающие за «Центр обновления Windows», либо воспользоваться сторонними программами. Ранее мы более детально писали о таких вариантах в отдельных руководствах на сайте.
Подробнее:
Отключение обновлений в ОС Windows 10
Отключение обновлений Windows 10 через «Редактор локальных групповых политик»
Наша группа в TelegramПолезные советы и помощь
tutorial
Windows 10 Home users do not have much control over what updates are pushed to their PCs by Microsoft. However, users can choose when to reboot their computers or devices to install the pending operating system updates. In the newer versions of Windows 10, there is a small yet helpful feature named Active hours, that controls when Windows 10 reboots and updates itself for installing updates. Read on to see how to configure the schedule for Windows 10 updates installing and rebooting your PC:
NOTE: The features shared in this article apply to Windows 10 October 2018 Update.
How to schedule Windows 10 updates by setting Active Hours
The first thing you must do is open the Settings app. A quick way to do that is to click or tap on the Settings icon from the Start Menu or to press Windows + I on the keyboard. In the Settings app, click or tap the Update & Security category.

If not already selected, click or tap Windows Update in the column on the left. On the right side, you see all the settings that govern how Windows 10 updates itself. Amongst them, you also find an option called «Change active hours.» Click or tap on it.
Windows 10 displays a dialog in which you are told that you can «set active hours to let us [Microsoft] know when you typically use this device. We [Microsoft] won’t automatically restart it during active hours, and we won’t restart without checking if you’re using it.»
This means that you can set the time frame in which you usually work on your Windows 10 computer or device, and the operating system is not going to interrupt you during that time by doing an unexpected system reboot to install updates. This feature is called Active hours. You can choose any start time and end time, as long as there is not a difference bigger than 18 hours between them. When done, click or tap Save to apply your schedule.
From now on, Windows 10 is not going to install updates that require a reboot and restart your PC during the Active hours that you have set.
How to restart for updating Windows 10 only after you’ve done all your work
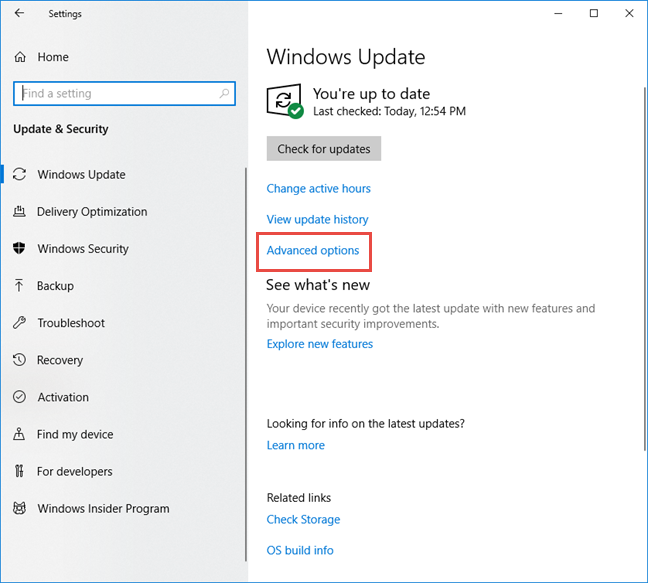
Although configuring Active hours is useful for daily activities, there may be times when you have got a tight deadline to meet, and you must work after hours. In such situations, restarting your computer to update Windows 10 would be even more unproductive than on other days. That is why Windows 10 also gives you the option to configure it so that it never restarts your PC for updates, without asking for your approval first. To do that, in the Windows Update section from the Settings app, click or tap Advanced options.
You get access to different options that you can configure. To make sure that Windows 10 never restarts for updates without asking first, turn On the switch that says «Show a notification when your PC requires a restart to finish updating,» in the Update notifications section.
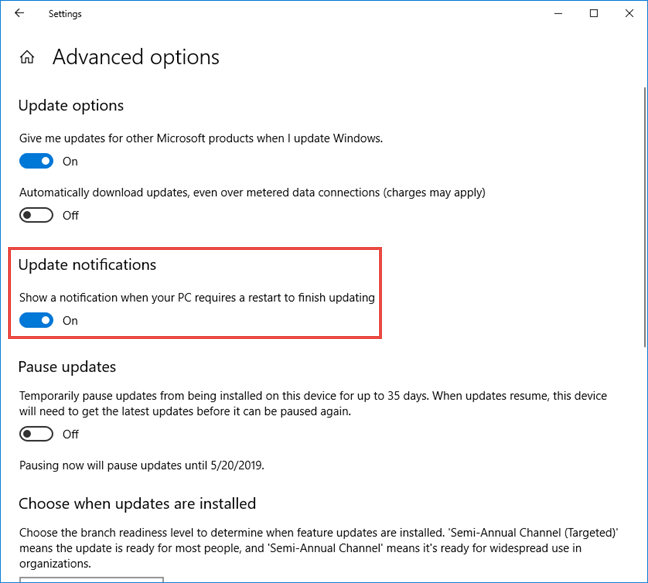
That’s it! Now Windows 10 is going to update itself respecting the schedule that you have set for Active hours, and it is not going to reboot without notifying you first.
Do you like how the new Windows 10 updates schedule works?
The Active hours feature gives you control over how Windows 10 updates itself on your PC. Although Microsoft does not let users completely disable the Windows 10 updates, at least there is a way to choose when they get installed. If you want more control, you can also delay or pause updates, in select Windows 10 editions such as Windows 10 Pro or Enterprise. Is that enough? Are you happy with the options you have for scheduling updates in Windows 10? Comment below, and share your perspective.
Subscribe:
RSS Feed
Google News
YouTube