
In Windows PowerShell, the `wget` equivalent is `Invoke-WebRequest`, which allows you to download files or web content from the internet.
Invoke-WebRequest -Uri 'http://example.com/file.txt' -OutFile 'C:\Path\To\Save\file.txt'
Overview of wget in PowerShell
Introduction to wget
wget is a powerful command-line tool used primarily for downloading files from the internet. Originally developed for Unix-based systems, it has since become widely used across various platforms, including Windows. Its simplicity and versatile nature make it a popular choice among developers and system administrators alike.
Why Use wget in Windows PowerShell?
Using wget in Windows PowerShell offers several advantages, particularly when downloading files or interacting with web resources. The tool excels in its ability to handle complex URLs, withstand network interruptions, and efficiently manage large downloads. Additionally, wget is straightforward to use, which makes it an excellent option for users looking for quick deployment and minimal syntax complexity. The scenarios in which wget shines include downloading files from servers or scraping data from web pages, tasks that can sometimes be cumbersome using native PowerShell cmdlets.
Unlocking PWD in Windows PowerShell: A Quick Guide
Installing wget for PowerShell
Downloading and Installing wget
Installing wget on Windows is a simple process. Users can download a Windows-compatible version from trusted sources. Here’s a step-by-step guide to get wget up and running:
- Visit the official site or a reliable software repository.
- Download the appropriate Windows executable file.
- Place the executable in a directory that is included in your system’s PATH, or simply keep it in a folder you can easily access.
For example, to download wget, you can use the following command in PowerShell:
Invoke-WebRequest -Uri "https://eternallybored.org/misc/wget/1.21.1/64/wget.exe" -OutFile "C:\Program Files (x86)\GnuWin32\bin\wget.exe"
Verifying Your Installation
After installation, it’s crucial to ensure wget is accessible and functioning. You can verify the installation by executing the following command in PowerShell:
wget --version
This command displays the version number of wget installed on your system, confirming that the installation was successful.
Unlocking Windows PowerShell Scriptomatic For Quick Tasks
Basic Usage of wget in PowerShell
Syntax of wget Command
The basic syntax for using wget in PowerShell follows a structure that is intuitive and straightforward. The command generally looks like this:
wget [options] [URL]
Common Options and Flags
Understanding the various options and flags available with wget can significantly enhance its functionality. Here are essential flags to consider:
- -q: This flag activates quiet mode, suppressing unnecessary output.
- -O: Use this flag to specify a custom name for the downloaded file. This is useful when you want to save the file with a different name than the one provided in the URL.
- —no-check-certificate: This option skips the verification of SSL certificates, which can be useful for sites that use self-signed certificates.
Each option can be combined with the wget command to create a powerful downloading tool tailored to specific needs.
Basic Examples of wget Commands
To help you understand the practical application of wget, here are some simple examples:
Example: Downloading a Single File
If you want to download a file directly, you can use the command:
wget http://example.com/file.zip
Example: Saving with a Custom Name
If you want to specify a different filename for your download, use the following command:
wget http://example.com/file.zip -O myfile.zip
Invoke-PowerShell: Mastering Command Execution Effortlessly
Advanced Usage of wget in PowerShell
Downloading Multiple Files
wget also allows downloading multiple files simultaneously. This can be achieved using wildcards. For example, to download all `.zip` files in a specific directory from a server, use:
wget "http://example.com/files/*.zip"
Downloading from Password-Protected Sites
In cases where the file is hosted on a password-protected site, wget can handle HTTP authentication. Use the following syntax to specify your credentials:
wget --user=username --password=password http://protectedsite.com/file.zip
Make sure to substitute «username» and «password» with your actual username and password.
Resuming Incomplete Downloads
In instances where a download is interrupted, wget allows users to resume incomplete downloads by using the `-c` option. This feature is particularly useful for large file downloads. The command looks like this:
wget -c http://example.com/largefile.iso
Get OS Information Using PowerShell Commands
Troubleshooting Common Issues
Common wget Errors
While using wget in PowerShell, you might encounter errors. Some common issues include:
- 403 Forbidden: This error indicates that access to the requested URL is restricted.
- 404 Not Found: The file is not available at the specified URL, indicating a potential typo or removal of the resource.
Each of these errors can typically be resolved by checking the URL for accuracy or obtaining the necessary permissions.
Tips for Ensuring Successful Downloads
To maximize the success rate of your downloads, adhere to these best practices:
- Always check the URL’s correctness to avoid 404 errors.
- Consider using a valid SSL certificate by omitting the `—no-check-certificate` option whenever possible.
- Use the `-q` flag for streamlined output when you need to execute multiple downloads.

Windows PowerShell Network Commands Made Easy
Alternatives to wget in PowerShell
Native PowerShell Cmdlets
While wget is an excellent tool for file downloads, Windows PowerShell itself has built-in cmdlets such as `Invoke-WebRequest` and `Invoke-RestMethod`. These cmdlets can accomplish similar tasks and are integrated within the Windows ecosystem.
Comparison of wget vs. PowerShell Cmdlets
When deciding between wget and PowerShell cmdlets, consider the use case. If you’re looking for a straightforward, one-off file download, `Invoke-WebRequest` might suffice. However, for more complex downloading tasks or bulk operations, wget could be a more efficient choice.
Contains in PowerShell: Your Simple Guide to Mastery
Conclusion
Summary of Key Points
In this guide, we explored wget in the context of Windows PowerShell, discussing installation, basic and advanced usage, and troubleshooting tips. We also touched upon alternatives to wget, highlighting the strengths of PowerShell’s native cmdlets.
Further Resources
For additional information and resources to enhance your wget skills, consult the official wget documentation and reputable programming communities.
Call to Action
We encourage you to practice using wget to familiarize yourself with its capabilities. Explore additional PowerShell tutorials offered by our company to broaden your understanding and enhance your technical proficiency!
Do you need to download files from the web but hate repeatedly clicking links? If your job involves downloading files from the web regularly, you will probably want to automate the task. Why not use PowerShell to download files much like an alternative PowerShell wget?
Not a reader? Watch this related video tutorial!
Not seeing the video? Make sure your ad blocker is disabled.
Windows PowerShell and PowerShell comes with file-download capabilities. Using PowerShell to download files is a matter of knowing which cmdlets and .NET classes to use and how to use them.
In this article, you’ll learn the various ways to use PowerShell to download files from the web.
Prerequisites
Since this is a learning-by-doing article, there are some prerequisites to ensure that you can follow the examples. Below are the basic requirements.
- A computer that is running on Windows 10 or higher. This computer is where you will run the scripts/commands featured in this article.
- Windows PowerShell 5.1 or PowerShell 7.1 (recommended).
- Windows 10 already includes Windows PowerShell 5.1.
- A web site that hosts the files to download.
- For non-authenticated file downloads, consider using the Tele2 Speedtest site, which is free.
- If you want to test file downloads with authorization, you may have to build your HTTP file server. An example of a free HTTP file server is HFS by Rejetto.
Using PowerShell to Download Files from URLs: Four Ways
There are four methods to use PowerShell to download files that do not depend on third-party tools. These are:
Invoke-WebRequestInvoke-RestMethodStart-BitsTransfer- .NET WebClient Class.
Whichever one of these four methods you use, the logic and components to make them work are the same. There must be a source URL pointing to the file’s location and the destination path to save the downloaded files. If required by the webserver, you need to enter the credentials as well.
The next sections show each of these four methods. In the end, it’s up to you to decide which way you would adapt when using PowerShell to download files.
Using Invoke-WebRequest as a PowerShell wget Alternative
The first method in PowerShell to download files is by using the Invoke-WebRequest cmdlet. Perhaps the most used cmdlet in this article, Invoke-WebRequest, can download HTTP, HTTPS, and FTP links.
Whether the source location requires users to log in, the Invoke-WebRequest cmdlet can handle requests with credentials as well.
To download a file, the syntax below shows the minimum parameters required to achieve the desired outcome.
Invoke-WebRequest -Uri <source> -OutFile <destination>For example, the code below downloads a file with the name 10MB.zip from a website. Then it saves the downloaded file to C:\dload\10MB.zip. You may copy the code below and paste it into your PowerShell session to test.
# Source file location
$source = 'http://speedtest.tele2.net/10MB.zip'
# Destination to save the file
$destination = 'c:\dload\10MB.zip'
#Download the file
Invoke-WebRequest -Uri $source -OutFile $destination
The demonstration below shows the expected result after running the code above in PowerShell. As you can see, the file download was successful.

How about if the source requires authentication before allowing access? For example, the code below downloads a file from a private website where users must log in.
$source = 'https://mirror.lzex.ml/100MB.zip'
$destination = 'c:\dload\100MB.zip'
Invoke-WebRequest -Uri $source -OutFile $destination
However, the download failed due to unauthorized access.

If authentication is required, you should add a credential to the request using the -Credential parameter. The first line in the code below prompts you to enter the credential (username and password) and stores it to the $credential variable.
$credential = Get-Credential
$source = 'https://mirror.lzex.ml/100MB.zip'
$destination = 'c:\dload\100MB.zip'
Invoke-WebRequest -Uri $source -OutFile $destination -Credential $credential
The demonstration below shows what you’d expect to see when you run the above code in PowerShell. As you can see, the Get-Credential cmdlet prompted a PowerShell credential request. This time, using the credential with Invoke-WebRequest resulted in a successful download.

Related: Using the PowerShell Get-Credential Cmdlet and all things credentials
Looking Out for Parsing Errors when using Invoke-WebRequest
A crucial thing to remember when using Invoke-WebRequest in Windows PowerShell is that, by default, this cmdlet uses the Internet Explorer engine to parse data. The error below may happen when using Invoke-WebRequest on computers without the Internet Explorer in it.
You’ll have to re-issue your command, but this time, include the -UseBasicParsing switch.
Invoke-WebRequest -Uri <source> -OutFile <destination> -UseBasicParsingIn Windows PowerShell, you may receive an error message: The response content cannot be parsed because the Internet Explorer engine is not available, or Internet Explorer’s first-launch configuration is not complete. Specify the UseBasicParsing parameter and try again.
Starting with PowerShell Core 6.0, the Invoke-WebRequest cmdlet uses basic parsing only. As such, the -UseBasicParsing parameter is no longer necessary.
Using Invoke-RestMethod
The Invoke-RestMethod cmdlet is more about sending an HTTP or HTTPS request to a RESTful web service. This cmdlet is more suited for requests that interact with REST APIs such as Microsoft Graph API.
When it comes to downloading files straight from the web, Invoke-RestMethod is an excellent contender. Do not be deceived into thinking otherwise. There is not much difference between using Invoke-RestMethod and Invoke-WebRequest when used for downloading files from a direct web link.
Downloading a File using Invoke-RestMethod
To download a file using Invoke-RestMethod, use the syntax below. You’ll notice that the command uses the same parameters as Invoke-WebRequest.
Invoke-RestMethod -Uri <source> -OutFile <destination>In the example code below, the file is downloaded from the URL value in the $source variable. Then, saved to the path defined in the $destination variable.
$source = 'http://speedtest.tele2.net/10MB.zip'
$destination = 'c:\dload\10MB.zip'
Invoke-RestMethod -Uri $source -OutFile $destination
If the source requires authentication, you can pass the credentials using the -Credential parameter. The example below prompts for the credentials and stores it to the $credential variable. The value of the $credential variable is then passed to the -Credential parameter.
Also, since the file link is an HTTP source and not HTTPS, it means that you are sending an unencrypted authentication. Typically, you should avoid using HTTP sources for security. But if you must use an HTTP source, you need to add the -AllowUnencryptedAuthentication switch to your command.
$credential = Get-Credential
$source = 'http://speedtest.tele2.net/10MB.zip'
$destination = 'c:\dload\10MB.zip'
Invoke-RestMethod -Uri $source -OutFile $destination -Credential $credential -AllowUnencryptedAuthentication
Using Start-BitsTransfer
Start-BitsTransfer is designed specifically for transferring files between client and server computers. This PowerShell cmdlet is dependent on the Background Intelligent Transfer Service (BITS) that is native to the Windows operating system.
Because Start-BitsTransfer requires BITS to work means that this cmdlet is not available on non-Windows computers. On the flipside, Start-BitsTransfer enjoys the benefits of BITS itself. Some of these benefits are:
- Network bandwidth and usage awareness.
- Interruption handling (resume, auto-resume, pause, etc.)
- Downloading multiple files as background jobs.
- Ability to set download job priorities.
Downloading a File
The fundamental way to use Start-BitsTransfer in PowerShell to download a file is to specify a source and destination. Using the script below, you only need to change the $source and $destination values according to your requirements.
$source = 'http://speedtest.tele2.net/100MB.zip'
$destination = 'c:\dload\100MB.zip'
Start-BitsTransfer -Source $source -Destination $destination
As you can see from the demo below, the file is downloaded to the path c:\dload\100MB.zip.

Suppose the destination is not specified,
Start-BitsTransferdownloads and saves the file to the current working directory. For example, if you runStart-BitsTransferfrom C:\dload, the file downloads to the same directory.
For downloads that require authentication, Start-BitsTransfer has a -Credential parameter that accepts a PSCredential object.
Downloading Multiple Files
To demonstrate downloading multiple files, you’ll need to create a CSV file with two columns. Name the file filelist.txt. The first column should contain the link to the source, while the second column must contain the destination path. The file contents would like the one below.
# source,destination
http://speedtest.tele2.net/1MB.zip,c:\dload\1MB.zip
http://speedtest.tele2.net/10MB.zip,c:\dload\10MB.zip
http://speedtest.tele2.net/100MB.zip,c:\dload\100MB.zip
Related: Managing CSV Files in PowerShell with Import-Csv
Once the CSV file is ready, use the command below to begin the file download. The command imports the CSV file using Import-Csv and passes the contents to Start-BitsTransfer.
Import-Csv .\filelist.csv | Start-BitsTransferRefer to the demo below to see how the code above works. As you can see, the download starts, and you see the download progress. The PowerShell prompt is not available during the download process.

Suppose you want to start the download process as a background job. To do so, you only have to add the -Asynchronous switch at the end of the Start-BitsTransfer command.
Import-Csv .\filelist.csv | Start-BitsTransfer -AsynchronousInitially, the state of each job would show connecting. The screenshot below shows each file download’s job id.

Now that you’ve started the download process, you’ll want to check whether the download has been completed. To check the download job status, use the Get-BitsTransfer cmdlet. As you can see below, the download jobs’ status has changed to Transferred.

Using WebClient Class and HttpClient Class (.NET Framework)
PowerShell is based on .NET, and its nature makes it capable of leveraging the power of .NET itself. There’s two .NET class you can use in PowerShell to download files; WebClient and HttpClient.
If you want to know more about these two .NET class in more development and technical way, you could start with → When to use WebClient vs. HttpClient vs. HttpWebRequest. In the next section, you will learn how to use WebClient and HttpClient in PowerShell to download files from the web.
Downloading a File using System.Net.WebClient
To use the WebClient class, you need to initiate an object as a System.Net.WebClient **type. In the example below, the $webClient is the new System.Net.WebClient object. Then, using the DownloadFile() method starts the download of the file from the source.
Related: Using PowerShell Data Types Accelerators to Speed up Coding
Please copy the code below and run it in your PowerShell session to test. Note that you will not see any progress or output on the screen unless there’s an error. However, the PowerShell prompt will be locked until the download is complete.
# Define the source link and destination path
$source = 'http://speedtest.tele2.net/10MB.zip'
$destination = 'c:\dload\10MB.zip'
# Create the new WebClient
$webClient = [System.Net.WebClient]::new()
# Download the file
$webClient.DownloadFile($source, $destination)
If the source requires authentication to allow the file download, you can use the code below. The first line prompts for the credential and stores it to the $credentials variable. The value of $credential is then included in the file download request.
# Prompt for username and password
$credentials = Get-Credential
$source = 'http://speedtest.tele2.net/10MB.zip'
$destination = 'c:\dload\10MB.zip'
# Create the new WebClient
$webClient = [System.Net.WebClient]::new()
# Add the credential
$webClient.Credentials = $credentials
# Download the file
$webClient.DownloadFile($source, $destination)
According to this Microsoft document: “We don’t recommend that you use the WebClient class for new development. Instead, use the System.Net.Http.HttpClient class.”
It appears that the WebClient class is obsolete, and the new class that Microsoft is endorsing is the HttpClient class. Don’t worry, though. The next section talks about using the HttpClient class in PowerShell to download files from the web.
Downloading a File using System.Net.Http.HttpClient
Like the WebClient class, you need to create first the System.Net.Http.HttpClient. Using the code below downloads the file from the $source to the $destination. Refer to the comments above each line to know what each line of code does.
The code below is live, and you can test it by running it in your PowerShell session.
# Set the source and destination
$source = 'http://speedtest.tele2.net/10MB.zip'
$destination = 'c:\dload\10MB.zip'

# Create the HTTP client download request
$httpClient = New-Object System.Net.Http.HttpClient
$response = $httpClient.GetAsync($source)
$response.Wait()

# Create a file stream to pointed to the output file destination
$outputFileStream = [System.IO.FileStream]::new($destination, [System.IO.FileMode]::Create, [System.IO.FileAccess]::Write)

# Stream the download to the destination file stream
$downloadTask = $response.Result.Content.CopyToAsync($outputFileStream)
$downloadTask.Wait()

# Close the file stream
$outputFileStream.Close()
In situations where downloading a file requires authentication, you need to add the credential to the HttpClient object. To include a credential to the file download request, create a new System.Net.Http.HttpClientHandler object to store the credentials.
You can copy the code below and run it in PowerShell to test. Or you can also run it as a PowerShell script. In this example, the code is saved as download-file.ps1.
# Set the source and destination
$source = 'http://speedtest.tele2.net/10MB.zip'
$destination = 'c:\dload\10MB.zip'

# Prompt for credentials
$credentials = Get-Credential

# Create the HTTP client download request with credentials
$handler = New-Object System.Net.Http.HttpClientHandler
$handler.Credentials = $credentials
$httpClient = New-Object System.Net.Http.HttpClient($handler)
$response = $httpClient.GetAsync($source)
$response.Wait()

# Create a file stream to pointed to the output file destination
$outputFileStream = [System.IO.FileStream]::new($destination, [System.IO.FileMode]::Create, [System.IO.FileAccess]::Write)

# Stream the download to the destination file stream
$downloadTask = $response.Result.Content.CopyToAsync($outputFileStream)
$downloadTask.Wait()

# Close the file stream
$outputFileStream.Close()
The demo below shows the result when running the PowerShell script to download the file.
At the start, the directory only has the script file in it. There’s a prompt to enter the username and password. Then, the script proceeds to download the file. After downloading the file, you can see that the new file is now inside the destination directory.

Conclusion
Windows PowerShell and PowerShell Core come with built-in capabilities to download files, acting as a PowerShell wget alternative! Whether downloading password-protected sources, single or multiple files – a PowerShell way is available to you.
The file download methods covered in this article works on both Windows PowerShell and PowerShell Core. This means that these methods apply to both Windows and Non-Windows systems, with the exclusion of Start-BitsTransfer.
And since PowerShell is more than a command prompt, you can translate what you learned into scripts. For you, that would mean an opportunity for automation. No more copying URLs, clicking links, and waiting for downloads manually.
Most users will download files onto their PC using their web browser. There’s a problem with this method, however—it’s not particularly efficient. If you need to pause your download, or if you’ve lost your connection, you’ll probably need to start your download again from scratch. You may also be working with Python or other code at the command line and want to download directly from the command prompt.
That’s where tools like Wget come in. This command line tool has a number of useful features, with support for recursive downloads and download resumption that allows you to download single files (or entire websites) in one go.
Wget is popular on Linux and other Unix-based operating systems, but it’s also available for Windows users. Below, we’ll explain how to install and use Wget to download any content you want online from your Windows command line.
Installing GNU Wget on Windows
Wget (in name, at least) is available on Windows 10 and 11 via the PowerShell terminal. However, this version of Wget isn’t the same as the GNU Wget tool that you’d use on a Linux PC. Instead, this version is simply an alias for a PowerShell command called Invoke-WebRequest.
Invoke-WebRequest is Wget-like in what it does, but it’s a completely different tool that’s much more difficult to use and understand. Instead, you’ll be better served by installing Wget for Windows, a compiled version of the same tool available for Linux users, using the steps below.
1. Download the Wget for Windows setup file from the Wget website. You’ll need to do this using your web browser.
Get Tom’s Hardware’s best news and in-depth reviews, straight to your inbox.
2. Run the Wget for Windows installer file. Once the Wget setup file has finished downloading, run the setup file and follow the on-screen instructions to complete the installation.
3. Update the Wget.exe file (optional). The Wget installer is packaged with a fairly old version of the Wget binary. If you run into difficulties downloading files because of SSL certificate errors, you should download the latest wget.exe for your architecture from this website and save it to your Wget installation directory (typically C:\Program Files (x86)\GnuWin32\bin). This step is optional, but highly recommended.
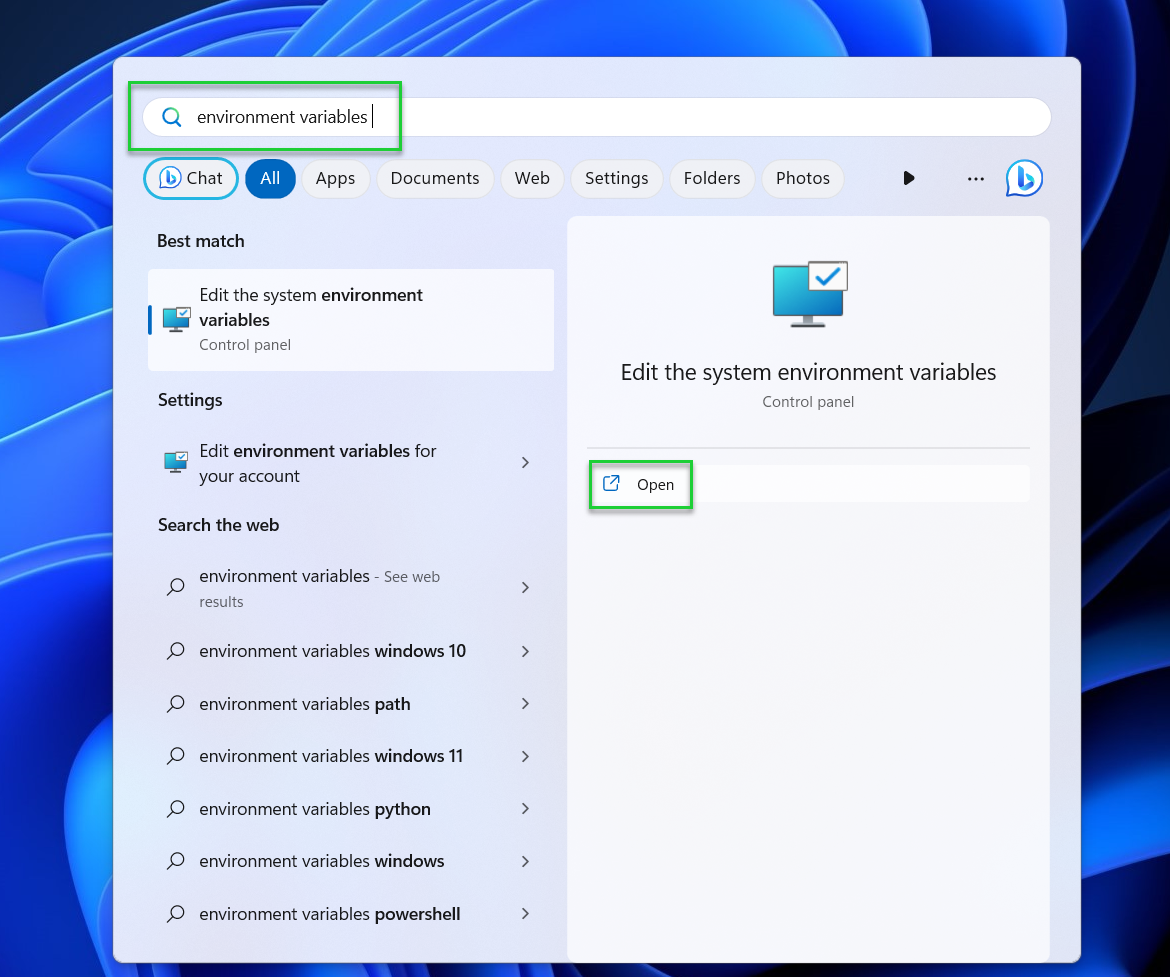
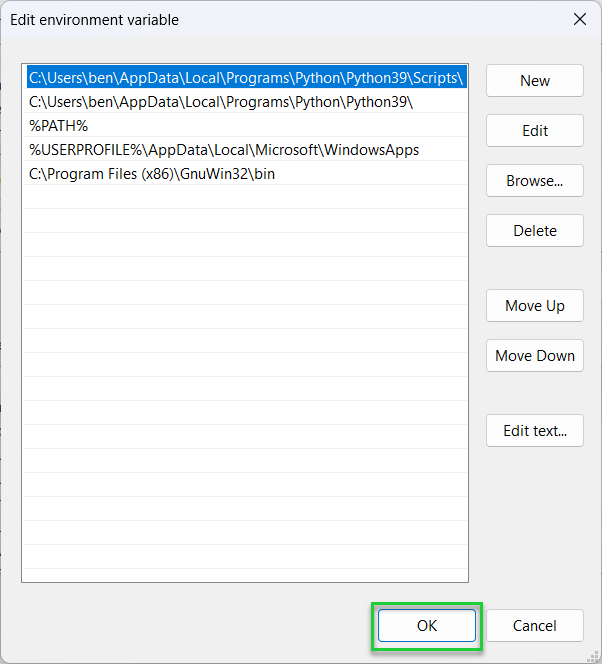
4. Open the Start menu, search for environment variables, and click Open. Once the installation is finished, use the search tool in the Start menu to search for environment variables, then click Open. You’ll need to do this to allow you to use the ‘wget’ command from the command line without referencing its location every time you wish to run it.
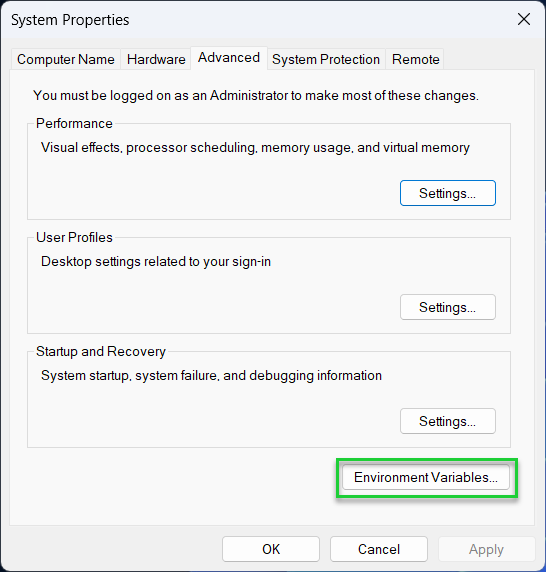
5. Click Environment Variables in the System Properties window.
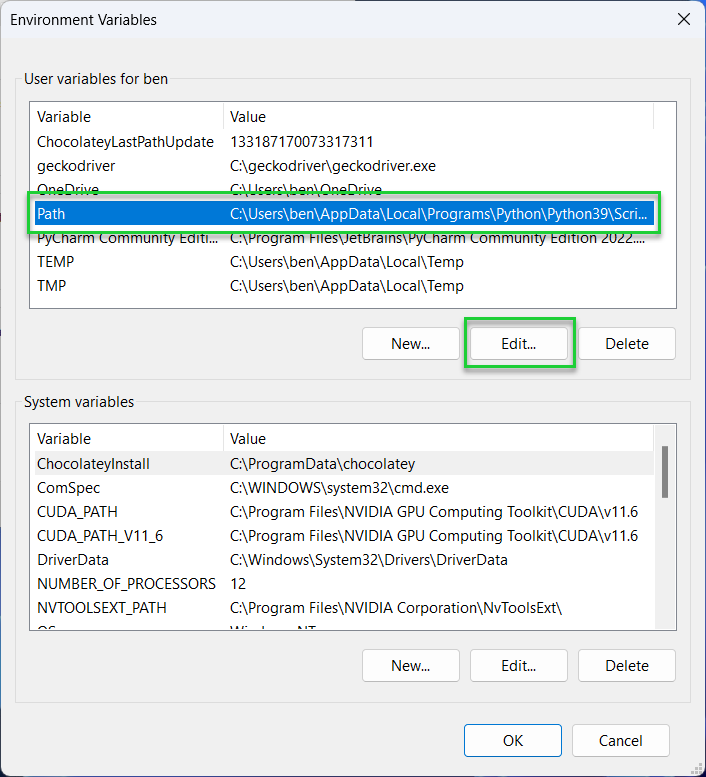
6. Select Path and click Edit under System or User variables.
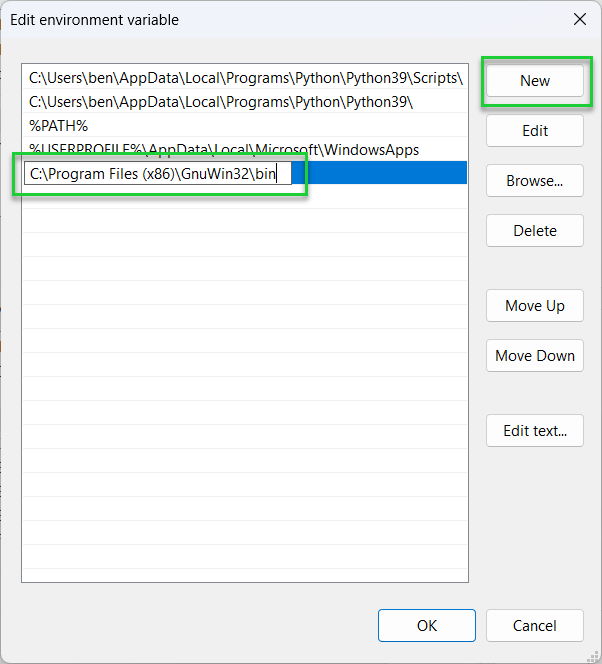
7. Click the New button and type in the directory for the Wget for Windows binary (.exe) file. By default, this should be C:\Program Files (x86)\GnuWin32\bin.
8. Save your changes. When you’re finished, click OK in each menu and exit System Properties.
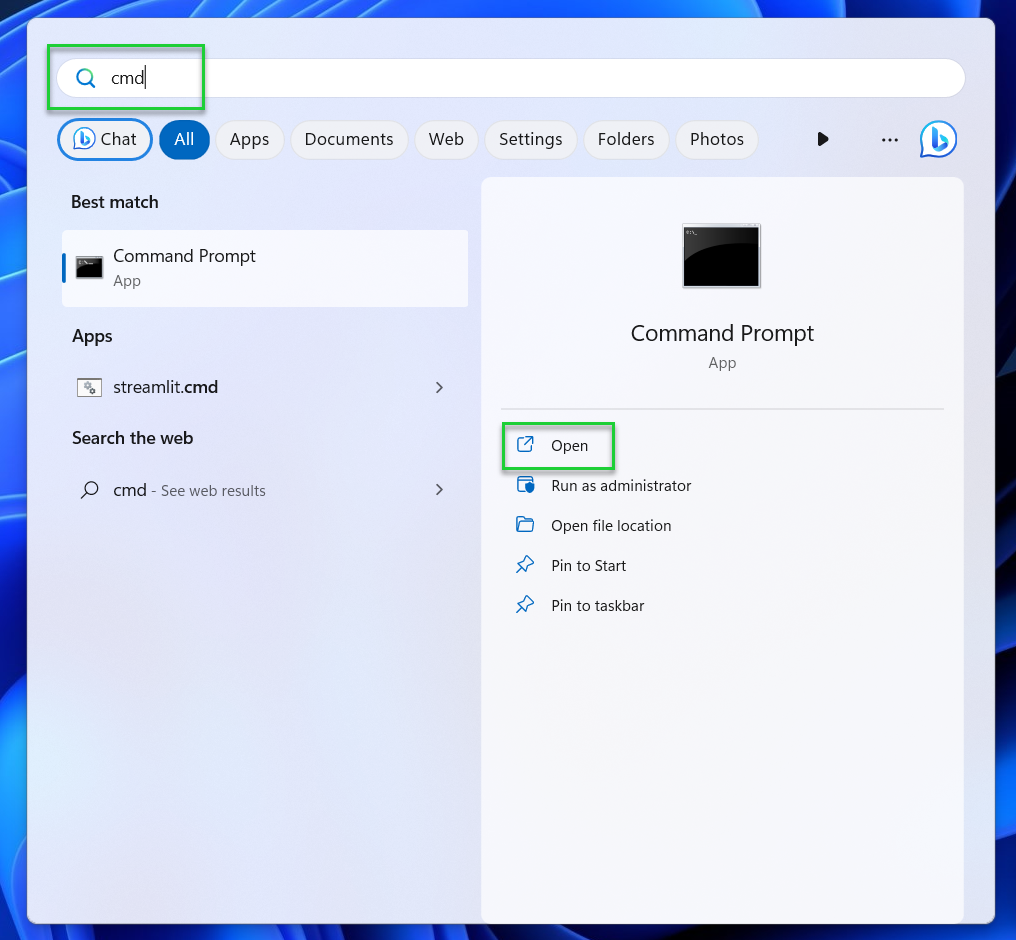
9. Open the Start menu, type cmd, and press Open. This will launch a new command prompt window. You can also use the newer Terminal app, as long as you switch to using a command prompt shell.
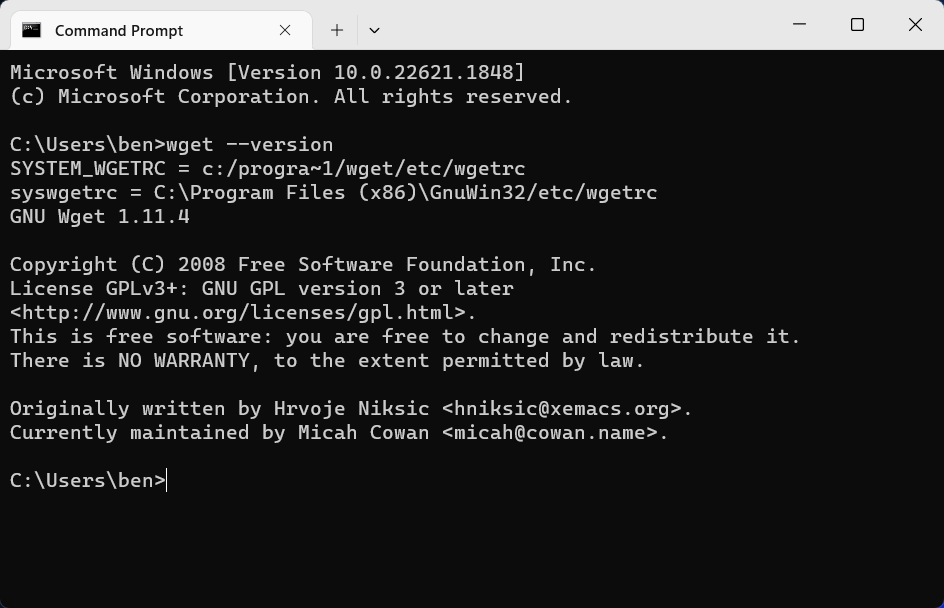
10. Type wget —version and press Enter. If Wget was installed correctly, you should see the GNU Wget version returned in the command prompt window.
If you want to run Wget from a PowerShell terminal instead, you’ll need to run the file from its installation directory directly (eg. C:\Program Files (x86)\GnuWin32\bin\wget.exe).
Downloading Files with Wget
Once you’ve installed GNU Wget and you’ve configured the environment variables to be able to launch it correctly, you’ll be able to use it to start downloading files and webpages.
We’ve used an example domain and file path in our examples below. You’ll need to replace this with the correct path to the file (or files) that you want to download.
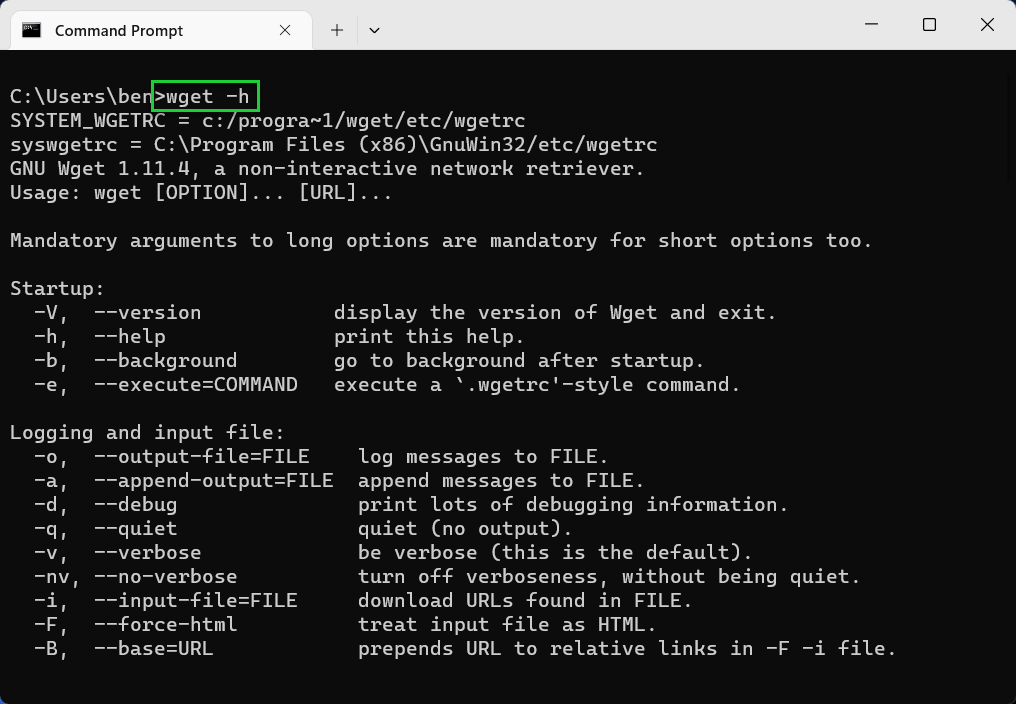
- Type wget -h to see a full list of commands. This will give you the full list of options that you can use with Wget.
wget -h
- Download a single file using wget <url>. Replace <url> with the path to a file on an HTTP, HTTPS, or FTP server. You can also refer to a website domain name or web page directly to download that specific page (without any of its other content).
wget example.com

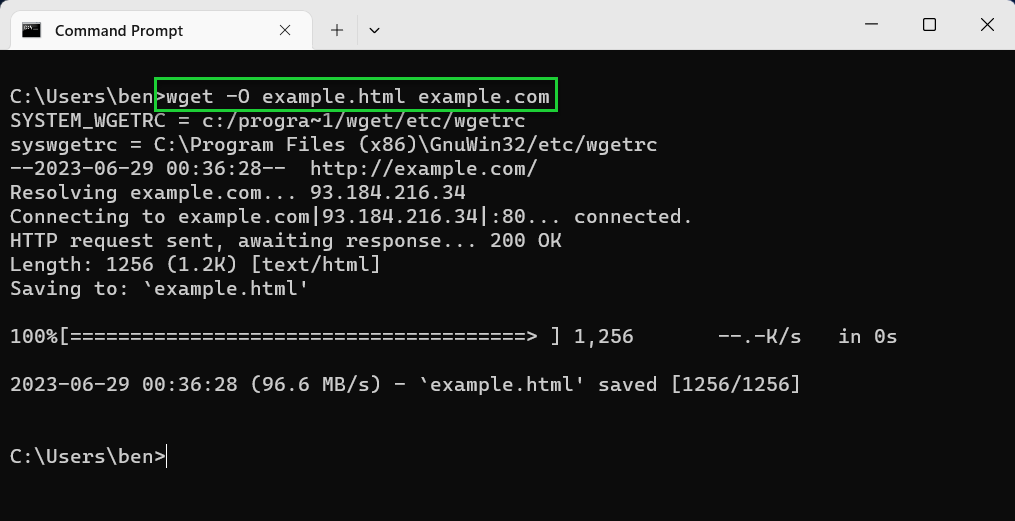
- Save with a different filename using -O. Using the -O option, you’ll be able to save the file with a different filename. For example, wget -O <filename> <url>, where <filename> is the filename you’ve chosen.
wget -O example.html example.com
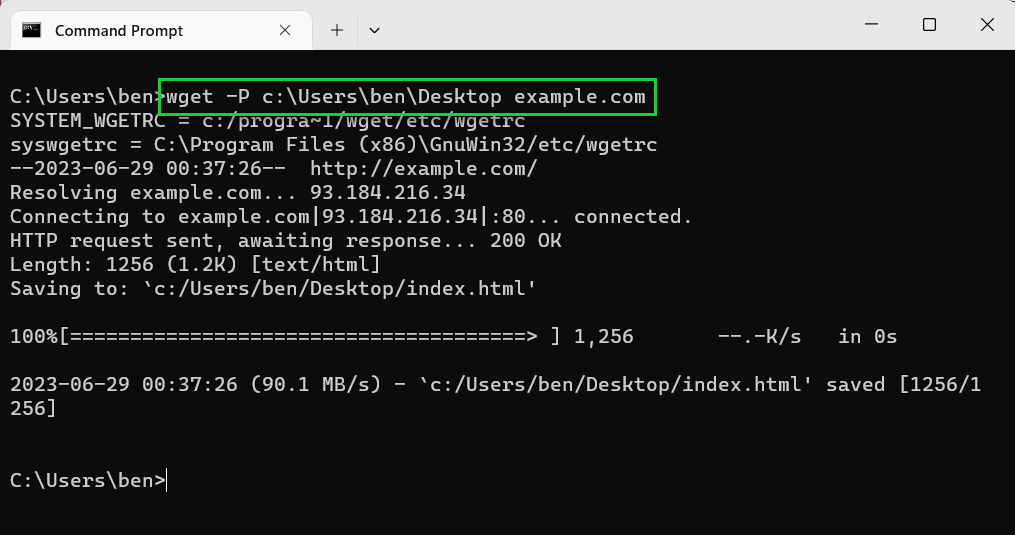
- Save to a different directory using -P. If you want to save to another directory than the one you’re currently in, use the -P option. For example, wget -P <path> <url>.
wget -P C:\folder example.com
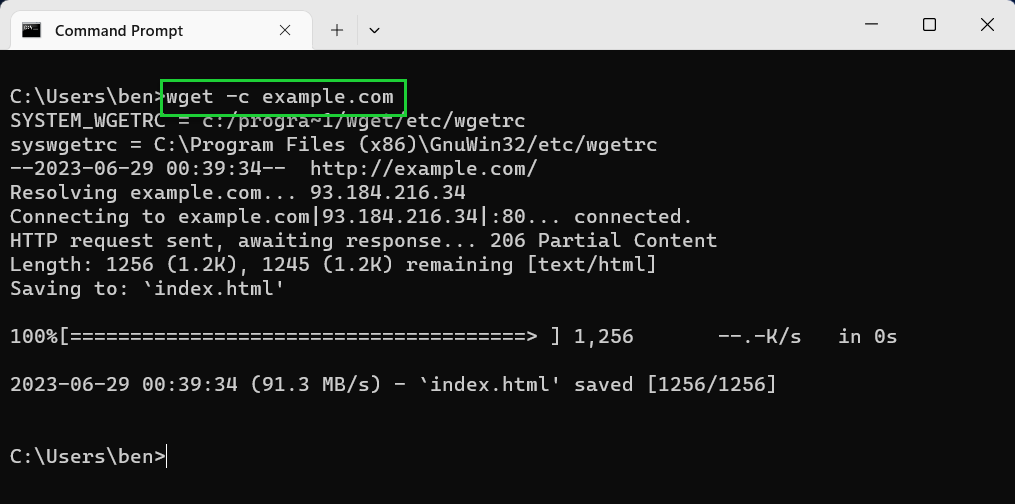
- Use —continue or -c to resume files. If you want to resume a partial download, use the -c option to resume it, as long as you’re in the same directory. For example, wget -c <url>.
wget -c example.com
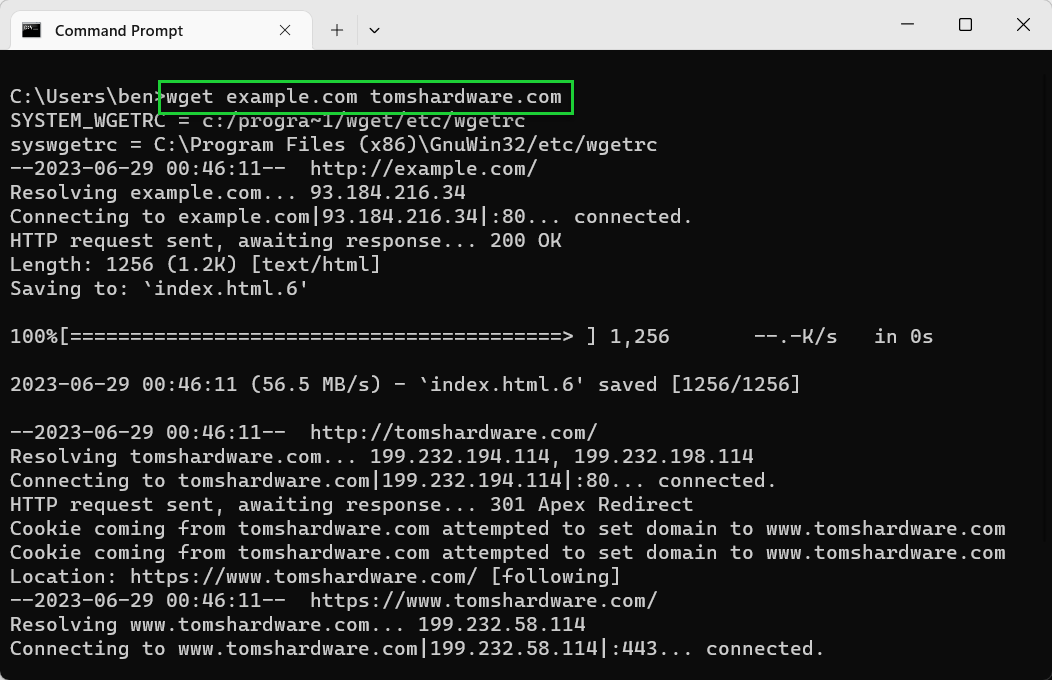
- Download multiple files in sequence. If you want to download several files, add each URL to your Wget command. For example, wget <url1> <url2> etc.
wget example.com tomshardware.com
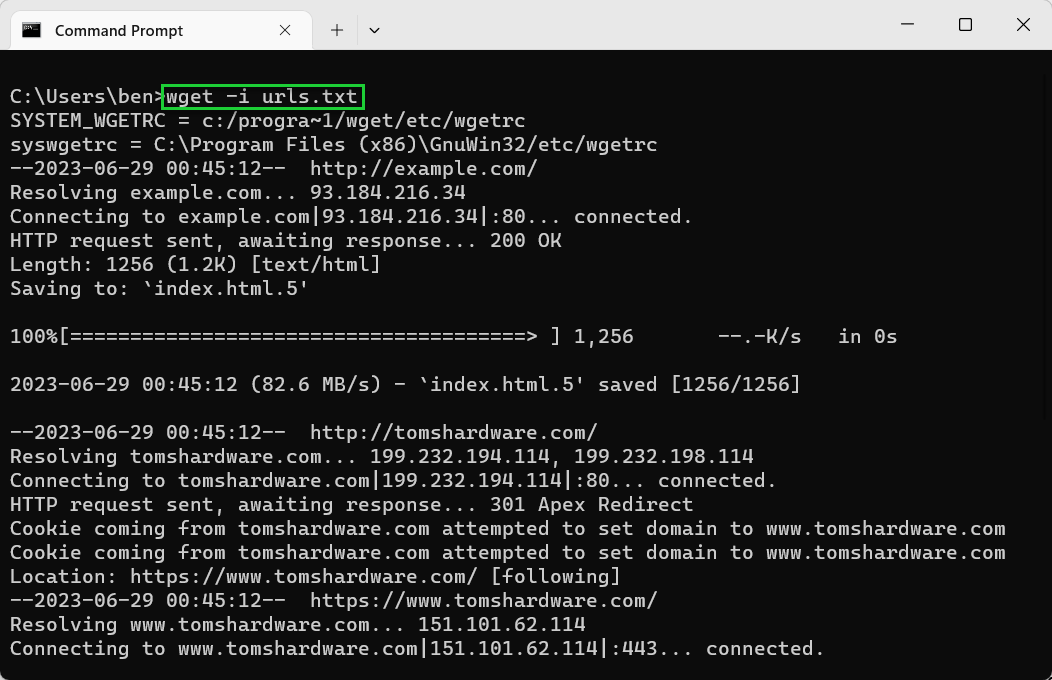
- Download multiple files using a text file with -i. Using the -i option, you can refer to a text file that contains a list of URLs to download a large number of files. Assuming that each URL is on a new line, Wget will download the content from each URL in sequence. For example, wget -i <file.txt> <url>.
wget -i urls.txt
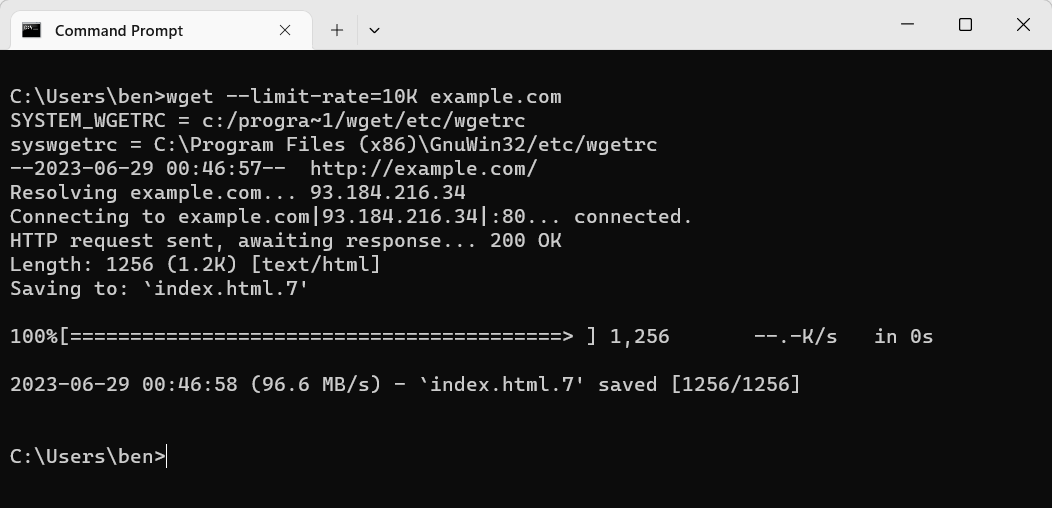
- Limit download speeds using —limit-rate. If you want to limit your bandwidth usage, you can cap the download speeds using the —limit-rate option. For example, wget —limit-rate=1M <url> would limit it to 1 megabyte per second download speeds, while wget —limit-rate=10K <url> would limit it to 10 kilobytes per second.
wget —limit-rate=10K example.com
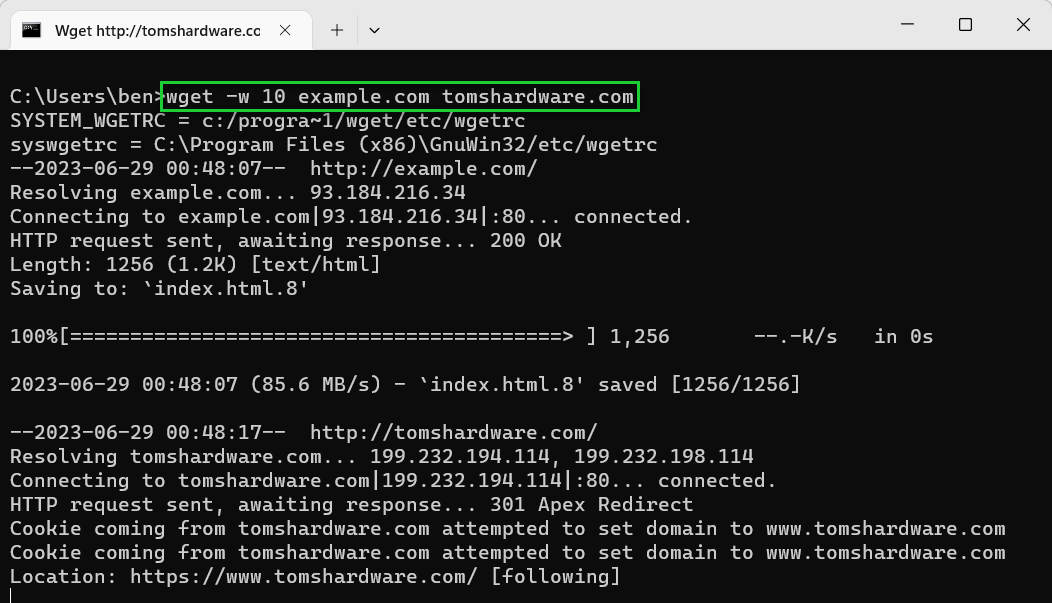
- Use -w or –wait to set a pause period after each download. If you’re downloading multiple files, using -w can help to spread the requests you make and help to limit any chance that your downloads are blocked. For example, wget -w 10 <url1> <url2> for a 10 second wait.
wget -w 10 example.com tomshardware.com
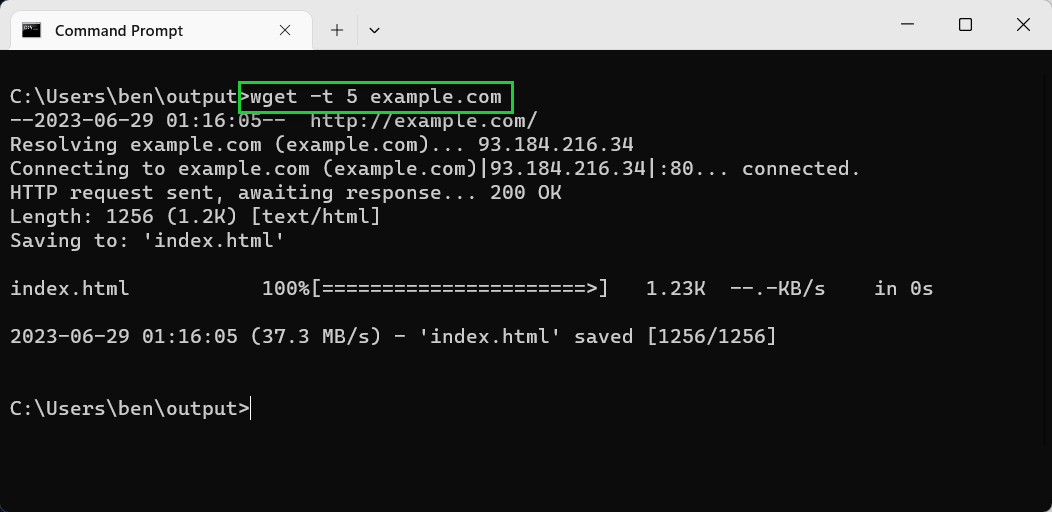
- Set a retry limit using -t or —tries. If a download fails, wget will use the -t value to determine how many times it’ll attempt it again before it stops. The default value is 20 retries. If the file is missing, or if the connection is refused, then this value is ignored and Wget will terminate immediately.
wget -t 5 example.com
- Save a log using -o or -a. You can save your log data to a text file using -o (to always create a new log file) or -a (to append to an existing file). For example, wget -o <file.txt> <url>.
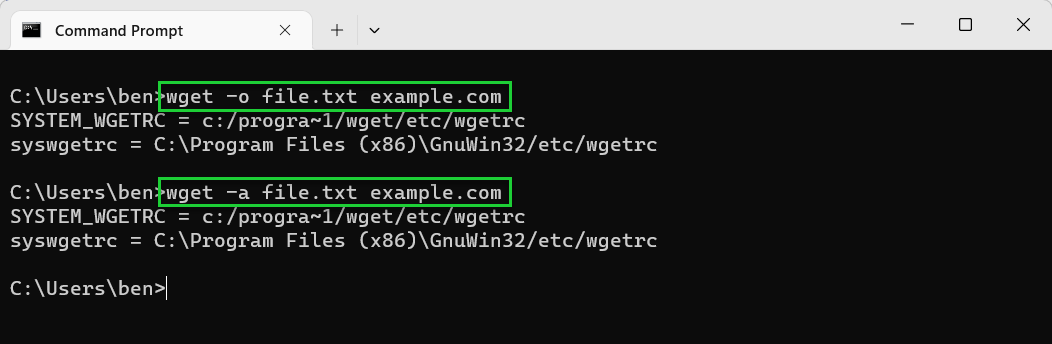
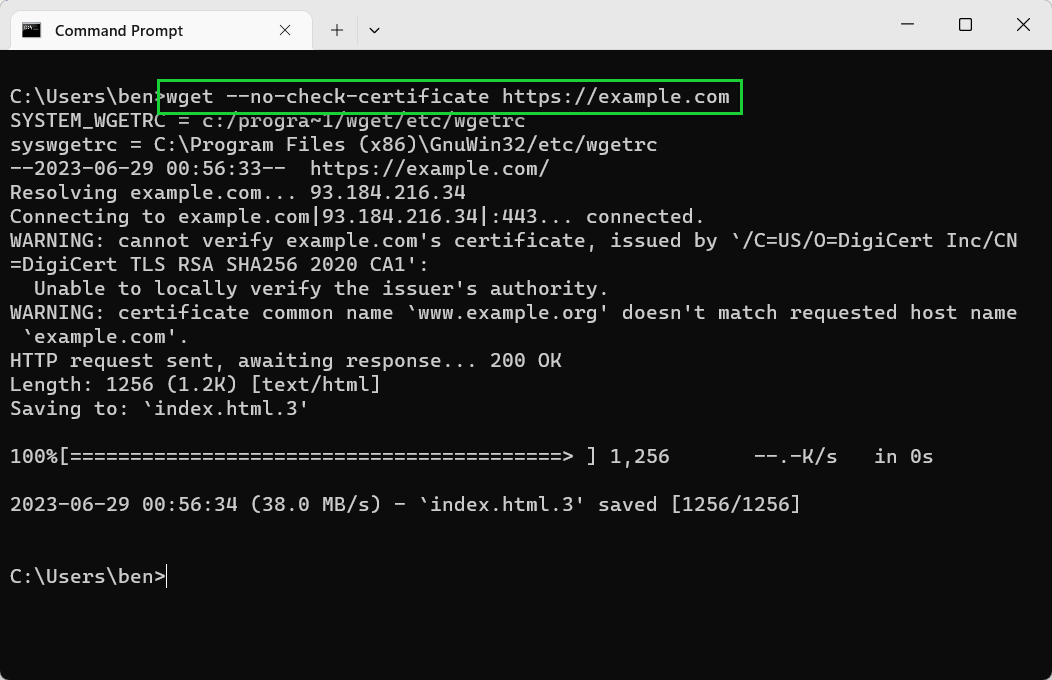
- Bypass SSL errors using —no-check-certificate. If you’re having trouble downloading from a web server with an SSL certificate and you’ve already updated your Wget installation, bypass the SSL certificate check completely using —no-check-certificate to allow the download (in most cases). You should only do this for downloads from locations that you completely trust. For example, wget —no-check-certificate example.com.
wget —no-check-certificate https://example.com
Make sure to use the wget -h or wget —help command to view the full list of options that are available to you. If you run into trouble with Wget, make sure to limit the number of retries you make and set a wait limit for each download you attempt.
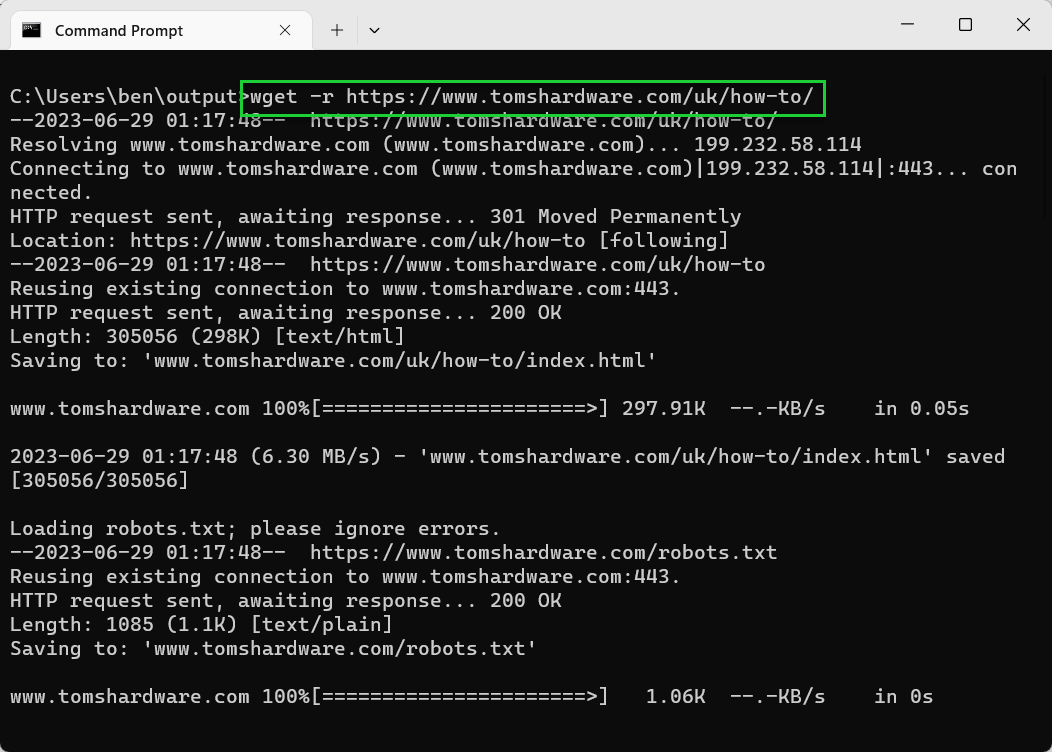
Using Wget for Recursive Downloads
One of Wget’s most useful features is the ability to download recursively. Instead of only downloading a single file, it’ll instead try to download an entire directory of related files.
For instance, if you specify a web page, it’ll download the content attached to that page (such as images). Depending on the recursive depth you choose, it can also download any pages that are linked to it, as well as the content on those pages, any pages that are linked on those pages, and so on.
Theoretically, Wget can run with an infinite depth level, meaning it’ll never stop trying to go further and deeper with the content it downloads. However, from a practical point of view, you may find that most web servers will block this level of scraping, so you’ll need to tread carefully.
- Type wget -r or wget —recursive to download recursively. By default, the depth level is five. For example, wget -r <url>.
wget -r tomshardware.com
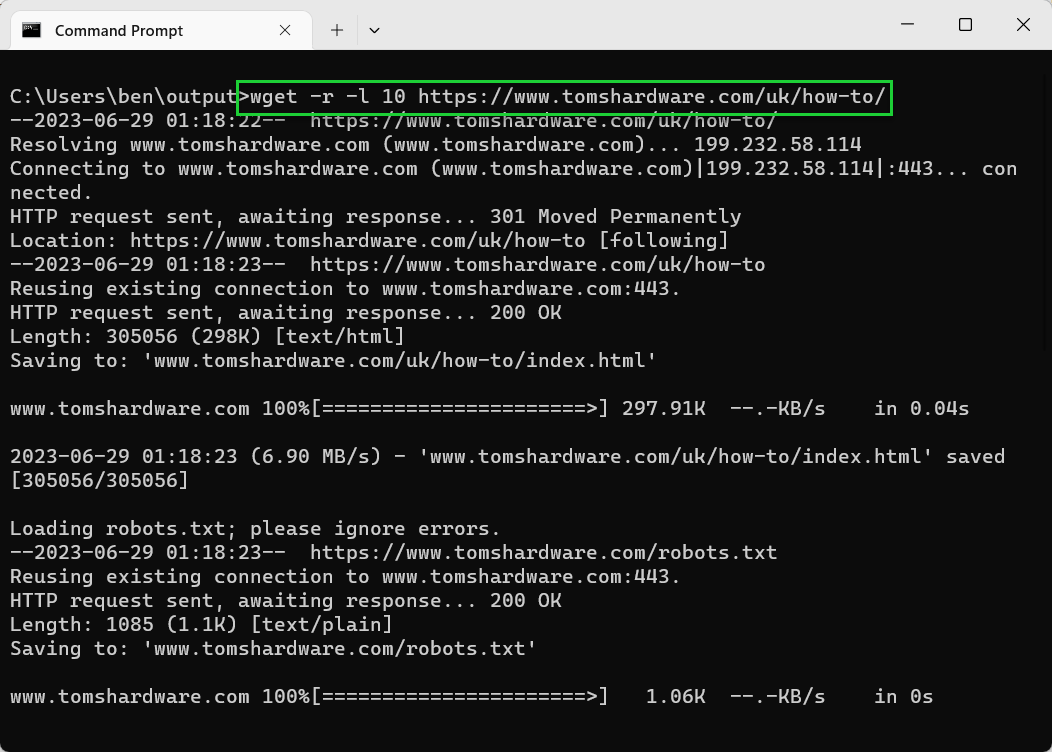
- Use -l or –level to set a custom depth level. For example, wget -r -l 10 <url>. Use wget -r -l inf <url> for an infinite depth level.
wget -r -l 10 tomshardware.com
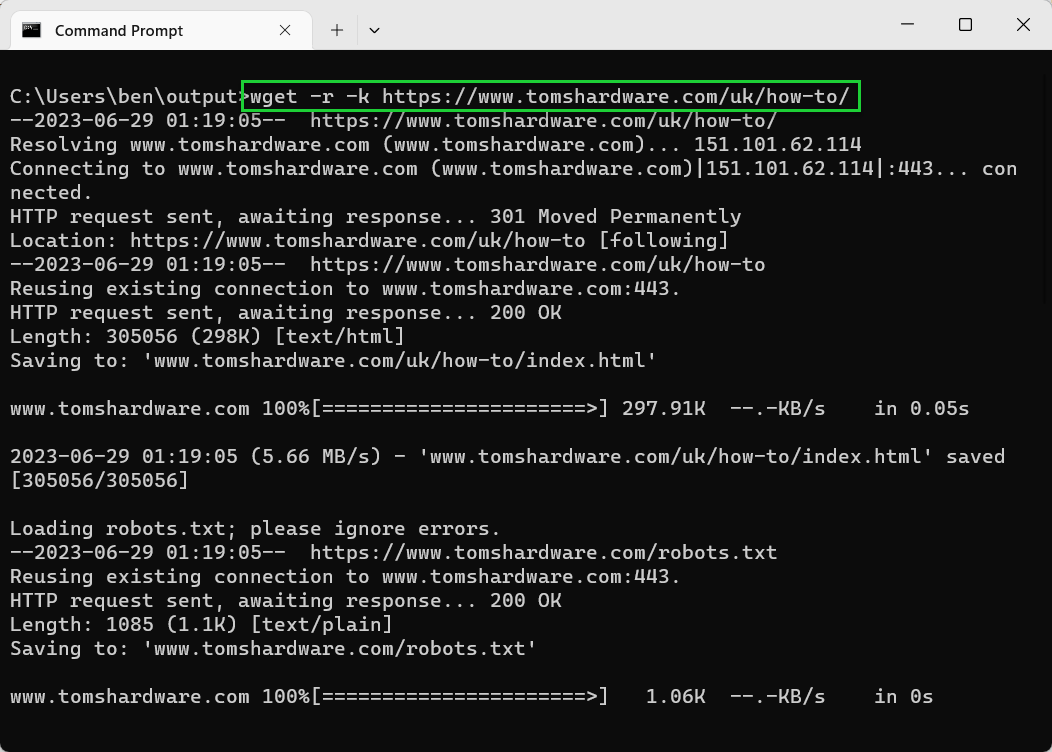
- Use -k to convert links to local file URLs. If you’re scraping a website, Wget will automatically convert any links in HTML to point instead to the offline copy that you’ve downloaded. For example, wget -r -k <url>.
wget -r -k tomshardware.com
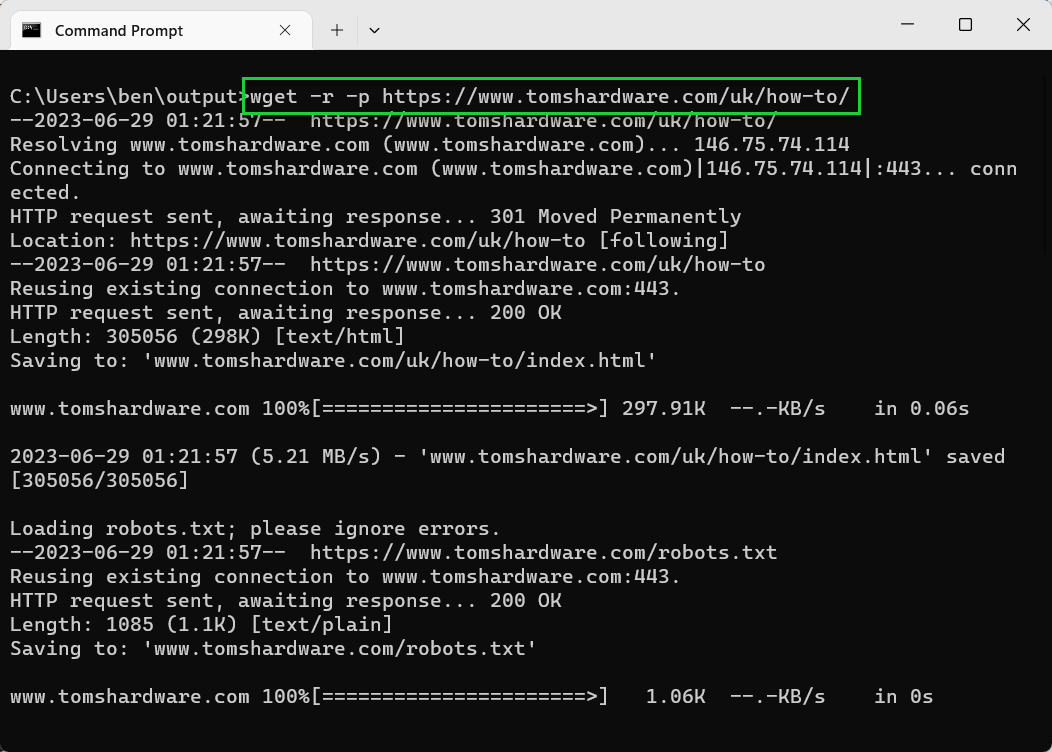
- Use -p or —page-requisites to download all page content. If you want a website to fully download so that all of the images, CSS, and other page content is available offline, use the -p or —page-requisites options. For example, wget -r -p <url>.
wget -r -p tomshardware.com
For a full list of options, make sure to use the wget —h command. You should also take care to respect any website that you’re actively downloading from and do your best to limit server loads using wait, retry, and depth limits.
If you run into difficulties with downloads because of SSL certificate errors, don’t forget to update your Wget binary file (wget.exe) with the latest version.
If you are accustomed to using the wget or cURL utilities on
Linux or
Mac OS X
to download webpages from a
command-line interface (CLI), there is a
Gnu
utility,
Wget for Windows
, that you can download and use on systems running Microsoft
Windows. Alternatively, you can use the Invoke-WebRequest
cmdlet from a PowerShell prompt, if you have version 3.0 or greater of
PowerShell on the system. You can determine the version of PowerShell on
a system by opening a PowerShell window and typing $psversiontable.
E.g., in the example below from a Windows 10 system, the version of PowerShell
is 5.1.15063.674.
PS C:\Users\public\documents> $psversiontable

Name                           Value
----                           -----
PSVersion                      5.1.15063.674
PSEdition                      Desktop
PSCompatibleVersions           {1.0, 2.0, 3.0, 4.0...}
BuildVersion                   10.0.15063.674
CLRVersion                     4.0.30319.42000
WSManStackVersion              3.0
PSRemotingProtocolVersion      2.3
SerializationVersion           1.1.0.1


PS C:\Users\public\documents>
If you have version 3.0 or later, you can use wget or
curlInvoke-WebRequest cmdlet,
at least up through version 5.x. E.g., if I want to download the home
page for the website example.com to a file named index.html, I could use
the command wget -OutFile index.html http://example.com
at a PowerShell prompt. Or I could use either of the following commands,
instead:
curl -OutFile index.html http://example.com

Invoke-WebRequest -OutFile index.html http://example.com
If you don’t want to download the page to the
system, but just want to see the header information for the page. You
can just specify the URL for the page as shown below.

PS C:\Users\public\documents> wget http://example.com
StatusCode : 200
StatusDescription : OK
Content : <!doctype html>
<html>
<head>
<title>Example Domain</title>
<meta charset="utf-8" />
<meta http-equiv="Content-type" content="text/html; charset=utf-8" />
<meta name="viewport" conten...
RawContent : HTTP/1.1 200 OK
Vary: Accept-Encoding
X-Cache: HIT
Content-Length: 1270
Cache-Control: max-age=604800
Content-Type: text/html
Date: Wed, 11 Oct 2017 02:28:12 GMT
Expires: Wed, 18 Oct 2017 02:28...
Forms : {}
Headers : {[Vary, Accept-Encoding], [X-Cache, HIT], [Content-Length, 1270], [Cache-Control,
max-age=604800]...}
Images : {}
InputFields : {}
Links : {@{innerHTML=More information...; innerText=More information...; outerHTML=<A
href="http://www.iana.org/domains/example">More information...</A>; outerText=More information...;
tagName=A; href=http://www.iana.org/domains/example}}
ParsedHtml : mshtml.HTMLDocumentClass
RawContentLength : 1270
PS C:\Users\public\documents>
You can see syntax information for the cmdlet by typing
Invoke-WebRequest -? at a PowerShell prompt.
PS C:\Users\public\documents> Invoke-WebRequest -?

NAME
    Invoke-WebRequest

SYNTAX
    Invoke-WebRequest [-Uri] <uri> [-UseBasicParsing] [-WebSession <WebRequestSession>] [-SessionVariable <string>]
    [-Credential <pscredential>] [-UseDefaultCredentials] [-CertificateThumbprint <string>] [-Certificate
    <X509Certificate>] [-UserAgent <string>] [-DisableKeepAlive] [-TimeoutSec <int>] [-Headers <IDictionary>]
    [-MaximumRedirection <int>] [-Method {Default | Get | Head | Post | Put | Delete | Trace | Options | Merge |
    Patch}] [-Proxy <uri>] [-ProxyCredential <pscredential>] [-ProxyUseDefaultCredentials] [-Body <Object>]
    [-ContentType <string>] [-TransferEncoding {chunked | compress | deflate | gzip | identity}] [-InFile <string>]
    [-OutFile <string>] [-PassThru]  [<CommonParameters>]


ALIASES
    iwr
    wget
    curl


REMARKS
    Get-Help cannot find the Help files for this cmdlet on this computer. It is displaying only partial help.
        -- To download and install Help files for the module that includes this cmdlet, use Update-Help.
        -- To view the Help topic for this cmdlet online, type: "Get-Help Invoke-WebRequest -Online" or
           go to https://go.microsoft.com/fwlink/?LinkID=217035.


PS C:\Users\public\documents>
Updated March 13, 2023

Introduction to PowerShell wget
The PowerShell Wget, which is an alias for the Invoke-WebRequest in PowerShell, is a non-interactive utility that sends the request to the HTTP or HTTPS web page or the web services and parses the response and returns the collection of the links, images, and HTML elements and it also helps to download the files from the webpage, post or delete or modify the data on the website with the forms, checks the status of the websites, etc.
Syntax
Invoke-WebRequest

[-UseBasicParsing]

[-Uri] <Uri>

[-WebSession <WebRequestSession>]

[-SessionVariable <String>]

[-AllowUnencryptedAuthentication]

[-Authentication <WebAuthenticationType>]

[-Credential <PSCredential>]

[-UseDefaultCredentials]

[-CertificateThumbprint <String>]

[-Certificate <X509Certificate>]

[-SkipCertificateCheck]

[-SslProtocol <WebSslProtocol>]

[-Token <SecureString>]

[-UserAgent <String>]

[-DisableKeepAlive]

[-TimeoutSec <Int32>]

[-Headers <IDictionary>]

[-MaximumRedirection <Int32>]

[-MaximumRetryCount <Int32>]

[-RetryIntervalSec <Int32>]

[-Method <WebRequestMethod>]

[-Proxy <Uri>]

[-ProxyCredential <PSCredential>]

[-ProxyUseDefaultCredentials]

[-Body <Object>]

[-Form <IDictionary>]

[-ContentType <String>]

[-TransferEncoding <String>]

[-InFile <String>]

[-OutFile <String>]

[-PassThru]

[-Resume]

[-SkipHttpErrorCheck]

[-PreserveAuthorizationOnRedirect]

[-SkipHeaderValidation]

[<CommonParameters>]
If we check the Invoke-Webrequest syntax, PowerShell 7.1 version supports the 4 sets for this command.
The other 3 sets include the below extra parameters.
-NoProxy
-CustomMethod
This means that you can not combine the above 2 parameters with the First set of certain parameters. For example, you can’t use the -Proxy and -NoProxy parameter together but set support the -NoProxy and -CustomMethod both together.
How does PowerShell wget works?
Wget utility is the Unix-based utility that, in general, people using to download files from the webpages. PowerShell has introduced a similar utility in the form of the cmdlet Invoke-WebRequest, and its alias name is wget so that the people coming from the Unix background can understand that this command has the similar or more advanced functionality in the PowerShell.
The Invoke-WebRequest was introduced in PowerShell 3.0 onwards and has become very popular for interacting with the webpage.
Wget is the name of the alias of the Invoke-WebRequest command in the PowerShell .Net framework version (v1.0 to 5.1).
Get-Alias -Name wget
Output:

While in the Powershell Core version (6.0 onwards), the wget alias name is replaced with the iwr command.
Get-Alias -Definition Invoke-Webrequest
Output:

Wget and iwr also have the same supported utility called curl, which is a Unix command but introduced as an alias of the Invoke-Webequest command.
Get-Alias -Definition Invoke-WebRequest
Output:

When you parse the web page using the Wget command, a few properties and methods are associated with this command. Let see what those members are.
$uri = "https://theautomationcode.com"

$response = wget -Uri $uri

$response | gm
Output:
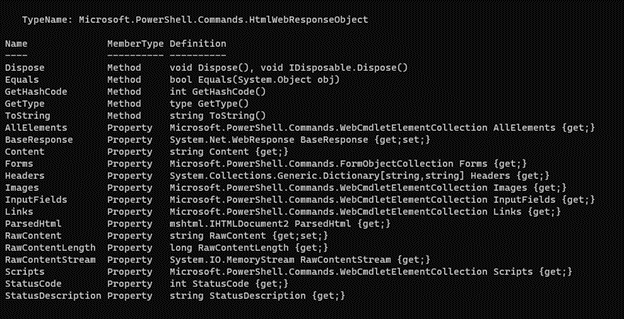
There are various properties like Headers, Images, links, which you can retrieve directly through the wget command.
In the examples below, we will see how various parameters are supported with the wget command.
Examples of PowerShell wget
Given below are the examples of PowerShell wget:
Example #1
Using the wget command to check the website status
We can check the status of the webpage using the wget (Invoke-WebRequest) command.
$uri = "https://theautomationcode.com"

wget -Uri $uri
Output:
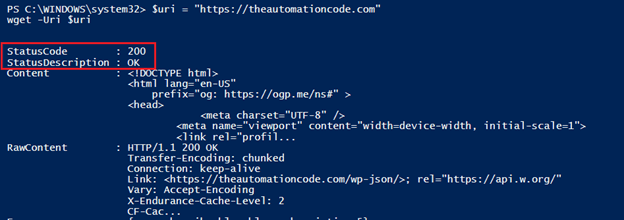
StatusCode 200 means that the site is OK. You can check the various status codes on the wiki page link below.
https://en.wikipedia.org/wiki/List_of_HTTP_status_codes
Example #2
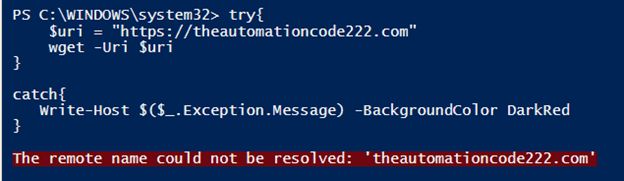
Exception handling in the Wget command.
Programming language uses the try/catch methods for exception handling. In this example, we will handle the non-existence website exception using the same method in PowerShell.
Try {

$uri = "https://theautomationcode222.com"

wget -Uri $uri -EA Stop

}

Catch {

Write-Host $($_.Exception.Message) -BackgroundColor DarkRed

}
Output:
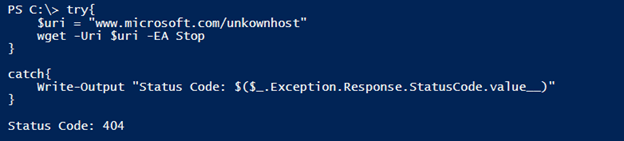
To catch the status code of the message.
try{

$uri = "www.microsoft.com/unkownhost"

wget -Uri $uri -EA Stop

}

catch{

Write-Output "Status Code:  $($_.Exception.Response.StatusCode.value__)"

}
Output:
Example #3
Downloading a file with the Wget command.
We can download files directly from the internet using the wget command as shown below. We are downloading a Web-based net framework from the MS website in this example, as shown below.
$uri = https://go.microsoft.com/fwlink/?LinkId=2085155

wget -Uri $uri -OutFile "C:\temp\netframework.exe" -Verbose
Output:

The above command will keep the download file in the C:\temp folder with the NetFramework.exe name.
Example #4
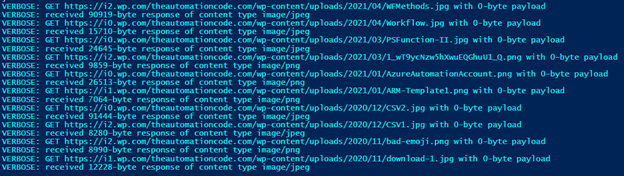
Downloading Images, links from the webpage.
With the wget widget, we can access the images or links from the website directly to the local system, as shown below.
$uri = "https://theautomationcode.com"

$response = wget -Uri $uri
With the above command, the response from the webpage will be stored in the $Response variable. Thus, we can directly access those properties. But, first, let’s check the images stored on the website.
$response.Images.src
Output:

The above command shows the source of the images from the website.
With some operation on the command above, you can download those images to the particular folder as shown below. It will download all the images from the link to the C:\temp\WebImages folder.
foreach($img in $response.Images.src){

$imgurl = ($img.Split('?'))[0]

$imgname = ($imgurl -split '/')[-1]

wget -Uri $imgurl -OutFile "C:\temp\WebImages\$imgname" -Verbose

}
Output:
Similarly, you can access the links from the website.
$response.Links.Href
Example #5
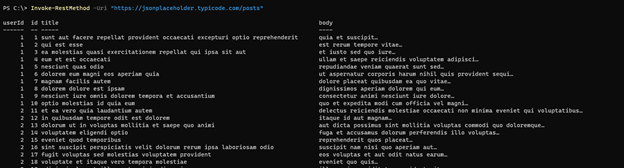
Converting Rest API content to JSON data using wget.
When we use the rest API to get the website data, that data is generally is in JavaScript Object Notation (JSON) format. Therefore, when we use the Invoke-RestMethod command, it directly converts the output to the JSON format, as shown below.
Invoke-RestMethod -Uri "https://jsonplaceholder.typicode.com/posts"
Output:
But using the wget command, we need to use some cmdlets to filter the content and then we can convert to the above output display format.
$uri = 'https://jsonplaceholder.typicode.com/posts'

$response = Invoke-WebRequest -Uri $uri

$response.Content | ConvertFrom-Json
You will get the same output as the first one.
Example #6
Login to the website using the wget post method.
In the below example, we will use the LinkedIn website to log in using wget forms as shown below.
$linloginpage = 'https://www.linkedin.com/login?fromSignIn=true&trk=guest_homepage-basic_nav-header-signin'

$response = wget -Uri $linloginpage -SessionVariable LIN

$form = $response.Forms[1]

$form.Fields["Username"] = "user@emailid"

$form.Fields["Password"] = "Your password"

$uri = "https://www.linkedin.com" + $form.Action

$r = wget -Uri $uri -WebSession $Lin -Method Post -Body $form.Fields

Write-Output "`n`nWebsite Status: $($r.StatusDescription)"
Output:
Conclusion
Wget or Invoke-WebRequest (Curl, iwr) is one of the best command-line tools for webpage scrapping and is used by various developers and scripters to call the APIs, pass, delete, modify, add the information to the APIs or the webpages without using the GUI and also helpful to deal with the various types or webpage errors and reporting purpose.
Recommended Articles
This is a guide to PowerShell wget. Here we discuss How does PowerShell wget work along with the examples and outputs. You may also have a look at the following articles to learn more –
- PowerShell ZIP
- PowerShell do while
- PowerShell Dictionary
- PowerShell Multiline String