
Некоторые пользователи могут столкнуться с задачами настройки отдельных аспектов отображаемых элементов или поведения экрана блокировки Windows, для которых в системе не предусмотрено легко доступных параметров. Однако, часть из них можно изменить с помощью редактора реестра.
В этой инструкции о некоторых возможностях настройки экрана блокировки Windows 11 и 10 путём изменения параметров в реестре, которые могут оказаться полезными.
Изменение времени до появления экрана блокировки при выключении экрана
В случае, если на вашем ПК или ноутбуке автоматически выключается экран после определённого периода бездействия, то по прошествии минуты, если снова «активировать» компьютер, вы попадёте на экран блокировки. При желании вы можете изменить этот период времени.
- Запустите редактор реестра: нажмите клавиши Win+R на клавиатуре, либо нажмите правой кнопкой мыши по кнопке «Пуск» и выберите пункт «Выполнить», введите regedit и нажмите Enter
- В редакторе реестра перейдите к разделу
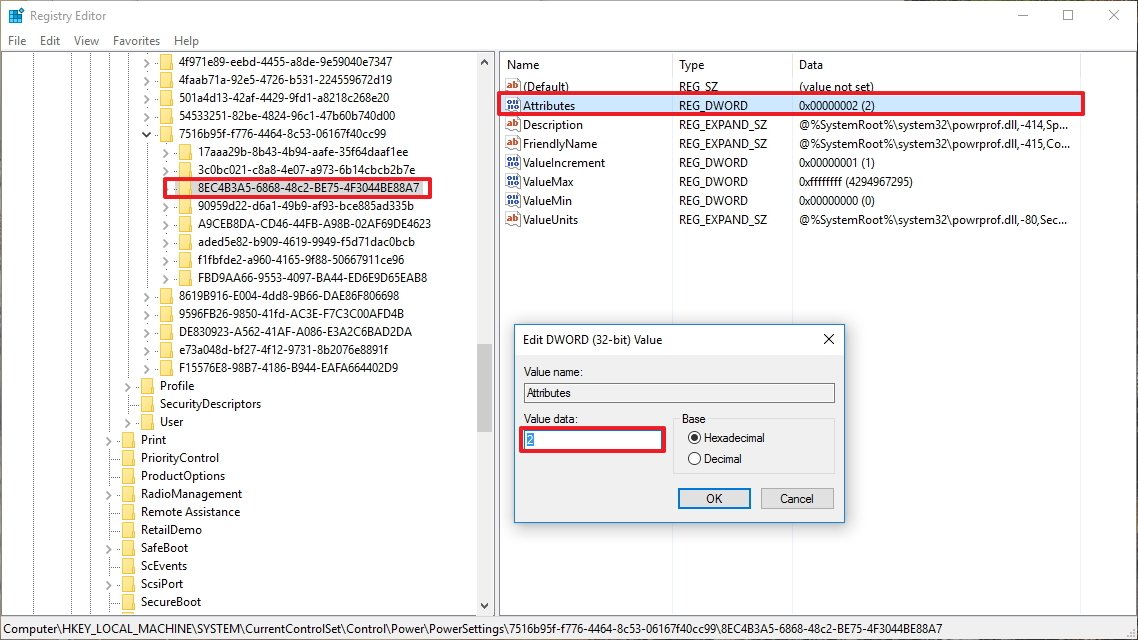
HKEY_LOCAL_MACHINE\SYSTEM\CurrentControlSet\Control\Power\PowerSettings\7516b95f-f776-4464-8c53-06167f40cc99\8EC4B3A5-6868-48c2-BE75-4F3044BE88A7
- В правой панели редактора реестра дважды нажмите по параметру Attributes и установите значение 2 для него, примените настройки.


Как правило, перезагрузка не требуется и появляется возможность настройки времени до необходимости повторного входа в Windows 11/10 после выключения экрана:
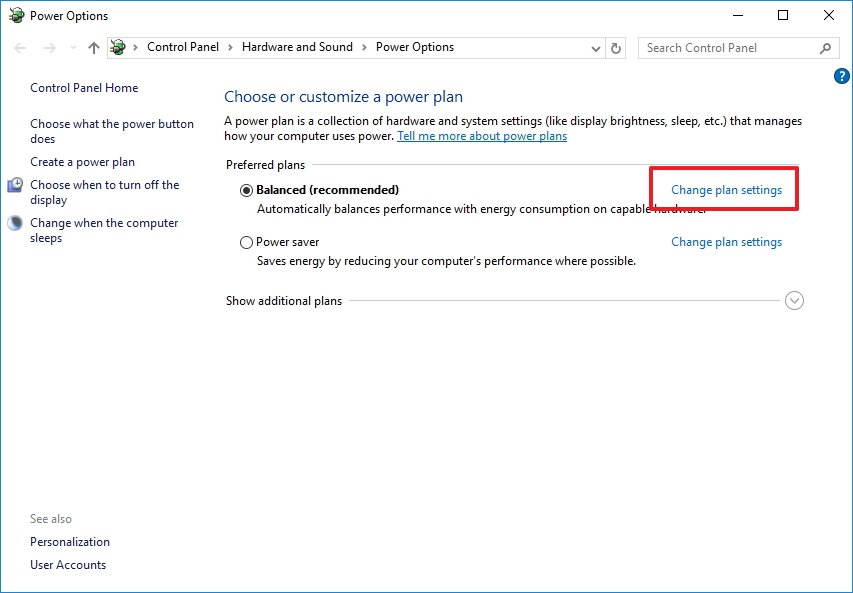
- Откройте параметры электропитания (Win+R — powercfg.cpl).
- Нажмите по пункту «Настройка схемы электропитания» справа от активного профиля.

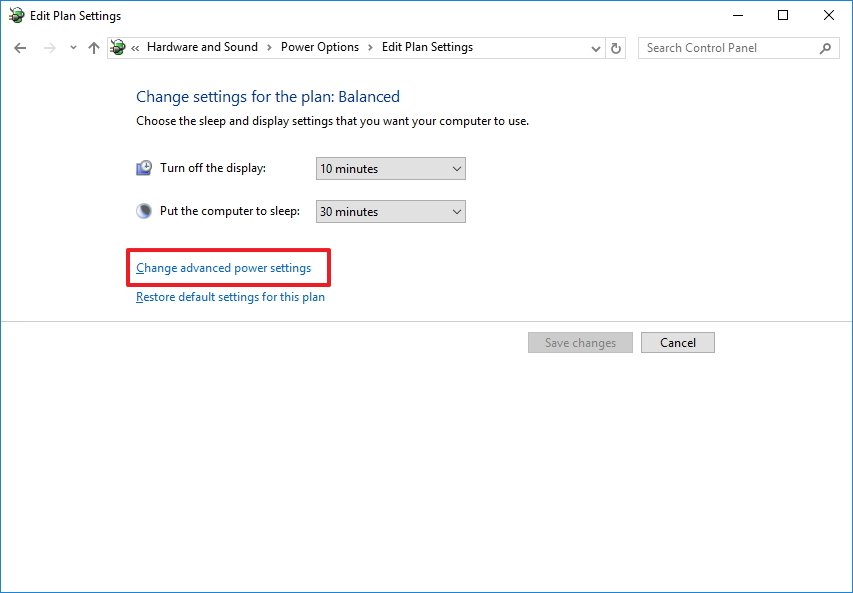
- Нажмите «Изменить дополнительные параметры питания».

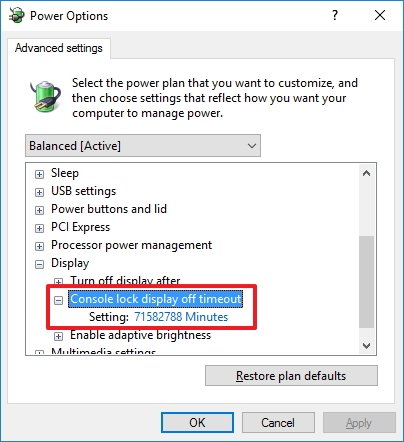
- Перейдите в раздел «Экран» и настройте пункт «Время ожидания до отключения экрана блокировки» (перевод сомнительный, но имеется в виду, время до включения экрана блокировки после отключения дисплея), примените настройки.


Добавление сообщения на экран блокировки
При желании вы можете добавить собственное сообщение на экран блокировки Windows:
- В редакторе реестра перейдите к разделу реестра
HKEY_LOCAL_MACHINE\SOFTWARE\Microsoft\Windows\CurrentVersion\Policies\System
- Нажмите правой кнопкой мыши в пустом месте правой панели редактора реестра и создайте новый строковый параметр с именем legalnoticecaption (при условии, что он отсутствует). Тем же способом создайте параметр legalnoticetext
- Дважды нажмите по каждому из параметров для изменения их значения: в первом вводится заголовок сообщения, во втором — его текст. Примените изменения.


Для того, чтобы это изменение начало работать, потребуется перезагрузка компьютера. Результат выглядит следующим образом, это сообщение появляется при каждом включении или перезагрузке:

Отключение возможности переключения пользователей
При наличии нескольких учётных записей пользователей на компьютере вы можете переключаться между ними с экрана блокировки. Эту возможность можно отключить:
- В редакторе реестра перейдите к разделу
HKEY_LOCAL_MACHINE\SOFTWARE\Microsoft\Windows\CurrentVersion\Policies\System
- Нажмите правой кнопкой мыши в правой панели редактора реестра и создайте новый параметр DWORD32 с именем HideFastUserSwitching
- Установите значение 1 для него и сохраните настройки.
- Перезагрузите компьютер.
Результат действия: будет отключена функция быстрого переключения пользователей и для того, чтобы зайти в другую учётную запись потребуется сначала зайти в учётную запись, куда ранее был осуществлён вход и выйти из неё.
Скрытие кнопки питания
Кнопка питания, изображенная на экране блокировки, позволяет не только выключить или перезагрузить компьютер, что само по себе может быть нежелательным, если в какой-либо учётной записи ведётся работа, но и зайти в среду восстановления Windows (откуда при определённых условиях возможно выполнить действия в том числе и ведущие к сбросу пароля).
Кнопку питания также можно убрать с экран блокировки:
- В редакторе реестра перейдите к разделу
HKEY_LOCAL_MACHINE\SOFTWARE\Microsoft\Windows\CurrentVersion\Policies\System
- Дважды нажмите мышью по параметру с именем shutdwonwithoutlogon и измените его значение на 0, примените настройки.
Перезагрузка не требуется, кнопка питания сразу перестанет отображаться на экране блокировки (точнее — экране входа в систему):
Дополнительная информация
Некоторые дополнительные материалы, касающиеся экрана блокировки Windows 11/10 на сайте:
- Как изменить язык на экране блокировки Windows 11/10
- Настройка виджетов на экране блокировки Windows 11
- Отключение размытия фона на экране блокировки Windows 10
Надеюсь, материал был полезным. А если есть что добавить, буду рад вашему комментарию ниже.
В Windows 10 нет явной опции, которая открывала бы прямой доступ к настройкам тайм-аута блокировки системы. Можете сколько угодно копаться в «Параметрах» или в панели управления, но вы не найдете там ничего, что позволило бы изменить время ожидания перед блокировкой Windows. Обойти это ограничение можно путем использования экранной заставки, при активации которой Windows 10 будет автоматически блокироваться.
Это простой и действенный способ, но у него есть один значимый недостаток. Экранная заставка может блокировать выполнение ряда сценариев, связанных с параметрами электропитания. Поэтому гораздо более безопасным и эффективным способом изменения времени блокировки Windows станет настройка реестра.
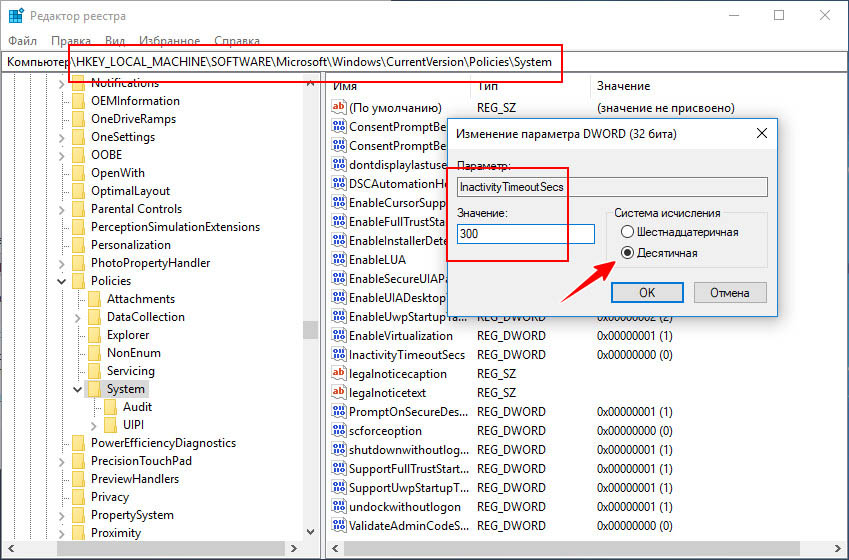
Запустите командой regedit редактор реестра и перейдите к следующему разделу:
HKLM\SOFTWARE\Microsoft\Windows\CurrentVersion\Policies\System
В правой колонке вам нужно отыскать параметр InactivityTimeoutSecs, как раз отвечающий за время ожидания до блокировки.
Вполне возможно, что этого параметра у вас не будет, в этом случае его нужно создать с помощью контекстного меню, вызываемого кликом правой кнопкой мыши. Тип он должен иметь DWORD. В качестве значения параметра установите время в секундах, предварительно выбрав десятичную систему счисления.
Чтобы настройки вступили в силу, потребуется перезагрузить компьютер.
Отныне Windows 10 станет автоматически блокироваться по истечении времени, указанного вами в реестре.
Изменить его значение вы можете в любое время.
Твик никак не повлияет на отключения экрана при бездействии, но при активации заставки Windows 10 станет блокироваться по-прежнему в независимости от установленного вами тайм-аута.
You may want to change lock screen timeout settings because either the time is set to too low or high for Windows to lock screen when the PC is idle. This is a good feature when you want to secure your PC when you are not using it. So what Windows does is that it locks your screen automatically after your PC is idle for a certain amount of time and it either displays screensaver or turns off the display.

Earlier the Screensavers were used to prevent burn out on CRT monitors, but nowadays it’s more of a security feature. For example, if you are away from your computer for a few hours, the chances are that someone might access your files, passwords etc. if the PC is not locked or turned off by you. But if you have correctly set the lock screen timeout setting, then the display will automatically turn off after the PC is left idle for few minutes and if someone tries to access it, Windows will as for login password.
The only problem with this security feature is that sometimes the lock screen timeout is set to 5 minutes, meaning that the computer will lock screen after the PC is left idle for 5 minutes. Now, this setting annoys a lot of users as their PC can get lock frequently and they have to enter the password every time which waste their lot of time. To prevent this from happening, you need to increase the lock screen timeout setting in Windows 10 to frequently prevent turning off the display.
Table of Contents
Make sure to create a restore point just in case something goes wrong.
Method 1: Increase Screen Timeout Setting from Windows Settings
1.Press Windows Keys + I to open Settings then click on Personalization.

2. From the left-hand menu, choose Lock Screen.
3. Now scroll down till you find Screen timeout settings and once you find it click on it.

4. Set the time setting under Screen to a little higher if you want to avoid turning off the screen every now & than.

5. If you want completely disable the setting then choose Never from the dropdown.
6. Make sure that the sleep time is set higher than the screen turn off time or else the PC will go to sleep, and the screen wouldn’t be locked.
7. It’s preferred if Sleep is disabled or at least set at 30 minutes or more, in this case, you will have a lot of time to get back to your PC; if not, it will go into sleep mode.
8. Reboot your PC to save changes.
Method 2: Change Lock Screen Timeout Setting from Control Panel
Note: This is just an alternative of the above method if you have followed that then skip this step.
1. Press Windows Key + X then select Control Panel.
2. Click System and Security then click on Power Options.

3. Now click Change plan settings next to your currently active power plan.
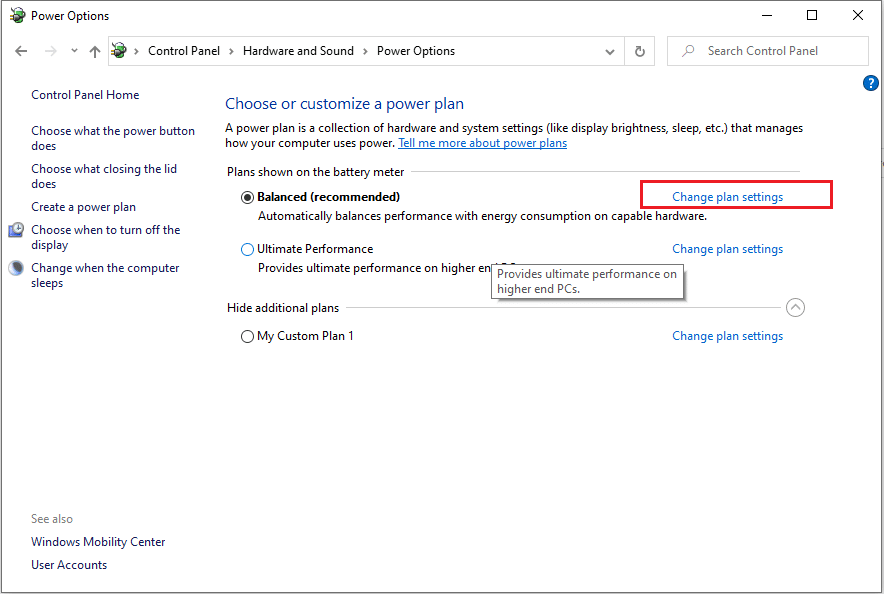
4. Again set the same settings as advice in the previous method.

5. Make sure to set the settings for both batteries and plugged in option.
Method 3: Using Registry
1. Press Windows Key + R then type regedit and hit Enter to open Registry Editor.
2. Navigate to the following path in the Registry:
HKEYLOCAL_MACHINE\SYSTEM\CurrentControlSet\Control\Power\PowerSettings\7516b95f-f776-4464-8c53-06167f40cc99\8EC4B3A5-6868-48c2-BE75-4F3044BE88A7
3. On the right-hand side window, double click on Attributes DWORD.

4. If you can’t find it, you need to create the DWORD, right-click in an empty area in the right-hand side window and select New > DWORD (32-bit) value.
5. Name it as Attributes and double click on it.
6. Now change its value from 1 to 2 and click OK.
7. Reboot your PC to save changes.
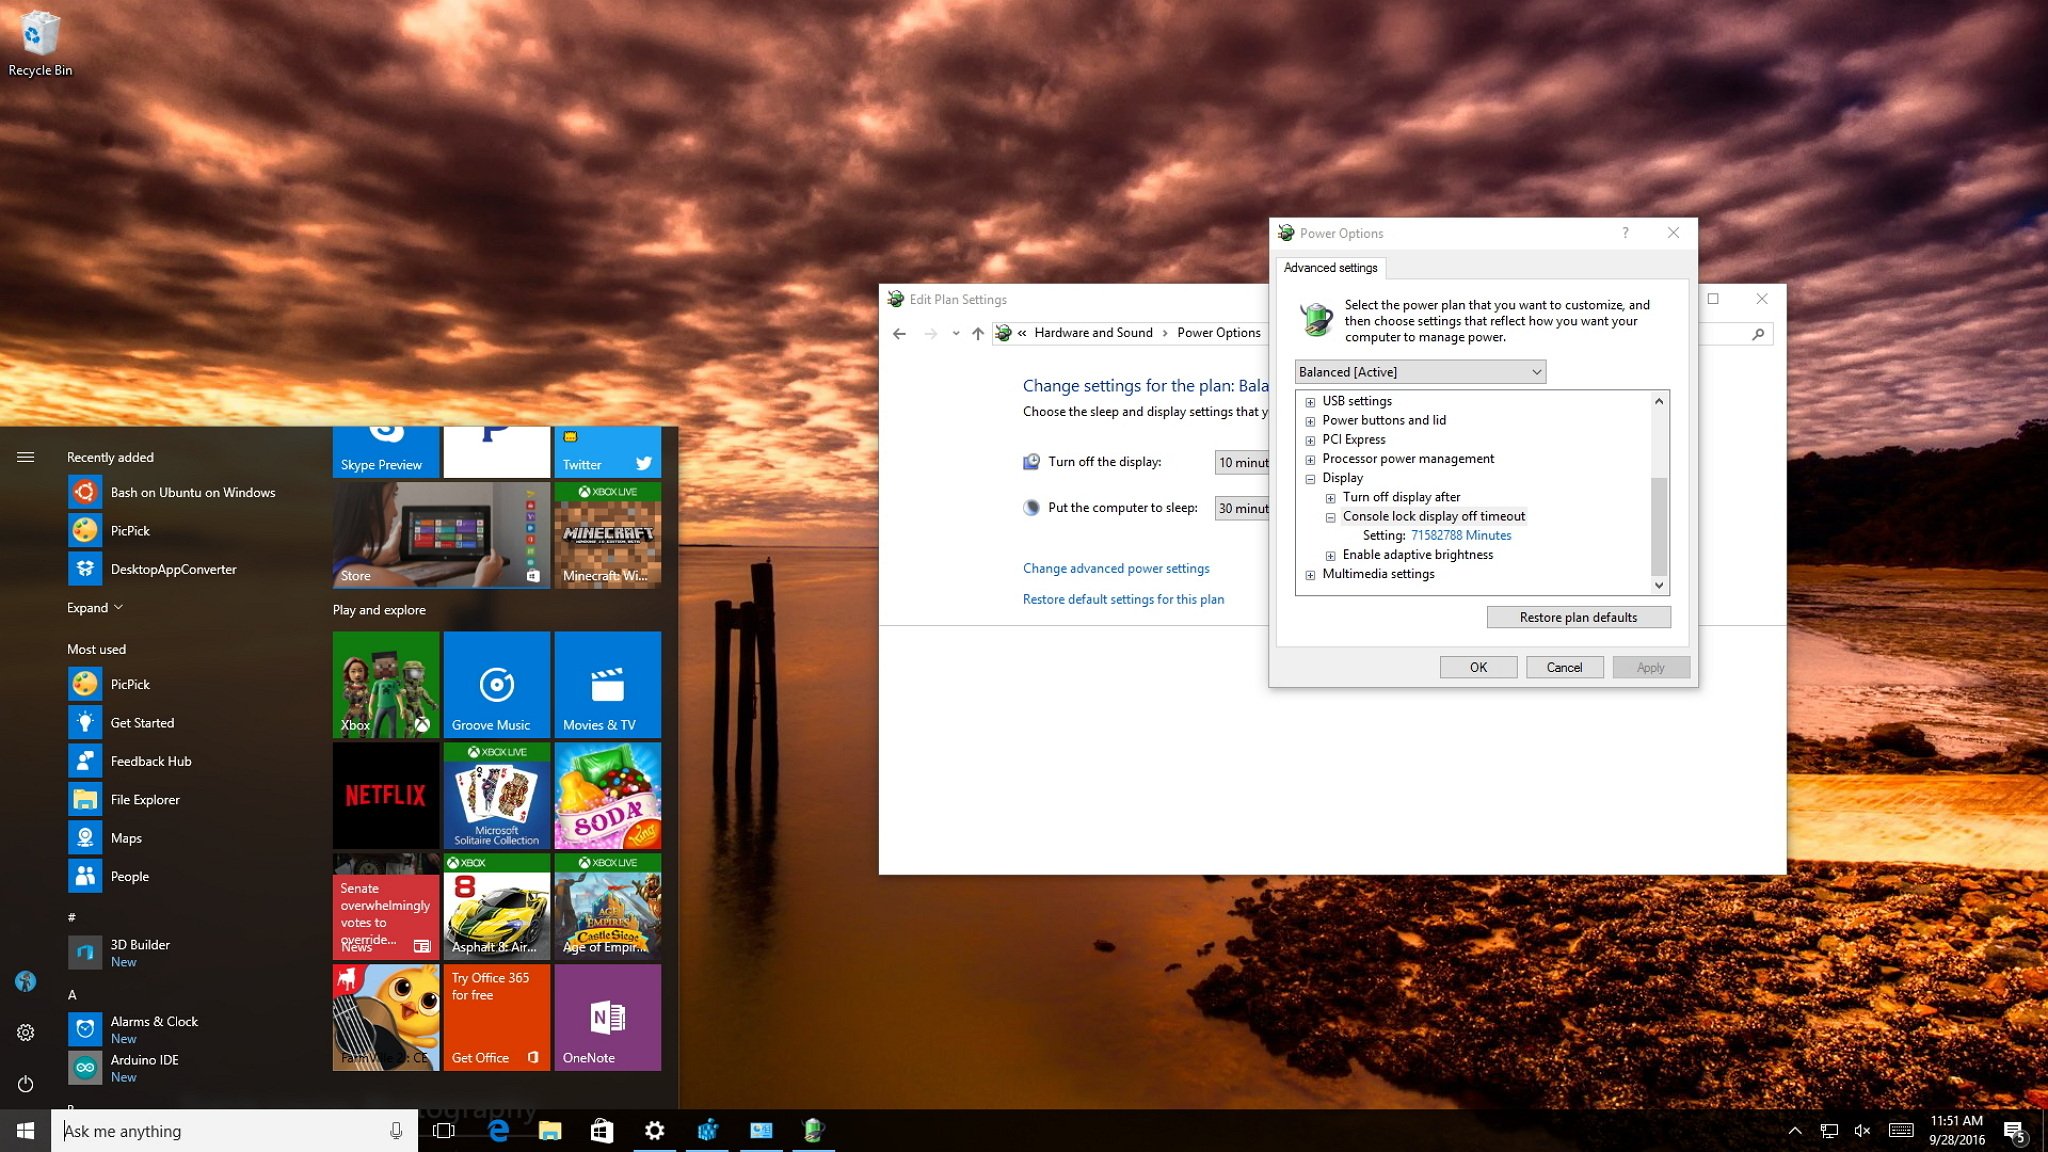
8. Now right-click on Power icon on the system tray and select Power Options.
9. Click Change plan settings next to your currently active plan.
10. Then click Change advanced power settings.

11. Scroll down till your see Display, then click on it to expand its settings.
12. Double click on Console lock display off a timeout and then change its value from 1 minute to the time you want.

13. Click Apply, followed by OK.
14. Reboot your PC to save changes.
Method 4: Change Lock screen timeout Settings using Command Prompt
1. Press Windows Key + X then select Command Prompt (Admin).
2. Type the following command and press Enter:
powercfg.exe /SETACVALUEINDEX SCHEME_CURRENT SUB_VIDEO VIDEOCONLOCK 60
powercfg.exe /SETDCVALUEINDEX SCHEME_CURRENT SUB_VIDEO VIDEOCONLOCK 60

Note: You must replace the “60” in the above command with the screen timeout setting you want (in seconds) for example if you want 5 minutes then set it at 300 seconds.
3. Again type the following command and hit Enter:
powercfg.exe /SETACTIVE SCHEME_CURRENT
4. Reboot your PC to save changes.
Recommended:
- Fix DPC_WATCHDOG_VIOLATION Error 0x00000133
- Fix Windows could not automatically detect this network’s proxy settings
- Resolve Windows 10 Freezes Randomly Issue
- Fix There was a problem resetting your PC error
That’s it you have successfully learned How to Change Lock Screen Timeout Setting in Windows 10 but if you still have any questions regarding this post then feel free to ask them in the comment’s section.
On Windows 10, similar to Windows 8.1, the operating system features a Lock screen before you sign in to your account. The new experience showcases date and time, quick status for apps you choose, and more importantly a background image, which typically, users opt to display personal pictures or those from Windows Spotlight.
While the Lock screen provides useful information and beautiful pictures, you probably noticed that your computer’s display turns off after 60 seconds when you lock your Windows 10 account. This happens even if you change the power options to never turn off the monitor or never put the computer to sleep.
The reason is that by design, the operating system includes a function that detects when the device is locked and waits for 60 seconds. After the time expires, the computer screen goes black. This is a function, which for a mysterious reason, users can’t customize in Control Panel or the Settings app. However, you can modify the Registry to enable a new option in the power settings to change the time to anything you want.
In this Windows 10 guide, we’ll walk you through the steps to tweak the Registry (or Command Prompt) to customize the operating system should way until turning the display off, which will give you more time to see the background, status, and interact with Cortana on the Lock screen.
- How to change the time when the display turns off when your PC is locked
- How to change the Lock screen timeout using Command Prompt
How to change the time when the display turns off when your PC is locked
Important: Before diving into this guide, it’s worth noting that editing the registry can be dangerous, and it can cause irreversible damage to your system if you don’t do it correctly. It’s highly recommended to make a full backup of your PC before proceeding. You’ve been warned!
- Use the Windows key + R keyboard shortcut to open the Run command, type regedit, and click OK to open the registry.
- Browse the following path:
HKEYLOCAL_MACHINE\SYSTEM\CurrentControlSet\Control\Power\PowerSettings\7516b95f-f776-4464-8c53-06167f40cc99\8EC4B3A5-6868-48c2-BE75-4F3044BE88A7 - On the right side, double-click the Attributes DWORD.
- Change the value from 1 to 2.
- Click OK.
These steps only enabled the option on Windows 10 called «Console lock display off timeout.» Now the only thing left to do is to customize this option to any time you want. To do this, use these instructions:
- Use the Windows key + X keyboard shortcut to open the Power User menu and select Power Options.
- Click the Change plan settings link for the selected plan.
- Click the Change advanced power settings link.
- On Advanced settings, scroll down and expand the Display settings.
- You should now see the Console lock display off timeout option, double-click to expand.
- Change the default time of 1 minute to the time you want, in minutes.
- Click Apply.
- Click OK to complete the task.
Once you complete the steps, you can test the new settings by locking your computer (Windows key + L keyboard shortcut), and now the screen shouldn’t turn off until the time you set expires.
All the latest news, reviews, and guides for Windows and Xbox diehards.
At any time, you can revert the changes by following the previous steps, but this time, on step 4 change the registry value key from 2 to 1.
How to change the Lock screen timeout using Command Prompt
The beauty of Windows is that you can configure the same feature in a number of ways. Alternatively, you can use the PowerCfg.exe utility to change you display timeout setting when your computer is locked. When it’s connected to AC power or when your device is running on battery (DC power).
To change the Lock screen timeout using Command Prompt, do the following:
- Use the Windows key + X keyboard shortcut to open the Power User menu and select Command Prompt (admin).
- Type the following command and press Enter:
powercfg.exe /SETACVALUEINDEX SCHEME_CURRENT SUB_VIDEO VIDEOCONLOCK 60Important: You must change «60» in the command-line with the timeout time you want to use, in seconds. For example, if you want the screen to turned on for 5 minutes, then you need to use 300 at the end of the command. - Type the following command and press Enter:
powercfg.exe /SETACTIVE SCHEME_CURRENT

- Use the Windows key + L keyboard shortcut to lock your PC and see if the new settings work.
The command mentioned in step 2 will work when your computer is using AC power. You must replace /SETACVALUEINDEX for /SETDCVALUEINDEX if you want to change the timeout setting on your laptop or tablet running on battery.
It’s worth noting that while changing the Registry settings is an advanced task, during my test, I have found that sometimes using the command lines may settings may not work as expected, but it’s an alternative.
On the other hand, changing the Registry worked perfectly, and after making the tweak, I can simply go to the Power Options settings in Control Panel and adjust the Lock screen timeout without having to use any commands.
More Windows 10 resources
For more help articles, coverage, and answers on Windows 10, you can visit the following resources:
- Windows 10 on Windows Central – All you need to know
- Windows 10 help, tips, and tricks
- Windows 10 forums on Windows Central
Mauro Huculak has been a Windows How-To Expert contributor for WindowsCentral.com for nearly a decade and has over 15 years of experience writing comprehensive guides. He also has an IT background and has achieved different professional certifications from Microsoft, Cisco, VMware, and CompTIA. He has been recognized as a Microsoft MVP for many years.
Сегодня, мы вам расскажем о том, как задать время блокировки компьютера с Windows 10 после бездействия, так как на сегодняшний день данная настройка ОС весьма актуальна для тех из вас, кто много работает за компьютером и периодически отвлекается от него на сопутствующие дела.
Данная настройка, о которой мы хотим вам рассказать, заключается в том, что при условии, что у вас активирована опция, которая при бездействие компьютера выводит на экран «Рабочего стола» так называемый скринсейвер – экранную заставку, после чего происходит блокировка системы. Понятное дело, что блокировка системы происходит не мгновенно, ведь если сразу после появления заставки нажать клавишу на клавиатуре или же по шевелить мышкой, заставка блокировки пропадет, но если промедлить больше 5 секунд, то вам придется вводить пользовательский пароль. Именно по этой причине, мы решили предложить вам увеличить 5 секундный промежуток времени на тот, который для вас будет наиболее оптимальным.
Как обычно, открываем «Редактор реестра» при помощи команды «regedit» -> после чего, переходим вот по такому пути: HKEY_LOCAL_MACHINE\SOFTWARE\Microsoft\Windows NT\CurrentVersion\Winlogon.
Попав в подраздел «Winlogon», создайте в нем 32-битный параметр типа DWORD -> создаваемому параметру присвойте имя «ScreenSaverGracePeriod».

Теперь, параметр «ScreenSaverGracePeriod» должен будет получить от вас числовое значение, которое должно быть равно от 0 до 2147483 (число задается только в десятичной системе счисления).

Соответственно, то число, которое вы установите, позволит вам задать время блокировки компьютера с Windows 10 после бездействия. Тут стоит так же понимать, что задаваемый промежуток времени до блокировки, должен быть оптимальным, ведь он не должен быть слишком велик и не должен быть слишком мал!
Обратите внимание на тот момент, что те изменения по времени, которые вы будите задавать параметру «ScreenSaverGracePeriod», будут распространяться на все учетные записи без исключения! При необходимости, отказаться от своих настроек блокировки ОС, мы рекомендуем просто удалить параметр «ScreenSaverGracePeriod».