
Учетная запись «Гость» в Windows позволяет предоставить временный доступ к компьютеру пользователям без возможности для них устанавливать и удалять программы, изменять настройки, устанавливать оборудование, а также открывать приложения из Магазина Windows 10. Также при гостевом доступе пользователь не сможет просмотреть файлы и папки, находящиеся в пользовательских папках (Документы, Изображения, Музыка, Загрузки, Рабочий стол) других пользователей или удалить файлы из системных папок Windows и папок Program Files.
В этой инструкции пошагово описаны два простых способа включить учетную запись Гость в Windows 10 с учетом того факта, что с недавних пор встроенный пользователь «Гость» в Windows 10 перестал работать (начиная со сборки 10159).
Примечание: для ограничения пользователя единственным приложением используйте Режим киоска Windows 10.
Включение пользователя Гость Windows 10 с помощью командной строки
Как было отмечено выше, неактивная учетная запись «Гость» присутствует в Windows 10, но не работает так, как это было в предыдущих версиях системы.
Его можно включить несколькими способами, такими как gpedit.msc, «Локальные пользователи и группы» или команда net user Гость /active:yes — при этом он не появится на экране входа в систему, но будет присутствовать в переключении пользователей меню пуск других пользователей (без возможности входа под Гостем, при попытке сделать это вы вернетесь на экран входа в систему).

Тем не менее в Windows 10 сохранилась локальная группа «Гости» и она работоспособна, таким образом, чтобы включить учетную запись с гостевым доступом (правда, назвать её «Гость» не получится, так как это имя занято за упомянутой встроенной учетной записью), потребуется создать нового пользователя и добавить его в группу Гости.
Самый простой способ сделать это — использовать командную строку. Шаги по включению записи Гость будут выглядеть следующим образом:
- Запустите командную строку от имени администратора (см. Как запустить командную строку от имени Администратора) и по порядку используйте следующие команды, нажимая Enter после каждой из них.
- net user Имя_пользователя /add (здесь и далее Имя_пользователя — любое, кроме «Гость», которое вы будете использовать для гостевого доступа, у меня на скриншоте — «Гостевой»).
- net localgroup Пользователи Имя_пользователя /delete (удаляем вновь созданную учетную запись из локальной группы «Пользователи». Если у вас изначально англоязычная версия Windows 10, то вместо Пользователи пишем Users).
- net localgroup Гости Имя_пользователя /add (добавляем пользователя в группу «Гости». Для англоязычной версии пишем Guests).

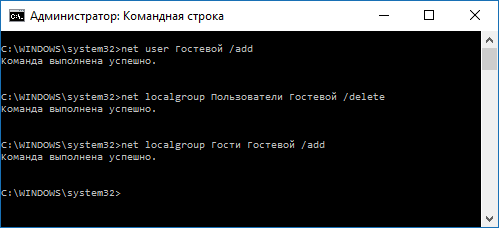
Готово, на этом учетная запись Гость (а точнее — созданная вами учетная запись с правами Гостя) будет создана, и вы сможете войти в Windows 10 под ней (при первом входе в систему некоторое время будут настраиваться параметры пользователя).
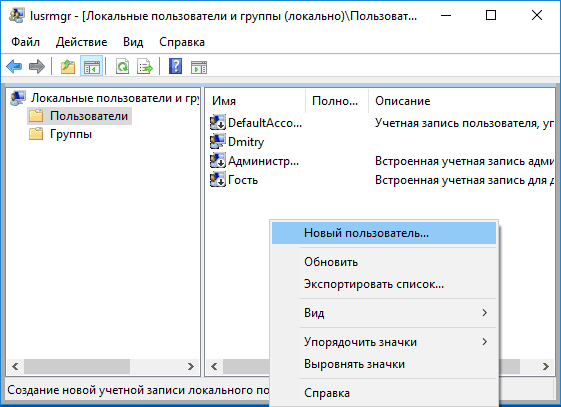
Как добавить учетную запись Гостя в «Локальные пользователи и группы»
Еще один способ создать пользователя и включить для него гостевой доступ, подходящий только для версий Windows 10 Профессиональная и Корпоративная — использование инструмента «Локальные пользователи и группы».
- Нажмите клавиши Win+R на клавиатуре, введите lusrmgr.msc для того, чтобы открыть «Локальные пользователи и группы».
- Выберите папку «Пользователи», нажмите правой кнопкой мышки в пустом месте списка пользователей и выберите пункт меню «Новый пользователь» (или используйте аналогичный пункт в панели «Дополнительные действия» справа).

- Укажите имя для пользователя с гостевым доступом (но не «Гость»), остальные поля заполнять не обязательно, нажмите кнопку «Создать», а затем — «Закрыть».
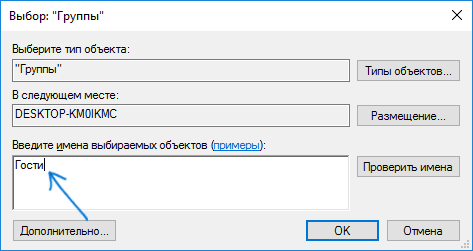
- В списке пользователей дважды кликните по вновь созданному пользователю и в открывшемся окне выберите вкладку «Членство в группах».
- Выберите в списке групп «Пользователи» и нажмите «Удалить».

- Нажмите кнопку «Добавить», а затем в поле «Выберите имена выбираемых объектов» введите Гости (или Guests для англоязычных версий Windows 10). Нажмите «Ок».


На этом необходимые шаги закончены — можно закрыть «Локальные пользователи и группы» и войти под учетной записью Гостя. При первом входе некоторое время займет настройка параметров для нового пользователя.
Дополнительная информация

После входа в учетную запись Гостя вы можете заметить два нюанса:
- То и дело появляющееся сообщение о том, что OneDrive невозможно использовать с учетной записью Гостя. Решение — убрать OneDrive из автозагрузки для этого пользователя: правый клик по значку «облака» в панели задач — параметры — вкладка «параметры», убрать отметку автоматического запуска при входе в Windows. Также может пригодиться: Как отключить или удалить OneDrive в Windows 10.
- Плитки в меню пуск будут выглядеть как «стрелки вниз», иногда сменяющиеся надписью: «Скоро выйдет отличное приложение». Связано это с невозможностью устанавливать приложения из магазина «под Гостем». Решение: правый клик по каждой такой плитке — открепить от начального экрана. В результате меню пуск может показаться слишком пустым, но вы можете исправить это, изменив его размер (края меню пуск позволяют изменять его размер).
На этом всё, надеюсь, информация была достаточной. Если же остались какие-то дополнительные вопросы — можно задать их ниже в комментариях, буду стараться отвечать. Также, в плане ограничения прав пользователей может оказаться полезной статья Родительский контроль Windows 10.
Как включить учётную запись «Гость» в Windows 10
Друзья, включить учётную запись «Гость» в Windows 10 или создать пользователя с гостевыми правами можно и без редактора локальной групповой политики, делается это в любой версии операционной системы очень просто.
Открываем командную строку от имени администратора

и вводим команду:
netplwiz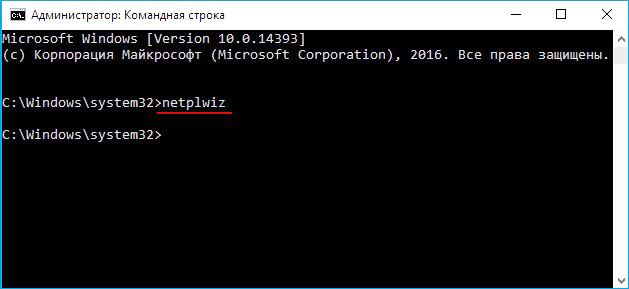
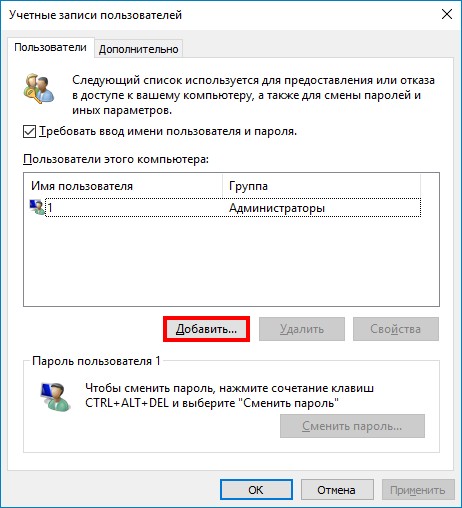
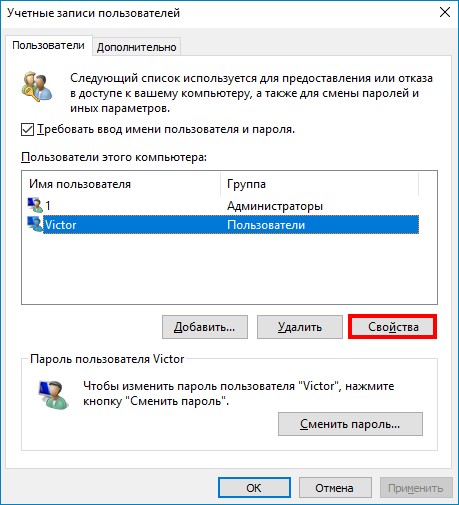
открывается окно «Учётные записи пользователей». Видим, что в операционной системе имеется один пользователь с именем 1, имеющий права администратора.
Жмём на кнопку «Добавить»
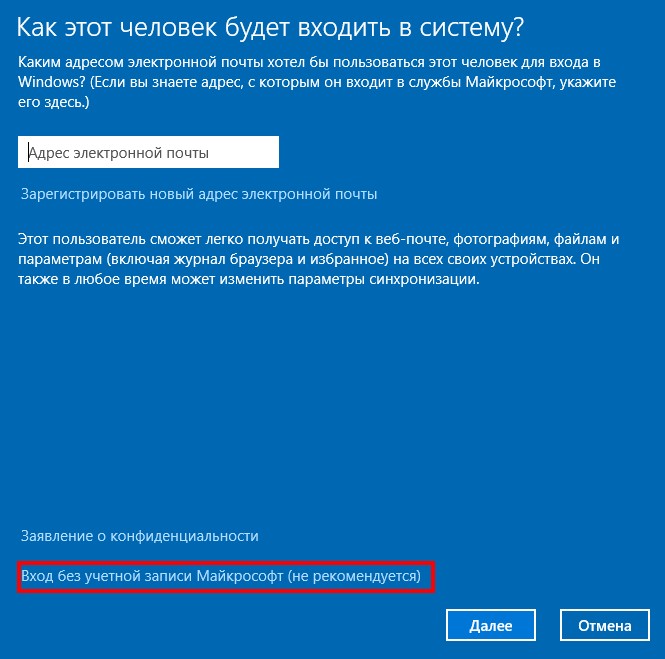
Жмём левой кнопкой мыши на кнопку «Вход без учётной записи Майкрософт»
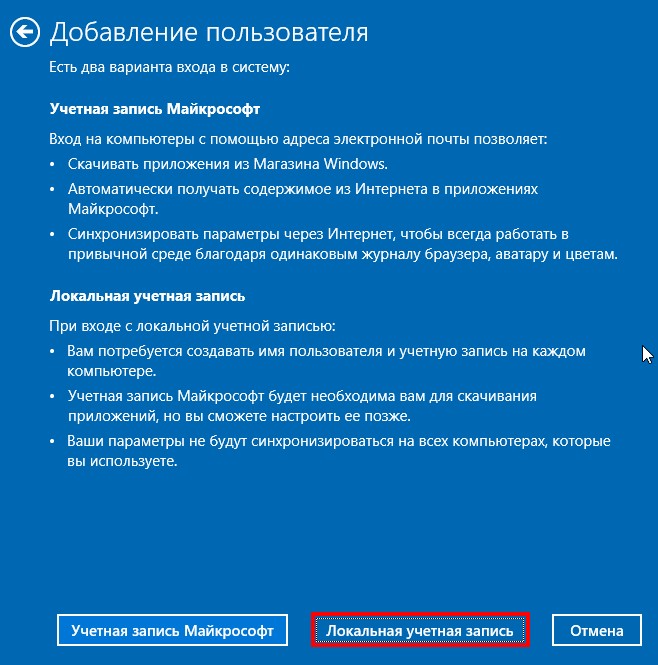
«Локальная учётная запись»
Придумываем и вводим имя пользователя, к примеру «Victor».
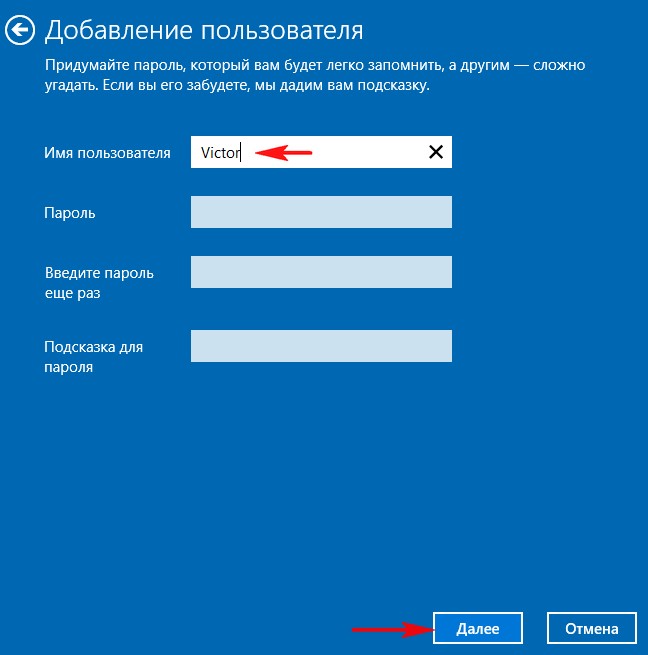
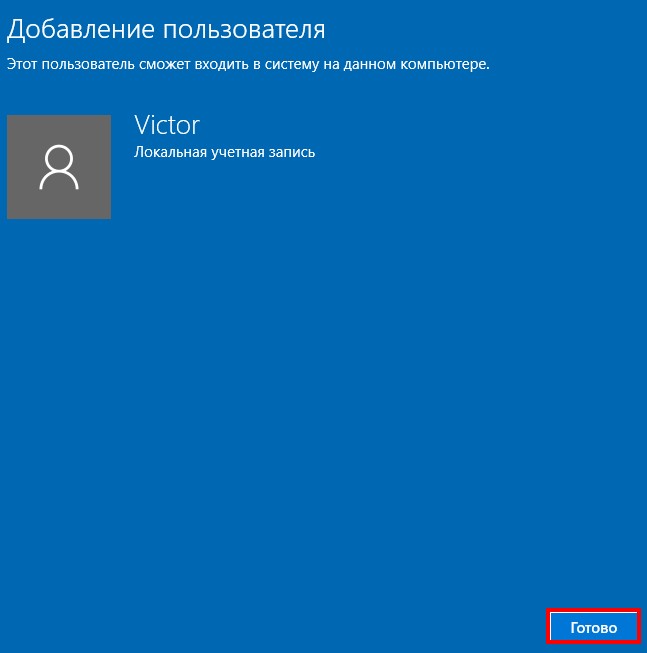
Готово.
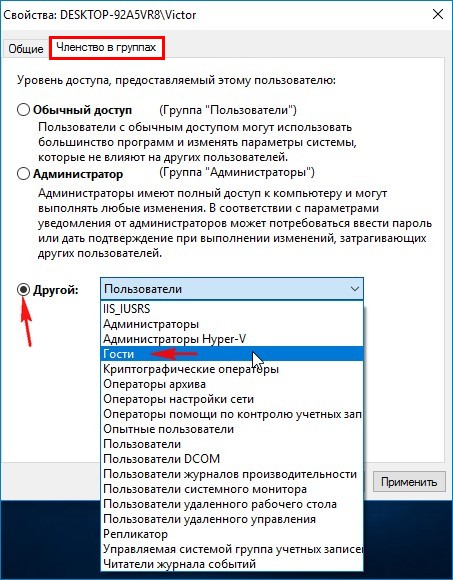
Выделяем левой мышью созданного нами пользователя «Victor» и жмём на кнопку «Свойства»
Выбираем «Членство в группах»
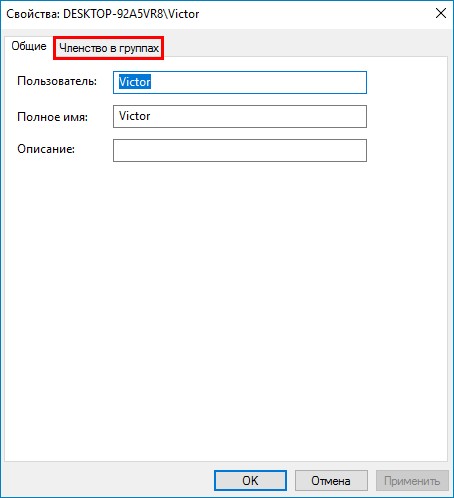
Выбираем уровень доступа созданного пользователя.
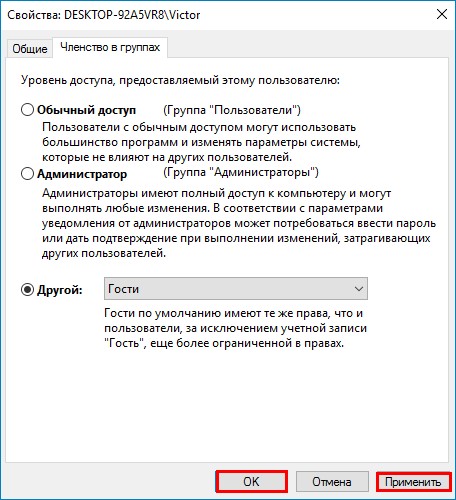
Отмечаем пункт «Другой» и выбираем в выпадающем списке «Гости»
«Применить и «ОК»
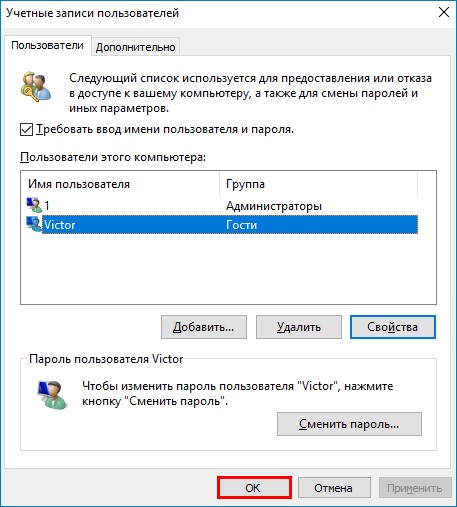
«ОК»
Производим выход из системы.
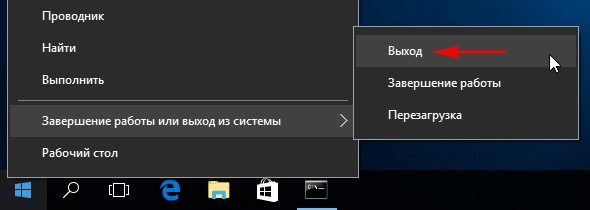
Выбираем созданную нами учётную запись «Victor».
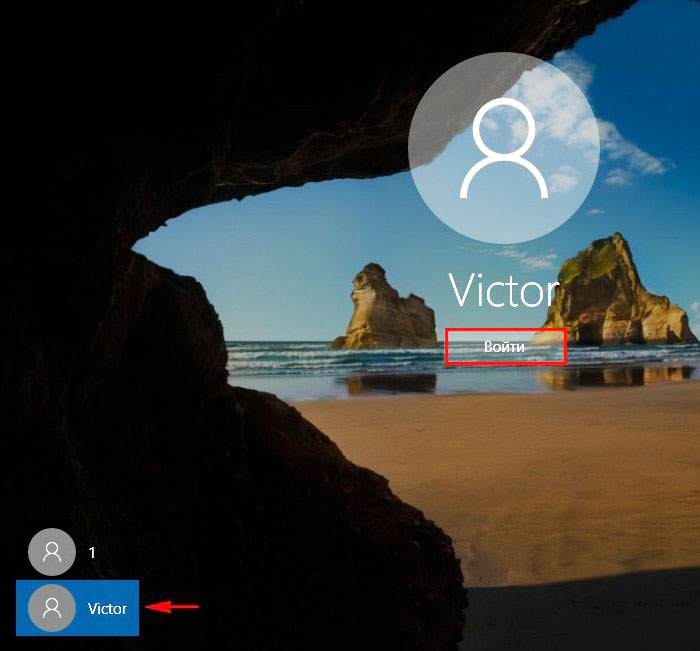
Загружается пользовательский профиль «Victor», имеющий гостевые права на нашем компьютере.
Читайте также: Как создать учётную запись в Windows 10
UPDATE: Microsoft has now removed the Guest account from Windows 10. These solutions don’t work with the recent versions of Windows 10. So, we recommend you create a standard local user account via the Settings > Accounts > Family & other users.
What’s a guest account on a Windows PC? A guest account is nothing but an account for users who don’t have a permanent or specified account on the PC. The guest account comes in handy when you want to let someone else use your PC for a short period without creating a new user account.
The user on the guest account can’t access files on other accounts. Additionally, the guest account user can’t make any changes to system settings, create a new user account, or create a password for the account.
In the previous version of Windows, turning on or enabling the built-in guest account was fairly straightforward. We could navigate to the user accounts section of the Control Panel to turn on the guest account.
In Windows 10, Microsoft has moved almost all user account settings to the new Settings app, but there is no option under the Accounts section of Settings to enable the guest account. The Settings app only allows you to create standard local or Microsoft accounts.
Is the Guest account missing from Windows 10?
No, the guest account is available in Windows 10 as well. It’s only that the guest user account can’t be enabled in Windows 10 via Settings or classic Control Panel. In order to enable the guest account in Windows 10, you need to use the Local Users and Groups.
Complete the given below directions to turn on or enable guest account in Windows 10.
Method 1 – Turn on guest account via Local Users and Groups
Method 2 – Enable guest account via Command Prompt
Method 3 – Enable guest account in Windows 10 via Group Policy
Method 1 of 3
Enable guest account via Local Users & Groups
Step 1: In the Start menu or taskbar search box, type Lusrmgr.msc and then press Enter key to open Local Users and Groups.

Step 2: Here, on the left-side, under Local Users and Groups (local), click Users.

Step 3: Next, in the middle pane, double-click on Users to view all user accounts on your Windows 10 PC.

Step 4: Right-click the Guest and then click Properties or double-click on Guest to open its properties.
Step 5: To enable the Guest account, under the General tab, uncheck the option titled Account is disabled. In the full name field, type in a name for the account if you wish to have a different name for the account, and then click the Apply button to enable the guest account.

You have just enabled the Guest account!
To sign in or switch to the Guest account, click on your user account name on the Start menu (top-left of the Start) and then click on the Guest account to switch the account.

Note that many users are reporting that the Guest account is not correctly working even after enabling the same.
Method 2 of 3
Enable Guest account via Command Prompt
Step 1: Open Command Prompt as administrator. To do so, type CMD in the Start menu or taskbar search box to see Command Prompt in the search results, right-click on the Command Prompt entry, and then click Run as administrator option.

Click Yes button when you see the User Account Control prompt.
Step 2: In the elevated prompt, type the following command and then hit Enter key.
net user guest /active:yes


Step 3: Close the Command Prompt window. That’s it!
Method 3 of 3
Enable Guest account via Group Policy
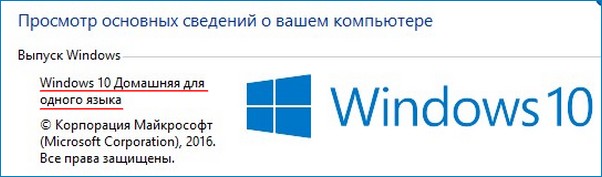
Note that Group Policy is not part of the Home edition of Windows 10. So, this method doesn’t work on Windows 10 Home edition.
Step 1: Open Group Policy Editor by typing Edit Group Policy in the Start or taskbar search box and then pressing Enter key.

Click Yes if and when you see the UAC prompt.
Step 2: In the Group Policy Editor, navigate to the following policy:
Computer Configuration > Windows Settings > Security Settings > Local Policies > Security Options.
Step 3: On the right-side, look for the policy labeled Accounts: Guest account status and double-click on the same to open its properties.

Step 4: Select the Enabled option and then click the Apply button to turn on the Guest account in Windows 10.

Have you enabled the guest account on your Windows 10 PC?
Download Windows Speedup Tool to fix errors and make PC run faster
A Guest Account in Windows 11/10 lets users use the Windows PC without any account. This is very helpful when you want someone to use your PC, and you do not want them to have all the permissions. For instance, the user with a guest account does not have permission to create a new account, change the password or change any system settings. You may have already read our post highlighting the difference between the Admin, Standard, Guest, etc. Accounts.

Enabling and disabling the Guest Account in previous versions of Windows is very simple, and it can be done from User Accounts in Control Panel. But the process to enable a Guest account in Windows 11/10 is a bit tricky. In this article, I will let you know how to enable Guest Account in Windows 11/10 using Command Prompt.
UPDATE: Things appear to have changed in recent Windows 10 versions. Windows 10, v1607 introduced Shared or Guest PC Mode. This sets up Windows 10 Pro, Pro Education, Education, and Enterprise for limited use in certain scenarios. As a result, the following procedure may not work in Windows 10 v1607, v1703, and later now.
The guest account can be used only to browse files that are already present and carry out regular web surfing. Users on the guest account cannot install and uninstall software, access and modify local files, and more.

Before you begin, create a system restore point first. Next, you need to open WinX Menu and select Command Prompt (Admin). In the Command Prompt window, type the following command and hit enter.
net user guest /active:yes
It will show you the message “The command completed successfully”. This means that the Guest Account has been enabled in Windows 11/10.
If you want to disable the Guest Account in Windows 11/10, use the following command in Command Prompt:
net user guest /active:no
To see the “Guest” account, open the Start Menu and click on your user account name. You will be able to see the Guest Account.
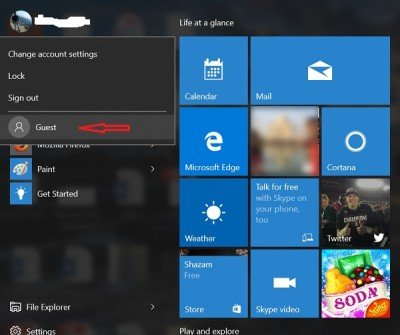
But you may notice one issue. If you click on Guest, then, on the Login screen, you may not be offered the Guest account to sign in. You may simply be offered your account.
So do try out this method and let us know if this worked for you or not. See this post if you want to learn how to create a Guest Account in Windows 11/10.
How do I create a guest account on Windows 11?
You can do it from Windows Settings. Open it using Win + I, and then navigate to Accounts > Family and other users. Click on Add account, and then create a standard user account. You can then allow others to use this account as guest users. Make sure not to use the name GUEST as a user account, as it is reserved by the System.
How to check users using cmd?
You can view the list of user accounts using cmd by executing the following command:
net user
Open the Command Prompt as an administrator and type the above command in it. After that, press Enter. You will see a list of all user accounts in th Command Prompt.
That’s it. I hope this helps.
Sridhar is a Software Engineer who loves to stay updated with developments in the world of technology. He is fond of writing everything related to Internet, Computers and Mobile and Desktop Operating Systems.