Creating a Windows 10 virtual machine on VirtualBox can be simple and efficient. First, download and install VirtualBox, then get a Windows 10 ISO file. Create a new virtual machine, allocate resources, and install Windows 10 using the ISO file. Follow these steps to run a virtualized instance of Windows 10 on your computer.
This guide will walk you through the steps to set up your very own Windows 10 virtual machine using VirtualBox. Virtual machines are excellent for testing software, running different operating systems, or just exploring without risking your main system.
Step 1: Download and Install VirtualBox
Head over to the VirtualBox website and download the installer suitable for your operating system.
VirtualBox supports various OS like Windows, macOS, and Linux. The installation process is straightforward; just follow the prompts and accept the default settings unless you have specific needs.
Step 2: Download a Windows 10 ISO File
Go to the Microsoft website and download the Windows 10 ISO file.
You’ll need this file to install Windows 10 on your virtual machine. Ensure you download the correct version and save it somewhere easily accessible.
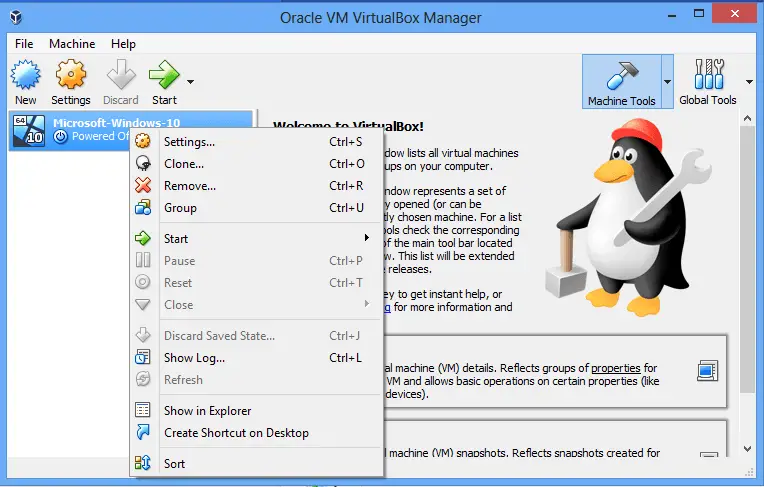
Step 3: Open VirtualBox and Create a New Virtual Machine
Launch VirtualBox and click on the “New” button to start creating a new VM.
A wizard will appear to guide you through the process. Name your virtual machine and select “Windows 10” as the version.
Step 4: Allocate Resources
Assign the amount of RAM and CPU cores to your new virtual machine.
For a smooth experience, it’s recommended to allocate at least 4GB of RAM and 2 CPU cores. However, adjust these settings based on your system’s capabilities.
Step 5: Create a Virtual Hard Disk
Choose to create a new virtual hard disk and select a file type for it.
The default VDI format works well. Allocate at least 30GB of storage space to ensure you have enough room to install and run Windows 10.
Step 6: Configure Storage Settings
Go to the “Settings” of your new virtual machine and navigate to the “Storage” section.
Here, you’ll need to link the Windows 10 ISO file to the virtual machine. Click on the empty disk icon and select “Choose a disk file” to locate your ISO.
Step 7: Start the Virtual Machine
Click on the “Start” button to power up your VM.
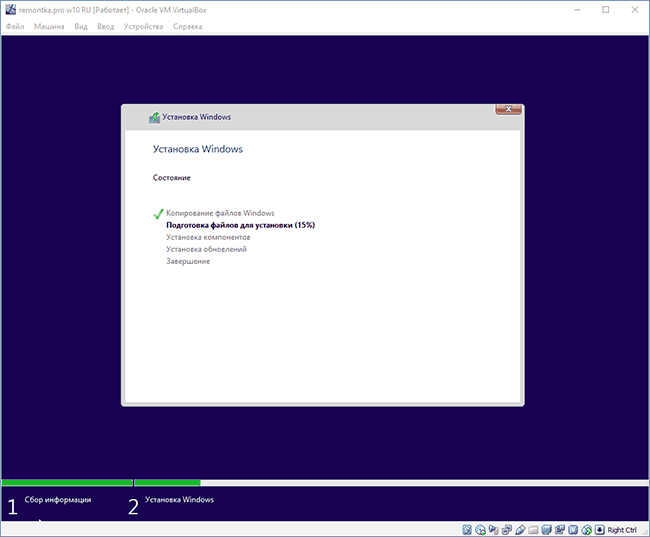
VirtualBox will boot from the ISO file, launching the Windows 10 installation process. Follow the on-screen instructions to complete the setup.
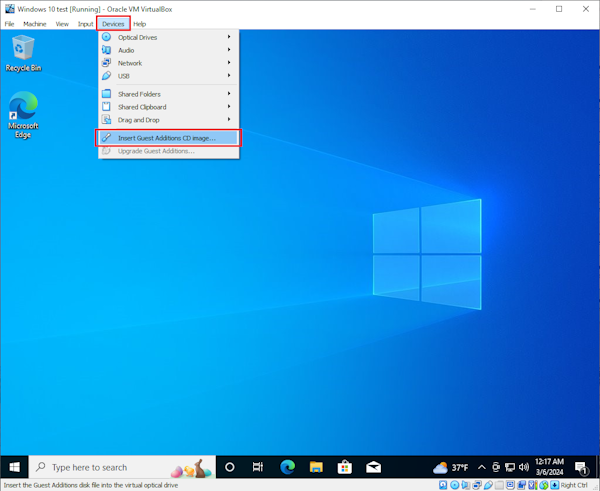
Step 8: Install Guest Additions
Once Windows 10 is installed, go to the “Devices” menu and select “Insert Guest Additions CD image.”
This step enhances the performance and usability of your virtual machine by installing additional drivers and tools.
After these steps, your virtual machine will run Windows 10 just like a physical computer. You can install programs, browse the internet, and customize settings within the virtual environment.
Tips for Creating a Windows 10 Virtual Machine on VirtualBox
- Allocate sufficient resources: Make sure you give your VM enough RAM and CPU power for smooth performance.
- Use dynamic storage: Selecting dynamic allocation for the virtual hard disk saves space on your physical drive.
- Update VirtualBox: Always use the latest version of VirtualBox for better compatibility and features.
- Backup regularly: Take snapshots of your VM to easily revert changes or recover from issues.
- Optimize settings: Tweak VirtualBox settings for optimal performance based on your specific use case.
Frequently Asked Questions
Why should I use a virtual machine?
Virtual machines allow you to run different operating systems on your existing hardware without affecting your main OS. They are great for testing software, experimenting, and improving security.
What is an ISO file?
An ISO file is a digital copy of a CD/DVD. For installing an operating system, it’s like having a virtual install disk.
How much RAM should I allocate?
For Windows 10, at least 4GB of RAM is recommended. However, if your system has more to offer, allocating more can improve performance.
Can I use VirtualBox on a Mac?
Yes, VirtualBox is compatible with macOS. The installation process is similar to Windows.
Are virtual machines safe?
Yes, VMs are isolated from your host system, meaning any issues within the VM won’t affect your main OS. However, always practice good security habits.
Summary
- Download and install VirtualBox.
- Download a Windows 10 ISO file.
- Open VirtualBox and create a new virtual machine.
- Allocate resources.
- Create a virtual hard disk.
- Configure storage settings.
- Start the virtual machine.
- Install guest additions.
Conclusion
Creating a Windows 10 virtual machine on VirtualBox can be a game-changer. It opens up a world of possibilities for testing, learning, and development in a secure environment. Whether you’re a student trying to learn more about different operating systems or a developer needing a safe space to test apps, a virtual machine is a versatile tool.
Remember to allocate enough resources to your VM and regularly update VirtualBox to ensure smooth operation. Don’t forget to take snapshots so you can easily return to a previous state if things go awry. With these tips and steps, you’ll be well on your way to mastering virtual machines. Happy virtualizing!
Matt Jacobs has been working as an IT consultant for small businesses since receiving his Master’s degree in 2003. While he still does some consulting work, his primary focus now is on creating technology support content for SupportYourTech.com.
His work can be found on many websites and focuses on topics such as Microsoft Office, Apple devices, Android devices, Photoshop, and more.
Creating a virtual machine in Windows 10 using VirtualBox is a powerful way to explore different operating systems, test software, and isolated environments. In this post, we will guide you through the process of setting up your own virtual machine in Windows 10 using VirtualBox. Whether you’re a developer, an IT professional, or someone who wants to experiment with different operating systems, this tutorial will provide you with step-by-step instructions and valuable insights to create and manage virtual machines effectively. Get ready to unlock the world of virtualization and enhance your computing experience on Windows 10 with VirtualBox!
How to Create a Virtual Machine in Windows 10 in VirtualBox?

Here are the steps to create a virtual machine in VirtualBox:
Step 1: Install VirtualBox

Make sure you have VirtualBox installed on your Windows 10 system. You can download the latest version of VirtualBox and follow the installation instructions.
Step 2: Launch VirtualBox
Open VirtualBox from the Start menu or desktop shortcut to begin creating your virtual machine.
Step 3: Click on New
In the VirtualBox Manager window, click on the New button. This will start the virtual machine creation wizard.
Step 4: Name your virtual machine
Provide a name for your virtual machine. Choose a name that is descriptive and easy to remember.
Step 5: Select the operating system type
Choose the operating system type that you want to install on the virtual machine. Select the appropriate option from the list. Here we are going to select Windows (64-bit) as we are going to install Windows 10 on this VM.
Step 6: Allocate memory
Specify the amount of memory (RAM) you want to allocate to the virtual machine. Considering the amount of memory required for Windows 10, a total of 4-8 GB RAM is enough to run the OS.
Step 7: Create a virtual hard disk
Choose the option to create a virtual hard disk now for your virtual machine. This will allow you to install and store the operating system and files.
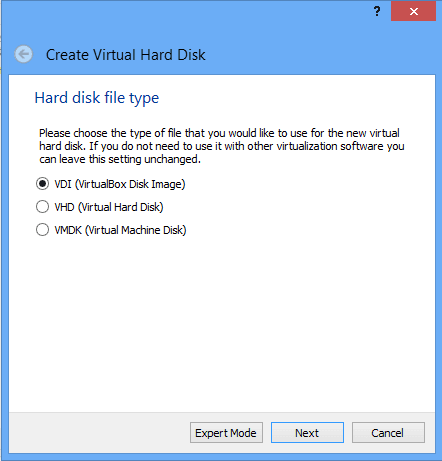
Step 8: Select the hard disk file type
Choose the file type for your virtual hard disk. The VDI (VirtualBox Disk Image) option is usually fine, but you can select a different file type if needed.
Note: When creating a virtual machine in VirtualBox, you have the flexibility to choose from various hard drives file types like VDI, VHD, and VMDK. Each option has its pros and cons, but for most general purposes, the VDI format is recommended. It strikes a good balance between performance and compatibility, making it suitable for a wide range of applications. So, when setting up your virtual machine, opt for the VDI file type to ensure optimal performance and compatibility.
Step 9: Allocate hard disk space
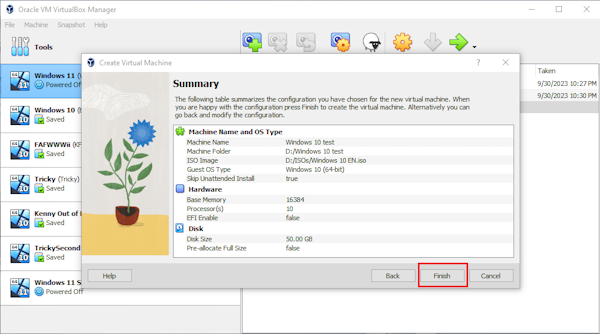
Specify the amount of hard disk space you want to allocate to the virtual machine. Consider the requirements of the operating system and any applications you plan to install. Usually, users select 50 GB as the size of the VM. However; you can increase the size if you want to install numerous applications.
Step 10: Create a VM on VirtualBox
Now you will click on Create to create the VM.
Step 11: Configure virtual machine settings
Review the summary of your virtual machine settings and make any necessary adjustments. You can modify options such as network settings, display settings, and more.
- Right-click the virtual machine and select Settings.
- Go to System and configure the boot order if desired.
- In the Processor tab, allocate the number of processors for the VM.
- Navigate to Storage and select the Windows 10 ISO file.
- Optionally, enable 3D Acceleration in the Display tab for improved video performance.
- Specify the desired video memory.
- Click OK to save the changes.
Now you’re all set to proceed with the Windows 10 installation on your virtual machine.
Step 12: Install the operating system
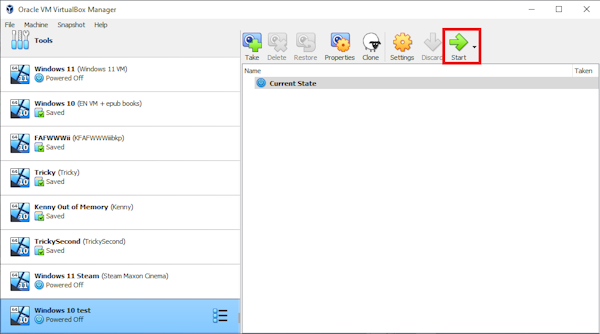
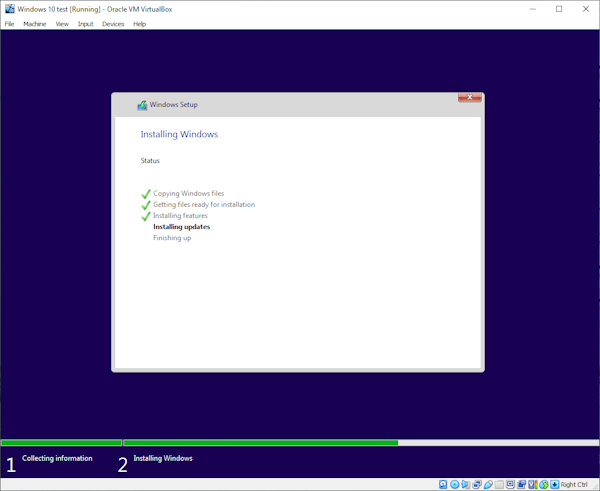
Once you have created the virtual machine and configured it then you will select VM and click on the Start. You will need to provide the installation media for the operating system (e.g., Windows 10 ISO file, physical DVD) and follow the installation process within the virtual machine.
Step 13: Install Windows 10 on a virtual machine

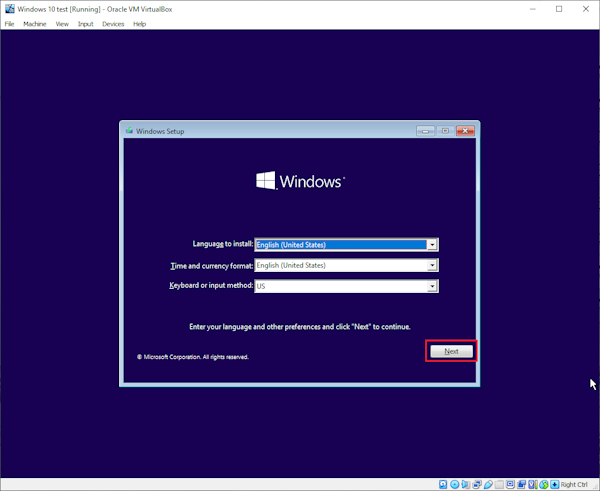
The virtual machine will boot up and the Windows 10 installation process will begin. Follow the on-screen instructions to install Windows 10. Select your language preferences, agree to the license terms, and choose the installation type (typically “Custom: Install Windows only“).
Step 15: Create a partition
On the disk selection screen, choose the virtual hard disk created for the virtual machine and click on Next to create a partition and install Windows 10 on it. You can leave the default settings unless you have specific requirements.
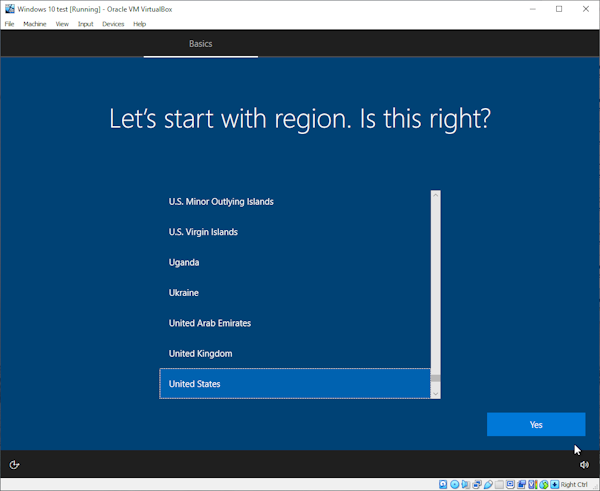
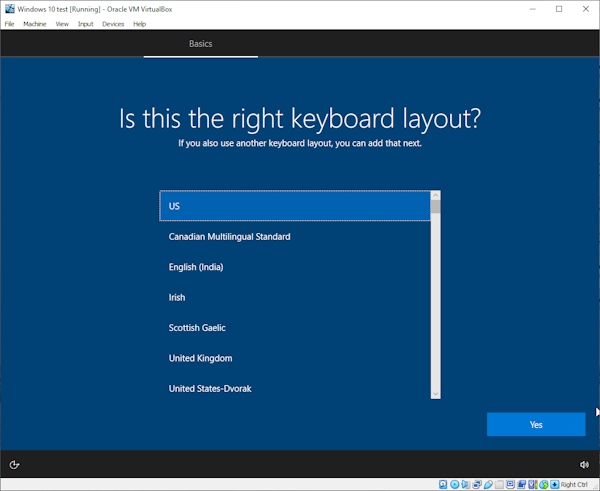
Step 16: Customize Windows 10 settings
Set up your preferences for the region, keyboard layout, and personalization options. Create a user account and password for the virtual machine. You can also customize privacy settings according to your preferences.
Step 17: Complete the installation
Allow the installation process to complete. The virtual machine will restart during this process. After the restart, Windows 10 will finalize the installation.
Step 18: Install VirtualBox Guest Additions (optional)
Once Windows 10 is installed, it is recommended to install VirtualBox Guest Additions for enhanced performance and additional features. In the VirtualBox menu of the virtual machine window, go to Devices and select Insert Guest Additions CD image. Follow the on-screen prompts to install the Guest Additions.
After the Guest Additions installation is complete, restart the virtual machine.
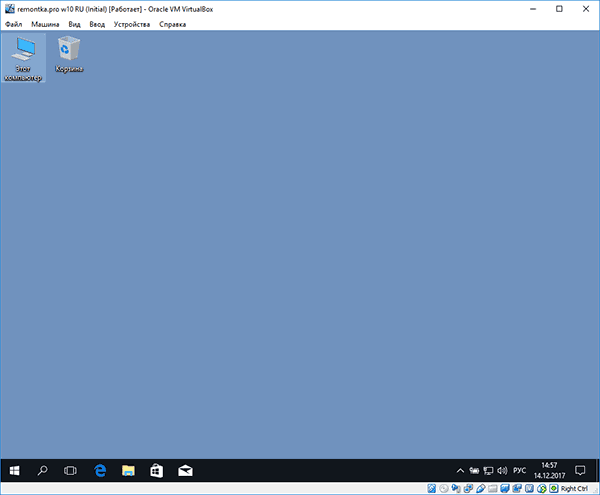
Congratulations! You have successfully created a virtual machine in Windows 10 on VirtualBox. You can now explore and experience the features of Windows within the virtual environment.
Are you thinking about testing or giving Windows 10 a try without diving into a full installation? Consider trying it out on a virtual machine, such as VirtualBox. This guide will explain further about VirtualBox and walk you through the process.
What is VirtualBox, and why do you want to use it?
VirtualBox or Oracle VM VirtualBox is a free and open-sourced virtual machine program developed by Oracle. With a virtual machine, you can run, test, and experiment with Windows 10 in a safe environment without affecting your main system.
Not only can you install Windows 10, but virtualization products like VirtualBox also allow you to use other operating systems like Linux and Mac without investing in hardware components. You can download and install VirtualBox for free from their website: https://www.virtualbox.org/
System requirements to install Windows 10 on VirtualBox
Do keep in mind that your system must comply with the following system requirements before you’re able to install Windows 10 on VirtualBox:
- Proper updated x86 CPU
- Memory: minimum 1 GB for 32-bit or 2 GB for 64-bit
- Storage space: VirtualBox itself only requires 30 MB of hard disk space, but you’ll need enough storage to install the virtual machine. To install Windows 11, you need to have a minimum of 16 GB (for 32-bit) or 20 GB (for 64-bit) of Virtual Disk
- A supported host operating system. Below are the supported Windows systems (64-bit):
- Windows 8.1
- Windows 10
- Windows 11 21H2
- Windows Server 2012
- Windows Server 2012 R2
- Windows Server 2016
- Windows Server 2019
- Windows Server 2022
Installing Windows 10 in VirtualBox
Once you’ve installed VirtualBox, here are the step by step to install Windows 10 on VirtualBox:
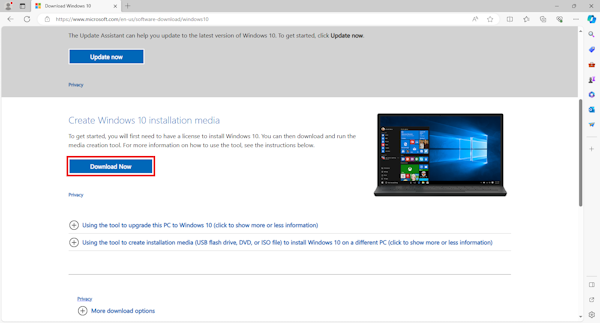
- Step 1: Download Media Creation Tool from https://www.microsoft.com/en-us/software-download/windows10. You can click the “Download Now” button under the “Create Windows 10 Installation Media” menu.
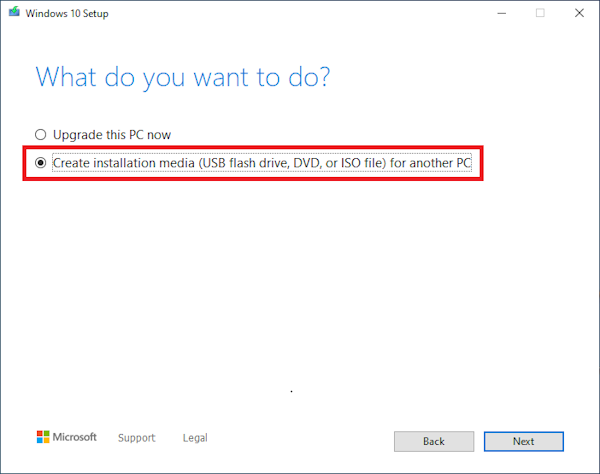
- Step 2: Run the Media Creation Tool. At some point, you’ll be asked a “What do you want to do?” question, select the “Create installation media for another PC” option and click “Next”.
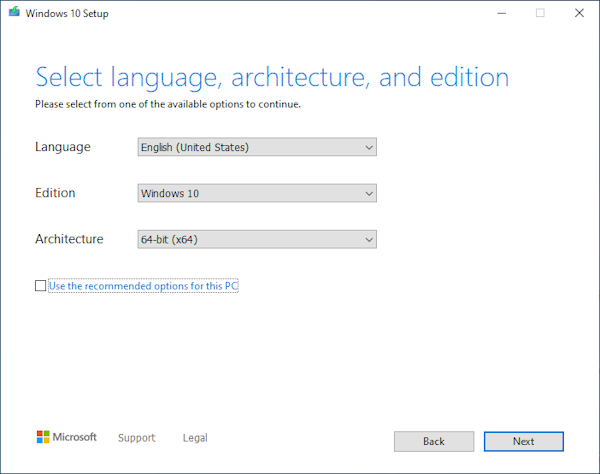
- Step 3: Select the Windows edition you wish to install and click Next.
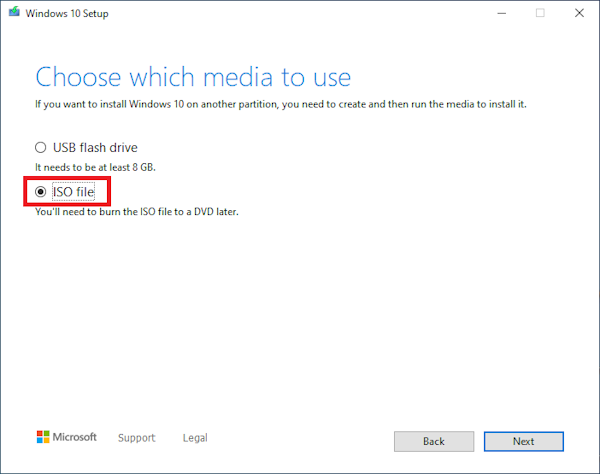
- Step 4: In the “Choose which media to use” question, select “ISO file”. Click “Next” and save the ISO file to the desired location.
- Step 5: Open Oracle VM VirtualBox Manager. You can do this by clicking “Machine” > “New” from the menu.

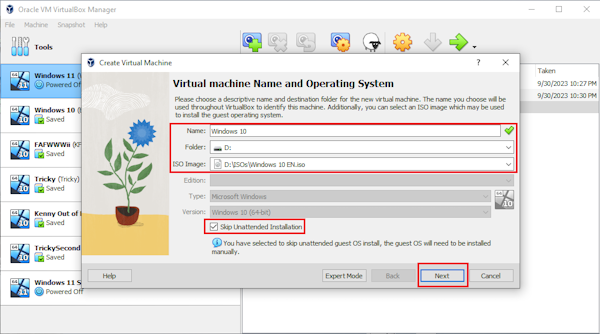
- Step 6: Name the virtual machine, select the installation folder, select the ISO file saved at Step 4, enable “Skip Unattended Installation” and click the “Next” button.
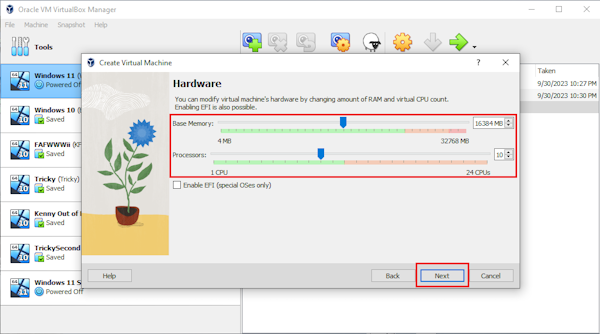
- Step 7: Choose the desired hardware (RAM and CPU) for the Virtual Machine and click “Next”. You need to have a minimum base memory of 1 GB for 32-bit or 2 GB for 64-bit. The more base memory you have, the better.
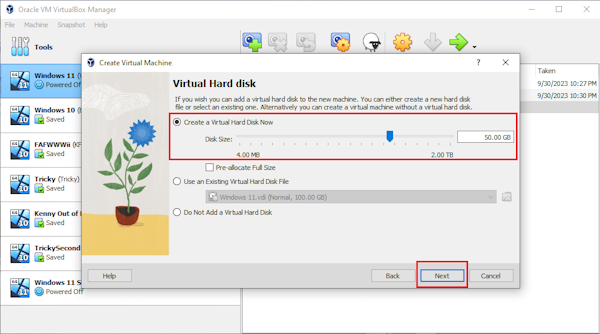
- Step 8: Create a virtual hard disk for the Virtual machine and click “Next”. You need to have a minimum of 16 GB (for 32-bit) or 20 GB (for 64-bit) of Virtual Disk for this.
- Step 9: Double check Summary and click “Finish”.
- Step 10: Start the Virtual Machine by clicking the “Start” button on the top right of the virtual machine window.
- Step 11: Follow the Windows Setup instructions to install Windows 10. Choose the language, time, currency format, and keyboard or input method of choice then click “Next” and then the “Install Now” button on the next screen.
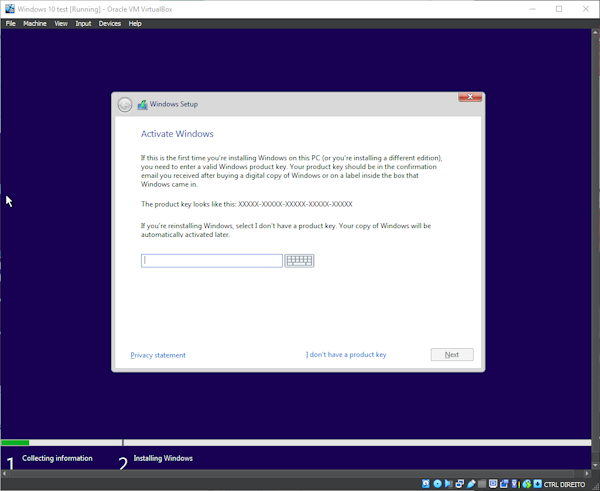
Afterward, you’ll also be asked to enter a product key. Enter the product key you have in the box, otherwise, click the “I don’t have a product key” option. From there, choose the Windows 10 edition you want to install and follow the next instructions.
- Step 12: After Windows Setup runs, the Virtual Machine will reboot.
- Step 13: Select your region.
- Step 14: Select the keyboard layout.
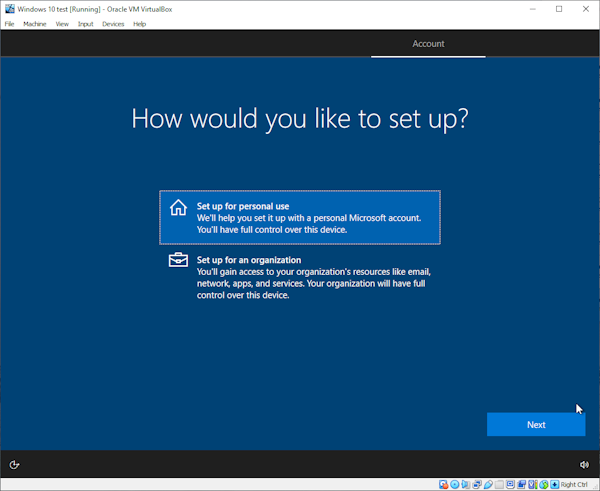
- Step 15: Select “Set up for personal use” and click “Next”.
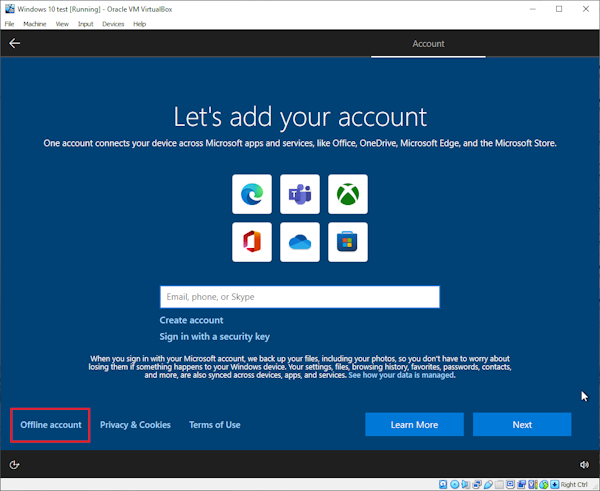
- Step 16: You can add your Microsoft Account now if you want, otherwise you can choose to use an “Offline account”.
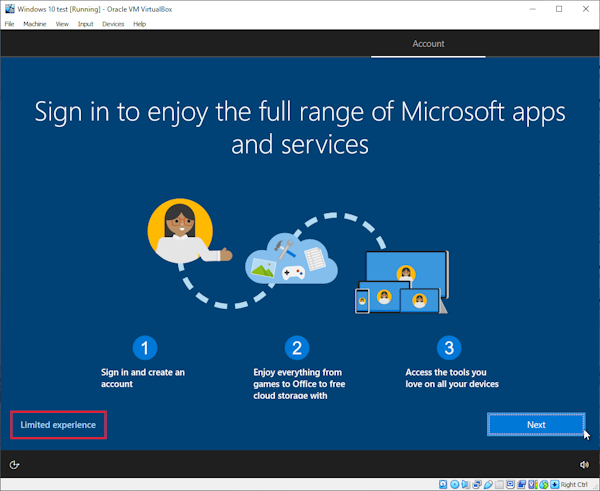
- Step 17: Click “Limited experience”.
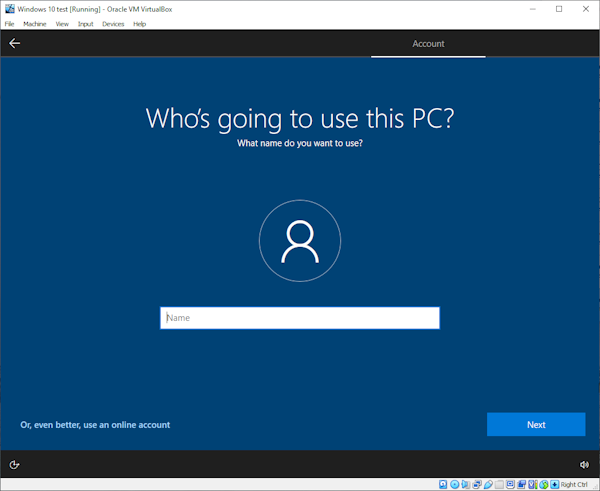
- Step 18: Create a Windows user and click “Next”.
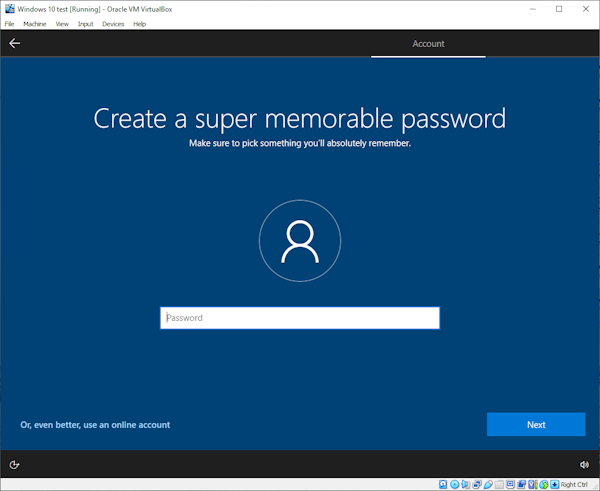
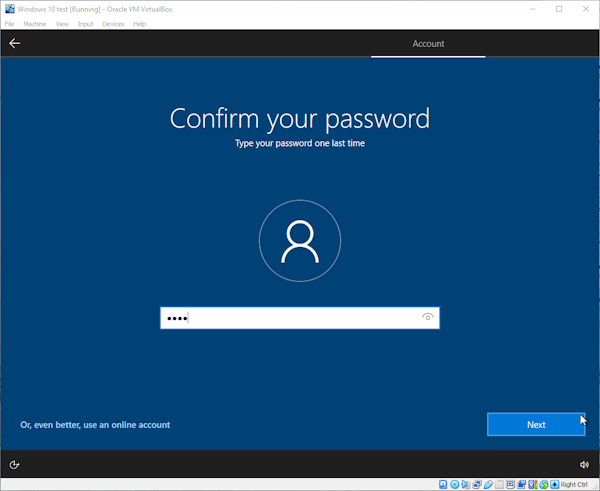
- Step 19: Create a password and click “Next”.
- Step 20: Confirm your password and click Next.
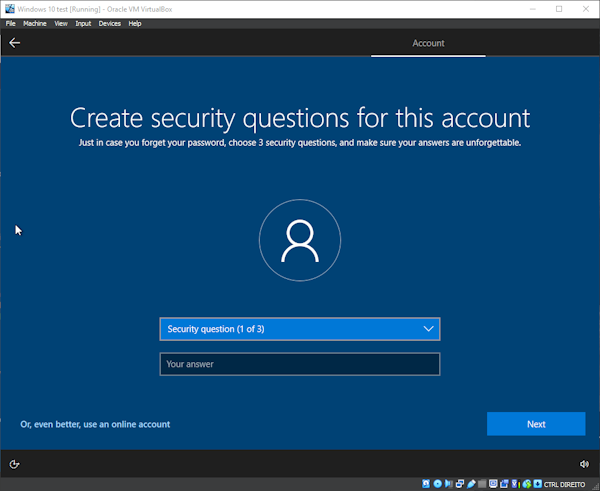
Afterward, you’ll be asked to create security questions. Create three security questions and the answers, then click “Next”.
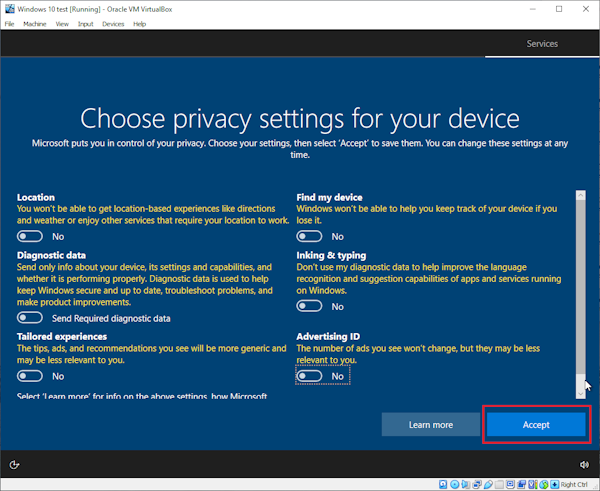
- Step 21: Choose privacy settings and click “Accept”.
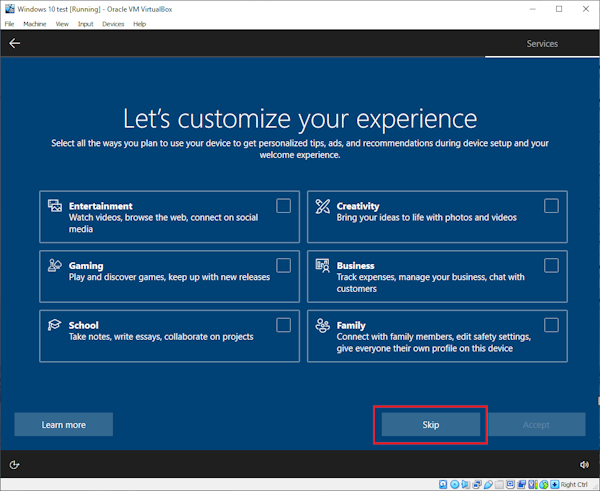
- Step 22: On the “Let’s customize your experience” screen, click “Skip”. From there, wait until the installation process finishes.
- Step 23: Once you’re on the Windows 10 main screen click “Devices” from the VirtualBox menu and choose “Insert Guest Additions CD Image”.
- Step 24: The above step will open File Explorer > run “VirtualBox Guest Additions” afterward.
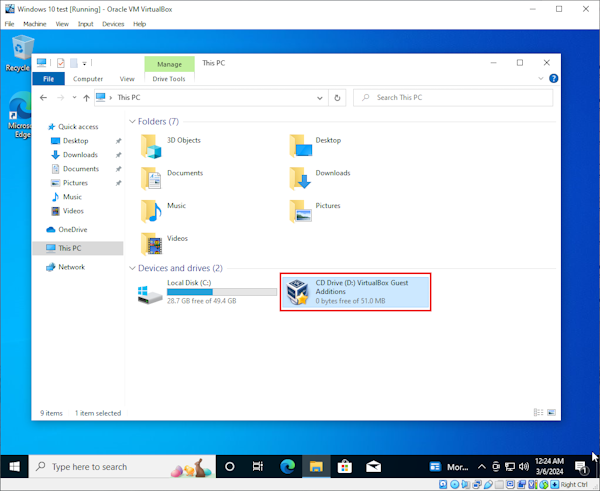
If you’re not automatically redirected to the relevant file’s location in steps 23 and 24, you can manually do this by going to Windows Explorer> go to CD Drive (D:) folder > run the “VBoxWindowsAddition” file.

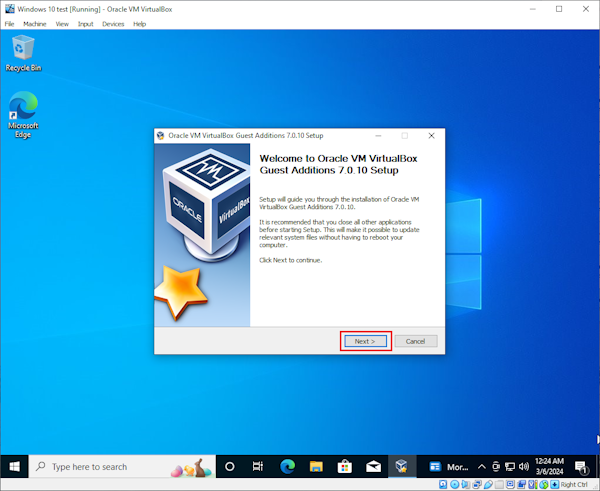
- Step 25: Follow the setup steps on the screen to install Guest Additions. The Virtual Machine will reboot after this.
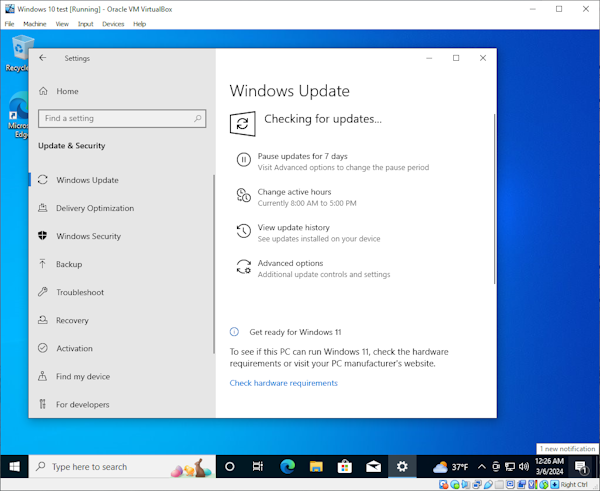
- Step 26: After Windows restarts, now is a good time to run Windows Update. You can do this by clicking the “Start” button > click “Settings” > choose “Update & Security” > click the “Check for updates” button.
- Step 27: After you get Windows up to date, from the VirtualBox menu, click “Machine” and choose “Take Snapshot”.
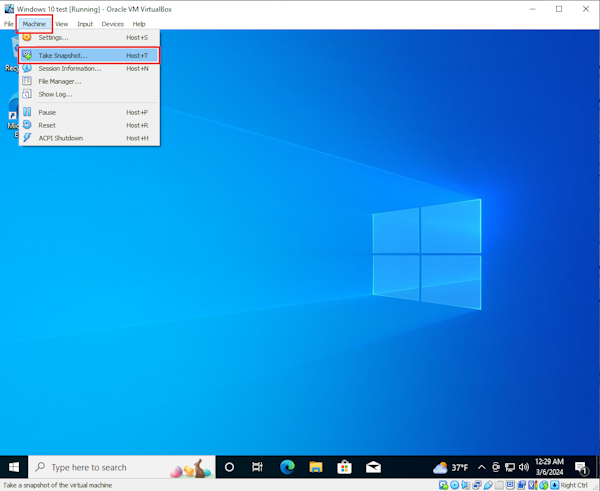
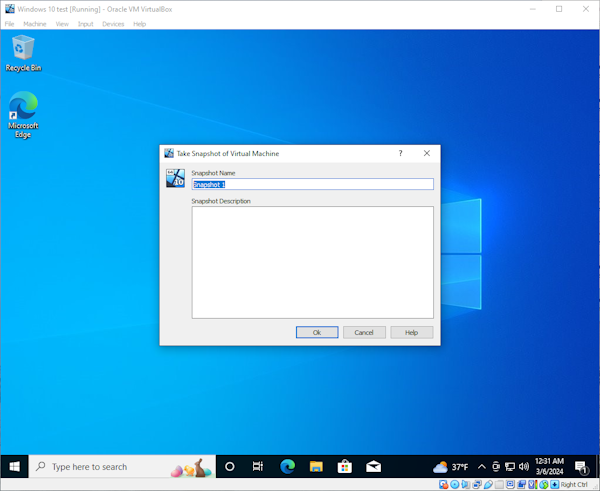
- Step 28: Name the Snapshot, click OK, and wait for the Snapshot to be saved.
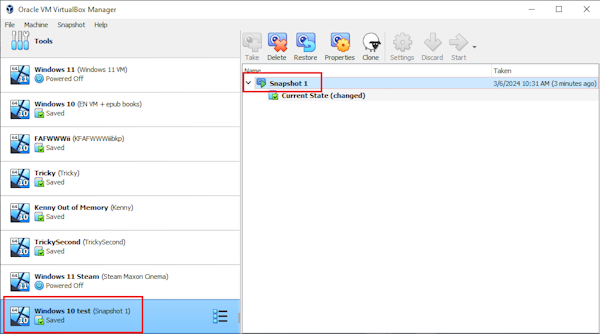
- Step 29: You now have a Virtual Machine running an up-to-date version of Windows 10, which you can use for testing purposes and restore after you are done!
Conclusion
Installing Windows 10 in a virtual machine like VirtualBox is a great option when you want to test or experiment with the operating system without performing a full installation and affecting your current system. Though the concept seems daunting in the beginning, with the step-by-step guide above you should be able to do this.
If you like this guide, please consider sharing this on your social media and follow our blog for more Windows tips!
Виртуальные машины представляют собой эмуляцию устройств на другом устройстве или, в контексте этой статьи и упрощенно, позволяют запускать виртуальный компьютер (как обычную программу) с нужной операционной системой на вашем компьютере с той же или отличающейся ОС. Например, имея на своем компьютере Windows, вы можете запустить Linux или другую версию Windows в виртуальной машине и работать с ними как с обычным компьютером.
В этой инструкции для начинающих подробно о том, как создать и настроить виртуальную машину VirtualBox (полностью бесплатное ПО для работы с виртуальными машинами в Windows, MacOS и Linux), а также некоторые нюансы по использованию VirtualBox, которые могут оказаться полезными.
Для чего это может потребоваться? Чаще всего, виртуальные машины используют для запуска серверов или для тестирования работы программ в различных ОС. Для начинающего пользователя такая возможность может быть полезна как для того, чтобы попробовать в работе незнакомую систему или, например, для запуска сомнительных программ без опасности получить вирусы на своем компьютере.
Кстати, в Windows 11/10 Pro и Enterprise есть встроенные средства для работы с виртуальными машинами, см. Виртуальные машины Hyper-V в Windows 10, а с недавних пор для личного использования стало бесплатным ПО от VMWare. Примечание: если на компьютере установлены компоненты Hyper-V, то VirtualBox будет сообщать об ошибке Не удалось открыть сессию для виртуальной машины, о том как это обойти: Запуск VirtualBox и Hyper-V на одной системе.
Установка VirtualBox
Вы можете бесплатно скачать ПО для работы с виртуальными машинами VirtualBox с официального сайта https://www.virtualbox.org/wiki/Downloads где представлены версии для Windows, Mac OS X и Linux. Несмотря на то, что сайт на английском, сама программа будет на русском языке. Запустите загруженный файл и пройдите простой процесс установки (в большинстве случаев достаточно оставить все параметры по умолчанию).

Во время установки VirtualBox, если вы оставите включенным компонент для доступа к Интернету из виртуальных машин, вы увидите предупреждение «Warning: Network Interfaces», которое сообщает о том, что в процессе настройки ваше Интернет-подключение будет временно разорвано (и восстановится автоматически после установки драйверов и настройки подключений).
По завершении установки можете запустить Oracle VM VirtualBox.
Создание виртуальной машины в VirtualBox
Примечание: для работы виртуальных машин требуется, чтобы на компьютере была включена виртуализация VT-x или AMD-V в БИОС. Обычно она включена по умолчанию, но, если что-то пойдет не так, учитывайте этот момент.
Теперь давайте создадим свою первую виртуальную машину. В примере далее используется VirtualBox, запущенная в Windows, в качестве гостевой ОС (той, которая виртуализируется) будет Windows 10.
- Нажмите «Создать» в окне Oracle VM VirtualBox Менеджер.

- В окне «Укажите имя и тип ОС» задайте произвольное имя виртуальной машины, выберите тип ОС, которая будет на нее установлена и версию ОС. В моем случае — Windows 10 x64. Нажмите «Далее».

- Укажите объем оперативной памяти, выделяемой для вашей виртуальной машины. В идеале — достаточный для её работы, но не слишком большой (так как память будет «отниматься» от вашей основной системы, когда виртуальная машина будет запущена). Рекомендую ориентироваться на значения в «зелёной» зоне.

- В следующем окне выберите «Создать новый виртуальный жесткий диск».
- Выберите тип диска. В нашем случае, если этот виртуальный диск не будет использоваться за пределами VirtualBox — VDI (VirtualBox Disk Image).
- Укажите, динамический или фиксированный размер жесткого диска использовать. Я обычно использую «Фиксированный» и вручную задаю его размер.
- Укажите размер виртуального жесткого диска и место его хранения на компьютере или внешнем накопителе (размер должен быть достаточным для установки и работы гостевой операционной системы). Нажмите «Создать» и дождитесь завершения создания виртуального диска.

- Готово, виртуальная машина создана и отобразится в списке слева в окне VirtualBox. Чтобы увидеть информацию о конфигурации, как на скриншоте, нажмите по стрелке справа от кнопки «Машины» и выберите пункт «Детали».


Виртуальная машина создана, однако, если её запустить, вы не увидите ничего кроме черного экрана со служебной информацией. Т.е. создан пока только «виртуальный компьютер» и никакая операционной система на нём не установлена.
Установка Windows в VirtualBox
Для того, чтобы установить Windows, в нашем случае Windows 10, в виртуальной машине VirtualBox вам потребуется образ ISO с дистрибутивом системы (см. Как скачать образ ISO Windows 10). Дальнейшие шаги будут выглядеть следующим образом.
- Вставьте образ ISO в виртуальный привод DVD. Для этого выберите виртуальную машину в списке слева, нажмите кнопку «Настроить», перейдите в пункт «Носители», выберите диск, нажмите по кнопке с диском и стрелкой и выберите пункт «Выбрать образ оптического диска». Укажите путь к образу. Затем в пункте настроек «Система» в разделе «Порядок загрузки» установите «Оптический диск» на первое место в списке. Нажмите «Ок».

- В главном окне нажмите «Запустить». Запустится созданная ранее виртуальная машина, при этом загрузка будет выполнена с диска (с образа ISO), можно выполнить установку Windows так, как это делается на обычном физическом компьютере. Все шаги первоначальной установки аналогичны таковым на обычном компьютере, см. Установка Windows 10 с флешки.

- После того, как Windows была установлена и запущена, следует установить некоторые драйверы, которые позволят гостевой системе правильно (и без лишних тормозов) работать в виртуальной машине. Для этого выберите в меню «Устройства» — «Подключить образ диска дополнений VirtualBox», откройте компакт-диск внутри виртуальной машины и запустите файл VBoxWindowsAdditions.exe для установки этих драйверов. При ошибке подключения образа, завершите работу виртуальной машины и подключите образ из C:\ Program Files\ Oracle\ VirtualBox\ VBoxGuestAdditions.iso в настройках носителей (как в первом шаге) и снова запустите виртуальную машину, а затем произведите установку с диска.

По завершении установки и перезагрузки виртуальной машины она полностью будет готова к работе. Однако, возможно, вы захотите выполнить некоторые дополнительные настройки.
Основные настройки виртуальной машины VirtualBox
В настройках виртуальной машины (учтите, что многие настройки недоступны, пока виртуальная машина запущена) вы можете изменить следующие основные параметры:
- В пункте «Общие» на вкладке «Дополнительно» можно включить общий с основной системой буфер обмена и функцию Drag-n-Drop для перетаскивания файлов в гостевую ОС или из неё.
- В пункте «Система» — порядок загрузки, режим EFI (для установки на GPT диск), размер оперативной памяти, количество ядер процессора (не следует указывать число более количества физических ядер процессора вашего компьютера) и допустимый процент их использования (низкие значения часто приводят к тому, что гостевая система «тормозит»).
- На вкладке «дисплей» можно включить 2D и 3D ускорение, задать объем видеопамяти для виртуальной машины.
- На вкладке «Носители» — добавить дополнительные приводы дисков, виртуальные жесткие диски.
- На вкладке USB — добавить USB устройства (которые физически подключены к вашему компьютеру), например, флешку, к виртуальной машине (нажмите по значку USB с «плюсом» справа). Для использования контроллеров USB 2.0 и USB 3.0 установите Oracle VM VirtualBox Extension Pack (доступно для скачивания там же, где вы загружали VirtualBox).

- В разделе «Общие папки» можно добавить папки, которые будут общими для основной ОС и виртуальной машины.

Некоторые из указанных выше вещей можно выполнить и из запущенной виртуальной машины в главном меню: например, в пункт «Устройства» можно подключить флешку, извлечь или вставить диск (ISO), включить общие папки и т.п.
Дополнительная информация
В завершение — некоторая дополнительная информация, которая может оказаться полезной при использовании виртуальных машин VirtualBox.
- Одна из полезных возможностей при использовании виртуальных машин — создание «снимка» (snapshot) системы в её текущем состоянии (со всеми файлами, установленными программами и прочим) с возможностью отката к этому состоянию в любой момент (и возможностью хранить несколько снимков). Сделать снимок в VirtualBox можно на запущенной виртуальной машине в меню «Машина» — «Сделать снимок состояния». А восстановить в менеджере виртуальных машин, нажав «Машины» — «Снимки» и выбрав вкладку «Снимки».

- Некоторые комбинации клавиш по умолчанию перехватываются основной операционной системой (например, Ctrl+Alt+Del). Если вам требуется отправить подобное сочетание клавиш в виртуальную машину, используйте пункт меню «Ввод».
- Виртуальная машина может «захватывать» ввод клавиатуры и мышь (так, что нельзя перевести ввод на основную систему). Чтобы «освободить» клавиатуру и мышь, если потребуется, используйте нажатие хост-клавиши (по умолчанию это правый Ctrl).
- На сайте Майкрософт есть готовые бесплатные виртуальные машины Windows для VirtualBox, которые достаточно импортировать и запустить. Подробно о том, как это сделать: Как скачать бесплатные виртуальные машины Windows с сайта Майкрософт.
- При необходимости вы можете включить загрузку виртуальной машины VirtualBox с физической флешки или другого накопителя

Now you installed VirtualBox on your Windows Desktop successfully.
What Next…..?
Let’s create the first Windows 10 virtual machine using VirtualBox. VirtualBox supports guest operating systems like Windows, Linux Family – Ubuntu, Suse, Solaris, etc., Free BSD, and other operating systems. Here is the official page showing the complete list of the guest operating system supported.
To keep it simple, let’s use Microsoft Windows 10 as a guest system. Most of you are aware of Windows and it’s the installation process. It will become easy to understand and learn the process of creating a Virtual Machine.
This tutorial assumes a basic working knowledge of the Windows Operating system and installation process.
- Microsoft Windows 7/8/10
- VirtualBox 5.6.2
Download Microsoft Windows 10
You need an installer for Microsoft Windows 10 Operating system. You can use any type of windows installers like DVD, USB, or ISO image. There is an option available to download the evaluation copy of the Windows 10 Operating system on Microsoft Network.
This is actually an Evaluation Copy and Valid for 90 Days only.

You can download it here. Select ISO-Enterprise and click continue. Just enter your name, phone, email and other required information and click on download. It starts downloading the ISO images. Oops.. it is too big 4 GB. Make sure you have a high-speed internet connection and unlimited download package.
Install Windows 10 on Virtual Machine
This is a complete wizard-driven process where VM manager presents some window to get information. We are going to choose the default option. So, lets’ go ahead and create a virtual machine.
1. Start Oracle Virtual Box
Navigate to program or you may have a shortcut created on a desktop while installation and start VirtualBox VM Manager. The user interface (GUI) is very simple and easy to understand. On the left-hand side, you can see the list of virtual machines and virtual machine groups on your computer. Right now, it is empty as there is no VM.
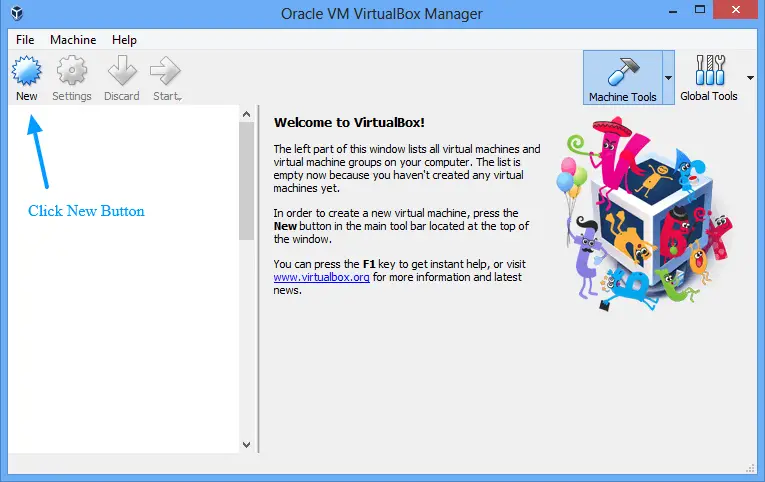
Click New icon.
2. Enter Name and Operating System
- Name: We recommend to create a logical name so that it becomes easy to identify Virtual machine later when you have many.
- Type: Type of VM whether Windows, Linux, etc
- Version: Version of the operating system. We have downloaded Windows 64 bit so mentioning same here
.
3. Choose Memory Size
Select the amount of memory (RAM) in megabytes for the virtual machine. This memory will not be available to the Host operating system when Virual Machine is running.
4. Hard Disk
Select Hard Disk. Select default Create a virtual disk now option and click create.
5. Hard disk file type
Select Hard disk file type as VDI (VirtualBox Disk Image) and click Next.
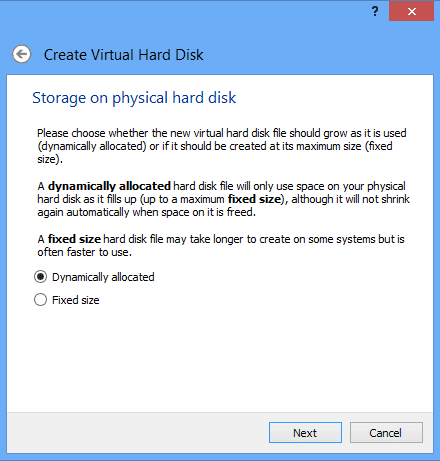
6. Storage on physical hard disk
Select Dynamically allocated and click Next.
7. File location and size
Click on Browse folder and select folder where VM stores its supporting file.
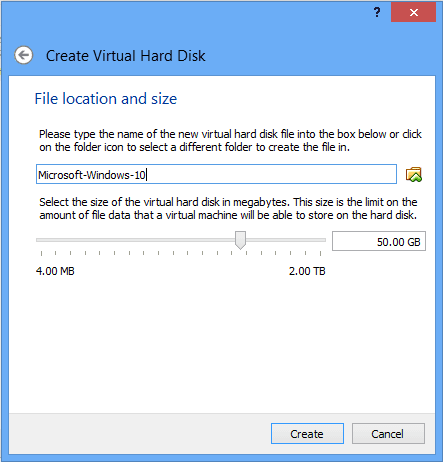
That’s it and your Virtual Machine is ready. It is simply an empty container. There is no operating system installed yet.