
,
The following issue(s) may occur when you try to install the Windows 10 Update 1709, also known as ‘Fall Creators Update’: The Update fails to install or the update downloading procedure is stuck. In this tutorial you ‘ll find instructions on how to resolve the following issues when downloading or installing the Windows 10 Fall Creators Update 1709:
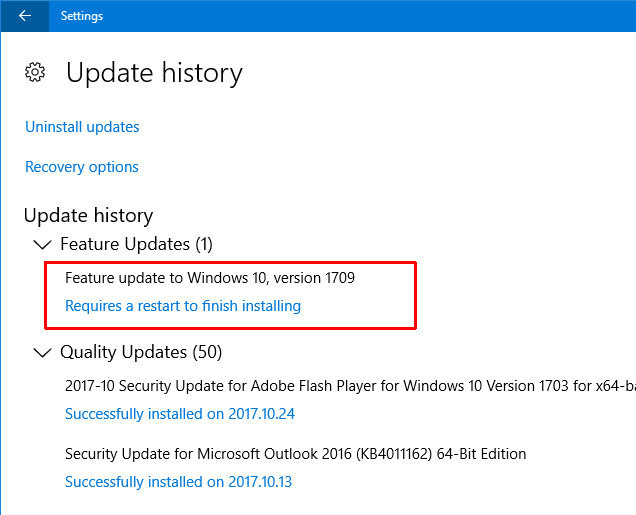
Issue No1: When the download of Windows 10 Fall Creators Update version 1709 is completed, Windows asks to restart the system to install the update. After the system’s restart, the Fall Creator Update is not installed and at the Update history you receive the following error: «Feature update to Windows 10, version 1709: Failed to install…» (error: 0x80080008)
Issue No2: After checking for new updates, Windows is starting to download the Fall Creators Update for Windows 10 version 1709, but during the Downloading Updates operation, is stuck at xx% (e.g. at 85% or 99%) with error 0x80d02002.

In this tutorial you ‘ll find detailed instructions to resolve problems when installing the Windows 10 Fall Creators Update 1709.
How to fix: Feature update to Windows 10, version 1709 Failed to install.
Suggestions: Before proceeding to update your system:
1. Completely uninstall the antivirus program or any other security program from your system.
2. Disconnect any USB connected devices that you don’t need. (e.g. USB Wireless Mouse or Keyboard Receiver, USB Wireless Network Card, etc.).
3. Be patient…the update takes a few hours to download and install.
4. Before applying the methods mentioned below, run first the Windows Update Troubleshooter from Settings > Update & Security > Troubleshoot > Windows Update.
Method 1. Delete the Windows Update Folder.
Method 2. Download and install the Windows 10 Update Manually.
Method 3. Repair System Files with SFC.
Method 4. FIX Windows corruption errors with the DISM tool.
Method 5. Repair Windows 10 with an in-place Upgrade.
Method 6. Prevent Windows 10 Automatic Update.
General troubleshooting guide for Windows 10 updates.
Method 1. Delete the Windows Update folder.
The Windows Update folder (C:\Windows\SoftwareDistribution), is the location where Windows stores the new updates after downloading them. In many cases, the «SoftwareDistribution» folder’s contents become corrupted and cause problems during downloading or installing updates. At these cases all these problems can be easily bypassed if you delete the «SoftwareDistribution» folder.
To delete the Windows Update folder:
1. Simultaneously press the Win + R keys to open the run command box.
2. Type the following command and press OK.
- services.msc
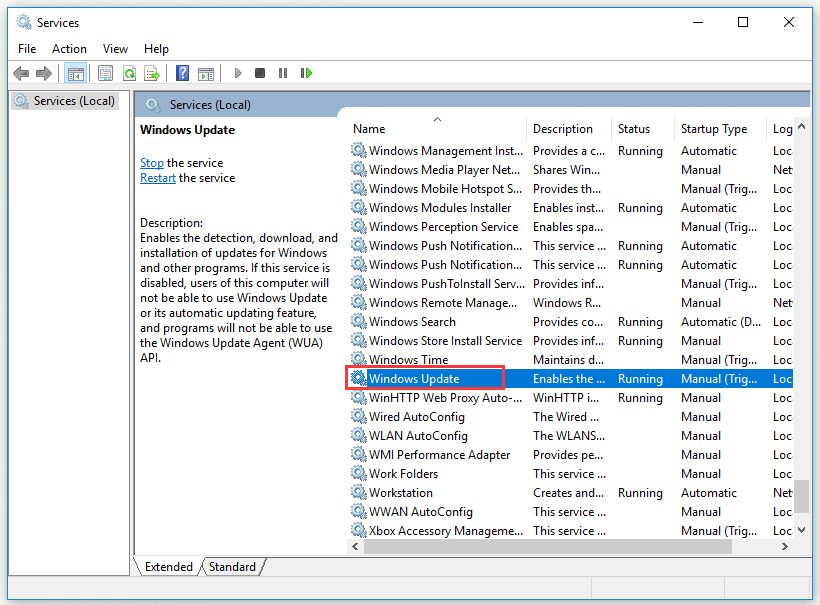
3. From the list of services, at the right pane locate the Windows Update service.
4. Right click on «Windows Update» service and choose Stop. *
5. Close «Services» window.
* Note: If you cannot stop the Windows Update service, then:
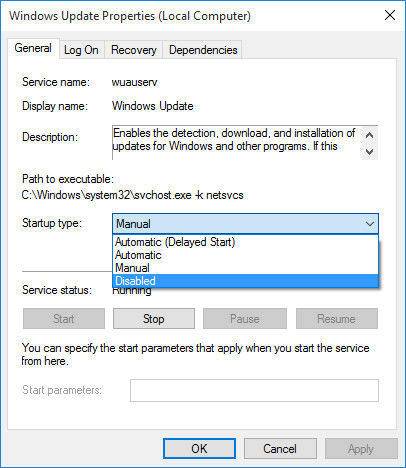
a. Double click on it to open its Properties.
b. Set the Startup type to Disabled and click OK.
c. Restart you computer.
d. After restart, continue to the next step.

6. Open Windows Explorer and navigate to C:\Windows folder.
7. Locate and then Delete the SoftwareDistribution folder. *
* Notes:
1. If you cannot delete the folder with error «Folder in use – try again», then restart Windows in «Safe Mode» and repeat the procedure.
2. If you have disabled the Windows Update service (Startup type = Disabled), then go to services and set the Startup type to Automatic.
8. Restart your computer.
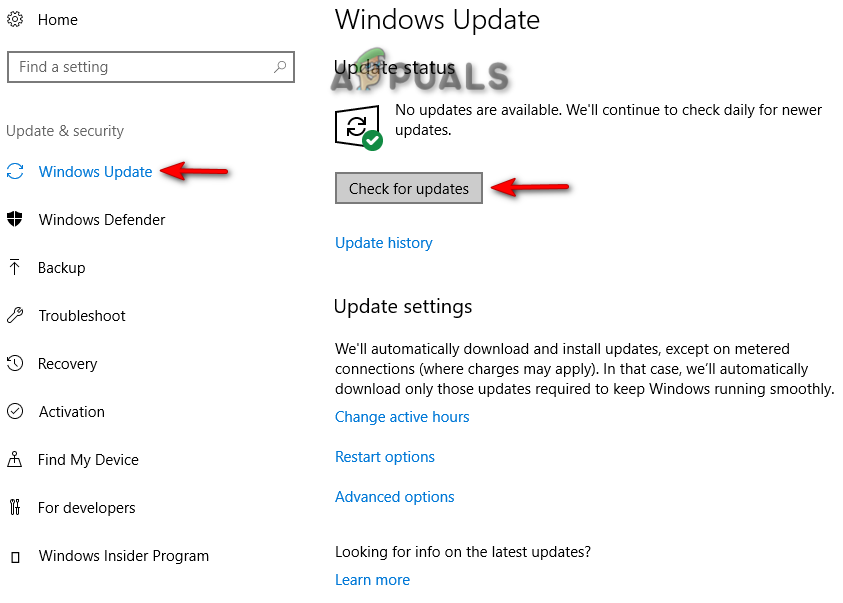
9. After the restart, go to Start > Settings > Update & Security.
10. Check for updates and install them.
Method 2. Download and install the Windows 10 v1709 Update Manually.
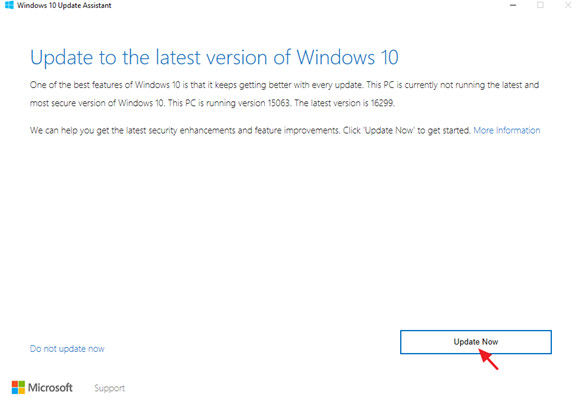
The next method, to resolve the issues while downloading or installing the Windows 10 Fall Creators update 1709, is to download and install the update using the «Windows Update Assistant»: To do that:
1. Navigate to Windows 10 download site and click the Update now button.

2. When asked, click to Run the «Windows10Upgrade9252.exe» file to start the installation immediately, or click the Save button to run the installer later.

3. Finally click the Update Now button and follow the on screen prompts to install the Update.

Method 3. Repair System Files with SFC.
If you still experience problems with the Windows Update installation, then try to repair Windows System files by using the SFC command line tool. To do that:
1. Open Command Prompt as Administrator. To do that:
a. In the Search box type: cmd (or command prompt).
b. Right click on the command prompt (result) and select Run as Administrator.

2. Type the following command and press Enter:
- SFC /SCANNOW

3. When the SFC scan is completed, try to install the Windows 10 Fall Creators 1709 update again.
Method 4: FIX Windows corruption errors with the DISM command line tool.
The next method to fix Windows 10 Update v1709 installation problems, is to repair the Windows image using the DISM command.
1. Open Command Prompt as Administrator.
2. At the command prompt window, type the following command & press Enter:
- Dism.exe /Online /Cleanup-Image /Restorehealth

3. Be patient until DISM repairs component store.
4. When the operation is completed, you should be informed that the component store corruption was repaired.

5. Close command prompt window and restart your computer.
6. Check for updates and install them.
Method 5. Repair Windows 10 with an in-place Upgrade.
Another method that usually works, to fix Windows 10 update problems, is to perform a Windows 10 Repair-Upgrade. For that task follow the detailed instructions on this article: How to repair Windows 10.
That’s it! Let me know if this guide has helped you by leaving your comment about your experience. Please like and share this guide to help others.
If this article was useful for you, please consider supporting us by making a donation. Even $1 can a make a huge difference for us in our effort to continue to help others while keeping this site free:
- Author
- Recent Posts
Konstantinos is the founder and administrator of Wintips.org. Since 1995 he works and provides IT support as a computer and network expert to individuals and large companies. He is specialized in solving problems related to Windows or other Microsoft products (Windows Server, Office, Microsoft 365, etc.).
If you failed to install feature update to windows 10, version 1709, you are in the right place. This post offered by MiniTool Solution will help you. It will show you some workable solutions. You can try to delete the Windows Update folder, download and install the update with Windows Update Assistant and more.
When you try to install the Windows 10 Update 1709 (Fall Creators Update), you may encounter the problem: The Update fails to install or the update downloading procedure is stuck. To resolve this issue, you can read this post to get some instructions.
Method 1: Delete the Windows Update Folder
If feature update to Windows 10 version 1709 failed to install, now, the first method you can try is to delete the Windows Update folder.
Windows stores the new updates in the Windows Update folder (SoftwareDistribution) after downloading these updates. However, if the contents of the Windows Update folder become corrupted, some problems will occur during downloading or installing updates.
In this case, you can simply delete the SoftwareDistribution folder to fix the issue. Here is a quick guide on how to do that.
Step 1: Press the Win key + R key to open the Run dialog box. Next, type services.msc and press OK.
Step 2: Locate the Windows Update service from the list of services.
Step 3: Right-click Windows Update and choose Stop.
Step 4: Close the Services window.
Step 5: Open Windows Explorer and navigate to C:\Windows\SoftwareDistribution.
Step 6: Delete the SoftwareDistribution folder and restart your computer.
After that, the “feature update to Windows 10 version 1709 failed to install” issue should be solved. Now you can check for updates and install them.
Method 2: Download and Install the Windows 10 Version 1709 Update Manually
The next method you can try to resolve the issues is to download and install the update with Windows Update Assistant. Here are the steps.
Step 1: Click this link to enter the Windows 10 download site. Next, click Update now.
Step 2: When a window pops up to ask you “What do you want to do with Windows10Upgrade9252.exe(6.0 MB)? From: download.microsoft.com”, click Run to start the installation immediately or click Save to run the installer later.
Step 3: When the User Account Control window pops up, click Yes.
Step 4: Once the Windows 10 Update Assistant window appears, click Update now.

Step 5: Then, follow the instructions to finish installing the Update.
After that, check if the “feature update to Windows 10 version 1709 failed to install” issue is solved.
Method 3: Repair System Files with SFC
Another solution you can try is to repair Windows System files with the SFC command line tool. Here are the steps to do this job.
Step 1: Type cmd in the Search bar, navigate to Command Prompt and then choose Run as administrator.
Step 2: Now, type this command: sfc /scannow and press Enter.
After the SFC scan is completed, try to install the Windows 10 Fall Creators 1709 update again and check if the “feature update to Windows 10 version 1709 failed to install” issue is fixed.
Method 4: Fix Windows Corruption Errors by Running the DISM
The next method to fix this problem is to repair the Windows image with the DISM command line tool.
Step 1: Type cmd in the Search bar, navigate to Command Prompt and then choose Run as administrator.
Step 2: Once the command prompt window, type this command: Dism.exe /Online /Cleanup-Image /Restorehealth and press Enter.
Step 3: Be patient until the DISM repairs component store. When the operation is completed, you should be informed that the component store corruption was repaired.
Step 4: Close command prompt window and restart your computer.
The “feature update to Windows 10 version 1709 failed to install” issue should be solved. Check for updates and install them.
Method 5: Repair Windows 10 with an In-Place Upgrade
To fix Windows 10 update problems, performing a Windows 10 Repair-Upgrade usually works. To do that, follow the detailed instructions from this post: Windows 10 In-Place Upgrade: a Step-by-Step Guide.
After that, check if the problem is solved.
Bottom Line
To sum up, this post has shown you how to fix the error if Windows 10 Update 1709 fails to install. After reading this post, you should manage to fix this error.
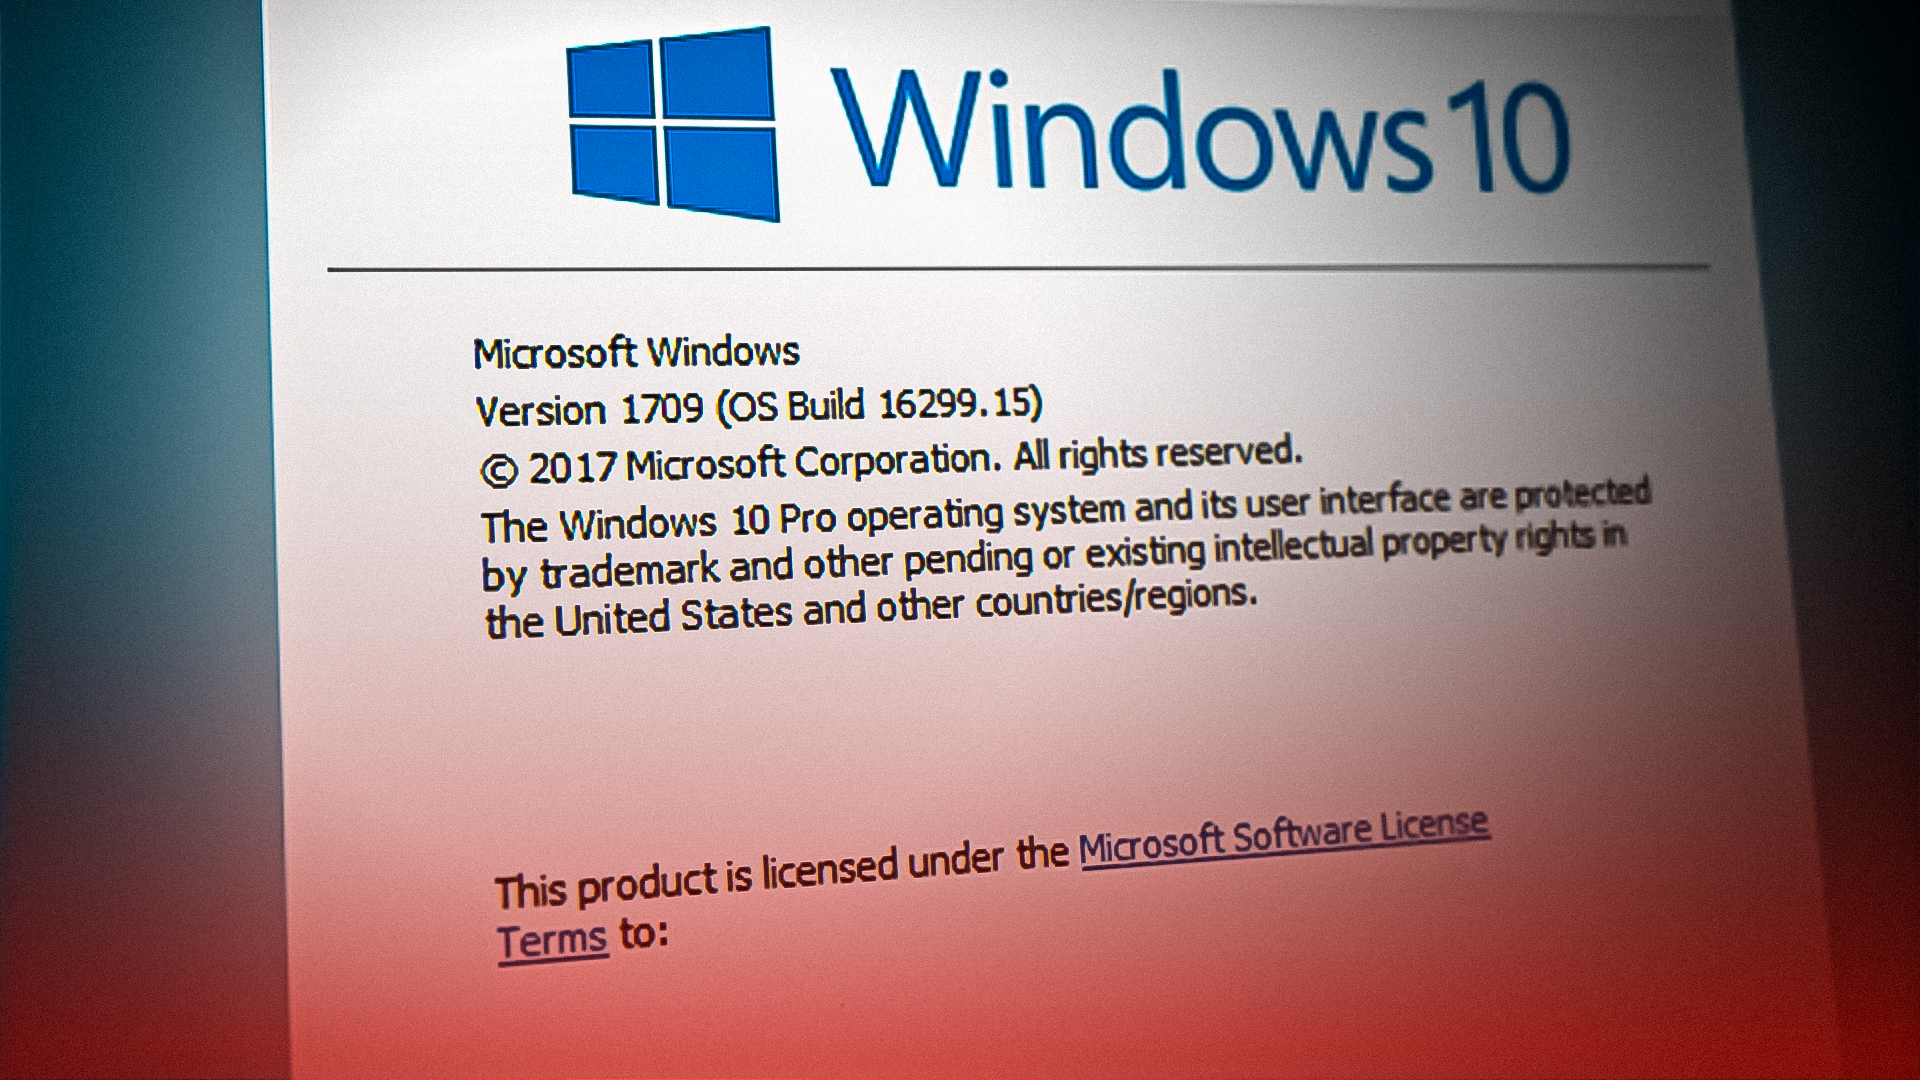
Update to Windows 10, version 1709 fail.
Lately, my machine has been trying to install «Feature update to Windows 10, version 1709» with no success, having to revert back to the previous version of Windows 1703 (OS Build 15063.786).
What happen to versions 1704 thru 1708 if such versions exist?
Why is the update for Windows 10, version 1709 not installing, and how can I stop-until I resolve the problem-version 1709’s future updates?
Windows 10, version 1709, also known as the Fall Creators Update. It contains all features and fixes included in previous cumulative updates to Windows 10, version 1703. Since Microsoft establishes this update, there are many users who choose to get their Windows 10 up to date. However, there are also groups of users find it always get to fail to install Windows 10 update to 1709. In this article we are going to introduce you the best 3 methods to fix this problem, just follow us.
Method 1: Windows Update Troubleshooter
Generally, if you are having problems with Windows update, you may make sure that your computer has connected to Internet, and then you can download and run Windows Update Troubleshooter for your new Windows 10 version 1709 to install.
Download troubleshooter for Windows 10
After the troubleshooter is done, try running Windows Update again and install any available updates.
Method 2: Manually Download and Install Windows 10 Version 1709
If you find it still fail to install Windows 10 version 1709, we also suggest you try to install Windows 10 v.1709 with the help of “Windows Update Assistant”.
Go to Microsoft Windows 10 Download Site, click “Update now”. After you got the .exe file, run the program or save it for further use.

If you choose to run the «Windows10Upgrade9252.exe» file, you may see the interface below and you should click “Update now” to follow its steps to update Windows 10 to Version 1709.
Method 3: Disable Windows 10 Update Installation
By this way you can stop the Windows 10 update service and delete the content downloaded by Update Manager. And then you may restart the service to try to install again.
You should press “Windows” and “R” keys to open Run command box. Type in “services.msc”.
Double click to launch “Windows Update service’s properties. You should set “Startup type” as “Disable”.
After that, restart your Windows 10 computer and you may find the problem that Windows 10 update to 1709 fails have been solved.
That’s all about how to fix Windows 10 update 1709 fails to install, you can try the three solutions one by one to get your trouble out. Besides, if you have problem in boot your Windows 10 computer or even Windows 7/8 computer, you can get help from Windows Boot Genius, it can give the most professional help to fix all kinds of Windows computer boot issues.
Windows launch updates each time there is a fault in the previous version to fix bugs and glitches. Windows 1709 is one of the cumulative updates. When updating your Windows to Version 1709, you might face an installation failure. This issue occurs due to corruption in the system which prevents the system from updating to a new version of Windows. As a result, you revise the “Feature Update to Windows 10, 1709 Failed to install” message.
In this guide, we will be showing you how to fix the issue when Windows 10 fails to Update to Version 1709.
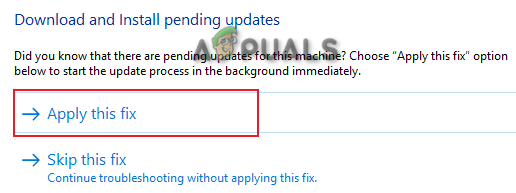
1. Run the Windows Update Troubleshooter
When Windows fails to install an update, you can run Windows Update Troubleshooter. It is a built-in feature in Windows that allows the system to detect the errors found and provides you with solutions to fix them as well. Therefore, run the Windows Troubleshooter as instructed below:
- Open the Windows Settings by pressing the Win + I keys together.
- Navigate to Update and Security > Troubleshoot.
- Click on the Windows Update option under “Get up and running.”
- Run the Windows Update troubleshooter by clicking the “Run the troubleshooter” option.
- After the troubleshooter has detected the problem, select the provided solutions.

Selecting Troubleshooter Solution - Restart your computer to make the necessary changes.
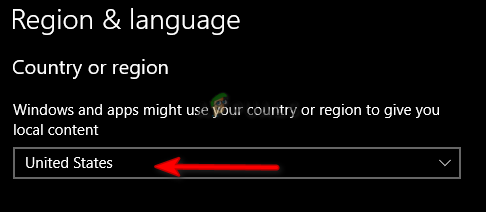
2. Update Time and Region Settings
One of the reasons you are facing the issue is because of the wrong time zone. When your system time and region are set to different as compared to the actual time of your region, it will interfere with the Windows Update. Therefore, you must check your time zone and change it to the one shown on the Internet. You can Sync your computer’s time with the internet by following the steps listed below:
- Check your regional time on the Internet.
- Open the Windows Settings by pressing the Win + I keys together.
- Navigate to Time and Language > Date and Time.
- Turn off the “Set time Automatically” and “Set Time Zone Automatically” buttons.
- Set the time zone to the one on the Internet by clicking on the “Change” button.
Changing the time zone - Now, click on the Region tab and change the Region.

Setting the Region
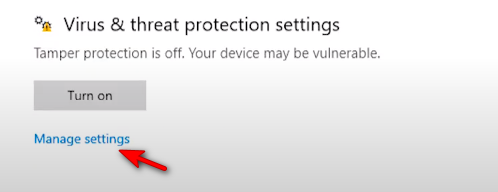
3. Temporarily Disable Windows Security and Third Party Software
Although Windows Security provides you additional protection from viruses and malware, they are also known to cause issues with Windows updates. Therefore, you must disable all protection services on your system and temporarily disable third-party security software as well by following the steps below:
- Open the Windows Settings by pressing the Win + I keys together.
- Navigate to Update and Security > Virus and threat protection.
- Click “Manage Settings” option under Virus and threat protection settings.

Managing Virus and Threat Protection settings - Turn off the “Real-time Protection” toggle button.
Turning Real-time protection Off - Now, you must disable the third-party antivirus software running on the system.
- Open Avast Antivirus and navigate to Menu > Settings > Protection > Core Shield.
- Disable the Avast security feature by turning off the Core-Shield toggle switch.

Turning off the Avast Core Shield

4. Update the Windows without Internet
Another easy way you can fix this issue is by disabling your Internet connection before automatically updating Windows to a new Version. Simply follow the steps below to update your Windows with a disabled Internet connection:
Disable Wi-Fi Connection
- If you are using a Wi-Fi connection on your system, you must disable your Wi-fi.
- Click on the Wi-Fi option on the right-most part of the taskbar.
- Click on the “Airplane mode” option to enable it.
Enabling the Airplane Mode
Disable Ethernet Connection
If you are using a computer with an Ethernet Connection, you must unplug your Ethernet cable to disable the internet connection.
Automatically Update Windows
- Open the Windows Settings by pressing the Win + I keys together.
- Navigate to Update and Security > Windows Update.
- Click on the “Check for Updates” option.
- Download the latest Windows update by clicking on the Download option.

Checking Windows Update - Restart your computer after the Windows update has been installed to make the changes.
5. Manually Update your Windows
Windows Catalog is a website that provides you with exclusive updates for your Windows. When facing issues with your Windows Update, you can use this website to manually download and install an update for your Windows. You can do that by following the instructions listed below.
Note: Before downloading the Update for Windows, you must check your Operating System size.
- Open the Windows Settings by pressing the Win + I keys together.
- Navigate to System > About and check the Operating System Type under “Device specifications” (x64-bits here).

Checking device specifications - Go to the Official Windows Catalog Website.
- Download the top Windows 1709 Update (KB4023057) by clicking on the “Downloads” option.
- Select the location of the file and click on the Save option.
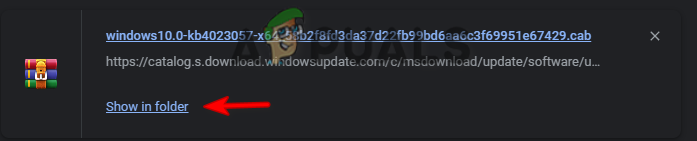
- Click on the three dots on your browser and open the downloads page.
Opening the Downloads tab - Open the file location by clicking on “Open in folder”

Showing file in the folder - Extract the WinRAR file by right-clicking on it and selecting the “Extract Here” option.
Extracting the file - Run the extracted file by right-clicking on it and selecting the “Open” option.
- After the file has been installed, restart your computer to update your Windows. to Version 1709.

6. Restart the Recent Item List
Windows consists of two methods of viewing files; Quick Access and Recent Item list. When the Recent Item List gets corrupted, it will interfere with the Windows Updates. Therefore, you must restart it in order to prevent any interference in installing the updates.
- Open the Windows Settings by pressing the Win + I keys together.
- Navigate to Personalization > Start.
- Click on the Show Recently Opened Items toggle button and turn it off.
- Turn it back on after a while to restart the feature with a cleared item list.

Recent Item List feature

7. Run the System Scans
Corruption in the system files will also lead to this error. When system files are corrupted, they prevent Windows from performing certain actions. Therefore, you should make sure that your system files are not corrupted by performing System Scans that will detect and repair the error found. Following are the steps to performing System Scans:
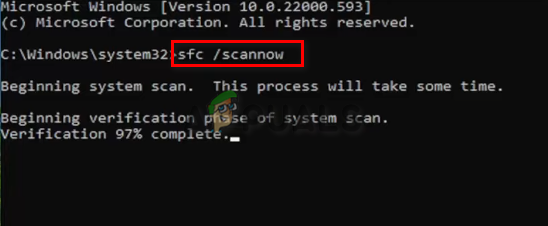
- Open the Windows Start Menu by pressing the Win key.
- Type “cmd” in the Windows Search bar.
- Run the command prompt as an administrator by right-clicking on it and selecting the “Run as an administrator” option.
Running the Command Prompt as an administrator. - Type the following command in the Command Prompt while giving a space between “sfc” and “/.”
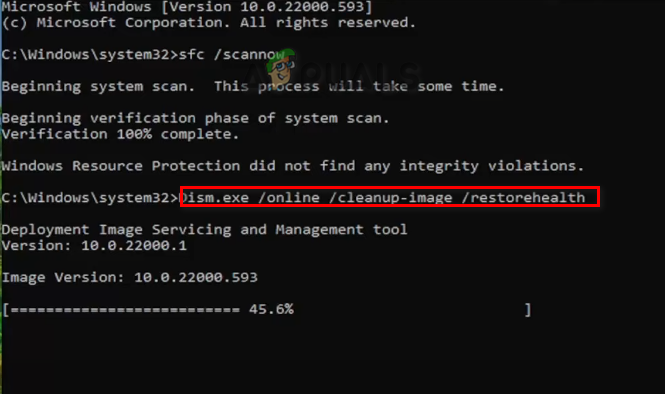
sfc /scannow

Running system file checker on the command prompt. - After scanning your System, the file checker automatically repairs the corrupted files.
Note: After the System File Checker has scanned the damaged files, you must run the DISM Command. Follow the steps below to run the DISM Command:
- To run the DISM command, Paste the following command into the command prompt and press the Enter key.
Dism.exe /online /cleanup-image /restorehealth

Running DISM Command on the Command Prompt
Note: After you are done running the DISM command, you must run the Disk Checker as well. Corruption in the disk will cause files on the system to fail to run properly causing such an error to occur.
- To run the Disk Checker, Paste the following command into the command prompt and press the Enter key (here “C” is the name of the drive”).
Chkdsk C: /r
Chkdsk C: /f
- Restart your computer and make the required changes.
8. Download Windows Update Reset.bat
If the issue still persists, then you must manually download the Windows Update Reset.bat file and run it as an administrator to fix the issue automatically. Follow the steps below to perform these actions.
- Download the Windows Update Reset.bat file.
- Open the browser’s download page by clicking on the Three dots at the top right part of the browser and click on the Downloads options.
Opening the Downloads tab - Open the file location by clicking on the” Show in Folder” option.

Showing file in the folder - Open the file with administrative permission by right-clicking on it and selecting the “run as administrator” option.
Running file as an administrator - After the process has been completed, the .bat file will automatically fix the Windows update issue.

Muhammad Zubyan
Muhammad Zubyan is a certified Google IT Support Professional with over 7 years of extensive experience. He has worked on more than 1500 computers, gaining valuable insights that enable him to detect and troubleshoot any complicated root cause of Windows-related issues and errors. In addition to managing Appuals as a Senior Editor, he is currently developing his own Game Optimization program that caters to both gamers and casual users alike.
17.03.2018, 10:24. Показов 19869. Ответов 9
Рад приветствовать сообщество КиберФорума, надеюсь тут смогут мне помочь в решение проблемы уже давненько меня беспокоящей, хотя на самом деле не сильно беспокоящей, но обновления вещь важная поэтому собравшись с мыслями решил всё же довести это дело конца, обычно активно пользовался гуглом но сейчас не в силах найти ответ.
Описание проблематики:
Открываю Центр обновления Windows
Состояние обновления:
• Накопительное обновление для Windows 10 Version 1709 для систем на базе процессоров x64, 2018 03 (KB4088776) — ошибка 0xca00a000
• Обновление системы безопасности для Adobe Flash Player for Windows 10 Version 1709 для систем на базе процессоров x64 (KB4088785), 03.2018 — ошибка 0x80073712
Открываю журнал установленных обновлений
Обновления компонентов:
Обновление функций до Windows 10, версия 1709
Успешно установлено 18.11.2017
Исправления:
Накопительное обновление для Windows 10 Version 1709 …
Неудачная попытка — 0x80073712
Накопительное обновление для Windows 10 Version 1709 …
Неудачная попытка — 0x80073712
Обновление системы безопасности для Adobe Flash Player for Windows 10 Version 1709 для систем на базе процессоров x64 (KB4056887)
Успешно установлено 10.01.2018
Накопительное обновление для Windows 10 Version 1709 …
Неудачная попытка — 0x80073712
Update for Windows 10 Version 1709 for x64-based Systems (KB4058043)
Успешно установлено 17.12.2017
Ещё:
В Microsoft Store все приложения обновляются нормально кроме «Кино и ТВ» сейчас смотрю к нему ещё добавилось «Центр Отзывов» с ошибкой Код: 0x80073CF9
Ища в интернете инфу наткнулся на такие команды как
sfc /scannow
Начато сканирование системы. Этот процесс может занять некоторое время.
Защита ресурсов Windows не может выполнить запрошенную операцию.
dism /Online /Cleanup-Image /ScanHealth
Cистема DISM
Версия: 10.0.16299.15
Версия образа: 10.0.16299.64
[== 5.0% ]
Ошибка: 14098
Хранилище компонентов повреждено.
Файл журнала DISM находится по адресу C:\WINDOWS\Logs\DISM\dism.log
Тоже вызывает вопросы..
Ещё в интернете почерпнул, что решение может быть в реестре, но дальше по этой теме не гулгил, если кто в курсе подскажите, интересно в этом направлении поискать
Вообщем как то так