
,
This troubleshooting guide contains several methods to help users to fix Windows 10 Update problems such as errors during downloading or installing updates or other issues that may occur while upgrading Windows 10 to a most recent version (build).
Many Windows 10 PC owners face several problems during the installation of a new critical Windows 10 update and in most cases, the update installation error message, such as the «Something Happened – Windows 10 Installation Has Failed» or the «Feature update to Windows 10 Failed to install», does not help solve the problem. (I never understood why updating a system that works normally should be so time-consuming and often unsuccessful).

Unfortunately, there is not only one method to solve all the different problems that may occur during updating or upgrading Windows 10, so I decided to write this guide which includes all the methods that I have used from time to time to solve similar problems.
Windows 10 update or upgrade issues that were fixed with this troubleshooting guide:
Windows 10 Update Installation is stuck/freezes
Windows 10 Upgrade Installation is stuck/freezes
Windows 10 Installation Error: Something Happened – Windows 10 Installation Has Failed.
Feature update to Windows 10 Failed to install.
Windows 10 Update fails to install.
Windows 10 could not complete the installation of an update.
Windows 10 cannot find or download updates.
How to Solve Windows 10 Update or Upgrade Problems
Important: Before applying the methods mentioned below to troubleshoot Windows 10 Update/Upgrade issues, proceed and apply the following steps and then try to update Windows 10 again.
Step 1. Ensure that you have signed in with an account with administrative privileges.
Step 2. Make sure that the Date, Time & Regional settings are correct.
Step 3. If you have enabled the device encryption on your system (BitLocker, VeraCrypt), then proceed and decrypt the drive C: before installing the update.
Step 4. Open Windows Services and set the following services to start Automatically at Windows Startup (Startup type=Automatic).
- App Readiness
- Background Intelligent Transfer Service
- Cryptographic Services
- Windows Modules Installer
- Windows Update
Step 5. Disconnect all the peripheral devices that you don’t need (e.g. USB Drives, SD Cards, USB Wireless Mouse or Keyboard Receiver, USB Wireless Network Card, Printer etc.).
Step 6. Turn off the Developer Mode:
- Go to Settings -> Update and Security -> For developers -> Select Sideload apps and then click Yes to confirm.
- Then, navigate to Settings –> Apps -> Manage optional features -> Windows Developer Mode –> click Uninstall.
- Restart your PC and try to update.
Step 7. Make sure that your computer is clean from viruses and malware. To accomplish this task you can use this Malware Scan and Removal Guide to check and remove viruses or/and malicious programs that may be running on your computer.
Step 8. At Power Options (in Control Panel), set Put the computer to Sleep to Never & also disable the Fast Startup.
Step 9. Make sure that you have enough free space on your disk (at least 30GB).
Step 10. Delete the useless files with Disk Cleanup. by using the instructions in this tutorial: How to Free Up Disk Space with Disk Cleanup.
Step 11. Download and install the latest Servicing stack update, for the installed Windows 10 version and architecture (32/64-bit). (To view the installed Windows 10 version/architecture, go to: Start -> Settings –> System –> About.)
Step 12. Update essential device drivers. Navigate to your hardware’s vendor support site and download and install the latest drivers for the Chipset and the Graphics adapter (VGA). Additionally, sometimes there is the need to uninstall the VGA driver or to update the system BIOS in order to install an update.
Step 13. Disable -or better- temporarily uninstall all non-Microsoft security software (antivirus, antimalware, firewall, etc.), to avoid compatibility issues with the latest Windows updates.
Step 14. Disable the Secure Boot from BIOS settings.
Method 1. Run the Windows Update Troubleshooter.
Method 2. Force Windows to re-create the Windows Update Store folder.
Method 3. Update Windows 10 Manually with Update Assistant
Method 4. Install the Windows 10 Updates in Clean Boot Mode.
Method 5. FIX Corrupted System Files and Services with DISM & SFC tools.
Method 6. Check Disk for Problems
Method 7. Identify the Cause of the Problem with SetupDiag.
Method 8. Repair Windows with an In-Place Upgrade.
Method 9: Update Windows by using the WSUS Offline Update tool.
Method 10. Perform a Clean Installation of Windows 10.
Method 1. Run the Windows 10 Update Troubleshooter.
The first method to fix Windows 10 update problems is to run the Microsoft’s Windows 10 Update Troubleshooter tool in Administrator mode. To do that:
1. Navigate to Control Panel –> Troubleshooting –> Fix problems with Windows Update.

2. When the troubleshooting process is complete, restart your computer.
3. Try to install the update.
Method 2. Force Windows to re-create the Windows Update Store folder
The second method to fix problems with the updates in Windows 10, is to recreate the Windows Update Store folder («C:\Windows\SoftwareDistribution«), which is the location where Windows stores the downloaded updates. To do that:
1. Simultaneously press the Windows + R keys to open run command box.
2. In run command box, type: services.msc and press Enter.

3. Right click on Windows Update service and select Stop.

4. Open Windows Explorer and navigate to C:\Windows folder.
5. Select and Delete the “SoftwareDistribution” folder.*
(Click Continue at «Folder Access Denied» window).
* Note: The next time that the Windows Update will run, a new empty SoftwareDistribution folder will be automatically created by Windows to store updates.

6. Restart your computer.
7. Download and run the Windows Update Troubleshooter for Windows 10 from Microsoft’s support site.
8. Reboot your computer.
9. Check and install Windows updates.
Method 3. Download and install the Windows 10 Update Manually.
The next method, to resolve the Windows 10 update issues is to download and install the failed update manually. To do that follow the instructions below according your case:
Case A: If you want to upgrade your Windows 10 version (e.g. from 1703 o 1709):
1. Navigate to Windows 10 download site and click the Update now button.

2. When asked, click to Run the downloaded file in order to start the installation immediately, or click the Save button to run the installer later.

3. Finally click the Update Now button and follow the on screen prompts to install the Update.

Case B: If you have problems when installing a standalone update:
1. Go to Settings –> Update & Security and open the Update History
2. Find out the KB number of the failed update. (e.g. «KB4025339»)
3. Navigate to Microsoft Update Catalog.
4. Type the KB number of the failed update and click search.

5. Download and then install the update.
Method 4. Install Windows 10 Update in Selective Startup Mode (Clean Boot Mode).
1. Simultaneously press the Windows + R keys to open the ‘Run‘ command box.
2. In run command box, type msconfig press Enter to open the System Configuration utility.
3. At Services tab, check the Hide all Microsoft services checkbox.

4. Then press the Disable all button, to disable all non Windows services that start with Windows.

5. Then select the Startup tab and click Open Task Manager.

6. Select one by one all startup items and click Disable.
7. Finally click OK and restart your computer.
8. Try to install the update. If the update installed without problems, then run «msonfig» again, check the «Normal Startup» at General tab, click OK and restart your computer normally.
Method 5. FIX Windows corruption errors with DISM & SFC tools.
1. Open command prompt as administrator. To do that:
1. In the Search box type: cmd or command prompt
2. Right click on the command prompt (result) and select Run as Administrator.
2. At the command prompt window, type the following command & press Enter:
- Dism.exe /Online /Cleanup-Image /Restorehealth

3. Be patient until DISM repairs component store. When the operation is completed, (you should be informed that the component store corruption was repaired), give this command and press Enter:
- SFC /SCANNOW

4. When SFC scan is completed, restart your computer.
5. Try to update your system again.
Method 6. Check and Repair Hard Disk Errors.
If the hard disk contains errors, Windows 10 update will not be successful. So, proceed to check and repair the hard drive and then try to install the update again. To check and repair errors on your hard drive:
1. Open command prompt as administrator.
2. At command prompt, give the following command and press Enter: *
- chkdsk /R
* Notes:
1. You will be required to reboot the computer if run the CHKDSK command on the system drive.
2. By default the CHKDSK command, will check your main C: drive for errors. If after checking the drive C:, you want to repair errors on another drive (e.g. the drive «E:» ), then switch to that drive (e.g. by typing E: & pressing Enter) and give the same command.
Method 7. Identify the Cause of the Problem with SetupDiag.
The next method to fix problems when upgrading Windows 10, is to diagnose the cause of the problem by using the SetupDiag tool. To do that, follow the instructions in this article: How to Use SetupDiag to Diagnose Windows 10 Upgrade Problems.
Method 8. Repair Windows 10 with an in-place Upgrade.
Another method that usually works, to fix Windows 10 update problems, is to perform a Windows 10 Repair-Upgrade, by using the Media Creation tool to create an ISO or USB Windows 10 install media. For that task follow the detailed instructions on this article: How to repair Windows 10.
Method 9. Update Windows by using the WSUS Offline Update tool. (Windows 10, 8.1, 8 or 7).
1. Download the latest version of WSUS Offline Update utility.
2. After the download, extract the «wsusoffline.zip» file.
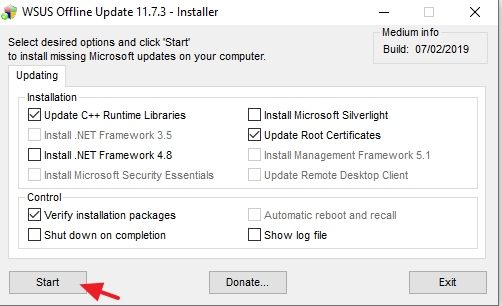
3. From the «wususoffline» folder, double click at UpdateGenerator.exe application.
4. At Windows tab, select the Windows Edition, that you are using.
5. Press the Start button.

6. Be patient until the WSUS Offline Update utility downloads all the available updates.

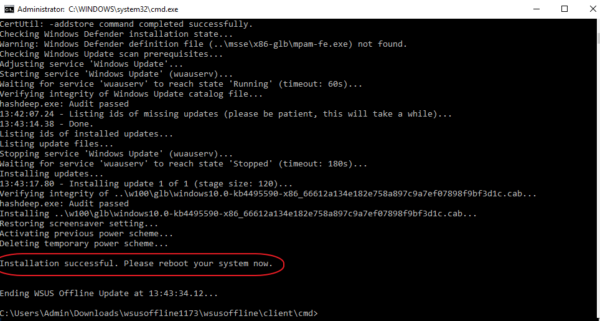
7. When the download is completed, open the client folder (wsusoffline\client), right click at «UpdateInstaller.exe» application and select Run as Administrator.

8. Finally press the Start button and be patient until the WSUS Offline Update installer, installs the downloaded updates to your system.
9. When the installation is completed, reboot your PC.
Method 10. Perform a Clean Windows 10 installation.
Many times, especially in computers with oldest Chipset and CPU, it is better and less time consuming to backup your files and to RESET your PC or to perform a clean Windows 10 installation, than to try to resolve update problems in Windows 10.
That’s it! Which method worked for you?
Let me know if this guide has helped you by leaving your comment about your experience. Please like and share this guide to help others.
If this article was useful for you, please consider supporting us by making a donation. Even $1 can a make a huge difference for us in our effort to continue to help others while keeping this site free:
- Author
- Recent Posts
Konstantinos is the founder and administrator of Wintips.org. Since 1995 he works and provides IT support as a computer and network expert to individuals and large companies. He is specialized in solving problems related to Windows or other Microsoft products (Windows Server, Office, Microsoft 365, etc.).
Microsoft rolled out Windows 10 version 22H2 with several new features and security improvements. Every compatible device connected to Microsoft Server will get upgraded automatically. Also, Microsoft officially released the Upgrade assistant to make the upgrade process smoother. However, at times when using Upgrade Assistant for Windows 10 upgrade, you might encounter a frustrating issue: the upgrade assistant stuck at 99% and never finishes. This can be very annoying and prevent you from enjoying the new features and improvements of the update. This article explores why Windows 10 Upgrade Assistant Stuck at 99% and some possible solutions to fix this problem and help you complete the upgrade successfully.
Post Contents :-
- 1 Windows 10 Update Assistant is stuck at 99%
- 1.1 Wait for a few hours
- 1.2 Restart your computer
- 1.3 Change the location of the Media folder temporarily
- 1.4 Disable the Windows update service
- 1.5 Run the Windows Update troubleshooter
- 1.6 Disable or uninstall antivirus software
- 1.7 Perform a clean boot
- 1.8 Delete Windows Update Cache
- 1.9 Upgrade using the Media Creation Tool
- 1.10 Windows 10 22H2 ISO
This issue arises due to various reasons, such as Slow internet download speed, insufficient Disk Space, Third-Party Software Interference, or Compatibility Issues, are common.
- Problems with your internet connection can slow down or stop the upgrade.
- Using VPNs or proxies can complicate the upgrade process.
- If your computer is low on storage, the upgrade won’t work smoothly.
- Antivirus or security programs could interfere with the upgrade process 0
- Sometimes, the files needed for the upgrade can get messed up or corrupted.
Here are some methods you can try to fix the Windows 10 upgrade assistant stuck at 99% issue:
Wait for a few hours
Sometimes, the upgrade assistant might take a long time to finish the installation, especially if you have a slow internet speed or a large amount of data to transfer. The upgrade may still be progressing in the background, even if it shows 99% for a long time. Therefore, the simplest solution is to wait for a few hours and see if the upgrade completes by itself. Do not turn off your computer or interrupt the upgrade process during this time.
- In addition, make sure you have a stable internet connection to download all Windows update files from the Microsoft server.
- Ensure Free disk space available on C drive to download and install Windows 10 updates.
Check Windows 10 22H2 update system requirement
- Memory: 2GB of RAM for 64-bit architecture and 1GB of RAM for 32-bit.
- Storage: 20GB of free space on 64-bit systems and 16GB of free space on 32-bit.
- Although not officially documented, it’s good to have up to 50GB of free storage for a flawless experience.
- CPU clock speed: Up to 1GHz.
- Screen resolution: 800 x 600.
- Graphics: Microsoft DirectX 9 or later with WDDM 1.0 driver.
- All latest Intel processors are supported including i3, i5, i7, and i9.
- Up through the AMD 7th generation processors are supported.
- AMD Athlon 2xx processors, AMD Ryzen 3/5/7 2xxx and others are also supported.
Restart your computer
If waiting does not work, you can try restarting your computer and see if that helps. To do this, press Ctrl+Alt+Del on your keyboard and choose Restart from the options. Alternatively, you can press and hold the power button on your computer for a few seconds until it shuts down, then turn it on again.
- Remove all connected External Devices such as a printer, scanner, audio jack, etc.
If you have an external USB device or SD memory card attached when installing Windows 10 version 22H2, you may get an error message stating “This PC can’t be upgraded to Windows 10.” This is caused by inappropriate drive reassignment during installation.
To safeguard your update experience, we have applied a hold on devices with an external USB device or SD memory card attached from being offered Windows 10 version 22H2 until this issue is resolved.
Microsoft explained their support page
Change the location of the Media folder temporarily
Note: Follow these steps before you restart your PC. Otherwise, the Media folder might not be available.
- Open File Explorer, type C:\$GetCurrent, and then press Enter.
- Copy and paste the Media folder to the desktop. If you don’t see the folder, select View and make sure the checkbox next to Hidden items is selected.
- Restart your PC, open File Explorer, type C:\$GetCurrent in the address bar, and then press Enter.
- Copy and paste the Media folder from the desktop to C:\$GetCurrent.
- Open the Media folder and double-click Setup.
- Follow the instructions to start the upgrade. On the Get Important updates screen, select Not Right Now, and then select Next.
- Follow the instructions to finish upgrading to Windows 10. After it’s done, make sure to install available updates. Select the Start button, and then select Settings > Update & security >Windows Update > Check for updates.
Disable the Windows update service
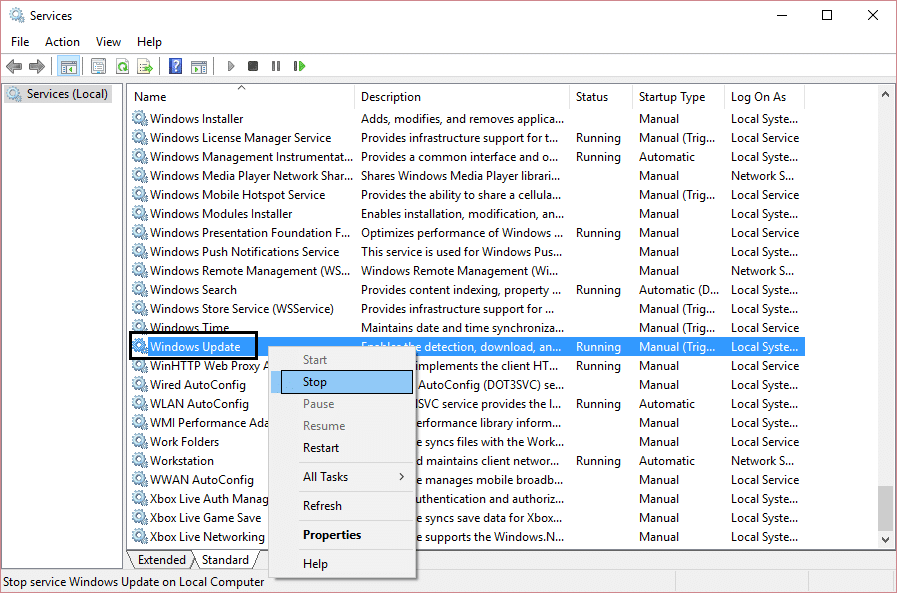
- Press Win + R, and type services.msc to open Windows services.
- Scroll down and look for the Windows update service,
- Right-click on the Windows update service, select properties,
- Here, change the Startup Type to Manual, And Stop the Service next to the service status
- After that try to run the Windows 10 upgrade assistant and this time it will work.
- And upgrade to 22H2 update smoothly without any stuck.
Run the Windows Update troubleshooter
Another option is to use the built-in Windows Update troubleshooter to fix any issues that might prevent the upgrade from completing.
- Go to Settings > Update & Security > Troubleshoot.
- Click on Additional troubleshooters.
- Select Windows Update and click on Run the troubleshooter.
- Follow the on-screen instructions to detect and fix any problems with Windows Update.
- Restart your computer and try the upgrade again.
Disable or uninstall antivirus software
Sometimes, your antivirus software might interfere with the upgrade process and cause it to get stuck at 99%. Some users also suggest security software blocks the upgrade process and disable Third-party Antivirus / Anti-malware applications help them to fix the issue.
You can try disabling or uninstalling your antivirus software temporarily before running the upgrade assistant. Make sure you re-enable or reinstall your antivirus software after the upgrade is done to protect your computer from viruses and malware.
Perform a clean boot
A clean boot is a way of starting your computer with only the essential services and programs running. This can help eliminate any conflicts or errors that might occur due to third-party software or drivers. To perform a clean boot, follow these steps:
- Press Windows key + R type msconfig and click OK.
- Go to the Services tab and check the box that says Hide all Microsoft services.
- Click on Disable all to disable all non-Microsoft services.
- Go to the Startup tab and click on Open Task Manager.
- Disable all startup items by right-clicking on them and choosing Disable.
- Close Task Manager and click OK on the System Configuration window.
- Restart your computer and run the upgrade assistant again.
Delete Windows Update Cache
Also if Windows update download files get damaged or corrupted, you may face different update / Upgrade download and installation problems. That causes we need to clear the Windows update cache on the Software Distribution folder (Where Windows update stores update files temporarily)
For this process first, we need to stop some Windows update-related services.
- Open the command prompt as administrator,
- Then type the below commands to stop BITS, Windows Update, Cryptographic, and MSI Installer services.
- Don’t forget to press Enter after each of them:
net stop bits
net stop wuauserv
net stop appidsvc
net stop cryptsvc
- Now minimize the command prompt window then go to the following folder: C:\Windows.
- Here look for the folder named SoftwareDistribution, then copy it and paste it on your desktop for backup purposes.
- Again navigate to C:\Windows\SoftwareDistribution\ and delete everything inside that folder.
Note: Don’t delete the folder itself.
Finally, restart BITS, Windows Update, Cryptographic, MSI Installer services by entering the following commands each followed by Enter:
net start bits
net start wuauserv
net start appidsvc
net start cryptsvc
That’s all reboot your PC for a fresh start and run Windows Upgrade Assistant again, this time, it might work.
Upgrade using the Media Creation Tool
If still, Windows upgrade Assistant is stuck At Any point while an upgrade to the latest Windows 10 version. Then Download the Media Creation Tool To make the Windows upgrade process smoother and error-free.
- After downloading the media creation tool, Double-click on the setup file to launch the tool.
- First Click Accept to agree to the terms and conditions.
- Next, select the Upgrade this PC now option and click Next.
- And follow on-screen instructions,
- The Windows 10 setup will take over and install the November 2021 Update on your PC
- The installation shouldn’t take longer than 30 minutes, but it’ll depend on your hardware configuration, internet speeds, and other factors.
Windows 10 22H2 ISO
If all the above method fails to upgrade to Windows 10 latest version, the Upgrade assistant is stuck at 99%, Media creation tool fails to upgrade to Windows 10 update, then the simple and easy method Use a Windows 10 ISO file.
This method is designed to guide users to perform a clean install of Windows 10 and get everything upgraded in PC so to fix the Windows 10 upgrade assistant update stuck or fail to install error.
- Windows 10 22H2 64 bit
- Windows 10 22H2 32 bit
First Backup All important Data and files to an external Device Drive. Download the Official Windows ISO file 32-bit or 64-bit as per your system processor support. Also, disable Any Security software such as Antivirus / Anti-malware applications if installed.
-
- Open the ISO file by double-clicking on it. (You will have to use software like WinRAR to open/extract the ISO file on Windows 7)
- Double-click setup.
- Get important updates: Select Download and install updates and click Next. You can also skip this by selecting Not Right Now and get the Cumulative Update later in step 10 below.
- Checking your PC. This will take some time. If it asks for Product Key in this step, that means your current Windows is not activated.
- Applicable notices and license terms: Click Accept.
- Make sure you’re ready to install: This might take a bit longer. Just be patient and wait.
- Choose what to keep: Select Keep personal files and apps and click Next If it is already selected by default, just click Next.
- <>Ready to install: Click Install.
- Installing Windows 10. Your PC will restart several times. This might take a while.
- After Windows 10 is installed, open Settings > Update & Security > Windows Update and click on Check for updates. Install all the updates. This includes updates for Windows 10 and drivers.
Earlier days Microsoft used to have different Windows versions and update to the next version when the earlier version is outdated. There are service packs for updating security and stability of the version. Now that Microsoft moved to releases like Apple, keeping Windows 10 as a product version and releasing updates seasonally. Generally all these releases will upgrade your Windows 10 automatically. Sometimes Windows 10 product upgrades may cause different kinds of issues and affect your PC. In this guide, we will help you with best practices in fixing the number of issues while upgrading Windows 10.
Related: 11 ways to secure your Windows 10 PC.
Fix Windows 10 Upgrade Errors
Following are the errors which can arise while updating your Windows 10.
- Common upgrade error codes
- Disable antivirus
- Disable other product updates
- Check failure status
- Connect power source to your PC
- Make sufficient storage space
- Check compatibility issues
- Disable auto update
1. Fixing Common Errors Codes
You may see these common errors – 0x8024200B, 0x80070422, 0x80070020, 0x80073712, 0x800705B4, 0x80004005, 0x8024402F, 0x80070002, 0x80070643, 0x80070003.
To fix them:
- Go to Windows update troubleshooter page and download the Windows 10 troubleshooter.
- Run it from the saved location in your PC and click on the ’Windows Update’ option.
- Click on ‘Next’ button and it will start detecting problems.

Windows Update Troubleshooting
- If no issues were there then click on ‘Try troubleshooting as an administrator’ then repeat the same steps again.

Trying As Administrator For Troubleshooting
- If the problem is found then it will ask you to fix it. Simply go further for fixing it.
2. Disable Antivirus
If troubleshooting does not fix your problem then try disabling any third party antivirus software installed in your PC. Sometimes the antivirus could stop the upgrade and terminate the process. Some of the antivirus software like Avast offers to disable the program for certain time.

Disabling Antivirus
After disabling your antivurs, start upgrading Windows again. In most of the cases, this usually fixes the issues.
3. Disable Other Product Updates
- Go to ‘Settings > Update & Security > Windows Update’. Click on ‘Advanced options’. Turn ‘Off’ the option ‘Give me updates for other Microsoft products when I Update Windows’.

Disabling Update Option
If still, you are getting the error then follow the instructions for DISM or the system update readiness tool.
4. Check Failure Status
When you upgrade to Windows 10, there can be many errors like below depending upon the system status.
- Failure configuring Windows updates. Reverting changes
- We couldn’t complete the updates. Undoing changes. Don’t turn off your computer
Such errors are generic errors and can occur anytime during the upgrade. To find more errors status in Windows:
- Follow this path ‘Settings > Update & Security > Windows Update’.
- Click on ‘View update history’ link.
- Double-click on the ‘Failed’ update status and check the error details of it.
Some specific errors could give you a clue about what had happened and you can focus on resolving that.
Related: Boot Windows 10 computer in safe mode.
5. Connect PC with Power Source
The error code 0x80200056 indicates that the process of upgrading Windows had stopped accidentally by the user. You might have accidentally restarted or signed out the computer. There might be battery problems also. To fix this issue:
- First of all, plug-in the power source with your computer.
- Try upgrading again, the upgrade will work this time.
6. Make Storage Space for Windows 10
Always ensure to have sufficient space on your hard disk for the system operations like upgrade. Otherwise you will see different types of errors due to insufficient storage. Errors like 0x800F0922 – System reserved partition, 0x80070070 – 0x50011, 0x50012, 0x60000 can also occur due to storage insufficiency.
For error 0x800F0922, you need to make space in your reserved partition:
- Use ‘Disk Management’ utility to allocate sufficient space.
- If you have any third-party tool to extend this partition then go for it.
- If not, then use the AOMEI partition assistant (https://www.disk-partition.com/tutorials/windows7-add-unallocated-space-to-system-partition.html) to increase the space.
For the remaining errors, you have to increase the space on your drive:
- Try deleting your unwanted files from the PC.
- Don’t forget to empty recycle bin.
Empty Recycle Bin
- Use ‘Disk Cleanup’ tool, double-click on ‘This PC’ from desktop to open it.
- Right-click on the drive, choose ‘Properties’ and click on ‘Disk Cleanup’ button.
- Click on ‘Clean up system files’ and select all the options in ‘Files to delete’ block.

Disk Cleanup Process
- Press ‘Ok’ and delete them.
Related: Fix hard disk errors in PC.
7. Compatibility Issues
There can be some compatibility issues like specific drivers are not compatible, requirements do not meet, some app is blocking the process.
Errors like 0x800F0923 (Drivers incompatibility), 0xC1900200, 0xC1900202 – 0x20008, 0xC1900208 – 0x4000C can be due to incompatibility.
For error 0x800F0923:
- Download and install Windows 10 upgrade assistant.
- From the left-side hamburger menu, under ‘Getting the upgrade’, click on ‘Check your PC’. It will start looking for the issues and the drivers which are not compatible.

Get Windows 10 Check Your PC Option
- Now, check the new and the latest driver support from the manufacturer’s website.
- Try upgrading the Windows again, it should be working.
For the remaining errors:
- Open the ‘Control Panel’, click on ‘Uninstall a program’ under ‘Programs’.
- Remove the application which is blocking the process by double-clicking on it. If there is any other application which you find malicious then remove that too.
8. Disable Auto Update
Some people like automatically upgrading to the latest releases. But we recommend to wait sometime before updating your operating system. This will help to get sufficient feedback from others and identify any major problems or changes.
- Press ‘Win + R’ and open ‘services.msc’.
- Look for ‘Windows Update’ service and double click on it to open it’s properties.
- Against ‘Startup type’ select ‘Manual’ or ‘Disabled’ option.
Remember, manual or automatic, you should upgrade to the latest version to keep your system safe.
Conclusion
We hope the above explained methods helped you to resolve the upgrade related errors. If your PC got struck with upgrade error which you can’t resolve probably you should check with your support company help.
Fix Windows 10 upgrade assistant stuck at 99%: The Windows 10 Anniversary Update is finally ready for download and millions of people simultaneously downloading this update is obviously going to create some problems. One such problem is Windows 10 Upgrade Assistant stuck at 99% while downloading the update, without wasting time let’s see how to fix this issue.

Table of Contents
Method 1: Disable Windows 10 update manually
Note: Make sure the upgrade assistant is running
1.Type services.msc in the Windows search bar, then right click and select run as administrator.
2.Now locate Windows update services in the list and right-click on it, then select stop.
3.Again right click and select Properties.
4.Now set the startup type to Manual.

5.Close services.msc after verifying that the update services has stopped.
6.Again try to run Windows 10 upgrade assistant and this time it will work.
Method 2: Delete Windows Update Cache
1.Restart Windows 10 if you are stuck at the Windows 10 anniversary update.
2.Right Click on Windows button and select Command Promot (Admin).
3.Now type the following in the cmd and press enter after each one:
net stop bits
net stop wuauserv

4.Exit Command Prompt and go the following folder: C:\Windows\
5.Search for the folder SoftwareDistribution, then copy it and paste it on your desktop for backup purpose.
6.Navigate to C:\Windows\SoftwareDistribution\ and delete everything inside that folder.
Note: Don’t delete the folder itself.

7.Finally, reboot your PC and see if you’re able to Fix Windows 10 upgrade assistant stuck at 99% issue.
Method 3: Updating using the Media Creation Tool
1.Download the Media Creation Tool from here.
2.Double-click on the setup file to launch the tool.
3.Follow on screen instruction until you get to Windows 10 Setup.
4.Select Upgrade this PC now and click Next.

5.When the download is finished, click Accept to agree to terms and conditions.
6.Make sure you have selected Keep personal files and apps in the installer which is selected by default.
7.If not then click on “Change what to keep” link in the setup to change the settings.
8.Click Install to begin the Windows 10 anniversary update.
Method 4: Fix Windows 10 Upgrade Assistant is stuck at 99% [New Method]
1.Press Windows Key + E to open File Explorer then type C:\$GetCurrent in the address bar of File Explorer and hit Enter.
2.Next, click on View then click on Options from File Explorer. Switch to View tab and checkmark “Show hidden files, folders, or drivers“.
3.Click Apply followed by Ok.
4.Now Copy and paste the Media folder from C:\$GetCurrent to desktop.
5.Reboot your PC, then open File Explorer and navigate to C:\$GetCurrent.
6.Next, copy and paste the Media folder from the desktop to C:\$GetCurrent.
7.Open the Media folder and double-click on setup file.
8.On “Get important updates” screen, select Not right now and then click on Next.

9.Follow the on-screen instructions to complete the setup. Once finished, press Windows Key + I to open Settings then navigate to Update & security > Windows Update > Check for updates.

Recommended for you:
- System icons do not appear when you start Windows 10
- Fix This site can’t be reached error in Gooogle Chrome
- Fix System Thread Exception Not Handled Error Windows 10
- How to fix Automatic Repair couldn’t repair your PC
If above doesn’t work for you then again go to services.msc and right click on it to disable it. Restart your PC and make sure Windows update is disable then again try to run the Windows 10 upgrade assistant or better use Media Creation Tool.
That’s it you have successfully Fix Windows 10 upgrade assistant stuck at 99% issue but if you still have any question regarding this post feel free to ask them in comments. Share this post to help your family and friends if they are still facing this issue.
Contrary to popular belief, luck has nothing to do with the preference for Windows 10 upgrades. Users who get the updates before the general population avoid OTA and stick with the Upgrade Assistant.
This tool is excellent for installing major updates just after the release. However, some of those users seem unable to upgrade their system with the Upgrade Assistant as there’s a reoccurring error that prevents them from finalizing the installation process.
What causes Windows 10 Update Assistant failed error?
When Windows needs more than one update, you will get the update failed error. This is a prevalent reason for Update Assistant issues. When this occurs, restarting the device and attempting the update again will result in a successful installation.
Suppose your personal computer does not have sufficient free space on its hard drive to perform a Windows 10 update successfully. In that case, the update will be terminated, and Windows will indicate that the update was unsuccessful.
In most cases, making some more room will solve the problem. Moreover, restart the update process once you have disconnected all of your external devices, such as printers and USB hubs.
Our readers reported a plethora of similar issues that we will address below. Some of them are the following:
- Windows 10 upgrade failed no error code – Before trying the update, make sure that your antivirus software is disabled or, better yet, uninstalled.
- Windows 10 Update Assistant error code 0x80072F8F – Incorrect date, time, or timezone settings on the computer are often the culprits behind the appearance of error code 0x80072F8F.
- Error code 0x80072ee7 Windows 10 Update assistant – There is a possibility that improper TCP/IPv4 settings led to the occurrence of error 0x80072EE7.
- Windows 10 Update Assistant not updating – We recommend that you attempt to repair the difficulties with Windows Updates by running the Windows Update Troubleshooter.
- Windows 10 Update Assistant keeps failing – Remove the Windows Update Assistant from your computer and then wait to be requested to reinstall it.
- Error code 0xc19001e2 Windows 10 Update Assistant – However, there have been reports of it causing problems with the installation of certain Windows Updates.
- Windows 10 Update Assistant error can’t find the necessary file – Turn off any additional security software you may have installed.
- Windows 10 Update Assistant error code 0x8000ffff – This problem often occurs after Windows has been updated, at which point the Windows Store becomes inaccessible.
If you find your error in the list above, you are lucky! With our solutions below, you can say goodbye to Update errors in Windows 10.
Does Windows 10 Upgrade Assistant still work?
Your device will have feature updates downloaded and installed automatically by the Windows 10 Update Assistant.
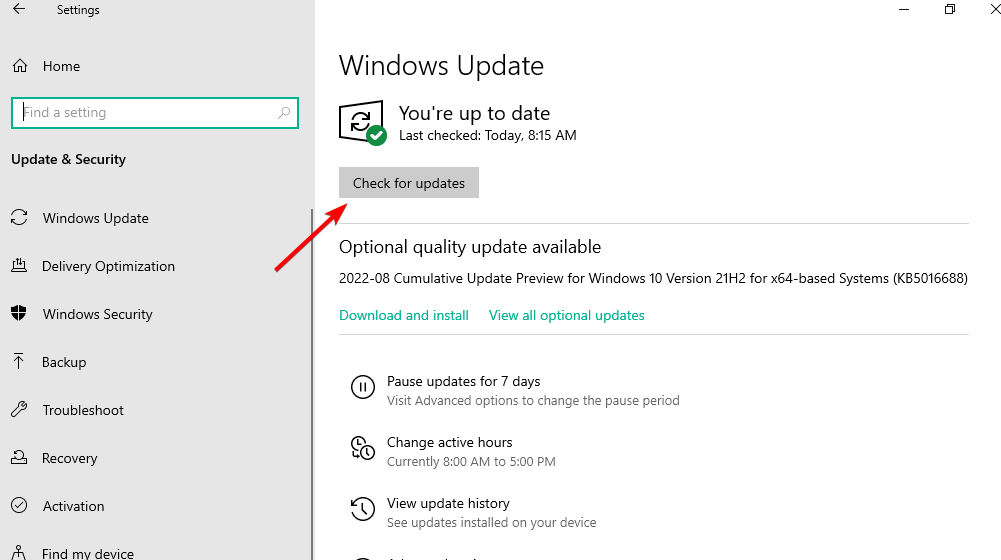
However, you may manually upgrade Windows 10 if you don’t want to wait for an automatic update or if you want to check for quality updates (which are released more often and include minor bug fixes and security patches).
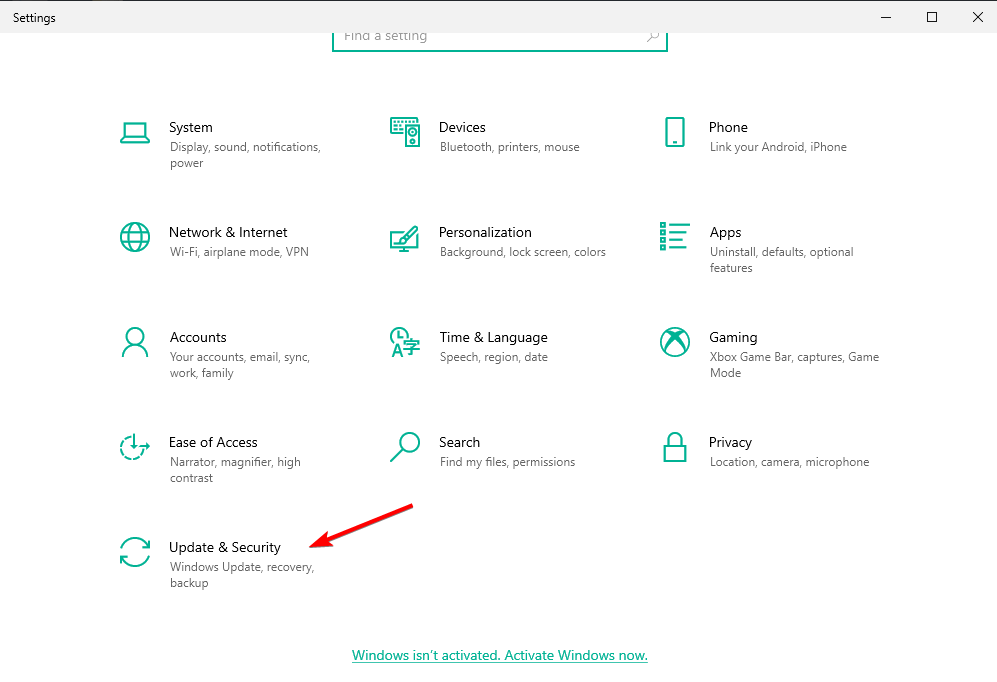
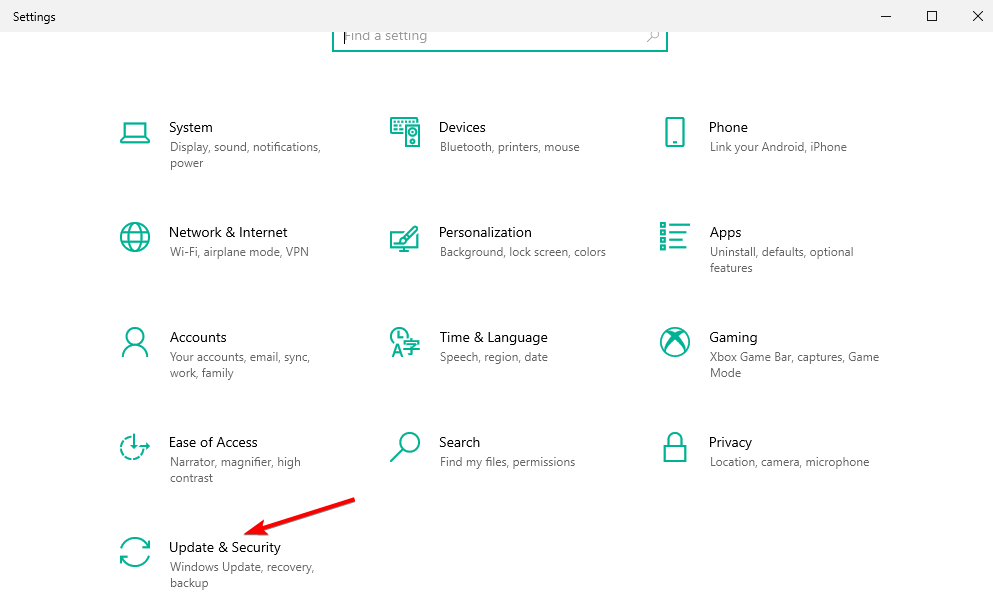
- Press Windows + I, then go to Update & Security.

- Next, click the Check for updates button to find new updates and install them manually. Then, the Windows 10 Upgrade Assistant error will be solved.

Let’s see how you can fix the Upgrade Assistant errors in Windows 10 and get back to using the latest features. Follow along!
How can I fix Upgrade Assistant errors in Windows 10?
1. Make sure you meet the requirements
Firstly, let’s start with the important reminder. We mainly refer to storage space when we say to meet the requirements. This is because you’ll need at least 16 GB of free space to install a major update.
In addition, we encourage you to double-check the drivers and uninstall third-party applications. This isn’t needed by default, but there are reports about third-party programs causing update issues.
Once you’ve done that, restart the update/upgrade process and look for changes. If the error is persistent, move on to the next step on the list.
2. Run the Update troubleshooter
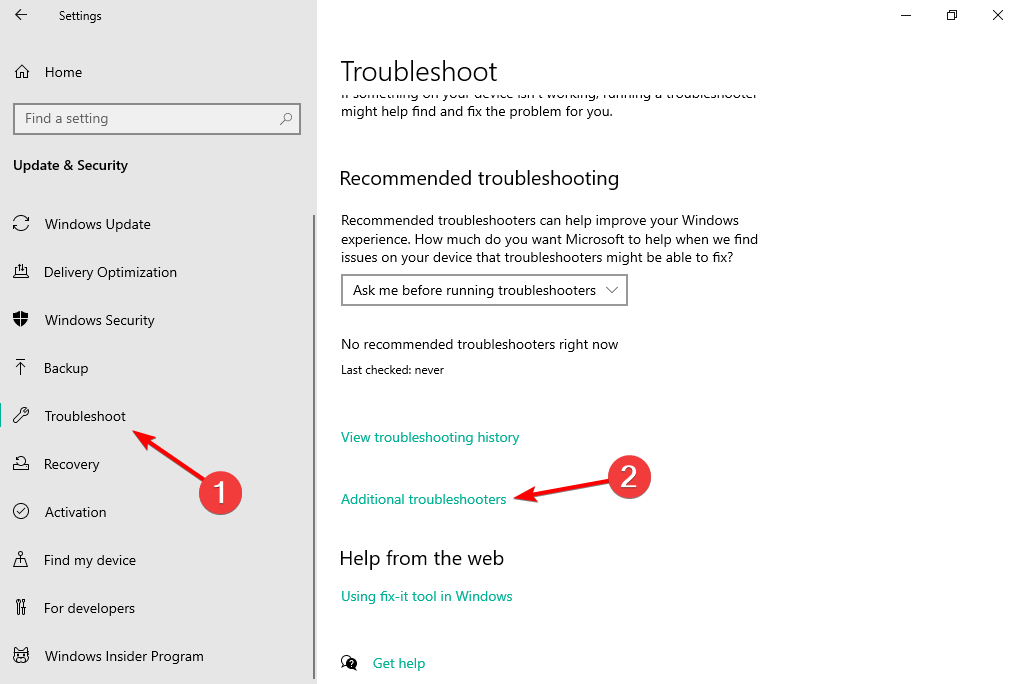
- Access the Settings app by pressing Windows +, then navigate to the Update & Security section.

- Select Troubleshoot from the left menu, followed by Additional troubleshooters on the right side.

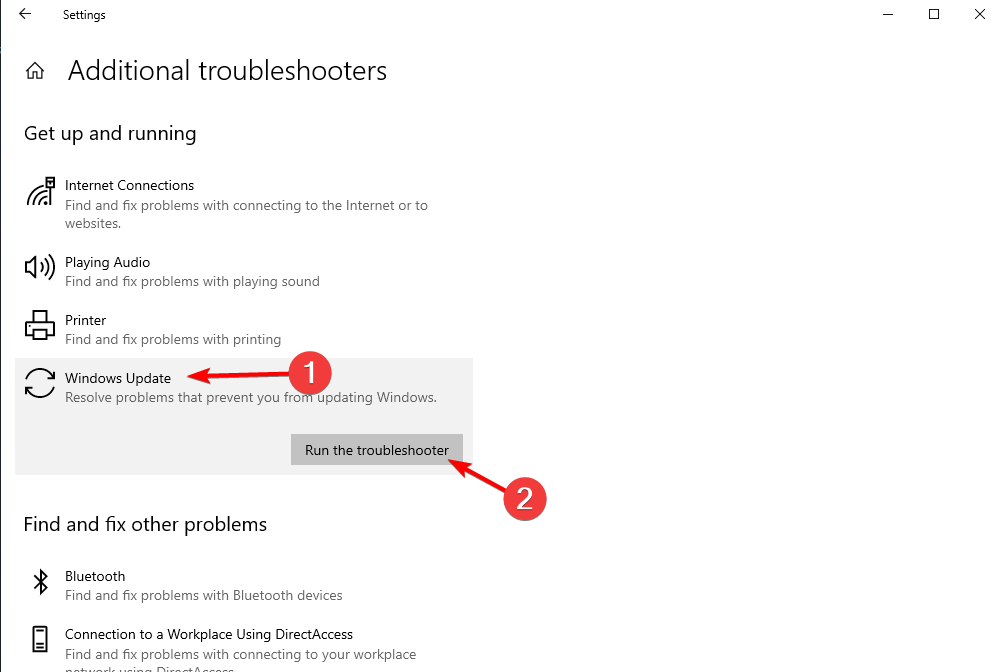
- Click the Windows Update troubleshooter to expand it and hit Run the troubleshooter.

- Follow the on-screen steps to run it and find out what went wrong with your update. The Windows 10 Upgrade Assistant error will be fixed.
Windows 10 comes with a built-in troubleshooter for all system-related features. That includes the Windows Update troubleshooter.
This is probably, the most used troubleshooter due to the sheer number of update issues. Ideally, it would find and fix the problem causing the Upgrade Assistant error.
3. Disable third-party antivirus and unplug the peripherals
We already mentioned the negative effect of third-party apps. The system should be able to upgrade without meddling with the installed software, but that doesn’t work every time.
The programs that are especially causing errors are third-party antivirus solutions, which integrate deep into the system core. That’s why we suggest uninstalling them.
You can also temporarily disable them until the upgrade is successfully installed. However, if your antivirus causes this error, you may think of switching to a different one.
Many Windows 10 compatible antivirus software packages are stable and won’t block your system updates or other processes or apps.
Furthermore, unplugging all external hardware, with the mouse being the only exception, maybe a workaround that can work for some users. Unfortunately, it seems there’s a stall leading to an error when the update fails to install the drivers for specific devices.
4. Use the Media Creation Tool
- Download the Media Creation Tool for Windows 10.
- Plug in a compatible USB flash drive with at least 6GB of free storage space.
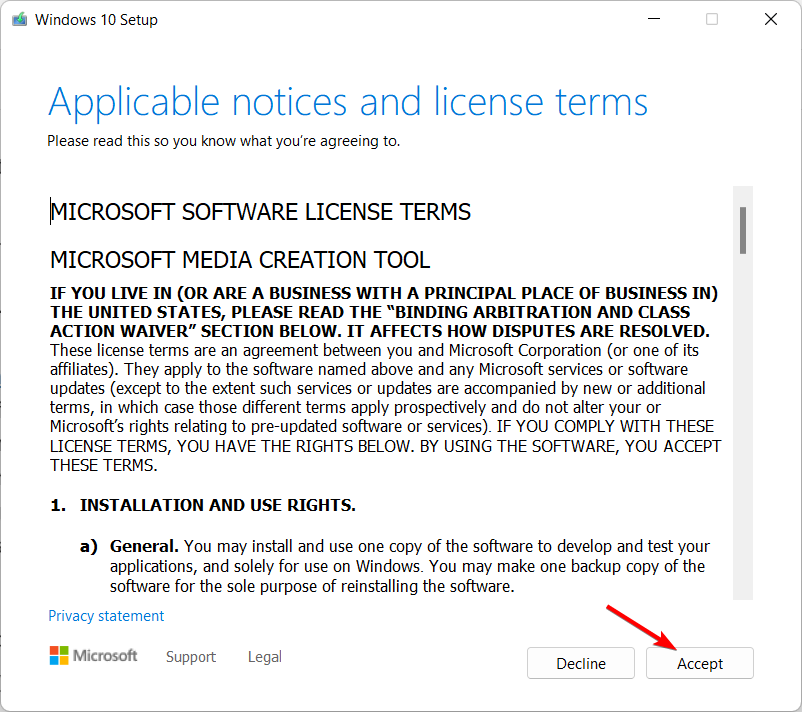
- Run the tool and accept the License Terms.

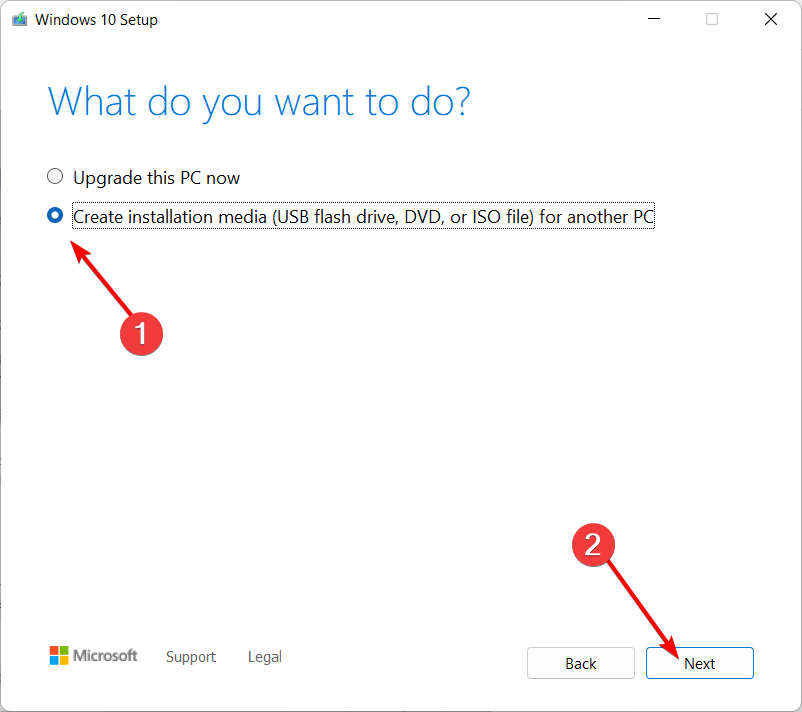
- Select Create installation media (USB flash drive, DVD, or ISO file) for another PC, then click Next.
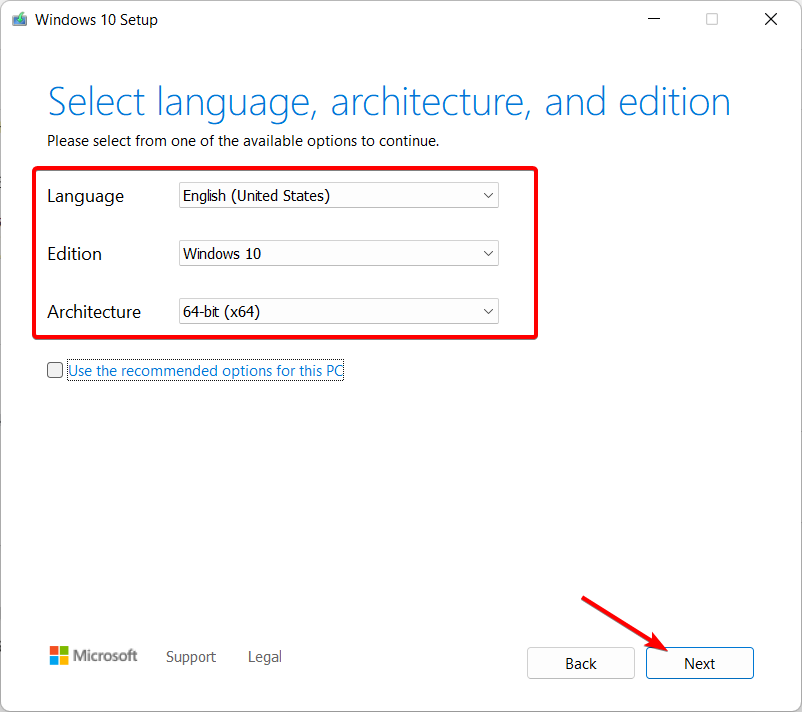
- Choose the preferred language, architecture, and edition, then click Next.
- Choose a USB flash drive and click Next.
- Wait until everything is done.
Now, there are multiple ways to install the same update. Besides the standard over-the-air update via the system and Upgrade Assistant, you also have Media Creation Tool for Windows 10 at your disposal.
This tool comes in handy when you need to create the installation media. However, you can also use it to download and install the update at hand.
Be it a small patch or a significant update. Download the Media Creation tool, accept the License Terms and click Update now.
In addition, if this fails, you can create the installation media and install updates from there. Success or failure, you’ll need the bootable Windows 10 drive for the final two steps either way.
Use the above steps to create the bootable media drive with ease.
5. Repair previous Windows 10 installation
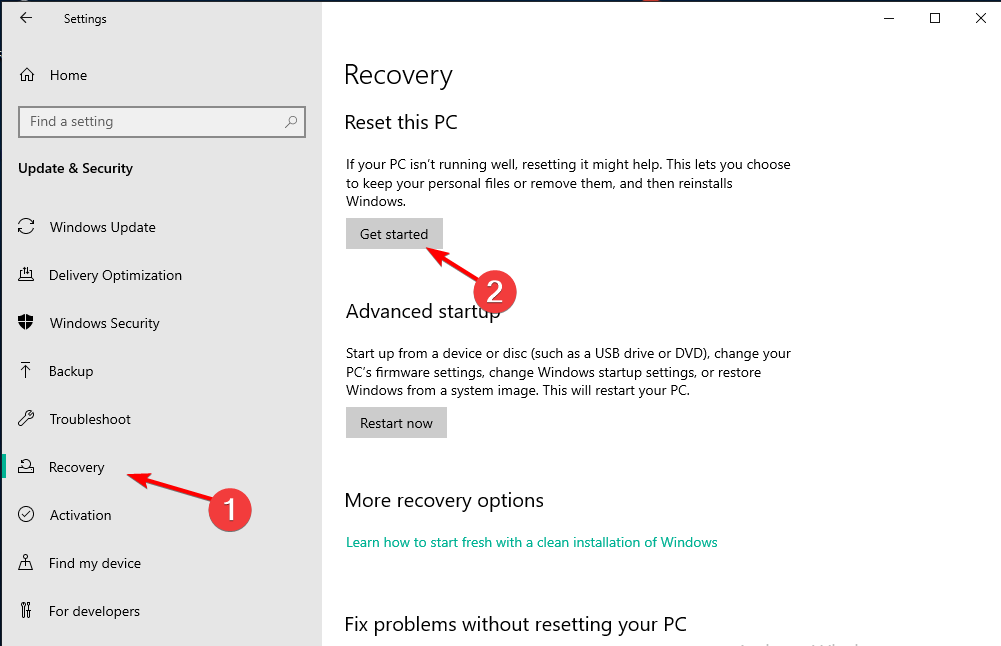
- Press the Windows key + I to open the Settings app, then go to Update & Security.
- Select the Recovery option from the left pane, then, under the Reset this PC section, click Get started.

- Choose the Keep my files option and continue with the procedure.
The most common critical reason for this is given by issues with the previous installation you made.
We suggest repairing the system installation, whether that was a failed major update or something else.
If you can access the system interface when the Upgrade Assistant error occurs, you should be able to reset your PC to factory values.
In addition, you can boot from the bootable USB drive and load the installation files. Then, click on Repair and repair the system instead of going for the clean install.
- Fix: Windows installation has failed on Windows 10/11
- Recent Windows 11 update lets you disable profanity filter in voice typing
6. Perform a clean reinstallation of Windows 10
In the end, if all of the previous steps fell short, the approach which remains is the clean reinstallation.
With the clean reinstallation, you should be able to start from scratch, and the updates will be automatically administered during the installation.
To find out how to do this, check out our post on how to get a clean install of Windows 10/11 without the refresh tool.
What do I do if a Windows Update failed to install?
If Windows cannot finish installing an update, you should check to ensure that you are correctly connected to the Internet and that your hard drive has adequate free space since these are the two most typical causes.
It would help if you also attempted to restart your computer, or you could check to see whether the Windows drivers were successfully installed.
But for more detailed, step-by-step solutions, look at our dedicated guide on fixing Windows Update fails in Windows 10 & 11.
That should do it. If you still have some questions or, perhaps, alternative solutions, it would be nice to share them in the comments section below.