
В этой статье мы рассмотрим, как удалить драйвера оборудования или принтеров в Windows 10 и 11. При подключении нового оборудования к компьютеру, Windows пытается автоматически найти, скачать (или обновить) подходящие драйвера через Windows Update. Со временем в каталоге
C:\Windows\System32\DriverStore
может накопиться большое количество драйверов, которые не используются.
Вы можете удалить драйвер из хранилища драйверов Windows несколькими способами.
Содержание:
- Удалить драйвер принтера в Windows
- Удалить драйвер из диспетчера устройства Windows
- Как удалить драйвер в Windows из командной строки?
Удалить драйвер принтера в Windows
Если вы удалили принтер из панели управления Windows, его драйвер все еще остается в системе. Чтобы полностью удалить драйвера печати в Windows:
- Откройте консоль управления печатью
printmanagement.msc
(если консоль отсутствует, установите ее из набора администрирования RSAT с помощью команды:
dism /Online /add-Capability /CapabilityName:Print.Management.Console~~~~0.0.1.0
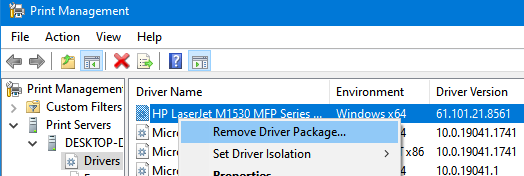
); - Перейдите в Print Manager -> Print Servers -> выберите ваш компьютер -> Drivers;
- Здесь будут перечислены все драйвера принтеров. Щелкните по драйверу, который вы хотите удалить и выберите Удалить пакет драйвера (Remove driver package);

Также вы можете удалить ненужные драйвера через свойства сервера печати. Для этого выполните команду
printui /s /t2
, выберите драйвер принтера, нажмите кнопку Remove и выберите Remove driver and driver package.
Удалить драйвер из диспетчера устройства Windows
Перед удалением любого драйвера нужно отсоединить устройства, которые могут его использовать. Затем:
- Запустите консоль диспетчера устройств (
devmgmt.msc
); - В разделе View включите опцию Show hidden device;
- Найдите в списке ваше устройства, щелкните по нему правой кнопкой и выберите Uninstall device;
Если для устройства отсустствует драйвер, оно отображается в диспетчере оборудования с желтым восклицательным знаком. Вы можете найти драйвер для неизвестного устройства в Windows по этому инструкции.
- Чтобы удалить и оборудование и драйвер из хранидища драйверов, отметьте опцию Delete the driver software for this device и нажмите Uninstall.
Как удалить драйвер в Windows из командной строки?
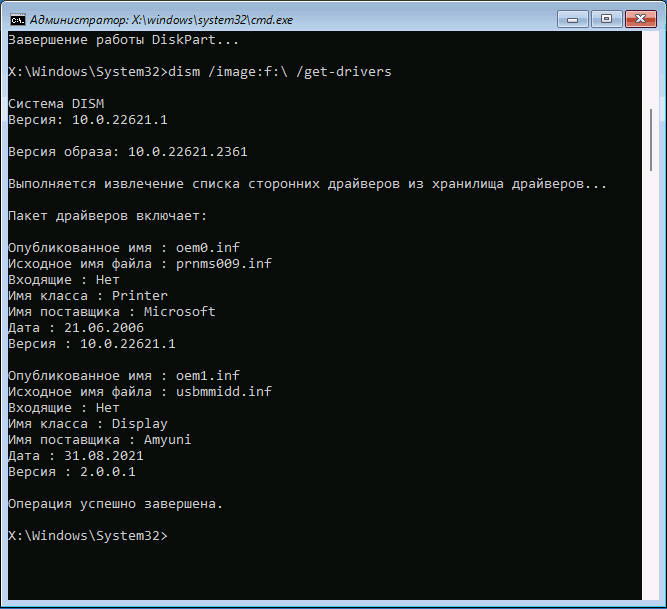
Чтобы вывести список сторонних драйверов, установленных в Windows, выполните команду:
pnputil /enum-drivers
или
dism /online /get-drivers /format:table
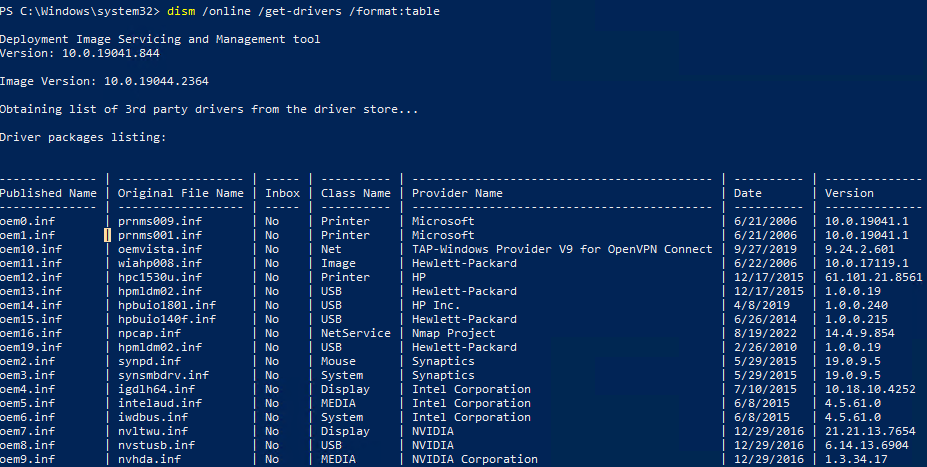
В результатах программы видны как имя INF файда драйвера, под которым драйвер установлен в хранилище драйверов (Published name в формате
oem#.inf
) так и оригинальное имя файла (Original File Name).
Найдите в списке нужный драйвер и запомните имя файла (в формате oem#.inf ). Чтобы удалить драйвер из командной строки, выполните:
pnputil /delete-driver <Published Name> /uninstall /force
Например:
pnputil /delete-driver oem15.inf /uninstall /force
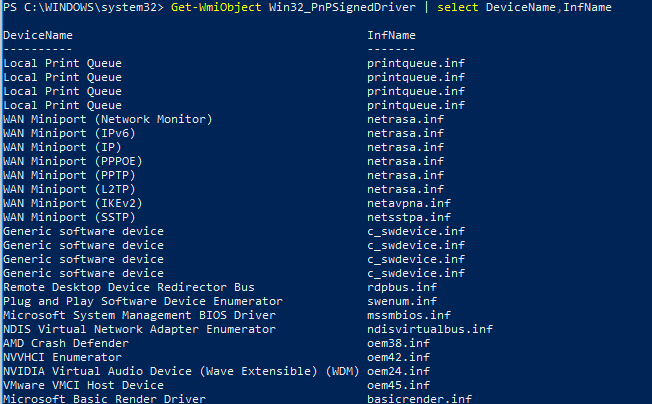
Вывести полный список установленных драйверов (включая системные) можно с помощью PowerShell:
Get-WmiObject Win32_PnPSignedDriver | select DeviceName,InfName|
Если драйвер не удаляется в Windows в онлайн режиме, вы можете попробовать удалить его из офлайн образа Windows.
Загрузите Windows в среде восстановления или WinPE. Выведите список драйверов в офлайн образе:
DISM /Image:C:\ /Get-Drivers
Где
C:\
— буква раздела с Windows.
Чтобы удалить драйвер из образа, выполните:
DISM /Image:C:\ /remove-driver /driver:oem11.inf
Нужно использовать для удаления драйвера именно DISM. При попытке удалить драйвер в офлайн образе Windows из среды WinPE с помощью PnpUtil.exe, появится ошибка:
Failed to delete driver package: The specified file is not an installed OEM INF.
Или укажите путь к INF файлу:
DISM /Image:C:\ /Remove-Driver /Driver:<полный_путь_к_inf-файлу>
Как удалить драйвер в командной строке
Удаление драйверов Windows возможно не только в диспетчере устройств или с помощью специальных утилит, но и в командной строке. Зачем это может пригодиться? Например, при невозможности зайти в систему из-за проблем с драйвером, возможность его удаления с помощью команд в среде восстановления может быть полезной.
В этой инструкции подробно о том, как удалить драйвер в командной строке Windows 11, Windows 10 и других версиях системы. Сначала методы для работающей ОС, затем — для случая, когда нужно выполнить удаление без входа в систему.
Удаление драйверов с помощью командной строки в запущенной Windows
Если вход в Windows 11/10 возможен, базовым способом для удаления драйверов в командной строке будет использование утилиты pnputil. Необходимые шаги:
- Запустите командную строку от имени администратора.
- Введите команду
pnputil /enum-drivers
для получения списка драйверов и их опубликованных имен.
- Для удаления определенного драйвера используйте следующую команду, заменив номер на соответствующий номер из значения «Опубликованное имя» нужного драйвера:
pnputil.exe /delete-driver oemНОМЕР.inf /force


В результате вы должны будете увидеть сообщение «Пакет драйвера успешно удален».
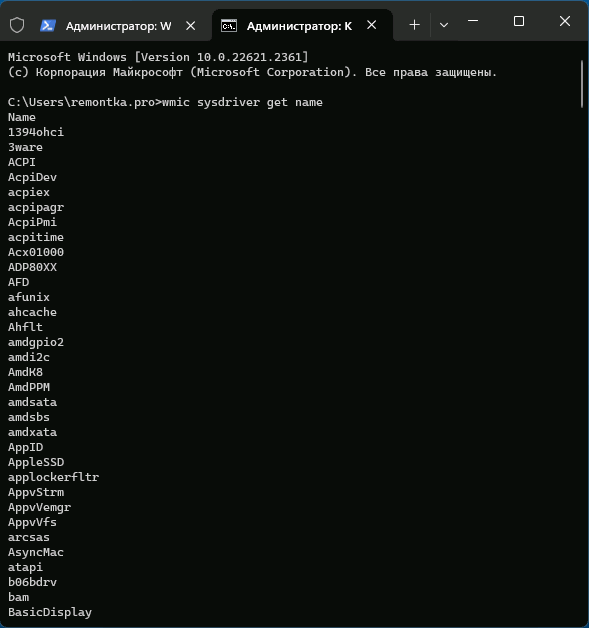
Описанный выше метод работает только для сторонних драйверов, установленных вручную или из Центра обновлений Windows, однако системные драйвера в списке отображаться не будут. Если задача — удаление системных драйверов, шаги будут следующими:
- Запустите командную строку от имени администратора.
- Введите команду
wmic sysdriver get name

- Предыдущая команда отобразит список имен системных драйверов. Для удаления драйвера по имени используйте команду:
wmic sysdriver where(name="имя") delete


Удаление драйвера в среде восстановления, WinPE или с загрузочной флешки
Предыдущие способы сработают лишь в том случае, если Windows исправно запускается и её использование возможно.
Если это не так, например, вместо загрузки вы видите синий экран с ошибкой, есть возможность использовать команды DISM для удаления драйверов в командной строке в среде восстановления, с загрузочной флешки (в программе установки Windows достаточно нажать клавиши Shift+F10 чтобы открыть командную строку) или загрузившись в WinPE.
- В командной строке введите
dism /image:c:\ /get-drivers

это отобразит список установленных пакетов драйверов.
- Если предыдущая команда отобразит сообщение «Не удалось получить доступ к образу», возможно, буква диска с системой отличается от C: (такое может быть в среде восстановления). В этом случае используйте команды
diskpart
list volume
exit
чтобы определить актуальную букву системного раздела диска и использовать её в команде.

- В списке установленных драйверов будет отображаться опубликованное имя, класс устройства, поставщик драйвера. Если этого окажется недостаточно, чтобы определить, какой драйвер нужно удалить, вы можете использовать команду получения подробной информации о драйвере:
dism /image:c:\ /get-driverinfo /driver:oemНОМЕР.inf
заменив номер на номер опубликованного имени драйвера и букву диска, если это необходимо.
- Для удаления драйвера введите команду (если нужно, изменив букву системного раздела диска):
dism /image:c:\ /remove-driver /driver:oemНОМЕР.inf


В результате соответствующий драйвер будет удален из системы.
Если у вас есть дополнительные вопросы, касающейся рассмотренной темы, вы можете задать их в комментариях ниже, я постараюсь помочь.
Jun. 23, 2022 / Updated by
Bessie Shaw to
Windows Driver Solutions
Want to uninstall Nvidia, AMD, or printer drivers from your computer? It’s easy to uninstall/remove old drivers and clean all the driver packages in Windows 10, Windows 8.1, Windows 8, Windows 7, Windows XP and Windows Vista. In this post, you will learn why it is important to uninstall a driver, top 3 methods on how to remove a driver and what to do after you uninstall the driver.
Part 1. Why You Need to Uninstall Drivers on Computer
Part 2. How to Uninstall Drivers in Windows OS – Top 3 Workable Methods
Part 3. What to Do after You Remove Drivers
Part 1. Why You Need to Uninstall a Driver on Laptop, Notebook or Desktop PC
Normally it’s not recommended to uninstall a driver that is working properly, because drivers are the must-have software to make Windows Operating System communicate with hardware and devices and ensure the hardware and devices work properly on your computer.
However, drivers can go wrong and they will even crash your entire computer. If you manually install an incorrect driver from the manufacturer’s website, your hardware or device will surely get issues. If the drivers on your computer are out-of-date, corrupted, damaged, broken, missing or incompatible, then yes, you will have lots of problems, such as no wifi, no internet connection, no Bluetooth, display driver stopped responding, black screen, no audio/sound, etc. This is not in the alarmist. When Microsoft’s Windows Vista came out in 2007, it’s slow and crashed a lot and this issue affected large amount of users. Finally Microsoft found that the crashes were mainly caused by driver issues.
If you find problematic drivers and they are causing issues and errors on your computer, uninstall the drivers. What’s more, it’s necessary to remove old drivers after updating to new hardware.
Part 2. How to Remove Drivers on Windows 10/8.1/8/7/XP/Vista – Top 3 Methods
It’s very easy to uninstall and remove a driver and all the driver related files on your computer. There are 3 best workable solutions: Driver Talent (professional driver removal utility and driver uninstaller), Uninstall Programs windows, and Device Manager. All work for laptops, notebooks, desktop PCs, including Asus, Acer, Dell, HP, Sony, Lenovo, Samsung, Toshiba, IBM, Alienware, Compaq, Gateway, LG, Microsoft, MSI, etc.
If you prefer one-click and also one-stop to uninstall drivers totally and clearly without residual files, try Method 1.
Method 1. Uninstall Drivers with Professional Driver Uninstaller Driver Talent
Uninstalling drivers totally and clearly without residual files is necessary. This helps to install new drivers successfully (If you try to uninstall driver files with residual driver package files left in the registry, it will cause issues for newly-installed drivers, such as the new drivers won’t work properly).
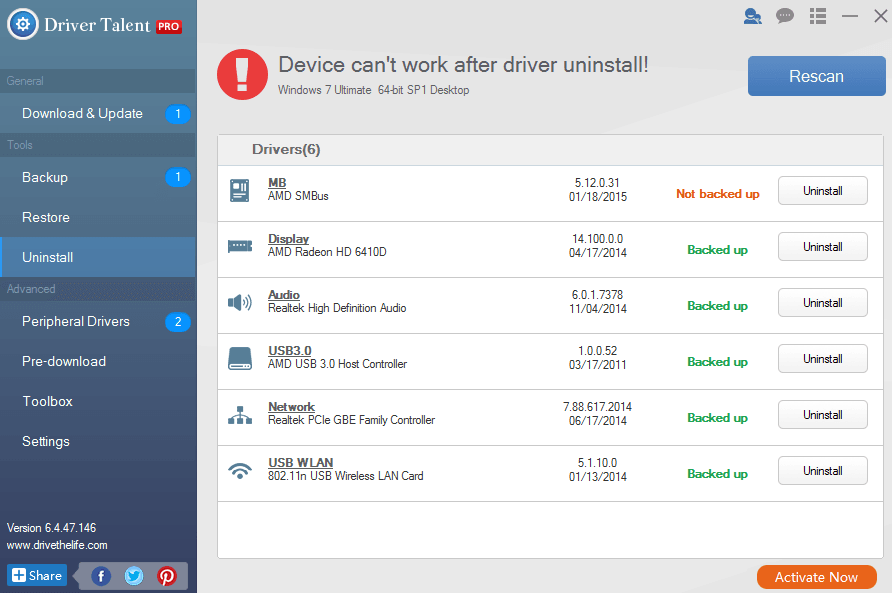
Driver Talent helps you to remove drivers and the driver packages clearly.
Free download and install Driver Talent on your computer in 64 bit or 32 bit Windows OS.
Download Now
Step 1. Launch Driver Talent and click “Tools” to enter the main interface.
Step 2. Click “Uninstall” on the left menu. This utility will help to scan and list all the drivers that you can uninstall. Select the ones you want to remove and click “Uninstall”.
Step 3. Restart your computer for changes to take effect.
Driver Talent can remove all drivers, including:
|
Windows 10 drivers |
Windows 8.1 drivers |
Windows 8 drivers |
|
Windows 7 drivers |
Windows XP drivers |
Windows Vista drivers |
|
Nvidia drivers |
Printer drivers |
ATI drivers |
|
AMD drivers |
Wireless drivers |
Display/Video/Graphics drivers |
|
Audio/Sound drivers |
USB drivers |
Mobile phone drivers |
|
Monitor drivers |
Bluetooth drivers |
WiFi drivers |
|
Network drivers |
Touchpad drivers |
Webcam drivers |
|
Keyboard drivers |
Motherboard drivers |
Mouse drivers |
|
Camera drivers |
Card reader drivers |
Gamepad drivers |
|
Camcorder drivers |
DVD/Media player drivers |
And more |
Method 2. Remove a Driver in the Uninstall Programs windows
If you’ve added the device and its driver to your system through an installer, say the graphics card driver, sound card driver, etc., you can remove the driver in the Uninstall Programs window. If the device doesn’t have an uninstaller, try Method 1.
Step 1. Go to the Uninstall Programs window. You can type “uninstall program” in the Start search box and to locate it. Alternatively, click “Start”, select “Control Panel” and “Programs and Features” (Windows 7 is the example).


Step 2. Find the device or drivers. Double-click the entry to uninstall the drivers and the components.
Method 3. Uninstall Drivers in the Device Manager
There is an “Uninstall” feature in the Device Manager. You can try it to uninstall the device and its driver. This, however, may not give you a clean slate to install new drivers. In this case, we recommend Driver Talent for help to completely remove the device driver.
Step 1. Go to the Device Manager. You can type “device manager” in the Start search box to locate it.

Step 2. Find the problematic device that contains the problematic driver. Double-click it to bring up the Properties window.
Step 3. Select the “Driver” tab and click “Uninstall”. In the little pop-up window, tick the “Delete the driver software for this device” Box and click “OK”

At this point, Windows will automatically remove and clean the current driver for the device.
Part 3. After You Uninstall Drivers – What to Do
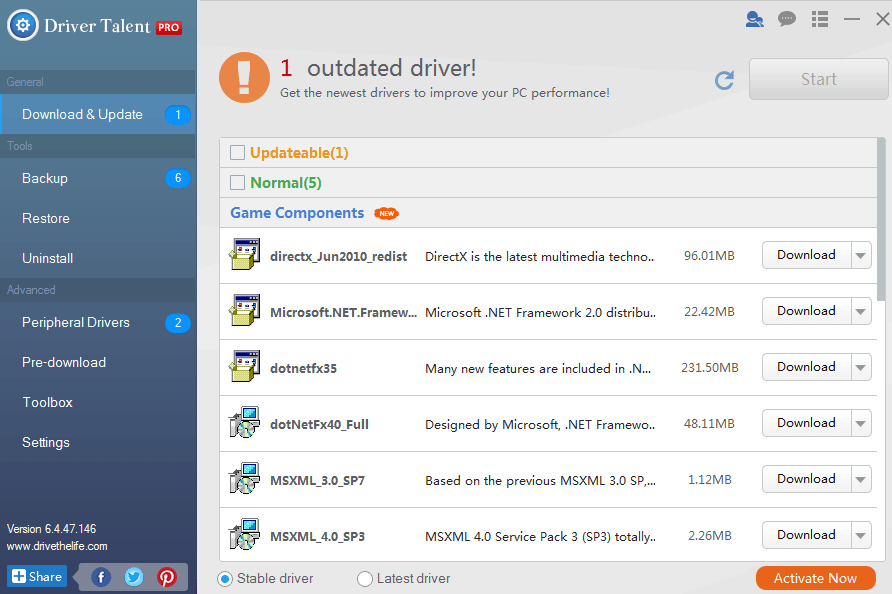
Once you uninstall the drivers, you break the middleman between your Windows OS and the related hardware and devices. It’s not a big deal at this point, because you will need to install the correct drivers to work properly on your computer. The correct drivers will fix all the issues. Try Driver Talent to download and install the best-matched drivers for your computer hardware and devices. This utility will instantly find the best compatible drivers and install them on your computer.
Download Now
Remember to restart your computer for changes to take effect.
Tags:
Recommended Download
|
ExplorerMax |
Driver Talent for Network Card | |||
| Smart and advanced file explorer tool for Windows platforms | Download & Install Network Drivers without Internet Connection | |||
|
30-day Free Trial |
Free Download |
If you need to uninstall drivers in Windows 10 but don’t know where to start, you’re in the right place. This tutorial walks you through the process step by step so your system can run smoothly again. It’s easier than you think!
First, we’ll dive into the steps for uninstalling drivers in Windows 10. This guide aims to help you remove outdated, unnecessary, or problematic drivers from your system. Ready to get started? Let’s go!
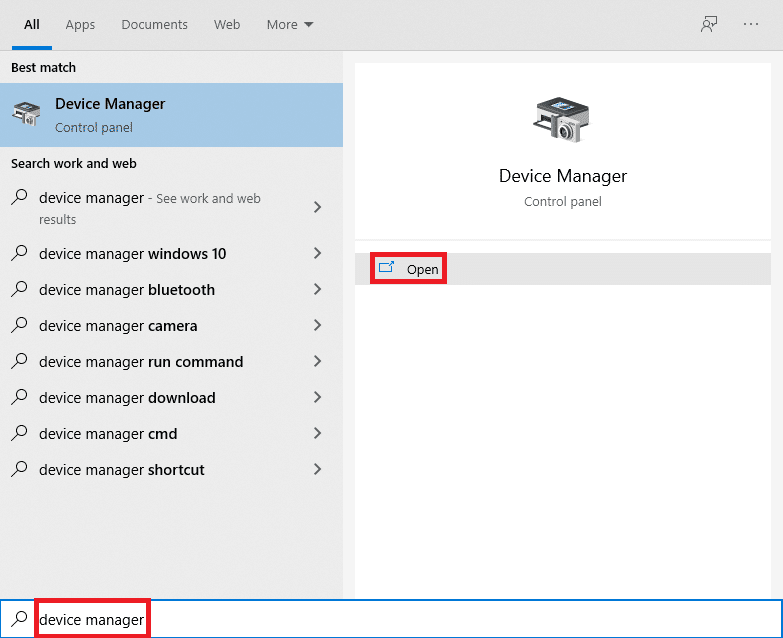
Step 1: Open Device Manager
To open Device Manager, press ‘Windows + X’ and select ‘Device Manager’ from the menu.
Device Manager is the hub for managing all your hardware devices and their drivers. You’ll find it useful for many tasks beyond just uninstalling drivers.
Step 2: Locate the Device
In Device Manager, find the device whose driver you want to uninstall. Right-click on it.
Devices are categorized, so if you’re looking for a network driver, check under ‘Network Adapters’. Expand the appropriate category to find your device.
Step 3: Choose “Uninstall Device”
Right-click on the device and select ‘Uninstall Device’ from the context menu.
When you choose ‘Uninstall Device’, a prompt will appear asking for confirmation. Make sure you’re uninstalling the correct driver!
Step 4: Confirm the Uninstall
In the pop-up window, check the box that says ‘Delete the driver software for this device’ and click ‘Uninstall’.
This step ensures that the driver files are removed from your system, preventing them from reinstalling automatically.
Step 5: Restart Your Computer
Restart your computer to complete the uninstallation process.
Restarting ensures that all changes take effect and any remnants of the driver are fully removed from your system.
After completing these steps, your computer will no longer use the uninstalled drivers. New devices or updated drivers can now be installed without conflicts.
Tips for Uninstalling Drivers in Windows 10
- Create a Restore Point: Before uninstalling any drivers, create a restore point. This way, you can revert back if something goes wrong.
- Verify Device: Double-check you’re uninstalling the correct driver to avoid accidentally removing essential components.
- Update Drivers: Sometimes, updating a problematic driver is a better solution than uninstalling it.
- Backup Drivers: Use driver backup software to save your drivers, so you can reinstall them if needed.
- Use Safe Mode: If a driver is causing system instability, boot into Safe Mode to uninstall it without additional conflicts.
Frequently Asked Questions
What happens if I uninstall a driver?
The device associated with that driver may stop functioning properly until a new driver is installed.
Can I reinstall a driver after uninstalling it?
Yes, you can download and install the latest version of the driver from the manufacturer’s website.
Will uninstalling a driver corrupt my system?
Generally, no. But it’s always good practice to create a restore point as a precaution.
How do I know which driver to uninstall?
If you’re troubleshooting, look for devices with a yellow exclamation mark in Device Manager. These often indicate driver issues.
Do I need internet access to reinstall a driver?
Not necessarily. You can use a backup of the driver or have the installation file on a USB drive. However, internet access is useful for downloading the latest drivers.
Summary
- Open Device Manager
- Locate the Device
- Choose “Uninstall Device”
- Confirm the Uninstall
- Restart Your Computer
Conclusion
Uninstalling drivers in Windows 10 is a straightforward process that can help resolve various hardware and performance issues. By following these steps, you can ensure your system remains in tip-top shape. Remember to take precautions like creating a restore point and backing up drivers to avoid any mishaps.
If you found this guide helpful, consider exploring more about maintaining your PC’s health. There are always new tips and tricks to learn, whether it’s dealing with software updates or optimizing performance.
Ready to dive deeper? Start exploring other aspects of Windows 10 management and keep your machine running smoothly. Happy troubleshooting!
Matt Jacobs has been working as an IT consultant for small businesses since receiving his Master’s degree in 2003. While he still does some consulting work, his primary focus now is on creating technology support content for SupportYourTech.com.
His work can be found on many websites and focuses on topics such as Microsoft Office, Apple devices, Android devices, Photoshop, and more.
Drivers are the main components needed for hardware to interact with the operating system in order to fulfill all tasks as intended. Many problems can arise due to a malfunctioning driver, which could leave you scratching your head. Thankfully, both Microsoft developers and computer manufacturers make sure to release regular driver updates to keep things working properly. Although, issues like corrupt, missing, or incompatible drivers crop up. Today, we will discuss the methods to reinstall drivers on Windows 10 including NVIDIA, AMD & Intel.

Table of Contents
The uninstallation and reinstallation of system drivers will delete the current driver installed in the system and replace it with the latest version. We have drafted the methods for three types of drivers: Graphics, Audio, and Network, with the explanation of the uninstall and reinstall method for each, one by one. Follow the correct method to reinstall drivers Windows 10 carefully.
Option I: Uninstall and Reinstall Graphics Driver
For a smooth and lag-free visual experience, you need to have the latest graphic driver installed on your system. To uninstall and reinstall drivers Windows 10, follow the upcoming steps:
1. Hit the Windows key, type device manager, and click on Open.
2. Click on the arrow next to Display adapters to expand it.
3. Right-click on the driver and select Uninstall device as depicted below.

3. A warning prompt will be displayed on the screen. Check the box marked Delete the driver software for this device and click Uninstall.

4 Visit the manufacturer website to manually download the driver as per system specifications. For example,
- Intel

- AMD

- or NVIDIA

5. Run the downloaded .exe file to install the drivers.
Also Read: How to Tell If Your Graphics Card is Dying
Option II: Uninstall and Reinstall Audio Driver
The audio driver is something that is needed almost every day no matter what you use your computer for; whether it is to stream movies on Netflix or to play your favorite games or to call your friends, family, or co-workers. The first step of this reinstall drivers NVIDIA method is uninstallation.
1. Launch Device Manager as earlier and expand the Sound, video and game controllers category as depicted below.

2. Right-click on the audio driver (e.g. NVIDIA Virtual Audio Device (Wave Extensible) (WDM) ) and select Uninstall device, as shown.

3. Now, check the box Delete the driver software for this device and confirm the warning prompt by clicking Uninstall.

4. Open any web browser and go to the NVIDIA homepage.
5. Here, click on DRIVERS from top menu, as shown.

5. Find and download the driver with relevance to the Windows version on your PC through, as illustrated below.
6. Once downloaded, double click on the downloaded file and follow the given instructions to install it.
Also Read: Fix Windows 10 No Audio Devices are Installed
Option III: Uninstall and Reinstall Network Driver
For the smoothest network connectivity on your system, reinstall drivers Windows 10 as follows:
1. Launch Device Manager from the Windows search menu.
2. Right-click on the driver and select Uninstall device as shown.

3. A warning prompt will be displayed on the screen. Check the box titled Delete the driver software for this device and confirm it by clicking Uninstall.

4. Visit the manufacturer website e.g. Intel.

5. Find and Download the drivers corresponding to the Windows version on your PC.
6. Once downloaded, double click on the downloaded file and follow the on-screen instructions to install it.
Recommended:
- How to Reset Windows 10 Without Losing Data
- How to Rollback Drivers on Windows 10
- How to Install Graphics Tool in Windows 11
- How to Fix The Audio Service is Not Running Windows 10
You learned how to uninstall and reinstall drivers on Windows 10/7. We hope you found this article useful. Keep visiting our page for more cool tips & tricks, and leave your comments below.