
(Image credit: Windows Central)
When you start a new installation of Windows 10, you must go through the Windows Setup, which is the experience that helps you to configure various settings, including language preferences, product key, and partition layout. After the installation, you also have to go through the out-of-box experience (OOBE), which you need to complete to configure settings like keyboard layout, account, and privacy settings.
Although the process is relatively easy for most people, you still have to spend the time controlling the installation and answering questions, which can take up a lot of time, especially if you need to complete multiple installations in your workplace.
If you want to automate the installation process (and save time in the process), you can create an answer file with instructions to complete every on-screen prompt, which you can integrate onto a bootable media. Then the Windows Setup can read to install Windows 10 automatically.
In this Windows 10 guide, we walk you through the steps to create an autounattend.xml answer file containing all the necessary settings to perform a basic unattended installation of the OS.
On Windows 10, you can use many ways to create and set up an answer file to automate the installation process. This guide outlines the instructions to configure a «.xml» file to perform an unattended installation of Windows 10 Pro 64-bit on a computer with a single drive using Unified Extensible Firmware Interface (UEFI) or Basic Input-Output System (BIOS).
After setting up the answer file, the process will erase everything on the drive, create and configure the necessary partitions, and install a fresh copy of Windows 10 with the most basic settings.
Warning: This is a friendly reminder that the installation process will completely erase the hard drive of your computer. If you have anything important on this device, it’s recommended to make a full backup of your PC before proceeding.
All the latest news, reviews, and guides for Windows and Xbox diehards.
- Requirements
- How to install Windows System Image Manager
- How to create Windows 10 answer file project
- How to create Windows 10 answer file
- How to save Windows 10 answer file project
- How to install Windows 10 with answer file
- How to troubleshoot problems with Windows 10 answer file
Requirements
This guide has quite a few steps, and you’ll need a few things to complete the project successfully:
- Windows Assessment and Development Kit (ADK).
- Windows 10 installation files.
- Windows 10 account with administrator privileges.
- USB flash drive with 8GB of space.
- Spare computer to test the installation.
How to install Windows System Image Manager
Anyone can write an answer file manually. Microsoft offers the Windows System Image Manager (SIM) console available through the Windows Assessment and Deployment Kit (ADK) to make it easier to create the file to install Windows 10 unattended.
To install the Windows System Image Manager, use these steps:
- Download the Windows ADK installer for Windows 10 version 2004.
- Double-click the adksetup.exe file to begin the installation.
- Select the Install the Windows Assessment and Deployment Kit — Windows 10 to this computer option.
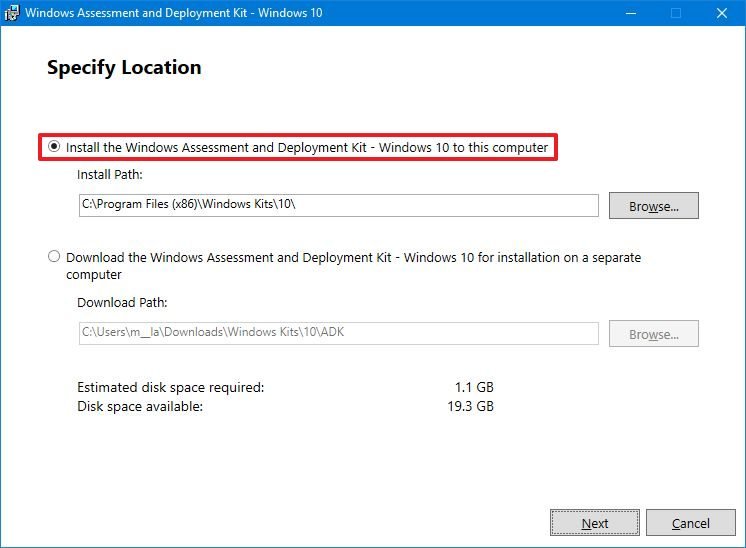
- Click the Next button.
- Select your privacy setting.
- Click the Next button.
- Click the Accept button to agree to the license agreement.
- Clear all preselected choices.
- Check only the Deployment Tools package to install the Windows System Image Manager components.
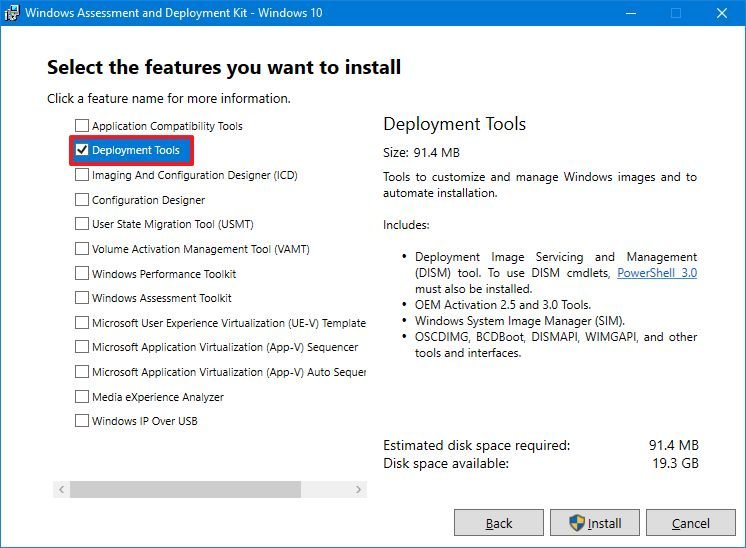
- Click the Install button.
- Click the Close button.
Once you complete the steps, you can use the console to create a «.xml» file with the answer to all the questions to automatically install Windows 10.
After the file is created, you can adjust the settings and reuse it for other installations, instead of having to use the Windows System Image Manager tool.
How to create Windows 10 answer file project
After installing the Windows System Image Manager console, you need to import the OS installation files onto your device, and set up the environment to create an answer file.
Import Windows 10 image files
To create an answer file, you need to open a Windows 10 image and create a catalog of all the components to automate the installation. However, to perform this task, you must first import the installation files onto your device.
To import the Windows 10 installation files, use these steps:
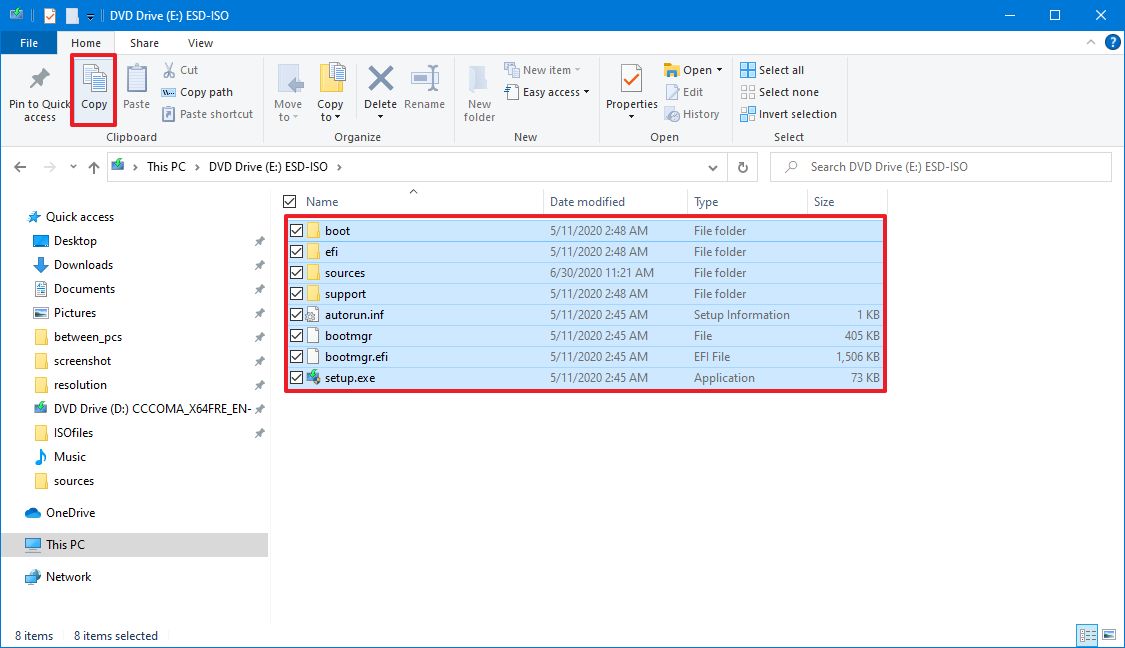
- Open File Explorer.
- Navigate to the Windows 10 ISO file location.Quick tip: Alternatively, you can also connect the USB flash drive with the installation files. If you don’t have the files below, you can find the steps to use Rufus to download the latest ISO for Windows 10.
- Right-click the ISO file and select the Mount option.
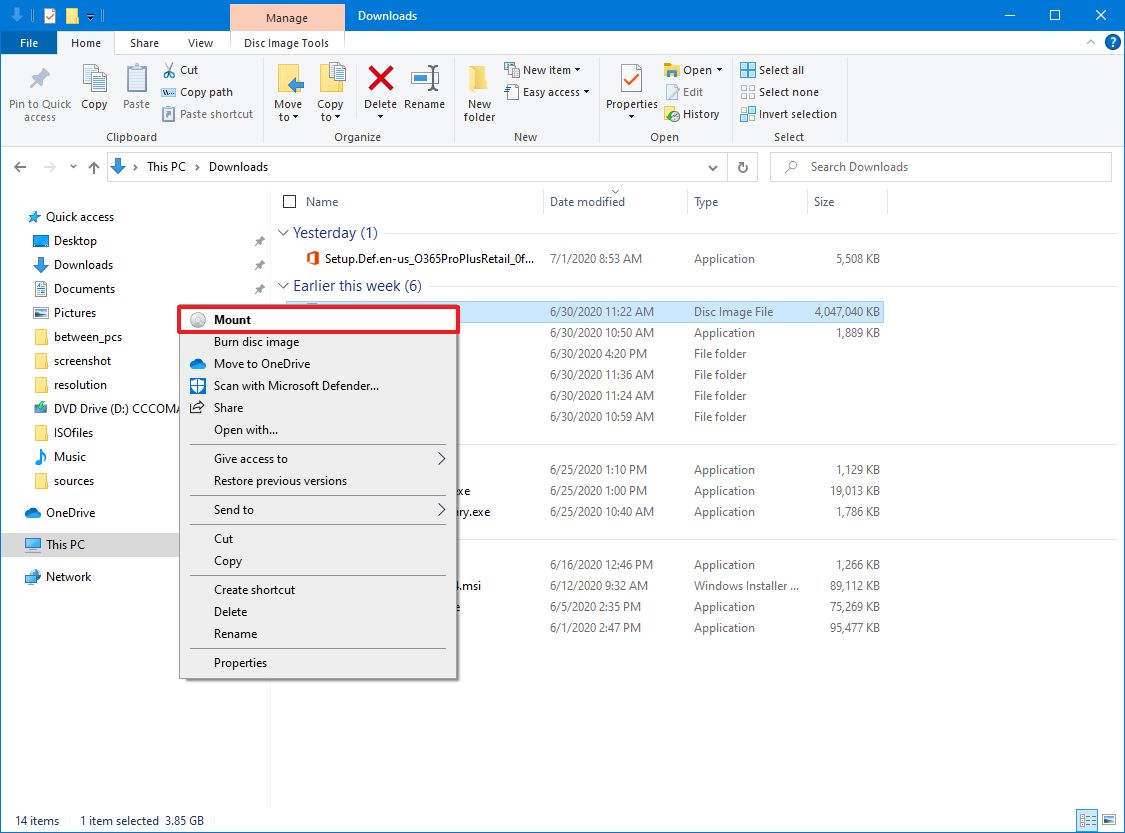
- Open the drive with the Windows 10 installation files.
- Click the Select all button from the «Home» tab.
- Click the Copy button from the «Home» tab.
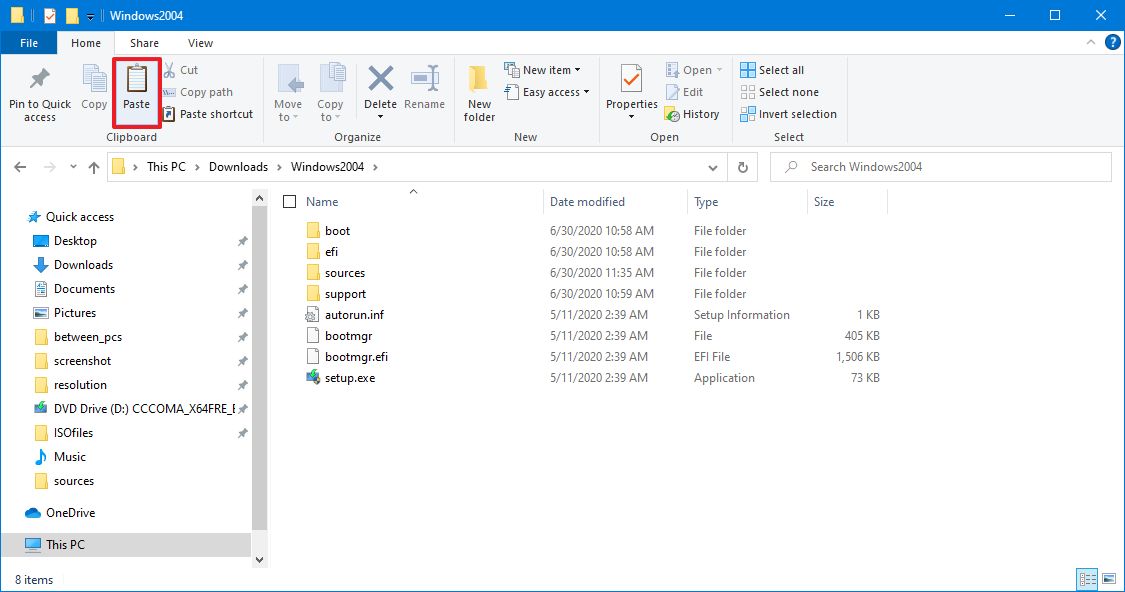
- Navigate to the folder you want to use to store the files for the project.
- Click the New folder button from the «Home» tab.
- Specify a name for the folder – for example, Windows2004.
- Open the newly created folder.
- Click the Paste button from the «Home» tab.
Once you complete the steps, the installation files will be available on your device. However, to continue, you need to confirm the install.wim file image is present in the «sources» folder. If the ISO was created using the Media Creation Tool, you’re likely to have an install.esd, which you won’t be able to open because it’s encrypted.
If you don’t have an .wim image file, you can get the uncrypted image by downloading the latest Windows 10 ISO file from the Windows Insider Program or MSDN with a subscription.
Convert install.esd to install.wim
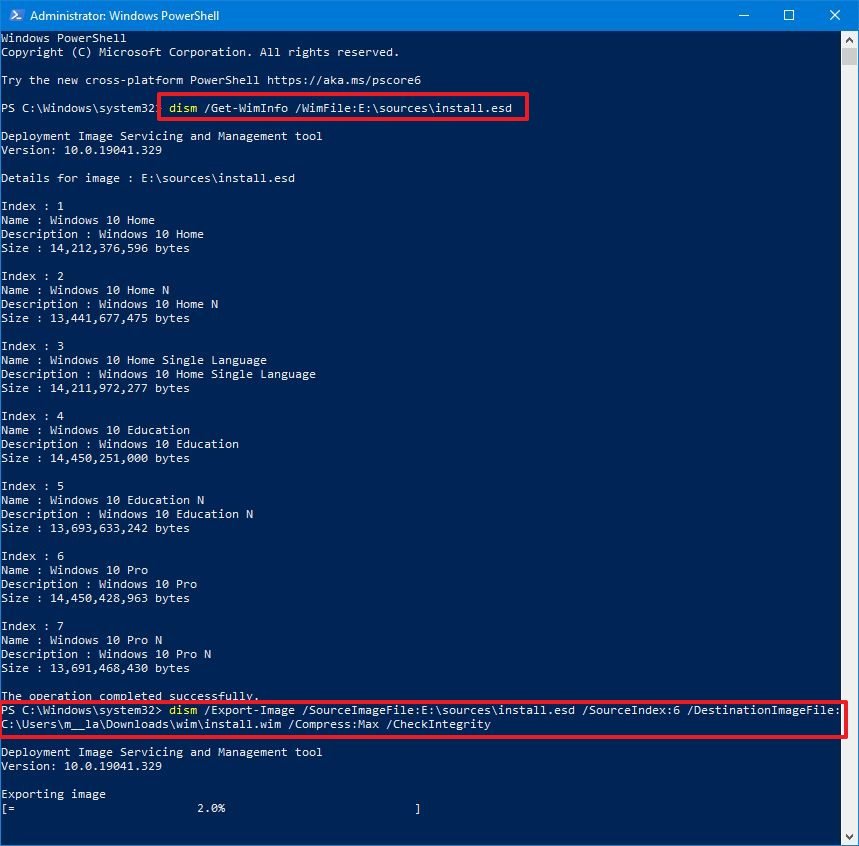
In the case that you’re stuck with an «install.esd» image, you can use the DISM command tool to export the image files and create a «.wim» image from a «.esd» file.
To decrypt an install.esd image, use these steps:
- Open Start.
- Search for PowerShell, right-click the top result, and select the Run as administrator option.
- Type the following command to identify the index number of the edition you want to use and press Enter:
dism /Get-WimInfo /WimFile:C:\path\to\folder\sources\install.esdIn the command, make sure to change the path to the sources folder location with the «install.esd» file on your computer. - Confirm the index number for the edition you want to deploy. For example, in the case, select the index number of 6 to extract the files for Windows 10 Pro.
- Type the following command to create an install.wim file and press Enter:
dism /Export-Image /SourceImageFile:C:\path\to\folder\sources\install.esd /SourceIndex:6 /DestinationImageFile:C:\path\to\folder\sources\install.wim /Compress:Max /CheckIntegrityIn the command, make sure to change the path to the sources folder location with the «install.esd» file on your device. The destination path should be the same as the source.
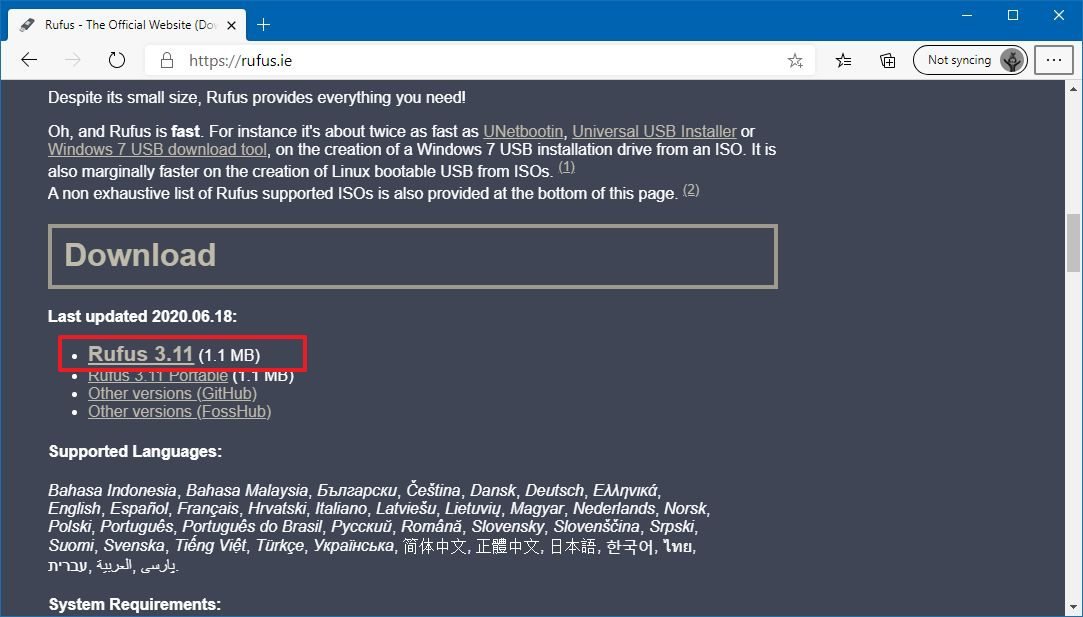
Alternatively, you can also use the Rufus tool to download the Windows 10 ISO with an «install.wim» file.
Download install.wim using Rufus
To download a Windows 10 ISO file with Rufus, use these steps:
- Open Rufus download page.
- Under the «Download» section, click the latest release of the tool to save the file on the computer.
- Double-click the Rufus-x.x.exe file to launch the tool.
- Under the «Device» section, select the USB flash drive with at least 8GB of space.
- Under the «Boot selection» section, click the arrow button next to the «Select» option, and choose the Download option.
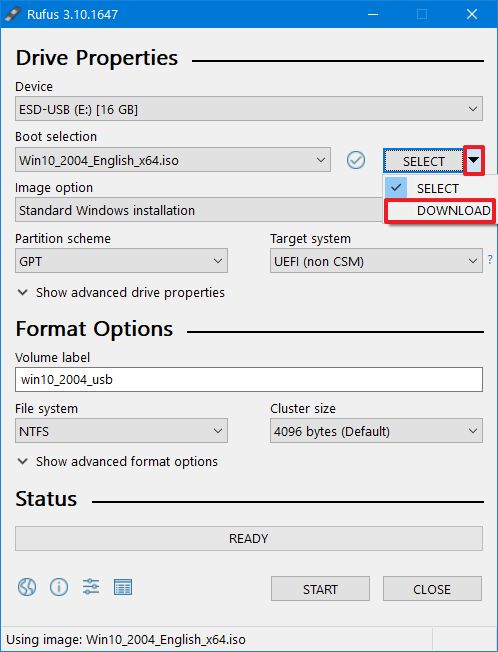
- Click the now available Download button.
- Use the «Version» drop-down menu and select Windows 10.
- Click the Continue button.
- Select the 20H1 (Build 19041.264 — 2020.05) option to download the Windows 10 May 2020 Update.
- Click the Continue button.
- Use the «Edition» drop-down menu and select the Windows 10 Home/Pro option.
- Click the Continue button.
- Use the «Language» drop-down menu and select your installation language.Quick note: If you’re in the United States, you should select «English» instead of «English International.»
- Click the Continue button.
- Use the «Architecture» drop-down menu and select the 32-bit or 64-bit (recommended).Quick tip: You can find out the architecture of your device on Settings > System > About, under Device specifications.
- Check the Download using a browser option.
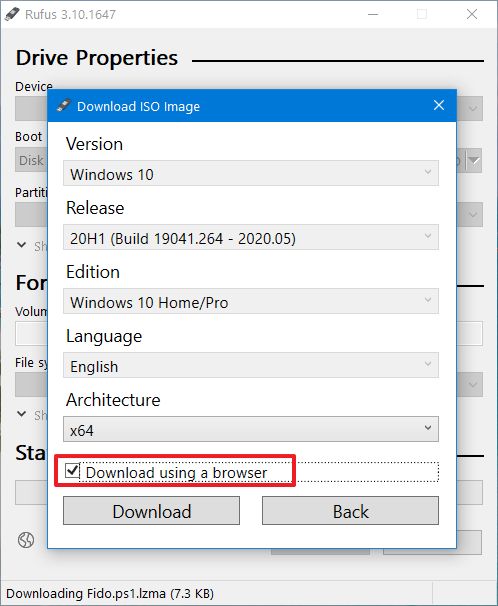
- Click the Download button.
- Save the ISO file on your device.
Once you complete the steps, you’ll end up with an ISO file of Windows 10 that includes the install.wim file inside the «sources» folder.
Setting up an answer file environment
To prepare the environment to create a new answer file project, use these steps:
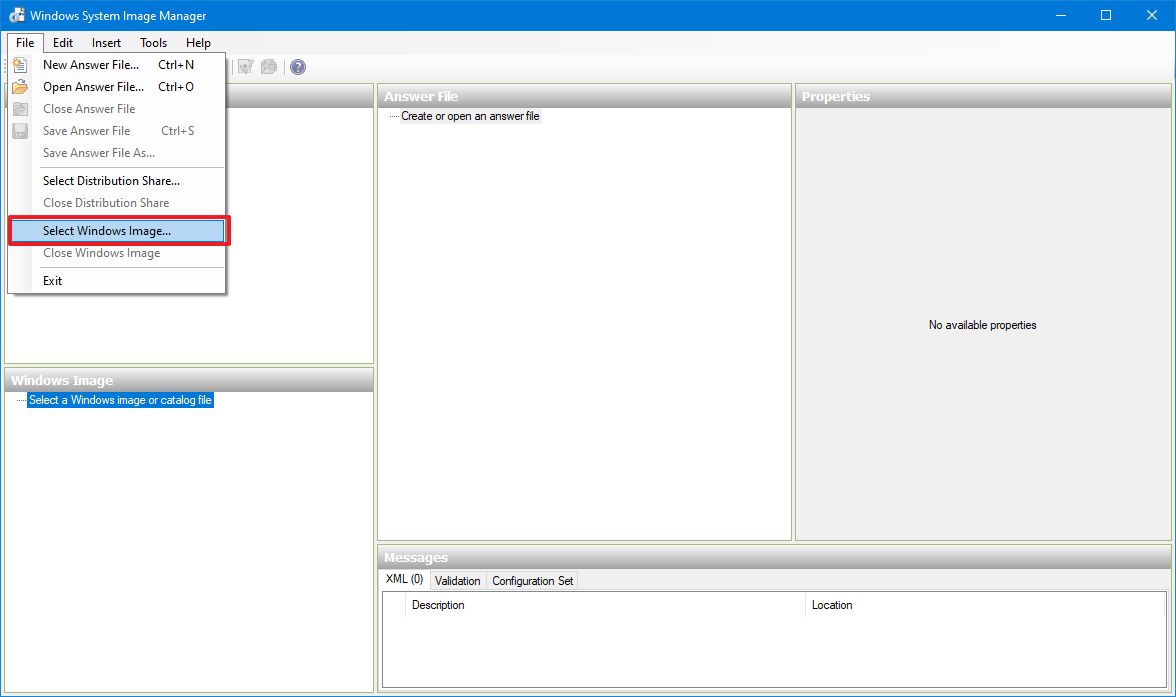
- Open Start.
- Search for Windows System Image Manager and click the top result to open the console.
- Click the File menu.
- Select the Select Windows Image option.
- Navigate to the folder with the Windows 10 installation files exported.
- Access the source folder.
- Select the install.wim image file.
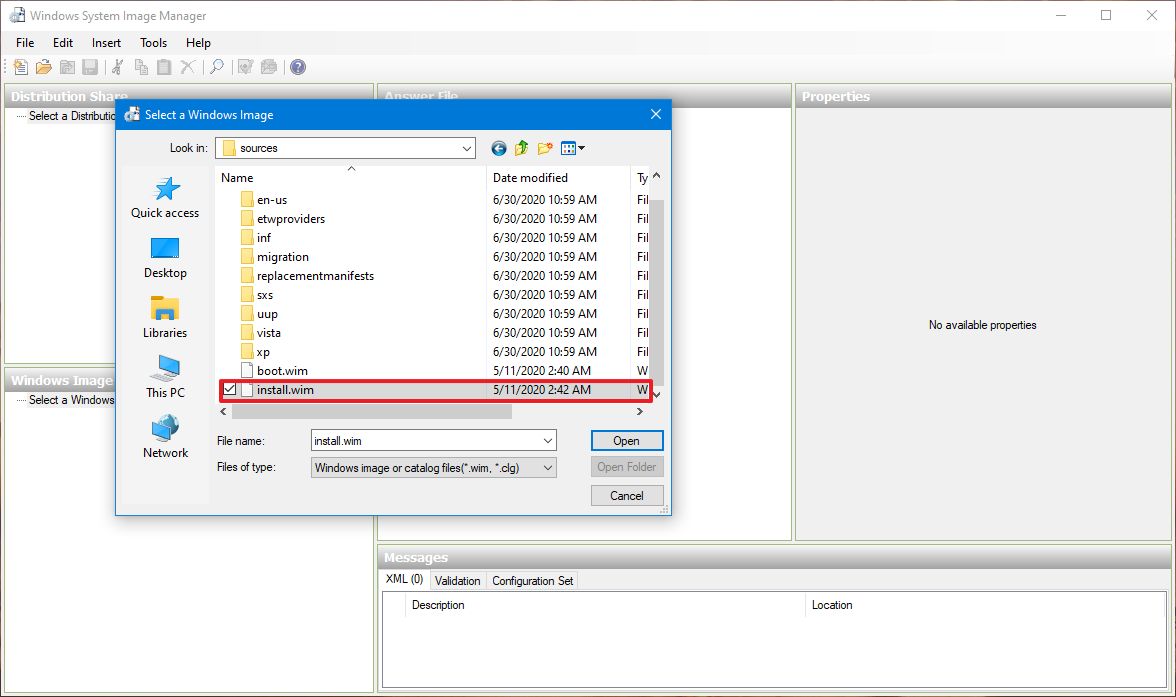
- Click the Open button.Important: Make sure that image is an install.wim file. Otherwise, if you have an install.esd image, this will not work.
- Select the edition of Windows 10 you want to use. (Usually, you want to select the version that you’re planning to install.)
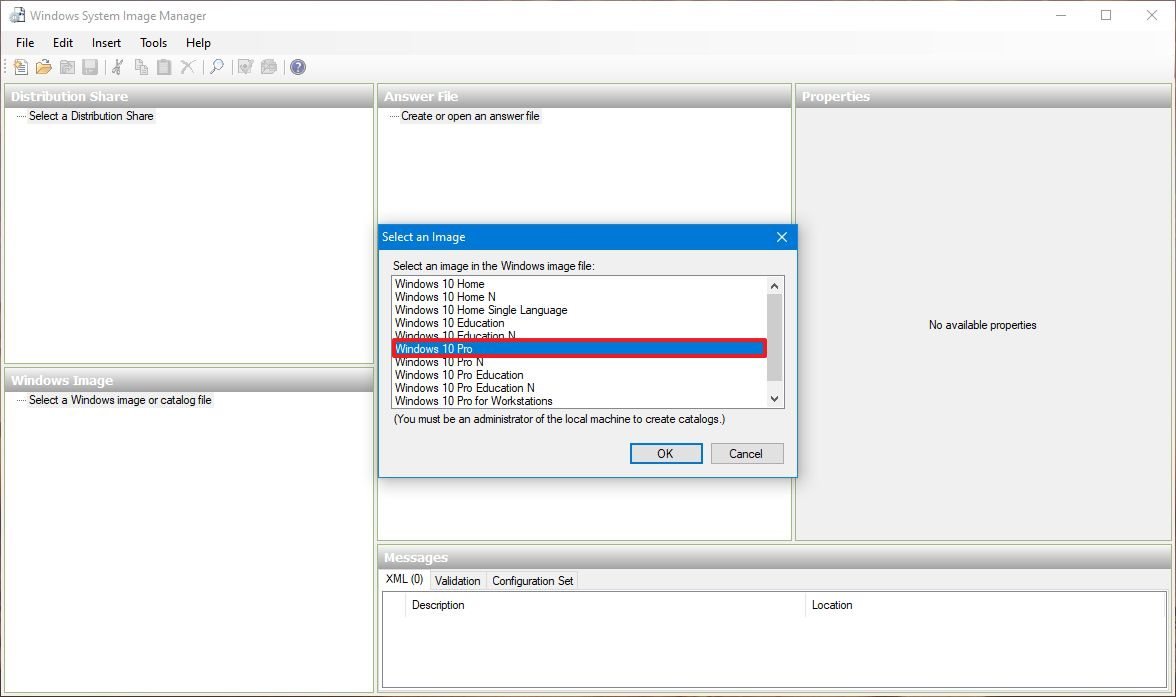
- Click the OK button.
- Click the Yes button to create a new catalog file (if applicable).Quick note: This process will take some time, but it’s a one-time process. The .clg file will be saved in the same location where the install.wim is stored, and you can reuse it later on other projects.
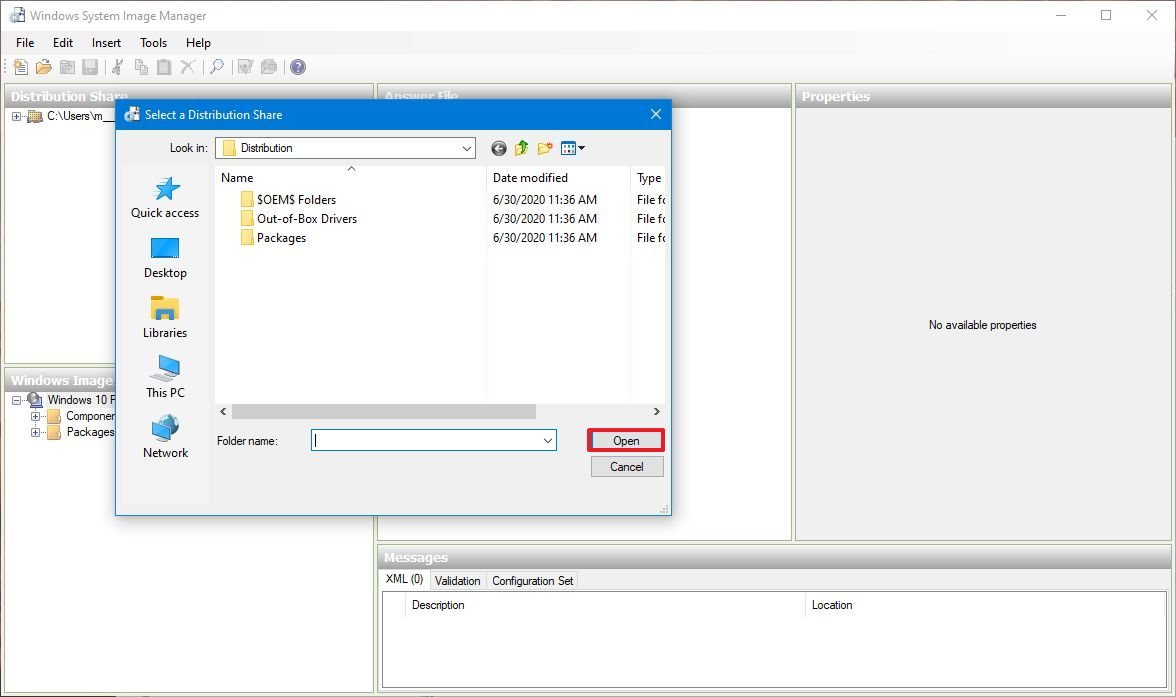
- Under the «Distribution Share» section, right-click on «Select a Distribution Share» and select the Create Distribution Share option.

- Click the Create New Folder option in the dialog box.
- Specify a name for the folder – for example, «Distribution» and select the folder.
- Click the Open button.
- Click the File menu.
- Select the Select Distribution Share option.
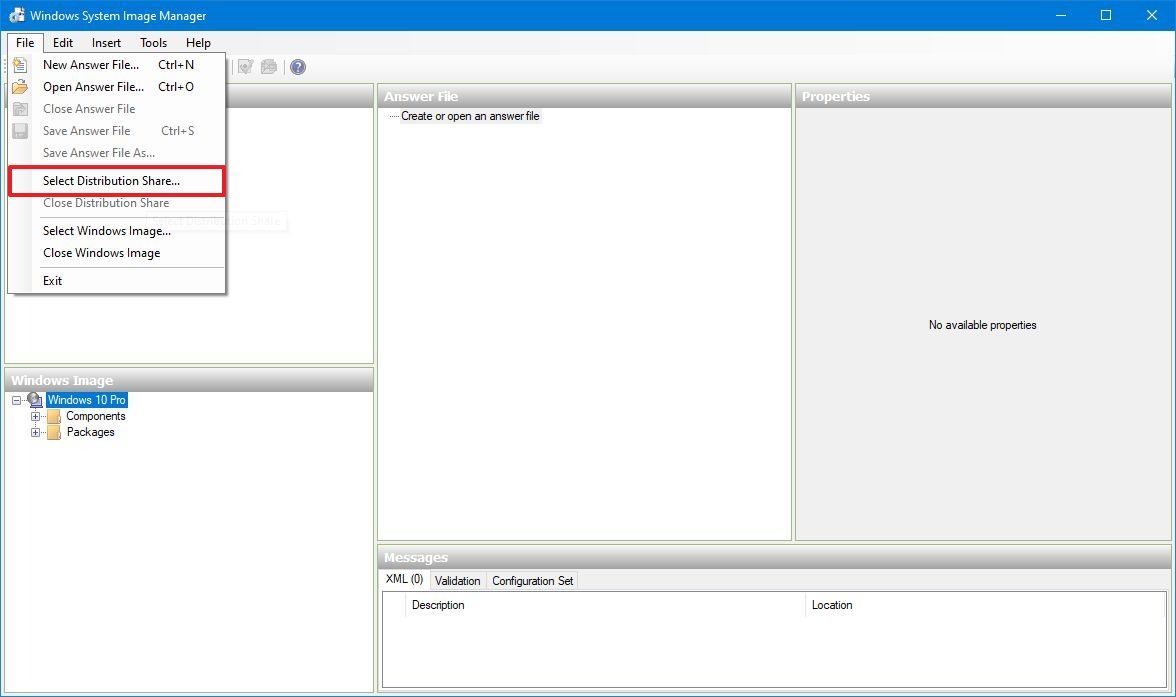
- Locate the folder you recently created for the distribution files.
- Click the Open button.
- Click the File menu.
- Select the New Answer File option.
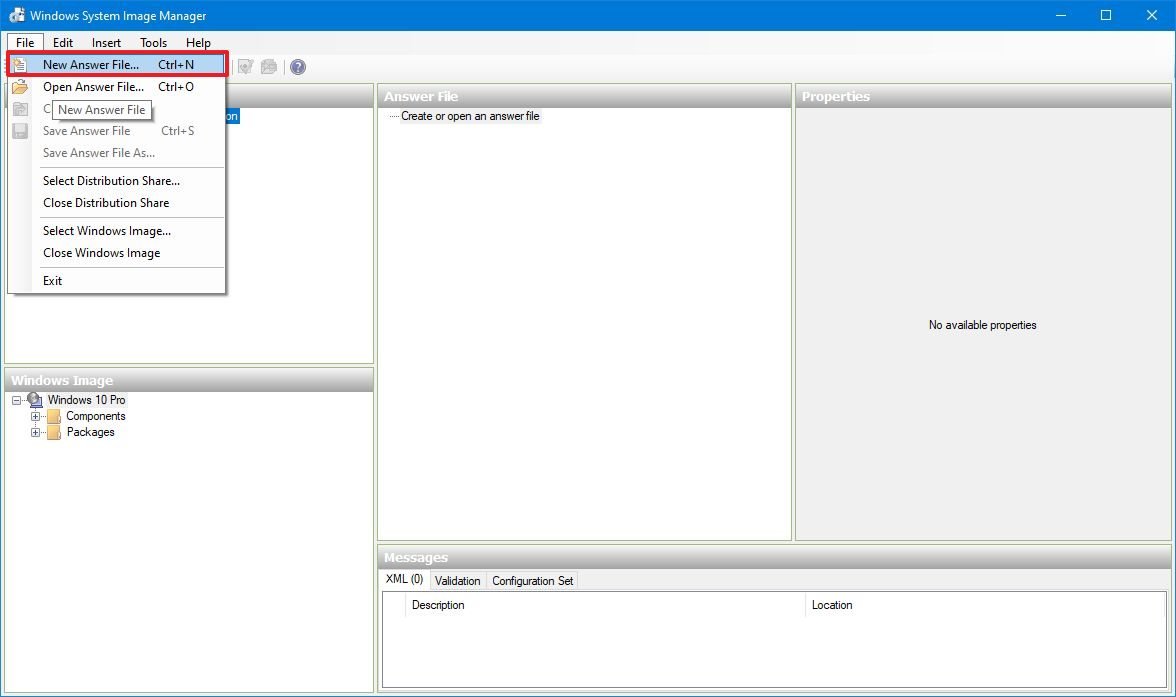
After you complete the steps, the environment will be created to configure an answer file.
How to create Windows 10 answer file
An answer file contains seven different stages (passes), and the stages you need to configure will depend upon the type of automation you want to create.
This guide will help you to get started configuring an autounattend.xml answer file with the minimum requirements to automate the installation of Windows 10 Pro using the 1 windowsPE, 4 specialize, and 7 oobeSystem stages.
Pass 1 windowsPE
Using the pass «1 windowsPE,» you’ll set up region and language, drive configuration, installation location, and product key.
Quick note: Depending on the image, you may see the components name starting with amd64_Microsoft-Windows for the 64-bit version or x86_Microsoft-Windows for the 32-bit version of Windows 10. For this guide, we’ll be using the amd64_Microsoft-Windows name format.
Configure language and region settings
To configure the region and language settings, while in the Windows System Image Manager, use these steps:
- Under the «Windows Image» section, expand the Components folder.
- Expand the amd64_Microsoft-Windows-International-Core-WinPE component.
- Right-click the SetupUILanguage component and select the Add Setting to Pass 1 windowsPE option.
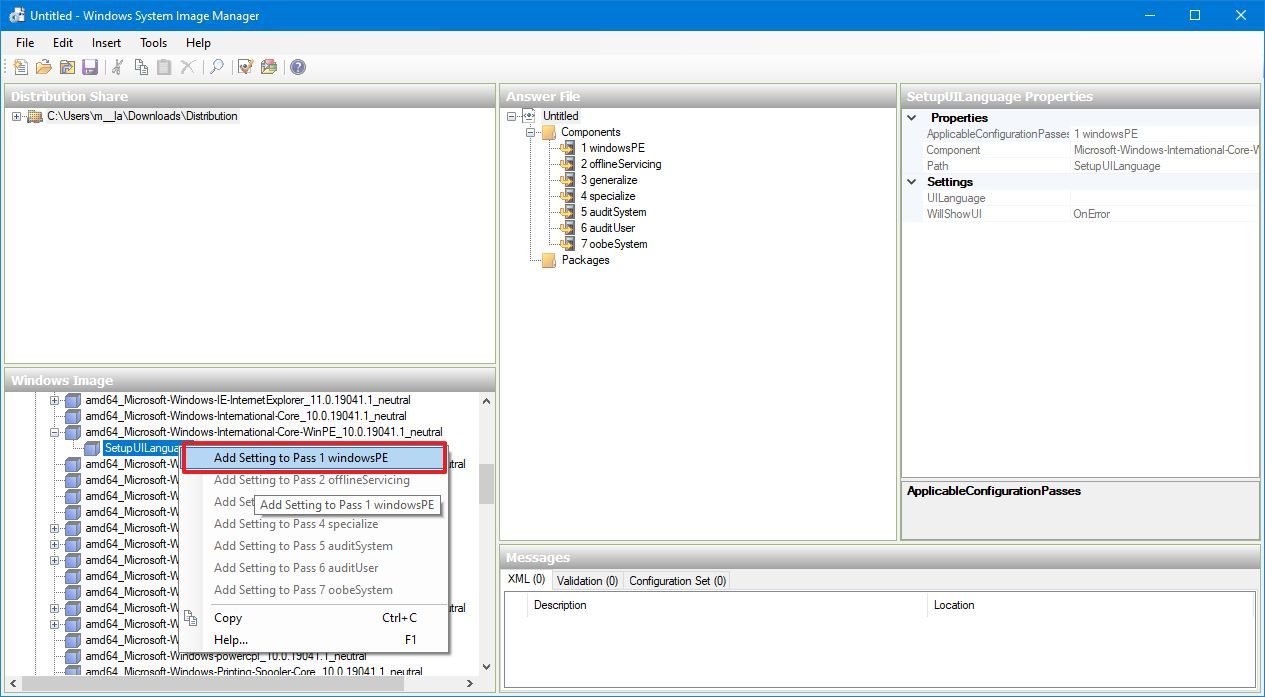
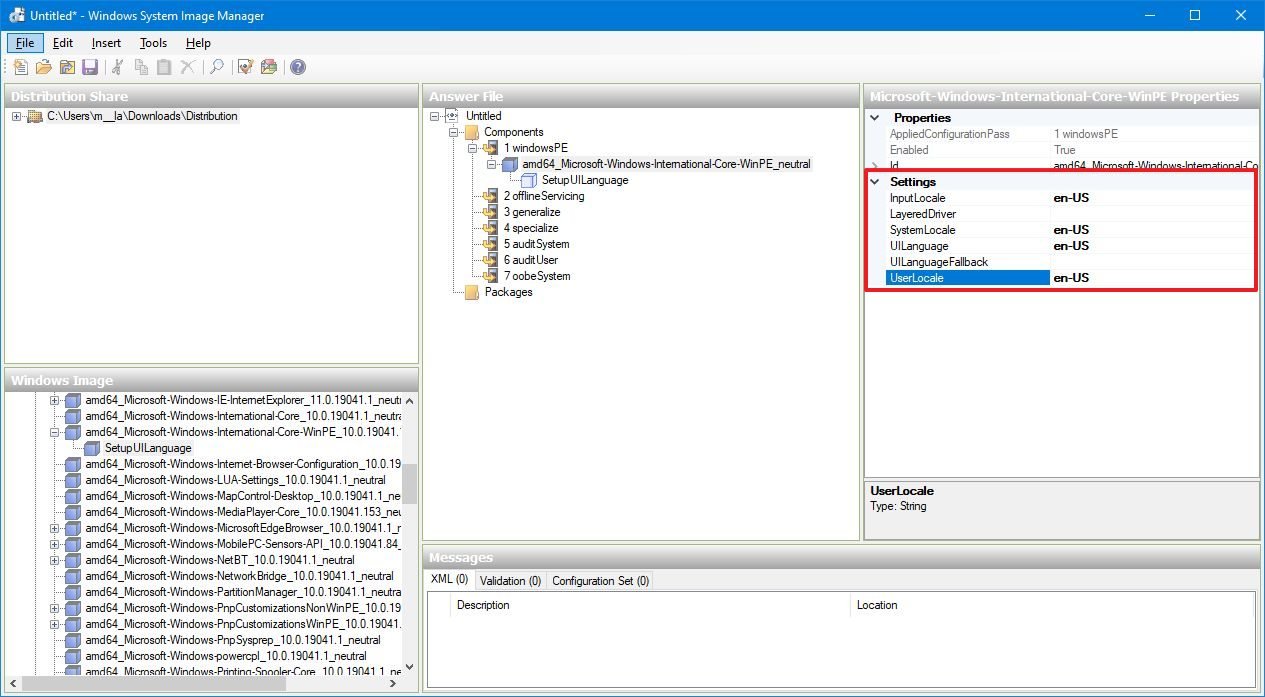
- Under the «Answer File» section, on the right side, select the amd64_Microsoft-Windows-International-Core-WinPE component.
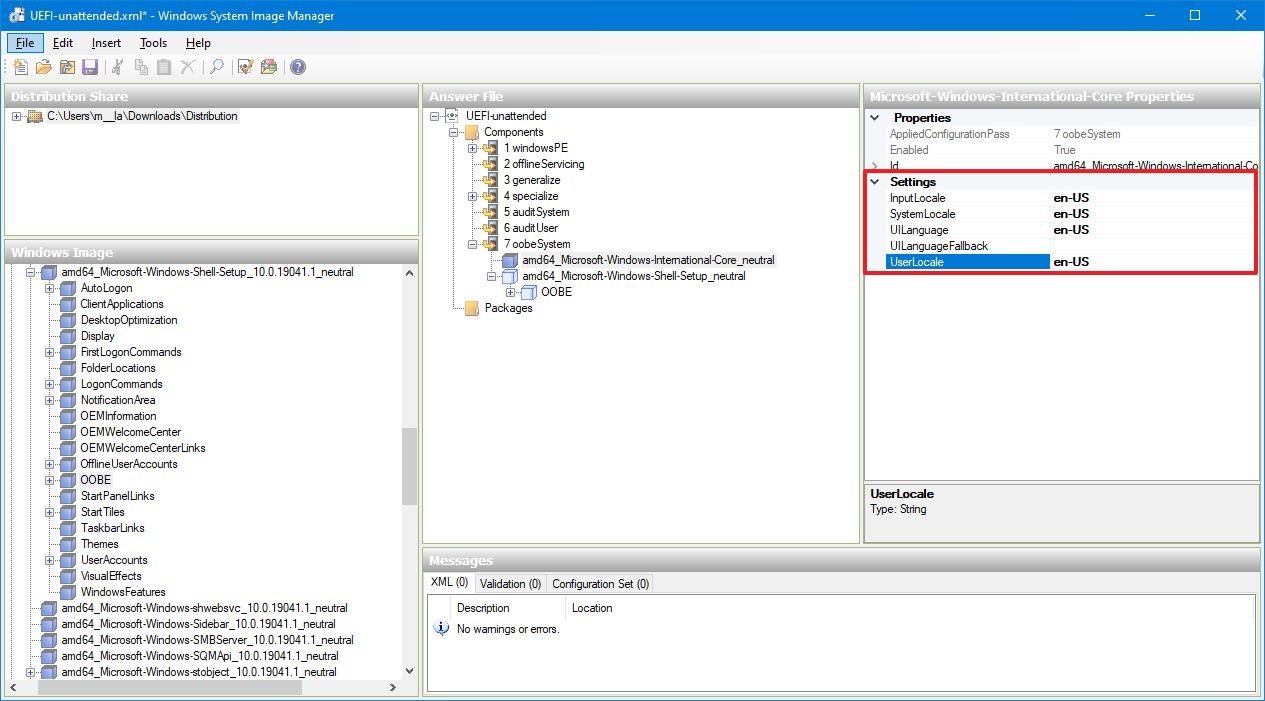
- Under the «Settings» section, on the right side, define the keyboard, region, primary and fall back language, and device location. For example, if you’re located in the United States, you should be using these settings:
- InputLocale: en-US.
- SystemLocale: en-US.
- UILanguage: en-US.
- UserLocale: en-US.
Quick tip: Only users outside the United States should configure ULLanguageFallback using the en-US value as the fallback language. To identify the correct input profile name, you can check out this Microsoft support page.
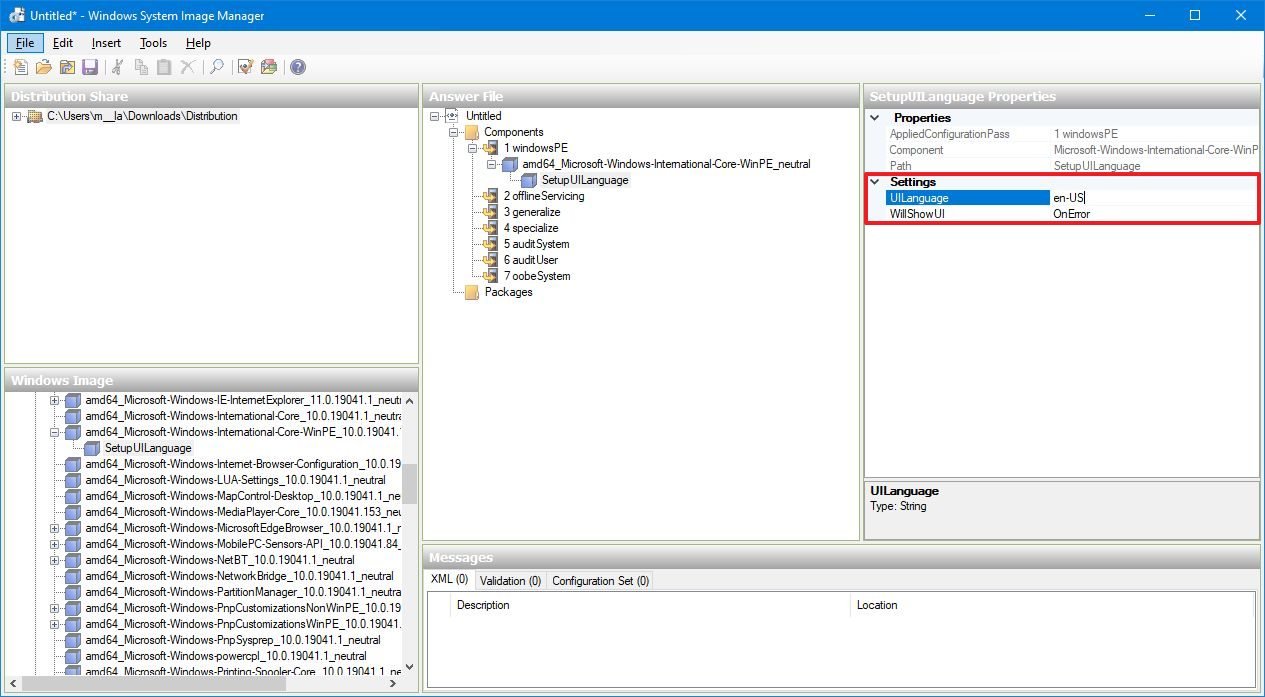
- Select the SetupUILanguage sub-component.
- Under the «Settings» section, on the right side, set UILanguage with the correct language. For example, because we’re doing an install in «English,» we’re using the en-US option.
Configure installation settings
Inside the answer file, you also have to specify the settings to properly configure the drive.
To configure the drive settings in the answer file, use these steps:
- Under the «Windows Image» section, expand the Components folders.
- Expand the amd64_Microsoft-Windows-Setup component.
- Expand the DiskConfiguration component.
- Right-click the Disk component, and select the Add Setting to Pass 1 windowsPE option.
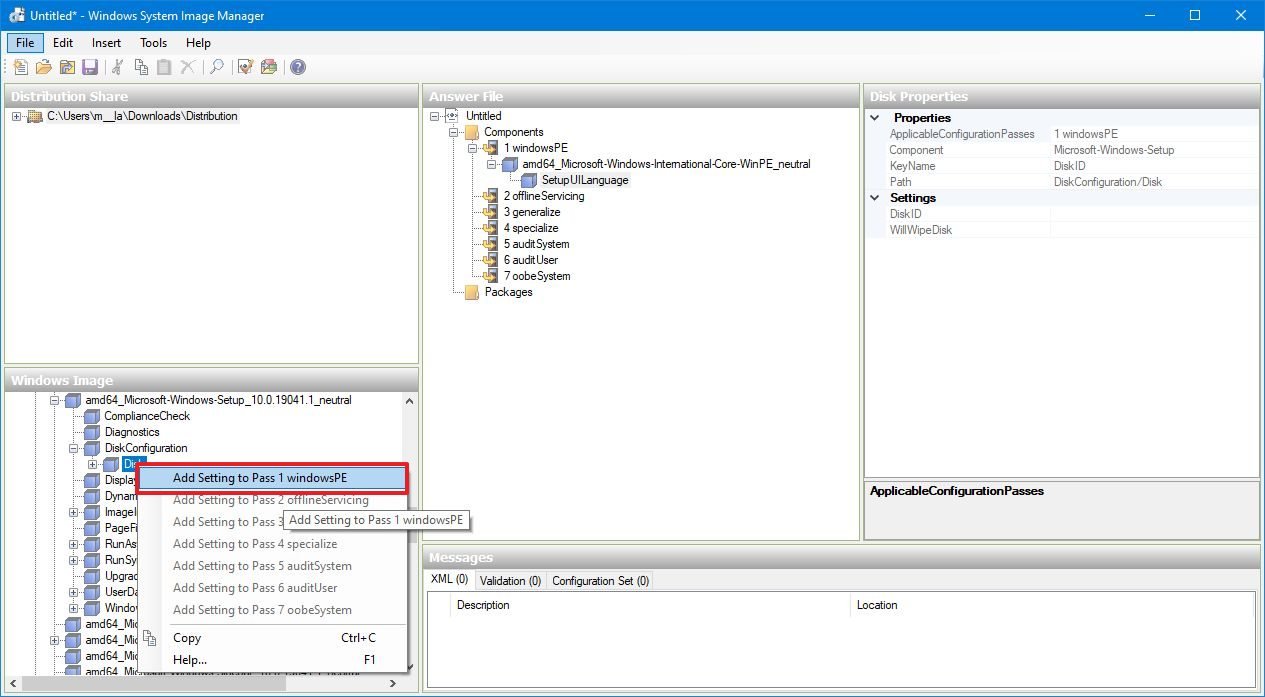
- Under the «Answer File» section, on the right side, select the DiskConfiguration component.
- Under the «Settings» section, on the right side, set the WillShowUI value to OnError. (If you leave this setting empty, the installation will stop during the hard drive setup process.)
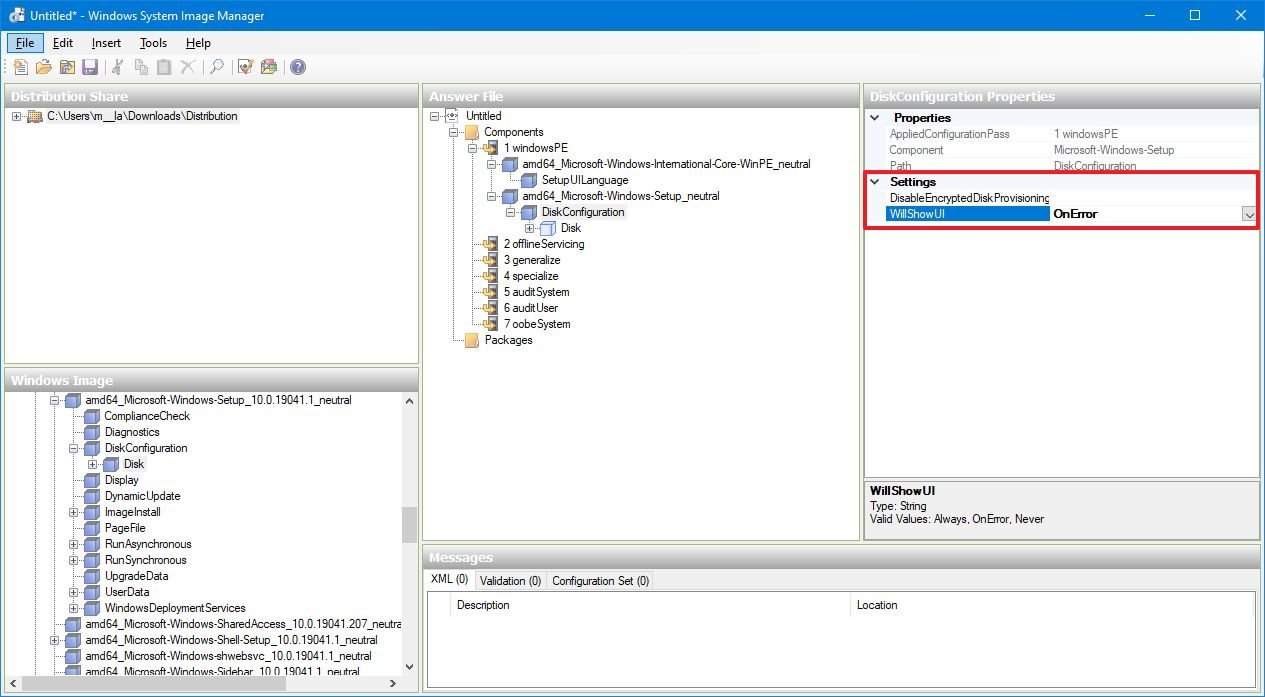
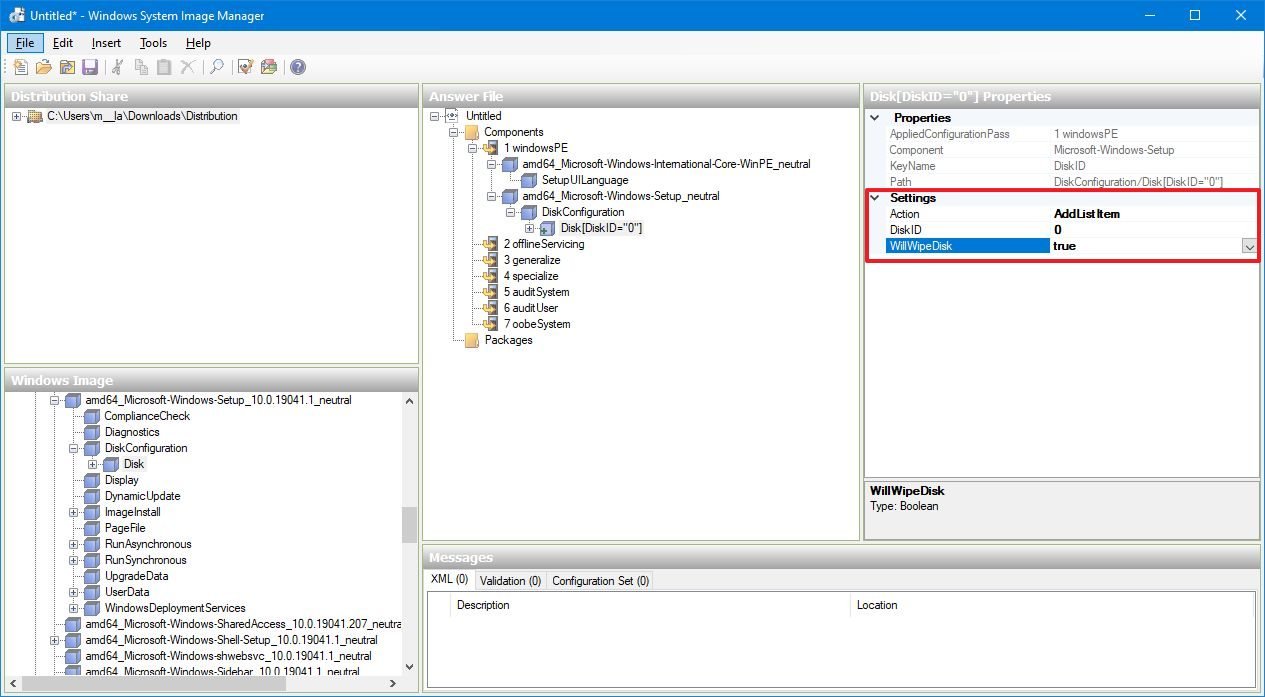
- Select the Disk component.
- Under the «Settings» section, on the right side, use these values:
- DiskID: 0
- WillWipeDisk: true
Quick note: Setting the WillWipeDik setting to true will make sure to erase everything on the first hard drive before setting up the partitions. If you have anything important on this drive, you should backup the data before proceeding.
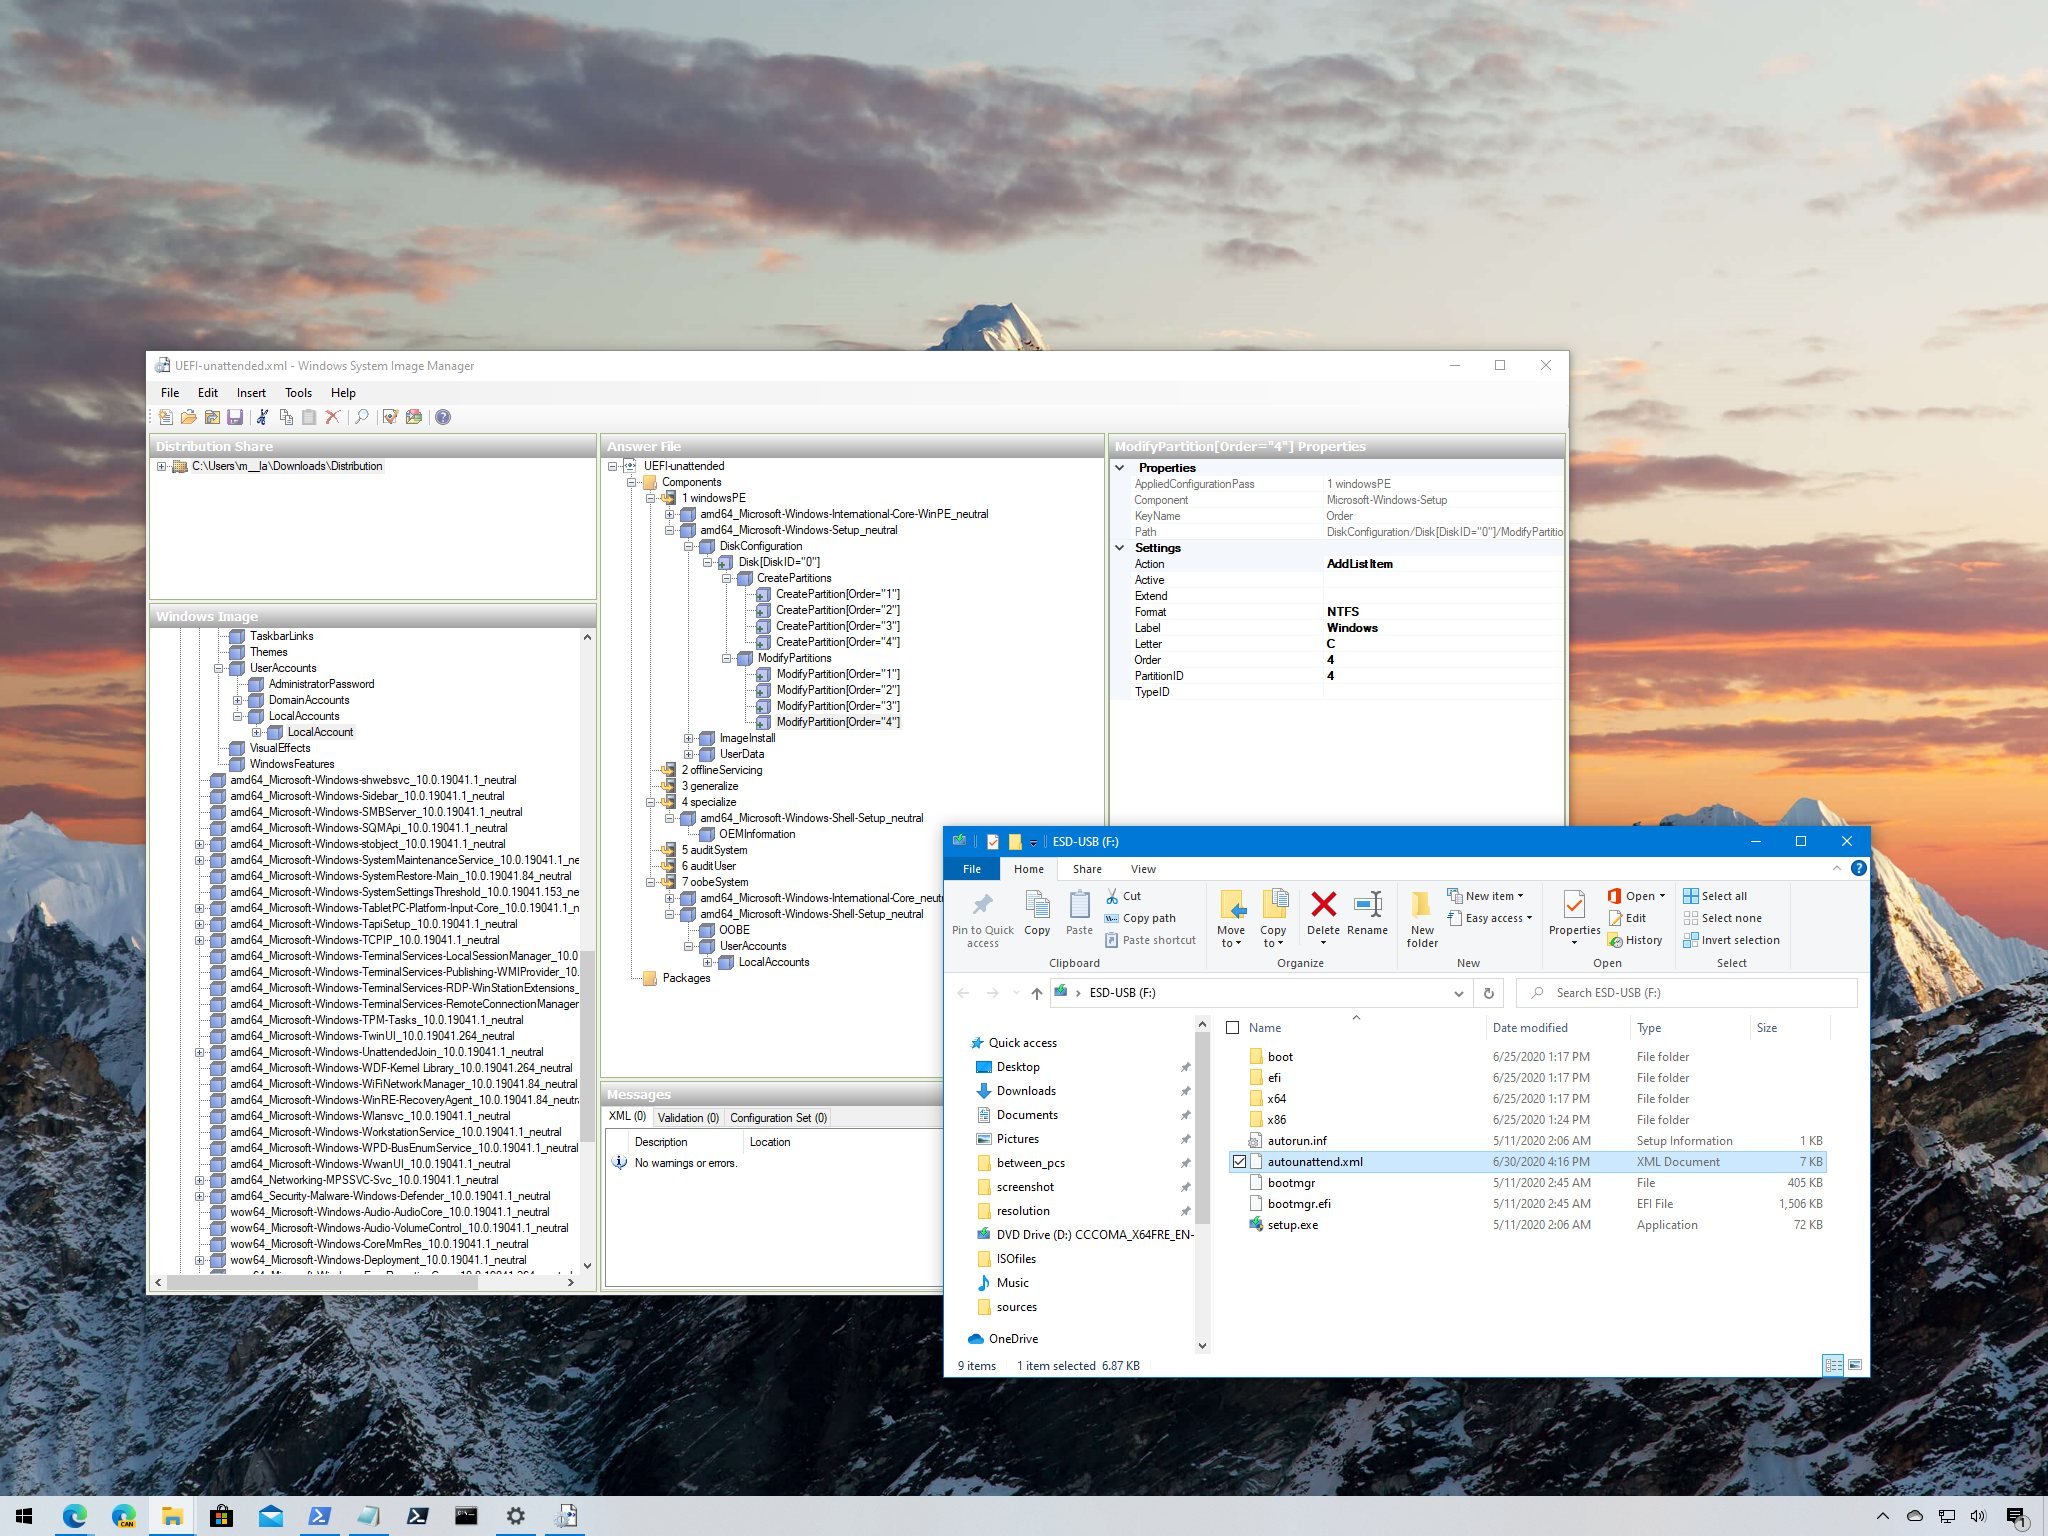
Once you complete the steps to configure the DiskConfiguration settings, you’ll need to set up the partition layout, depending on whether your device uses a legacy BIOS or UEFI.
The reason is that BIOS-based computers only require two partitions (System Reserved and Windows), and UEFI-based devices require four partitions (WinRE, EFI, MSR, and Windows).
You can check if you’re using BIOS or UEFI by opening System Information from the Start menu, and checking the «System Summary.» If «BIOS Mode» reads Legacy, then you’re using BIOS; if it reads UEFI, you’re using UEFI.
BIOS only: Creating and modifying partitions
If you have a computer using the legacy BIOS, continue with these steps. Otherwise, skip this part, and follow the UEFI instructions below.
To configure the partition layout for a device using BIOS, use these steps:
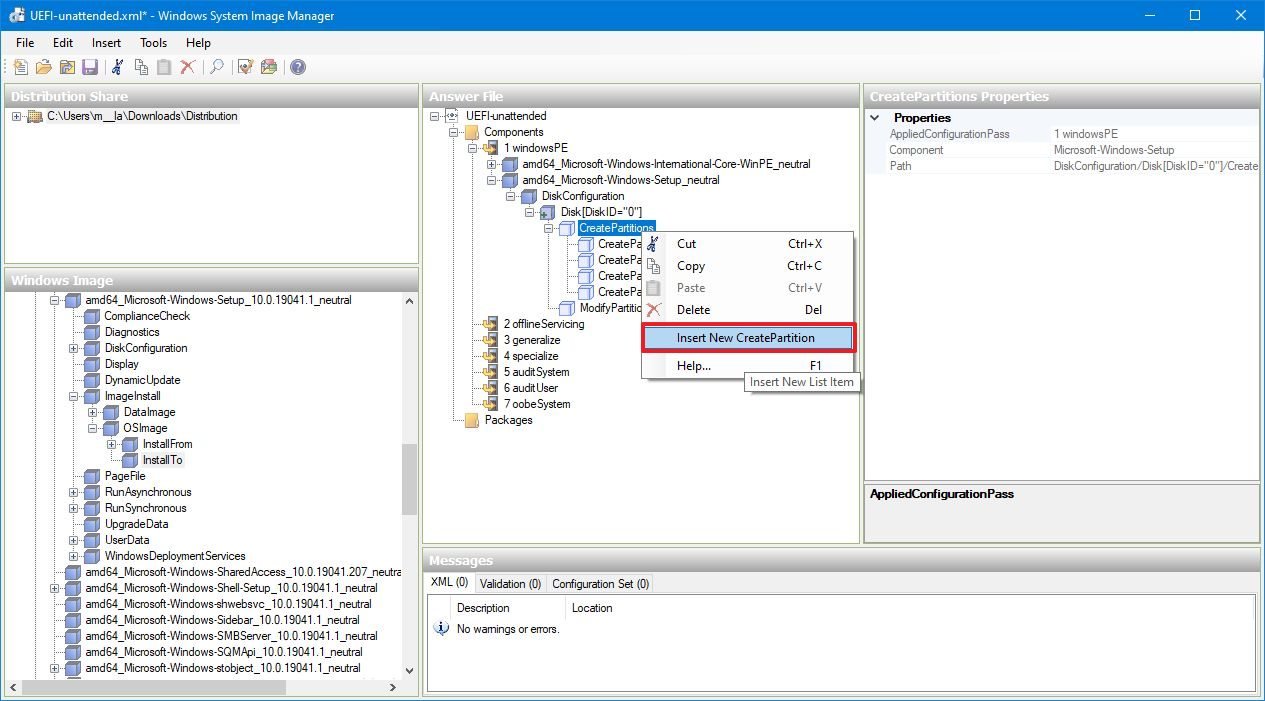
- Under the «Answer File» section, expand the amd64_Microsoft-Windows-Setup component.
- Expand the DiskConfiguration component.
- Expand the Disk component.
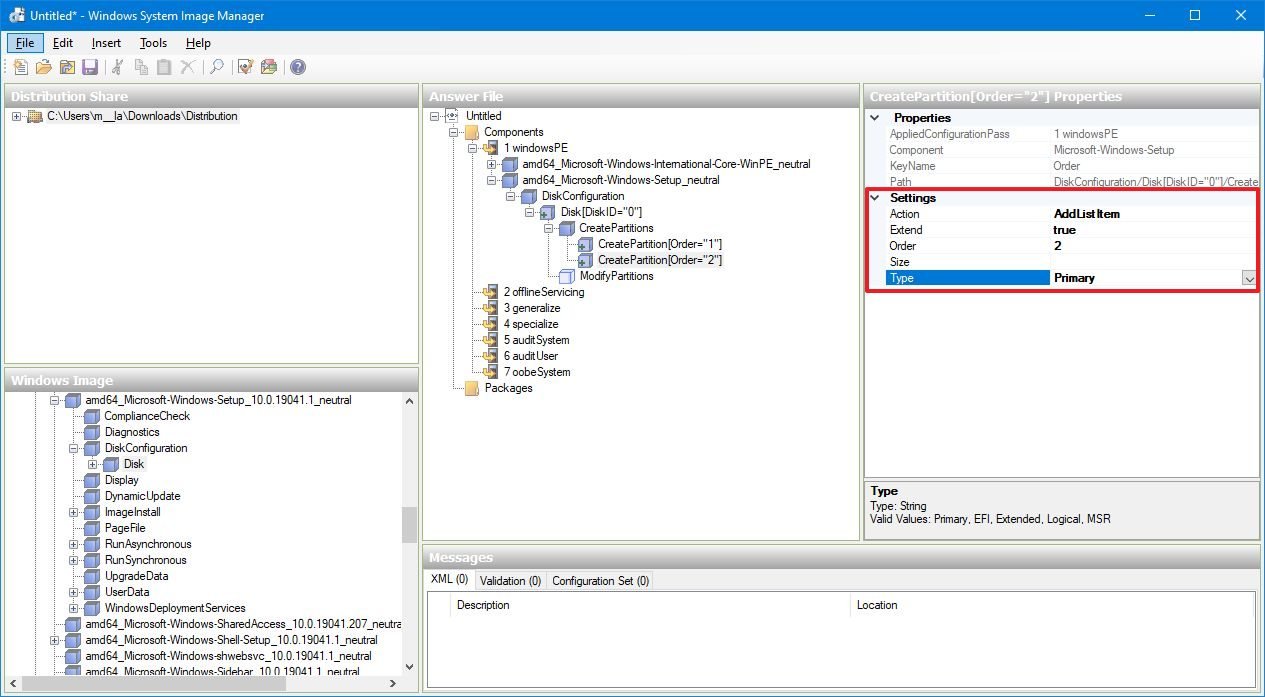
- Right-click the CreatePartitions component, and select the Insert New CreatePartition option to create the first partition.
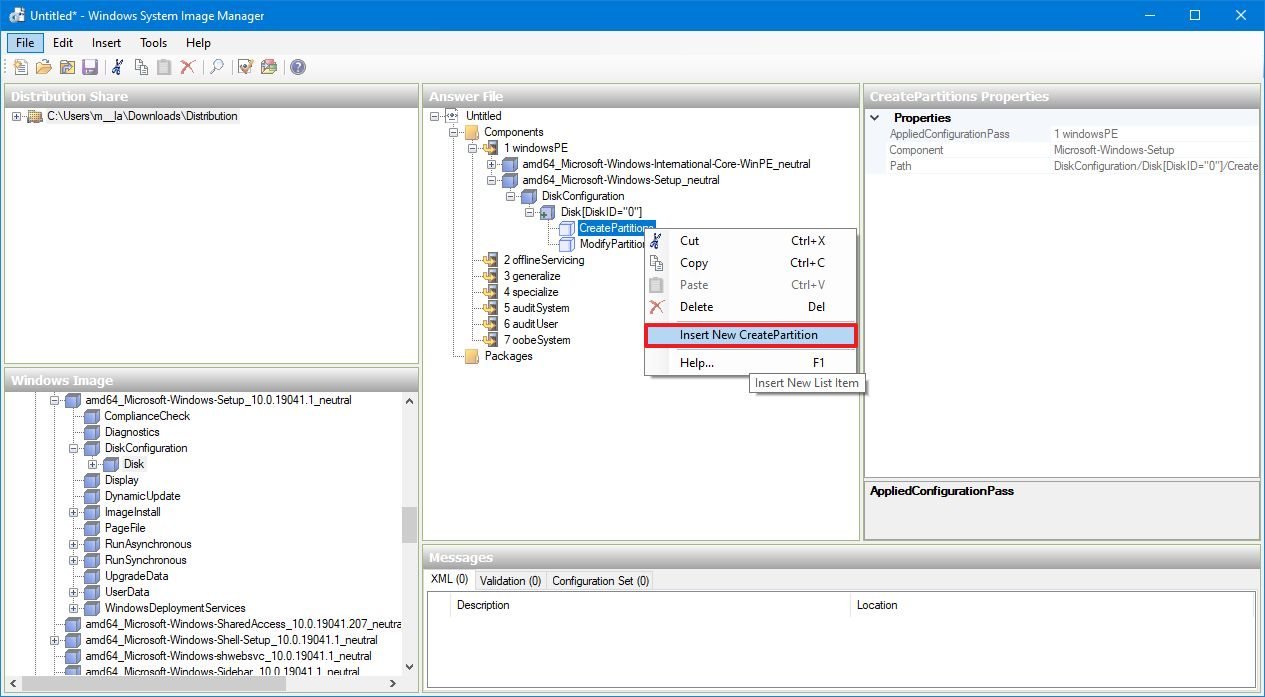
- Right-click CreatePartitions again, and select the Insert New CreatePartition option to create a second partition.
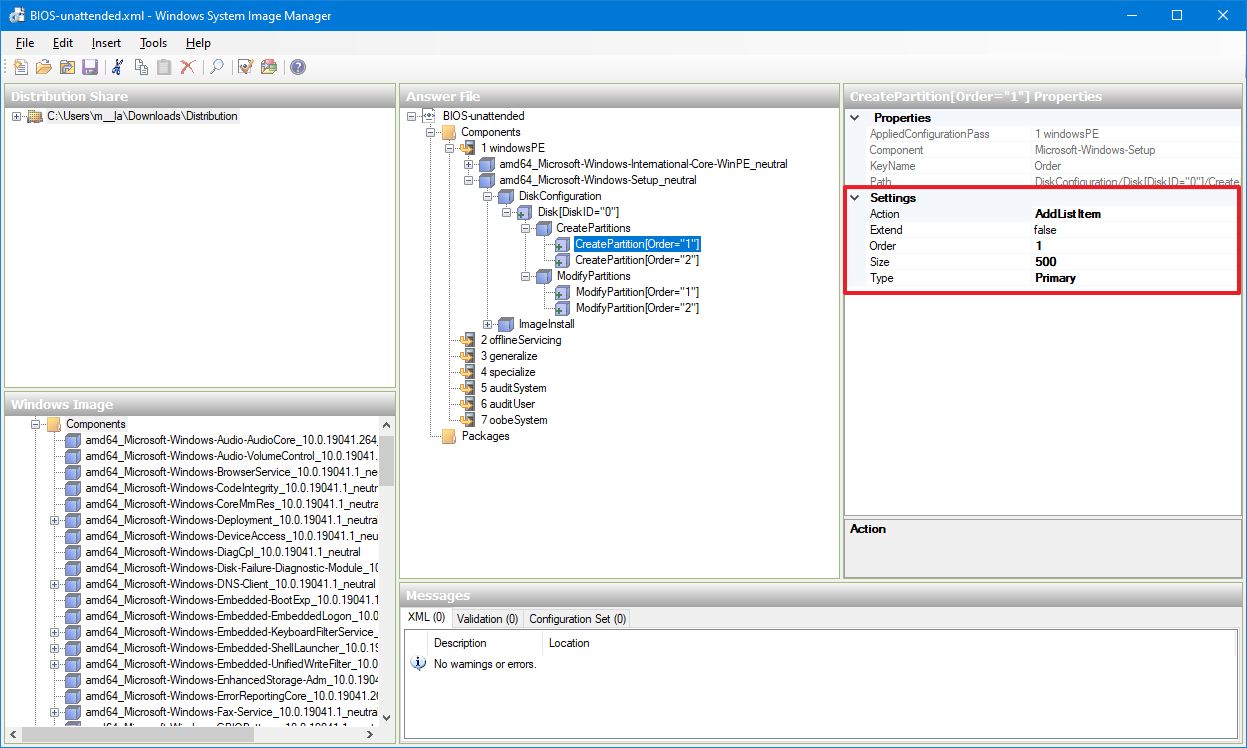
- Select the first CreatePartition.
- Under the «Settings» section, on the right side, use these values to create a system reserved partition:
- Extend: false.
- Order: 1.
- Size: 500.
- Type: Primary.
Using these settings, you’re indicating the setup to create the system reserved partition of 500MB, a partition required for Windows to boot.
- Select the second CreatePartition.
- Under the «Settings» section, on the right side, use these values to create a partition to install Windows 10:
- Extend: true.
- Order: 2.
- Type: Primary.
Using these settings, you’re indicating the setup to create a partition to install Windows 10. You’ll also notice that the Size value wasn’t specified, and Extend was set to true. This is because we want the Windows Setup to create a partition with all the available space left on the drive after creating the system reserved partition.If you want to create multiple partitions, you need to set the value of Extend to false, and enter a value in megabytes in the Size setting. Then the last partition should have Extend set to true without specifying the Size value to indicate the setup to use the remaining available space to create the partition.
Using the above steps, outlined the steps to carved the partitions. The next steps specify the required file format and partition properties.
To specify the format settings in the answer file, use these steps:
- Under the «Answer File» section, expand the amd64_Microsoft-Windows-Setup component.
- Expand the DiskConfiguration component.
- Expand the Disk component.
- Right-click the ModifyPartition component, and select the Insert ModifyPartition option to modify the first partition.
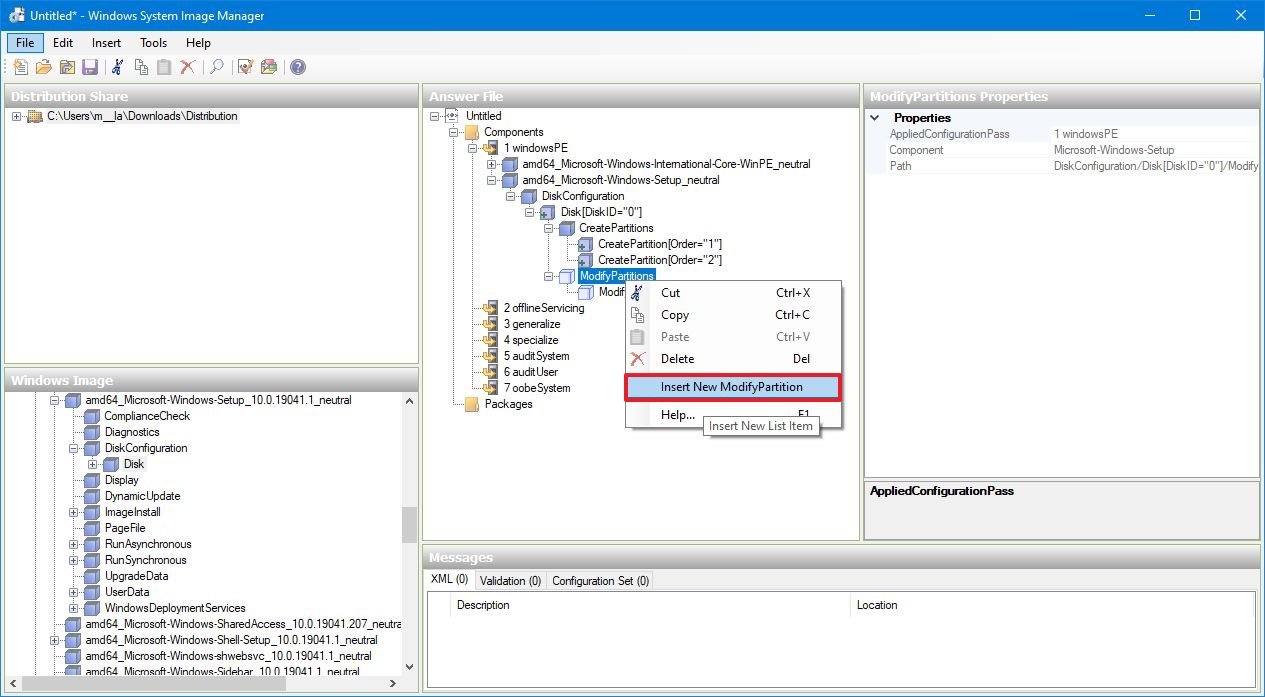
- Right-click ModifyPartition again, and select the Insert ModifyPartition option to modify the second partition.
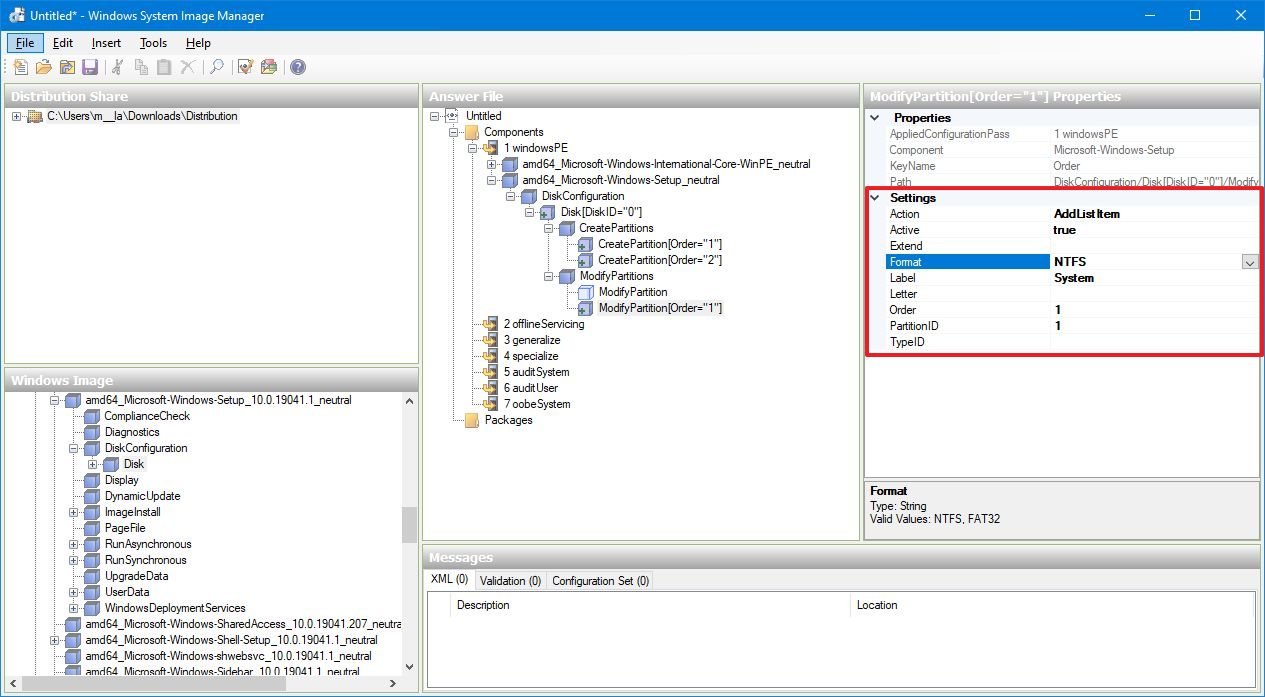
- Select the first ModifyPartition.
- Under the «Settings» section, on the right side, use these values to configure a system reserved partition:
- Active: true.
- Format: NTFS.
- Label: System.
- Order: 1.
- PartitionID: 1.
- Select the second ModifyPartition.
- Under the «Settings» section, on the right side, use these values to configure a partition to install Windows 10:
- Format: NTFS.
- Label: Windows.
- Letter: C.
- Order: 2.
- ProductID: 2.
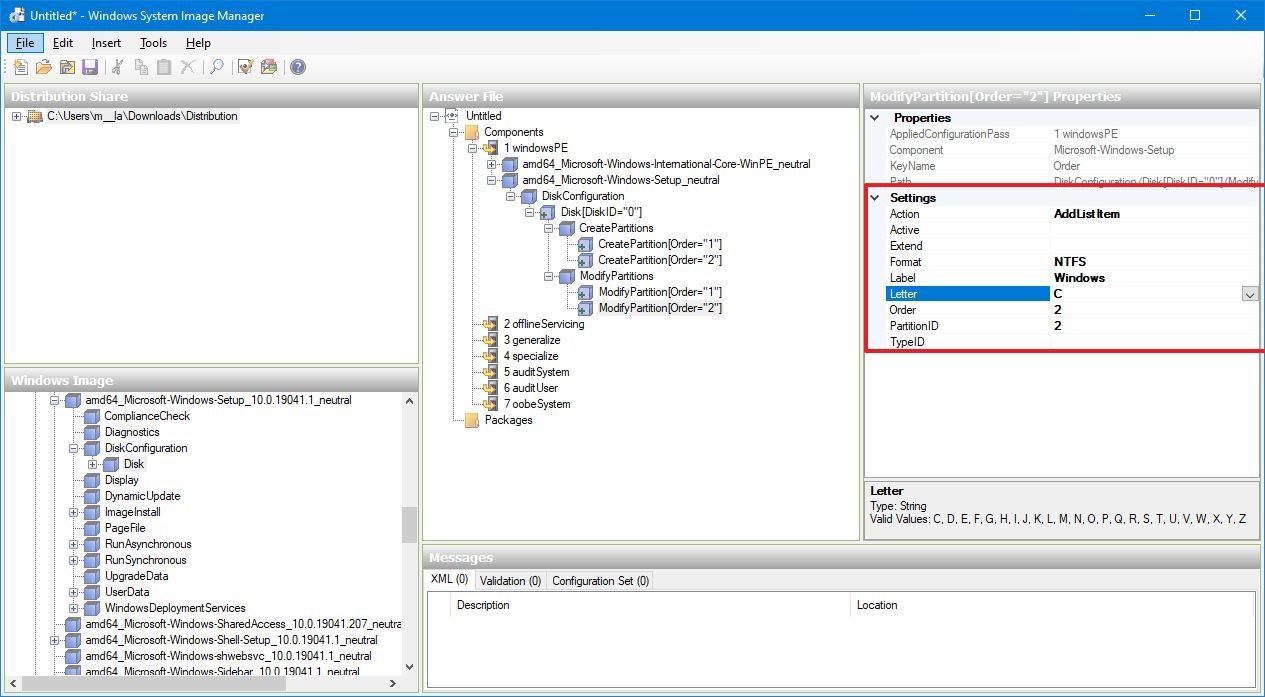
In the steps, using the Order and PartitionID, you’re specifying how the Windows Setup should configure on each of the two raw partitions we created earlier.
You can learn more about the partition layout required for a BIOS system in this Microsoft support page.
As part of this setup, the last task is to indicate the setup where to install Windows 10.
To select the drive to install Windows 10 automatically, use these steps:
- Under the «Windows Image» section, expand the Components folders.
- Expand the amd64_Microsoft-Windows-Setup component.
- Expand the ImageInstall component.
- Expand the OSImage.
- Right-click the InstalTo component, and select the Add Setting to Pass 1 windowsPE option.
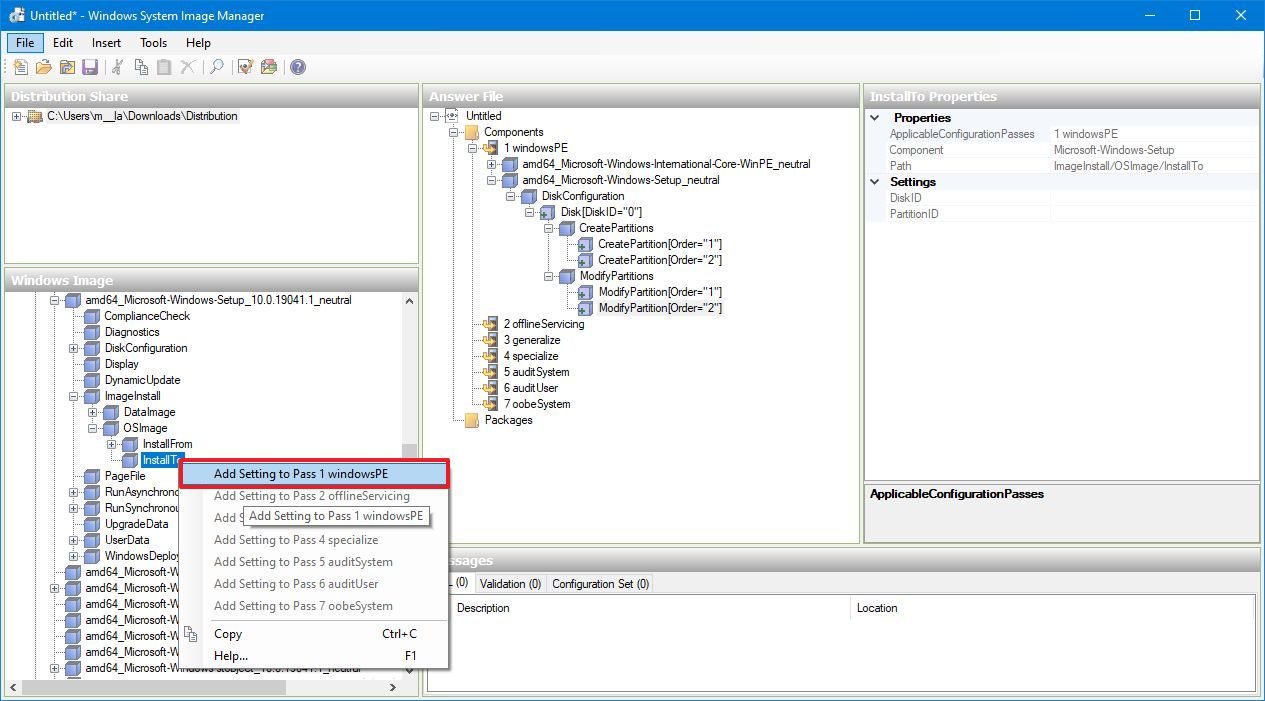
- Under the «Answer File» section, on the right side, select the InstallTo component.
- Under the «Settings» section, on the right side, use these values:
- DiskID: 0.
- PartitionID: 2.

The above settings tell the setup to install Windows 10 automatically on the first drive inside the second partition.
Once you complete the steps, continue with the Defining the product key instructions.
UEFI only: Creating and modifying partitions
If you have a computer using UEFI, continue with these steps. Otherwise, skip this part, and follow the BIOS instructions outlined above.
- Under the «Answer File» section, expand the amd64_Microsoft-Windows-Setup component.
- Expand the DiskConfiguration component.
- Expand the Disk component.
- Right-click the CreatePartitions component, and select the Insert New CreatePartition option to create the first partition.
- Right-click CreatePartitions again, and select the Insert New CreatePartition option to create a second partition.
- Right-click CreatePartitions again, and select the Insert New CreatePartition option to create a third partition.
- Right-click CreatePartitions again, and select the Insert New CreatePartition option to create a fourth partition.
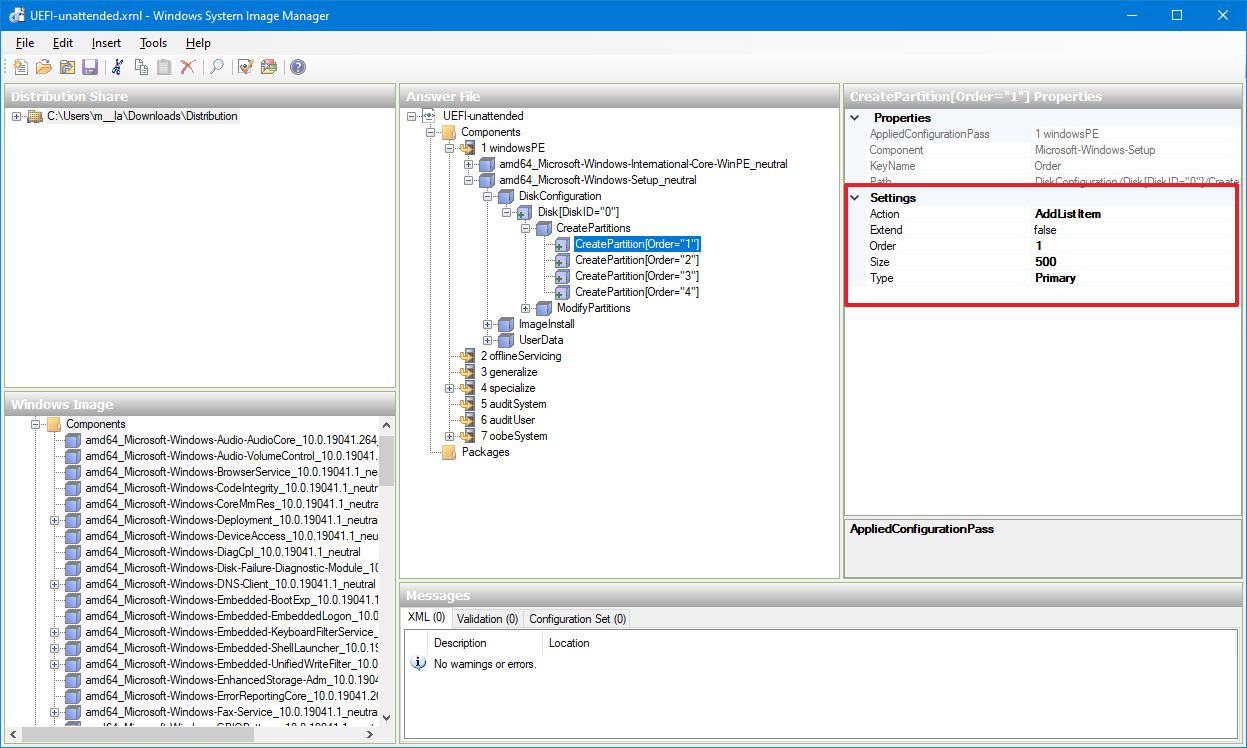
- Select the first CreatePartition.
- Under the «Settings» section, on the right side, use these values to create the Windows Recovery (WinRE) partition:
- Extend: false.
- Order: 1.
- Size: 500.
- Type: Primary.
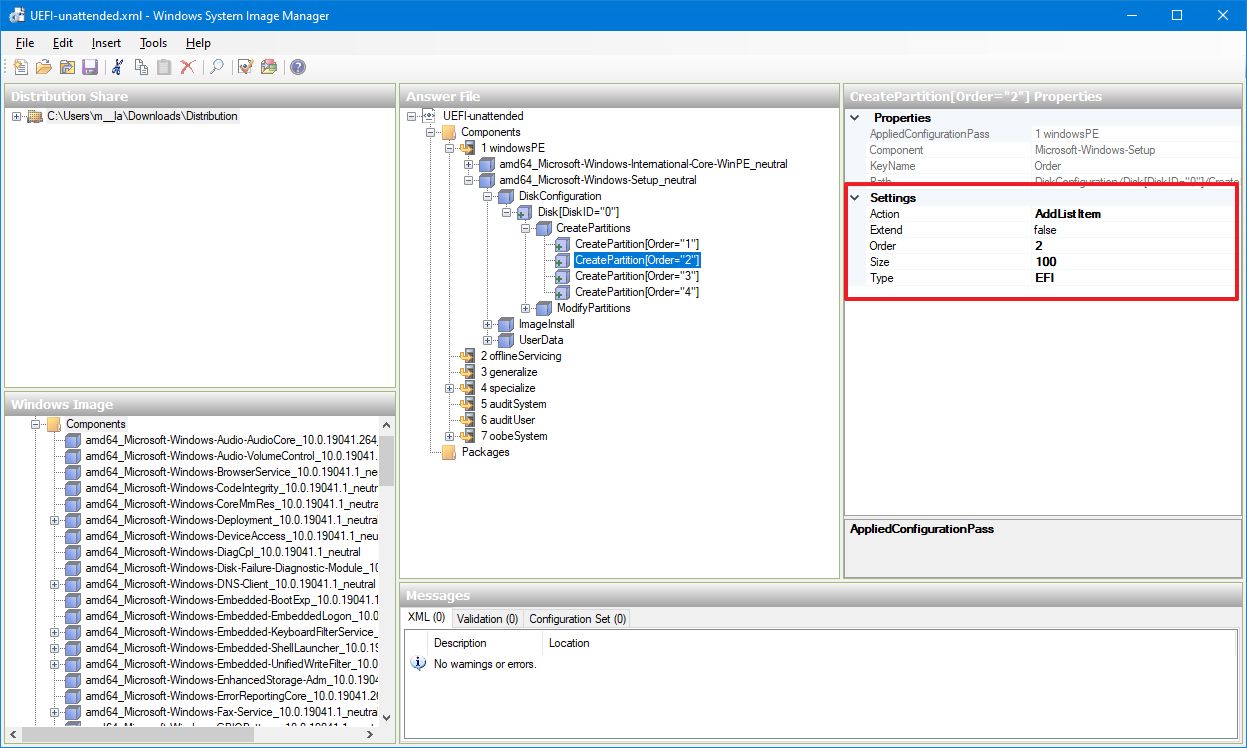
- Select the second CreatePartition.
- On the right side, under «Settings,» use these values to create an EFI partition:
- Extend: false.
- Order: 2.
- Size: 100.
- Type: EFI.
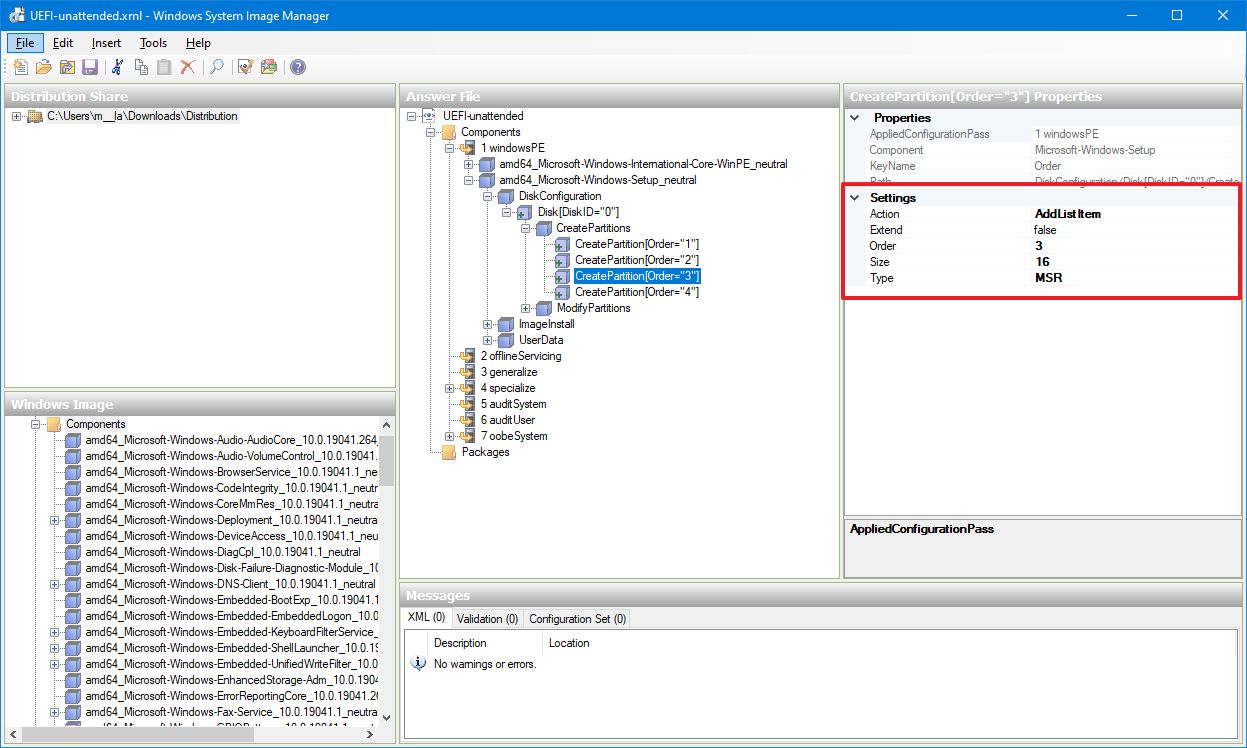
- Select the third CreatePartition.
- On the right side, under «Settings,» use these values to create a Microsoft reserved partition (MSR) partition:
- Extend: false.
- Order: 3.
- Size: 16.
- Type: MSR.
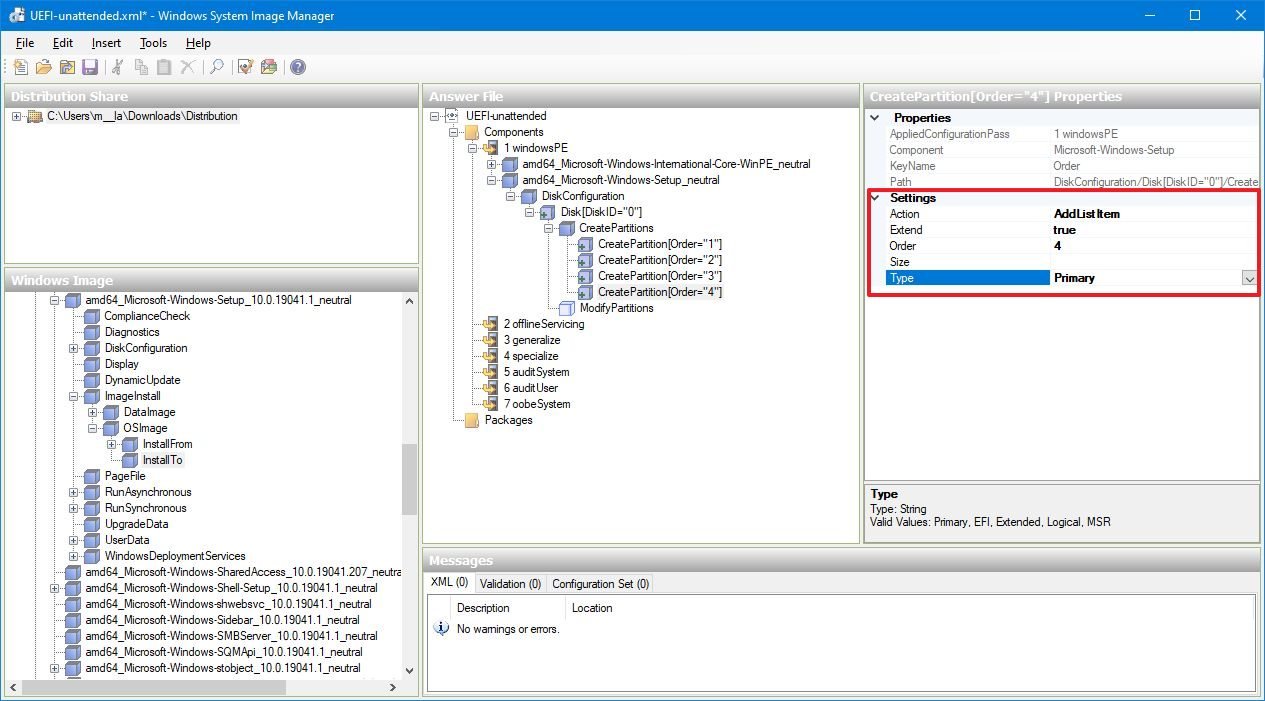
- Select the third CreatePartition.
- On the right side, under «Settings,» use these values to create the Windows partition:
- Extend: true.
- Order: 4.
- Type: Primary.
Using the above steps, outlined the steps to carved the partitions. The next steps specify the required file format and partition properties.
To specify the format settings in the answer file, use these steps:
- Under the «Answer File» section, expand the amd64_Microsoft-Windows-Setup component.
- Expand the DiskConfiguration component.
- Expand the Disk component.
- Right-click the ModifyPartition component, and select the Insert ModifyPartition option to create the first partition.
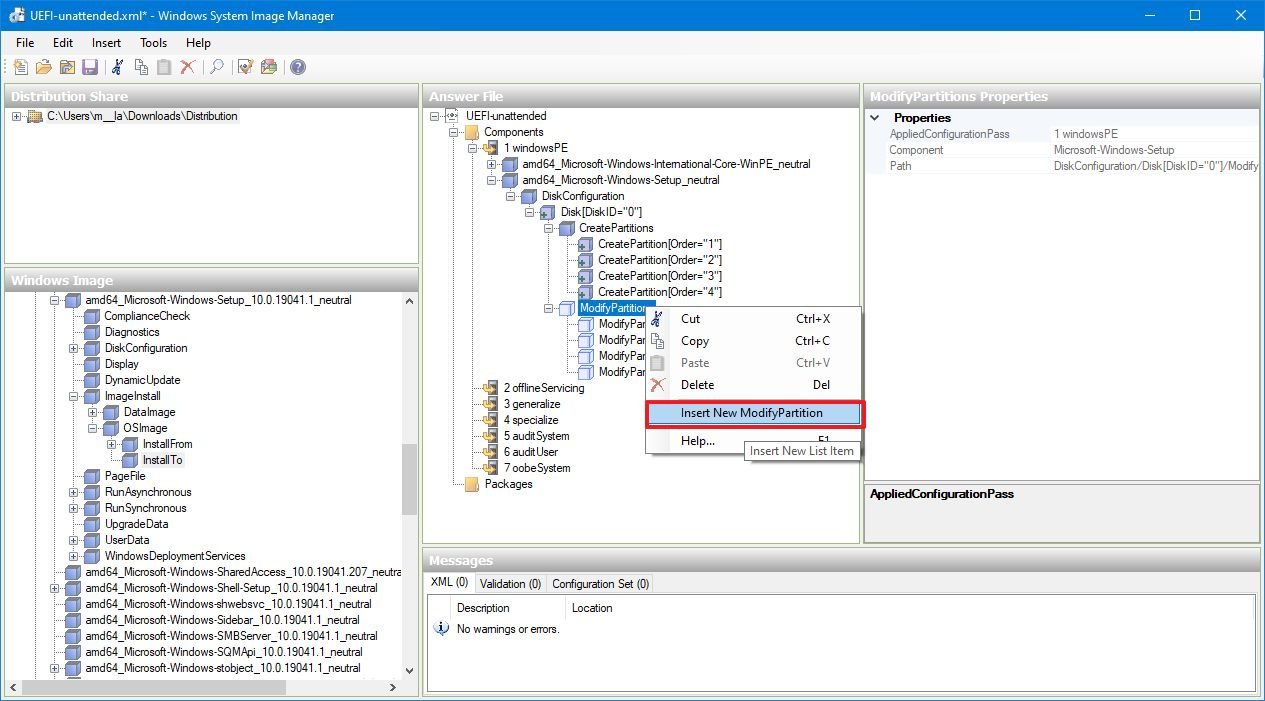
- Right-click ModifyPartition again, and select the Insert ModifyPartition option to modify the second partition.
- Right-click ModifyPartition again, and select the Insert ModifyPartition option to modify the third partition.
- Right-click ModifyPartition again, and select the Insert ModifyPartition option to modify the fourth partition.
- Select the first ModifyPartition.
- On the right side, under «Settings,» use these values to configure the Windows Recovery (WinRE) partition:
- Format: NTFS.
- Label: WinRE.
- Order: 1.
- PartitionID: 1.
- TypeID: DE94BBA4-06D1-4D40-A16A-BFD50179D6AC.

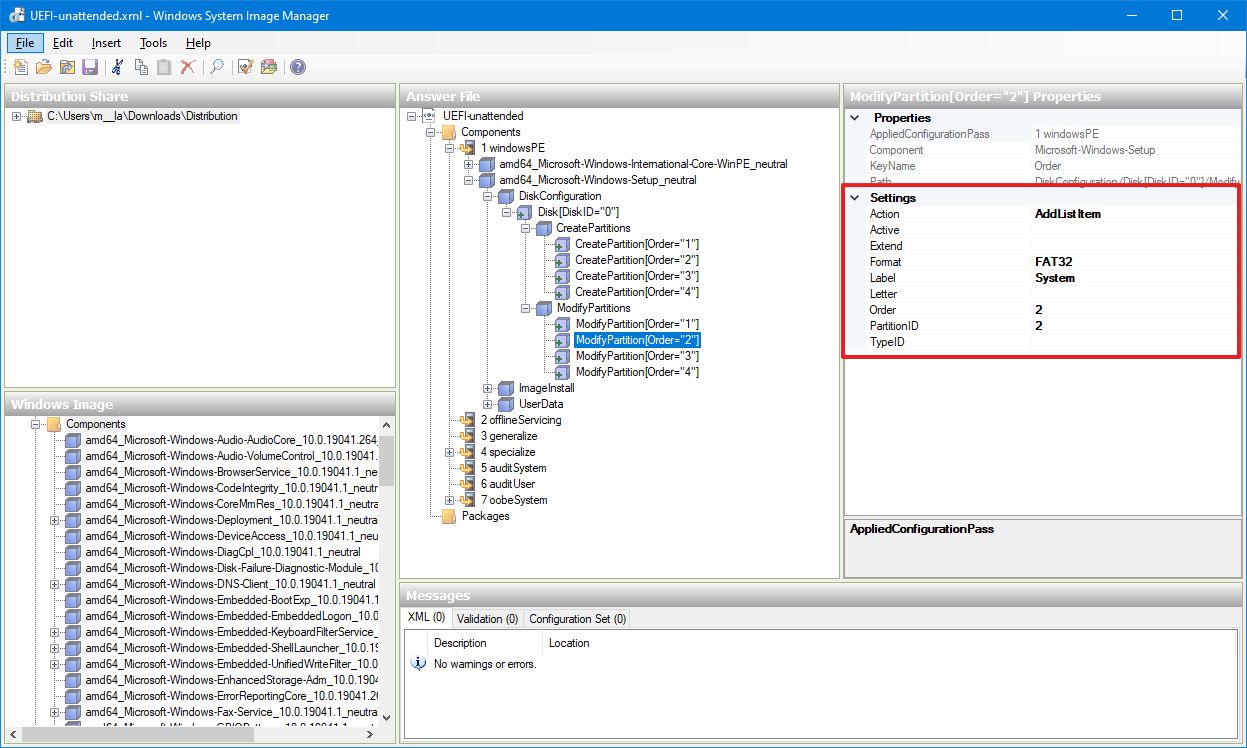
- Select the second ModifyPartition.
- On the right side, under «Settings,» use these values to configure an EFI partition:
- Format: FAT32.
- Label: System.
- Order: 2.
- PartitionID: 2.
- Select the third ModifyPartition.
- On the right side, under «Settings,» use only these two values to configure a Microsoft reserved partition (MSR) partition:
- Order: 3.
- PartitionID: 3.
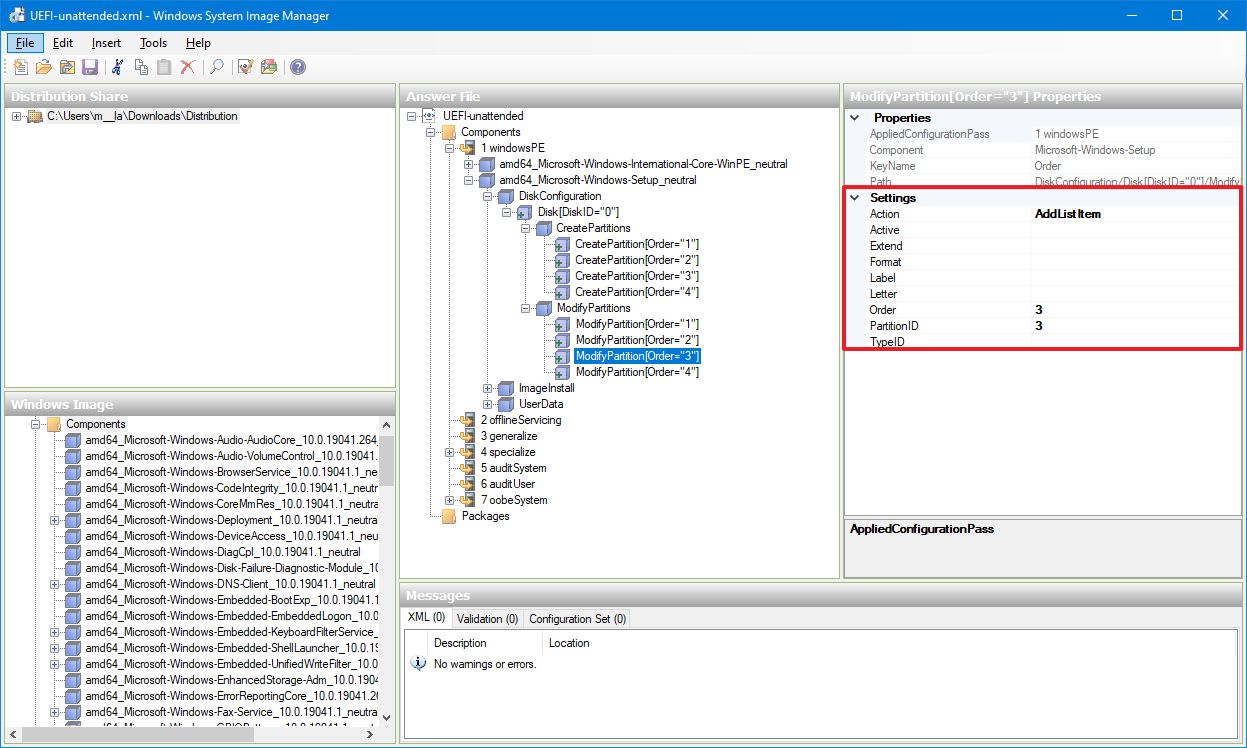
- Select the third ModifyPartition.
- On the right side, under «Settings,» use these values to configure a partition to install Windows 10:
- Format: NTFS.
- Label: Windows.
- Letter: C.
- Order: 4.
- PartitionID: 4.
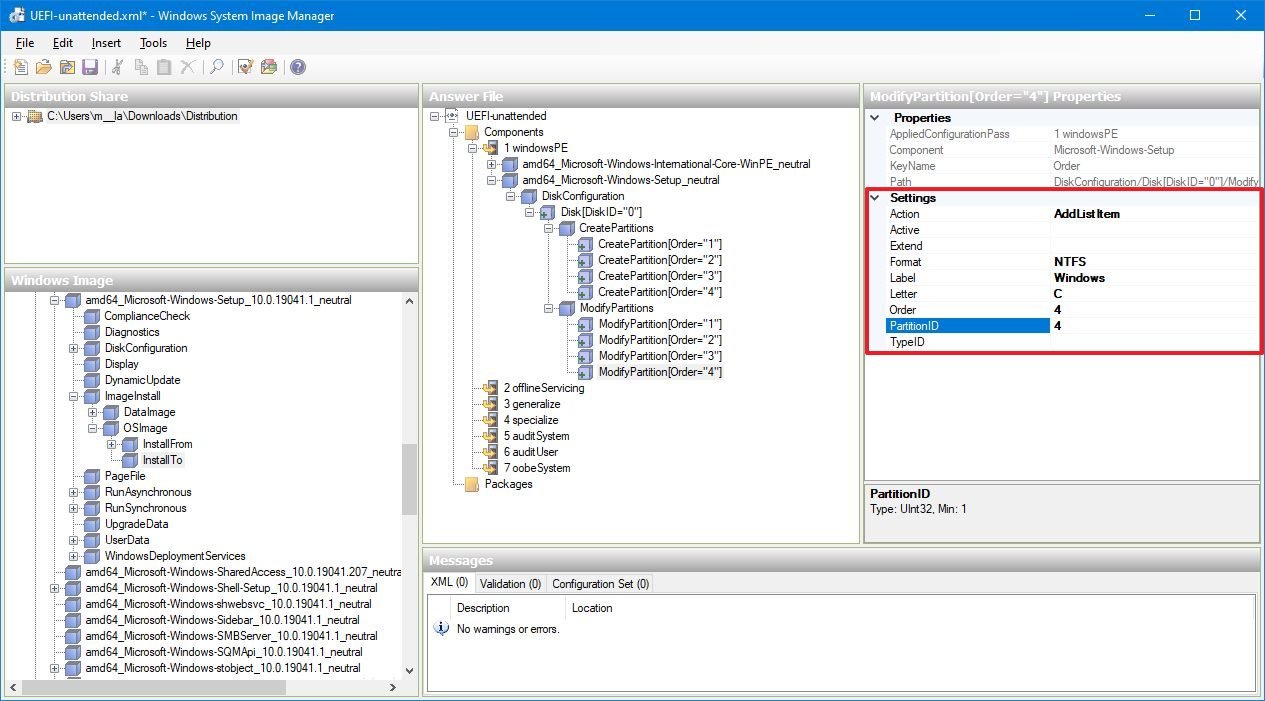
In the steps, using the Order and PartitionID, you’re specifying how the setup should configure each of the four raw partitions you have created earlier.
You can learn more about the partition layout required for a UEFI system in this Microsoft support page.
As part of this part of the setup, the last task is to indicate the setup where to install Windows 10.
To select the drive to install Windows 10 automatically, use these steps:
- Under «Windows Image,» expand the Components folders.
- Expand the amd64_Microsoft-Windows-Setup component.
- Expand the ImageInstall component.
- Expand the OSImage component.
- Right-click the InstalTo component, and select the Add Setting to Pass 1 windowsPE option.
- Under the «Answer File» section, on the right side, select the InstallTo component.
- Under the «Settings» section, on the right side, use these values:
- DiskID: 0.
- PartitionID: 4.
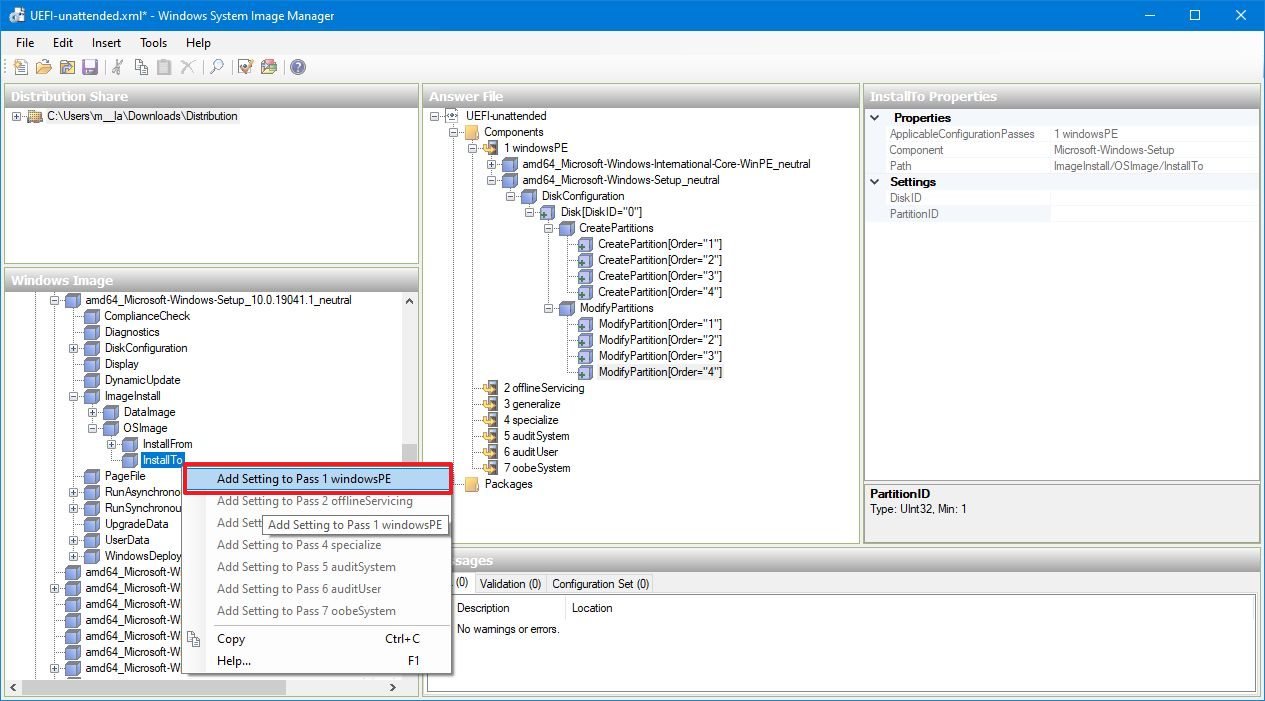
The above settings will indicate for the setup to install Windows 10 on the first drive inside the fourth partition.
Once you complete the steps, continue with the Defining the product key instructions below.
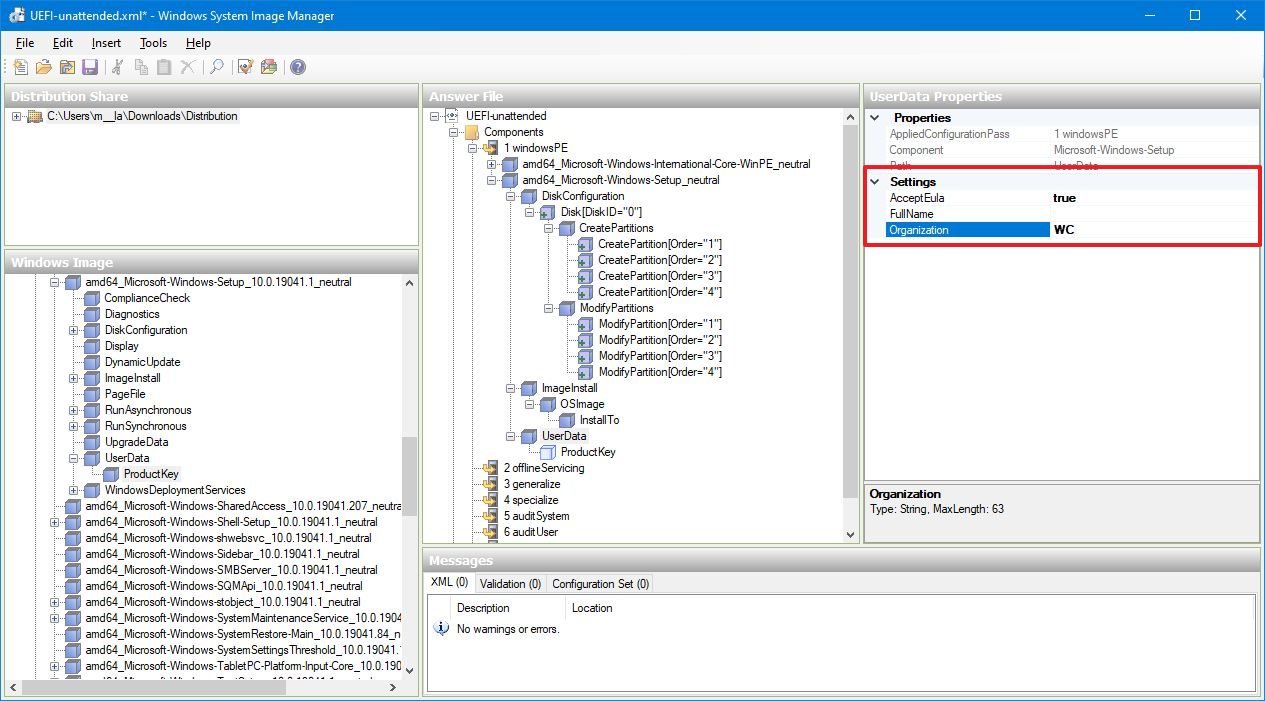
Defining the product key
In the first pass, you can also specify the product key for Windows 10. If you’re creating an answer file that you’ll use in multiple devices, you should be using a volume or generic product key.
To specify a product key, use these steps:
- Under the «Windows Image» component, expand the Components folders.
- Expand the amd64_Microsoft-Windows-Setup component.
- Expand the UserData component.
- Right-click the ProductKey component and select the Add Setting to Pass 1 windowsPE option.
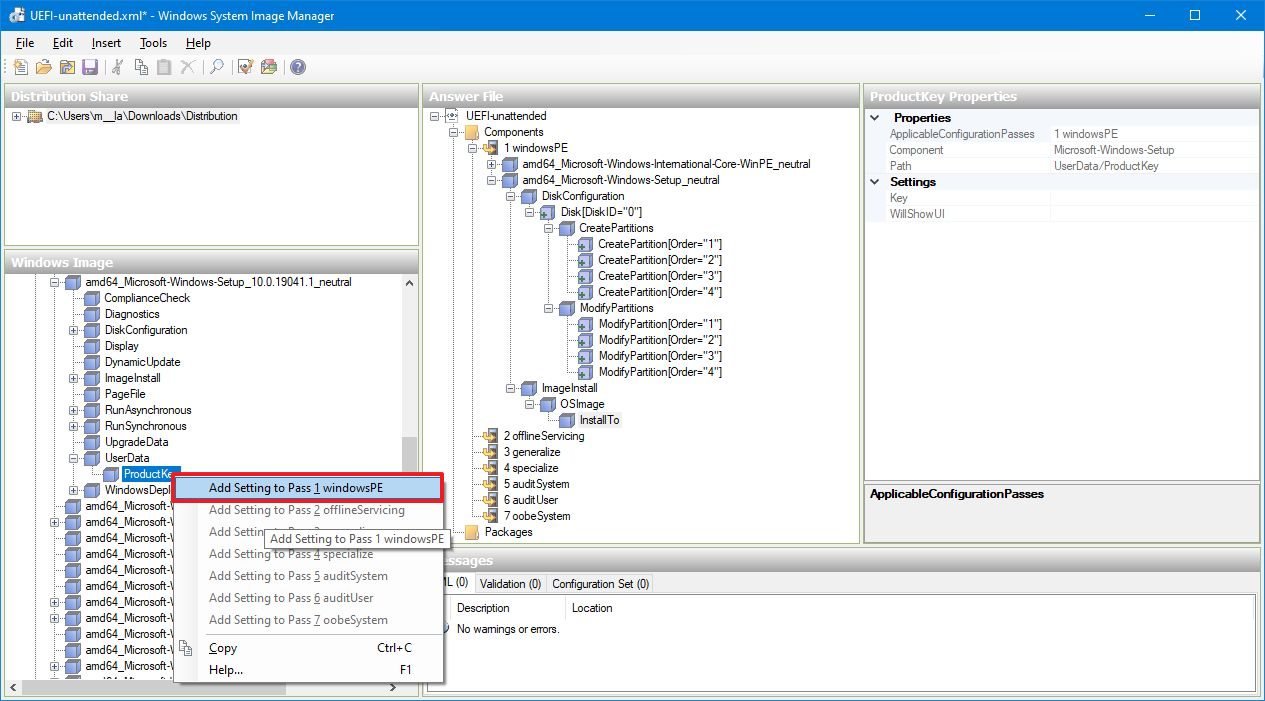
- Under the «Answer File» section, on the right side, select the UserData component.
- Under the «Settings» section, on the right side, use the following settings:
- AcceptEula: true.
- Organization: WC.
In the above settings, you can use any name for the Organization value. For example, home users could «Family» as the organization name.
- Expand the UserData component.
- Select the ProductKey component.
- Under the «Settings» section, make sure to update the Key value using the product key for the edition of Windows 10 you intend to install.
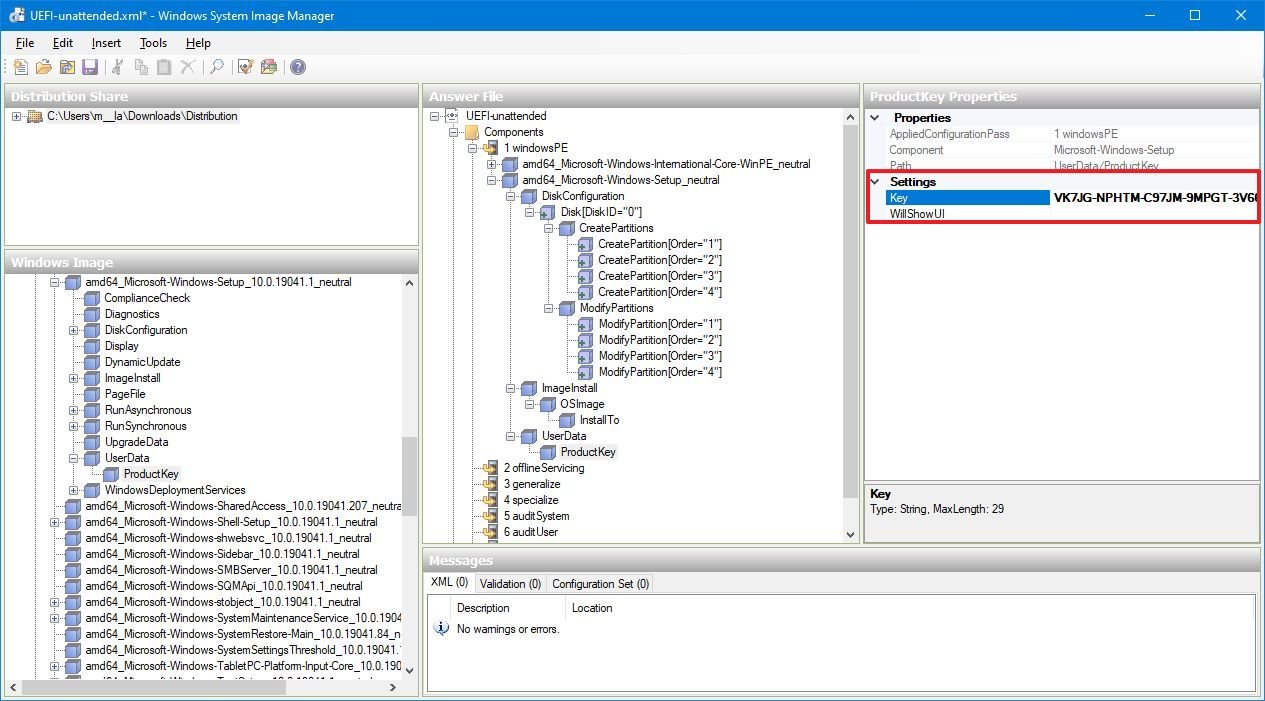
You can also use a generic product key to create an answer file:
- Windows 10 Pro: VK7JG-NPHTM-C97JM-9MPGT-3V66T.
- Windows 10 Home: YTMG3-N6DKC-DKB77-7M9GH-8HVX7.
- Windows 10 Enterprise: NPPR9-FWDCX-D2C8J-H872K-2YT43.
You can always check this Microsoft support website to find the appropriate generic key for your installation.
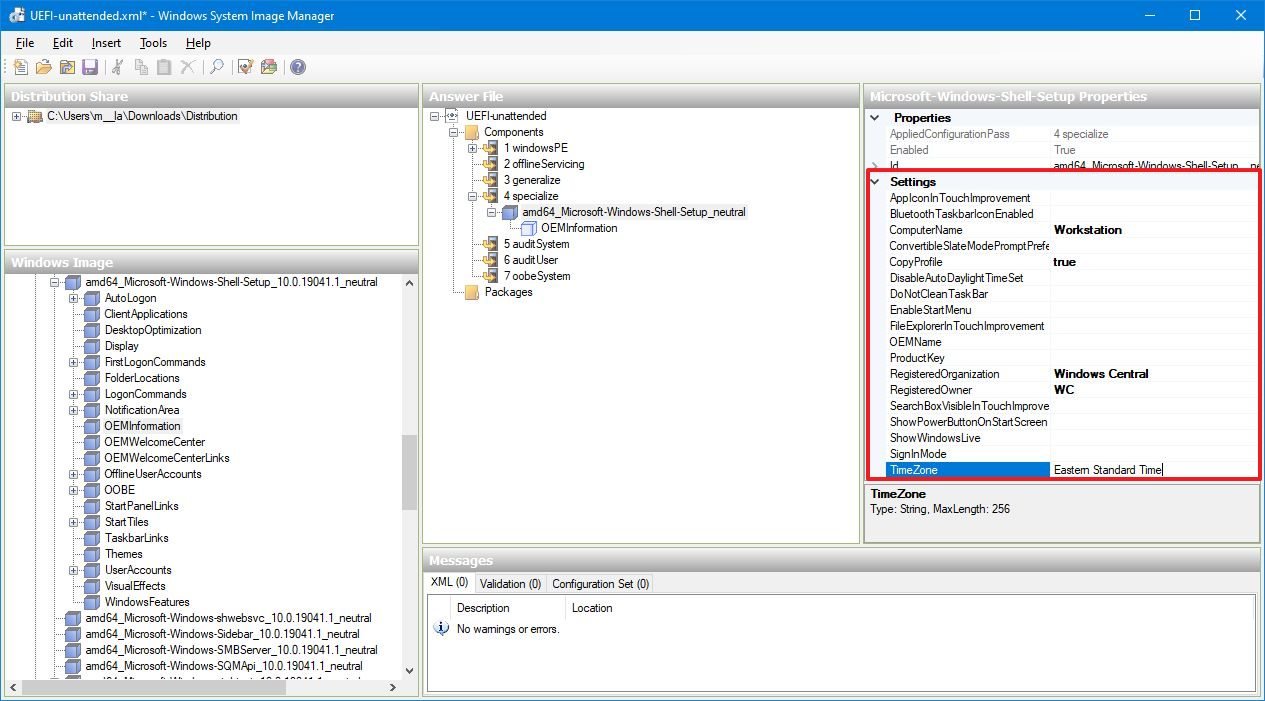
Pass 4 specialize
If you want to configure additional settings, such as model, manufacturer, computer name, ownership name, timezone, and more during the installation, while in the Windows System Image Manager, use these steps:
- Under the «Windows Image» section, expand the Components folders.
- Expand the amd64_Microsoft-Shell-Setup component.
- Right-click the OEMInformation component and select the Add Setting to Pass 4 specialize option.
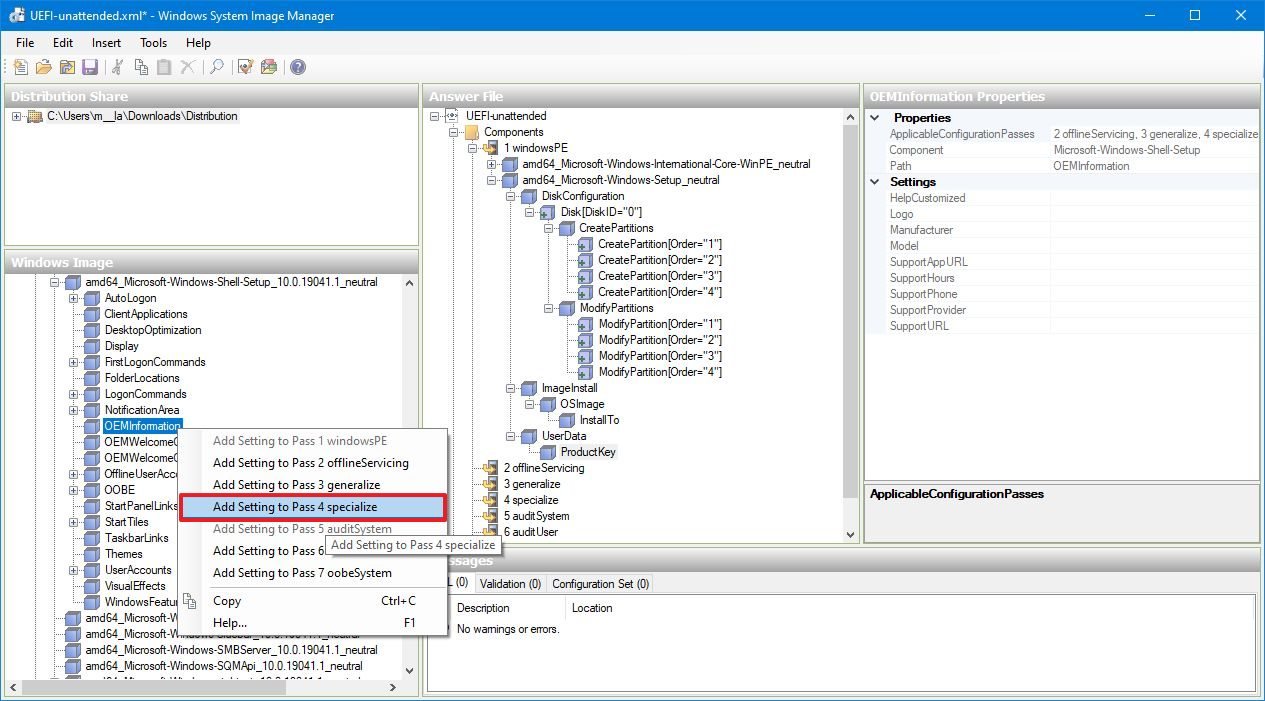
- Under the «Answer File» section, on the right-side, select the amd64_Microsoft-Shell-Setup component.
- Under the «Settings» section, on the right side, use the following values (specifying your custom information):
- ComputerName: Workstation.
- CopyProfile: true.
- RegisteredOrganization: Windows Central.
- RegisteredOwner: WC.
- TimeZone: Eastern Standard Time.
If you don’t configure the TimeZone setting, Windows 10 will set the zone based on the language you’re installing. You can check the Microsoft support website to find out the exact name for your time zone.
- Expand the amd64_Microsoft-Shell-Setup component.
- Select the OEMInformation component.
- (Optional) Under the «Settings» section, on the right side, specify some computer specific properties:
- Manufacturer: Dell.
- Model: XPS.
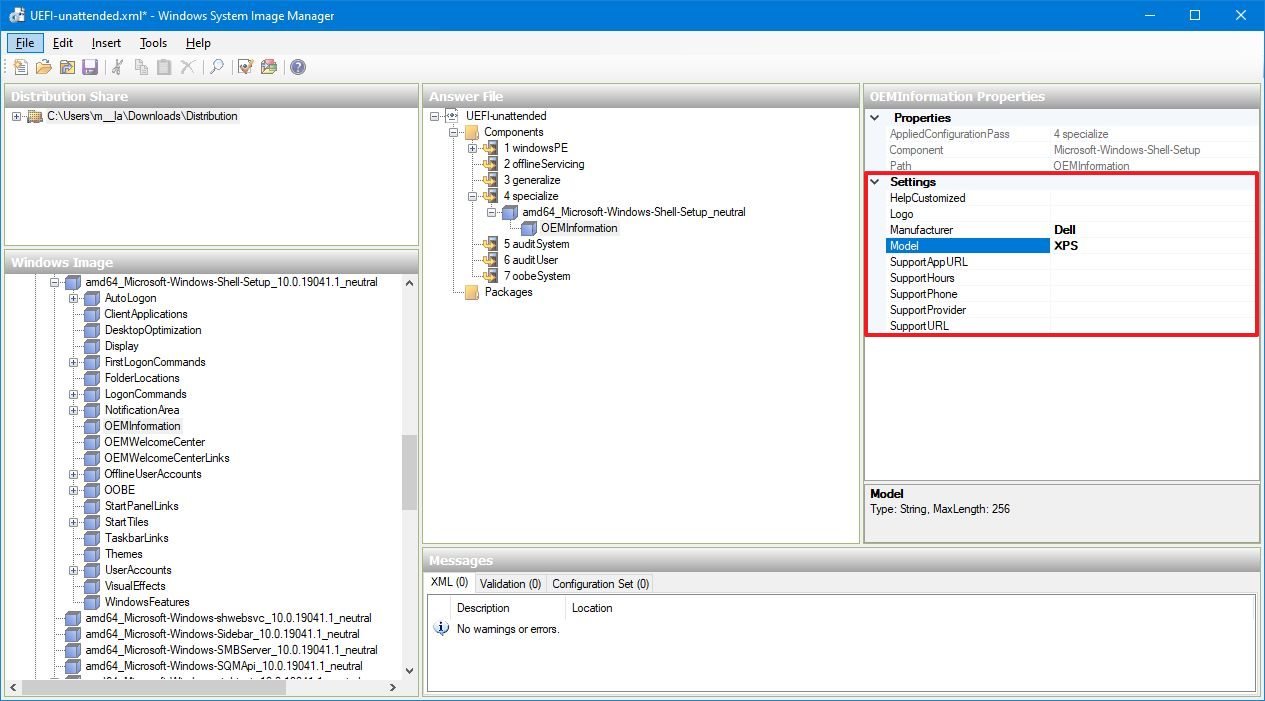
Once you complete the steps, during the installation, the setup will read the autounattend.xml file and configure the settings you specified.
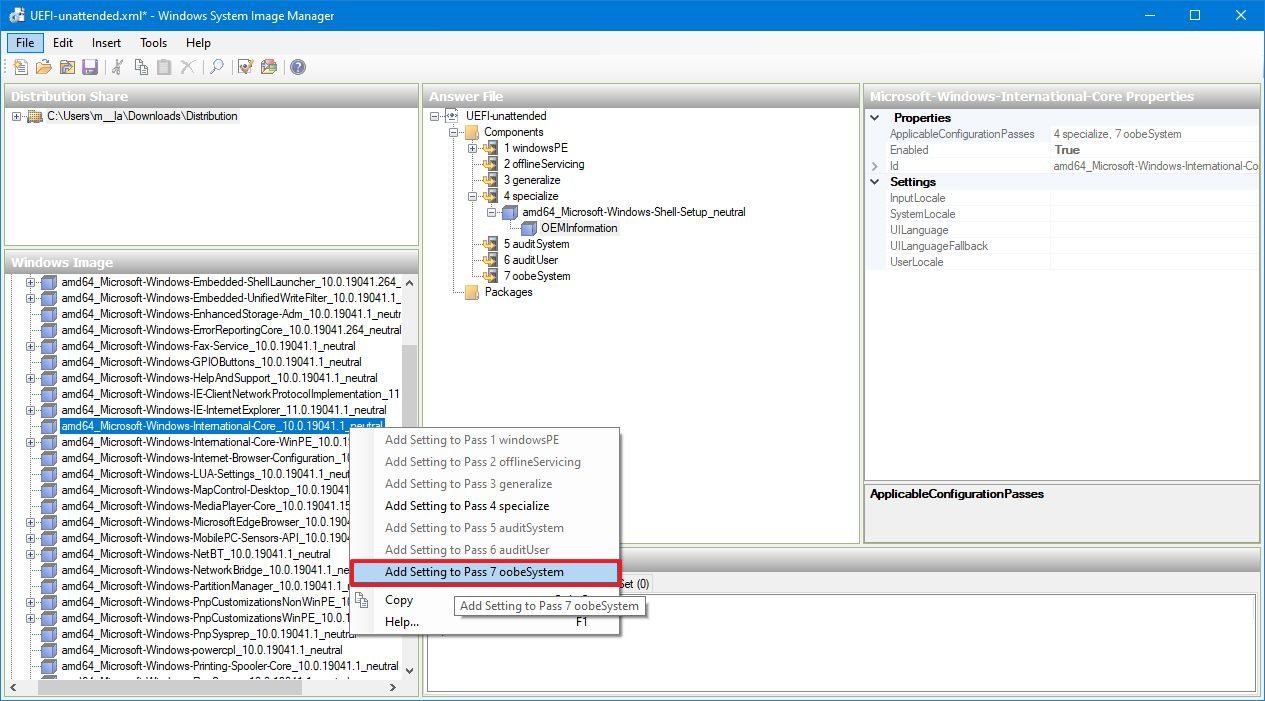
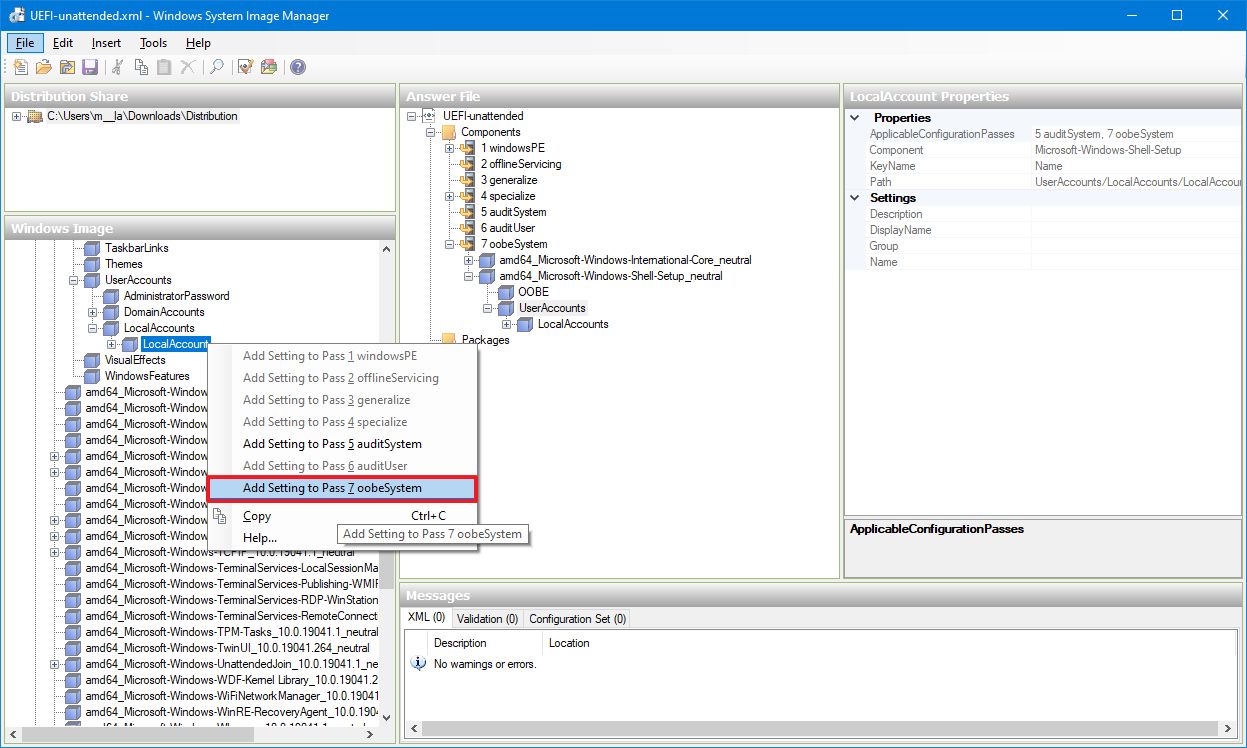
Pass 7 oobeSystem
Using an answer file, you can also automate the configuration of the out-of-box experience (OOBE), including additional language settings, accept the licensing agreement, create a user account, and more.
To configure the out-of-box experience, while in the Windows System Image Manager, use these steps:
- Under «Windows Image,» expand the Components folders.
- Right-click the amd64_Microsoft-Windows-International-Core component, and select the Add Setting to Pass 7 oobeSystem option.
- Under the «Windows Image» section, expand the amd64_Microsoft-Shell-Setup component.
- Right-click the OOBE component, and select the Add Setting to Pass 7 oobeSystem option.
- Expand the UserAccounts component.
- Expand the LocalAccounts component.
- Right-click the LocalAccounts component, and select the Add Setting to Pass 7 oobeSystem option.
- Under the «Answer File» section, select the amd64_Microsoft-Windows-International-Core component.
- Under the «Settings» section, on the right-side, specify the language settings:
- InputLocale: en-US.
- SystemLocale: en-US.
- UILanguage: en-US.
- UserLocale: en-US.
Only users outside the United States should configure ULLanguageFallback using the en-US value as the fallback language.To identify the correct input profile name, you can check out this Microsoft support page.
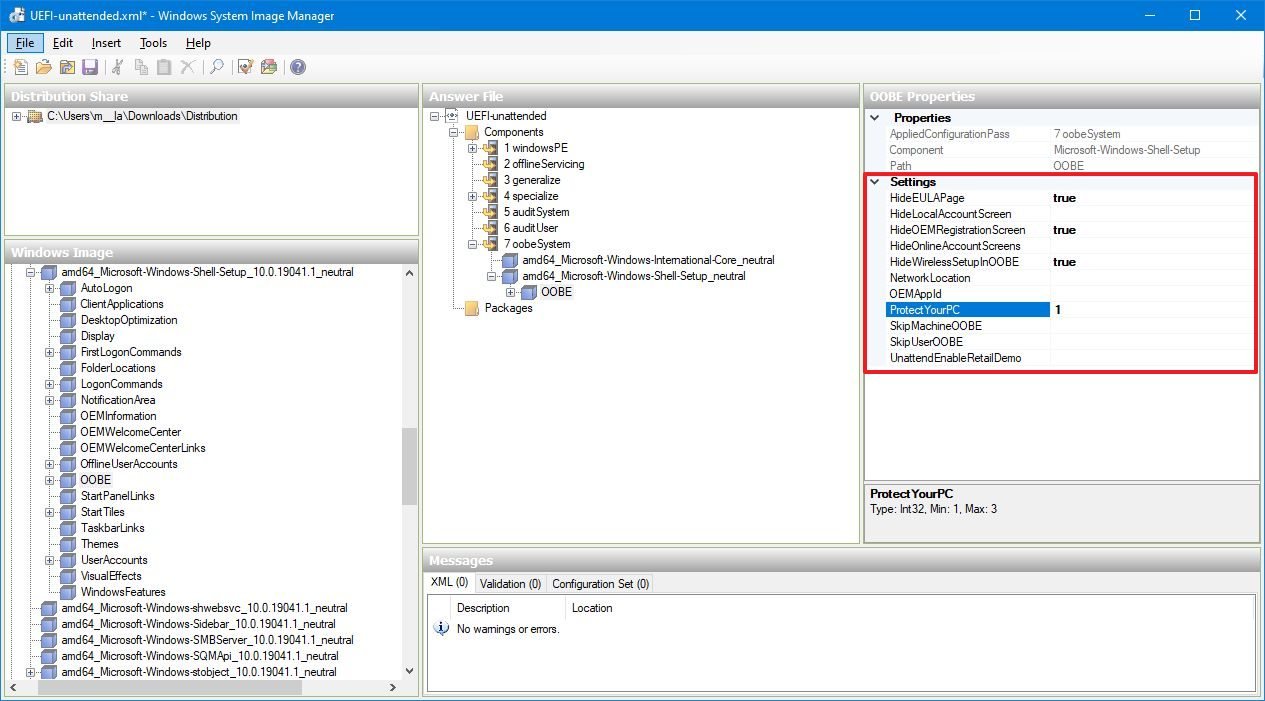
- Under the «Answer File» section, expand the amd64_Microsoft-Shell-Setup component.
- Select the OOBE component.
- Under the «Settings» section, on the right size, use the following values:
- HideEULAPage: true.*
- HideOEMRegistrationScreen: true.
- HideOnlineAccountScreens: true.
- HideWirelessSetupinOOBE: true.
- ProtectYourPC: 1.While most settings are self-explanatory, you’ll notice that the ProtectYourPC setting is also configured to define how the express settings should be handled. Using the value of 1, you’re telling the setup to enable the express settings using the default preferences.
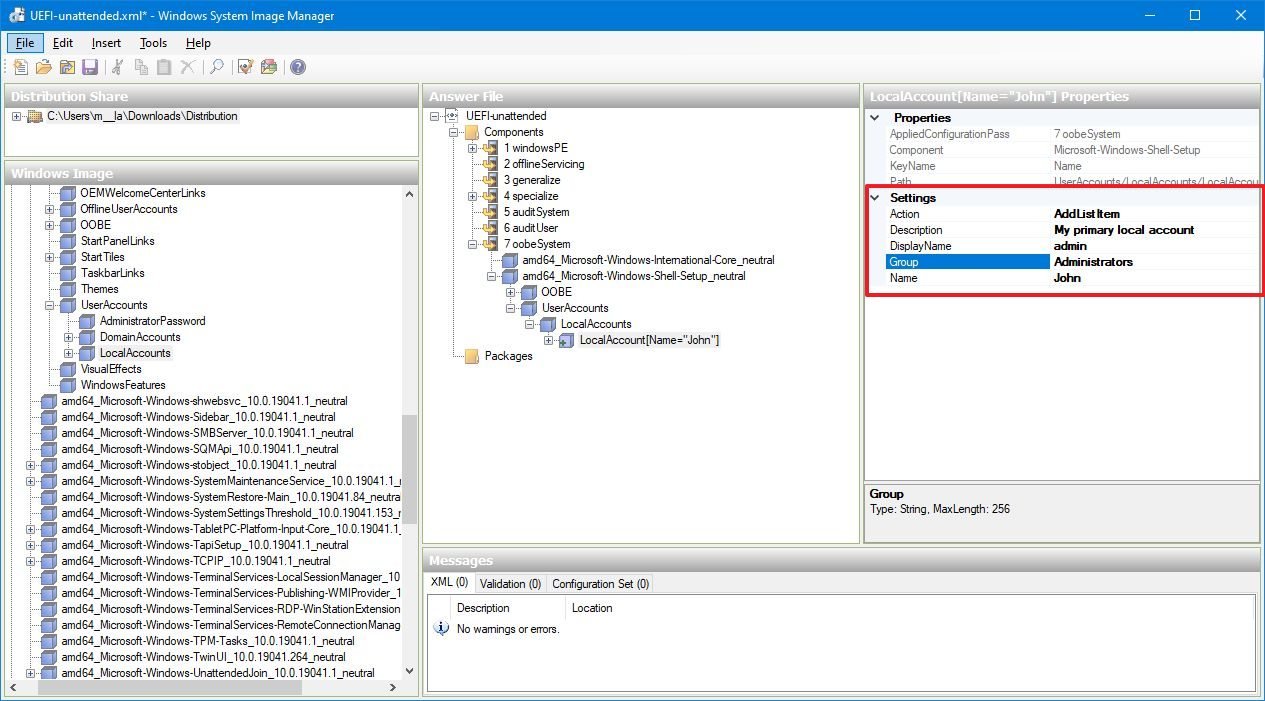
- Expand the UserAccounts component.
- Right-click the LocalAccounts component and select the Insert New LocalAccount option.
- Under the «Settings» section, on the right side, use the following configuration to create a primary local account:
- Description: My primary local account.
- DisplayName: admin.
- Group: Administrators.
- Name: John.
Using the above settings, you’ll be creating an account called «admin» for user «John,» and we’re adding the account to the «Administrators» group that gives the user unrestricted access to the device. Of course, you can always define your custom preferences, including for «Description,» «DisplayName,» «Group,» and «Name.»
- Expand the LocalAccount component.
- Select the Password component.
- Under the «Settings» section, on the right-side, type a password in the Value field.
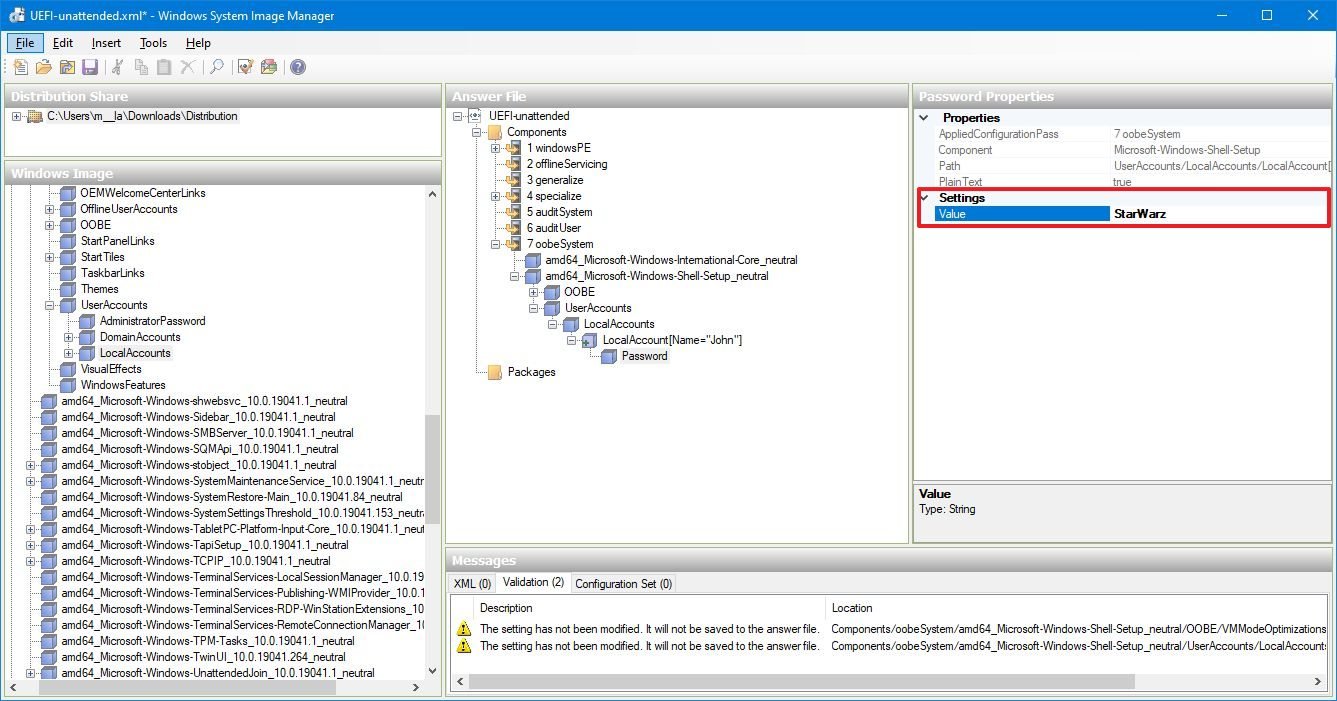
While you’ll see the password in plain text, after saving the autounattend.xml file, the value will be encrypted.
How to save Windows 10 answer file project
Once you complete setting up all the configurations to install Windows 10 automatically, you need to remove all the unmodified components, validate the answer file, and save changes as an autounattend.xml file.
Remove unmodified components
To remove unnecessary components, use these steps:
- Under the «Answer File» section, expand all the components you added from the «Windows Image» section.
- Select the component that you didn’t configure. (These are those with light purple color.)
- Right-click the components, and select the Delete option.
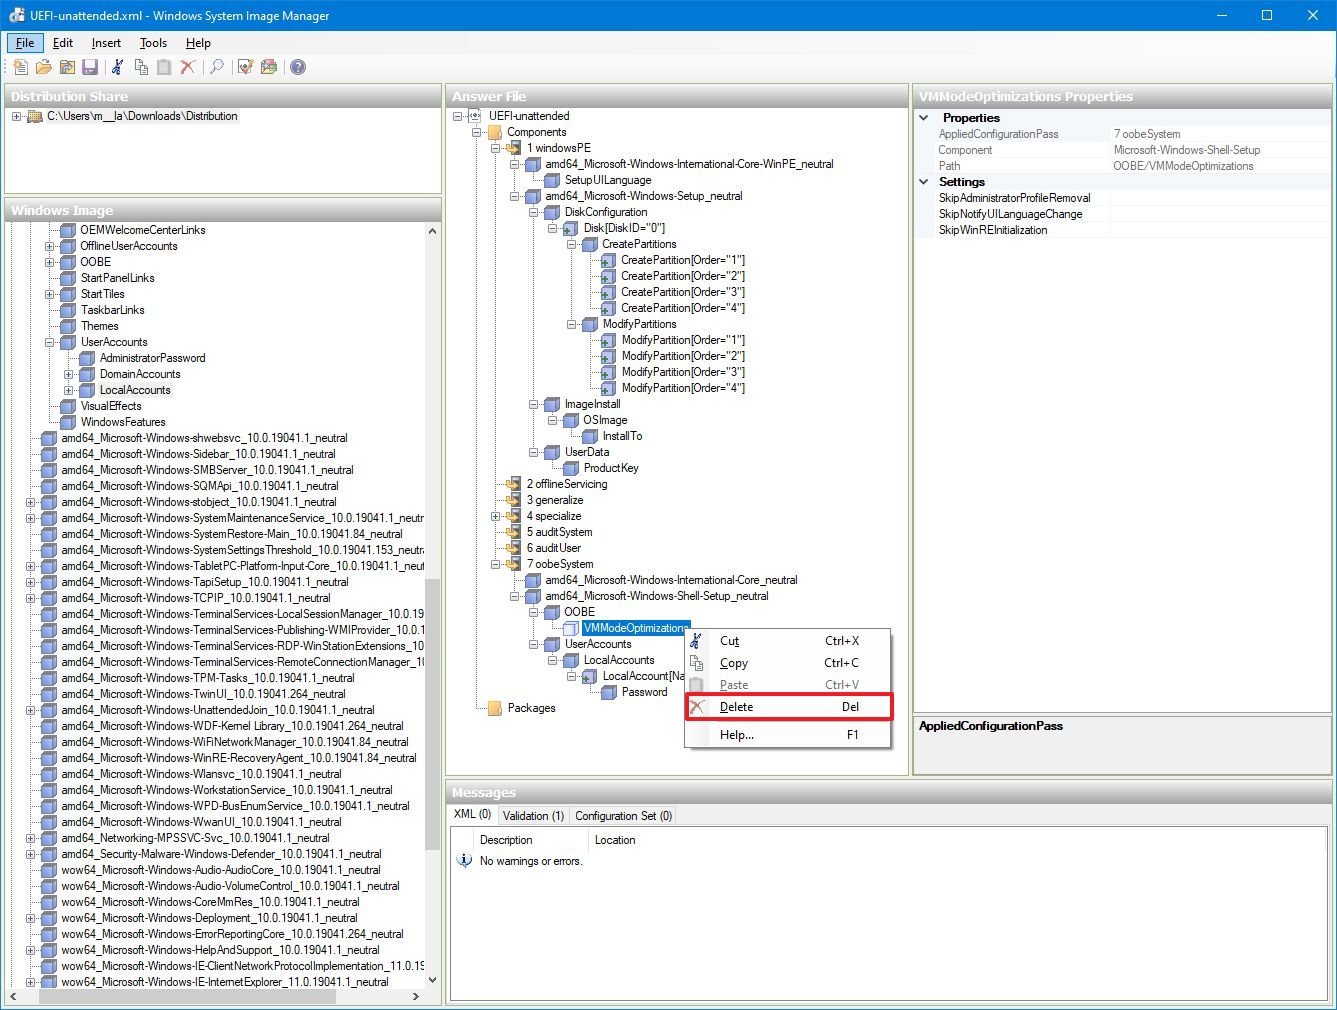
- Repeat steps No. 2 and 3 until you remove all the components that you didn’t modify.
After you complete the steps, you need to validate the answer file.
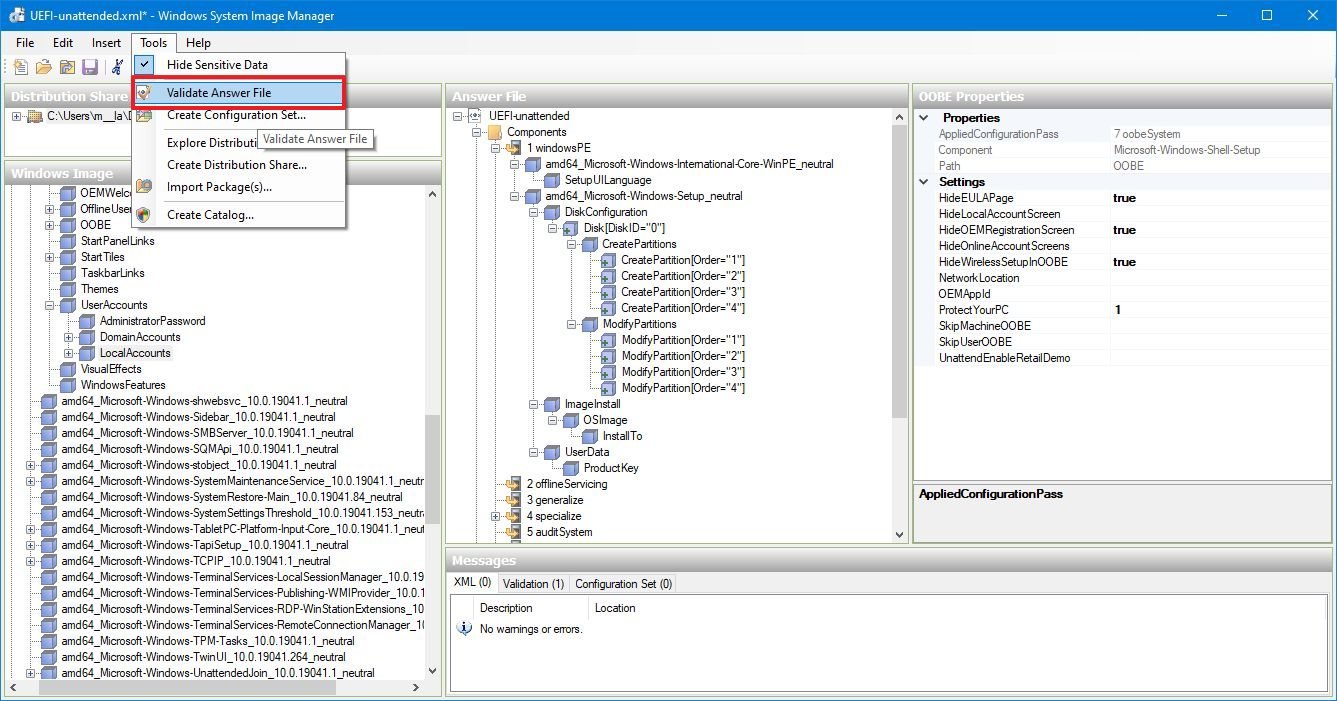
Validating answer files
To validate the answer file, use these steps:
- Click the Tools menu.
- Select the Validate option.
- Under the «Messages» section, at the bottom, check the Validation tab. If you don’t see any warnings, the file is good to go.
Once you complete the steps, it’s time to save the file and imported to the installation media.
Saving the answer file
To save the answer file, use these steps:
- Click the File menu.
- Select the Save Answer File As option.
- Navigate to the folder you want to save the file.
- Under «File name,» use the autounattend.xml file name.
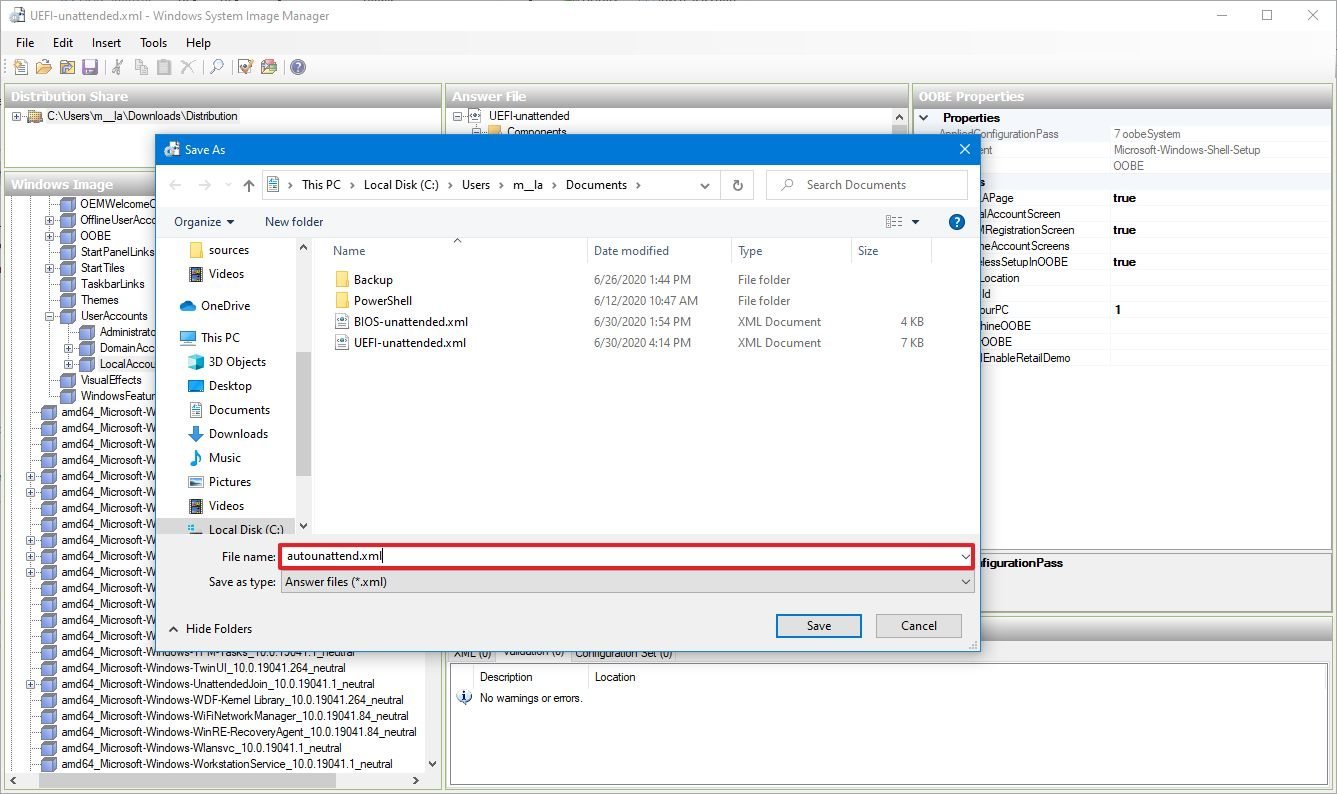
- Click the Save button.
If you’re configuring multiple answer files, it’ll be best to save the file on a different folder with a descriptive name.
Import answer file to USB media
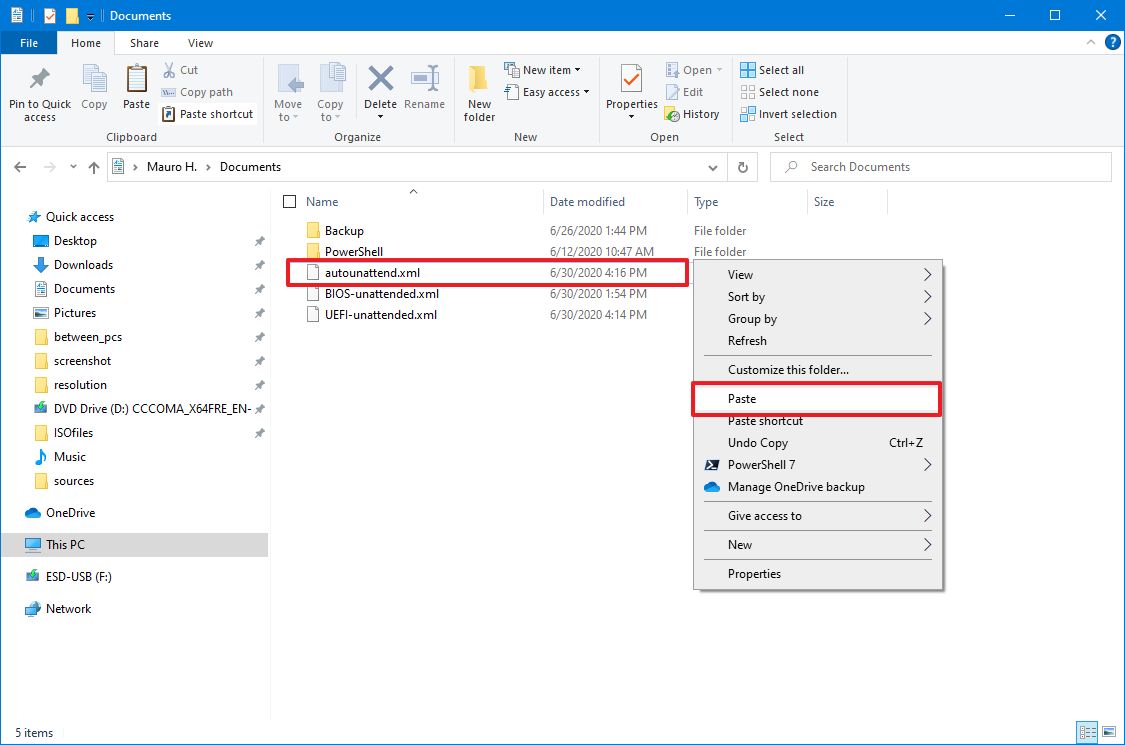
To include an autounattend.xml file on a Windows 10 bootable media, use these steps:
- Open File Explorer.
- Navigate to the autounattend.xml file location.
- Right-click the file, and select the Copy option.
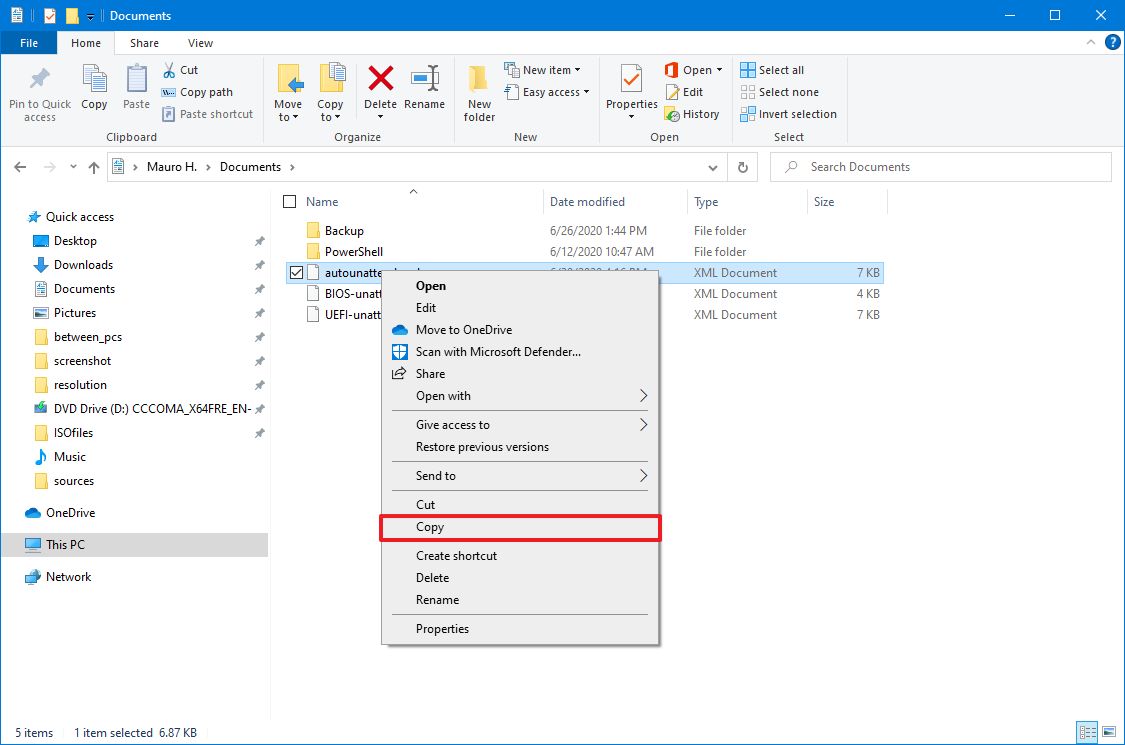
- Open the USB media with the Windows 10 installation files.
- In the root of the drive, right-click the Paste to copy the autounattend.xml to the Windows 10 installation media.Quick tip: When placing the «autounattend.xml» file on the installation media, make sure you’re using a bootable media that only includes one architecture (in this case, Windows 10 64-bit). If you created an installation media for both 32-bit and 64-bit, the process would pause at the beginning until you select the architecture to install.
In the case that you don’t have a Windows 10 USB installation media, you can create one using the Media Creation Tool or using a third-party tool, such as Rufus.
How to install Windows 10 using answer file
Once you have the USB bootable media with the answer file incorporated, you can perform an unattended installation of Windows 10 with these steps:
Warning: This process will delete everything on your computer and install Windows 10 without any prompts. Make sure to connect the USB flash drive to the correct device. Otherwise, you may end up wiping out the incorrect device.
- Turn off the computer you want to install Windows 10.
- Connect the USB flash bootable media with the autounattend.xml file.
- Power on the computer and then Windows 10 should install automatically.
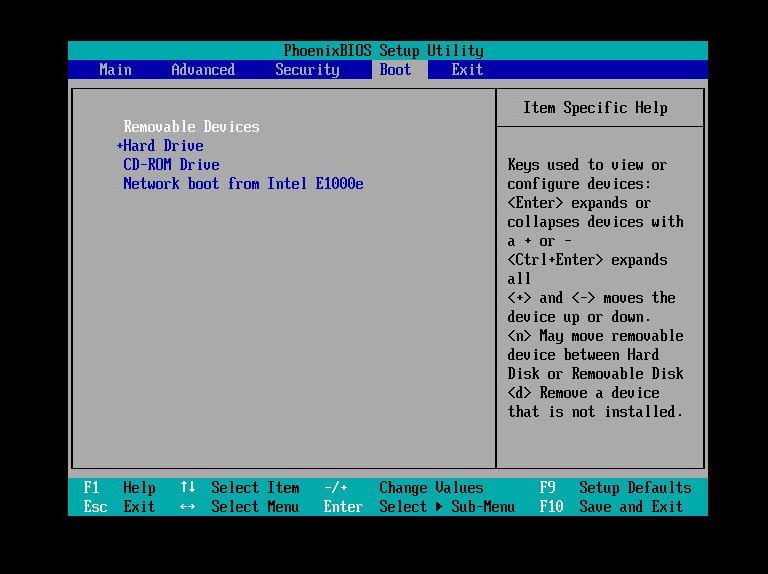
If the Windows Setup doesn’t start, it’s likely because you don’t have the device configured to boot from the USB installation media. If this is the case, you’ll need to access the BIOS or UEFI firmware on your motherboard to change the boot order.
This process typically requires hitting one of the function keys (F1, F2, F3, F10, or F12), the ESC, or Delete key as soon as you start your device. However, these settings will be different per manufacturer, and even per device model. Make sure to check your computer manufacturer’s support website for more specific instructions.
After getting access to the firmware interface, find the Boot settings and change the boot order to start with the USB drive that includes the installation files, and save the settings (usually using the F10 key).
If your computer is based on UEFI, then the steps to change the boot order will be different.
On a Windows 10 device using UEFI, you’ll need to access to Settings > Update & Security > Recovery, and under «Advanced Startup,» click the Restart now button.
Then click on Troubleshoot > Advanced options > UEFI Firmware Settings, and click the Restart button.
Once you’re in the UEFI firmware interface, find the Boot settings and change the boot order to start with the USB drive that includes the installation files, and then save the settings.
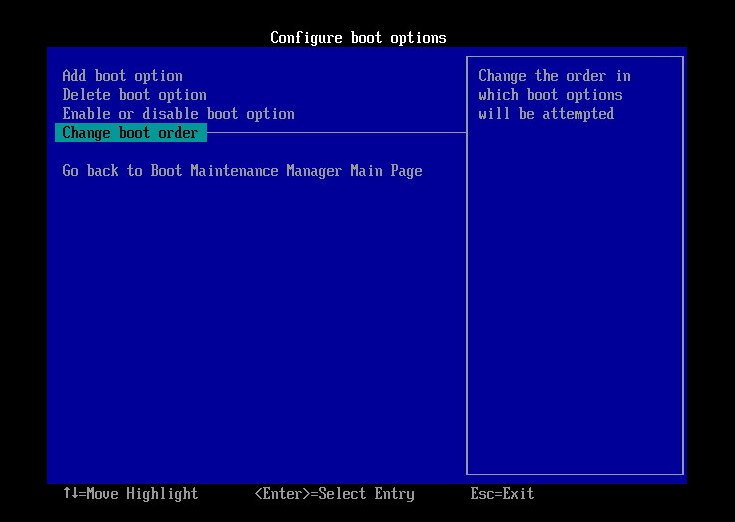
If the drive doesn’t have an OS already installed, check your manufacturer support website for details to access the UEFI firmware.
How to troubleshoot Windows 10 answer file
Although an answer file can make the process of installing Windows 10 easier, one small mistake can halt the setup and cause unwanted errors.
When validating the answer file, if you come across any problems, you should always re-check the settings for each component you selected and remove any additional element that was not modified.
If you made a mistake configuring a property value for a component, don’t empty the field, instead right-click the property and select the Revert Change option.
At the time to begin the Windows 10 installation, disconnect the computer from the network, because sometimes you may come across problems while the setup is trying to download updates. You can always reconnect to the network after the installation.
An answer file explicitly crafted for a computer using a legacy BIOS will not work on a UEFI-based device. Always make sure to use the correct settings for the hardware you’re trying to automate the installation process.
In the rare case that the answer file you created using Windows System Image Manager isn’t working, then you should open the «autounattend.xml» file with any text editor and correct any error manually.
Anyone can use this automation process, but this method has been designed for organizations. This means that you won’t find an option to perform an installation using a Microsoft account. However, you can always create an installation with a Windows 10 local account and then link it to your Microsoft account. You can perform this task from Settings > Accounts > Your info, and clicking the Sign in with your Microsoft account instead link.
You can check out this Microsoft support website to learn more about each setting, which you can configure to create an answer file to perform an automated installation of Windows 10.
Wrapping things up
While creating a bootable media with the instructions to install Windows 10 automatically has a lot of steps, the automation process will save you a significant amount of time and hassle, especially when you’re in a network environment where you need to setup Windows 10 on multiple machines.
We’re focusing on the minimum steps to perform an unattended clean installation of Windows 10 to help get started with the process. It’s up to you to dig through and configure the components you need to comply with your situation. Furthermore, depending on your installation requirements, you may need to create multiple answer files.
Mauro Huculak has been a Windows How-To Expert contributor for WindowsCentral.com for nearly a decade and has over 15 years of experience writing comprehensive guides. He also has an IT background and has achieved different professional certifications from Microsoft, Cisco, VMware, and CompTIA. He has been recognized as a Microsoft MVP for many years.
UnattendedWinstall
Introduction
UnattendedWinstall leverages Microsoft’s Answer Files (or Unattend files) to automate and customize Windows installations.
It enables modifications to Windows Settings and Packages directly in the Windows ISO during setup.
Why Use an Answer File?
Security
- Provides transparency by allowing inspection of all changes in the answer file.
- Runs directly on official Windows ISOs from Microsoft, eliminating the need for unofficial sources.
- Utilizes a Microsoft-supported feature designed for streamlined mass deployment of Windows installations.
Automation
- Enables automated configuration across multiple devices, saving time and effort by eliminating repetitive manual setups.
Versions
Support the Project
If UnattendedWinstall has been useful to you, consider supporting the project, it really does help!
Feedback and Community
If you have feedback, suggestions, or need help with UnattendedWinstall, please feel free to join the discussion on GitHub or our Discord community:
Requirements
- Windows 10 or Windows 11
- (Tested on Windows 10 22H2 & Windows 11 24H2)
- (32-bit, 64-bit and arm64 is supported)
What Does UnattendedWinstall Do?
The UnattendedWinstall answer file comes with detailed descriptions for nearly all configurations and registry tweaks, which are available for inspection here on GitHub. For customization, download the answer file and open it in editors like Cursor or VSCode.
Sources and Contributions
Click to Show
- Base Answer File Generation:
- Schneegans Unattend Generator
- Tweaks & Optimizations:
- ChrisTitusTech WinUtil
- FR33THY’s Ultimate Windows Optimization Guide
- Additional Tweaks:
- Tiny11Builder
- Ten Forums
- Eleven Forum
- Winaero Tweaker
Key Features
- Ability to choose Windows Edition (Pro is not enforced anymore as in v2.0.0)
- Bypasses Windows 11 system requirements
- Disables Windows Defender services by default
- prompted to enable after Windows installation
- Disables User Account Control by default
- prompted to enable after Windows installation
- Allows execution of PowerShell scripts by default
- Skips forced Microsoft account creation during Windows setup
- Removes preinstalled bloatware apps except Microsoft Edge, Notepad and Calculator
- Copilot and Recall is Disabled.
- Sets privacy-related registry keys to disable telemetry
- Limits Windows Update to install only security updates for one year
- Optimizes registry with various optimization and customization-related keys
- See the «Set-RecommendedHKLMRegistry» and «Set-RecommendedHKCURegistry» functions for more information
- Disables unnecessary scheduled tasks
- Configures Windows services for optimal performance
- Enables the Ultimate Performance power plan
Note
Use the UWScript.ps1 file once Windows is installed to reapply or revert settings in case Windows Update resets some of the settings or if you encounter any issues.
It can also be used to achieve a similar experience to UnattendedWinstall on an existing Windows installation without reinstalling Windows.
Before Running the Script
Ensure you open PowerShell as an administrator. Additionally, set the execution policy to allow script execution by running the following command:
Set-ExecutionPolicy Unrestricted
Running PowerShell with elevated permissions and enabling script execution will ensure that UWScript.ps1 can apply the necessary system changes.
Usage Instructions
To use an answer file, include autounattend.xml at the root of your Windows Installation Media to be executed during Windows setup.
Important
Ensure the answer file is named autounattend.xml; otherwise, it won’t be recognized by the installer.
Using Memory’s WIMUtil (Highly Preferred)
To use WIMUtil, follow these steps to launch PowerShell as an Administrator and run the installation script:
-
Open PowerShell as Administrator:
- Windows 10/11: Right-click on the Start button and select Windows PowerShell (Admin) or Windows Terminal (Admin).
PowerShell will open in a new window.
- Windows 10/11: Right-click on the Start button and select Windows PowerShell (Admin) or Windows Terminal (Admin).
-
Confirm Administrator Privileges:
- If prompted by the User Account Control (UAC), click Yes to allow PowerShell to run as an administrator.
-
Paste and Run the Command:
- Copy the following command:
irm "https://github.com/memstechtips/WIMUtil/raw/main/src/WIMUtil.ps1" | iex
- To paste into PowerShell, Right-Click or press Ctrl + V in the PowerShell or Terminal window.
This should automatically paste your copied command. - Press Enter to execute the command.
- Copy the following command:
Once launched, WIMUtil guides you through a wizard:
- Select or Download Windows ISO
- Add Latest UnattendedWinstall Answer File Automatically
- Extract and Add Current Device Drivers to Installation Media
- Create New ISO with Customizations Included
- Create a Bootable USB Flash Drive with Ventoy
- Copy the New ISO File to the Ventoy Flash Drive
- Boot from the USB flash drive, choose your ISO & Install Windows
For more info, check out the official WIMUtil GitHub Repo.
Old Methods
Method 1: Create a Bootable Windows Installation USB
- Video Tutorial
Click to Show Instructions
-
Download the
autounattend.xmlfile and save it on your computer. -
Create a Windows 10 or Windows 11 Bootable Installation USB drive with Rufus or the Media Creation Tool.
Important
- Some users have reported issues with the Media Creation Tool when creating the Windows Installation USB. Use it at your own discretion.
- When using Rufus, don’t select any of the checkboxes in “Customize Your Windows Experience,” as it creates another
autounattend.xmlfile that might overwrite settings in the UnattendedWinstall file.
-
Copy the
autounattend.xmlfile you downloaded in Step 1 to the root of the Bootable Windows Installation USB you created in Step 2. -
Boot from the Windows Installation USB, do a clean install of Windows as normal, and the scripts will run automatically.
Method 2: Create a Custom ISO File
- Video Tutorial
Click to Show Instructions
- Download the
autounattend.xmlfile and save it on your computer. - Download the Windows 10 or Windows 11 ISO file depending on the version you want.
- Download and install AnyBurn
- In AnyBurn, select the “Edit Image File” option.
- Navigate to and select the Official Windows ISO file you downloaded in Step 2.
- Click on “Add” and select the
autounattend.xmlfile you downloaded in Step 1, or just click and drag theautounattend.xmlinto the AnyBurn window. - Click on “Next,” then on “Create Now.” You should be prompted to overwrite the ISO file; click on “Yes.”
- Once the process is complete, close AnyBurn.
- Use the ISO file to install Windows on a Virtual Machine OR use a program like Rufus or Ventoy to create a bootable USB flash drive with the edited Windows ISO file.
Important
- When using Rufus, don’t select any of the checkboxes in “Customize Your Windows Experience,” as it creates another
autounattend.xmlfile that might overwrite settings in the UnattendedWinstall file.
- Boot from the Windows Installation USB, do a clean install of Windows as normal, and the scripts will run automatically.
Method 3: Use Ventoy Auto Install Plugin
- Video Tutorial
Click to Show Instructions
- Download the
autounattend.xmlfile and save it on your computer. - Download the Windows 10 or Windows 11 ISO file, depending on the version you want.
- Download and install Ventoy to your desired USB flash drive.
- Prepare the folder structure:
- In your newly created Ventoy USB disk, create the following folders:
ISOandTemplates.
They should be at the root of the drive. - Inside of the
ISOfolder, create a new folder calledWindows. - Copy your Windows ISO files in the
ISO\Windowsfolder. - Copy your
autounattend.xmlinto theTemplatesfolder.
- In your newly created Ventoy USB disk, create the following folders:
- Start VentoyPlugson. Depending on your OS, the steps might differ.
- On Windows, run the
VentoyPlugson.exefile. - A new browser window should open up with a Ventoy web interface ready to go.
- Select the
Auto Install Pluginmenu from the list. - Click on the
Addbutton. - Select [parent] to make the whole Windows ISO folder benefit from the plugin.
- In the Directory Path, paste in the absolute path to your
Windowsfolder.
example:F:\ISO\Windows(ReplaceFwith your drive letter.) - In the Template Path, paste in the absolute path to your
autounattend.xmlfile.
example:F:\Templates\autounattend.xml(ReplaceFwith your drive letter.)
(PSA: If you have moreautounattend.xmlfiles, you can add them later on!) - Click on
OKand you should see a message saying that the configuration has been saved successfully. - Close the VentoyPlugson browser window and stop the VentoyPlugson application.
- On Windows, run the
- Boot from the Ventoy USB drive in the computer where you want to install windows.
- After selecting a Windows ISO to boot from, you will be prompted to boot with the
/Templates/autounattend.xmlfile. - Select that option and the
autounattend.xmlwill be automatically executed during installation.
- After selecting a Windows ISO to boot from, you will be prompted to boot with the
FAQ
How can I apply these settings to an existing Windows installation?
- Run the
UWScript.ps1file or use the Chris Titus Tech Windows Utility (Video).
Can this answer file be used for an in-place upgrade?
- No, in-place upgrades do not support answer files.
Why is Windows still updating automatically?
- Feature updates are delayed for a year; however, security and driver updates continue as usual.
Why don’t I have internet after installing Windows?
Click to Show Instructions
If you’re unable to connect to the internet after installation, it’s likely because your Wi-Fi or LAN (Ethernet) drivers are missing. Windows sometimes doesn’t include all necessary drivers for network adapters, especially if they’re specific to your device.
To resolve this, follow these steps:
- Download your network driver from the manufacturer’s website on another computer with internet access. Look for Wi-Fi or LAN drivers specific to your device model.
- Transfer the driver to your Windows installation via USB drive.
- Install the driver on your Windows system and restart if necessary.
After installation, you should be able to connect to the internet.
How can I access the previous «IoT-LTSC-Like,» «Standard,» and «Core» versions of the file(s)?
- You still have access to the previous files here: Version 1.0.0 Release.
Note
You need to download the Source Code.zip file. Once extracted, you’ll have access to all the previous v1.0.0 files.
Why isn’t Microsoft Edge Uninstalled?
Click to Show Explanation
I spent a lot of time trying to find a way to uninstall Microsoft Edge during Windows installation. However, it was challenging because of differences between Windows 10 22H2 and Windows 11 24H2. My goal is to use Microsoft’s supported uninstall methods, and I plan to add an easy Edge removal option in future releases.
In the meantime, if you wish to remove Edge after Windows installation, consider using this script by FR33THY. FR33THY’s Ultimate Windows Optimization Guide was a major inspiration for version 2.0.0 of this project, and I highly recommend exploring it for additional Windows optimization tips.
How can I add my own Registry Tweaks to v2.0.0 of the autounattend.xml file?
Click to Show Instructions
You can also still add your own registry entries to the v2.0.0 file, and it is actually easier if you understand where to add it. I’ll give a brief explanation.
For registry entries that apply to the local machine, i.e., HKEY_LOCAL_MACHINE registry keys, you can find the function SetRecommendedHKLMRegistry in the autounattend.xml file, see here:
| function Set-RecommendedHKLMRegistry { |
and then add whatever registry entries you want to add in .reg format, like the rest of the entries are set, and just make sure you add it before the "@ to make it part of the .reg file that will be generated, see here:
and it will then be applied to the registry.
Similarly, if you have HKEY_CURRENT_USER registry keys, you can add those to the User Customization.ps1 file in the same way as explained above, starting here:
| Windows Registry Editor Version 5.00 |
so below the Windows Registry Editor Version 5.00 and then ending before the "@ here:
Note
The above links might not take you to the correct lines of code once new versions of the file are released, but it does take you to the correct lines on v2.0.0.
This service lets you create answer files (typically named unattend.xml or autounattend.xml) to perform unattended installations of both Windows 10 and Windows 11, including 24H2. Answer files generated by this service are primarily intended to be used with Windows Setup run from Windows PE to perform clean (rather than upgrade) installations.
Import a file generated by this service
Presets
| Region and language settings: |
Install Windows using these language settings: Windows display language: Windows features like Settings and File Explorer will appear in this language. It must match the language of your Windows 10/11 .iso file. Choose language preferences and keyboard layouts Specify the first language and keyboard layout Language: Keyboard layout / Input Method Editor: Specify a second language and keyboard layout Language: Keyboard layout / Input Method Editor: Specify a third language and keyboard layout Language: Keyboard layout / Input Method Editor: Home location: Windows and apps might use your country or region to give you local content. Select language settings interactively during Windows Setup |
||||||||||||||||||||||||
|---|---|---|---|---|---|---|---|---|---|---|---|---|---|---|---|---|---|---|---|---|---|---|---|---|---|
| Processor architectures: |
When you select multiple processor architectures, a single |
||||||||||||||||||||||||
| Setup settings: |
Bypass Windows 11 requirements check (TPM, Secure Boot, etc.) Allow Windows 11 to be installed without internet connection Only check this option if your computer really does not have internet access. You will still have to click the I don’t have internet button during Windows Setup in that case. If you just want to create local (“offline”) user accounts in Windows 11, you do not need this option – simply use the User accounts section of this form. Use a distribution share / configuration set Hide any PowerShell windows during Windows Setup |
||||||||||||||||||||||||
| Computer name: |
Let Windows generate a random computer name like Choose a computer name yourself Use this name: Provide a Windows PowerShell script to set the computer name dynamically: Your script will be evaluated during Windows Setup. The script must return a single string, which must be a valid computer name. You can also use a script such as |
||||||||||||||||||||||||
| Compact OS: |
Let Windows decide whether to use Compact OS Use Compact OS Do not use Compact OS |
||||||||||||||||||||||||
| Time zone: |
Let Windows determine your time zone based on language and region settings Set your time zone explicitly This is useful when your country or region spans multiple time zones, like Australia or the United States. Use this time zone: |
||||||||||||||||||||||||
| Partitioning and formatting: |
Partition the disk interactively during Windows Setup Let Windows Setup wipe, partition and format your hard drive (more specifically, disk 0) using these settings: Choose partition layout GPT The MBR MBR The MBR-based partition layout must be used for legacy BIOS systems. Choose how to install Windows RE Create a separate partition with a size of MB and install Windows RE to it. Install on Windows partition This will install Windows RE in Remove Windows RE This will delete the Use a custom If your disk is already partitioned and formatted, enter a Choose partition to install Windows to after script has run Install Windows to the first available partition that has enough space and does not already contain an installation of Windows Install to another partition:
When you let Windows Setup partition your disks unattendedly, there is a risk they were assigned unexpected index numbers. In rare cases, disk 0 does not refer to your primary hard drive, but rather your USB thumb drive. You can therefore provide VBScript code to check the assigned disk index numbers before Do not run a script Run this VBScript code to check disk layout: |
||||||||||||||||||||||||
| Windows edition: |
Use a generic product key Such a key can be used to install Windows, but will not activate it. You can change the product key later. Install this edition of Windows: Enter another product key Use this product key: Enter a product key interactively during Windows Setup You can also enter your key in the Use product key stored in BIOS/UEFI firmware Choose this if your computer came pre-installed with Windows and you want to reuse that license. |
||||||||||||||||||||||||
| User accounts: |
Let Windows Setup create the following local (“offline”) accounts:
Leave Display name empty unless you want it to be different from Account name. First logon Several settings will only be applied when an administrator logs on for the first time. You should therefore let Windows log you on to an administrator account once – this does not affect subsequent logons. Choose which account to use for this: Logon to the first administrator account created above Activate built-in account Set its password to: Do not logon The installation ends with the sign-in screen being shown. Obscure all account passwords in your Add a Microsoft (“online”) user account interactively during Windows Setup Add a local (“offline”) user account interactively during Windows Setup |
||||||||||||||||||||||||
| Password expiration: |
Passwords do not expire This is in accordance to NIST guidelines that no longer recommend password expiration. Use Windows default Passwords expire after 42 days. Use custom password expiration: Passwords expire after days. These settings only apply to local accounts. Also, the password of the built-in account |
||||||||||||||||||||||||
| Account Lockout policy: |
Use default policy By default, Windows will lock out an account after 10 failed logon attempts ( Disable policy Disabling Account Lockout might leave your computer vulnerable to brute-force attacks. Use custom policy: Lock out an account after failed logon attempts within minutes. After minutes, unlock the account automatically. |
||||||||||||||||||||||||
| File Explorer tweaks: |
Choose which files are hidden in File Explorer Use File Explorer default setting This will hide any file that has the Hide protected operating system files This will only hide files that have both the Show all files This setting is recommended for advanced users. Always show file extensions By default, File Explorer would hide extensions for known file types. Use classic context (right-click) menu in Windows 11 Open File Explorer to This PC instead of Quick access Show End task command in the taskbar |
||||||||||||||||||||||||
| Start menu and taskbar: |
Choose how to display the search box in the taskbar Full Icon and label Icon Hide Choose icons to display in the taskbar Use default icons Remove all icons Configure icons using an XML file: See Microsoft’s documentation for more examples. Disable widgets This hides the news and weather widget in the lower-left corner in Windows 11. Left-align the taskbar in Windows 11 Hide the Task view button from the taskbar Always show all tray icons On Windows 10, this will simply set the Do not show Bing results when searching in the Start menu or the search box Windows 10 Configure the tiles that are initially shown in the Windows 10 Start menu. You can add or remove tiles later. On Windows 11, this setting is simply ignored. Use default tiles If you select apps in the Remove bloatware section below, Windows 10 will automatically remove their tiles from the Start menu. Remove all tiles Configure tiles using an XML file created by PowerShell’s Windows 11 Configure the pins that are initially shown in the Windows 11 Start menu. You can add or remove pins later. On Windows 10, this setting is simply ignored. Use default pins Avoid this setting if you select apps in the Remove bloatware section below, as Windows 11 will deceptively retain their pins in the Start menu. Remove all pins Configure pins using a JSON file created by PowerShell’s |
||||||||||||||||||||||||
| System tweaks: |
Disable Windows Defender This disables certain services ( Disable Windows Update Disable User Account Control (UAC) Disable Smart App Control This turns Smart App Control off in Windows 11. Note that you will not be able to turn it back on. Disable SmartScreen in Windows and Edge Disable Fast Startup Disable System Protection / System Restore Windows will not create restore points for drive Enable long paths This sets the LongPathsEnabled registry value, which enables several programs (including PowerShell, 7-Zip and TreeSize) to use long paths with up to 32,767 characters without resorting to the Enable Remote Desktop services (RDP) Harden ACLs This removes write permissions on Allow execution of PowerShell script files This runs the command Do not update Last Access Time stamp This runs the command Prevent Windows Update from rebooting your computer This creates a scheduled task that periodically moves your active hours, tricking Windows into thinking your device is in use all the time. Turn off system sounds This changes the sound scheme from Windows Default to No sounds for all users. Disable app suggestions / Content Delivery Manager Prevent device encryption Windows 11 would otherwise enable BitLocker encryption automatically. Hide Edge First Run Experience This will skip the annoying dialogs when Edge is run for the first time. Disable Edge Startup Boost and Background mode This will stop Edge from running in the background all the time. Make Edge uninstallable This will modify the Disable the Enhance Pointer Precision mouse setting This may be useful for players of first-person shooters. Delete empty Audit process creation events Each time a new process is created, Windows writes an event to the Security log. This is a powerful tool for troubleshooting. Include command line in log events |
||||||||||||||||||||||||
| Visual effects: |
Use default settings chosen by Windows Adjust for best appearance Adjust for best performance Use custom settings: Animate controls and elements inside windows Animate windows when minimizing and maximizing Animations in the taskbar Enable Peek Fade or slide menus into view Fade or slide ToolTips into view Fade out menu items after clicking Save taskbar thumbnail previews Show shadows under mouse pointer Use drop shadows for icon labels on the desktop Show thumbnails instead of icons Show translucent selection rectangle Show window contents while dragging Slide open combo boxes Smooth edges of screen fonts Smooth-scroll list boxes Show shadows under windows |
||||||||||||||||||||||||
| Desktop icons: |
Show default desktop icons Show these desktop icons: Control Panel Desktop Documents Downloads Gallery Home Music Network Pictures Recycle bin This PC User’s Files Videos |
||||||||||||||||||||||||
| Virtual machine support: |
Install Oracle VirtualBox Guest Additions Install VMware Tools Install VirtIO Guest Tools and QEMU Guest Agent (e.g. for Proxmox VE) Make sure to check the usage notes for how to properly configure your VM. |
||||||||||||||||||||||||
| WLAN / Wi-Fi setup: |
Configure Wi-Fi interactively during Windows Setup Skip Wi-Fi configuration Choose this if you have a wired connection to the internet. Configure Wi-Fi using these settings:
If both your Wi-Fi router and your computer’s Wi-Fi adapter support it, make sure to select WPA3. Otherwise, Windows Setup will try to switch from WPA2 to WPA3 and require manual interaction. You should not enter your actual Wi-Fi password here. Once you have downloaded the Configure Wi-Fi using an XML file created by |
||||||||||||||||||||||||
| Express settings: |
Disable all Windows will not send diagnostic data, personalized input or your location history to Microsoft. Choose this if you value privacy. Enable all Windows will send data to Microsoft to provide location-based services, improve language recognition, and show personalized ads. Choose settings interactively during Windows Setup This lets you enable some settings while disabling others. |
||||||||||||||||||||||||
| Lock key settings: |
Use default lock key states and behaviors Configure the initial state and behavior of lock keys as follows:
This will affect all users and also the login screen. |
||||||||||||||||||||||||
| Personalization settings: |
These settings are particularly useful if you want to use Windows without activation when the Personalization settings page is not available. Colors Use default color theme Use custom color theme
Desktop wallpaper Use default wallpaper settings Use a solid color background: Provide a Windows PowerShell script to load a desktop wallpaper image: Your script will be evaluated during Windows Setup, after your computer has connected to a network. The script must return a |
||||||||||||||||||||||||
| Remove bloatware: |
Windows comes with several apps that many users do not want or do not need. Check all the apps you want removed during Windows Setup: 3D Viewer Bing Search Calculator Camera Clipchamp Clock Copilot Cortana Dev Home Family Feedback Hub Get Help Handwriting (all languages) Internet Explorer Mail and Calendar Maps Math Input Panel Media Features Mixed Reality Movies & TV News Notepad (modern) Office 365 OneDrive OneNote OneSync OpenSSH Client Outlook for Windows Paint Paint 3D People Photos Power Automate PowerShell 2.0 PowerShell ISE Quick Assist Recall Remote Desktop Client Skype Snipping Tool Solitaire Collection Speech (all languages) Steps Recorder Sticky Notes Teams Tips To Do Voice Recorder Wallet Weather Windows Fax and Scan Windows Hello Windows Media Player (classic) Windows Media Player (modern) Windows Terminal WordPad Xbox Apps Your Phone / Phone Link Bloatware removal works best with the original Windows 10 and 11 .iso images downloaded from Microsoft. I did not perform any tests with custom images. |
||||||||||||||||||||||||
| Run custom scripts: |
You may want to take a look at some sample scripts first. Scripts to run in the system context, before user accounts are created
Scripts to modify the default user’s registry hive This will automatically mount the
Scripts to run when the first user logs on after Windows has been installed The first user to log on is typically an administrator. In this case, these scripts will run with elevated privileges.
Scripts to run whenever a user logs on for the first time
Restart File Explorer after scripts have run This will restart the Your scripts will be run as follows:
|
||||||||||||||||||||||||
| Windows Defender Application Control: |
Do not configure WDAC policy Configure a basic WDAC policy using these settings: Applications in Choose how to enforce the policy Auditing mode Logs drivers and applications that would have been blocked. Auditing mode on boot failure When the policy blocks a system driver and thus would prevent Windows from booting, use audit mode. Otherwise, use enforcement mode. Enforcement mode Drivers and applications will be blocked unless allowed by the policy. Choose script enforcement Restricted PowerShell will run in Constrained Language Mode. See Script Enforcement for details. Unrestricted PowerShell will run in Full Language Mode. |
||||||||||||||||||||||||
| XML markup for more components: |
You can optionally add settings for all available components, with respect to their valid configuration passes.
The generator itself uses some components (displayed with a reddish background below). You may assign your own XML markup to these components, but this will completely replace their generated content, and there is no guarantee that the resulting Do not include
|
||||||||||||||||||||||||
| Download settings: |
Use filename Windows Setup will not process the |
||||||||||||||||||||||||
| Submit form: |
Уровень сложностиСредний
Время на прочтение9 мин
Количество просмотров17K

Начиная с Windows 7 компания Microsoft разработала новую технологию массовой установки (развёртывания) своей операционной системы. В оригинальных образах дистрибутивов появились ключевые файлы boot.wim и install.wim, которые являются Предустановочной средой (англ. — Preinstallation Environment, PE) и Устанавливаемой системой, соответственно. И хотя, версии Windows: 7, 8, 8.1 являются устаревшими, а текущими являются версии Windows: 10 и 11, процесс развёртывания (автоматической установки) указанных операционных систем в целом не поменялся. Поэтому приведённые здесь мои наработки работоспособны для всех версий, за исключением некоторых не критичных параметров. А вот в Windows XP всё было по-другому.
Официальная документация и инструменты
На сайте Microsoft Learn — документации компании, есть раздел посвящённый загрузке и установке Windows для производителей компьютеров. Там присутствует подраздел Windows Setup Automation Overview (рус. — Обзор автоматической установки Виндовс). В этом и последующих разделах (есть перевод на русский язык, но может быть несовершенным) подробно описано использование файлов сценариев, этапы установки ОС, конфигурирование системы с помощью скриптов. Замечу, что когда сам осваивал эту технологию и лет 8 назад читал официальную документацию — информация подавалась более логично и полно, а сейчас как-то намешано и неясно, но другого официального источника не нашел нет.
Для создания (генерирования) подходящего сценария автоматической установки — файла autounattend.xml к предполагаемому для развёртывания Установочного образа — файла install.wim используется официальный бесплатный инструмент — Windows Assessment and Deployment Kit (рус. — Средство оценки и развёртывания Виндовс). Скачать подходящую версию можно со страницы Download and install the Windows ADK, а после установить на свой компьютер. Править файл сценария можно и в обычном текстовом редакторе, если знаешь что делаешь, но после желательно проверить ошибки в синтаксисе и применимость параметров к развёртываемому образу с помощью конфигуратора.
Пример файла сценария автоматической установки
Мой вариант создан для автоматической установки 64-битной версии Windows 10 VL (корпоративное лицензирование без ввода ключа во время установки). Указаны языковые параметры, применены некоторые твики, выполнен «трюк» с пользователями, и скрыты различные экраны подтверждения. Работа с диском оставлена на «ручную» настройку.
Файл autounattend.xml целиком
<?xml version="1.0" encoding="utf-8"?>
<unattend xmlns="urn:schemas-microsoft-com:unattend">
    <settings pass="windowsPE">
        <component name="Microsoft-Windows-International-Core-WinPE" processorArchitecture="amd64" publicKeyToken="31bf3856ad364e35" language="neutral" versionScope="nonSxS" xmlns:wcm="http://schemas.microsoft.com/WMIConfig/2002/State" xmlns:xsi="http://www.w3.org/2001/XMLSchema-instance">
            <InputLocale>en-US</InputLocale>
            <SystemLocale>ru-RU</SystemLocale>
            <UILanguage>ru-RU</UILanguage>
            <UserLocale>ru-RU</UserLocale>
        </component>
        <component name="Microsoft-Windows-Setup" processorArchitecture="amd64" publicKeyToken="31bf3856ad364e35" language="neutral" versionScope="nonSxS" xmlns:wcm="http://schemas.microsoft.com/WMIConfig/2002/State" xmlns:xsi="http://www.w3.org/2001/XMLSchema-instance">
            <ImageInstall>
                <OSImage>
                    <InstallFrom>
                        <MetaData wcm:action="add">
                            <Key>/image/index</Key>
                            <Value>1</Value>
                        </MetaData>
                    </InstallFrom>
                </OSImage>
            </ImageInstall>
            <UserData>
                <AcceptEula>true</AcceptEula>
            </UserData>
        </component>
    </settings>
    <settings pass="specialize">
        <component name="Microsoft-Windows-ErrorReportingCore" processorArchitecture="amd64" publicKeyToken="31bf3856ad364e35" language="neutral" versionScope="nonSxS" xmlns:wcm="http://schemas.microsoft.com/WMIConfig/2002/State" xmlns:xsi="http://www.w3.org/2001/XMLSchema-instance">
            <DisableWER>1</DisableWER>
        </component>
        <component name="Microsoft-Windows-RemoteAssistance-Exe" processorArchitecture="amd64" publicKeyToken="31bf3856ad364e35" language="neutral" versionScope="nonSxS" xmlns:wcm="http://schemas.microsoft.com/WMIConfig/2002/State" xmlns:xsi="http://www.w3.org/2001/XMLSchema-instance">
            <fAllowFullControl>false</fAllowFullControl>
            <fAllowToGetHelp>false</fAllowToGetHelp>
            <fEnableChatControl>false</fEnableChatControl>
        </component>
        <component name="Microsoft-Windows-Shell-Setup" processorArchitecture="amd64" publicKeyToken="31bf3856ad364e35" language="neutral" versionScope="nonSxS" xmlns:wcm="http://schemas.microsoft.com/WMIConfig/2002/State" xmlns:xsi="http://www.w3.org/2001/XMLSchema-instance">
            <ComputerName>*</ComputerName>
        </component>
        <component name="Microsoft-Windows-SQMApi" processorArchitecture="amd64" publicKeyToken="31bf3856ad364e35" language="neutral" versionScope="nonSxS" xmlns:wcm="http://schemas.microsoft.com/WMIConfig/2002/State" xmlns:xsi="http://www.w3.org/2001/XMLSchema-instance">
            <CEIPEnabled>0</CEIPEnabled>
        </component>
        <component name="Microsoft-Windows-SystemRestore-Main" processorArchitecture="amd64" publicKeyToken="31bf3856ad364e35" language="neutral" versionScope="nonSxS" xmlns:wcm="http://schemas.microsoft.com/WMIConfig/2002/State" xmlns:xsi="http://www.w3.org/2001/XMLSchema-instance">
            <DisableSR>1</DisableSR>
        </component>
    </settings>
    <settings pass="oobeSystem">
        <component name="Microsoft-Windows-International-Core" processorArchitecture="amd64" publicKeyToken="31bf3856ad364e35" language="neutral" versionScope="nonSxS" xmlns:wcm="http://schemas.microsoft.com/WMIConfig/2002/State" xmlns:xsi="http://www.w3.org/2001/XMLSchema-instance">
            <InputLocale>en-US</InputLocale>
            <SystemLocale>ru-RU</SystemLocale>
            <UILanguage>ru-RU</UILanguage>
            <UserLocale>ru-RU</UserLocale>
        </component>
        <component name="Microsoft-Windows-Shell-Setup" processorArchitecture="amd64" publicKeyToken="31bf3856ad364e35" language="neutral" versionScope="nonSxS" xmlns:wcm="http://schemas.microsoft.com/WMIConfig/2002/State" xmlns:xsi="http://www.w3.org/2001/XMLSchema-instance">
            <AutoLogon>
                <Enabled>true</Enabled>
                <LogonCount>1</LogonCount>
                <Password>
                    <PlainText>true</PlainText>
                    <Value></Value>
                </Password>
                <Username>Administrator</Username>
            </AutoLogon>
            <FirstLogonCommands>
                <SynchronousCommand wcm:action="add">
                    <CommandLine>net user Временный /delete</CommandLine>
                    <Order>1</Order>
                </SynchronousCommand>
            </FirstLogonCommands>
            <OOBE>
                <HideOEMRegistrationScreen>true</HideOEMRegistrationScreen>
                <HideOnlineAccountScreens>true</HideOnlineAccountScreens>
                <HideWirelessSetupInOOBE>true</HideWirelessSetupInOOBE>
                <ProtectYourPC>3</ProtectYourPC>
            </OOBE>
            <TimeZone>Russian Standard Time</TimeZone>
            <UserAccounts>
                <AdministratorPassword>
                    <PlainText>true</PlainText>
                    <Value></Value>
                </AdministratorPassword>
                <LocalAccounts>
                    <LocalAccount wcm:action="add">
                        <Group>Users</Group>
                        <Name>Временный</Name>
                        <Password>
                            <PlainText>true</PlainText>
                            <Value></Value>
                        </Password>
                    </LocalAccount>
                </LocalAccounts>
            </UserAccounts>
        </component>
        <component name="Microsoft-Windows-WinRE-RecoveryAgent" processorArchitecture="amd64" publicKeyToken="31bf3856ad364e35" language="neutral" versionScope="nonSxS" xmlns:wcm="http://schemas.microsoft.com/WMIConfig/2002/State" xmlns:xsi="http://www.w3.org/2001/XMLSchema-instance">
            <UninstallWindowsRE>true</UninstallWindowsRE>
        </component>
    </settings>
</unattend>
Далее пройдём по этапам установки и параметрам указанным в соответствующих компонентах образа в файле сценария. Мой сценарий установки задаёт конфигурацию для следующих этапов: «windowsPE», «specialize», «oobeSystem».
Настройка установочной среды — этап «windowsPE»
Здесь с помощью группы параметров задаются языковые настройки. В настройках среды установки и устанавливаемой системы используется интерфейс на русском языке, русский формат даты и времени, но английская раскладка клавиатуры.
<InputLocale>en-US</InputLocale>
<SystemLocale>ru-RU</SystemLocale>
<UILanguage>ru-RU</UILanguage>
<UserLocale>ru-RU</UserLocale>
Теоретически, один файл установочного образа системы — install.wim может содержать несколько индексов, т.е. разных редакций устанавливаемой ОС. Я подготавливаю свои образы так, чтобы они содержали только одну редакцию, а значит один индекс.
<ImageInstall>
    <OSImage>
        <InstallFrom>
            <MetaData wcm:action="add">
                <Key>/image/index</Key>
                <Value>1</Value>
            </MetaData>
        </InstallFrom>
    </OSImage>
</ImageInstall>
Конечно, мы не хотим отвлекаться, чтобы ещё раз прочитать Лицензионное соглашение и принять его.
<UserData>
    <AcceptEula>true</AcceptEula>
</UserData>
Конфигурирование системы — этап «specialize»
Каждый параметр на этом этапе задаёт определённые значения для компонентов. Кто читал мои предыдущие статьи — знает, что мне нравится оптимизировать работу ОС, отключая всё лишнее, ненужное. Так и здесь, указанные параметры в основном что-либо отключают. Данные действия также можно выполнить ручной настройкой на установленной системе.
Отключение отправки отчёта об ошибках в корпорацию Microsoft.
<DisableWER>1</DisableWER>Отключение функций удалённого помощника средствами Windows.
<fAllowFullControl>false</fAllowFullControl>
<fAllowToGetHelp>false</fAllowToGetHelp>
<fEnableChatControl>false</fEnableChatControl>
Важный параметр — имя компьютера. Если этот параметр пропустить, то установка прервётся и спросит. Можно указать любое, но если с одного файла сценария будут произведены установки на множество компьютеров в локальной сети, то возникнут конфликты одинаковых имён. Указывается символ «*«, чтобы имена генерировались случайно.
<ComputerName>*</ComputerName>Отказ от участия в программе улучшения качества программных продуктов методом сбора телеметрии. Есть предположение, что данный параметр игнорируется.
<CEIPEnabled>0</CEIPEnabled>Отключение системы восстановления Windows считаю рациональным решением, так как при серьёзных повреждениях ОС — мне её проще переустановить предварительно сохранив пользовательские файлы, чем выяснять причины невозможности загрузки.
<DisableSR>1</DisableSR>Подготовка к первому запуску — этап «oobeSystem»
Повторение настройки языковых параметров, но уже для установленной системы.
<InputLocale>en-US</InputLocale>
<SystemLocale>ru-RU</SystemLocale>
<UILanguage>ru-RU</UILanguage>
<UserLocale>ru-RU</UserLocale>
В случае ручной установки, на завершающем этапе, программа предложит установщику создать пользователя, указав его имя и другие данные. Отказаться от создания пользователя — нельзя! Созданный пользователь будет принадлежать к группе «Администраторы» и войдёт в систему по завершении установки. Встроенный пользователь Администратор также присутствует но будет отключён по-умолчанию. Это излишество, а также потенциальная уязвимость.
Я придумал следующий обходной трюк: создаём временного пользователя (в примере — имя «Временный») в группе Пользователи. Также, включаем встроенного Администратора с пустым паролем и разрешаем ему автоматическую авторизацию в системе. Задаём для Администратора асинхронную команду, выполняемую при первом входе — удалить пользователя «Временный». После перезагрузки Администратор выполняет команду и остаётся единственным (и всемогущим) активным пользователем в системе.
<AutoLogon>
    <Enabled>true</Enabled>
    <LogonCount>1</LogonCount>
    <Password>
        <PlainText>true</PlainText>
        <Value></Value>
    </Password>
    <Username>Administrator</Username>
</AutoLogon>
<FirstLogonCommands>
    <SynchronousCommand wcm:action="add">
        <CommandLine>net user Временный /delete</CommandLine>
        <Order>1</Order>
    </SynchronousCommand>
</FirstLogonCommands>
<UserAccounts>
    <AdministratorPassword>
        <PlainText>true</PlainText>
        <Value></Value>
    </AdministratorPassword>
    <LocalAccounts>
        <LocalAccount wcm:action="add">
            <Group>Users</Group>
            <Name>Временный</Name>
            <Password>
                <PlainText>true</PlainText>
                <Value></Value>
            </Password>
        </LocalAccount>
    </LocalAccounts>
</UserAccounts>
Скрываем финальные диалоги входа в аккаунт Microsoft, подключения к беспроводным сетям и установливаем уровень безопасности.
<HideOEMRegistrationScreen>true</HideOEMRegistrationScreen>
<HideOnlineAccountScreens>true</HideOnlineAccountScreens>
<HideWirelessSetupInOOBE>true</HideWirelessSetupInOOBE>
<ProtectYourPC>3</ProtectYourPC>
Обязательно указать часовой пояс, иначе процесс автоматической установки также прервётся запросом. Словесное наименование своего часового пояса нужно узнать из справочника. В моём примере — время по-Москве.
<TimeZone>Russian Standard Time</TimeZone>Отдельным и последним параметром идёт команда удалить агент восстановления Windows, как ненужный.
<UninstallWindowsRE>true</UninstallWindowsRE>Послесловие
Рассмотренный файл сценария autounattend.xml у меня сохранён в кодировке UTF-8, так что если копировать из статьи нужно поступить также. Для личных нужд имею модифицированные файлы autounattend-mbr.xml и autounattend-gpt.xml, в которых указаны параметры для автоматической разбивки диска в соответствующих стандартах. В общем, вариантов много и каждый может детально изучив документацию создать свой сценарий автоматической установки Windows.
Table of Contents
INTRO
Windows 10 20H2 has been released. As you may already know, Windows 10’s installation can be automated with an Answer File. An answer file is created via Windows System Image Manager (WSIM) part of the Deployment Tools package included in Windows ADK for Windows 10. When Windows Setup loads it automatically looks for an answer file called AutoUnattend.xml.
I use a 4 GB USB flash drive formatted as FAT32 which has all my catalogs, and answer files organized, and I just move the one I want to use to the root when I need it. For those that don’t want to or can’t use an additional USB drive and want to use just one flash drive for installing Windows and using an answer file, you will need to follow my previous instructions here, to place the answer file in the boot.wim image.
ANSWER FILE NOTES
- The Product Key used is a Generic Key listed by Microsoft here:
- This is for Windows 10 Pro.
- The password for the Built-in Administrator and WinReflection user accounts is: Password01!
- Computer name is set to: WR-CLI-DWK-G77
- Naming Convention: WinReflection – Client – DELL Workstation – First 3 characters of device serial number
- Time Zone is Central Standard Time
- Search provider for IE is set to Google for default.
- Remote Desktop is configured in the firewall.
- Auto Activation is disabled.
- Custom IE settings and preferences are configured.
- A local user account called WinReflection will be created and added to the local-Administrators group with a login password of “Password01!”.
Below are tested and working versions for both UEFI/GPT and BIOS/MBR systems.
WINDOWS 10 20H2 – PREPARING FOR INSTALL
Note: The passwords in these Answer Files are hashed in Base64, you can use an online decoder to get the value, which I will give you. It’s “Password01!” without quotes. Both the Administrator and Support user accounts will have this password, and you need to change them after the OS is installed. The dummy password is just to get things going that’s why it’s not a secure one.
Additionally, if you need to install to a different disk, you need to first boot the installation media and go into Command Prompt via Windows PE. See below for commands and output on one of my servers using DiskPart.
BAT (Batchfile)
C:\Users\Administrator>diskpart

Microsoft DiskPart version 10.0.17763.1911

Copyright (C) Microsoft Corporation.
On computer: WR-CLI-DWK-G77

DISKPART> list disk

Disk ### Status Size Free Dyn Gpt
-------- ------------- ------- ------- --- ---
Disk 0   Online        232 GB  0       B   *
Disk 1   Online        232 GB  1024    KB  *
The DiskIDs will be listed, and this is what will be seen when the OS installed. There are two lines in the Answer File with the DiskID. You need to replace “0” with the DiskID you want to install to. If you get this wrong, you will lose data wiping a different disk.
If you do not see your disks, it’s most likely because Windows PE does not have drivers for your SATA or RAID controllers, and you will need to integrate those with DISM commands and then use DISM commands again to integrate the drivers or use third-party software like NTLite.
The easiest way to get the drivers you need is on a fully installed OS; you simply use these commands to export all third-party drivers (.inf) into a folder. You will want to do this before installing since there is no GUI or Windows Desktop to do so after the fact. You will want to integrate into both the install.wim image and the boot.wim images.
I have noticed when using the Answer File saved to a USB drive, sometimes Windows Setup boots-up before the chipset and USB controllers are ready, so you may need to click “Install” first, but after that the install should take off in unattended fashion.
The only way around this is to integrate the AutoUnattend.xml file into the boot.wim image next to Windows Setup, this is explained in a post I made years ago in 2018 which you can find.
AUTOUNATTEND.XML – UEFI | GPT
XML
<?xml version="1.0" encoding="utf-8"?>
<unattend xmlns="urn:schemas-microsoft-com:unattend">
    <settings pass="windowsPE">
        <component name="Microsoft-Windows-Setup" processorArchitecture="amd64" publicKeyToken="31bf3856ad364e35" language="neutral" versionScope="nonSxS" xmlns:wcm="http://schemas.microsoft.com/WMIConfig/2002/State" xmlns:xsi="http://www.w3.org/2001/XMLSchema-instance">
            <DiskConfiguration>
                <Disk wcm:action="add">
                    <CreatePartitions>
                        <CreatePartition wcm:action="add">
                            <Type>EFI</Type>
                            <Size>512</Size>
                            <Order>1</Order>
                        </CreatePartition>
                        <CreatePartition wcm:action="add">
                            <Extend>false</Extend>
                            <Type>MSR</Type>
                            <Order>2</Order>
                            <Size>128</Size>
                        </CreatePartition>
                        <CreatePartition wcm:action="add">
                            <Type>Primary</Type>
                            <Order>3</Order>
                            <Size>1024</Size>
                        </CreatePartition>
                        <CreatePartition wcm:action="add">
                            <Order>4</Order>
                            <Type>Primary</Type>
                            <Extend>true</Extend>
                        </CreatePartition>
                    </CreatePartitions>
                    <ModifyPartitions>
                        <ModifyPartition wcm:action="add">
                            <Format>FAT32</Format>
                            <Order>1</Order>
                            <PartitionID>1</PartitionID>
                        </ModifyPartition>
                        <ModifyPartition wcm:action="add">
                            <Order>2</Order>
                            <PartitionID>2</PartitionID>
                        </ModifyPartition>
                        <ModifyPartition wcm:action="add">
                            <Format>NTFS</Format>
                            <Order>3</Order>
                            <PartitionID>3</PartitionID>
                            <Label>Recovery</Label>
                            <TypeID>DE94BBA4-06D1-4D40-A16A-BFD50179D6AC</TypeID>
                        </ModifyPartition>
                        <ModifyPartition wcm:action="add">
                            <Format>NTFS</Format>
                            <Label>Windows</Label>
                            <Order>4</Order>
                            <PartitionID>4</PartitionID>
                        </ModifyPartition>
                    </ModifyPartitions>
                    <DiskID>0</DiskID>
                    <WillWipeDisk>true</WillWipeDisk>
                </Disk>
                <WillShowUI>OnError</WillShowUI>
            </DiskConfiguration>
            <ImageInstall>
                <OSImage>
                    <InstallFrom>
                        <MetaData wcm:action="add">
                            <Key>/IMAGE/NAME</Key>
                            <Value>Windows 10 Pro</Value>
                        </MetaData>
                    </InstallFrom>
                    <InstallTo>
                        <DiskID>0</DiskID>
                        <PartitionID>4</PartitionID>
                    </InstallTo>
                    <InstallToAvailablePartition>false</InstallToAvailablePartition>
                    <WillShowUI>OnError</WillShowUI>
                </OSImage>
            </ImageInstall>
            <UserData>
                <ProductKey>
                    <WillShowUI>OnError</WillShowUI>
                    <Key>VK7JG-NPHTM-C97JM-9MPGT-3V66T</Key>
                </ProductKey>
                <AcceptEula>true</AcceptEula>
            </UserData>
        </component>
        <component name="Microsoft-Windows-International-Core-WinPE" processorArchitecture="amd64" publicKeyToken="31bf3856ad364e35" language="neutral" versionScope="nonSxS" xmlns:wcm="http://schemas.microsoft.com/WMIConfig/2002/State" xmlns:xsi="http://www.w3.org/2001/XMLSchema-instance">
            <SetupUILanguage>
                <UILanguage>en-US</UILanguage>
            </SetupUILanguage>
            <InputLocale>en-US</InputLocale>
            <SystemLocale>en-US</SystemLocale>
            <UILanguage>en-US</UILanguage>
            <UserLocale>en-US</UserLocale>
        </component>
    </settings>
    <settings pass="specialize">
        <component name="Microsoft-Windows-Shell-Setup" processorArchitecture="amd64" publicKeyToken="31bf3856ad364e35" language="neutral" versionScope="nonSxS" xmlns:wcm="http://schemas.microsoft.com/WMIConfig/2002/State" xmlns:xsi="http://www.w3.org/2001/XMLSchema-instance">
            <ComputerName>WR-CLI-DWK-G77</ComputerName>
        </component>
        <component name="Microsoft-Windows-IE-InternetExplorer" processorArchitecture="amd64" publicKeyToken="31bf3856ad364e35" language="neutral" versionScope="nonSxS" xmlns:wcm="http://schemas.microsoft.com/WMIConfig/2002/State" xmlns:xsi="http://www.w3.org/2001/XMLSchema-instance">
            <SearchScopes>
                <Scope wcm:action="add">
                    <ScopeDefault>true</ScopeDefault>
                    <ScopeDisplayName>Google</ScopeDisplayName>
                    <ScopeKey>Google</ScopeKey>
                    <ScopeUrl>http://www.google.com/search?q={searchTerms}</ScopeUrl</ScopeUrl>
                    <ShowSearchSuggestions>false</ShowSearchSuggestions>
                </Scope>
            </SearchScopes>
            <DisableAccelerators>true</DisableAccelerators>
            <DisableFirstRunWizard>true</DisableFirstRunWizard>
            <Home_Page>about:blank</Home_Page>
            <BlockPopups>yes</BlockPopups>
            <FavoritesDelete>true</FavoritesDelete>
        </component>
        <component name="Microsoft-Windows-TerminalServices-LocalSessionManager" processorArchitecture="amd64" publicKeyToken="31bf3856ad364e35" language="neutral" versionScope="nonSxS" xmlns:wcm="http://schemas.microsoft.com/WMIConfig/2002/State" xmlns:xsi="http://www.w3.org/2001/XMLSchema-instance">
            <fDenyTSConnections>false</fDenyTSConnections>
        </component>
        <component name="Networking-MPSSVC-Svc" processorArchitecture="amd64" publicKeyToken="31bf3856ad364e35" language="neutral" versionScope="nonSxS" xmlns:wcm="http://schemas.microsoft.com/WMIConfig/2002/State" xmlns:xsi="http://www.w3.org/2001/XMLSchema-instance">
            <FirewallGroups>
                <FirewallGroup wcm:action="add" wcm:keyValue="RemoteDesktop">
                    <Group>@FirewallAPI.dll,-28752</Group>
                    <Profile>all</Profile>
                    <Active>true</Active>
                </FirewallGroup>
            </FirewallGroups>
        </component>
        <component name="Microsoft-Windows-Security-SPP-UX" processorArchitecture="amd64" publicKeyToken="31bf3856ad364e35" language="neutral" versionScope="nonSxS" xmlns:wcm="http://schemas.microsoft.com/WMIConfig/2002/State" xmlns:xsi="http://www.w3.org/2001/XMLSchema-instance">
            <SkipAutoActivation>true</SkipAutoActivation>
        </component>
    </settings>
    <settings pass="oobeSystem">
        <component name="Microsoft-Windows-Shell-Setup" processorArchitecture="amd64" publicKeyToken="31bf3856ad364e35" language="neutral" versionScope="nonSxS" xmlns:wcm="http://schemas.microsoft.com/WMIConfig/2002/State" xmlns:xsi="http://www.w3.org/2001/XMLSchema-instance">
            <AutoLogon>
                <Password>
                    <PlainText>false</PlainText>
                    <Value>UABhAHMAcwB3AG8AcgBkADAAMQAhAFAAYQBzAHMAdwBvAHIAZAA=</Value>
                </Password>
                <Enabled>true</Enabled>
                <LogonCount>2</LogonCount>
                <Username>Administrator</Username>
            </AutoLogon>
            <OOBE>
                <HideEULAPage>true</HideEULAPage>
                <HideWirelessSetupInOOBE>true</HideWirelessSetupInOOBE>
                <ProtectYourPC>3</ProtectYourPC>
                <HideOnlineAccountScreens>true</HideOnlineAccountScreens>
                <HideOEMRegistrationScreen>true</HideOEMRegistrationScreen>
                <HideLocalAccountScreen>true</HideLocalAccountScreen>
            </OOBE>
            <TaskbarLinks>
                <Link0>%USERPROFILE%\AppData\Roaming\Microsoft\Windows\Start Menu\Programs\Accessories\Internet Explorer.lnk</Link0>
            </TaskbarLinks>
            <UserAccounts>
                <AdministratorPassword>
                    <PlainText>false</PlainText>
                    <Value>UABhAHMAcwB3AG8AcgBkADAAMQAhAEEAZABtAGkAbgBpAHMAdAByAGEAdABvAHIAUABhAHMAcwB3AG8AcgBkAA==</Value>
                </AdministratorPassword>
                <LocalAccounts>
                    <LocalAccount wcm:action="add">
                        <Password>
                            <PlainText>false</PlainText>
                            <Value>UABhAHMAcwB3AG8AcgBkADAAMQAhAFAAYQBzAHMAdwBvAHIAZAA=</Value>
                        </Password>
                        <Group>Administrators</Group>
                        <Name>Support</Name>
                    </LocalAccount>
                </LocalAccounts>
            </UserAccounts>
            <TimeZone>Central Standard Time</TimeZone>
        </component>
        <component name="Microsoft-Windows-International-Core" processorArchitecture="amd64" publicKeyToken="31bf3856ad364e35" language="neutral" versionScope="nonSxS" xmlns:wcm="http://schemas.microsoft.com/WMIConfig/2002/State" xmlns:xsi="http://www.w3.org/2001/XMLSchema-instance">
            <InputLocale>en-US</InputLocale>
            <UILanguage>en-US</UILanguage>
            <SystemLocale>en-US</SystemLocale>
            <UserLocale>en-US</UserLocale>
        </component>
    </settings>
    <cpi:offlineImage cpi:source="catalog:d:/catalogs/windows 10 pro/20h2/install_windows 10 pro.clg" xmlns:cpi="urn:schemas-microsoft-com:cpi" />
</unattend>
AUTOUNATTEND.XML – BIOS | MBR
XML
<?xml version="1.0" encoding="utf-8"?>
<unattend xmlns="urn:schemas-microsoft-com:unattend">
    <settings pass="windowsPE">
        <component name="Microsoft-Windows-Setup" processorArchitecture="amd64" publicKeyToken="31bf3856ad364e35" language="neutral" versionScope="nonSxS" xmlns:wcm="http://schemas.microsoft.com/WMIConfig/2002/State" xmlns:xsi="http://www.w3.org/2001/XMLSchema-instance">
            <DiskConfiguration>
                <Disk wcm:action="add">
                    <CreatePartitions>
                        <CreatePartition wcm:action="add">
                            <Type>Primary</Type>
                            <Size>512</Size>
                            <Order>1</Order>
                        </CreatePartition>
                        <CreatePartition wcm:action="add">
                            <Extend>false</Extend>
                            <Type>Primary</Type>
                            <Size>1024</Size>
                            <Order>2</Order>
                        </CreatePartition>
                        <CreatePartition wcm:action="add">
                            <Extend>true</Extend>
                            <Type>Primary</Type>
                            <Order>3</Order>
                        </CreatePartition>
                    </CreatePartitions>
                    <ModifyPartitions>
                        <ModifyPartition wcm:action="add">
                            <Active>true</Active>
                            <Format>NTFS</Format>
                            <Label>System</Label>
                            <Extend>false</Extend>
                            <Order>1</Order>
                            <PartitionID>1</PartitionID>
                        </ModifyPartition>
                        <ModifyPartition wcm:action="add">
                            <Format>NTFS</Format>
                            <TypeID>0x27</TypeID>
                            <Label>Recovery</Label>
                            <Order>2</Order>
                            <PartitionID>2</PartitionID>
                        </ModifyPartition>
                        <ModifyPartition wcm:action="add">
                            <Format>NTFS</Format>
                            <Letter>C</Letter>
                            <Order>3</Order>
                            <PartitionID>3</PartitionID>
                            <Label>Windows</Label>
                        </ModifyPartition>
                    </ModifyPartitions>
                    <DiskID>0</DiskID>
                    <WillWipeDisk>true</WillWipeDisk>
                </Disk>
                <WillShowUI>OnError</WillShowUI>
            </DiskConfiguration>
            <ImageInstall>
                <OSImage>
                    <InstallFrom>
                        <MetaData wcm:action="add">
                            <Key>/IMAGE/NAME</Key>
                            <Value>Windows 10 Pro</Value>
                        </MetaData>
                    </InstallFrom>
                    <InstallTo>
                        <DiskID>0</DiskID>
                        <PartitionID>3</PartitionID>
                    </InstallTo>
                    <InstallToAvailablePartition>false</InstallToAvailablePartition>
                    <WillShowUI>OnError</WillShowUI>
                </OSImage>
            </ImageInstall>
            <UserData>
                <ProductKey>
                    <WillShowUI>OnError</WillShowUI>
                    <Key>W269N-WFGWX-YVC9B-4J6C9-T83GX</Key>
                </ProductKey>
                <AcceptEula>true</AcceptEula>
            </UserData>
        </component>
        <component name="Microsoft-Windows-International-Core-WinPE" processorArchitecture="amd64" publicKeyToken="31bf3856ad364e35" language="neutral" versionScope="nonSxS" xmlns:wcm="http://schemas.microsoft.com/WMIConfig/2002/State" xmlns:xsi="http://www.w3.org/2001/XMLSchema-instance">
            <SetupUILanguage>
                <UILanguage>en-US</UILanguage>
            </SetupUILanguage>
            <InputLocale>en-US</InputLocale>
            <SystemLocale>en-US</SystemLocale>
            <UILanguage>en-US</UILanguage>
            <UserLocale>en-US</UserLocale>
        </component>
    </settings>
    <settings pass="specialize">
        <component name="Microsoft-Windows-Shell-Setup" processorArchitecture="amd64" publicKeyToken="31bf3856ad364e35" language="neutral" versionScope="nonSxS" xmlns:wcm="http://schemas.microsoft.com/WMIConfig/2002/State" xmlns:xsi="http://www.w3.org/2001/XMLSchema-instance">
            <ComputerName>WR-CLI-DWK-G77</ComputerName>
        </component>
        <component name="Microsoft-Windows-IE-InternetExplorer" processorArchitecture="amd64" publicKeyToken="31bf3856ad364e35" language="neutral" versionScope="nonSxS" xmlns:wcm="http://schemas.microsoft.com/WMIConfig/2002/State" xmlns:xsi="http://www.w3.org/2001/XMLSchema-instance">
            <SearchScopes>
                <Scope wcm:action="add">
                    <ScopeDefault>true</ScopeDefault>
                    <ScopeDisplayName>Google</ScopeDisplayName>
                    <ScopeKey>Google</ScopeKey>
                    <ScopeUrl>http://www.google.com/search?q={searchTerms}</ScopeUrl>
                    <ShowSearchSuggestions>false</ShowSearchSuggestions>
                </Scope>
            </SearchScopes>
            <DisableAccelerators>true</DisableAccelerators>
            <DisableFirstRunWizard>true</DisableFirstRunWizard>
            <Home_Page>about:blank</Home_Page>
            <BlockPopups>yes</BlockPopups>
            <FavoritesDelete>true</FavoritesDelete>
        </component>
        <component name="Microsoft-Windows-TerminalServices-LocalSessionManager" processorArchitecture="amd64" publicKeyToken="31bf3856ad364e35" language="neutral" versionScope="nonSxS" xmlns:wcm="http://schemas.microsoft.com/WMIConfig/2002/State" xmlns:xsi="http://www.w3.org/2001/XMLSchema-instance">
            <fDenyTSConnections>false</fDenyTSConnections>
        </component>
        <component name="Networking-MPSSVC-Svc" processorArchitecture="amd64" publicKeyToken="31bf3856ad364e35" language="neutral" versionScope="nonSxS" xmlns:wcm="http://schemas.microsoft.com/WMIConfig/2002/State" xmlns:xsi="http://www.w3.org/2001/XMLSchema-instance">
            <FirewallGroups>
                <FirewallGroup wcm:action="add" wcm:keyValue="RemoteDesktop">
                    <Group>@FirewallAPI.dll,-28752</Group>
                    <Profile>all</Profile>
                    <Active>true</Active>
                </FirewallGroup>
            </FirewallGroups>
        </component>
        <component name="Microsoft-Windows-Security-SPP-UX" processorArchitecture="amd64" publicKeyToken="31bf3856ad364e35" language="neutral" versionScope="nonSxS" xmlns:wcm="http://schemas.microsoft.com/WMIConfig/2002/State" xmlns:xsi="http://www.w3.org/2001/XMLSchema-instance">
            <SkipAutoActivation>true</SkipAutoActivation>
        </component>
    </settings>
    <settings pass="oobeSystem">
        <component name="Microsoft-Windows-Shell-Setup" processorArchitecture="amd64" publicKeyToken="31bf3856ad364e35" language="neutral" versionScope="nonSxS" xmlns:wcm="http://schemas.microsoft.com/WMIConfig/2002/State" xmlns:xsi="http://www.w3.org/2001/XMLSchema-instance">
            <AutoLogon>
                <Password>
                    <PlainText>false</PlainText>
                    <Value>UABhAHMAcwB3AG8AcgBkADAAMQAhAFAAYQBzAHMAdwBvAHIAZAA=</Value>
                </Password>
                <Enabled>true</Enabled>
                <LogonCount>2</LogonCount>
                <Username>Administrator</Username>
            </AutoLogon>
            <OOBE>
                <HideEULAPage>true</HideEULAPage>
                <HideWirelessSetupInOOBE>true</HideWirelessSetupInOOBE>
                <ProtectYourPC>3</ProtectYourPC>
                <HideOnlineAccountScreens>true</HideOnlineAccountScreens>
                <HideOEMRegistrationScreen>true</HideOEMRegistrationScreen>
                <HideLocalAccountScreen>true</HideLocalAccountScreen>
            </OOBE>
            <TaskbarLinks>
                <Link0>%USERPROFILE%\AppData\Roaming\Microsoft\Windows\Start Menu\Programs\Accessories\Internet Explorer.lnk</Link0>
            </TaskbarLinks>
            <UserAccounts>
                <AdministratorPassword>
                    <PlainText>false</PlainText>
                    <Value>UABhAHMAcwB3AG8AcgBkADAAMQAhAEEAZABtAGkAbgBpAHMAdAByAGEAdABvAHIAUABhAHMAcwB3AG8AcgBkAA==</Value>
                </AdministratorPassword>
                <LocalAccounts>
                    <LocalAccount wcm:action="add">
                        <Password>
                            <PlainText>false</PlainText>
                            <Value>UABhAHMAcwB3AG8AcgBkADAAMQAhAFAAYQBzAHMAdwBvAHIAZAA=</Value>
                        </Password>
                        <Group>Administrators</Group>
                        <Name>Support</Name>
                    </LocalAccount>
                </LocalAccounts>
            </UserAccounts>
            <TimeZone>Central Standard Time</TimeZone>
        </component>
        <component name="Microsoft-Windows-International-Core" processorArchitecture="amd64" publicKeyToken="31bf3856ad364e35" language="neutral" versionScope="nonSxS" xmlns:wcm="http://schemas.microsoft.com/WMIConfig/2002/State" xmlns:xsi="http://www.w3.org/2001/XMLSchema-instance">
            <InputLocale>en-US</InputLocale>
            <UILanguage>en-US</UILanguage>
            <SystemLocale>en-US</SystemLocale>
            <UserLocale>en-US</UserLocale>
        </component>
    </settings>
    <cpi:offlineImage cpi:source="catalog:d:/catalogs/windows 10 pro/20h2/install_windows 10 pro.clg" xmlns:cpi="urn:schemas-microsoft-com:cpi" />
</unattend>
CONCLUSION
This is much quicker and easier way to install Windows 10 in my opinion. Hope this helps.
My name is Dex Sandel, author at WinReflection.
I am a Christian, conservative, truth-seeker, and problem-solver who is not afraid to be vocal about important or controversial issues—silence leads to death. There’s more to life than the worldly status quo, and that’s why many are sad and depressed—they’re suffocating. Truth and purpose can bring fresh air into one’s life, and that’s my mission. If you would like work done for you by me, click here.
The best is yet to come, and nothing can stop what’s coming!
John 3:16: For God so loved the world that he gave his one and only Son, that whoever believes in him shall not perish but have eternal life.