
Your Windows 10 computer will automatically sleep after a certain amount of time in order to help conserve power or your laptop’s batteries. However, it can be annoying if your computer keeps going to sleep when you don’t want it to. Here’s how to turn off sleep mode on your Windows 10 PC and prevent your computer from sleeping in the future.
How to Turn Off Sleep Mode on a Windows 10 PC
To turn off sleep mode on a Windows 10 PC, press the Windows + I keys to open a settings window. Then, go to System > Power & sleep and select the drop-down menus under Sleep. Finally, choose Never to completely turn off sleep mode on your computer.
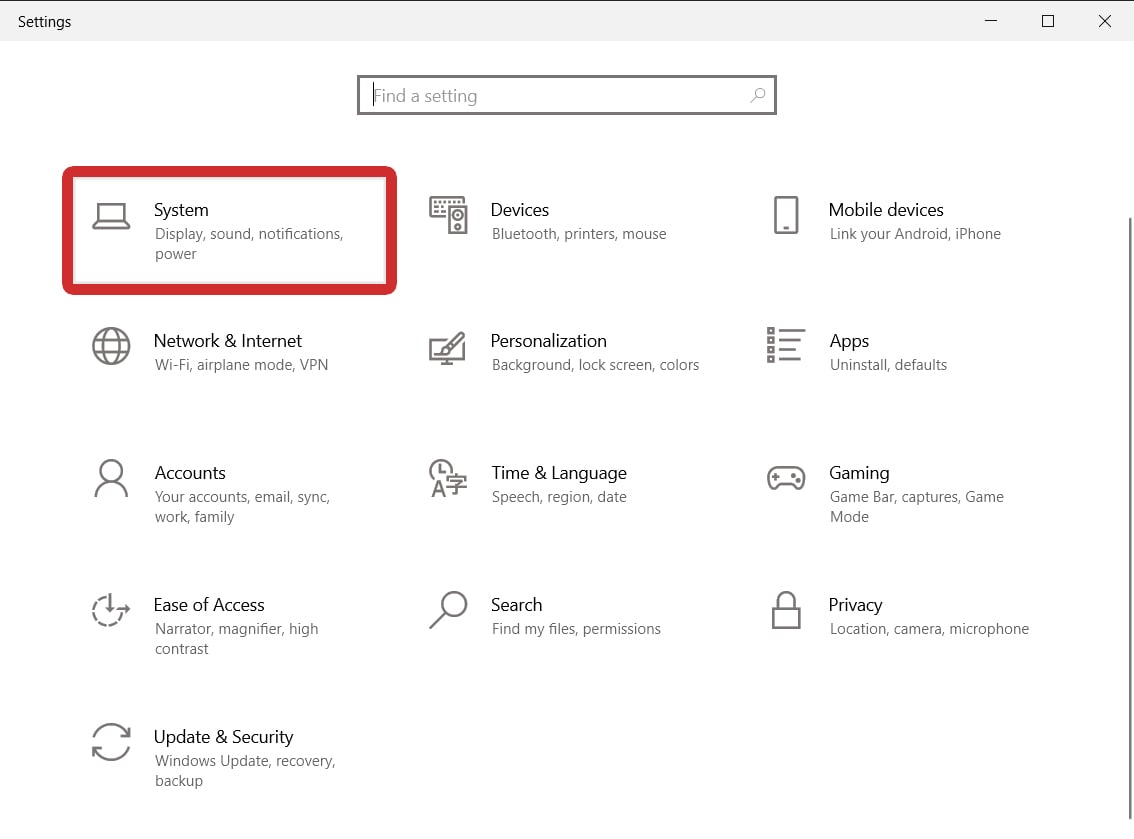
- Press the Windows + I keys on your keyboard. When you press these keys at the same time, a settings window will open. Alternatively, you can open settings by clicking the Windows logo at the bottom of your screen, typing “settings” into the search bar, and clicking Open.
- Then, go to System.

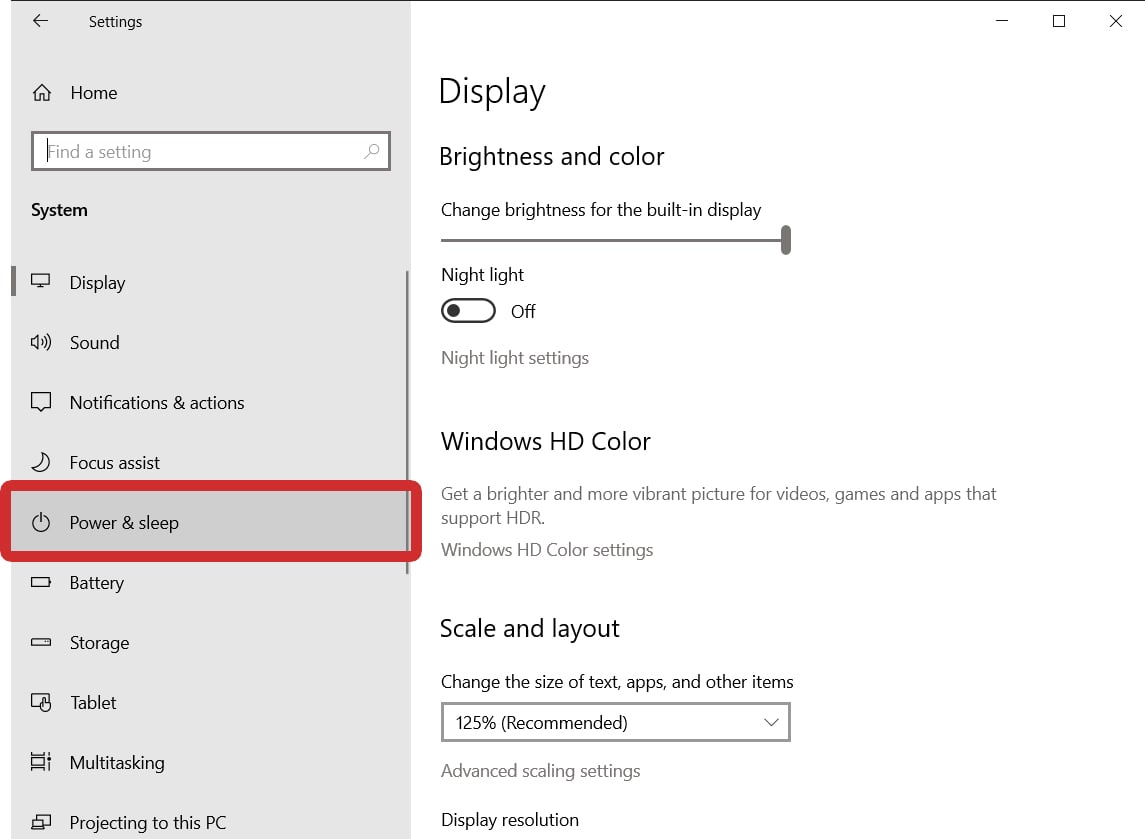
- Next, click Power & sleep. You will see this in the left sidebar. If you don’t see this option, try expanding the window by clicking the square icon in the top-right corner.
- Finally, click the drop-down boxes under Sleep and change them to Never. Your computer will not enter sleep mode anymore. You can also choose to adjust the time it takes before your computer goes to sleep.
Note: You will only see two drop-down menus under Sleep if you are using a laptop.
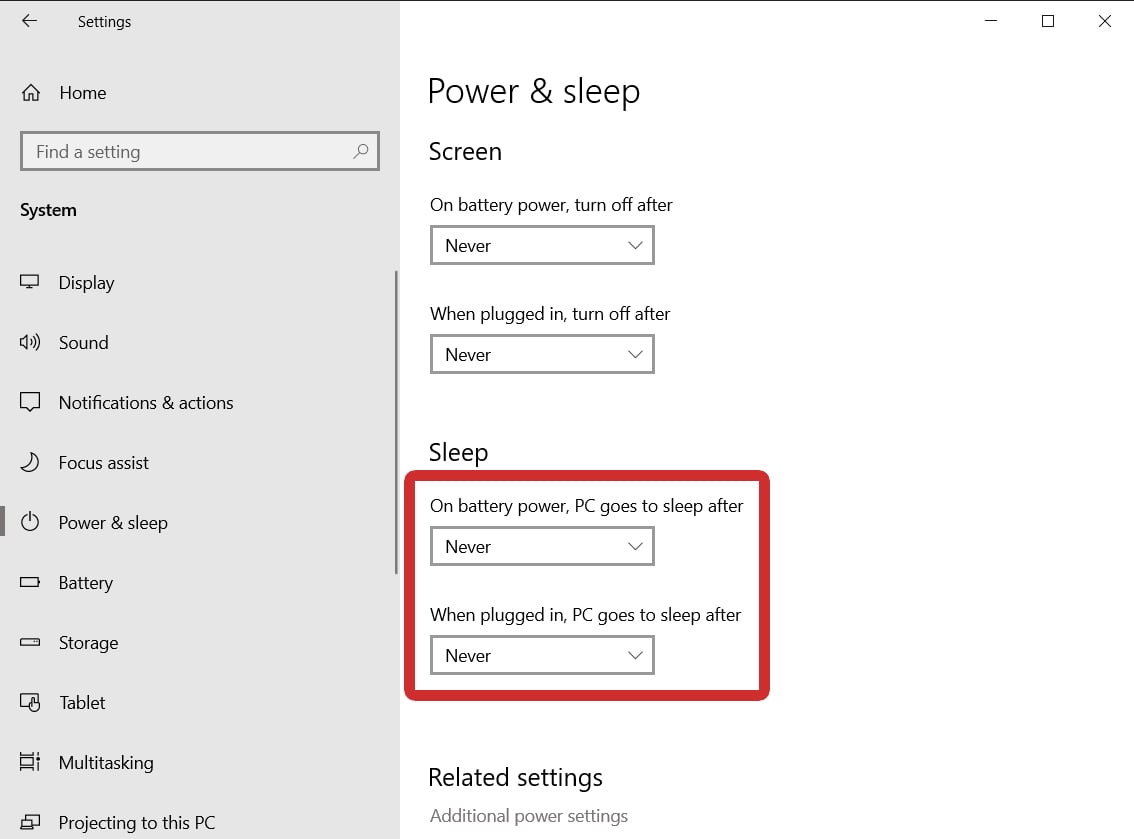
From here, you can also set how long it takes for your screen to turn off. Under the Screen section above Sleep, set the options to Never if you want to keep your screen on whenever your computer is running.
Read More: How to set up dual monitors on Windows 10
If these steps don’t work, you might have to change other settings in the Control Panel instead. Here’s how:
How to Prevent Your Windows 10 PC from Sleeping
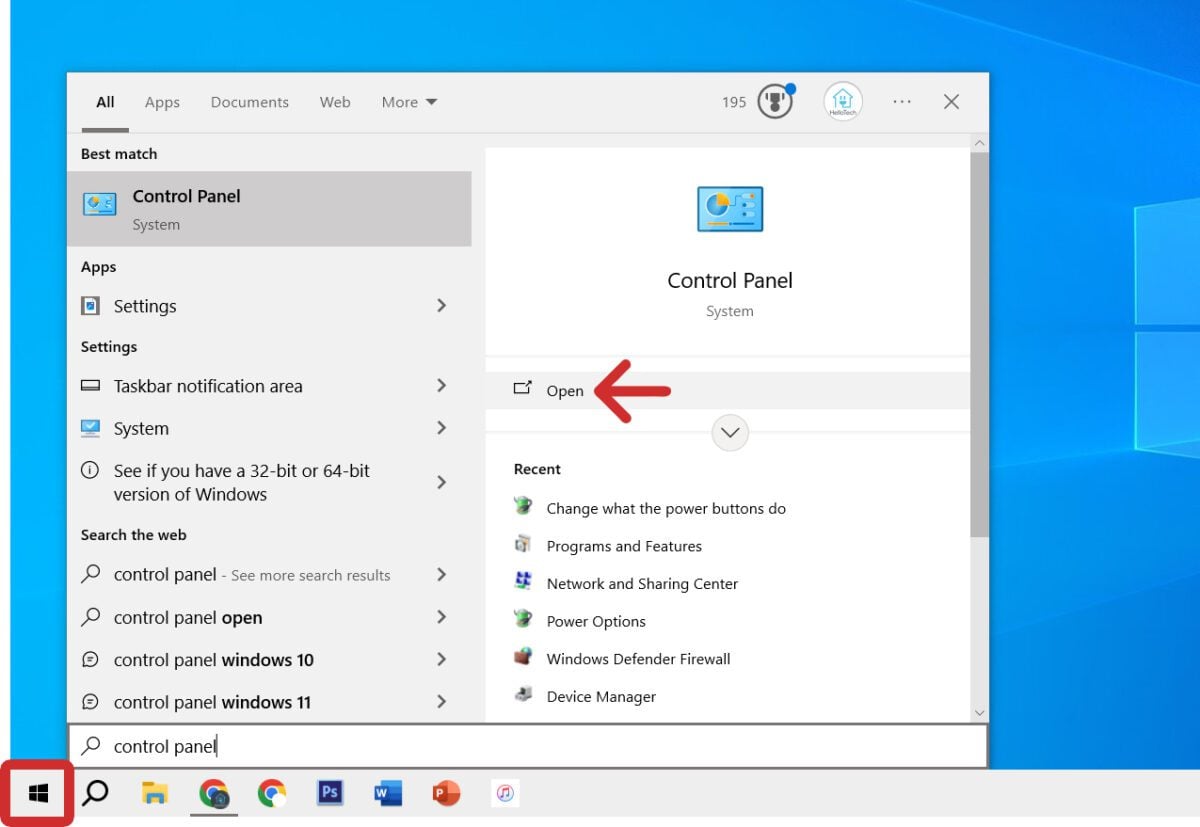
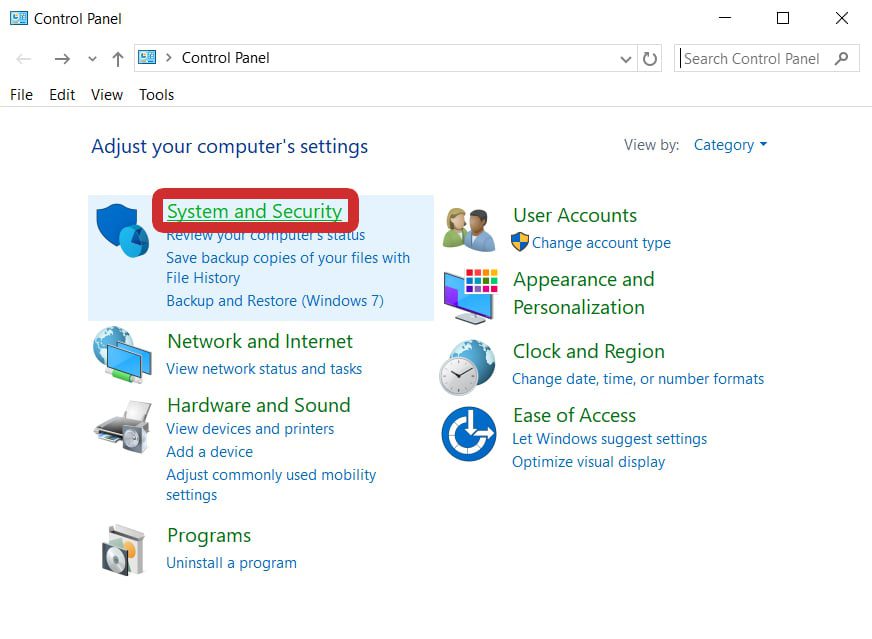
To prevent your Windows 10 PC from entering sleep mode, click the Windows logo at the bottom of your screen, type “Control Panel,” and click Open. Then go to System and Security > Change when the computer sleeps. Finally, set all values to Never and click Save changes.
- Left-click the Windows logo at the bottom of your screen. This will open the Windows Start menu.
- Then, type “Control Panel.” When you start typing, a search bar will appear. You won’t have to type the whole phrase to see the right option appear.
- Next, click Open. You will see this on the right side of the pop-up window. Alternatively, you can press Enter on your keyboard.
- Then select System and Security.
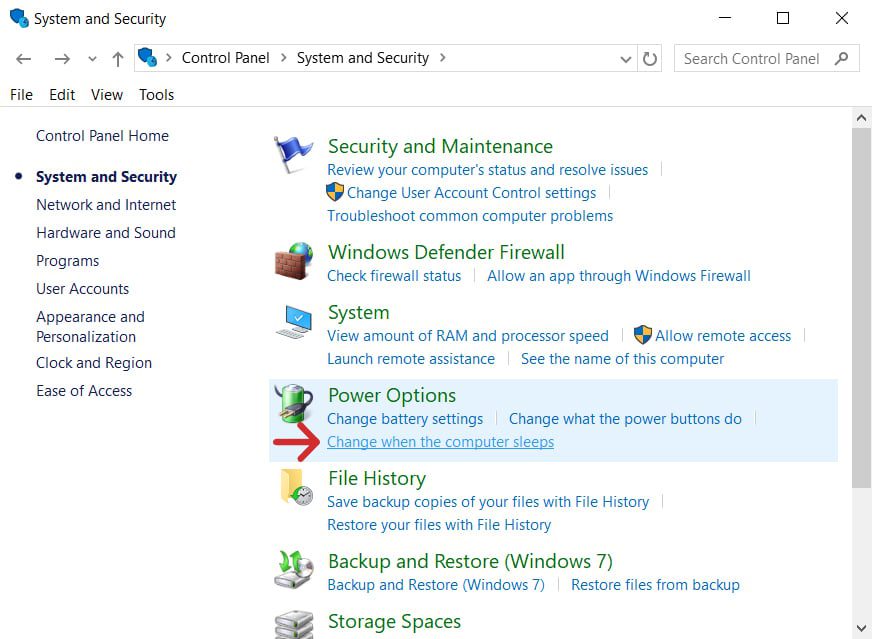
- Next, click Change when the computer sleeps. You will see this under Power Options.
Note: If you want to prevent your computer from sleeping when you press the power button, click Change what the power buttons do under Power Options.
- Then, set all options to Never to turn off sleep mode.
- Finally, click Save changes.
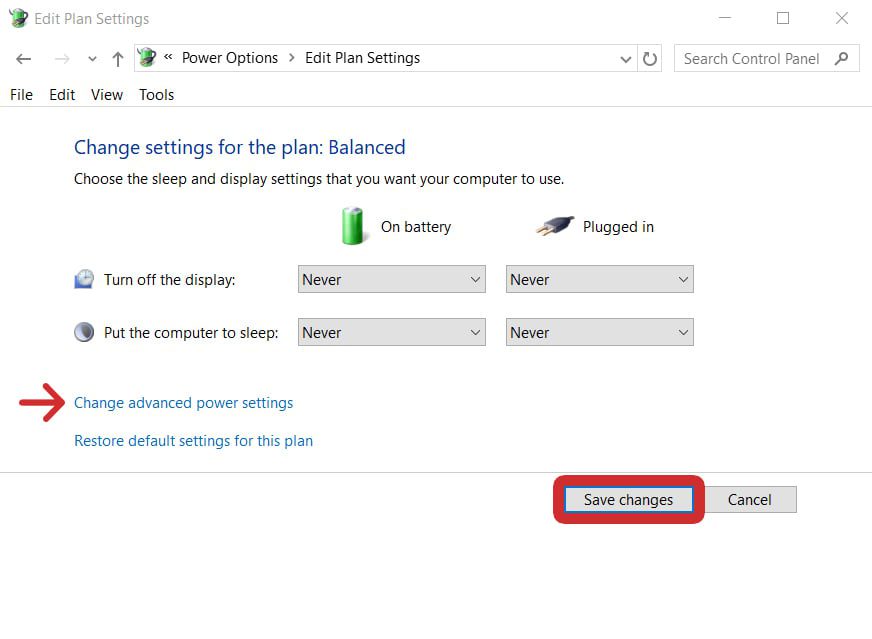
If you want to make sure sleep mode is off everywhere, click Change advanced power settings just above the Save changes button. This will open a menu with all the settings you can change for sleep, hibernation, and more.
Note: Don’t forget to click Apply when you’re done changing settings.
Read More: How to keep your computer on when it’s closed
You are here:
Home » Windows 10 » How To Enable Or Disable Sleep Mode In Windows 10/11
The sleep mode or sleep state is a low-power state available in the Windows operating system, including Windows 10/11. This low-power sleep mode comes in handy, especially for notebook and tablet users, to extend the battery life.
What’s the sleep mode in Windows 10/11?
Unlike Hibernation, when a device is put into sleep mode or state, it will draw a very small amount of power, but you will be able to resume your work very quickly (almost instantly) by pressing any key on the keyboard, moving the mouse/touchpad, or pressing the power button.
Since the sleep state draws a small amount of power on a battery-powered device, if the battery level falls below the critical level, Windows automatically puts the device into hibernation mode (if enabled) to prevent any data loss.
With default settings, your PC might go to sleep mode after 15 (when on battery) or 30 (when plugged in) minutes of inactivity. This also means that, at times, your Windows 10/11 PC might go to sleep mode when a program is running in the background, resulting in loss of data.
For instance, your Windows 10/11 PC might go to sleep mode when a file is being downloaded via a web browser, forcing you to start the download all over again if the server from where you are downloading the file doesn’t offer resume support.
If you find that the sleep mode is not so useful, you can either configure your PC to enter the sleep mode after a long period of user inactivity or make your Windows 10/11 PC never sleep.
Method 1 of 2
For Windows 11 directions, scroll down the page.
Step 1: Open the Settings app. To do so, click on the Settings app icon on the Start menu or simultaneously press Windows and I keys.
Step 2: Click the first option titled System.

Step 3: On the resulting page, click Power & Sleep. Now, under the Sleep section, you will see two options:
# On battery power, PC goes to sleep after
# When plugged in, PC goes to sleep after

For both options, expand the drop-down menu and select Never. That’s it! Your PC will never go to sleep mode again. Here, as you can see in the above picture, you can configure how long should Windows 10 wait before putting the computer to sleep mode.
Note that changes made to the sleep mode will apply to the current power plan only. To make changes to other power plans, switch to the different power plans by right-clicking the battery icon in the system tray, clicking Power Options, and then selecting a power plan from the list.
Once a different power plan is selected, repeat above mentioned steps to configure or disable sleep mode for that plan.
Method 2 of 3
Disable sleep mode in Windows 11
Step 1: Open the Settings app. Go to System > Power & Battery page.
Step 2: Here, in the Power section, click on Screen and sleep to see related settings.

Step 3: To disable the sleep mode, select Never from all four drop-down boxes, as shown in the picture below.

Method 3 of 3
Another way to make your Windows 10/11 PC never sleep
Step 1: Open the Control Panel, change the View by to Small icons, and then click Power Options.
Step 2: On the left pane, click Change when the computer sleeps link to open the Edit plan settings window.

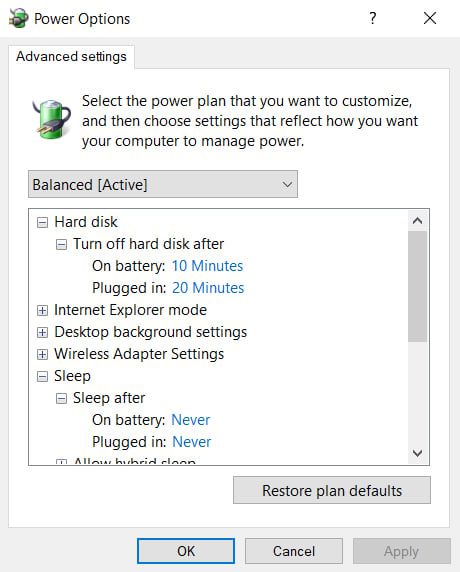
Step 3: Here, in the drop-down menus next to Put the computer to sleep, select Never for On battery and Plugged in. Click the Save changes button. That’s it!

Note that instead of selecting Never, selecting any other number will enable the sleep mode in Windows 10/11.
IMPORTANT: You need to repeat the steps mentioned above for all power plans. That is, if you have disabled sleep mode for the Power Saver plan, you will need to do the same for Balanced and other plans (if you have created one) to avoid Windows 10/11 putting your PC into sleep mode while on these power plans.
Readers help support Windows Report. We may get a commission if you buy through our links.
Read our disclosure page to find out how can you help Windows Report sustain the editorial team. Read more
Sleep mode is a power-saving feature that helps conserve energy by putting your Windows 10 computer into a low-power state.
While this feature can be helpful, there may be times when you want to disable sleep mode to prevent interruptions or complete maintenance tasks.
In this guide, we will walk you through different methods to turn off sleep mode in Windows 10. Let’s start!
What are the different ways to turn off sleep on Windows 10?
1. Use the Settings
- Press Windows + I to open the Settings app.
- Click System.

- Now select Power & sleep.

- Under Sleep, choose Never from the dropdown menu.


2. Use the Control Panel
- Press the Windows, type Control Panel, and click Open.

- Select Category for View as and click Hardware and Sound.

- Choose Power Options.

- Locate the current power plan, and click Change plan settings.

- Now click the Put the computer to sleep option and choose Never from the dropdown list.


3. Use the Command Prompt
- Press the Windows key, type Cmd, and click Run as administrator.

- Type the following command to disable hibernation & turn off sleep mode, and press Enter:
powercfg -h off

4. Use the Group Policy Editor
- Press Windows + R to open the Run window.
- Type gpedit.msc and click OK to open Group Policy Editor.
- Navigate to this path:
Computer Configuration \Administrative Templates\System\Power Management\Sleep Settings - Select and double-click Allow Standby States (S1-S3) When Sleeping (Plugged In)

- Select Enabled and set the time to Never.
- Click Apply and OK.

5. Use the Registry Editor
- Press Windows+ R to open the Run dialog box.
- Type regedit and click OK to open Registry Editor.
- Navigate to this path:
Computer\HKEY_LOCAL_MACHINE\SYSTEM\CurrentControlSet\Control\Power - Double-click CsEnabled and change the Value data from 1 to 0.

- Restart your computer.

- Microsoft wants Windows 10 users to upgrade to Windows 11 or Copilot + PCs
- Deleting ‘inetpub’ folder lets hackers permanently stop Windows updates, Microsoft warns
6. Use the Device Manager
- Press Windows + R to open the Run console.

- Type devmgmt.msc and click OK to open Device Manager.
- Double-click to expand System devices.
- Go to system devices and double-click it to open Properties.
- Switch to the Power Management tab.

- Removed the checkmark next to Allow the computer to turn off this device to save power.
- Click Apply and then OK.


7. Use the BIOS settings
- Press Windows + I to open Settings.
- Go to System.
- Go to Recovery, under Advanced options, and click Restart now.
- Now under Choose an option page, click Troubleshoot.

- Select Advanced options.

- On the Advanced options page, select UEFI Firmware Settings.

- Click Restart.

- Select the appropriate option to reach BIOS. For example, go to Power Management or ACPI settings.
- Locate Sleep Mode or Suspend Mode.
- Choose Disabled or Off.


8. Use the Task Scheduler
- Press the Windows key, Task Scheduler, and click Open.

- Click Create Task.

- Name the task Disable Sleep Mode.

- Go to the Conditions tab, and remove the checkmark next to Start the task only if the computer is idle for.
- Under the Actions tab, click New.
- In the Program/script field, type powercfg.exe

- For Add arguments field, type change -standby-timeout-ac 0
- Click OK.


9. Use the Windows PowerShell
- Go to the search bar, type Powershell, and click Run as administrator.

- Copy and paste the following command to change the standby timeout for when the computer is plugged into 0 and press Enter:
powercfg -change -standby-timeout-ac 0

10. Use the Windows Registry
- Press Windows + R to open the Run console.
- Type regedit and click OK to open Registry Editor.
- Click File, then click Export. Finally, save the .reg file in a desired location to back the registry entries.

- Navigate to this path:
Computer\HKEY_LOCAL_MACHINE\SYSTEM\CurrentControlSet\Control\Power\PowerSettings\238C9FA8-0AAD-41ED-83F4-97BE242C8F20\7bc4a2f9-d8fc-4469-b07b-33eb785aaca0
- Double-click on Attributes and change the Value data to 2.
- Restart your computer for the changes to take effect.


So, these are different ways to turn off sleep mode on Windows 10. Try them and let us know what worked for you in the comments section below.
Srishti Sisodia
Windows Software Expert
Srishti Sisodia is an electronics engineer and writer with a passion for technology. She has extensive experience exploring the latest technological advancements and sharing her insights through informative blogs.
Her diverse interests bring a unique perspective to her work, and she approaches everything with commitment, enthusiasm, and a willingness to learn. That’s why she’s part of Windows Report’s Reviewers team, always willing to share the real-life experience with any software or hardware product. She’s also specialized in Azure, cloud computing, and AI.
По умолчанию многие системные параметры в Windows 10 установлены таким образом, чтобы они были оптимальны для большинства пользователей. В частности, это касается режима сна и гибернации, которые изначально включены. Если вас не устраивают дефолтные настройки, их можно легко поменять.
Что такое режим сна и режим гибернации?
Прежде, чем что-либо отключать в системе, лучше предварительно разобраться в вопросе, чтобы можно было наверняка сказать, действительно ли это вам необходимо. Многие начинающие пользователи думают, что гибернация и сон — это одно и то же, но это не так.
Режим сна активируется в Windows 10, когда пользователь бездействует определенное время (его можно настроить). Тогда ОС отключает монитор и периферийные устройства, а некоторые комплектующие переводит в энергосберегающий режим. Сделана такая функция для экономии потребляемой компьютером электроэнергии.
Режим гибернации же активируется пользователем вручную с помощью контекстного меню «Пуск». В таком состоянии аппаратная часть ПК выключается полностью, однако БИОС остается включенным и при этом работает от батарейки. Принципиальное отличие гибернации от выключения заключается в том, что данные, хранящиеся в оперативной памяти, сохраняются в системе. Они записываются в специальный файл hiberfil.sys, который хранится в системном каталоге. Его размер равен объему установленной оперативной памяти. Так что режим гибернации можно ещё отключать для экономии дискового пространства. Об этом мы писали в отдельной публикации.
После режима гибернации операционная система загружается за несколько секунд, а все открытые программы восстановят свое состояние. Владельцам жестких дисков режим гибернации позволит сэкономить много времени, а владельцам SSD его лучше отключать, поскольку большое количество циклов записи во время этого процесса ощутимо снижают срок службы накопителя. Спящий режим редко доставляет пользователю дискомфорт. Исключение составляет мониторинг происходящего в системе без непосредственного взаимодействия с ПК. Если ваша деятельность подразумевает такое использование, вот вам несколько способов, как отключить спящий режим на компьютере.
Как на Windows 10 отключить спящий режим: системные параметры
Нажимаем комбинацию клавиш Win + I и выбираем пункт «Система». Альтернативный способ — кликнуть правой кнопкой мыши по меню «Пуск» в левом нижнем углу и выбрать пункт «Параметры». Также если открыть «Мой компьютер», в верхней части окна вы обнаружите нужный нам пункт.
Далее нужно перейти в раздел «Питание и спящий режим» в левой части окна. Здесь вы сможете настроить время, через которое будет отключаться экран. Аналогичным способом настраивается и спящий режим.
Если вы являетесь владельцем ноутбука, лучше установить минимально возможные значения. Иначе, если полностью отключить режим, компьютер будет работать (и потреблять энергию) до тех пор, пока вы его не выключите. Например, во время вашего обеда или долгого разговора по телефону.
Как убрать спящий режим на Windows 10: панель управления
Нажмите комбинацию клавиш WIN + R и в появившемся поле введите команду control. Нажатием Enter подтвердить операцию. Далее в верхнем правом углу необходимо выбрать тип просмотра «Мелкие значки». Переходим в раздел «Электропитание».
Здесь в левой части окна настраиваем переход в спящий режим и время отключения дисплея по своему усмотрению. Также можно выбрать одну из нескольких схем электропитания.
- Экономия энергии будет переводить комплектующие в режим минимального потребления, когда компьютер не используется.
- Режим высокой производительности, наоборот, будет снабжать железо максимальным количеством электроэнергии независимо от степени нагрузки.
- Сбалансированная схема — нечто среднее между двумя предыдущими. Владельцам лэптопов в этом же окне будет доступна настройка уровня яркости дисплея.
Это два самых простых и легких способа, как убрать спящий режим на компьютере. Если вы хотите отключить и режим гибернации, то придется использовать командную строку. Windows 10 не имеет подобного функционала в интерфейсе.
Как отключить режим гибернации
Нажимаем правой кнопкой по меню «Пуск» и внизу вводим текст «командная строка». Далее в правой части выбираем «Запуск от имени администратора». Данную утилиту также можно найти в списке установленных программ в разделе «Служебные».
В появившемся окне введите команду powercfg -h off и нажмите Enter. Гибернация будет отключена, но никаких признаков система не подаст. Для вступления изменений в силу потребуется перезагрузка. После старта обратите внимание, что свободное место на диске увеличится. Это происходит из-за удаления файла hiberfil.sys, о котором мы писали в самом начале. Для того, чтобы снова включить режим гибернации потребуется следующая команда: powercfg -h on.
Читайте также:
- Настройка файла подкачки в Windows 10: как увеличить, изменить, отключить?
- Что за папка Windows.old, и зачем она нужна?
If you’re tired of your computer unexpectedly going to sleep, you’re in the right place. Turning off sleep mode on Windows 10 is a straightforward process you can complete in just a few steps. This article will guide you through the method to ensure your computer stays awake as long as needed.
In this section, you’ll learn how to disable sleep mode on your Windows 10 computer. This ensures your system remains active and doesn’t go to sleep automatically.
Step 1: Open Settings
Open the Start Menu and select the gear icon to open Settings.
Finding the Settings menu is your first step. Look for the gear icon in the Start Menu. This window is the hub for all your computer’s settings.
Step 2: Go to System
Click on «System» in the Settings menu.
In the Settings menu, «System» is where you’ll find options related to your computer’s performance and power settings. Click on it to proceed.
Step 3: Select Power & Sleep
Choose «Power & Sleep» from the left sidebar.
The «Power & Sleep» section houses all the settings related to your computer’s sleep and power options. This is where you can adjust how your machine handles sleep mode.
Step 4: Adjust Sleep Settings
Under «Sleep», set both «On battery power, PC goes to sleep after» and «When plugged in, PC goes to sleep after» to «Never».
Here, you can decide when your computer goes to sleep. By setting both options to «Never,» you’re instructing your machine to stay awake indefinitely, whether it’s running on battery or plugged in.
Step 5: Save Changes
Close the Settings window to save your changes.
Once you’ve adjusted the settings, simply exit the window. Your changes take effect immediately, and your computer will no longer go into sleep mode on its own.
After you complete these steps, your computer will stay awake until you manually put it to sleep or shut it down.
Tips for How to Turn Off Sleep Mode Windows 10
- Check Battery Life: If you’re on a laptop, keep an eye on the battery life since disabling sleep mode can drain it faster.
- Use When Necessary: Only disable sleep mode when you need your computer to stay on for long periods without interruption.
- Custom Sleep Times: You can customize sleep settings instead of turning it off completely if you prefer a middle ground.
- Monitor Performance: Ensure your computer doesn’t overheat by staying active for too long, especially if it’s performing intensive tasks.
- Regular Updates: Keep your system updated to ensure optimal performance and security, even if sleep mode is turned off.
Frequently Asked Questions about How to Turn Off Sleep Mode Windows 10
What is sleep mode in Windows 10?
Sleep mode saves power by putting your computer into a low-power state without shutting down.
Will turning off sleep mode affect my computer’s performance?
No, but it can cause your computer to use more power and potentially overheat if left on for too long.
Can I turn sleep mode back on?
Yes, simply follow the same steps and select a desired sleep time instead of «Never.»
Does disabling sleep mode affect battery life?
Yes, it can cause your battery to drain faster if you’re using a laptop.
What if my computer still goes to sleep?
Ensure you saved the changes and check if any additional software might be overriding the settings.
Summary of How to Turn Off Sleep Mode Windows 10
- Open Settings.
- Go to System.
- Select Power & Sleep.
- Adjust Sleep Settings.
- Save Changes.
Conclusion
So there you have it! Turning off sleep mode in Windows 10 is pretty simple, right? By following these steps, you can ensure your computer stays awake as long as you need it to. Whether you’re working on a big project, watching a movie, or just want to avoid the inconvenience of waking your computer up constantly, disabling sleep mode can be a real lifesaver.
Remember, though, that keeping your computer on all the time can use up more power and potentially strain your system. So, if you don’t need your machine to stay awake constantly, consider setting a longer sleep time instead of turning it off completely. And don’t forget to monitor your computer’s performance and battery life, especially if you’re on a laptop.
For further reading, you might want to explore other power-saving tips or dive into other Windows 10 settings that can optimize your computer’s performance. If you found this guide helpful, share it with others who might benefit from it. Happy computing!
Matt Jacobs has been working as an IT consultant for small businesses since receiving his Master’s degree in 2003. While he still does some consulting work, his primary focus now is on creating technology support content for SupportYourTech.com.
His work can be found on many websites and focuses on topics such as Microsoft Office, Apple devices, Android devices, Photoshop, and more.