
Содержание статьи:
- Настройка ленты и погоды в Windows 10
- ШАГ 1
- ШАГ 2 (обновление ОС)
- ШАГ 3 (перевод на русский)
- ШАГ 4 (как ее отключить)
- ШАГ 5 (альтернативный вариант)
- Вопросы и ответы: 0
Доброго дня!
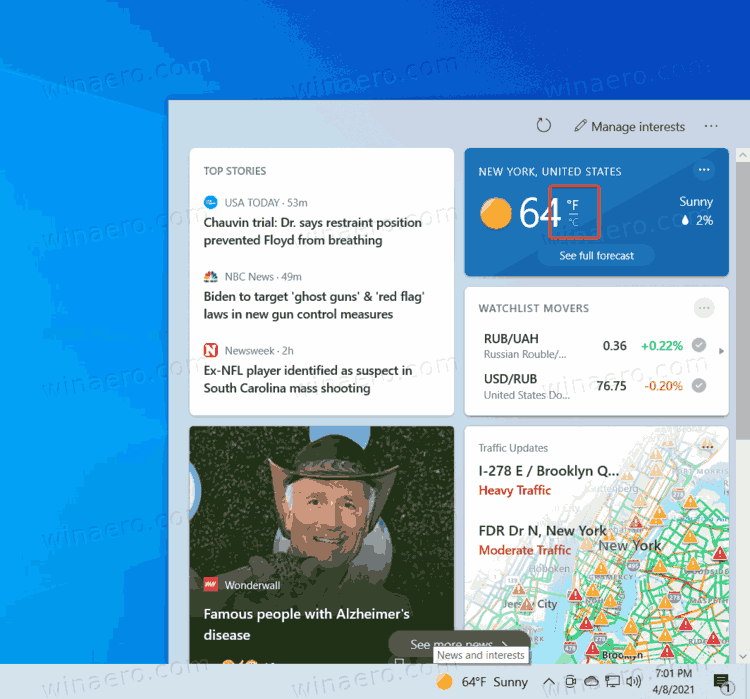
Относительно недавно вышло обновление для Windows 10, позволяющее на панель задач вывести погоду и всплывающую ленту с новостями по интересам (базируется на Microsoft MSN). Не нужно делать даже одного клика мышкой, чтобы быстренько узнать что там в Мире происходит: в спорте, в финансах, в политике и т.д. (темы можно выбрать именно те, которые интересны вам!).
Однако, далеко не у всех пользователей ОС обновилась (и, разумеется, такая полезная «лента» под-рукой пока отсутствует…). Как она выглядит, кстати, я привел на скрине ниже. 👇👀
Собственно, в сей заметке я покажу, как в ручном режиме можно поставить нужное обновление и включить отображение этой ленты по интересам. Думаю, что многим пользователям она может вполне прийтись по душе! 👌
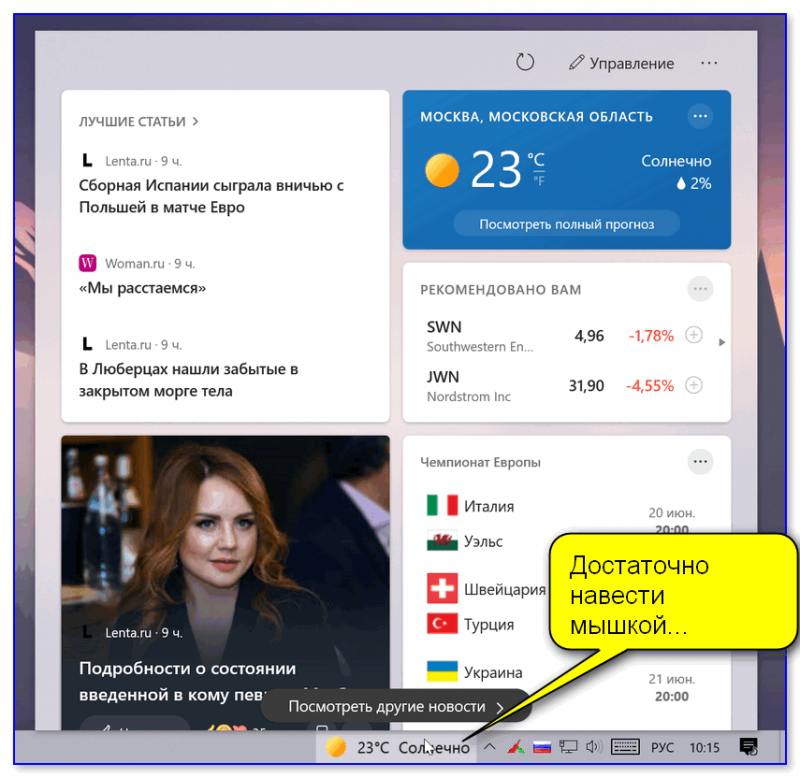
Статьи, новости, погода (Windows 10)

В обычном состоянии (никак не мешает)
*
Настройка ленты и погоды в Windows 10
ШАГ 1
Итак…
Первое, с чего следовало бы начать заметку — это сразу же попробовать включить ленту (вдруг, у вас уже обновлена ОС и лента предустановлена…).
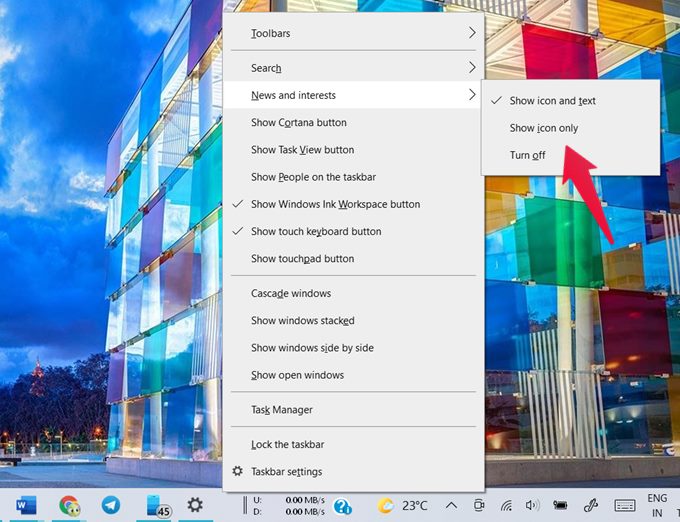
Кликните правой кнопкой мыши (ПКМ) по свободному месту на панели задач — в появившемся меню найдите вкладку «Новости и интересы» и активируйте пункт «Показать значок и текст». 👌
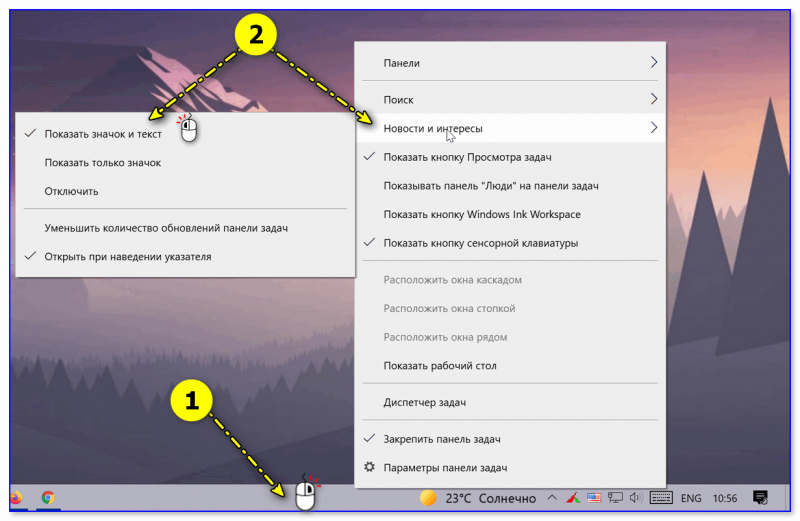
Новости и интересы — ПКМ по панели задач
После этого на панели задач появиться виджет погоды — если на него навести курсор — всплывёт окно с новостями…
Статьи, новости, погода (Windows 10)
*
ШАГ 2 (обновление ОС)
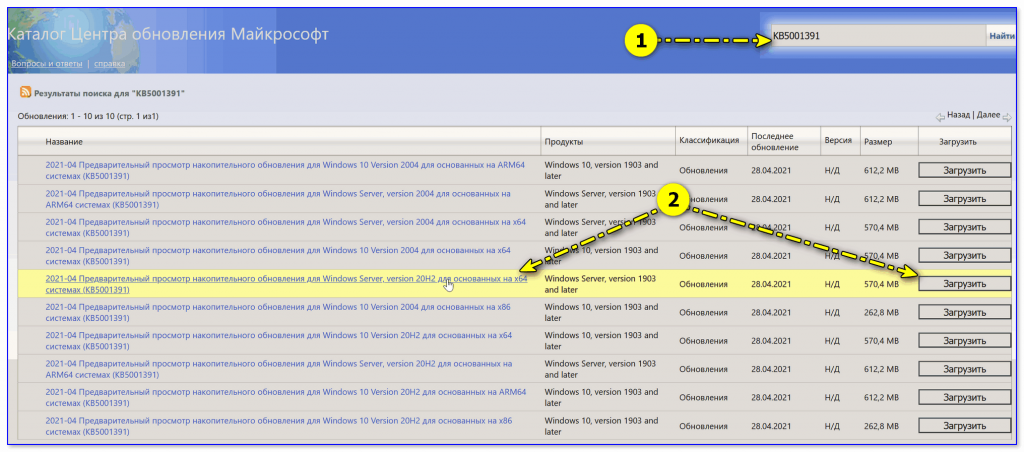
Если вкладки «Новости и интересы» у вас нет — вероятно не обновлена ОС Windows 10 (прим.: ранее такой опции в Windows не было).
Как это исправить:
- 👉 обновить систему до последней версии (если 👉 ваша ОС версии 2004 и 20H2 — 👉 установите обновление KB5001391). Прим.: я сразу же привел ссылки на инструкции, которые помогут вам узнать текущую версию ОС, и как ее обновить;

Поиск нужного патча
- проверьте, чтобы ваша 👉 панель задач была закреплена снизу (если вы сделаете ее вертикальной, перенеся вправо/влево — виджет отображаться не будет!);
- если вы работаете за ноутбуком с небольшим монитором (где рабочей ширины недостаточно для виджета) — он может не отображаться (конкретные условия назвать сложно, т.к. Microsoft точные критерии не привела…).
*
После обновления и настройки системы — перезагрузите компьютер и попробуйте еще раз выполнить ШАГ 1.
*
ШАГ 3 (перевод на русский)
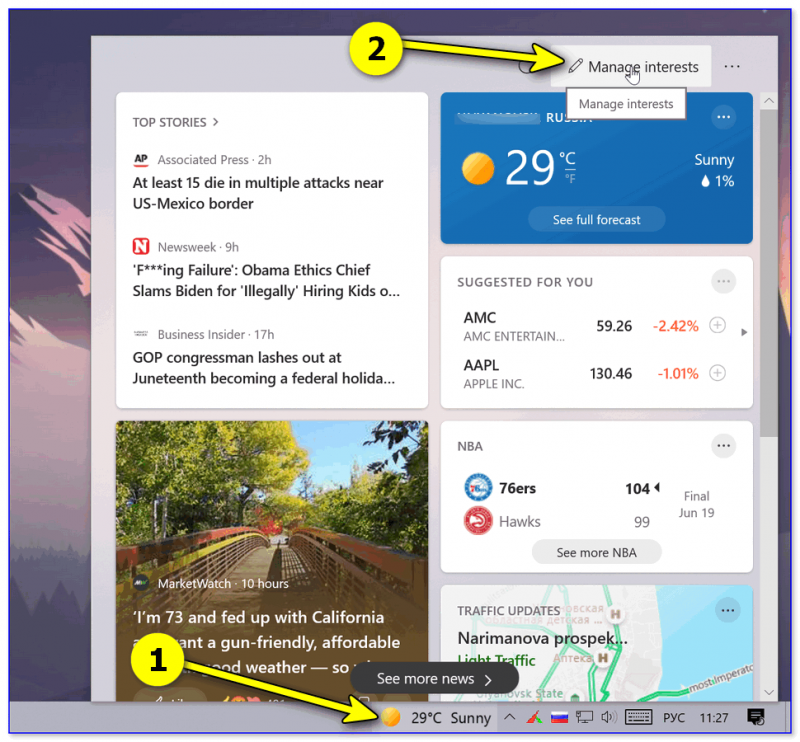
Если лента у вас на английском языке (прим.: многие пользователи жалуются на это) — откройте ее и кликните по кнопке «Manage Interests» (на русском: управление лентой интересов). См. пример ниже. 👇
Manage Interests // настройка ленты
Далее перейдите во вкладку «Мой канал» («My Channel») и нажмите по шестеренке справа — в меню укажите «Русский». 👇
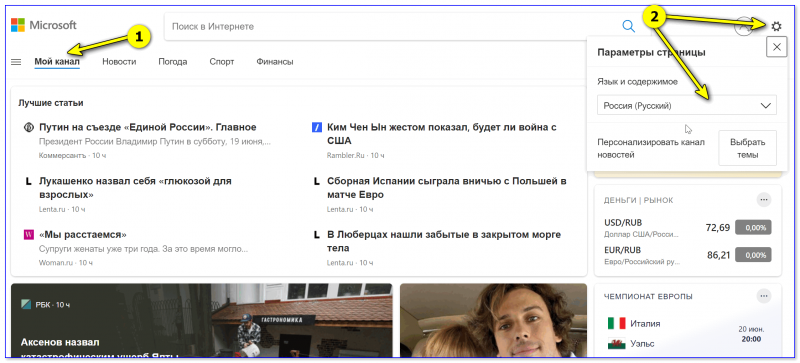
Мой канал — параметры страниц
После еще раз откройте ленту и нажмите по кнопке «Обновления» (стрелочка, в виде кружка). Вкладка обновится и все станет на русском: как сами новости, так и пункты настроек.
Аналогичным образом можно настроить и то, какие новости (по жанру/разделам) вам показывать, а какие нет…

Обновляем ленту
*
ШАГ 4 (как ее отключить)
Если со временем вы найдете для себя, что лента вам стала не нужна (или мешает / отвлекает) — то ее сравнительно быстро можно отключить. Для этого достаточно кликнуть ПКМ по панели задач и во вкладке «Новости и интересы» выбрать вариант «Отключить». См. пример ниже. 👇
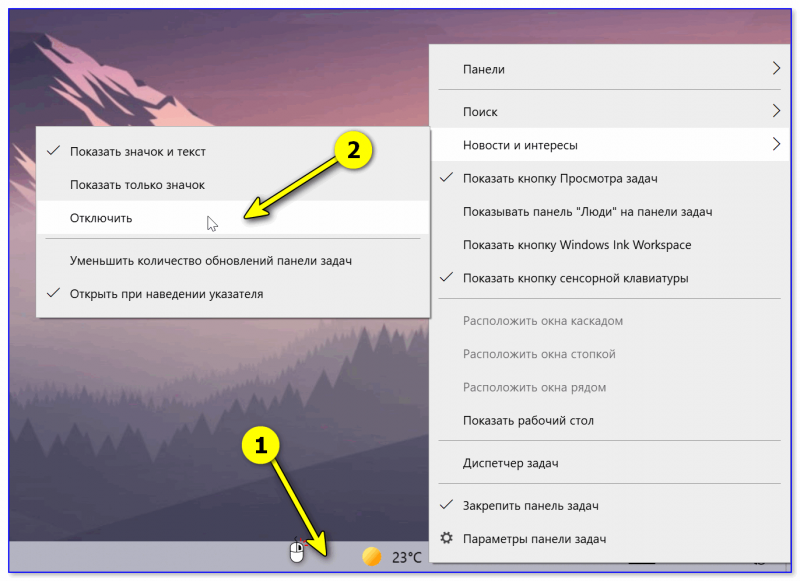
Отключаем ленту
*
👉 Также в тему!
Время в Windows: установка, обновление и синхронизация, настройка отображения (дата, часы и пр.)
*
ШАГ 5 (альтернативный вариант)
В июне 2021г. (относительно недавно) вышла первая версия Windows 11 (Insider Preview). Так вот, в ней есть встроенный раздел с виджетами (вынесен на панель задач), где отображаются и новости, и курсы валют, и погода… 👇 Сделано весьма удобно, и красиво. Возможно стоит попробовать?
Примечание: не могу не отметить, что это пока «тестовые» версии Windows 11 (не финальный релиз!), а значит возможны ошибки/сбои и пр. Поэтому, не рекомендую «делать» Windows 11 своей основной системой, пока не проверите ее на своем ПК вдоль и поперек…
👉 В помощь!
Как установить Windows 11: второй системой рядом с Windows 10 (+ поиск и загрузка ISO, проверка ОС на совместимость с ПК, решение проблем с TMP)

Виджеты Windows 11
*
Дополнения по теме — приветствуются в комментариях!
Всем здравия!
👋
If you have been looking for a weather app or widget for Taskbar in Windows 10, Microsoft heard you. Now no need to download any third-party weather widget or app. Microsoft offers a Windows 10 weather widget for the Taskbar. You can use it to see the daily weather in the taskbar on Windows 10 PC.
Are you curious to know how to set up and show the weather widget on Windows 10? You will find a detailed guide over here. The post covers how to show or hide temperature in Taskbar, and change weather location in Taskbar widget on Windows 10.
Let’s get started.
Content
- Add and Show Weather in Taskbar on Windows 10
- Change Weather Location in Taskbar Widget on Windows 10
- Disable Windows 10 Weather Widget in Taskbar
- Remove Weather Card From News and Interests Panel
- Add Weather Card to News and Interests Panel
Add and Show Weather in Taskbar on Windows 10
Your PC needs to be running the latest version of Windows 10 to show weather in the taskbar on Windows 10. The feature is available on Windows 10 versions 1909 and higher i.e., version 2004, 20H2, and 21H1.
To update your Windows PC to the latest version, go to Settings > Update & security. Click on Check for updates if an update isn’t available. Install the available update and restart computer.
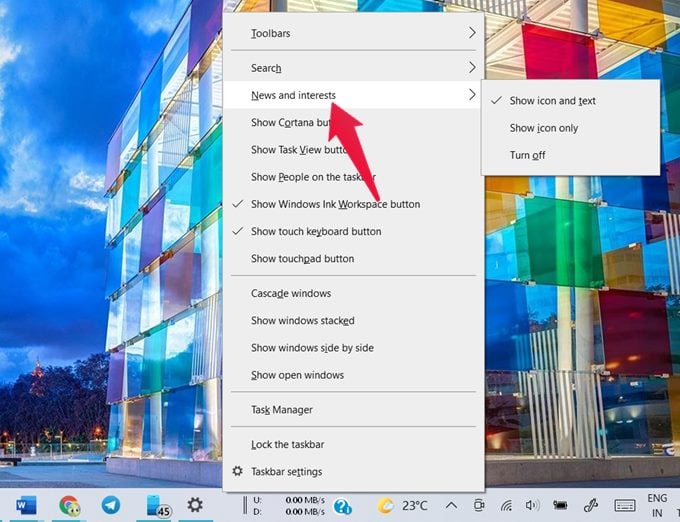
Typically, if your computer runs on the supported Windows 10 version, the weather icon will show up automatically in the taskbar. In case that doesn’t happen, right-click on the Taskbar and go to News & interests. Select ‘Show icon and text’ from the list of options. Now you should be able to see the weather on Taskbar.
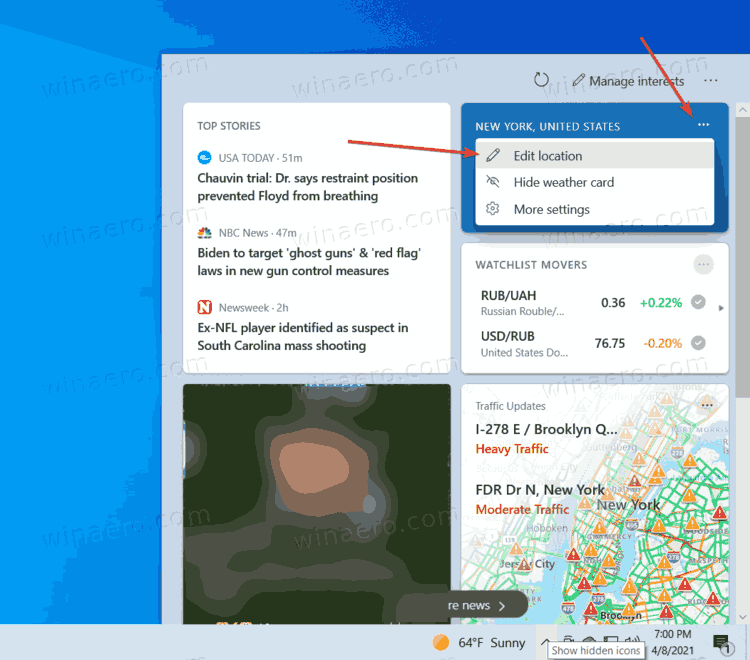
Once you have activated the Windows 10 weather widget in Taskbar, it might be showing the wrong weather location. To change the weather location to your desired place, open the News and interests panel by hovering your mouse over the weather icon.
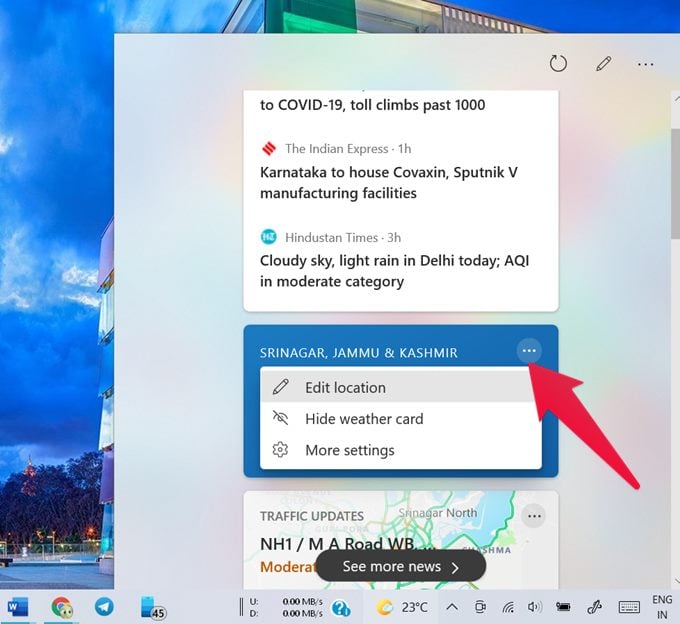
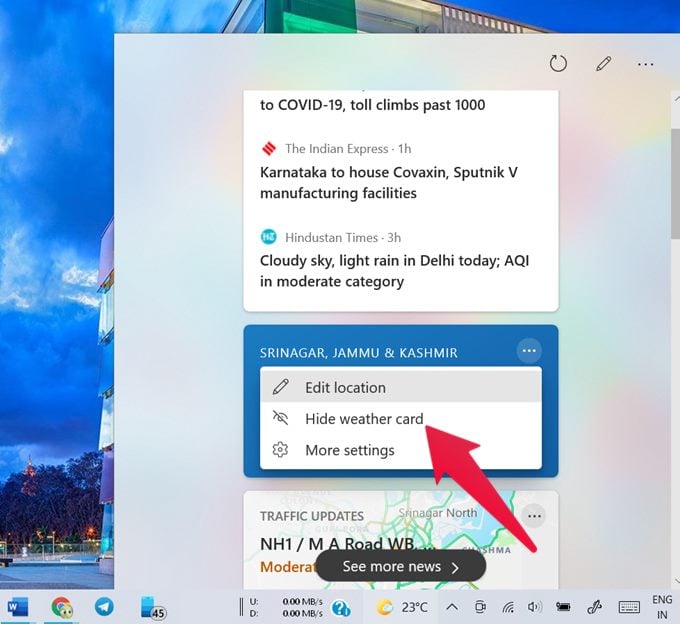
Scroll down in the panel until you see the Weather card. Click on the three-dot icon on the Weather card and select Edit location.
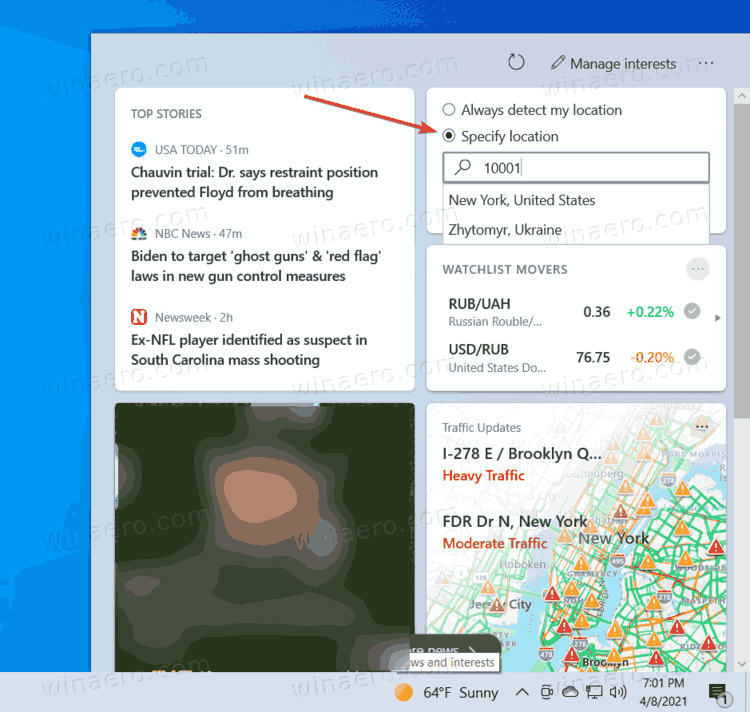
You will be shown two options – Automatically detect the location and Enter manually. Select the one as per your need. If the automatic location option doesn’t work, enter the place manually and hit the Save button. Click on the Refresh icon at the top of the panel to see the weather data for the new location.
In case you don’t like the weather icon showing up on the Taskbar, you can either remove Windows 10 weather widget icon completely from Taskbar or hide the temperature text.
For that, right-click on the Taskbar and select News and interests. If you don’t want the weather to show up on the Taskbar, select Turn off from the list. Do note that doing so will disable the entire Windows 10 weather taskbar widget. You will not be able to see News as well.
However, if you are bothered by the temperature alone, you can just show the Windows 10 weather widget icon without the text. That way you can still check and read the News from the taskbar. Removing temperature also helps in saving space on the taskbar. To do so, simply select ‘Show icon only’ from the list of options.
Remove Weather Card From News and Interests Panel
The Windows 10 weather widget icon only shows the current temperature on the taskbar. You need to open the News and Interest panel to view the full weather forecast. You will see the Weather card that shows extra information along with the ability to view the detailed forecast.
In case you are happy with just the temperature in the taskbar and feel that the weather card is taking up space in the feed, you can hide it. For that, click on the three-dot icon on the Weather card and select Hide weather card.
Add Weather Card to News and Interests Panel
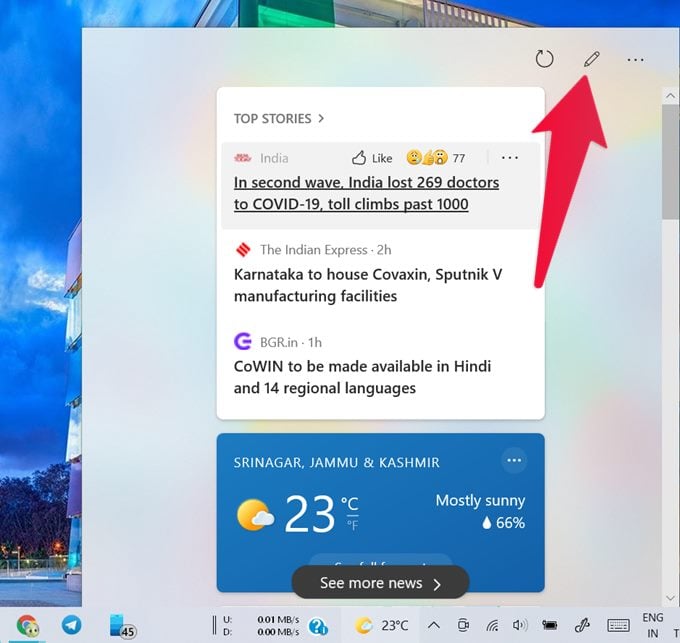
If the Windows 10 Weather widget card doesn’t show up in the News and interests feed or you removed it, you can always add it back. For that, open the News and Interest panel. Click on the Edit/Manage interests icon (pencil icon) at the top.
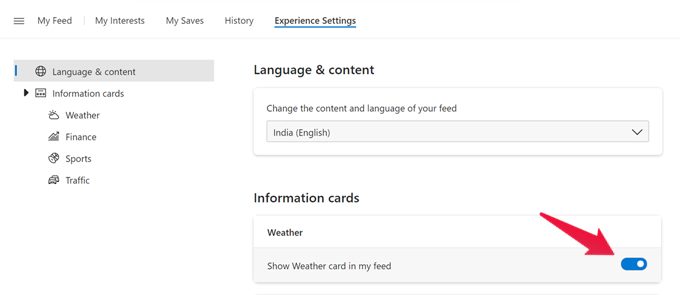
A new browser window will open. Log in to your Microsoft account. Click on Experience settings in the feed personalization window. Scroll down to the Information cards section and enable the toggle under Weather for ‘Show weather in my feed.’
You can use the same screen to hide or show other informational cards such as finance, sports, and traffic from your feed.
That’s how to customize weather and show the temperature on Taskbar in Windows 10. The Windows 10 weather widget was a much-needed feature that took a long time to arrive but hopefully will benefit many Windows 10 users. Meanwhile, since you are customizing Taskbar, find out how to center Windows 10 Taskbar icons. Also, read how to pin your favorite websites to Taskbar for faster access.
Disclosure: Mashtips is supported by its audience. As an Amazon Associate I earn from qualifying purchases.
Download Windows Speedup Tool to fix errors and make PC run faster
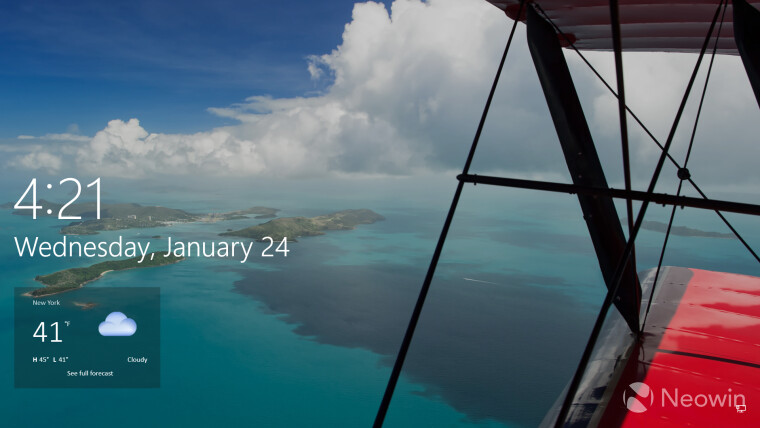
The Lockscreen of a Windows computer is the window you see every time you boot it up, right when you’re about to log into your system. The screen is highly customizable on Windows computers. Since it’s the first thing you view every time you begin to work on your computer, it’s important that it houses all the important stuff, stuff that you need to catch up with instantaneously. For many people, that can be the weather forecast for the current and upcoming days. In this article, we will be showing you how you can add the weather widget to your lock screen, and also to your desktop screen and taskbar in Windows 11/10.
The process to do so is unsurprisingly easy. All you have to do is make a change in your Windows settings and you’re good to go. Here’s what that change is:
- Open the Windows Settings by pressing the Windows and ‘I’ keys together
- From the options available on the main window, go to Personalization
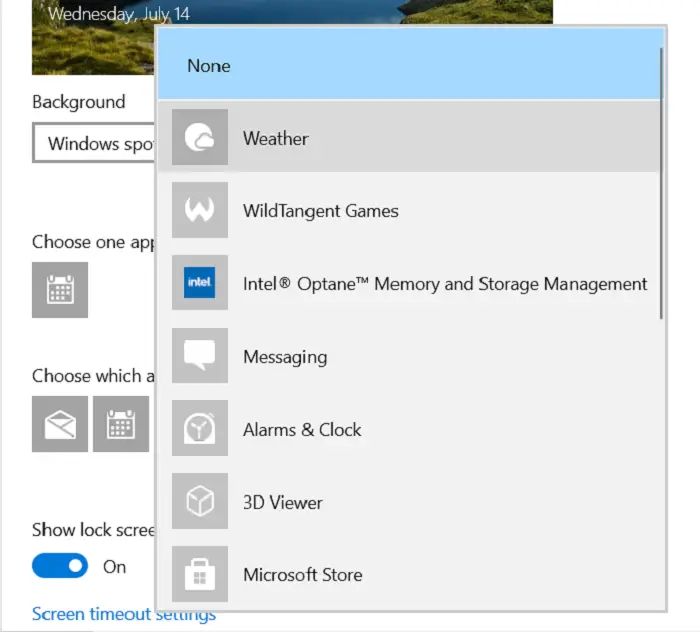
- Here, click on Lock Screen from the left-side options pane
- Here, you see an option to add items to your lock screen. This typically includes the date and time, next to which is a ‘+’ sign
- Click on that and from the list, select ‘Weather’
- If you want to undo this change, click on it again and this time select ‘None’
How to add Weather to desktop in Windows 11/10
The process isn’t as easy to replicate with your desktop as it is with the Lock screen. In fact, Microsoft doesn’t provide an option to its users to add a weather widget to their desktop screen using a built-in utility. Thus, we have to rely on third-party apps for the same. The most reliable and efficient one for this purpose is a package named Widget Launcher. It consists of not just weather but several more widgets like date & time, currency conversion, etc.
The process to set the app up is pretty easy and takes just a couple of minutes. Here’s what you need to do:
- Download the Widget Launcher app from the Microsoft Store. (It went by the name Widget HD before, so you can search with that name too).
- Launch the app once it’s been downloaded.
- There, you’ll see all the widgets the package has to offer.
- Last on the list will be one named ‘Weather’.
- Click to configure it.
Type out your location, or the location the weather of which you want to keep track of, and enter it.

You’ll find a Widget as below on your Desktop screen. You can customize this widget based on your preferences, such as its colors and how transparent you want it to be.
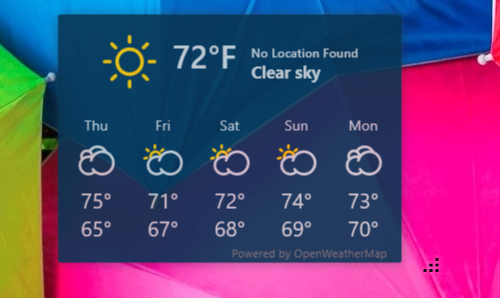
You can also drag to increase or decrease its size based, again, on your choice and the number of apps you have on your desktop, since a big widget may make it look crowded. If you want to get rid of it, simply open the Widget Launcher and disable it.
How to add a Weather widget to the Taskbar in Windows 11/10

This isn’t something a user of the latest Windows version would be asking, since this has been taken care of by Microsoft with the News and Interests feature. This utility sits on a user’s taskbar, displaying the weather, and when you hover over it you see several cards, some with the news you want to read and things that are of interest to you.
So, the best way to get the weather feature on your taskbar without relying on a third-party utility is to update your PC to the latest Windows version and use the News and Interests feature.
We hope that this post was helpful and that you are now able to display the weather widget wherever you want on your PC.
Shiwangi loves to dabble with and write about computers. Creating a System Restore Point first before installing new software, and being careful about any third-party offers while installing freeware is recommended.
Here’s how to change weather location on Taskbar in Windows 10.
One of the most recent updates to Windows 10 brought a new hub called «News and Interests.» By default, it shows a weather forecast in the taskbar providing users with the most necessary weather information. When you click on the forecast icon, Windows 10 opens a flyout with additional information, such as traffic, news, sports results, finances, etc. The News and Interests flyout is fully customizable, so you can specify what topics you want to follow, what sources to get the articles from, etc. In this article, you will learn how to personalize one of the available cards, Weather.
By default, the weather icon on the taskbar in Windows 10 uses the location data to get information about the local forecast. It works in the same way the Weather app does. Still, sometimes Windows 10 incorrectly detects the location. Also, the weather card will not get the information it needs if you didn’t grant access to the location data. When this happens, you may want to manually specify the weather location for News and Interests.
- Click on the News and Interest icon on the taskbar.

- Locate the Weather card in the flyout.
- Click the three-dots button in the card’s upper right corner to open its settings.
- Click the Edit location option.

- Next, select either automatic location detection or specify your precise location. You can enter a city name or a ZIP code.

- Click on Save.
Note that the weather icon on the taskbar is tied to the Weather app in Windows 10. This means that it will follow the settings you have in the stock Weather app, such as a location and units.
How to Change temperature units in News and Interests
Again, Windows should automatically detect your preferred units and change them accordingly. If for some reason, the operating system fails to do so, or you just want to change temperature units for weather on the taskbar, here is how to do that.
To change temperature units in News and Interests,
- Open the News and Interests hub.
- Locate the Weather card.
- Next to the temperature, you will find the
CandFsymbols.
- Click on
Cto switch the units to Celsius. ClickFto change the temperature units to Fahrenheit.
Show icon only for weather on the taskbar
The weather on the taskbar takes a significant amount of space. Users who have a smaller screen size may prefer to have an icon for the weather forecast without its extra info. Some may want to completely remove News and Interest button or at least make it more compact. Microsoft understands that and offers an option to show only an icon.
You will not see the temperature or the conditions, but the icon will update according to the weather forecast.
To show icon only for weather on the taskbar,
- Right-click the taskbar.
- Select News and Interests from the menu.
- Click the Show icon only option.

You are done.
It is worth mentioning that the News and Interests hub is currently available only in pre-release Windows 10 builds. Update: It is now available in stable Windows 10 releases as well. To get these builds, you need to enroll your computer into the Windows Insider Program in the Dev Channel. We do not recommend doing so on your primary device, as preview builds may have critical bugs and work unstable. Microsoft is expected to ship a new Windows 10 update with News and Interests in the second half of 2021.
Support us
Winaero greatly relies on your support. You can help the site keep bringing you interesting and useful content and software by using these options:
If you like this article, please share it using the buttons below. It won’t take a lot from you, but it will help us grow. Thanks for your support!
Guide
When you purchase through links on our site, we may earn an affiliate commission. Here’s how it works.
· Hot!
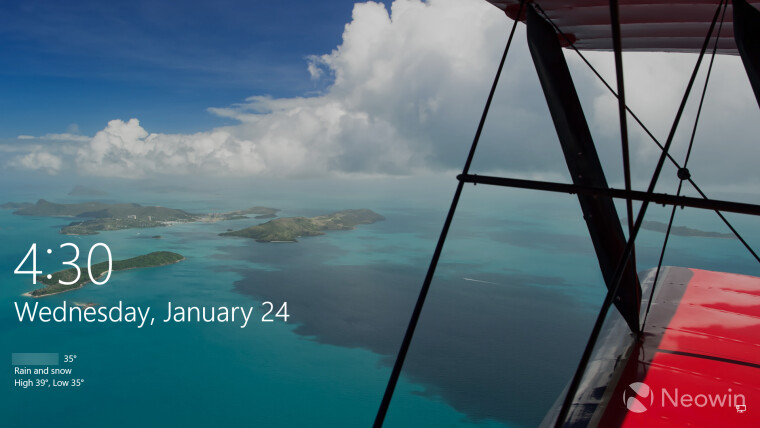
Microsoft is rolling out a somewhat unexpected new feature for Windows 10 users. The aging operating system received a new weather widget ported straight from Windows 11’s lock screen. It offers a new forecast UI when the system is locked, plus it allows opening MSN Weather from the lock screen to get extra information. The new widget is rolling out gradually to Windows 10 customers, but you can force-enable it if that is something you want right now.
How to enable the new weather widget on Windows 10 lock screen?
- Begin with installing the January 2023 non-security update for Windows 10 version 22H2. That is KB5034203 with build number 19045.2996.
- After installing the update, go to GitHub and download the latest ViVeTool release. Extract its files in a convenient and easy-to-find folder. For example, you can place those files in C:\vive, so it is easier for you to execute commands from Command Prompt.
- Press Win + R and type cmd, then press Ctrl + Shift + Enter to launch Command Prompt as Administrator. If you know other ways to launch elevated Command Prompt, feel free to use them.
- Open the folder containing the previously downloaded ViVeTool files using the CD command. For example, CD C:\Vive.
- Type vivetool /enable /id:48129505,48158013 and press Enter. Credit for the IDs goes to @thebookisclosed on X.
- Restart your computer.
- Go to Settings > Personalization > Lock Screen and press the plus button under «Choose one app to show detailed status on the lock screen.» Select Weather.

- Press Win + L to lock your computer and check the result. Note that Windows might take some time before showing you the new weather widget. If it is not there right away, give the operating system an hour or so to work its software.

The new weather widget is already getting all sorts of feedback from Windows 10 users. Some like the new variant, while others think the original widget from the Windows 8 era looks and feels much better than the new one.
Although Microsoft does not provide a user-friendly method to switch back to the old widget, you can do so by completing the same steps as described above, with the exception of step 5, where you should replace /enable with /disable. That is assuming your system has already received the new variant.
Here is what the old variant looks like, in case you have forgotten:
Which widget do you like more, the old one or the new one? Let us know in the comments section.