
|
|
|
Заблокирован |
|
|
24.05.2017, 08:22. Показов 32801. Ответов 18 при входе в визуал студио вылазит окошко авторизации с учетной записью.
0 |
|
12 / 12 / 2 Регистрация: 05.06.2016 Сообщений: 248 |
|
|
24.05.2017, 08:27 |
|
|
Использовать GCC
1 |
|
Заблокирован |
|
|
24.05.2017, 08:28 [ТС] |
|
|
это что ? в винде это можно использовать?
0 |
|
Модератор 5287 / 2375 / 342 Регистрация: 20.02.2013 Сообщений: 5,773 Записей в блоге: 20 |
|
|
24.05.2017, 08:43 |
|
|
Сообщение от Michaello это что ? в винде это можно использовать? Michaello, GCC — это коллекция компиляторов. Для винды есть MinGW: Сообщение от Википедия MinGW (англ. Minimalist GNU for Windows), ранее mingw32, —компилятор, родной программный порт GNU Compiler Collection (GCC) под Windows вместе с набором свободно распространяемых библиотек импорта и заголовочных файлов для Windows API. MinGW позволяет разработчикам создавать родные (native) приложения Windows. Такая среда разработки, как Code::Blocks по умолчанию укомплектован компилятором MinGW. QtCreator поставляется либо с MinGW, либо с майкрософтовским VC++. И к Code::Blocks, и к QtCreator можно прицепить любой компилятор на свой вкус. Нарпимер LLVM Clang.
1 |
|
Заблокирован |
|
|
24.05.2017, 08:51 [ТС] |
|
|
а визуал студио оно любое требует регистрации? Добавлено через 3 минуты 57 секунд
0 |
|
Модератор 5287 / 2375 / 342 Регистрация: 20.02.2013 Сообщений: 5,773 Записей в блоге: 20 |
|
|
24.05.2017, 09:11 |
|
|
Сообщение от Michaello а работает ли визуал студио после окончания тестового периода без доступа в интернет, т.е. если не получится сделать регистрацию по причине отсутствия интернета, получается вс не будет работать? Не знаю. Я зарегался, скачал бесплатную 2015-ю студию. И инет у меня всегда есть, так что тут не подскажу.
0 |
|
Заблокирован |
|
|
24.05.2017, 09:13 [ТС] |
|
|
а чем к примеру еклипса хуже мингВ?
0 |
|
Модератор 5287 / 2375 / 342 Регистрация: 20.02.2013 Сообщений: 5,773 Записей в блоге: 20 |
|
|
24.05.2017, 09:16 |
|
|
Сообщение от Michaello чем к примеру еклипса хуже мингВ? Некорректное сравнение.
0 |
|
12 / 13 / 2 Регистрация: 11.01.2015 Сообщений: 208 Записей в блоге: 15 |
|
|
24.05.2017, 10:08 |
|
|
Michaello, можно юзать QT. В ней есть MinGW. Можно разные компиляторы туда приделывать, в том числе и для компиляции для разных ОС. Можно использовать библиотеки QT, можно нет, просто делать проекты на Си или Си++. У меня вообще накрылась студия медным тазом после того, как установил триал-версию фотошопа… удаление фотошопа не помогло QT не накрылась.
0 |
|
Заблокирован |
|
|
24.05.2017, 10:09 [ТС] |
|
|
Сообщение от wareZ1400 как установил триал-версию фотошопа… удаление фотошопа не помогло у меня тоже с ней траблы начались + триал закончился.
0 |
|
8973 / 4319 / 960 Регистрация: 15.11.2014 Сообщений: 9,760 |
|
|
24.05.2017, 11:17 |
|
|
Сообщение от Michaello как этого избежать? купить лицензию. Сообщение от Michaello регаться 1000% не вариант.ибо западло. вообще халявщики расслабились.
0 |
|
Заблокирован |
|
|
24.05.2017, 11:28 [ТС] |
|
|
кстати заработала без инета после переустановки.
0 |
|
Модератор 5287 / 2375 / 342 Регистрация: 20.02.2013 Сообщений: 5,773 Записей в блоге: 20 |
|
|
24.05.2017, 11:39 |
|
|
Сообщение от Michaello кстати заработала без инета после переустановки. Michaello, а как же вот это: Сообщение от Michaello регаться 1000% не вариант.ибо западло. ?
0 |
|
Заблокирован |
|
|
24.05.2017, 13:32 [ТС] |
|
|
Сообщение от gru74ik Michaello, а как же вот это: я не принципиальный.
0 |
|
12 / 13 / 2 Регистрация: 11.01.2015 Сообщений: 208 Записей в блоге: 15 |
|
|
25.05.2017, 06:31 |
|
|
Michaello, я сейчас переустановил студию и всё работает. Вы программы пишите только для windows или еще и для других ОС?
0 |
|
Renji 2784 / 1937 / 570 Регистрация: 05.06.2014 Сообщений: 5,602 |
||||
|
25.05.2017, 10:09 |
||||
|
Сообщение от Michaello разбираться в хитросплетениях линуксоидов и несовместимыми компиляторами — еще более западло. «Хитросплетения линуксоидов» это вы про ошибки компиляции при попытке использовать прописанный в стандарте strcpy или про веселые микрософтовские грабли при использовании std::min?
source_file.cpp(9): error C2589: ‘(‘: illegal token on right side of ‘::’
1 |
|
6521 / 4097 / 1606 Регистрация: 09.05.2015 Сообщений: 9,561 |
|
|
25.05.2017, 17:18 |
|
|
Достаточно вместо Community поставить корректную редакцию Professional или Enterprise и ввести ключ, без регистрации, смс и интернета.
0 |
|
Заблокирован |
|
|
27.05.2017, 10:50 [ТС] |
|
|
Сообщение от Someone007 y поставить корректную редакцию Professional или Enterprise и ввести ключ, у меня нет ключа. Сообщение от Renji «Хитросплетения линуксоидов» это вы про ошибки компиляции при попытке использовать прописанный в стандарте strcpy или про веселые микрософтовские грабли при использовании std::min? про это не понял, это кирпич в мой огород? Добавлено через 15 секунд Сообщение от Someone007 y поставить корректную редакцию Professional или Enterprise и ввести ключ, у меня нет ключа. Сообщение от Renji «Хитросплетения линуксоидов» это вы про ошибки компиляции при попытке использовать прописанный в стандарте strcpy или про веселые микрософтовские грабли при использовании std::min? про это не понял, это кирпич в мой огород?
0 |
|
2784 / 1937 / 570 Регистрация: 05.06.2014 Сообщений: 5,602 |
|
|
27.05.2017, 10:56 |
|
|
Сообщение от Michaello про это не понял, это кирпич в мой огород? Это кирпич в сторону идеи использовать Студию, дабы избежать несовместимостей. Микрософт обращается со стандартами весьма вольно, так что абсолютно корректный код у вас может просто не скомпилироваться. По крайней мере, без определенных танцев с бубном.
0 |
|
inter-admin Эксперт 29715 / 6470 / 2152 Регистрация: 06.03.2009 Сообщений: 28,500 Блог |
27.05.2017, 10:56 |
|
19 |
|
Новые блоги и статьи
Все статьи Все блоги / |
||||
|
Анализ текста на Python с NLTK и Spacy
AI_Generated 14.05.2025 NLTK, старожил в мире обработки естественного языка на Python, содержит богатейшую коллекцию алгоритмов и готовых моделей. Эта библиотека отлично подходит для образовательных целей и. . . |
Реализация DI в PHP
Jason-Webb 13.05.2025 Когда я начинал писать свой первый крупный PHP-проект, моя архитектура напоминала запутаный клубок спагетти. Классы создавали другие классы внутри себя, зависимости жостко прописывались в коде, а о. . . |
Обработка изображений в реальном времени на C# с OpenCV
stackOverflow 13.05.2025 Объединение библиотеки компьютерного зрения OpenCV с современным языком программирования C# создаёт симбиоз, который открывает доступ к впечатляющему набору возможностей. Ключевое преимущество этого. . . |
POCO, ACE, Loki и другие продвинутые C++ библиотеки
NullReferenced 13.05.2025 В C++ разработки существует такое обилие библиотек, что порой кажется, будто ты заблудился в дремучем лесу. И среди этого многообразия POCO (Portable Components) – как маяк для тех, кто ищет. . . |
Паттерны проектирования GoF на C#
UnmanagedCoder 13.05.2025 Вы наверняка сталкивались с ситуациями, когда код разрастается до неприличных размеров, а его поддержка становится настоящим испытанием. Именно в такие моменты на помощь приходят паттерны Gang of. . . |
|
Создаем CLI приложение на Python с Prompt Toolkit
py-thonny 13.05.2025 Современные командные интерфейсы давно перестали быть черно-белыми текстовыми программами, которые многие помнят по старым операционным системам. CLI сегодня – это мощные, интуитивные и даже. . . |
Конвейеры ETL с Apache Airflow и Python
AI_Generated 13.05.2025 ETL-конвейеры – это набор процессов, отвечающих за извлечение данных из различных источников (Extract), их преобразование в нужный формат (Transform) и загрузку в целевое хранилище (Load). . . . |
Выполнение асинхронных задач в Python с asyncio
py-thonny 12.05.2025 Современный мир программирования похож на оживлённый мегаполис – тысячи процессов одновременно требуют внимания, ресурсов и времени. В этих джунглях операций возникают ситуации, когда программа. . . |
Работа с gRPC сервисами на C#
UnmanagedCoder 12.05.2025 gRPC (Google Remote Procedure Call) — открытый высокопроизводительный RPC-фреймворк, изначально разработанный компанией Google. Он отличается от традиционых REST-сервисов как минимум тем, что. . . |
CQRS (Command Query Responsibility Segregation) на Java
Javaican 12.05.2025 CQRS — Command Query Responsibility Segregation, или разделение ответственности команд и запросов. Суть этого архитектурного паттерна проста: операции чтения данных (запросы) отделяются от операций. . . |
Наверх
CodeGuru content and product recommendations are editorially independent. We may make money when you click on links to our partners. Learn More.
WinForms to Web: Migrating Desktop Applications, Part 1
Introduction
This is the first part of a series of articles that describes the various migration options of desktop/smart client applications to the web available using Visual WebGui.
To discuss the migration process of legacy desktop applications to the web, you should first be aware of three different types of desktop applications:
- WinForms-based desktop application (C#/VB.NET): The UI layer is coded using .NET languages—the business can be .NET, COM+, or any other interop.
- VB 6.0-based applications: The UI layer is coded with VB 6.0.
- Smart client or other desktop technologies (C++ MFC/ATL, Delphi, Java, and so forth): Any other smart client technology based applications.
This document describes the migration process of WinForms-based desktop applications to the web using Visual WebGui.
WinForms-Based Desktop Applications: Background
Normally, without Visual WebGui the migration process of a WinForms desktop application to the web will require a full re-engineering of the UI layer to fit the web architecture and capabilities.
If you take WinForms migration to ASP.NET, for example, using any AJAX third-party controls to provide a rich UI experience, you will have to consider:
- Entirely new API.
- Entirely new update approach.
- Entirely new look & feel—or work hard to customize the UI to look the same.
- Lighten the amount of data transferred to the client and presented at any given time to avoid severe latency.
- Compromise on features list due to the web limitations.
- Handle security holes created as a result of opening services consumed by client-side AJAX and transferring business logics to the client.
The Visual WebGui SDK is fully integrated with Visual Studio and provides the exact same API and set of tools/capabilities that are provided out of the box with WinForms 1.0 and 2.0. This fact enables the native capability of simply copying any existing WinForms source code to a VWG project and providing a fully functional equivalent web application.
The Process
The three basic steps of migration (view a walkthrough tutorial):
- Open a new Visual WebGui application.
- Copy the code from your WinForms project into this new web application.
- Replace any reference to the WinForms API namespace (“System.Windows.Forms”) within the code to Visual WebGui API reference (“Gizmox.WebGUI.Forms”).
Any standard WinForms application that uses the 58 WinForms out-of-the-box controls will then compile and execute as a plain web application.
The outcome of this short process is an ASP.NET-based solution in terms of deployment and runtime and has the following properties:
- Deployment is a copy & paste equivalent to an ASP.NET web site.
- Server infrastructure requires an IIS and .NET CLR only.
- The application can be consumed from any plain browser—no installation is made on the client.
- Minor static and cached footprint on the client— ~200kb of plain JS and HTML code due to the Empty Client concept.
- Support for multiple presentation layers with the same code base (DHTML/Silverlight or Smart Client).
- Maintain a single layer of code—no need to write or maintain JavaScript, HTML, and services.
- Highly secured due to the Empty Client concept.
Considerations & Exceptions
There are three major setbacks you might have during the process that you can quantify in advance and estimate the amount of work that has to be done to migrate your application:
- Minor differences between the VWG API and WinForms that are mainly caused by architecture differences.
- The amount of third-party controls that are used in your application. This section describes a situation of using some non-WinForms out-of-the-box controls (for example, Infragistics or DevExpress controls, and so on). In those cases, you can select the most suitable solution from the following three options:
- Choose a similar control from the WinForms out of the box, adjust your code to use it, and then perform the migration process.
- Select an equivalent third-party ASP.NET control (Infragistics, Telerik, DevExpress, and the like) that provides the same functionality, wrap it by a click of a button in VWG, and adjust your code to use it.
- Write your own VWG custom control that will perfectly suit your needs and then adjust your code after the migration process to use this control.
- Adjustments of a single-user desktop application to a multiuser web environment. This section summarizes some of the major issues of transforming a single-user application to a multiuser application sharing the same CPU, memory space, and other resources.
- Thread safety: Because a WinForms application can contain static members that are accessible to a single user, you should now consider one of the following:
- Replacing those static members to synchronized multi-thread safe data structures.
- Lock critical read/write sections to protect concurrent multi user access.
- Remove the statics and find an instance or DB-based solutions.
- Memory load: In a desktop application, there might be places when the original consideration of the amount of memory in use was based on the assumption that the executing machine is local. Therefore, many items are loaded to memory simultaneously without limitation. Now, on a shared memory environment, when the server does the heavy lifting, the amount of memory consumed by each user will set the number of concurrent users that can be served by each server.
The following steps are recommended:
- Consider loading items to memory on demand (keep only the headers and the identifiers in memory).
- Remove any large objects read to memory. For example, don’t save binary objects to memory; instead, write the binary to the response stream directly to the client.
- Prefer DB-based paging on entire prefaces and memory-based paging. Visual WebGui provides mechanisms to enable it easily.
Summary
Migration of any WinForms application to the web using Visual WebGui has the following advantages:
- In three simple steps, you will be able to get very close to a working web application.
- The effort you have to make to accomplish a fully functional web application is measurable.
- The application can keep using the existing BL and DL layers; only the UI is either migrated automatically or adjusted.
Introduction
Hello guys, in this article we will create a login and registration form with a database in a C# Windows Form application. This application has three forms, login, registration, and home. Users first register themselves, then log in to their account and see the welcome message on the home page.
Step 1
Open your visual studio, here I will use Visual Studio 2019.
Step 2
The clock on file menu on top of the visual studio, hover mouse on new, and click on Project.
Step 3
Search for Windows Form App (.NET framework) and click on next.
Step 4
In this step, you have to enter some details of your application and then click on the Create button. You have to enter the following details:
- Project Name: Name of your project
- Location: Location where you want to store your app on your local computer.
- Solution Name: This name is displayed in solution explorer in visual studio.
- Framework: Select the appropriate framework as per your application requirements.
Step 5
Now your project is created. Open Solution Explorer. If you don’t see solution explorer, you can open it from the View menu on top, or you can try the short cut key “Ctrl+W,S”. We need to create some pages for our application. Right-click on the solution name then Hover the mouse on Add and click on Add New Item, or you can user short cut key “Ctrl+Shift+A”.
Step 6
Now you see a dialog where we add our forms. Select Windows Form, give it a proper name and click on Add. Add a Login, Registration, and Home page in the same way.
Step 7
Now we need to add a database in our project. Right-click on the solution name, then Hover mouse on Add and click on Add New Item, or you can user short cut key “Ctrl+Shift+A”. Select data filter from the left sidebar to see the item which is associated with the database. Select service-based database, give it a name and click on add.
Step 8
Now we create a table that we user in login and registration. Double click on the database file from solution explorer. It will open a database file in the server explorer.
Expand your database and right-click on the table, then click on Add New Table.
Step 9
Create a table field that you want. Here, I added only three fields, ID, Username, and password, where ID is auto incremented by 1. You can set it by right clicking on the field name, click on property, and find the Id Identity Specification. Expand it and make it true (Is Identity) field and give an increment number which increments Id by adding this number in the last Id.
q
CREATE TABLE [dbo].[LoginTable]
(
[Id] INT NOT NULL PRIMARY KEY IDENTITY,
[username] NVARCHAR(50) NULL,
[password] NVARCHAR(50) NULL
) Step 10
Now we create a Registration form. Create a design for your form as you need. In the below image, you see how I design a form.
Step 11
Now click anywhere on the form. It will generate a Form_Load event where you can enter the following code. This code creates a database connection and opens it. In the next step, you will learn how you get that connection string which are added in SQLConnection Constructor.
private void Registration_Load(object sender, EventArgs e)
{
cn = new SqlConnection(@"Data Source=(LocalDB)\MSSQLLocalDB;AttachDbFilename=H:\Website\RegistrationAndLogin\Database.mdf;Integrated Security=True");
cn.Open();
}Step 12
Go to Server Explorer, right-click on the database, then click on Modify Connection.
Step 13
Now you see a windows dialog popup click on the advance button. This will open another dialog. Before that, click on the test button and check that your database is working properly.
Step 14
Copy the path which shows below on this dialog and close both dialogs. Then paste this path in the form load event. Add @ sign before this path so there’s no need to change the slash.
Step 15
We need to open the login page when the user clicks on the login button, so enter the following code in the Login Button click event.
private void Button1_Click(object sender, EventArgs e)
{
this.Hide();
Login login = new Login();
login.ShowDialog();
}Code Explanation
- First, we hide the current form which is registration .
- Then we create an object of login page and show login form using that object.
Step 16
Now add the following code in the registration button click event:
private void BtnRegister_Click(object sender, EventArgs e)
{
if (txtconfirmpassword.Text != string.Empty || txtpassword.Text != string.Empty || txtusername.Text != string.Empty)
{
if (txtpassword.Text == txtconfirmpassword.Text)
{
cmd = new SqlCommand("select * from LoginTable where username='" + txtusername.Text + "'", cn);
dr = cmd.ExecuteReader();
if (dr.Read())
{
dr.Close();
MessageBox.Show("Username Already exist please try another ", "Error", MessageBoxButtons.OK, MessageBoxIcon.Error);
}
else
{
dr.Close();
cmd = new SqlCommand("insert into LoginTable values(@username,@password)", cn);
cmd.Parameters.AddWithValue("username", txtusername.Text);
cmd.Parameters.AddWithValue("password", txtpassword.Text);
cmd.ExecuteNonQuery();
MessageBox.Show("Your Account is created . Please login now.", "Done", MessageBoxButtons.OK, MessageBoxIcon.Information);
}
}
else
{
MessageBox.Show("Please enter both password same ", "Error", MessageBoxButtons.OK, MessageBoxIcon.Error);
}
}
else
{
MessageBox.Show("Please enter value in all field.", "Error", MessageBoxButtons.OK, MessageBoxIcon.Error);
}
}Code Explanation
- First of all, we check that the user entered a value in all fields. If yes, then continue, otherwise, show a message using the message box.
- Then we check if the password and confirm password both are the same.
- Then we check if any record/user is already registered with that username if not then continue further otherwise show an error message.
- In last we insert data in the table using the SQLCommand object.
Step 17
Now we create a login page. Here, I added two text boxes for username and password and two buttons for a login and open registration form.
Step 18
Click on anywhere in a form which generates a Form_Load event add connection code, as shown below.
private void Login_Load(object sender, EventArgs e)
{
cn = new SqlConnection(@"Data Source=(LocalDB)\MSSQLLocalDB;AttachDbFilename=H:\Website\RegistrationAndLogin\Database.mdf;Integrated Security=True");
cn.Open();
}Step 19
On a Registration button click, add the following code which opens the registration form.
private void Btnregister_Click(object sender, EventArgs e)
{
this.Hide();
Registration registration = new Registration();
registration.ShowDialog();
}Step 20
Add the below code in the login button click for redirecting users to the home page form if the user exists.
private void BtnLogin_Click(object sender, EventArgs e)
{
if (txtpassword.Text != string.Empty || txtusername.Text != string.Empty)
{
cmd = new SqlCommand("select * from LoginTable where username='" + txtusername.Text + "' and password='"+txtpassword.Text+"'", cn);
dr = cmd.ExecuteReader();
if (dr.Read())
{
dr.Close();
this.Hide();
Home home = new Home();
home.ShowDialog();
}
else
{
dr.Close();
MessageBox.Show("No Account avilable with this username and password ", "Error", MessageBoxButtons.OK, MessageBoxIcon.Error);
}
}
else
{
MessageBox.Show("Please enter value in all field.", "Error", MessageBoxButtons.OK, MessageBoxIcon.Error);
}
}Code Explanation
- Here, first of all, we check if the user enters a value in both fields. If yes, then continue, otherwise, show an error message.
- Then we check if the user exists in our database with that username and password. If the user exists, then open the home page which we generated at the start.
Step 21
Change the start page as login in Program.cs File.
static void Main()
{
Application.EnableVisualStyles();
Application.SetCompatibleTextRenderingDefault(false);
Application.Run(new Login());
}Step 22
Now run your application.
Login.cs
using System;
using System.Collections.Generic;
using System.ComponentModel;
using System.Data;
using System.Data.SqlClient;
using System.Drawing;
using System.Linq;
using System.Text;
using System.Threading.Tasks;
using System.Windows.Forms;
namespace RegistrationAndLogin
{
public partial class Login : Form
{
SqlCommand cmd;
SqlConnection cn;
SqlDataReader dr;
public Login()
{
InitializeComponent();
}
private void Login_Load(object sender, EventArgs e)
{
cn = new SqlConnection(@"Data Source=(LocalDB)\MSSQLLocalDB;AttachDbFilename=D:\Articles\Code\RegistrationAndLogin\Database.mdf;Integrated Security=True");
cn.Open();
}
private void Btnregister_Click(object sender, EventArgs e)
{
this.Hide();
Registration registration = new Registration();
registration.ShowDialog();
}
private void BtnLogin_Click(object sender, EventArgs e)
{
if (txtpassword.Text != string.Empty || txtusername.Text != string.Empty)
{
cmd = new SqlCommand("select * from LoginTable where username='" + txtusername.Text + "' and password='"+txtpassword.Text+"'", cn);
dr = cmd.ExecuteReader();
if (dr.Read())
{
dr.Close();
this.Hide();
Home home = new Home();
home.ShowDialog();
}
else
{
dr.Close();
MessageBox.Show("No Account avilable with this username and password ", "Error", MessageBoxButtons.OK, MessageBoxIcon.Error);
}
}
else
{
MessageBox.Show("Please enter value in all field.", "Error", MessageBoxButtons.OK, MessageBoxIcon.Error);
}
}
}
}
Registration.cs
using System;
using System.Collections.Generic;
using System.ComponentModel;
using System.Data;
using System.Data.Common;
using System.Data.SqlClient;
using System.Drawing;
using System.Linq;
using System.Text;
using System.Threading.Tasks;
using System.Windows.Forms;
namespace RegistrationAndLogin
{
public partial class Registration : Form
{
SqlCommand cmd;
SqlConnection cn;
SqlDataReader dr;
public Registration()
{
InitializeComponent();
}
private void Registration_Load(object sender, EventArgs e)
{
cn = new SqlConnection(@"Data Source=(LocalDB)\MSSQLLocalDB;AttachDbFilename=D:\Articles\Code\RegistrationAndLogin\Database.mdf;Integrated Security=True");
cn.Open();
}
private void BtnRegister_Click(object sender, EventArgs e)
{
if (txtconfirmpassword.Text != string.Empty || txtpassword.Text != string.Empty || txtusername.Text != string.Empty)
{
if (txtpassword.Text == txtconfirmpassword.Text)
{
cmd = new SqlCommand("select * from LoginTable where username='" + txtusername.Text + "'", cn);
dr = cmd.ExecuteReader();
if (dr.Read())
{
dr.Close();
MessageBox.Show("Username Already exist please try another ", "Error", MessageBoxButtons.OK, MessageBoxIcon.Error);
}
else
{
dr.Close();
cmd = new SqlCommand("insert into LoginTable values(@username,@password)", cn);
cmd.Parameters.AddWithValue("username", txtusername.Text);
cmd.Parameters.AddWithValue("password", txtpassword.Text);
cmd.ExecuteNonQuery();
MessageBox.Show("Your Account is created . Please login now.", "Done", MessageBoxButtons.OK, MessageBoxIcon.Information);
}
}
else
{
MessageBox.Show("Please enter both password same ", "Error", MessageBoxButtons.OK, MessageBoxIcon.Error);
}
}
else
{
MessageBox.Show("Please enter value in all field.", "Error", MessageBoxButtons.OK, MessageBoxIcon.Error);
}
}
private void Button1_Click(object sender, EventArgs e)
{
this.Hide();
Login login = new Login();
login.ShowDialog();
}
}
}
Home.cs
using System;
using System.Collections.Generic;
using System.ComponentModel;
using System.Data;
using System.Drawing;
using System.Linq;
using System.Text;
using System.Threading.Tasks;
using System.Windows.Forms;
namespace RegistrationAndLogin
{
public partial class Home : Form
{
public Home()
{
InitializeComponent();
}
}
}
Program.cs
using System;
using System.Collections.Generic;
using System.Linq;
using System.Threading.Tasks;
using System.Windows.Forms;
namespace RegistrationAndLogin
{
static class Program
{
/// <summary>
/// The main entry point for the application.
/// </summary>
[STAThread]
static void Main()
{
Application.EnableVisualStyles();
Application.SetCompatibleTextRenderingDefault(false);
Application.Run(new Login());
}
}
}
Conclusion
So here, we created a simple login and registration page in a Windows Form application. I hope you liked this article, share it with your friends.
C#,Windows Form, WPF, LINQ, Entity Framework Examples and Codes
This article deals with how to create a Windows Form Application in C# as a Login Page which basically all applications contain as the starting page, where users will be validated for their passwords.
Step 1
Open Visual Studio 2015 and click on File –> New –> Project which opens up the template window with many developing options.
Step 2
The above step brings in an empty Windows Form where the user can use Tools for designing the empty form into interactive form. I have used Label (2 nos), TextBox (2 nos) and a Button . Placing the tools in the right designing way, it looks like the below image.
Step 3
The conventional way of any login form will contain password displayed in a special character which is for security purposes. To bring that concept into your login form, select the Properties option of TextBox in which you could find the option Password Char where you can give your desired special character (in my case, I have used * asterisk). By making this change, if you run your application, it will display only the special symbol when you enter a password.
Step 4:
Now, it is time for creating the repository for your login form. For this, go to Start menu and find the MS Access and click once to open.
Step 5:
Source Code:
|
1 2 3 4 5 6 7 8 9 10 11 12 13 14 15 16 17 18 19 20 21 22 23 24 25 26 27 28 29 30 31 32 33 34 35 36 37 38 39 40 41 42 43 44 45 46 47 48 49 50 51 |
using System; using System.Collections.Generic; using System.ComponentModel; using System.Data; using System.Data.OleDb; using System.Drawing; using System.Linq; using System.Text; using System.Threading.Tasks; using System.Windows.Forms; namespace loginformcce { public partial class Form1 : Form { OleDbConnection con; OleDbCommand cmd; OleDbDataReader dr; public Form1() { InitializeComponent(); } private void btnLogin_Click(object sender, EventArgs e) { string usr = txtUser.Text; string psw = txtPass.Text; con = new OleDbConnection(«Provider=Microsoft.ACE.Oledb.12.0;Data Source=dbUsers.accdb»); cmd = new OleDbCommand(); con.Open(); cmd.Connection = con; cmd.CommandText = «SELECT * FROM tblUser where user='» + txtUser.Text + «‘ AND pass='» + txtPass.Text + «‘»; dr = cmd.ExecuteReader(); if (dr.Read()) { Form2 f2 = new Form2(); f2.Show(); } else { MessageBox.Show(«Username or password is incorrect»); } con.Close(); } } } |
Output:
You may also like
Многие приложения требуют авторизации для полноценного использования. Сегодня мы напишем простую форму авторизации Windows-приложений на языке C#.
Шаг 1. Создание базы
Первым делом создадим новую базу данных test для хранения тестовой информации. Добавьте таблицу user со следующими полями:
id(INT) c атрибутомAUTO_INCREMENT;name(VARCHAR(100));title(VARCHAR(100));address(VARCHAR(100)).
user в базе данных testШаг 2. Создание проекта
Создайте проект для нового приложения. В Visual Studio для этого нужно зайти в меню File > New > Project.
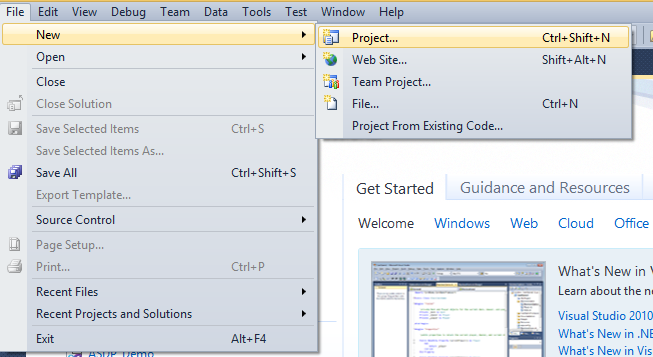
После этого появится окно New Project:
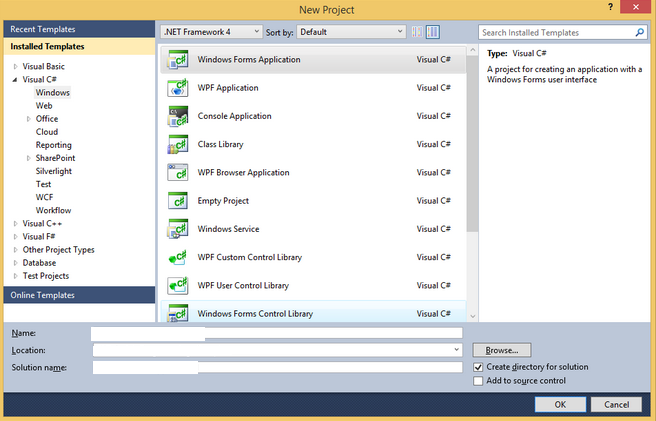
В поле Name нужно вписать название вашего проекта, в поле Location – указать нужную директорию, в Solution name – ввести название решения. Заполнили данные – нажимаем OK.
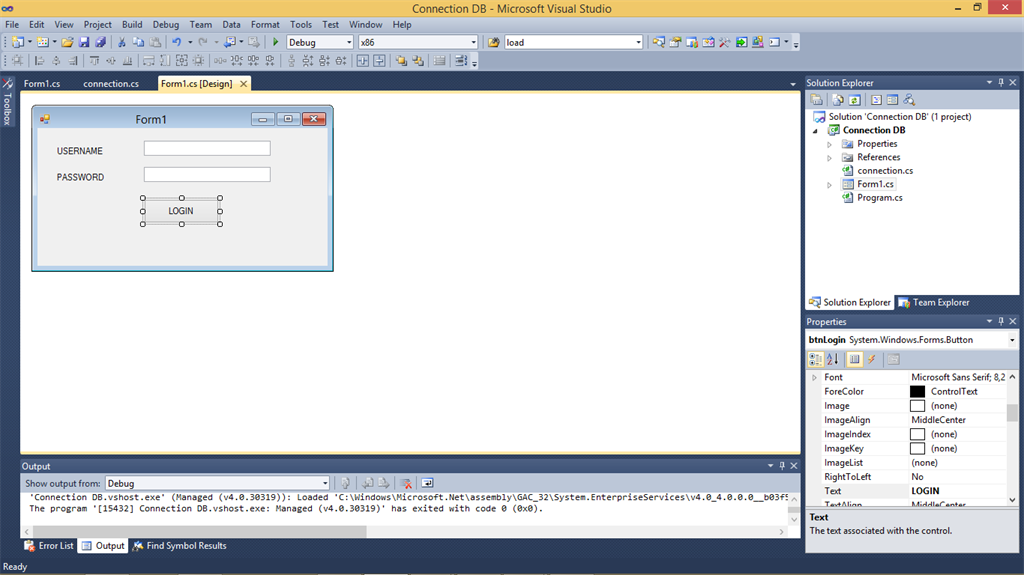
Шаг 3. Создание интерфейса
Создайте представление будущей формы авторизации, как показано на рисунке ниже. Добавьте два поля (username и password) и кнопку для входа.
Шаг 4. Настройка соединения с базой
Создайте класс connection для настройки соединения с базой. Пример реализации представлен в листинге ниже:
        using System;
using System.Collections.Generic;
using System.Linq;
using System.Text;
using MySql.Data.MySqlClient;
using System.Windows.Forms;
using System.Data;namespace Connection_DB
{
    class connection
    {

        MySql.Data.MySqlClient.MySqlConnection conn;
        string myConnectionString;
        static string host = "localhost";
        static string database = "test";
        static string userDB = "ecco";
        static string password = "password";
        public static string strProvider = "server=" + host + ";Database=" + database + ";User ID=" + userDB + ";Password=" + password;
        public bool Open()
        {
            try
            {
                strProvider = "server=" + host + ";Database=" + database + ";User ID=" + userDB + ";Password=" + password;
                conn = new MySqlConnection(strProvider);
                conn.Open();
                return true;
            }
            catch (Exception er)
            {
                MessageBox.Show("Connection Error ! " + er.Message, "Information");
            }
            return false;
        }        public void Close()
        {
            conn.Close();
            conn.Dispose();
        }        public DataSet ExecuteDataSet(string sql)
        {
            try
            {
                DataSet ds = new DataSet();
                MySqlDataAdapter da = new MySqlDataAdapter(sql, conn);
                da.Fill(ds, "result");
                return ds;
            }
            catch (Exception ex)
            {
                MessageBox.Show(ex.Message);
            }
            return null;
        }        public MySqlDataReader ExecuteReader(string sql)
        {
            try
            {
                MySqlDataReader reader;
                MySqlCommand cmd = new MySqlCommand(sql, conn);
                reader = cmd.ExecuteReader();
                return reader;
            }
            catch (Exception ex)
            {
                MessageBox.Show(ex.Message);
            }
            return null;
        }        public int ExecuteNonQuery(string sql)
        {
            try
            {
                int affected;
                MySqlTransaction mytransaction = conn.BeginTransaction();
                MySqlCommand cmd = conn.CreateCommand();
                cmd.CommandText = sql;
                affected = cmd.ExecuteNonQuery();
                mytransaction.Commit();
                return affected;
            }
            catch (Exception ex)
            {
                MessageBox.Show(ex.Message);
            }
            return -1;
        }
    }
}
Наконец, вернитесь к форме и добавьте следующий код:
using System;
using System.Collections.Generic;
using System.ComponentModel;
using System.Data;
using System.Drawing;
using System.Linq;
using System.Text;
using System.Windows.Forms;
using MySql.Data.MySqlClient;namespace Connection_DB
{
public partial class Form1 : Form
{
connection con = new connection();
string id, username, password, firstname, lastname, address;
public Form1()
{
InitializeComponent();
} private void btnLogin_Click(object sender, EventArgs e)
{
try
{ if (txtUsername.Text != "" && txtPassword.Text != "")
{
con.Open();
string query = "select id,username,password,firstname,lastname,address from user WHERE username ='" + txtUsername.Text + "' AND password ='" + txtPassword.Text + "'";
MySqlDataReader row;
row = con.ExecuteReader(query);
if (row.HasRows)
{
while (row.Read())
{
id = row["id"].ToString();
username = row["username"].ToString();
password = row["password"].ToString();
firstname = row["firstname"].ToString();
lastname = row["lastname"].ToString();
address = row["address"].ToString();
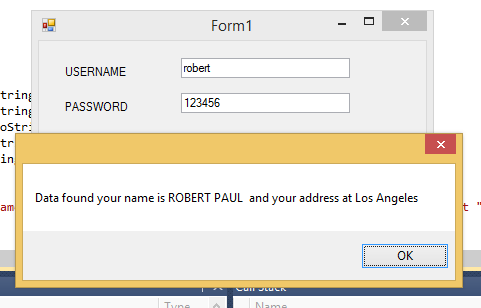
} MessageBox.Show("Data found your name is " + firstname + " " + lastname + " " + " and your address at " + address);
}
else
{
MessageBox.Show("Data not found", "Information");
}
}
else
{
MessageBox.Show("Username or Password is empty", "Information");
}
}
catch
{
MessageBox.Show("Connection Error", "Information");
}
}
}
}
Результат
Нажмите F5, чтобы запустить программу. Если соединение с базой данных успешно установится, вы увидите только что созданную форму.
Исходный код этой простой формы авторизации вы найдете на Github.
***
У нас есть много полезных материалов по C# для начинающих:
- Лучшие актуальные шпаргалки по C# на все случаи жизни
- Видеокурс по C# с нуля: от основ до полноценного приложения
- Самый понятный видеокурс по C# для новичков
Источники
- https://www.c-sharpcorner.com/article/simple-login-form-c-sharp-with-database-mysql/