
Item Preview
There Is No Preview Available For This Item
This item does not appear to have any files that can be experienced on Archive.org.
Please download files in this item to interact with them on your computer.
Show all files
SIMILAR ITEMS (based on metadata)
Время на прочтение1 мин
Количество просмотров15K

Разработчик NTDEV представил спидран-сборку для установки Windows 10 на базе облегчённой версии tiny10. Тесты показали, что с помощью этого проекта операционная система ставится на ПК за 104 секунды.
Обычное время установки полноценного дистрибутива Windows 10 на ПК составляет от 20 до 30 минут.
NTDEV посоветовал использовать в ПК только самые быстрые доступные SSD, ОЗУ с оптимальными таймингами, а также современные процессоры для установки как стандартной версии операционной системы Windows, так и его сборок.
В апреле 2023 года NTDEV выпустил сборку live11 — версию Windows 11 Pro для размещения на внешнем носителе, которой требуется всего 4 ГБ ОЗУ на ПК для загрузки без необходимости установки ОС и 2 ГБ ОЗУ для работы системы.
В сентябре вышел проект tiny11 23H2 для x64 для игровых ПК.
В октябре NTDEV представил самый компактный из своих проектов tiny11 core. ISO-образ tiny11 core весит всего 3 ГБ, а установка потребует чуть больше 3 ГБ на диске.
Совсем недавно мы тестировали сборку Windows 11 от команды NTDEV и, несмотря на то, что это компактная и легкая сборка, у нее есть огромный недостаток — отсутствие русского языка, вернуть который штатными средствами системы невозможно. И приступая к тестированию новой облегченной сборки от NTDEV на основе Windows 10 LTSC, я поставил себе цель не только посмотреть, насколько шустро и стабильно она работает, но и вернуть в нее русский язык.
Но сначала стоит рассказать о том, почему сборки от NTDEV стали так популярны в IT-среде и почему про них пишут не только блогеры, но даже такие издания, посвященные программирования и информационной безопасности, как Хабр и Comss.ru. Как писал один из комментаторов на Хабре — «С каких это пор Хабр начал писать про сборки Windows? Может еще про Zver напишете?»

Его изумление можно понять, ведь сборки Windows давно стали уделом малоопытных пользователей, мало разбирающихся в информационной безопасности. Залогом стабильной работы Windows давно стала установка официального образа с сайта Microsoft, а создание сборки Windows оправдано только при ее создании для себя, как, например, в блоге «Делаем быструю игровую сборку Windows 10 Pro 20H2 за полчаса, стараясь догнать Windows 10 LTSC» с помощью утилиты NTLite.
Что же изменилось и почему сборки Windows от NTDEV вызывают такое повышенное внимание? Во-первых, у пользователей появился острый запрос на облегченные версии современных операционных систем Windows 10 и Windows 11, ведь поддержка Windows 7 и Windows 8.1 полностью прекращена. А установив даже достаточно шуструю Windows 10 LTSC на старенький ноутбук без SSD, с двухъядерным процессором и 4 ГБ ОЗУ вы столкнетесь с жуткими тормозами и практически полной невозможностью работы на нем.

Во-вторых, грамотно сделать сборку Windows 10 и 11 своими руками или облегчить уже установленную Windows становится все сложнее, и система пытается восстановить работу по умолчанию или выдает различные ошибки. Мало какая сборка способна после этого без ошибок запустить команду SFC /Scannow. Вдобавок сборки быстро теряют актуальность, и в результате затрачивать свои силы на доведение сборки Windows до идеала — задача не очень благодарная, особенно если у вас мало знаний в этом.
В-третьих, столь пристальное внимание продвинутых пользователей к сборкам NTDEV обеспечивает косвенную гарантию безопасности их использования — если бы они содержали в себе вредоносные функции, об этом быстро стало бы известно. Поэтому сегодня мы посмотрим на очередную сборку от NTDEV — Windows 10 Tiny10, созданную на базе Windows 10 LTSC, которая позиционируется разработчиком для работы на слабых и старых компьютерах и ноутбуках с небольшим объемом памяти и скромным объемом накопителя. Скачать ее можно с сайта archive.org, где лежат и остальные сборки от NTDEV.

Файл tiny10 2303 x86.iso весит чуть более трех гигабайт, а приписка «x86» означает, что сборка основана на 32-разрядной версии Windows 10 LTSC. Эта версия будет оптимальна для устройств с 2-4 ГБ ОЗУ, обеспечив их максимальное быстродействие в рабочих программах.
Я установил Windows 10 Tiny10 на виртуальную машину с 4 ГБ ОЗУ, 4 потоками процессора и объемом накопителя в 40 ГБ. Установка прошла быстро и первым делом я стал интегрировать в нее русский язык, ведь пользоваться английской версией Windows сможет не всякий. Я готовился к худшему, и пошел по самому трудному пути, скачав файл языковых пакетов для Windows 10, чтобы интегрировать его с помощью PowerShell.
Я последовательно ввел:
Dism /Online /Add-Package /PackagePath:D:\LanguagesAndOptionalFeatures\Microsoft-Windows-Client-Language-Pack_x64_ru-ru.cab
Dism /Online /Add-Capability /capabilityname:Language.Basic~~~ru-ru~0.0.1.0 /source:D:\LanguagesAndOptionalFeatures
Dism /Online /Add-Capability /capabilityname:Language.Handwriting~~~ru-ru~0.0.1.0 /source:D:\LanguagesAndOptionalFeatures
Dism /Online /Add-Capability /capabilityname:Language.OCR~~~ru-ru~0.0.1.0 /source:D:\LanguagesAndOptionalFeatures
Dism /Online /Add-Capability /capabilityname:Language.Speech~~~ru-ru~0.0.1.0 /source:D:\LanguagesAndOptionalFeatures
Dism /Online /Add-Capability /capabilityname:Language.TextToSpeech~~~ru-ru~0.0.1.0 /source:D:\LanguagesAndOptionalFeatures
Но запуск команд PowerShell завершился ошибкой 0x80070057.

Но, попробовав затем установить русский язык средствами системы, я обнаружил, что он корректно скачивается и устанавливается, в отличие от сборки Windows 11 Tiny11.

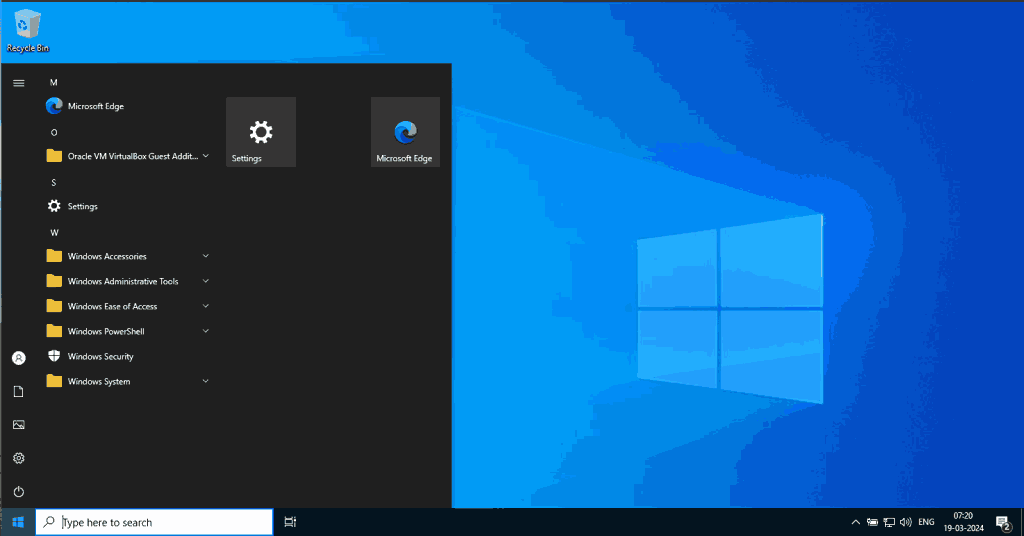
Теперь, вернув русский язык, можно посмотреть на сборку от NTDEV в работе. Нас встречает лаконичное меню Пуск без программного мусора от Microsoft.

Система в простое потребляет около 1 ГБ ОЗУ. Сказать, что это впечатляет — нельзя, ведь в своих системах мне удавалось достичь более низкого результата, а в сборках на просторах интернета на основе Windows 10 LTSB встречалось потребление оперативной памяти и вовсе на уровне 600 МБ. Да и сама Windows 10 LTSB «из коробки» потребляет всего около 1 ГБ ОЗУ.

Но сборка от NTDEV оказалась «порезана» не очень сильно и многие функции сохранены, что обеспечивает стабильность работы. А Windows 10 LTSC — заметно более прожорливая система, и разница между потреблением ОЗУ с обычной версией PRO небольшая. Стоит учесть и средства VMware Tools от виртуальной машины, запущенные в системе, так что 1 ГБ потребления ОЗУ — для Windows 10 LTSC весьма неплохо.
А вот на диске сборка занимает очень небольшой объем — занято всего 7.4 ГБ на накопителе, 1.4 ГБ из которых приходится на файл подкачки.

В списке установленных программ практически пусто, как и в автозагрузке.

А вот что радует, так это то, что система обновлений Windows работает корректно — обновления скачиваются и устанавливаются.

Количество процессов меньше, чем на обычной Windows 10 LTSC, никаких подозрительных процессов нет.

Итоги

Что можно сказать в итоге? Сборка Windows 10 LTSC от NTDEV требует заметно меньше системных ресурсов, чем обычная Windows 10 LTSC, и в нее легко вернуть русский язык средствами системы. Обновления работают корректно, а большинство нужных функций остались на своих местах. При этом сборка использует довольно свежую версию Windows 21H2, которая заметно современней Windows 10 LTSB и будет еще долго получать обновления.
Хорошим выбором она будет и для новых бюджетных ноутбуков, которые даже в 2023 году продаются всего с 4 ГБ ОЗУ и процессорами Celeron, где часть ОЗУ резервируется для видеосистемы. Например, HP 15-dw1495nia, Lenovo IdeaPad 3-15 или ASUS E410MA VivoBook 14 из Регарда. На таких ноутбуках прирост производительности от облегченной Windows будет очень заметен.

Пишите в комментарии, а как вы относитесь к сборкам Windows?
Блоги автора Zystax обо всем, что связано с компьютерами, Windows и играми.
Telegram-канал @overclockers_news — теперь в новом формате. Подписывайся, чтобы быть в курсе всех новостей!
We’ve all been there: you have decided to give tiny10/tiny11 a try, but you are confused about all the variants and names and links and whatnot.
Let’s fix that! In this article you’ll find everything that you need to know about every available tiny10 and tiny11 build, complete with official links and for whom is every build made.
THE LATEST RELEASES
Tiny11 2311 – tiny11 2311 : Microsoft/NTDEV : Free Download, Borrow, and Streaming : Internet Archive
This is the latest release of tiny11, which is fully serviceable and updateable.
It is designed for anyone who wants to try Windows 11, without all the excessive fluff of a standard installation. What’s best is the fact that if you need any component from the standard Windows 11 that isn’t included with tiny11, you can easily install it back using Winget or Add Optional Features or Microsoft Store.
Tiny11 core beta 1 – tiny11 core beta 1 : NTDEV, Microsoft : Free Download, Borrow, and Streaming : Internet Archive
This is a more “back to the basics” approach to making a smaller Windows image, having a lot of components removed, including Windows Component Store and Windows Defender.
It is NOT a replacement for tiny11! It has a different purpose: to be a quick-and-dirty testbed or development platform.
Also, make sure to download network drivers BEFORE installing tiny11 core, as it doesn’t have any network drivers integrated by default
Tiny10 23H2 (x64) – tiny10 23H2 : NTDEV : Free Download, Borrow, and Streaming : Internet Archive
This is the latest tiny10 release for x64 machines, based on Windows 10 LTSC 2021.
It is for everyone who needs a really lightweight yet still dependable operating system, being fully serviceable while still being able to run on low end hardware.
Tiny10 2303 x86 – Tiny10 : NTDEV : Free Download, Borrow, and Streaming : Internet Archive
Tiny10 2303 was released exclusively for x86 (32-bit) devices, and it is an ideal option for very old or low end devices that deserve to get a new breath of life.
LEGACY BUILDS
If you’re wondering about tiny11 23H2, it has been discontinued due to a bug that prevented it from being serviceable, which kind of defeated the purpose of the release. It has been replaced by tiny11 2311, as shown above
The original tiny11 builds- tiny11 : NTDEV : Free Download, Borrow, and Streaming : Internet Archive
Tiny11 b1 (b standing for beta) was released in February 2023 and has been a smashing success. However, it has been superseded by tiny11 core, having similar functionality while being based on the new 23H2 platform.
Tiny11 b2 (no sysreq for bypassing the system requirements at setup time) has the full component store kept intact, and it has been superseded by tiny11 2311.
Legacy tiny10 builds – tiny10 – legacy builds : NTDEV/Microsoft : Free Download, Borrow, and Streaming : Internet Archive
These are the builds of tiny10 that started it all, released way back in 2020. They are based on Windows 10 LTSC 2019, and are VERY barebones, tiny10 b3 being able to fit on a CD!
However, they are perfect for very old PCs and for experiments that require little amounts of space and processing power.
Tiny10 b3 is only for 32-bit systems, while b4 is only for x64.
Well, that’s pretty much it! These are the official links and that’s the current offering of
Thank you for reading this article. I hope you found it helpful and informative. If you would like to see more content like this and support me and this website, you can do so through any of these links: http://paypal.me/ntdev2, http://ko-fi.com/ntdev or http://patreon.com/ntdev.
Last Updated :
30 May, 2024
Windows operating system is one of the most popular OS in the market and Windows 10 has the majority market share. Though Windows 10 is a feature-loaded modern operating system with better UI than its previous versions of Windows you can still feel UI issues, inconsistency, and Performance issues in Windows 10. Some may suggest using Linux operating systems like Linux Lite on Old PCs to give a new life to them, but you don’t get access to Windows applications. Tiny 10 here comes into the picture solving these issues.
In this article, we will learn about Tiny10 and its benefits over traditional Windows 10 and how we can install Tiny10 on our computers.
Table of Content
- What is Tiny10?
- Benefits of Tiny 10 over Windows 10
- Steps to Install Tiny10
What is Tiny10?
Tiny10 is a modified version (Unofficial) of Windows 10 for better performance than the original one. It was developed by NTDEV who is a developer and YouTuber. NTDEV started upgrading the builds of Windows operating systems during the quarantine period in 2020. Tiny10 aims to remove all the unnecessary Windows components, services, and applications for a smoother user experience. Tiny10 not only removes services but also builds Optimizely for better performance. Tiny10 is available as the improved version of Windows 10 1809,2209, and 2303 and in both 32-bit64-bit 64-bita editions.
Benefits of Tiny 10 over Windows 10
The benefits of using Tiny10 over traditional Windows 10 are shown in the table below,
|
Features |
Tiny10 |
Windows 10 |
|---|---|---|
|
Resource Usage |
Requires less disk space ( e.g.: 5.2 GB for a 32bit system) |
Requires more disk space ( up to 22 GB) |
|
System Requirements |
Runs smoothly on low-end and Old PCs ( min 1GB RAM for 32bit System) |
Requires a higher specification (min 4GB RAM) |
|
Performance |
Fast performance with better responsiveness |
Performance lag for older Computers |
|
Bloatware |
Completely free of unnecessary third-party and Windows applications |
Contains a lot of Windows software and third-party applications |
|
Features |
Provides a clean and minimalist look with only the necessary features. |
Offers a wide range of features and customization options. |
Steps to Install Tiny10
Step 1. Download Installation file
To install Tiny10 in your computer you will require a bootable image of the operating system. To get the image of Tiny10 click on the Link. You will be directed to Internet Achieves where you can download the .iso file.
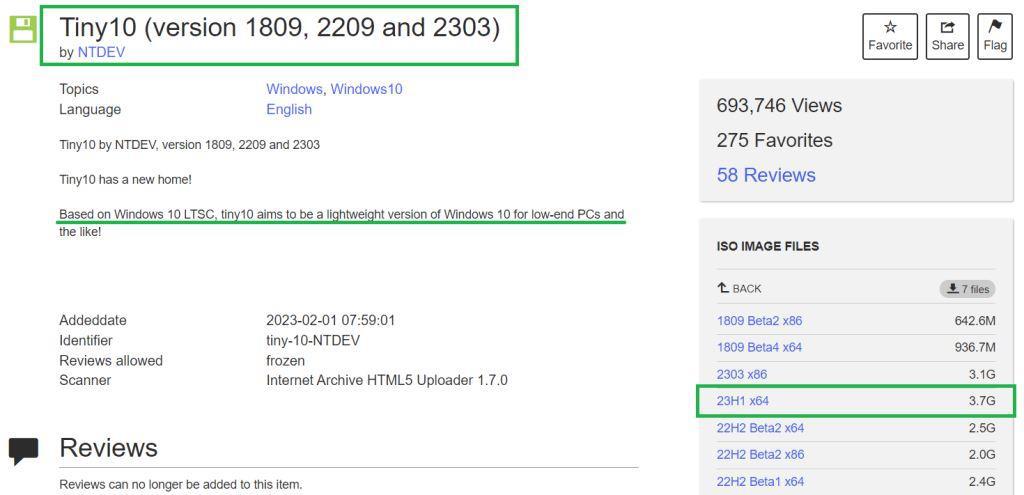
Here 23H1 is the stable version to use. As we are using a 64-bit Computer, so we will download the x64 version. You can download x86 if you are using a 32-bit machine. Click on the preferred version and wait till it’s downloaded into your computer.
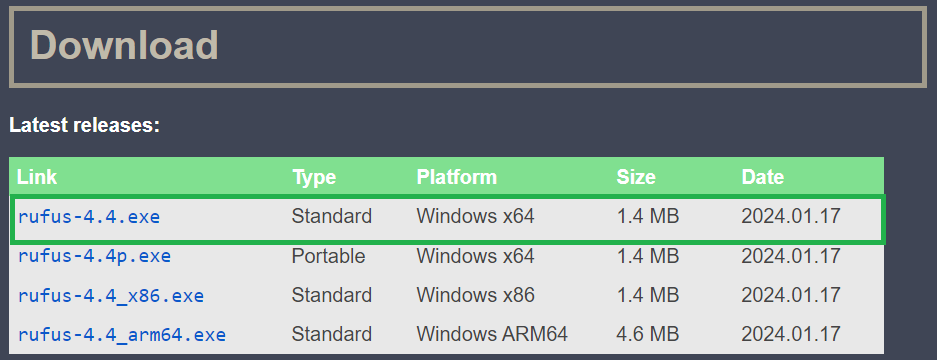
Step 2. Download Rufus
We will need a flashing tool to flash the bootable image in a Pen drive to make a bootable disk. Rufus is an open-source tool used to create a bootable drive for Windows distribution. Download the latest version of Rufus.
Step 3. Create Bootable Drive
Once both the downloads are completed, insert a Pendrive into your computer and run the Rufus software.
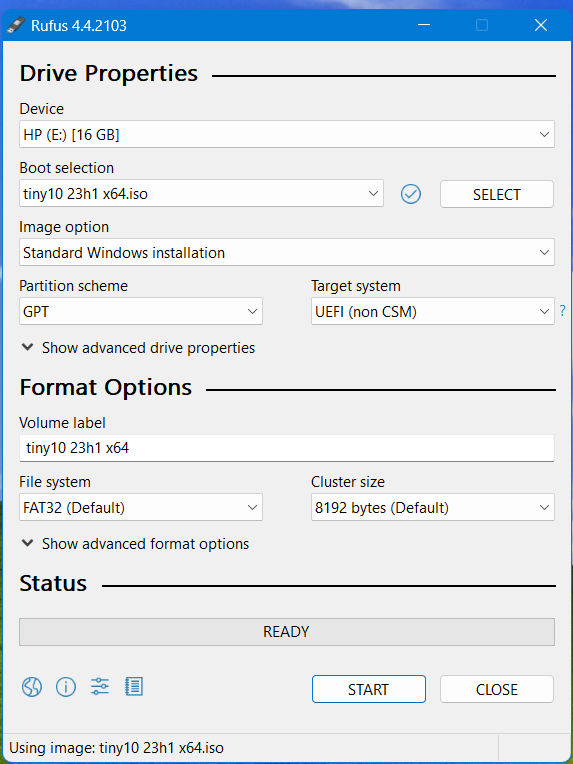
Select the iso file as Boot Selection and Choose the partition scheme as GPT which stands for GUID partition table ( For legacy systems choose MBR). Leave other configurations as it is and click on start. Once the flashing process is completed click on Close.
Step 4. Change Boot priority
Change the boot priority for your computer by accessing the BIOS settings. Check the computer manufacturer’s website to know the BIOS key for your system. In the Boot priority section, give the UFFI Boot as the highest priority. Also, Disable Secure Boot if it is enabled, otherwise you may face boot failure during the boot of Tiny10.
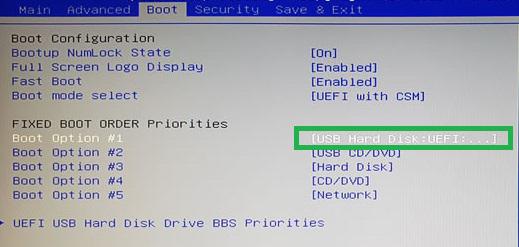
Once you have made the changes, save all changes and exit. The computer will be restarted automatically.
Step 5. Configure Installation
Once the computer restarts, you will see the Typical Windows 10 installation menu. But in this case, you have to select the configurations only that are necessary.

If you want to change anything like the Language, Time, advertisements and Currency, or the Keyboard layout, then change it and click on Next. On the Next screen, it will show the storage devices (e.g. HDD, SSD, etc.) attached to your computer. Select the appropriate disk to install the OS.
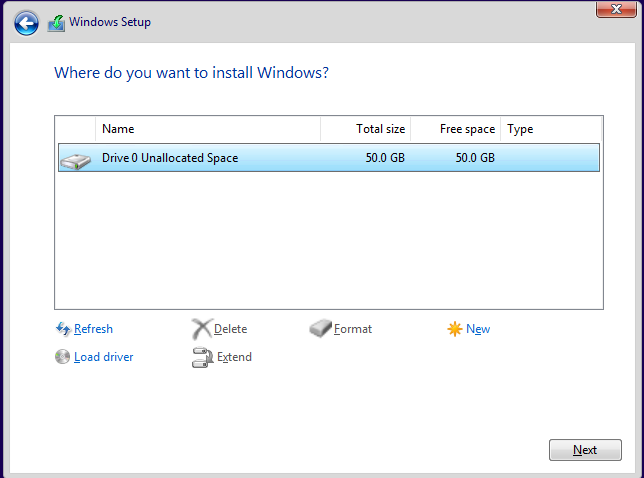
As we have only one disk, we will click on Next. It is recommended to format the disk first to delete all files of the previous OS. On the next screen, you will see that the startup has started copying the installation files.
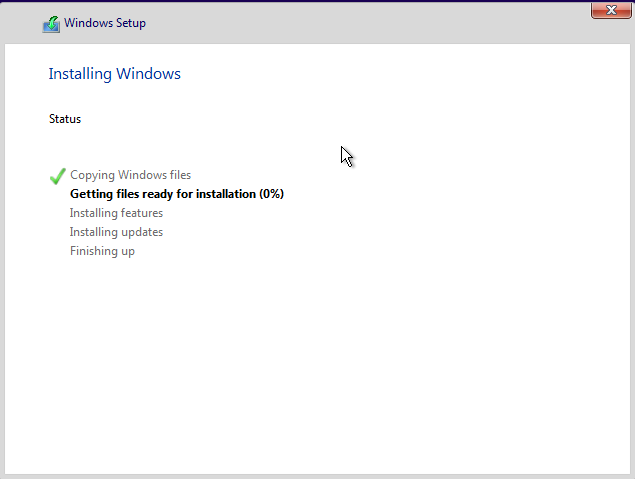
Wait for several minutes as it will take some time to finish up all the processes shown in the above picture. You can compare the installation process with typical Windows 10 installation by visiting the article on How to Install Windows 10 From a USB Flash Drive.
Step 6. Explore Tiny10
Once the installation is completed, set your username and password and you will be taken to the Home Screen of Tiny10. It is the same Windows 10 home screen but with no unnecessary applications or advertisements of third-party apps. It’s simple, clean, and minimal with the required tools and a web browser with Windows UI.
Also Read
- How to Reinstall Windows 10 without CD?
- How to Download and Install Windows 11?
- How to Install Microsoft Store on Windows 10 LTSC or LTSB Editions?
Conclusion
Installing Tiny10 in your old computer can significantly improve its performance and give a new life to the old Computer. You will be able to perform basic computing as Multimedia use, or Web browsing easily with this operating system. However, This is not an official version of Windows 10, so it can be risky to use. Till now we haven’t found anything suspicious, but still, we recommend you use the Official Windows versions for your Computer. We recommend you to use this only to reuse an Old computer or you can try the OS using Virtual Box.