
If you search for the “My Computer” (or This PC) icon on the Windows 11 or existing Windows 10 desktop, you will probably not find it unless someone manually added it. It is one of the favorite and helpful icons for all Windows users.
Follow the steps below to show This PC icon on the Windows 11/10 desktop. The same steps apply to Windows 8.1/7 if you still use these old Operating Systems.
If you want quick and easy access to your computer’s files and folders, you can show My Computer on desktop in Windows 11. Here’s how:
In Windows 11, the “My Computer” icon has been replaced with a new name, “This PC.” This change was made to provide a more user-friendly experience and align with the modern design of the operating system. Users can still access their files and drives by clicking on the “This PC” icon on the desktop or in the File Explorer.
How to Show This PC on Desktop – Windows 11/10
I’m demonstrating these steps from Windows 11, but these steps are identical on Windows 10 as well (except for slight changes in icons and appearance)
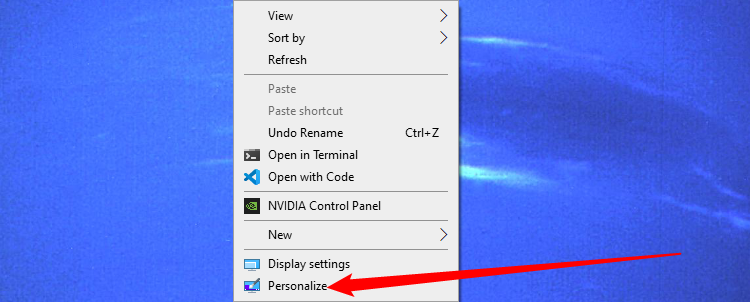
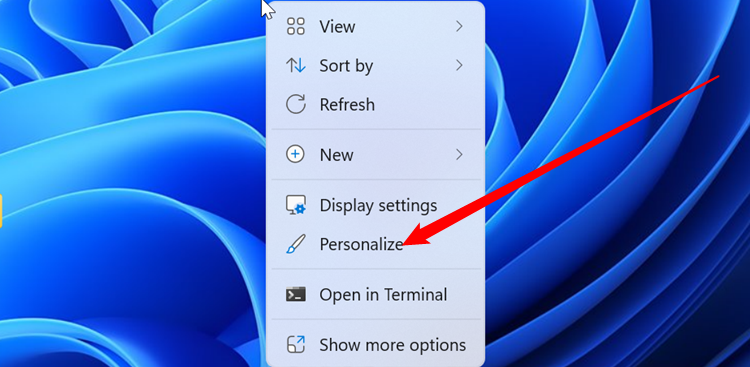
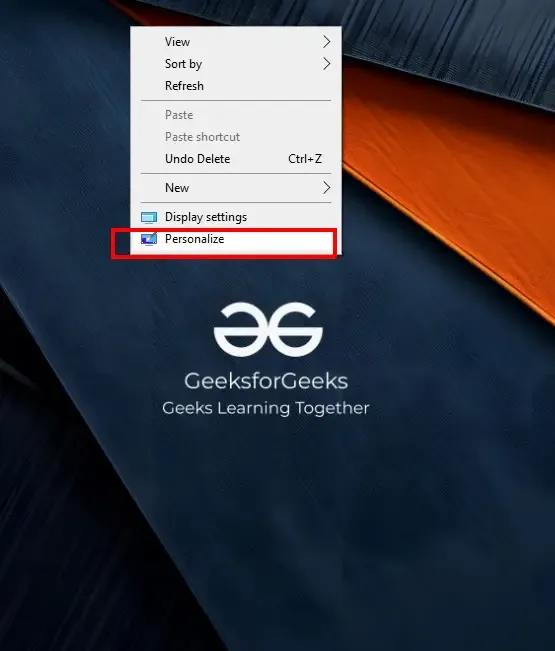
1) Right-click on the empty space on the desktop. Click on ‘Personalize’.

2) In Windows 11/10, it will take you to the settings app.
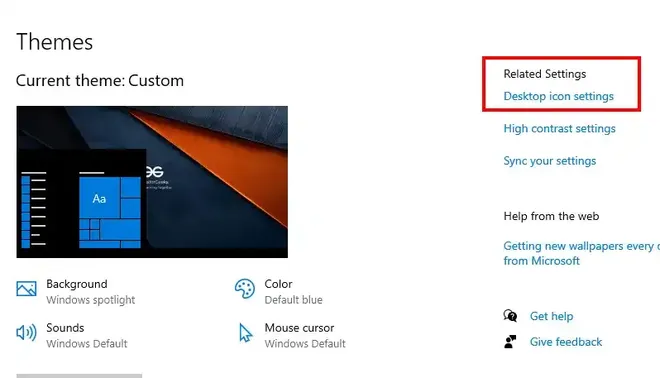
Click ‘Themes’ in the Personalization settings and ‘Go to desktop icon settings’ shown below.
In Windows 8.1, you will get the classic control panel to customize the icon set.
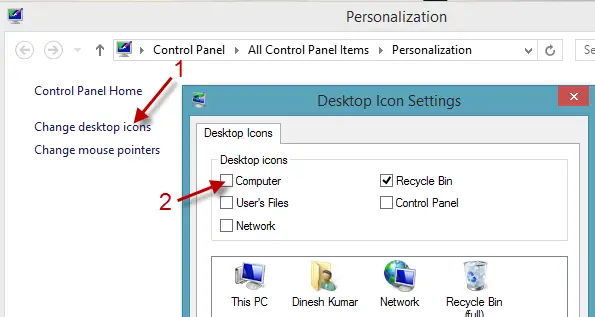
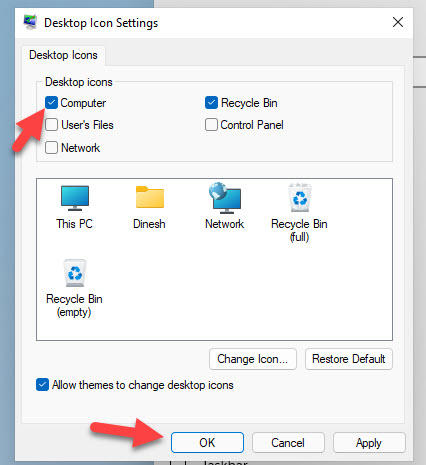
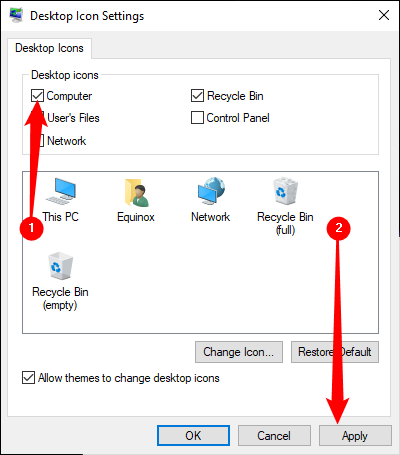
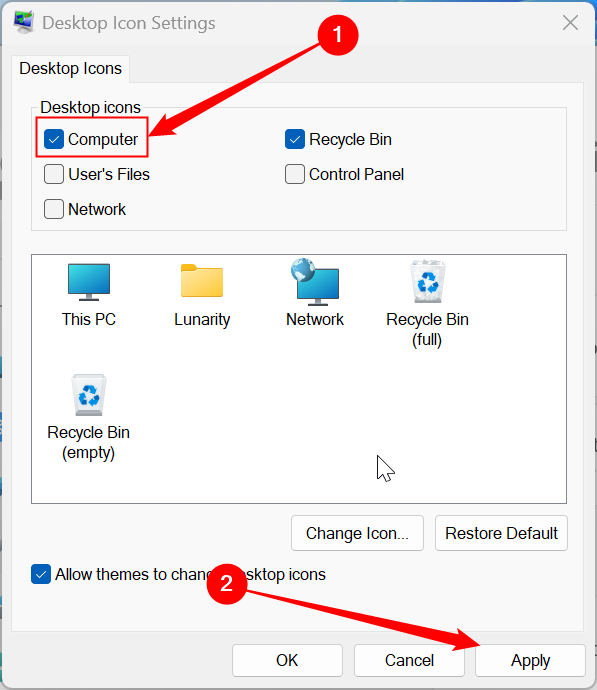
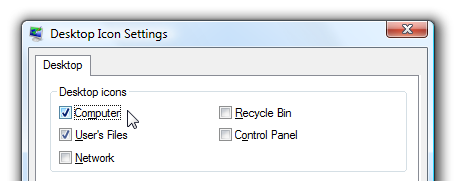
Tick the ‘Computer’ to show it on the desktop. Luckily, the ‘Recycle Bin’ is already ticked; if you can’t see the Recycle Bin or it is missing from the Windows 10/11 desktop, this is the first place you have to check and enable it.
3) The ‘This PC’ or ‘My Computer’ icon would appear on the desktop.
If you no longer want the “My Computer/This PC” icon to appear on your desktop, you can repeat these steps and uncheck the box next to “My Computer” to remove it.
Here is a short video of this method:
Add to Task Bar – This PC Windows 11
As you know, the start menu returned to Windows 10. The My Computer icon is not included in the start menu. You can follow the method below to pin the (This PC) icon to the start menu and list.
Also, the start menu was revamped in Windows 11, which looks great compared to earlier Microsoft Operating Systems.
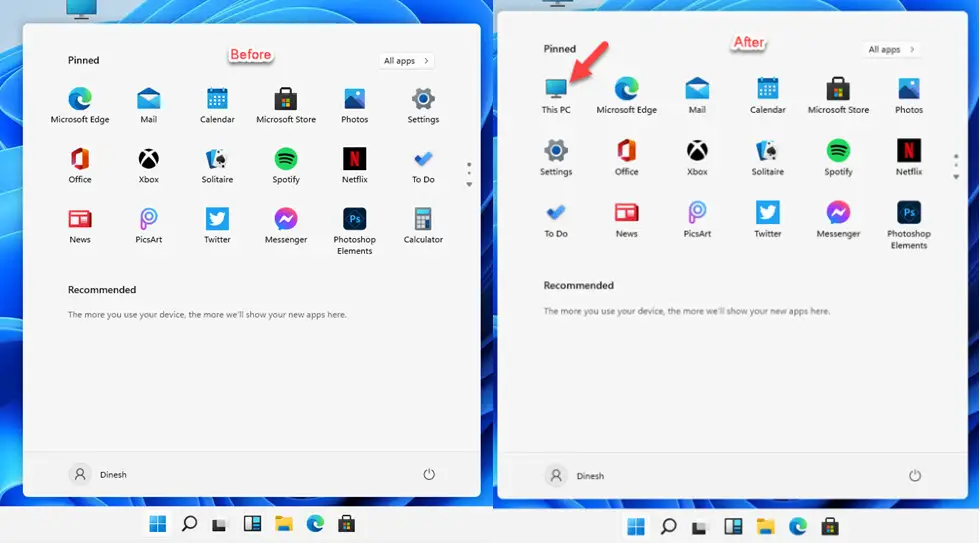
4) Right-Click on the ‘This PC’ icon after you have enabled it to display on the desktop. Select Pin to Start in Windows 11.
You have an additional option to add ‘Pin to Start list’ in Windows 10.
So, this is what happens when you select ‘Start’ and ‘Start List’ in Windows 10.
If you want to hide all icons from the desktop in Windows 10/11, here is the way.
Right Click on the empty space on the desktop, select View, and remove ‘Show desktop icons’ to hide all icons from the desktop. You can enable it to show all icons on the desktop again.
Can I Rename ‘This PC’ to ‘My Computer?
Yes, you can rename This PC to My Computer in Windows 11 or 10.
Simply click on the icon and press F2 (the standard rename keyboard shortcut), or select the rename option from right-click menu.
Change the name to ‘My Computer’, so you will not miss the familiar name.
Where can I find the This PC icon settings in Windows 11/10?
You can find the This PC icon settings by right-clicking on the desktop, selecting “Personalize,” then “Themes,” and finally, “Desktop icon settings.”
Set File Explorer to open My Computer Windows 11 by Default
To set File Explorer to open to This PC by default, open File Explorer, go to the View tab, select Options, and under the General tab, choose “This PC” from the drop-down menu next to “Open File Explorer.
We hope this guide helps on how to add This PC to desktop and customize the Recycle Bin icons/Taskbar.
If “My Computer” or “This PC” Desktop Icon is missing on your computer, it is likely that it has been deleted or not appearing after installation of an app or update on your computer.
Since, “This PC” is only a Desktop Shortcut, it can be easily deleted and deletion or removal of this Shortcut has practically no impact on the files and folders that it points to.
At any time, you can add ‘This PC’ Shortcut to the Desktop on your computer and it will once again start providing you with quick access to important locations of files and folders on your computer.
Once this useful shortcut is added, you can simply click on “This PC” Icon to gain immediate access to Hard Disk, Storage Drives, Network Locations and major folders like Documents, Downloads, Music, Pictures and Videos on your computer.
Advertisement
You can follow the steps below to Add “This PC” Shortcut Icon to the desktop of your Windows 11 computer.
1. Right-click in any empty space on the Desktop of your computer and select Personalize in the menu that appears.
2. On the Personalization screen, scroll down in the right-pane and click on Themes.

3. On the Themes screen, scroll down to “Related Settings” section and click on Desktop Icon Settings.
4. On Desktop Icon Settings screen, select the little box next to Computer and this will Add “This PC” Shortcut to the desktop on your computer.

5. Make sure you click on Apply and OK to save this setting on your computer.
2. Add “This PC” to Desktop in Windows 10
If you are using Windows 10, you can follow the steps below to Add “This PC” shortcut to the Desktop on your computer.
1. Right-click in any empty space on the Desktop of your computer and select Personalize in the menu that appears.
Advertisement
2. On the Personalization screen, select Themes in the left-pane. In the right-pane, scroll down to “Related Settings” section and click on Desktop Icon Settings link.
3. On the next screen, select the little box next to Computer

4. Make sure you click on Apply and OK to save this setting on your computer.
3. Rename “This PC” as “My Computer”
If you have been using Windows for a while, you must be knowing that “This PC” icon was popularly known as “My Computer” in the older versions of Windows.
If you still like using its earlier name, you can Rename “This PC” as “My Computer” by right-clicking on This PC and selecting the Rename option in the menu that appears.

Similarly, you can Rename Other Desktop icons and provide your own unique names to all Desktop Icons on your computer.
3. Add “This PC” to Start Menu
If the Desktop on your computer is cluttered, you can add “This PC” Shortcut to start menu on your computer by right-clicking on This PC and selecting Pin to Start option in the contextual menu.

After this, you will be able to access “This PC” Shortcut in the Start Menu by clicking on the Windows Start button.
Similarly, you can pin other Desktop icons to the start menu and they will remain in Start Menu even if you remove them from desktop.
Вопрос о том, как вернуть значок «Мой компьютер» (Этот компьютер) на рабочий стол Windows 10 с момента выхода системы задавался на этом сайте чаще чем любой другой вопрос, имеющий отношение к новой ОС и он имеет очень простой ответ.
В этой инструкции несколько способов вернуть значок компьютера в Windows 10 — с помощью параметров системных значков, доступ к которым можно получить различными методами, а также с помощью редактора реестра. Отмечу, что не следует создавать простой ярлык «Мой компьютер» на рабочем столе — по сравнению с системным значком он имеет ограниченную функциональность и не равнозначен ему.
- Включить значок Мой компьютер в параметрах Windows 10
- Видео инструкция
- Как вернуть значок компьютера через реестр
Как включить значок Мой компьютер в параметрах Windows 10
В Windows 10 для отображения значков рабочего стола (Этот компьютер, Корзина, Сеть и папка пользователя) присутствует тот же апплет панели управления, что и раньше, однако запускается он из другого места. Шаги для включения значка компьютера на рабочем столе выглядят следующим образом:
- Нажмите правой кнопкой мыши в любом пустом месте рабочего стола, выберите пункт «Персонализация», а затем откройте пункт «Темы» слева.
- В разделе «Сопутствующие параметры» вы найдете необходимый пункт «Параметры значков рабочего стола», сопутствующие параметры могут отображаться внизу списка или справа окна (если окно параметров широкое).

- Открыв этот пункт, вы можете указать, какие значки отображать, а какие — нет. В том числе включить «Мой компьютер» (Этот компьютер) на рабочем столе или убрать корзину с него, проделать то же самое с другими значками и, при необходимости изменить внешний вид значка компьютера или других значков.

Есть и другие способы быстро попасть в те же самые настройки для возврата значка компьютера на рабочий стол, которые подходят не только для Windows 10, но и для всех последних версий системы.
- Можно открыть окно с параметрами отображения значков рабочего стола одной из двух команд, запущенной из окна «Выполнить», которое можно вызывать, нажав клавиши Windows + R (Windows — клавиша с эмблемой Windows). Команды: desk.cpl ,5 (пробел перед запятой обязателен) или Rundll32 shell32.dll,Control_RunDLL desk.cpl,,5 (ошибок в написании не сделано, все именно так).

- В ранних версиях Windows 10 в панели управления в поле поиска справа вверху можно было набрать «Значки», в результатах увидеть пункт «Отображение или скрытие обычных значков на рабочем столе».

Видео инструкция
Как вернуть значок компьютера Windows 10 на рабочий стол с помощью редактора реестра
Есть и еще один путь для возврата Мой компьютер на рабочий стол — это использование реестра. Правки можно внести вручную, но я рекомендую создать файл .reg и добавить его в реестр. Содержимое файла для добавления:
Windows Registry Editor Version 5.00

[HKEY_CURRENT_USER\Software\Microsoft\Windows\CurrentVersion\Explorer\HideDesktopIcons\NewStartPanel]
"{20D04FE0-3AEA-1069-A2D8-08002B30309D}"=dword:00000000

[HKEY_CURRENT_USER\Software\Microsoft\Windows\CurrentVersion\Explorer\HideDesktopIcons\ClassicStartMenu]
"{20D04FE0-3AEA-1069-A2D8-08002B30309D}"=dword:00000000
После добавления изменений в реестр, перезапустите проводник или перезагрузите компьютер — значок появится на рабочем столе.
Quick Links
-
How to Add the My Computer Icon to the Windows 10 Desktop
-
How to Restore Missing Desktop Icons in Windows 11
-
How to Add the My Computer Icon to the Desktop in Windows 7, 8, or Vista
-
How to Restore All of Your Missing Desktop Icons
Summary
To display the «This PC» or the «My Computer» icon, right-click your desktop, then navigate to Personalize > Themes > Desktop Icon Settings. Select «Computer» from the listed options and then click «Apply» to add it to your desktop.
The My Computer icon was a fixture on Windows desktops for decades, but it was removed and renamed with the introduction of Windows 10. Now properly called «This PC,» the icon must be added back manually. Here’s how to get the This PC icon on your desktop.
How to Add the My Computer Icon to the Windows 10 Desktop
To add the missing My Computer icon back to your desktop on Windows 10, right-click empty space on your Desktop and select «Personalize» from the context menu.
Now select Themes on the left-hand menu, and then once you are there, select «Desktop Icon Settings» under the «Related Settings» section.
Tick the box next to «Computer,» then click «Apply» to restore the icon to your desktop.
If you’ve noticed that there are other critical desktop icons missing — like Network, Recycle Bin, your User folder, or the legacy Control Panel — you can restore them in this window. Just tick the box next to the missing icons before clicking «Apply.»
Of course, as a final step, you can right-click the «This PC» icon on your desktop. You can also change those icons, if you want to add some custom flair to your Desktop.
If you don’t see any desktop icons at all, right-click the Windows desktop, point to «View,» and ensure «Show Desktop Icons» is checked. If this option isn’t checked, Windows will hide all your desktop icons, including the This PC or My Computer icon.
How to Restore Missing Desktop Icons in Windows 11
Windows 11, by default, also keeps most of the important icons off your desktop. The process for restoring desktop icons on Windows 11, including the This PC icon, is basically the same as on Windows 10. Right-click the Desktop and click personalize.
Then navigate to Themes > Desktop Icon Settings.
Once there, tick the box next to «Computer,» then click «Apply» to place it on your Desktop.
How to Add the My Computer Icon to the Desktop in Windows 7, 8, or Vista
If you’re using an older version of Windows like Windows 7, Windows 8, or Windows Vista, here’s how to get the My Computer icon back.
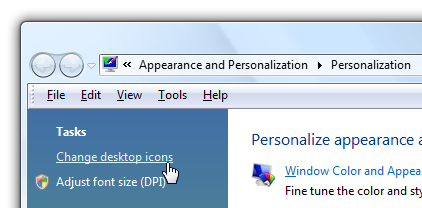
First, right-click on the desktop and choose Personalize, then click on «Change Desktop Icons» on the left-hand side of the screen.
Choose which of the built-in icons to show on the desktop in the Desktop Icons panel.
You can also add the Recycle Bin back from the same menu.
Another Trick in Windows 7 or Windows Vista
To put the Computer icon on the desktop, click the Start button, and then right-click on «Computer.»
Click the «Show on Desktop» item in the menu, and your Computer icon will show up on the desktop.
How to Restore All of Your Missing Desktop Icons
So, what if it isn’t just the This PC or My Computer icon that is missing. What if it is all of them? There are two possibilities.
- Your icons are only hidden
- Your icons have been deleted
The first problem is easy to fix. Right-click empty space on your desktop, then mouse over «View» and click «Show Desktop Icons.»
This works on Windows 10, Windows 11, Windows 7, Windows 8, and Windows Vista.
If that doesn’t display them, then your icons are probably gone. You’ll have to try restoring them from the Recycle Bin. If they’ve been permanently deleted, you can always just create a new desktop shortcut to replace the old one.
If you’re really into customizing Windows, you can also create a new icon out of just about any image you want.
The ‘This PC’ icon, previously known as ‘My Computer’, enables users to get quick access through all the computer’s drives, folders or any other connected devices. While Windows OS offers an easy method of navigating through the ‘This PC’ icon on a Windows 10 or 11 desktop and can be incredibly useful. This guide will help you add the ‘This PC’ icon on both Windows 10 and Windows 11, ensuring you can easily navigate your files and drives.
Table of Content
- Add the ‘This PC’ Icon to the Desktop in Windows 10 and 11 — Easy Methods
- Method 1: Windows Setting
- Method 2: Create Desktop Shortcut
- Method 3: Windows File Explorer
- Advanced Method 4: Use Control Panel
Add the ‘This PC’ Icon to the Desktop in Windows 10 and 11 — Easy Methods
Whether you’re using Windows 10 or Windows 11, these steps will help you display the ‘This PC’ icon on your desktop.
Method 1: Windows Setting
If you want to add the ‘This PC’ icon to your desktop in Windows 10 and 11, you can easily do so through Settings. Here’s how:
For Windows 11:
Step 1: Open Windows Settings
Press the Start button, select Settings from there, or press the shortcut keys Win + I to open settings.
Step 2: Navigate to Personalization
On the left-hand side in the Windows Settings, Click on «Personalization«
Step 3: Select Themes
Click on the «Themes» tab on the Right sidebar.
Step 4: Click on Desktop Icon Settings
Scroll down and click on «Desktop icon settings» and checkmark on “computer” or “This PC” and finally apply and OK.
Following this four simple steps, you can easily add This PC to your Windows 11 desktop.
For Windows 10:
Step 1: Open Windows Settings
Go to Windows Desktop, make a Right-click anywhere and select Personalize from the context menu.
Step 2: Go to Themes and Desktop Icon Settings
Navigate to Themes on the left panel and select Desktop Icon Settings (avilable on the right-hand side panel)
The above-mentioned two easy steps can help you to get ‘This PC’ icon on your Windows 10 desktop.
Method 2: Create Desktop Shortcut
If you prefer having the ‘This PC’ icon directly on your desktop for easy access, you can do so by creating a desktop shortcut. Here’s how:
Note: This method is suitable for both Windows 10 and Windows 11.
Step 1: Navigate to the Windows Desktop
Right-click on an empty space on your desktop (works for both Windows 10 and 11)
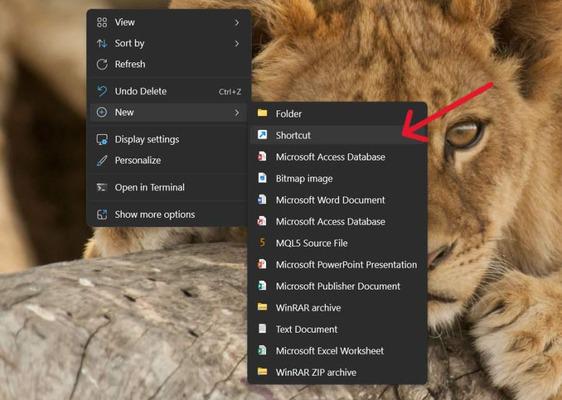
Step 2: Select New and Hover to Shortcut
Hover over «New» in the context menu. Choose ‘Shortcut‘
Step 3: Enter the Location of ‘This PC’
In the «Create Shortcut» window, enter the location of ‘This PC’:
%windir%\explorer.exe shell:MyComputerFolder
Step 4: Click «Next» and provide a name for the shortcut, such as «This PC and click «Finish» to create the shortcut.
Method 3: Windows File Explorer
If you prefer having quick access to your files and drives directly from your desktop, you can easily add the ‘This PC’ icon using File Explorer. Here’s how:
Note: This method is suitable for both Windows 10 and Windows 11.
Step 1: Access to Windows File Explorer
Open File Explorer you can use the shortcut Win + E or use Windows Keyboard Shortcut Win + X and then select File Explorer and click to open it.
Step 2: Navigate to ‘This PC’
Then, Select ‘This PC’ from the right sidebar and drag and drop to Desktop to create a copy of it.
By using this short and simpel two step method, you can easily add and get ‘This PC’ to your Windows Desktop.
Advanced Method 4: Use Control Panel
If you prefer using the Control Panel to customize your desktop icons in Windows 11, you can easily show the ‘This PC’ icon. Here’s how:
Step 1: Access to Control Panel
Go to the Start Menu and type Control Panel and hit the enter button.
Step 2: Navigate to Appearance & Personalization
Select “Control Panel” then click on “Appearance and Personalization” and click on “File Explorer Options.”
Step 3: Open File Explorer Options
Select “open file explorer to this pc” from the menu in the ‘general” tab then select ‘this PC’ and click apply.
Once the changes are being applied, you can press the “Windows + E” and the “This PC” window will open up on your screen.
Conclusion
Adding the ‘This PC’ icon on a Windows 11 desktop is a simple process that can greatly enhance your user experience by providing quick and easy access to your files and drives. By following these steps, you can personalize your desktop to enhance your workflow, and ensure that you are able to access This PC effectively.