
При запуске компьютера или ноутбука с Windows 10 программы в автозагрузке запускаются не сразу после входа в систему, а через некоторое время — около 10 секунд. Эта пауза предусмотрена для того, чтобы успели загрузиться все системные службы. Однако, при желании вы можете отключить эту задержку: иногда это способно ускорить загрузку Windows 10, особенно в случае использования SSD. Но теоретически может привести и к проблемам — какие-то элементы автозагрузки могут не запуститься, если нужные службы еще не работают.
В этой простой инструкции о том, как отключить задержку для запуска службы при входе в Windows 10, изменив соответствующий пункт реестра.
Отключение задержки при загрузке Windows 10
На всякий случай повторю: результат изменения не всегда положителен и, если вы столкнетесь с какими-то проблемами, просто отмените сделанные изменения в реестре, также можно заранее создать точку восстановления системы.
Шаги для отключения задержки при загрузке будут следующими:
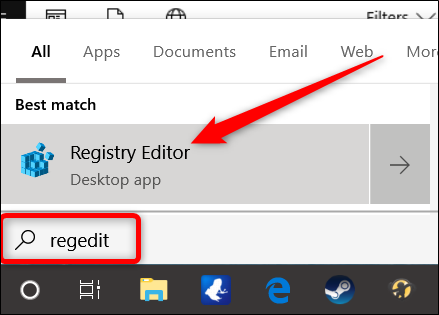
- Нажмите клавиши Win+R на клавиатуре, введите regedit и нажмите Enter.
- Перейдите в раздел реестра
HKEY_LOCAL_MACHINE\SOFTWARE\Microsoft\Windows\CurrentVersion\Explorer\Serialize
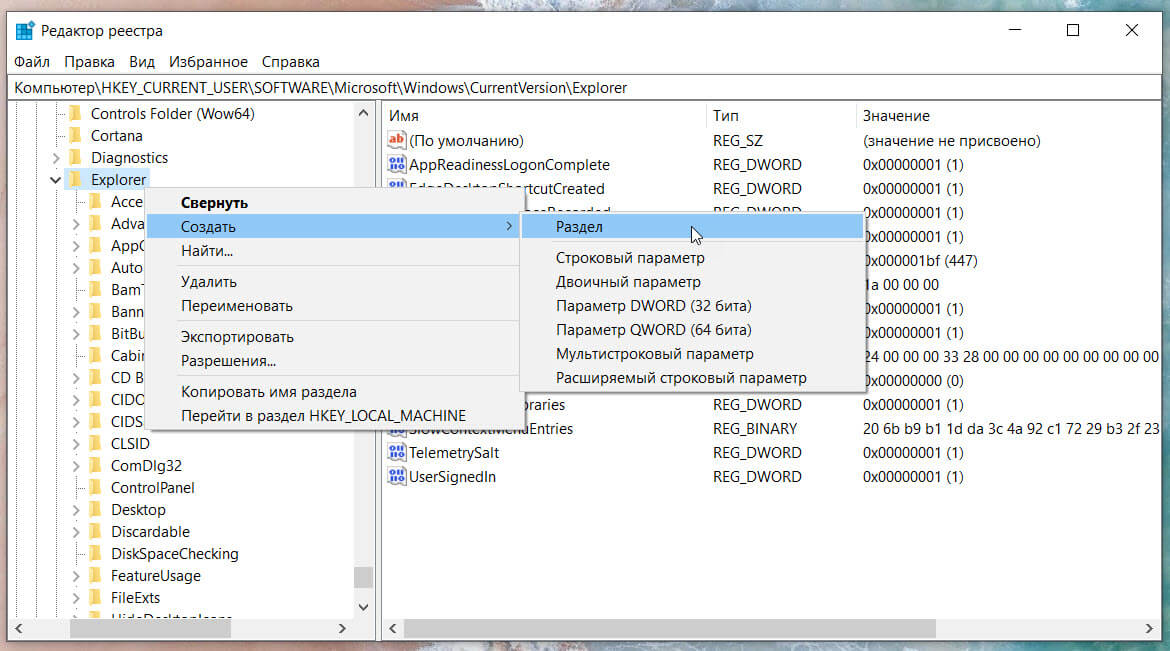
- Если подраздел Serialize отсутствует, нажмите по разделу Explorer правой кнопкой мыши, выберите пункт контекстного меню «Создать» — «Раздел» и задайте ему нужное имя.
- Выбрав раздел Serialize, нажмите правой кнопкой мыши в правой панели редактора реестра, выберите пункт «Создать» — «Параметр DWORD 32 бита» (даже для x64 систем) и задайте имя параметра StartupDelayInMSec
- Оставьте значение этого параметра равным 0, закройте редактор реестра и перезагрузите компьютер.


После перезагрузки запуск программ будет выполняться сразу при входе в Windows 10 без ожидания запуска служб. В случае, если результат окажется не тем, который ожидался, достаточно будет удалить созданный раздел в реестре. Также после загрузки вы можете проверить, не было ли ошибок при запуске программ из автозагрузки в «Просмотре событий»: Win+R — eventvwr.msc — Журналы Windows — Приложение.
Sign in to your How-To Geek account

Quick Links
-
How to Disable the Windows 10 Startup Delay
-
Download Our One-Click Registry Hack
After Windows starts up, it waits about ten seconds before opening your startup programs. This «startup delay» lets your desktop and Windows services finish loading, making everything run a bit smoother. If you have apps you’d rather run immediately, you can do it with a simple Registry hack.
The ten-second delay after Windows starts but before it begins loading startup apps gives the operating system time to load into memory and perform any necessary system tasks before the apps start requesting resources. The Registry hack we’re talking about in this article reduces or disables the startup delay, meaning that it applies to all startup apps. There’s no way to apply this technique only to specific apps.
Eliminating the startup delay works best on solid-state drives since they load things much quicker. While you can certainly give it a try if you have a traditional hard drive, you might not see much increase in how fast your startup apps load.
How to Disable the Windows 10 Startup Delay
To disable the Windows 10 startup delay, you just need to make a few edits in the Windows Registry.
Registry Editor is a powerful tool and misusing it can render your system unstable or even inoperable. This is a pretty simple hack, and as long as you stick to the instructions, you shouldn’t have any problems. That said, if you’ve never worked with it before, consider reading about how to use the Registry Editor before you get started. And definitely back up the Registry (and your computer!) before making changes.
Open the Registry Editor by hitting Start and typing «regedit.» Press Enter to open the Registry Editor and then permit it to make changes to your PC.
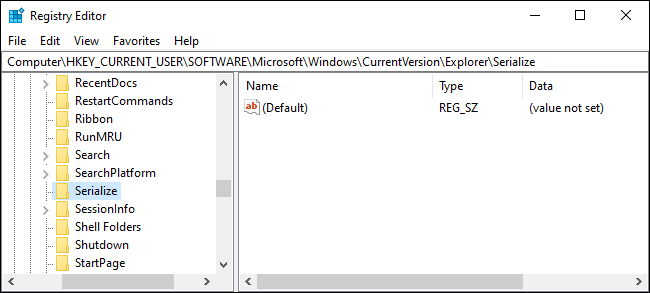
In the Registry Editor, use the left sidebar to navigate to the following key (or copy and paste it into the Registry Editor address bar):
HKEY_CURRENT_USER\SOFTWARE\Microsoft\Windows\CurrentVersion\Explorer\Serialize
If the Serialize key doesn’t already exist, you’ll need to create it. First, go to the following location:
HKEY_CURRENT_USER\SOFTWARE\Microsoft\Windows\CurrentVersion\Explorer\
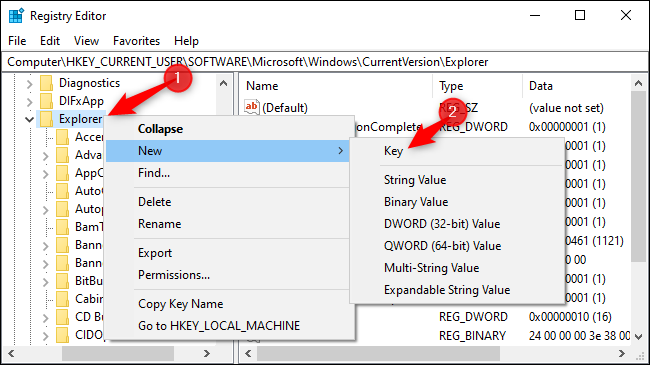
Right-click on the parent key ( Explorer ) and choose New > Key. Name it «Serialize.»
Now, right-click the Serialize key and choose New > DWORD (32-bit) Value. Name the new value StartupDelayInMSec .
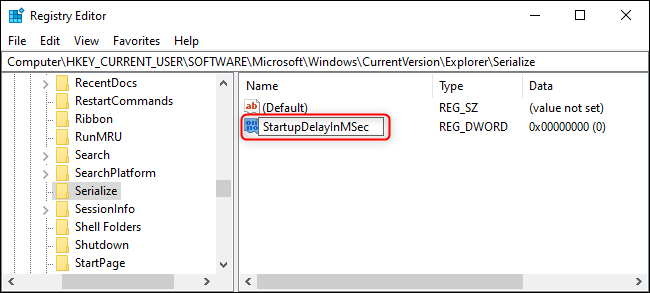
Next, you’re going to modify that value. Double-click the new StartupDelayInMSecvalue and make sure the value is set to 0 in the «Value data» box.
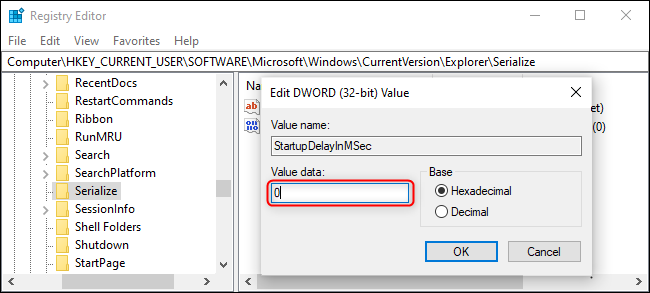
Click «OK» and then exit Registry Editor. For the changes to take effect, you’ll need to restart your computer. You and any other users should no longer experience the delay forced upon you by Windows.
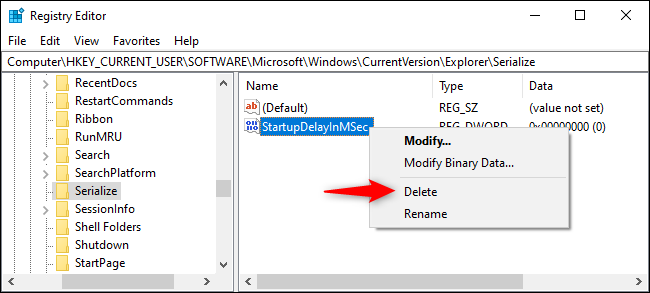
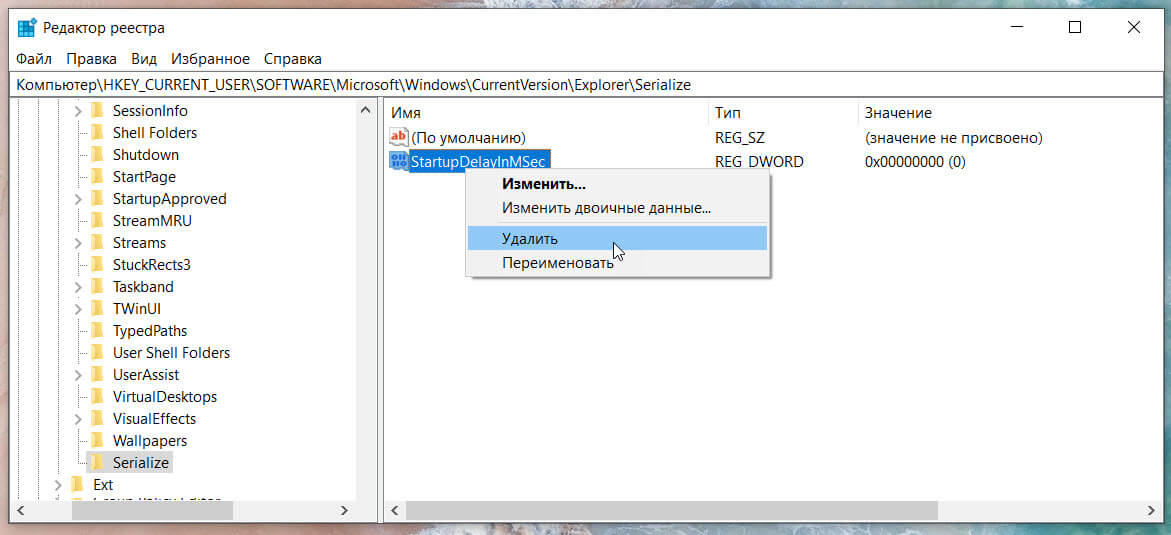
If you ever want to re-enable this delay because your startup programs are demanding too many resources upon signing in, head back into the Registry Editor and delete the StartupDelayInMSec value by right-clicking it and then clicking «Delete.»
Download Our One-Click Registry Hack

If you don’t feel like diving into the Registry yourself, we’ve created a registry hack you can use. Just download and extract the following ZIP file:
Disable Startup Delay Registry Hack
Inside you’ll find a REG file for disabling the Startup delay in Windows and one for enabling it again. Once extracted, double-click the file you want and accept the prompts asking whether you’re sure you want to make changes to your Registry.
These hacks are just the Serialize key exported from our own Registry after we added—or removed—theStartupDelayInMSec value we talked about in the previous section. Running the hack modifies the value in your Registry. If you enjoy fiddling with the Registry, it’s worth taking the time to learn how to make your own Registry hacks.
Когда вы включаете компьютер с Windows 10, происходит 10 секундная задержка. Эта задержка позволяет ОС Windows запускать системные службы и загружать системные файлы для бесперебойной работы. Это происходит, чтобы улучшить производительность на вашем устройстве и сделать процесс включения более плавным. Однако, если у вас мощное устройство, вы можете отключить задержку запуска, чтобы все элементы запускались сразу после включения устройства. В этом руководстве мы рассмотрим, как включить и отключить задержку запуска Windows 10 с помощью простого редактирования реестра.

Прежде чем вы начнете работать с реестром Windows, я бы посоветовал вам сначала сделать его резервную копию, чтобы вы могли все вернуть, если что-то пойдет не так. Кстати, если вы будете правильно следовать инструкциям, такой проблем не будет.
Отключить задержку запуска в Windows 10.
Шаг 1: Чтобы отключить задержку запуска Windows 10, кликните правой кнопкой мыши кнопку «Пуск» и выберите в меню «Выполнить».
Шаг 2: В текстовом поле введите Regedit и нажмите Enter, чтобы открыть редактор реестра.
Шаг 3: Нажмите на кнопку «Да», если вы видите запрос UAC, для запуска приложения от имени администратора.
Шаг 4: В окне редактора реестра скопируйте и вставьте следующий путь в адресную строку и нажмите Enter.
HKEY_CURRENT_USER\Software\Microsoft\Windows\CurrentVersion\Explorer\Serialize
Если вы найдете раздел Serialize в соответствующем месте, то все в порядке перейдите к шагу 8, если нет, вам придется создать его вручную.

Шаг 5: Таким образом, если раздел Serialize не существует по указанному адресу, кликните правой кнопкой мыши на Explorer (родительский раздел) и выберите из списка меню «Создать» → «Раздел».
Шаг 7: Как только новый раздел реестра будет создан, назовите его Serialize. После этого выберите Serialize и перейдите на правую панель.
Шаг 8: В пустой области кликните правой кнопкой мыши и выберите «Создать» → «Параметр DWORD (32-бита)».
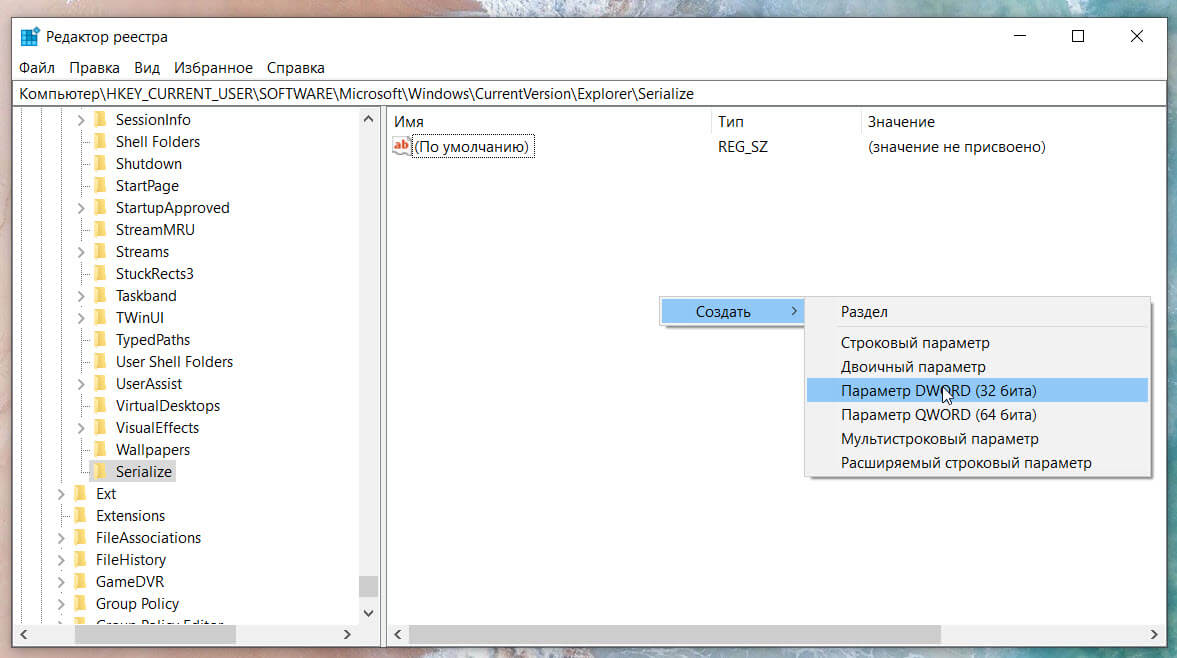
Шаг 9: Затем назовите новый параметр DWORD StartupDelayInMSec и нажмите Enter, чтобы сохранить его.
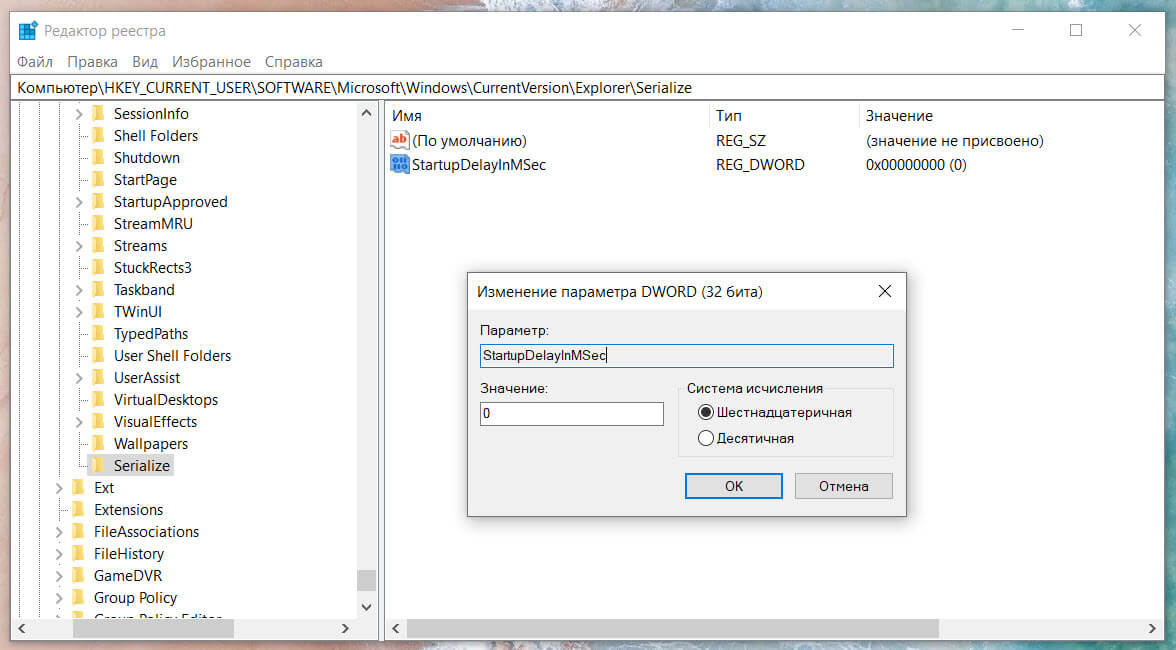
Шаг 10: После присвоения имени, дважды кликните по нему и убедитесь, что Значение равно 0.
Шаг 11: Теперь нажмите кнопку «ОК» и закройте окно редактора реестра. Чтобы применить изменения, вам придется перезагрузить устройство Windows.
Включить задержку запуска в Windows 10.
Шаг 1: Если вам когда-нибудь понадобится снова включить задержку запуска Windows 10, просто откройте окно редактора реестра и перейдите к —
HKEY_CURRENT_USER\Software\Microsoft\Windows\CurrentVersion\Explorer\Serialize
Шаг 2: Кликните правой кнопкой мыши на параметр StartupDelayInMSec, затем выберите опцию «Удалить».
Рекомендуем: Как ускорить меню Пуск в Windows 10
Убрать задержку при вызове контекстного меню «Создать» в Windows 10.
Procedures to Disable/Enable Startup Delay in Windows 10 through Steps. – The Startup items on Windows 10 comprises of shortcuts, programs, folders, drivers, etc that run automatically when OS boots up. You will get all these items inside Startup folder. Startup items are either selected by yourself or they get added by the apps or drivers during their installation. So, Windows 10 delays the Startup items when the OS boots up and this improves the performance of Windows startup. By default, the OS keeps hold on the startup items for about 10 seconds from running after the startup.
If your OS startup at a rapid speed, then you surely wish to run Startup items right away after logging into the account. But to run these items at startup, you have to disable the Startup Delay feature. So, in this guide, learn the steps to Disable/Enable Startup Delay on Windows 10 for your account through Registry Editor.
Way to Disable/Enable Startup Delay on Windows 10
Before following the steps, make sure that you are good at registry editing. Back up the respective registry key and proceed carefully.
Step 1 – Click the Windows icon on the taskbar and type the command regedit. This will soon launch Cortana displaying the regedit Run command as a result. So, click the regedit command.
For reference, you can also read our guide on How to Access Registry Editor in Windows 10 – 5 Simple Tips.
Step 2 – UAC prompt will show up on the screen, and to proceed further select Yes button.
If you are fed up from the prompting follow How to Stop User Account Control / UAC on Windows 10.
Step 3 – Now, browse to the below-mentioned key on the Registry Editor that comes up.
HKEY_CURRENT_USER\Software\Microsoft\Windows\CurrentVersion\Explorer\Serialize
Note – In case, if you don’t see Serialize key, then create a one. Simply, perform a right-click on Explorer and select New followed by Key. Now, name this new key as Serialize.
Step 4 – Next, move to the right-hand side of Serialize and on a blank space do a right-click. From the list of options that pop-up, select New option and DWORD Value.
Step 5 – Now, name this DWORD as Startupdelayinmsec.
Disable Startup Delay in Windows 10
Step 6 – After naming it, do a right-click on it and select Modify.
Step 7 – Now, a small edit box will be visible, put its Value data as 0 and finally click OK to disable Startup Delay on Windows 10.
Enable Startup Delay in Windows 10
Step 8 – Simply right-click the Startupdelayinmsec DWORD and select Delete option and this will enable Startup Delay in Windows 10.
Step 9 – Lastly, one small box for confirmation will appear, select Yes and Startupdelayinmsec DWORD will get deleted.
Conclusion
Hence, to Disable/Enable Startup Delay on Windows 10, follow the above-mentioned registry steps very cautiously. If you know more ways to do this task, write to us in the comments form.
Windows 10 is known for its fast boot-up time, but sometimes users may notice a delay in the startup process. This delay can be frustrating for those who want their computer to boot up quickly. Fortunately, there are ways to disable the startup delay in Windows 10 and make your computer boot faster.
In this article, we will discuss various methods to disable the startup delay in Windows 10 and improve the boot-up time of your computer. We will also provide a step-by-step tutorial on how to implement these methods effectively.
Understanding the Windows 10 Startup Delay
Before we delve into how to disable the startup delay in Windows 10, it’s essential to understand why this delay occurs in the first place. The startup delay is often caused by various factors, including unnecessary startup programs, outdated drivers, fragmented hard drive, and malware infections.
When you start your computer, Windows 10 loads several startup programs and services. These programs and services can slow down the boot-up process, leading to a noticeable delay in the startup time. Additionally, outdated drivers can also contribute to the delay as they can cause compatibility issues with Windows 10.
Another factor that can affect the boot-up time of Windows 10 is a fragmented hard drive. When files on your hard drive become fragmented, it can take longer for Windows 10 to access them, resulting in a slower boot-up time. Lastly, malware infections can also slow down the startup process as they consume system resources and interfere with essential system files.
Now that we have a better understanding of why the startup delay occurs let’s explore how to disable the startup delay in Windows 10 and make your computer boot faster.
Method 1: Disable Unnecessary Startup Programs
One of the most common reasons for the startup delay in Windows 10 is unnecessary startup programs. These programs automatically launch when you start your computer, consuming system resources and slowing down the boot-up process. To disable unnecessary startup programs, follow these steps:
- Press Ctrl + Shift + Esc to open the Task Manager.
- Click on the «Startup» tab.
- Select the unnecessary startup programs that you want to disable.
- Right-click on the selected programs and choose «Disable.»
By disabling unnecessary startup programs, you can reduce the number of programs that Windows 10 has to load during startup, resulting in a faster boot-up time.
Method 2: Update Drivers
Outdated drivers can cause compatibility issues with Windows 10, leading to a slowdown in the boot-up process. To update drivers on your computer, follow these steps:
- Press Win + X and select «Device Manager.»
- Expand the categories and locate the drivers that need updating.
- Right-click on the driver and choose «Update driver.»
- Follow the on-screen instructions to update the driver.
Updating drivers can help resolve compatibility issues and improve the boot-up time of Windows 10.
Method 3: Defragment Hard Drive
A fragmented hard drive can slow down the boot-up time of Windows 10 as it takes longer for the system to access fragmented files. To defragment your hard drive, follow these steps:
- Press Win + X and select «Disk Management.»
- Right-click on the drive you want to defragment and choose «Properties.»
- Go to the «Tools» tab and click on «Optimize.»
- Select the drive you want to optimize and click on «Optimize.»
Defragmenting your hard drive can help improve the boot-up time of Windows 10 by reducing the time it takes to access fragmented files.
Method 4: Scan for Malware
Malware infections can slow down the startup process of Windows 10 as they consume system resources and interfere with essential system files. To scan for malware on your computer, follow these steps:
- Open Windows Security by pressing Win + I and selecting «Update & Security.»
- Click on «Windows Security» and select «Virus & threat protection.»
- Click on «Scan options» and choose «Full scan.»
- Click on «Scan now» to start the full scan.
Scanning for malware can help identify and remove malicious software that may be causing the startup delay in Windows 10.
Tutorial: How to Disable Windows 10 Startup Delay
Now that we have discussed various methods to disable the startup delay in Windows 10 let’s provide a step-by-step tutorial on how to implement these methods effectively:
Step 1: Disable Unnecessary Startup Programs
- Press Ctrl + Shift + Esc to open the Task Manager.
- Click on the «Startup» tab.
- Select the unnecessary startup programs that you want to disable.
- Right-click on the selected programs and choose «Disable.»
By following these steps, you can disable unnecessary startup programs and reduce the number of programs that Windows 10 has to load during startup.
Step 2: Update Drivers
- Press Win + X and select «Device Manager.»
- Expand the categories and locate the drivers that need updating.
- Right-click on the driver and choose «Update driver.»
- Follow the on-screen instructions to update the driver.
Updating drivers can help resolve compatibility issues and improve the boot-up time of Windows 10.
Step 3: Defragment Hard Drive
- Press Win + X and select «Disk Management.»
- Right-click on the drive you want to defragment and choose «Properties.»
- Go to the «Tools» tab and click on «Optimize.»
- Select the drive you want to optimize and click on «Optimize.»
Defragmenting your hard drive can help improve the boot-up time of Windows 10 by reducing the time it takes to access fragmented files.
Step 4: Scan for Malware
- Open Windows Security by pressing Win + I and selecting «Update & Security.»
- Click on «Windows Security» and select «Virus & threat protection.»
- Click on «Scan options» and choose «Full scan.»
- Click on «Scan now» to start the full scan.
Scanning for malware can help identify and remove malicious software that may be causing the startup delay in Windows 10.
By following these steps, you can effectively disable the startup delay in Windows 10 and make your computer boot faster.
Conclusion
In conclusion, the startup delay in Windows 10 can be frustrating for users who want their computer to boot up quickly. By following the methods outlined in this article, you can disable the startup delay in Windows 10 and improve the boot-up time of your computer. Remember to disable unnecessary startup programs, update drivers, defragment your hard drive, and scan for malware regularly to ensure optimal performance. By implementing these methods effectively, you can enjoy a faster boot-up time and a smoother computing experience on Windows 10.