
Плитки начального экрана Windows 10, которые могут представлять собой отдельные приложения из магазина или же простые ярлыки, перекочевали из предыдущей версии ОС, разве что теперь (при выключенном режиме планшета) под начальным экраном понимается правая часть меню Пуск. Плитки автоматически добавляются при установке приложений из магазина, а также их можно добавить самому — кликнув правой кнопкой мыши по значку или ярлыку программы и выбрав пункт «Закрепить на начальном экране».
Однако, функция работает только для файлов и ярлыков программ (документ или папку на начальном экране закрепить таким способом не получится), кроме этого при создании плиток классических приложений (не из магазина) плитки выглядят неказисто — маленькая иконка с подписью на плитке с выбранным в системе цветом. Именно о том, как закрепить на начальном экране документы, папки и сайты, а также изменить оформление отдельных плиток Windows 10 и пойдет речь в этой инструкции.
Примечание: для изменения оформления придется использовать сторонние программы. Однако, если единственная ваша задача — добавить папку или документ на начальный экран Windows 10 (в виде плитки в меню пуск), сделать это можно и без дополнительного ПО. Для этого, создайте нужный ярлык на рабочем столе или в любом другом месте на компьютере, после чего скопируйте его в папку (скрытую) C:\ ProgramData\ Microsoft\ Windows\ Start Menu (Главное меню)\ Programs (Программы). После этого данный ярлык вы сможете найти в Пуск — Все приложения, кликнуть по нему правой кнопкой мыши и уже оттуда «Закрепить на начальном экране».
Программа Tile Iconifier для оформления и создания плиток начального экрана
Первая из программ, позволяющих создавать собственные плитки начального экрана для любого элемента системы (включая простые и служебные папки, адреса сайтов и не только) — Tile Iconifier. Она бесплатная, без поддержки русского языка на данный момент времени, но простая в использовании и функциональная.
После запуска программы вы увидите главное окно со списком уже присутствующих в системе ярлыков (тех, что располагаются у вас в «Все приложения») с возможностью изменить их оформления (при этом чтобы увидеть изменения вам после этого потребуется закрепить ярлык программы на начальном экране, в списке всех приложений он останется без изменений).
Делается это просто — выбираете ярлык в списке (несмотря на то, что их имена указаны на английском языке, в русскоязычной Windows 10 они соответствуют русским вариантам программ), после чего в правой части окна программы вы можете выбрать иконку (дважды кликните по имеющейся для замены).

При этом для изображения плитки можно указать не только файлы из библиотек иконок, но и собственные картинке в PNG, BMP, JPG. Причем для PNG поддерживается и работает прозрачность. По умолчанию размеры — 150×150 для средней плитки и 70×70 для маленькой. Здесь же в разделе Background Color задается фоновый цвет плитки, включается или отключается текстовая подпись к плитке и выбирается ее цвет — Светлый (Light) или Темный (Dark).
Для применения сделанных изменений нажмите кнопку «Tile Iconify!». А для того, чтобы увидеть новое оформление плитки, нужно закрепить измененный ярлык из «Все приложения» на начальный экран.
Но изменением оформления плиток для уже присутствующих ярлыков возможности Tile Iconifier не ограничиваются — если вы зайдете в меню Utilities — Custom Shortcut Manager, то сможете создать другие ярлыки, не только для программ, и оформить плитки для них.
После входа в Custom Shortcut Manager, нажмите «Create New Shortcut» для создания нового ярлыка, после чего откроется мастер создания ярлыков с несколькими вкладками:
- Explorer — для создания ярлыков простых и специальных папок проводника, включая элементы панели управления, устройства, различные настройки.
- Steam — для создания ярлыков и плиток для игр Steam.
- Chrome Apps — ярлыки и оформление плиток для приложений Google Chrome.
- Windows Store — для приложений магазина Windows
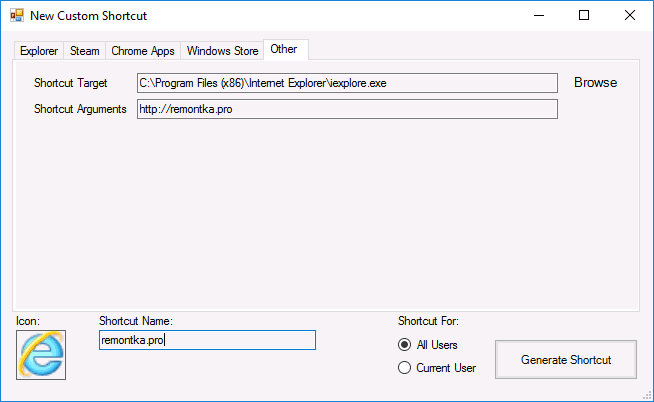
- Other — ручное создание любого ярлыка и его запуск с параметрами.

Само создание ярлыков не представляет сложности — указываете, что нужно запускать, имя ярлыка в поле Shortcut Name, создается ли он для одного или нескольких пользователей. Также можно задать иконку для ярлыка, дважды кликнув по ее изображению в диалоге создания (но если вы собираетесь задавать собственное оформление плитки, пока рекомендую не делать ничего с иконкой). В завершение нажмите «Generate Shortcut».
После этого, вновь созданный ярлык появится в разделе «Все приложения» — TileIconify (откуда его можно закрепить на начальном экране), а также в списке в главном окне Tile Iconifier, где вы сможете настроить плитку для этого ярлыка — изображение для средней и маленькой плиток, подпись, фоновый цвет (также как это было описано в начале обзора программы).
Надеюсь, у меня получилось объяснить использование программы достаточно понятно, чтобы у вас все получилось. На мой взгляд, из имеющихся бесплатных программ для оформления плиток эта на данный момент самая функциональная.
Скачать Tile Iconifier можно с официальной страницы https://github.com/Jonno12345/TileIconify/releases/ (рекомендую проверять весь скачиваемый бесплатный софт на VirusTotal, несмотря на то, что на момент написания статьи программа чистая).
Приложение Windows 10 Pin More
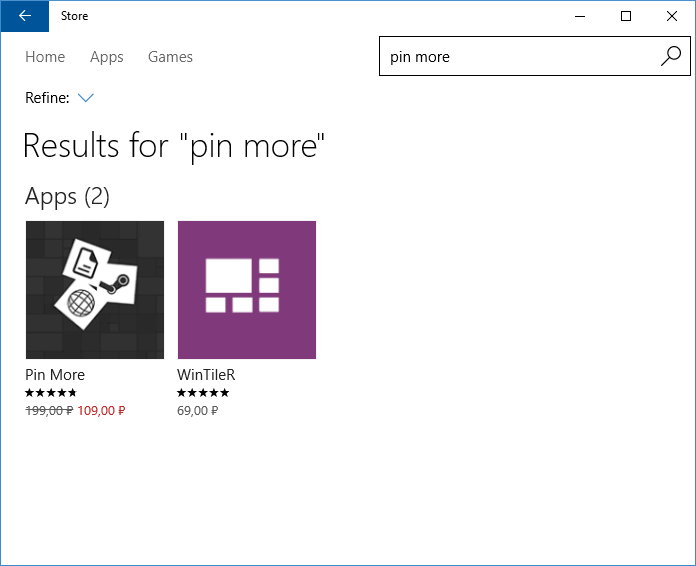
Для целей создания собственных плиток меню пуск или начального экрана Windows 10 в магазине приложений имеется отличная программа Pin More. Она платная, но бесплатная пробная версия позволяет создать до 4-х плиток, причем возможности действительно интересны и, если большее количество плиток вам и не требуется — это будет отличный вариант.
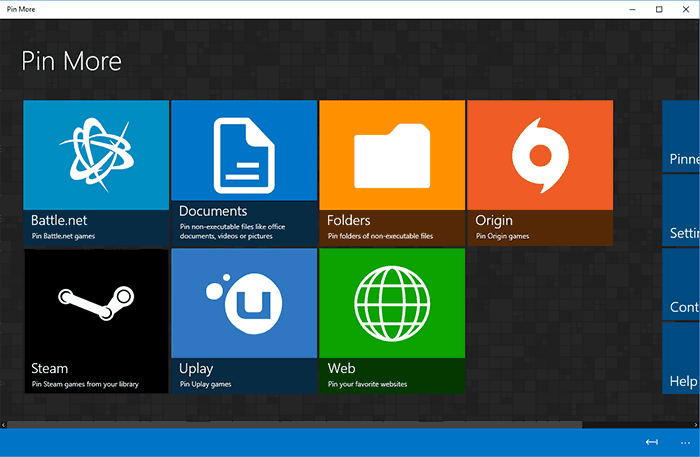
После загрузки из магазина и установки Pin More, в главном окне вы сможете выбрать, для чего требуется плитка начального экрана:
- Для игр net, Steam, Uplay и Origin. Я не особенный игрок, потому проверить возможности не было, но насколько понял — создаваемые плитки игр являются «живыми» и отображают игровую информацию из указанных сервисов.
- Для документов и папок.
- Для сайтов — причем также возможно создание живых плиток, получающих информацию с RSS ленты сайта.
Далее вы можете подробно настроить вид плиток — их изображения для маленькой, средней, широкой и большой плитки отдельно (требуемые размеры указаны в интерфейсе приложения), цвета и подписи.

По завершении настройки нажмите кнопку с изображением булавки слева внизу и подтвердите закрепление созданной плитки на начальном экране Windows 10.
Win10Tile — еще одна бесплатная программа для оформления плиток начального экрана
Win10Tile — еще одна бесплатная утилита для целей создания собственных плиток меню Пуск, работающая по тому же принципу, что и первая из рассмотренных, но с меньшим количеством функций. В частности, вы не можете создать из нее новых ярлыков, но имеете возможность оформить плитки для уже имеющихся в разделе «Все приложения».
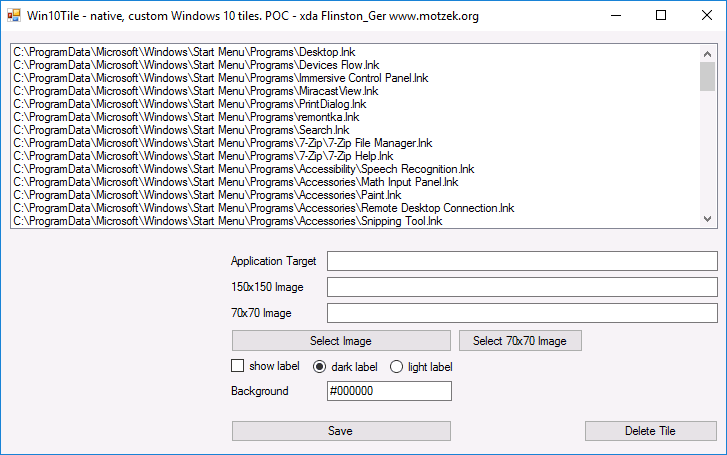
Просто выберите ярлык, для которого нужно изменить плитку, задайте два изображения (150×150 и 70×70), фоновый цвет плитки и включите или отключите отображение подписи. Нажмите «Save» для сохранения изменений, после чего закрепите отредактированный ярлык из «Все приложения» на начальном экране Windows 10. Страница программы Win10Tile —forum.xda-developers.com/windows-10/development/win10tile-native-custom-windows-10-t3248677
Надеюсь, для кого-то представленная информация по оформлению плиток Windows 10 окажется полезной.
tutorial
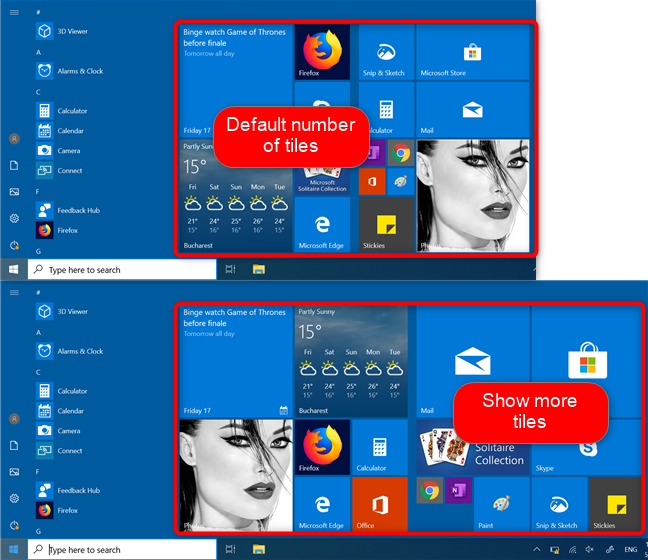
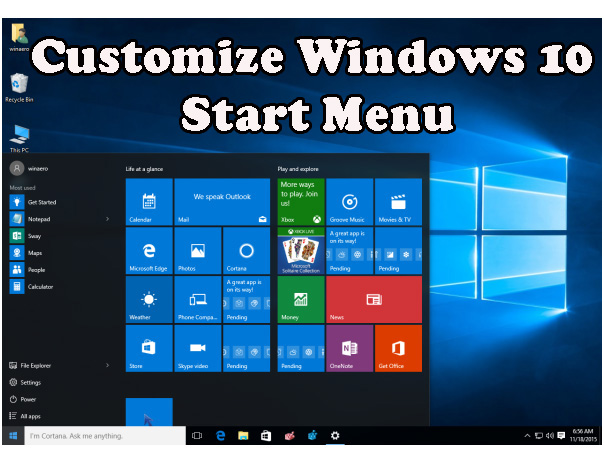
Building on the paradigm first introduced to computer users in Windows 8, the Start Menu in Windows 10 relies on using tiles to make it easy for us to access apps and to get quick bits of information from the apps that we are using. By default, the Start Menu from Windows 10 shows tiles in groups that are as wide as 3 medium-sized tiles. However, if you want more tiles, you can resize tile groups to fit 4 medium-sized tile columns. Here is how to show more tiles on the Start Menu from Windows 10:
NOTE: If you do not know what tiles are and how they are useful, read: Windows tiles: What are they? What do they do?
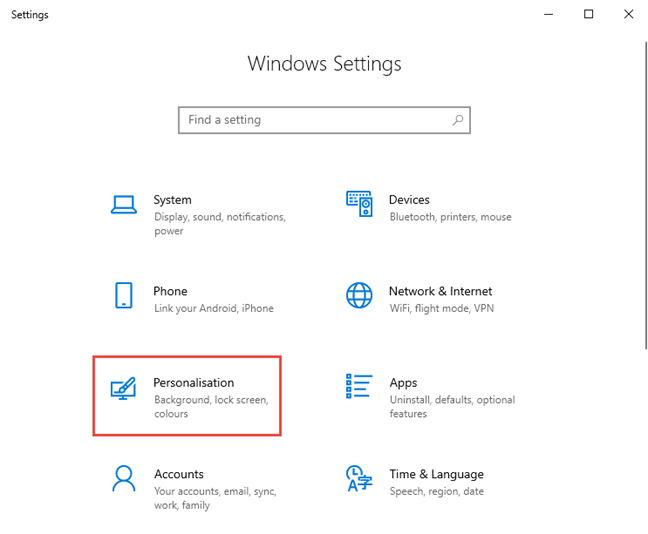
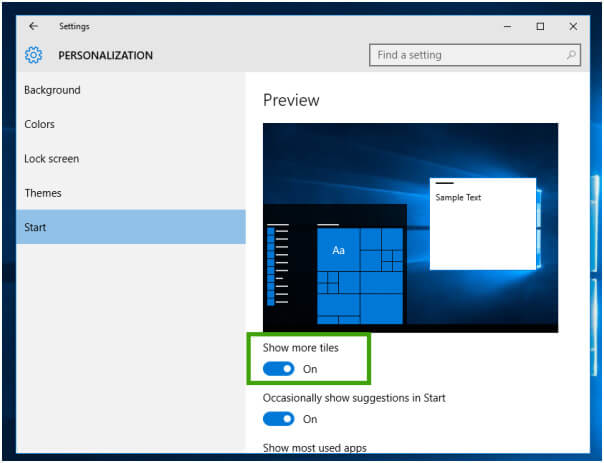
Step 1. Open the Settings app
The first thing you should do is open the Settings app. There are many ways to do it, and if you are in a hurry, know that a fast way is to click or tap on the Settings shortcut from the Start Menu.
Step 2. Go to Personalization
In the Settings app, click or tap the Personalization section.
Step 3. Access the Start settings
Click or tap Start in the column on the left.
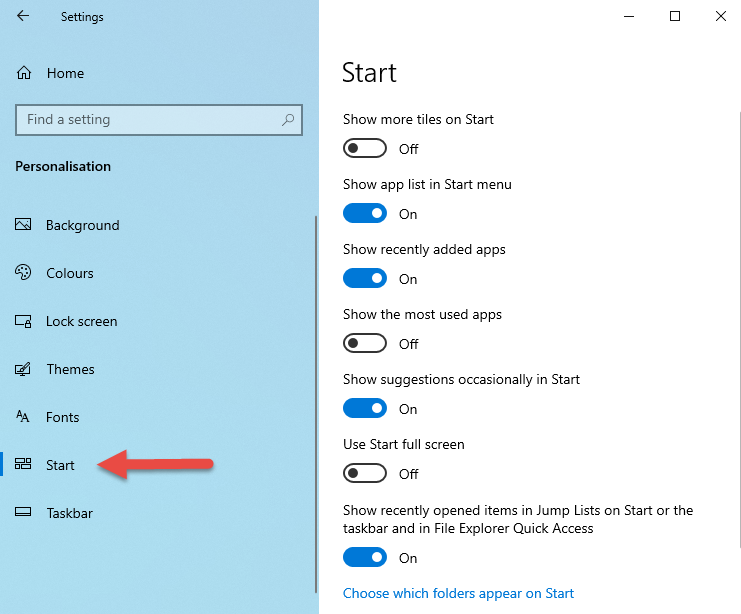
Step 4. Enable more tiles in Windows 10
On the right side of the window, you see some settings. The first one is called «Show more tiles on Start,» and it is turned off by default.
Click or tap its switch to activate it, thus enabling more tiles to be displayed in your Start menu.
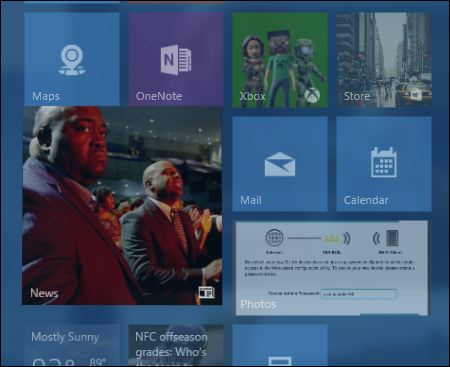
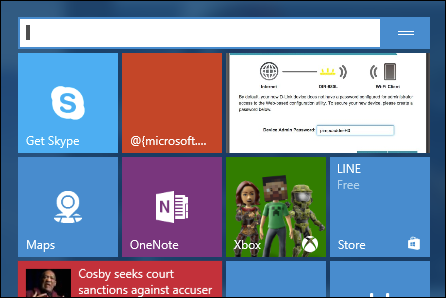
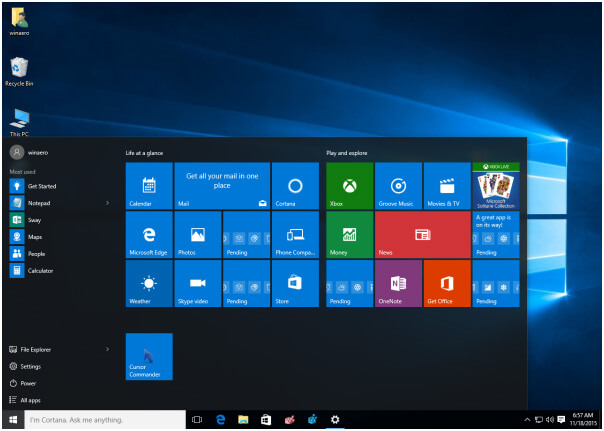
When you open the Start Menu, it now displays tiles in groups as wide as 4 medium-sized columns. Here’s a comparison that may explain things even better:
Increasing the width of tile groups from 3 to 4 medium-sized columns is completely unrelated to the size of your Windows 10 Start Menu, which can be resized as explained in How to change the size of the Start Menu in Windows 10.
How many tiles do you use?
Increasing the number of tiles that you can pin on your Start Menu in Windows 10 is both useful and straightforward. If you have a screen with a large resolution on your computer, this can prove to be a good way to increase your productivity. Tiles are not the only thing that can be pinned to your Start Menu, as you can see in the Complete Guide to pinning everything to the Start Menu in Windows 10. Before closing, tell us how many tiles do you currently use? Comment below and let’s discuss.
Subscribe:
RSS Feed
Google News
YouTube
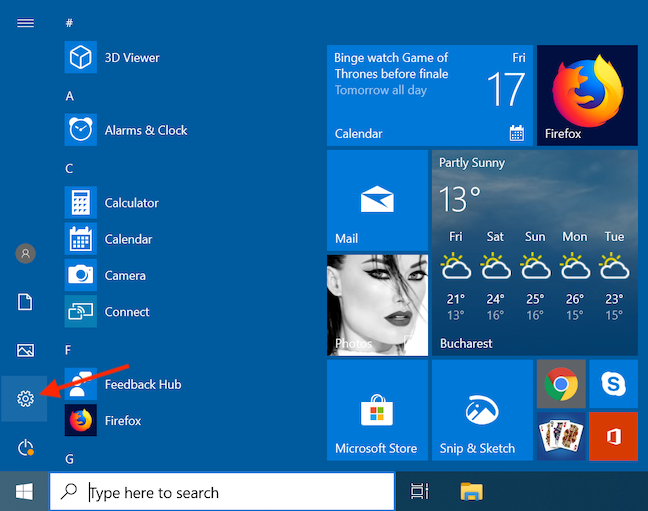
Many things have changed with the Start menu from Windows 7 to Windows 10. If you skipped Windows 8, you may be in for a quite an adjustment, particularly when it comes to Start menu «tiles». We want to talk about how to add, remove, and customize them.
We’ve already introduced you to the basics of the new Start menu, but there’s quite a bit more to it. The Start menu has what are commonly referred to as tiles. Tiles can be added, removed, resized, and animated. These animated tiles are known as «live tiles» and can be used to convey useful and pertinent information, such as headlines, updates, and so on.
Windows 8.1 users will be no doubt be familiar with Start tiles and how to use them, but new users, that is to say users who skipped Windows 8 (upgrading from Windows 7, Vista, or even XP), may be in for a bit of an adjustment.
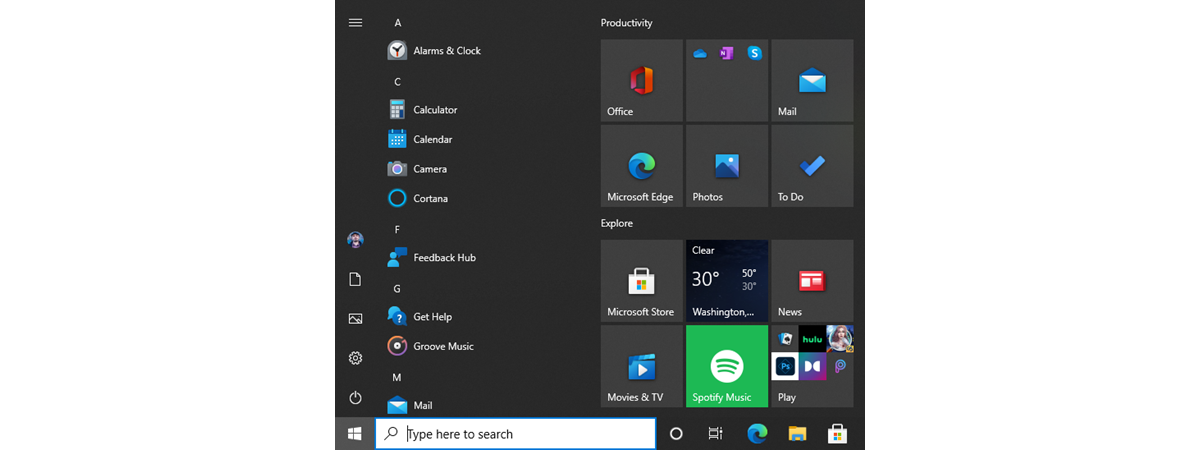
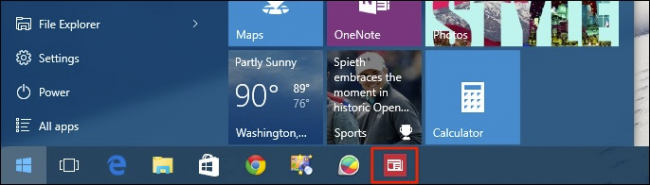
Here you see the new Start menu. On the left are folders, settings, and shortcuts. On the right, are app tiles, which usually open Windows Store apps.
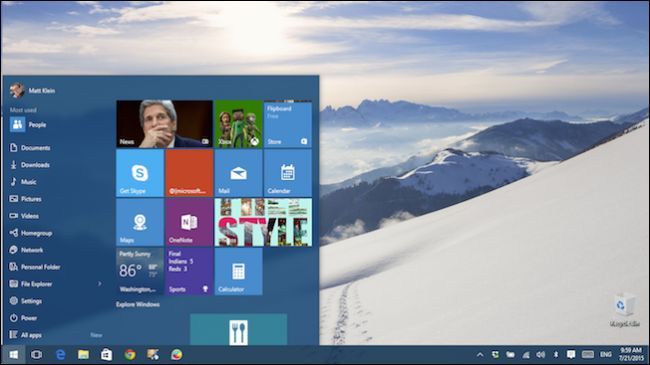
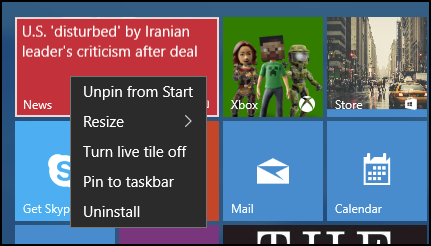
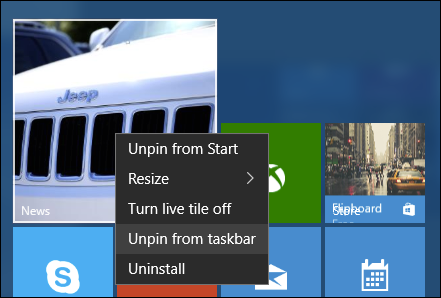
Right-click on a tile and you will see options, the first being «Unpin from Start», which will obviously removes the tile from the Start menu.
If you want to pin or repin an app then click or tap the «All apps» button, long-press or right-click the app you want, and select «Pin to Start».
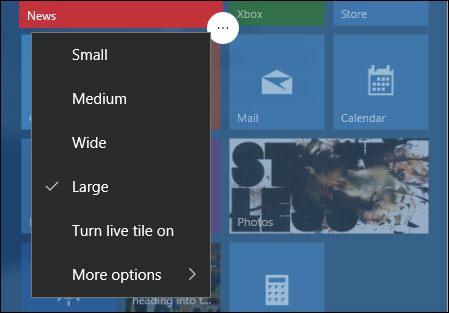
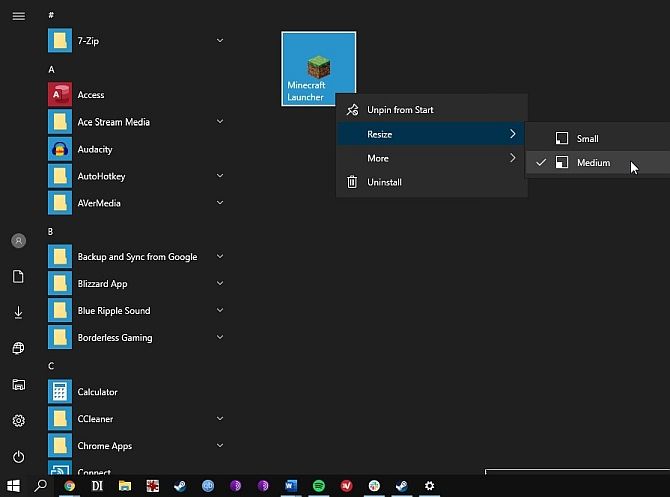
You can also resize tiles to better fit within your scheme. Your choices are (usually) small, medium, wide, and large. Some tiles may not have all those sizes available.
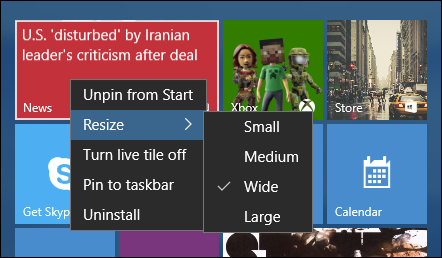
Here we see the difference (from the previous screenshot) between wide and large.
Live tiles might be cool to some, but to many of the rest of us they’re just a flashy animated distraction. You can turn off live tiles, which will convert them to a static tile.
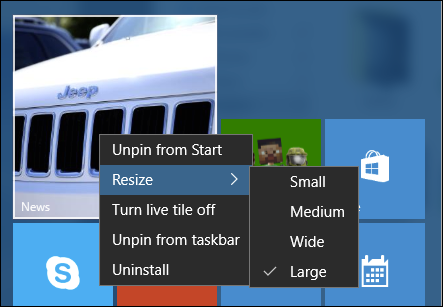
In the following example, we see a large, static tile which has been long-pressed (such as if you’re using a touchscreen) to reveal touch controls. In the top-right corner, you can unpin the tile.
Press the button in the lower-right corner, and you’ll have access to the other options, including resize, live tile, pin/unpin from taskbar, and uninstall (available under «more options»).
The ability to pin and unpin from the taskbar means you’ll be able to access favorite Windows Store apps from the taskbar, instead of having to open the Start menu every time.
To remove it, you can either right-click on the taskbar and unpin the item, or use the «Unpin from taskbar» option detailed previously.
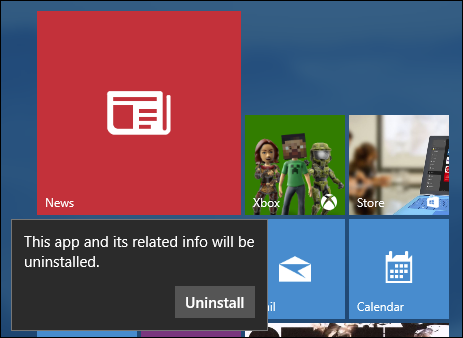
The last option is «Uninstall», which will prompt a dialog requiring you to confirm you’re ready to uninstall the «app and its related info.»
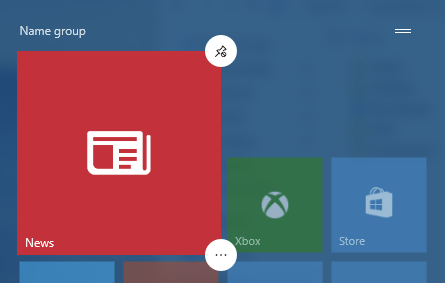
With all that out of the way, the last thing to consider are how your icons are arranged. You can click or long-press and grab tiles to move them around and rearrange them as desired.
You can also click the two lines at the top-right corner of each group to name it. So for example, if you have a lot of games installed, you can arrange them all together and then name the group «Games» or you can name your Office and other similar apps «Productivity» or something else appropriate.
The new Start menu is different, but that doesn’t mean it’s terribly difficult or frustrating. For the most part, the main functions are the same as in Windows 8.1, which is to say you can resize, rearrange, and remove tiles.
Of course, the ability to turn live tiles off is going to appeal to quite a few people who just want their Start menu to be functional and simple.
If you have any questions or comments you’d like to contribute, please leave them in our discussion forum.
Windows 10 comes with a decent range of customization options. Some of these customization options are not easy to access. As well as that, some parts of Windows 10 aren’t as easily customizable, such as the Windows 10 Start Menu tiles.
Although many users prioritize custom Windows 10 Start Menu tiles, Microsoft doesn’t make it easy to personalize. There are some Start Menu tile customization options, for sure. But third-party Windows 10 Start Menu tile customization tools offer way more options.
Here’s how you create custom Start Menu tiles in Windows 10.
The Windows 10 system settings contain several Start Menu live tile settings you can tweak before you opt for custom live tiles. While these aren’t custom Start Menu live tiles, you might find the tweaks you make here are what you need.
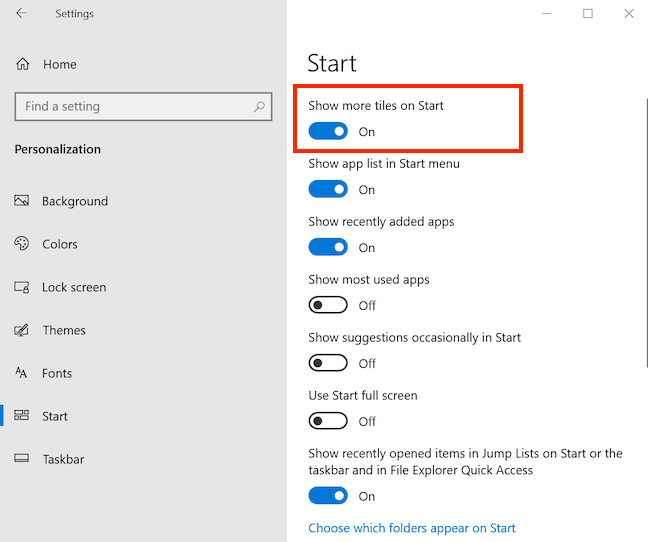
Default Windows 10 Start Menu settings are found under Start > Settings > Personalization > Start.
Some of these settings, such as Use Start full screen, are great options if you are using a Windows 10 tablet.
There is also the option to Show more icons, which increases the number of programs you can add to a row from three medium tile spaces to four.
If you’re annoyed by how often you have to open File Explorer to access your Downloads folder, click on the Choose which folders appear on Start option to add certain folders directly onto your Start Menu.
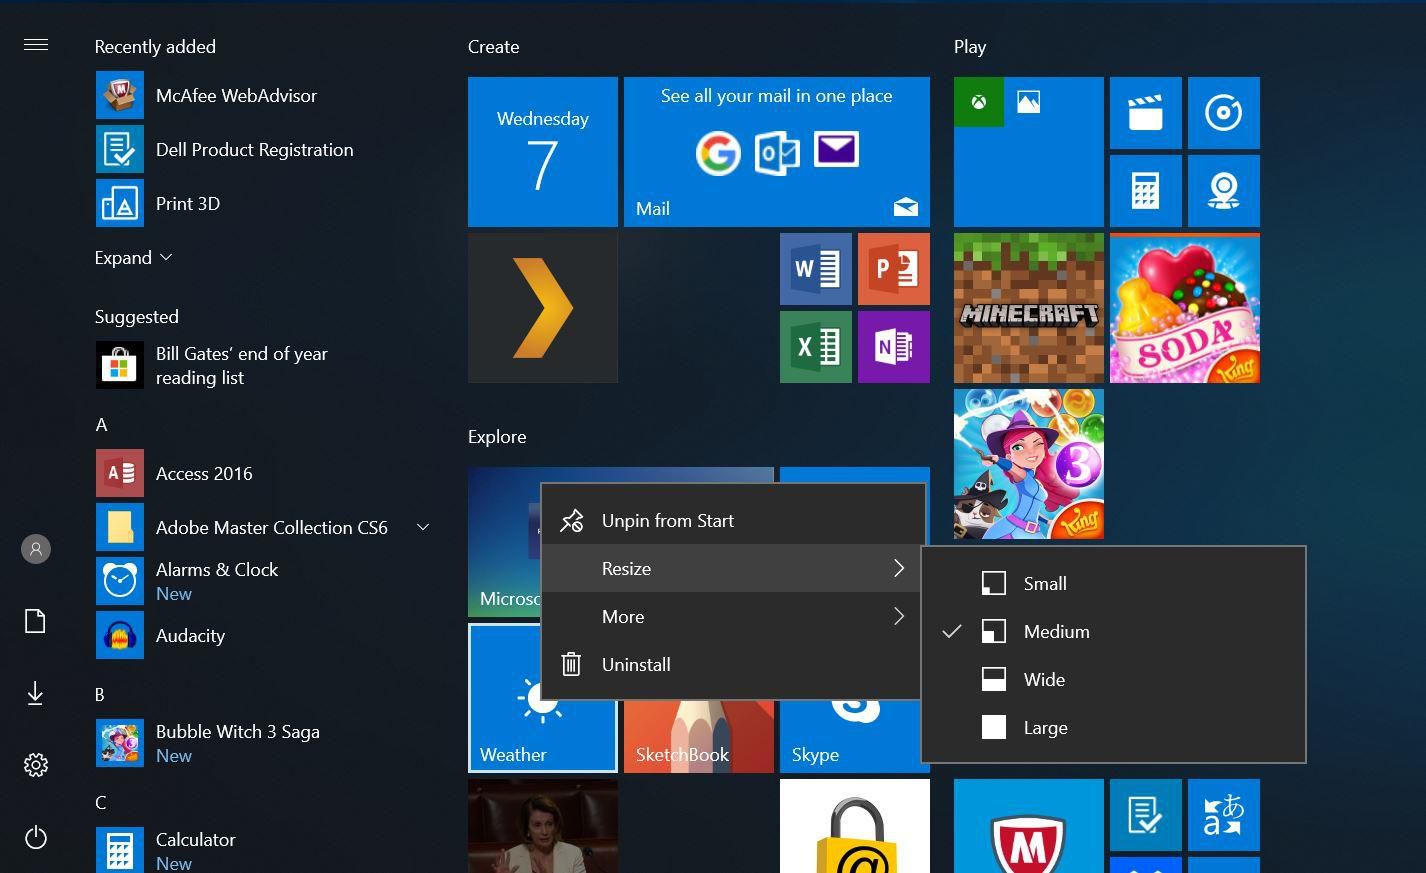
If you’d like to add tiles to your Start Menu, right-click on any program and select Pin to Start. Once a program is added to the Start Menu, you can resize the icon by right-clicking the tile selecting Resize.
Programs like weather applications downloaded through the Windows Store even have built-in live tile features. You can add Chrome applications and Universal Windows Platform (UWP) apps to the Start Menu as well, along with any program located on your PC.
However, other programs, like Steam, require some additional tweaking. Read on to find out how you can add Steam live tiles to your Windows 10 Start Menu.
By default, you can also activate the fence feature in Windows 10 by dragging a tile below or above another to create a section. You can label the tile grouping in the space provided as well.
Better StartMenu is a popular Windows 10 Start Menu customization tool. It offers easy to use live tile customization options.
The tool comes in two parts: Better StartMenu and StartMenu Helper.
The Helper program saves the tile data, including the name, icon, and path of the program, while Better StartMenu adds the tile onto your Start Menu. You must install both to add a custom live tile to your Windows 10 Start Menu using this method.
Better StartMenu lists for $2.99. However, the trial version has no limitations. For now, download the free trial. If you enjoy the software, consider donating to the developer.
Download: Better StartMenu for Windows (Free Trial/$2.99)
You must also download the StartMenu Helper. Better StartMenu doesn’t work properly without these files.
Download: StartMenu Helper for Windows (Free)
Once the StartMenu Helper finishes downloading, right-click, and extract the file contents. Once you extract the contents of the archive, run BetterStartMenuHelper.
Better StartMenu Helper is the tool you use to create a live tile icon. It helps you resize and modify an image to fit the various live tile sizes. But to create custom live tiles, you need some custom live tile icons.
The easiest way to find a large selection of free high-quality icons is through Flaticons, who provide free downloadable icon packs.
For this tutorial, I’m using Pixel Perfect’s Logos and Brands pack. You’ll have to create a free Flaticons account to complete the download. Once your download completes, extract the archive contents, then head back to Better StartMenu Helper.
Select New Tile to create a new live tile. Then, select Auto Generate all from a single image. Please note that Better StartMenu requires PNG files to create custom Start Menu live tiles.
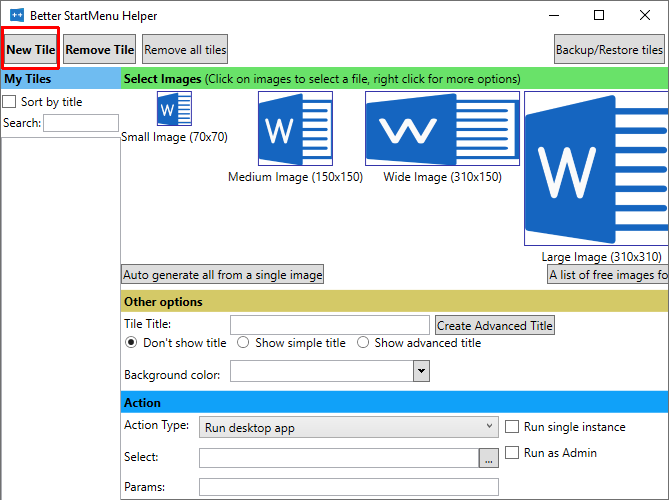
Configure Your Custom Live Tile Icon
Now, under Other options, give your new custom live tile a name, and decide whether you want to display the title on the tile. Next, choose the live tile a custom background, or stick to a transparent background.
The Action section is where you define which program your new custom live tile opens. First, select an option from the dropdown menu. In this case, Run desktop app is what you want, but you can see the options to open a folder, file location, and so on.
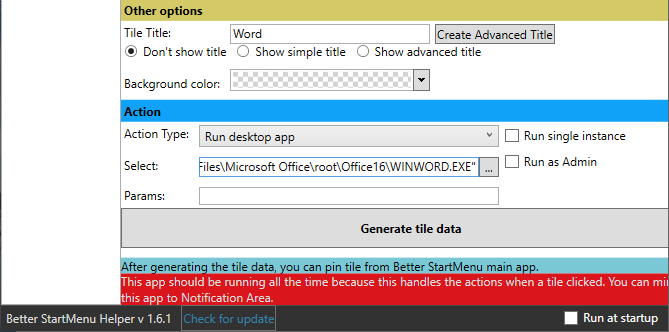
Now, Select the file path of the software you want to open. Click the three-dot icon and browse to the program, select it, and press OK.
Alternatively, browse to the software in your Start Menu, then right-click and select More > Open file location. Then, right-click the application and select Properties.
You’ll find the exact file location alongside Target. You can copy and paste this file path into Better StartMenu Helper.
Underneath, you can set any specific opening parameters for the software. Only do this if you know what you’re doing.
Finally, hit Generate tile data.
You now need to open the Better StartMenu software. However, do not close the Better StartMenu Helper. Better StartMenu requires the helper to remain open to process the custom live tile links.
In the bottom right corner of Better StartMenu Helper, make sure to check Run at startup. That way, you know your custom live tiles will always work.
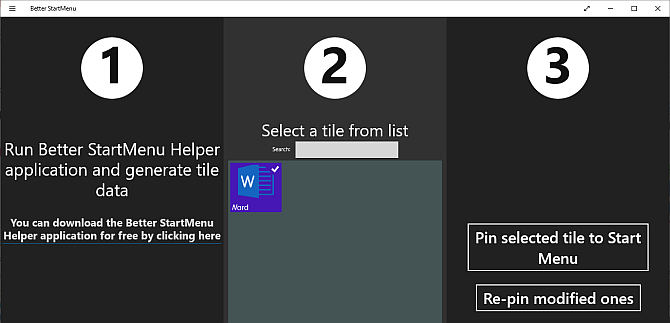
After you open Better StartMenu, you should spot your custom live tile. Select the custom live tile, then in the third column, hit Pin select tile to Start Menu.
Confirm that you want to add the live tile, and you’re good to go.
There are three alternatives to Better StartMenu, some with different qualities. The biggest pro that most alternatives have is allowing custom live tile links to work without a secondary background program.
Here are three Better StartMenu alternatives:
- Pin More: build large custom live tile grids, including multiple sources, and pin them all to your Start screen
- Win10Tile: create and pin custom live tiles to your Windows 10 Start Menu
- TileIconifier: open-source custom live tile app for Windows 10
You can use Better StartMenu to add custom game icon tiles to your Windows 10 Start Menu. However, a better option is the free tool Steam Tile, which takes information from your Steam account direct to provide in-live tile data.
Download: Steam Tile for Windows (Free)
Steam Tile requires your SteamID to function. You must also set your profile to public. To find your SteamID, open Steam, then head to Account Name > Profile > Edit Profile > Custom URL. Add your preferred URL and click Save Changes.
After creating your SteamID, enter it into the Steam Tile welcome screen, and you can begin pinning custom live Steam tiles to your Windows 10 Start Menu.
The difference between simply adding gaming programs to your Start Menu and using Steam Tile is stark and impressive. Steam Tile also allows you gaming access without having to open the Steam library.
Use more than one gaming client? Check out Pin More, as mentioned in the previous section as an alternative to Better StartMenu.
In mid-2019, Microsoft accidentally released an internal Windows 10 build, meant for in-house testers only. Windows 10 build 18947 included a completely new Start Menu design—without any live tiles. The new Start Menu design replaces live tile with static icons, favoring a simplified look over the current iteration.
Later in 2019, Microsoft announced Windows 10X, a version of Windows 10 designed for dual-screen and foldable devices. Windows 10X uses the leaked version of the Windows 10 Start Menu. However, it isn’t clear if the static Windows 10X Start Menu will make its way into the regular Windows 10 build (along with the new taskbar and other Windows 10X features).
Even if Microsoft is considering removing live tiles from a future Windows 10 build, you can still make the most of them for now. With these programs, you can customize your Windows 10 Start Menu, making it the dynamic feature it has the power to become.
If the Windows 10 Start Menu isn’t your cup of tea, why not try a complete Windows Start Menu alternative? Alternatively, check out our guide to Windows 10 customization for the best Windows 10 personalization hacks.
Now you can easily customize your Windows 10’s Start Menu, simply go with this tutorial and do what you want to do with the Windows 10 Start menu. By following this tutorial you can easily enable more tiles in start menu, Customize the far-left panel, Full-screen Start or not, Change the color, Pin and unpin tiles, Move and resize tiles and more.
These tips are for those users who aren’t happy with their default Start menu and want to make Windows 10 start menu more attractive without using any third party Start menu replacer. Under this tutorial, you will learn how to modify the default Start menu of Windows 10 to show more tiles.
No matter you are new with the Windows 10 or don’t have more knowledge. All the given tips and tricks are compatible with the latest TH2 update (Version 1511). Windows 10 has an option to add more tiles in the Start menu, if you want to add extra tiles on the start menu of this operating system then apply the below-given steps:
Step 1: Open the Settings app.
Step 2: Go to the Personalization -> Start.
Step 3: At here, you will see an option “Show more tiles”, simply enable it.
Here, the Start menu showing 4 columns of tiles. Earlier, it was displaying groups of 3 columns.
Before:
After:
After competition of above-given steps, the task is achieved. You don’t need to obey any extra steps like restarting or signing out. The modifications will take effect without delay.
Few More Tips to customize the Windows 10 Start menu
Full-screen Start or not
The full-screen Start menu is the default menu if you’re using a tablet, while the partial-screen Start menu is the default if you have a desktop or laptop.
In order to get full-screen experience on your Windows 10 PC or Laptop, navigate to the Settings > Personalization > Start and toggle on Use Start full screen.
Experience full-screen on a tablet or other portable devices, you have to navigate to the Settings > System > Tablet mode and select tablet more.
Also Read: How to secure your PC after First Windows 10 installation?
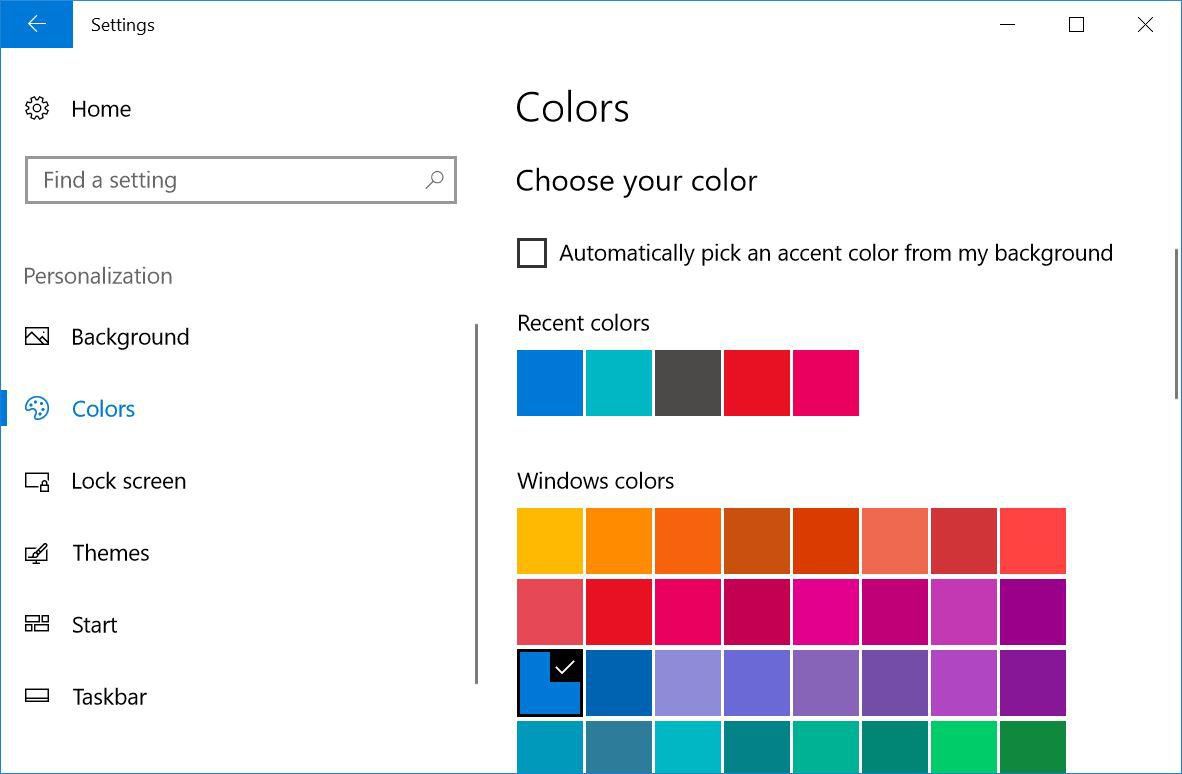
How to change the color?
If you want to modify the color of your Start menu then go to the Start screen, taskbar and window borders, then navigate to the Settings > Personalization > Colors > Show color on Start, taskbar, and action center.
You have to turn on this option and choose the accent color from the above-given options. You can also make your Start menu transparent, simply turn on the Make start, taskbar, and action center transparent.
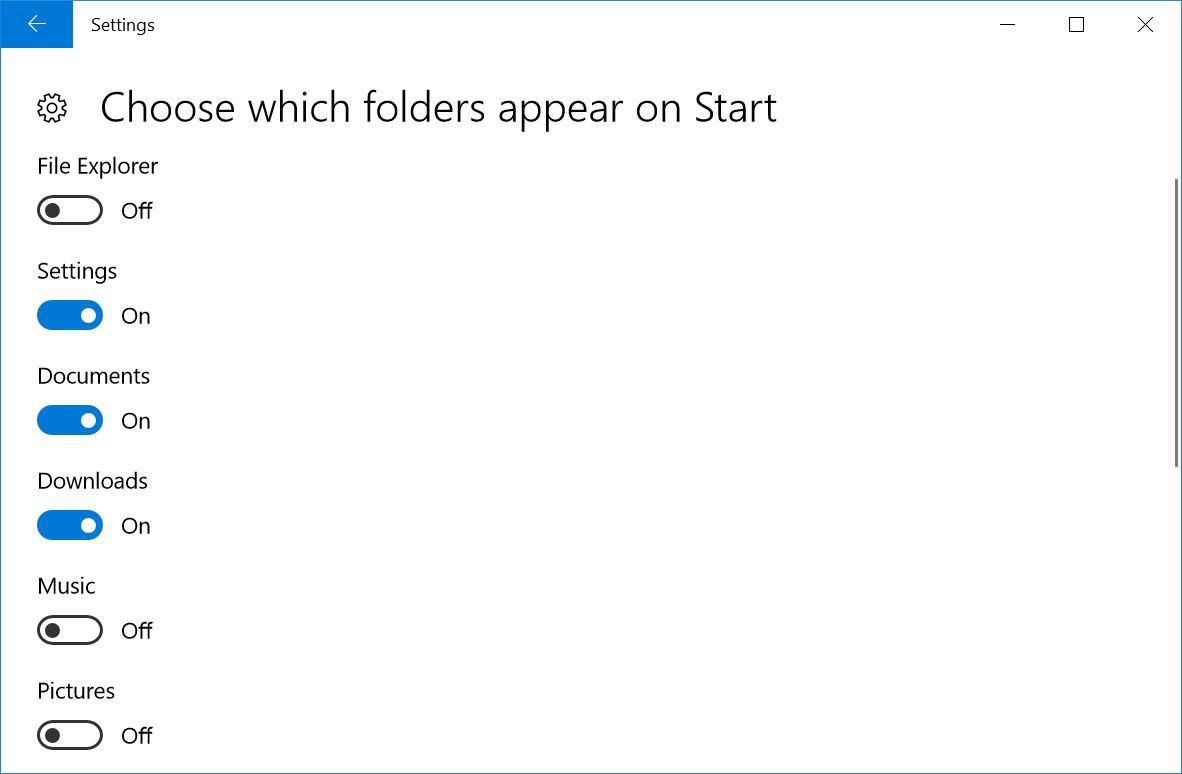
How to customize the far-left panel?
At the last-left panel of the Start menu, you can have a minimum of 2 icons and a maximum of 12 icons.
If you want to alter the icons that appear, then go to the Settings menu -> Personalization > Start > Choose which folders appear on Start.
In this window, you can clasp on/off the following icons: Settings, Documents, File Explorer, Downloads, Music, Pictures, Videos, HomeGroup, Network and Personal folder.
How to Pin and unpin tiles?
In order to pin an app to the Start menu as a tile, you have to first search the app in the center-left panel of the Start menu and right-click on it. Click the option Pin to Start, or you can also drag and drop it into the tile section of the Start menu.
If you want to unpin a tile then you have to right-click on the tile and click on the Unpin from Start option.
How to Move and Resize Tiles?
Right-click on the tile that you want to move or resize and then use Resize option to seta size.
According to the tile/app, you can select small, medium, wide or large. Most of the tiles are fixed either small or medium-sized, but other Windows apps such as Edge or Maps will be able to be resized to wide or large.
In order to move a tile, click or tap on the tile, hold it, and drag it the place where you want to place it.
How to make Start Menu Wide?
Is your PC or Laptop’s Start menu is looking very crowded, if yes then don’t worry as you can easily make it wider. Simply, go to the Settings > Personalization > Start and toggling on Show more tiles
Create Start menu folders
If the lots of thumbnails littering on your desktop and you want to fix it then you can easily organize Start menu tiles into folders. You have to do is, drag the tile on the top of another tile to create a folder of tiles.
How to Edit the tile sections?
Same as the Windows 8 and 8.1, Windows 10 also offers you to divide your live tiles into different categories according to your need. In order to create a new category, click on the tile, hold it and drag it to the end of the Start menu until a solid bar appear. Now, you have to drop the tile below this bar, that’s all- your tile will end up in its own little section.
Conclusion
Hence, with the help of the above-given tips and tricks, you can modify your Windows 10 System’s Start menu according to your need. By applying these methods you can turn a boring or odd-looking start menu into an attractive and well-organized platform on which you can easily find app and features to make your task easy.
If you really like this blog then kindly share it with your friends, colleagues, and your other contacts. Or if you have any query related to Windows Computer or Laptop then you can also contact us via Facebook or Twitter.
Hardeep has always been a Windows lover ever since she got her hands on her first Windows XP PC. She has always been enthusiastic about technological stuff, especially Artificial Intelligence (AI) computing. Before joining PC Error Fix, she worked as a freelancer and worked on numerous technical projects.