
После обновления до Windows 10 многие (судя по комментариям) столкнулись с проблемой, заключающейся в том, что новое меню Пуск не открывается, также не работают и некоторые другие элементы системы (например, окно «Все параметры»). Что делать в этом случае?
В этой статье я собрал способы, которые могут помочь если у вас не работает кнопка Пуск после обновления до Windows 10 или установки системы. Надеюсь, они помогут решить возникшую проблему.
Обновление (июнь 2016): Майкрософт выпустила официальную утилиту для исправления работы меню Пуск, рекомендую начать именно с неё, а если не поможет, вернуться к этой инструкции: Утилита исправления меню Пуск Windows 10.
Перезапуск explorer.exe
Первый способ, которые иногда помогает — простой перезапуск процесса explorer.exe на компьютере. Чтобы проделать это, сначала нажмите клавиши Ctrl+Shift+Esc чтобы открыть диспетчер задач, а затем нажмите кнопку «Подробнее» внизу (при условии, что она там есть).
На вкладке «Процессы» найдите процесс «Проводник» (Windows Explorer), кликните по нему правой кнопкой мыши и нажмите «Перезапустить».
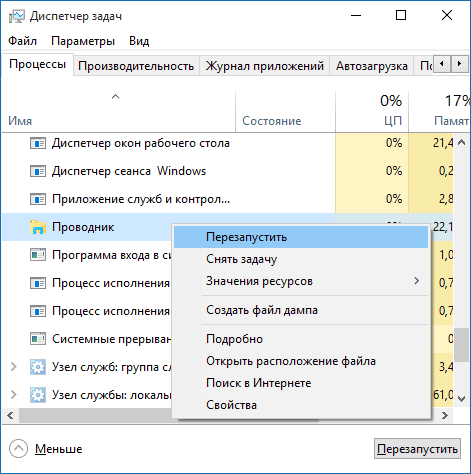
Возможно, после перезапуска меню Пуск заработает. Но срабатывает это далеко не всегда (только в тех случаях, когда особой проблемы на самом деле нет).
Заставляем меню Пуск открываться с помощью PowerShell
Внимание: этот способ одновременно помогает в большинстве случаев при проблемах с меню пуск, но так же может нарушить работу приложений из магазина Windows 10, учитывайте это. Рекомендую сначала использовать следующий вариант исправить работу меню Пуск, а если он не поможет, вернуться к этому.
Во втором способе будем использовать PowerShell. Поскольку Пуск и, вероятно, поиск у нас не работают, для того, чтобы запустить Windows PowerShell, зайдите в папку Windows\ System32\ WindowsPowerShell\ v1.0
В этой папке найдите файл powershell.exe, кликните по нему правой кнопкой мыши и выберите запуск от имени Администратора.
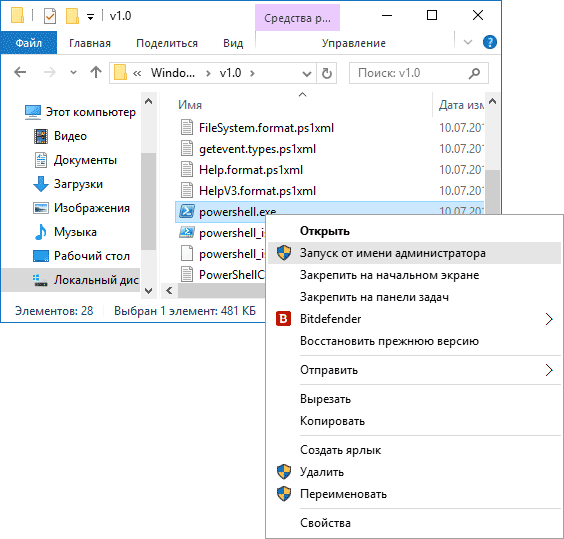
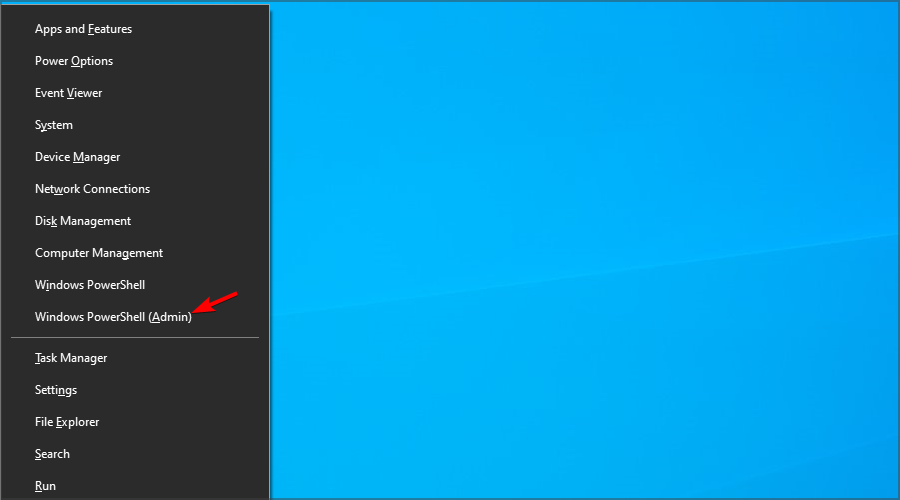
Примечание: еще один способ запустить Windows PowerShell от имени Администратора — кликнуть правой кнопкой мыши по кнопке «Пуск», выбрать «Командная строка (администратор)», а в командной строке набрать «powershell» (при этом отдельное окно не откроется, команды можно вводить прямо в командной строке).
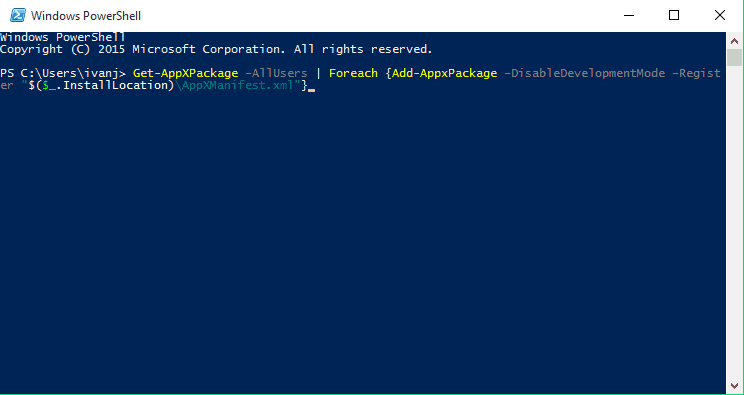
После этого, запустите следующую команду в PowerShell:
Get-AppXPackage -AllUsers | Foreach {Add-AppxPackage -DisableDevelopmentMode -Register “$($_.InstallLocation)\AppXManifest.xml”}
По завершении ее выполнения, проверьте, получается ли открыть меню Пуск теперь.
Еще два способа исправить проблему, когда Пуск не работает
В комментариях также были предложены следующие решения (они могут помочь, в случае если после исправления проблемы одним из первых двух способов, после перезагрузки кнопка Пуск снова не работает). Первое из них — использование редактора реестра Windows 10, для его запуска, нажмите клавиши Win+R на клавиатуре и введите regedit затем выполните следующие шаги:
- Зайдите в раздел HKEY_CURRENT_USER\ Software\ Microsoft\ Windows\ CurrentVersion\ Explorer\ Advanced
- Кликните в правой части правой кнопкой мыши — Создать — DWORD и задайте имя параметра EnableXAMLStartMenu (если только этот параметр уже не присуствует).
- Дважды кликните по данному параметру, задайте значение 0 (ноль для него).
Также, по имеющейся информации, проблема может быть вызвана русским именем папки пользователя Windows 10. Тут поможет инструкия Как переименовать папку пользователя Windows 10.
И еще один способ из комментариев от Алексея, по отзывам тоже у многих срабатывающий:
Была подобная проблема (меню Пуск — это сторонняя программа которая требует часть производительности для своей работы). решил проблему просто: свойства компьютера, снизу слева безопасность и обслуживание, по центру экрана «обслуживание», и выбрать начать. через полчаса все проблемы которые были у Windows 10 были исчезли. Примечание: чтобы зайти быстро в свойства компьютера можно нажать правой кнопкой по Пуск и выбрать пункт «Система».
Создание нового пользователя
Если ничто из описанного выше не помогло, вы можете также попробовать создать нового пользователя Windows 10, через панель управления (Win+R, затем ввести Control, чтобы попасть в нее) или командную строку (net user Имя_пользователя /add).
Обычно, для вновь созданного пользователя меню пуск, настройки и рабочий стол работают как положено. Если вы использовали этот способ, то в дальнейшем вы можете перенести файлы предыдущего пользователя в новую учетную запись и удалить «старый» аккаунт.
Что делать, если указанные способы не помогают
Если ни один из описанных способов не решил проблемы, то могу предложить лишь воспользоваться одним из методов восстановления Windows 10 (возврат в исходное состояние), либо, если вы недавно обновились — выполнить откат до предыдущей версии ОС.
If your Windows 10 Start button is not working, you might have some issues accessing certain features on your PC.
Start Menu is an integral part of Windows, but unfortunately, many reported that Start Menu isn’t working at all for them.
This can be a major problem, and in today’s guide, we’re going to tackle this issue and show you how to fix it properly.
Why is the Start button not working on Windows 10?
There are several reasons why the Start menu isn’t working on Windows 10, and here are the most common ones:
- System glitches – If Start menu has disappeared or you’re having any other issue with it, it’s possible that there’s a glitch on your system.
- Issues with the Windows Explorer process – In case this happens, you just need to open Task Manager and end restart the process.
- Corrupted registry – Sometimes corrupted registry can cause this issue. You can use Registry Editor to fix the issue.
Start Menu is integral to Windows, but many users reported various issues. Speaking of issues, here are some common problems that users reported:
- Windows 10: Start Menu and Cortana not working
- Start Menu and Cortana are closely related, and if one of those features isn’t working, try installing the latest updates and check if that helps.
- Windows Start button not working on Windows 10, quit working on Windows 10
- Many users reported that the Start button stopped working on their Windows 10 PC.
- To fix this problem, you might have to use Powershell and re-register all preinstalled applications.
- Start Menu button is frozen, won’t open on Windows 10
- This is another common problem with Start Menu; a temporary glitch usually causes it.
- Sign out of your account and log back in to fix the problem.
- Start Menu crashing in Windows 10, missing in Windows 10
- According to users, sometimes Start Menu could be crashing or even missing on your PC.
- You might have to create a new user account and switch to it to fix the problem.
What to do if Start Menu and Taskbar are not working on Windows 10?
There are all sorts of issues that can occur with the Start Menu, and many reported an unresponsive Taskbar in Windows 10.
This can be a problem, but it can be fixed by restarting the Windows Explorer process.
In some rare instances, you might get a Critical error in Start Menu, and if this happens, it’s advised to repair your profile or installation.
Luckily for you, fixing these issues isn’t hard, and in today’s guide, we’ll show you how to do it.
What can I do when the Start button is not working in Windows 10?
1. Check for Windows updates
- Press Windows Key + I to open the Settings app.
- Now go to the Update & Security section.

- In the right pane, click the Check for updates button.

Updates will be downloaded automatically in the background if any updates are available. Once your system is up to date, check if Windows 10 Start button and search are still not working.
2. Use the PowerShell to fix this issue
- Press Windows key + X and choose Windows PowerShell (Admin).

- Paste this into PowerShell:
Get-AppXPackage -AllUsers | Foreach {Add-AppxPackage -DisableDevelopmentMode -Register "$($_.InstallLocation)AppXManifest.xml"}
- Press Enter to run it.
That would be all, and your Start button should be working now.
You can try this workaround if your Windows button is not working. This isn’t a permanent solution, but it gets the job done and fixes the issue temporarily, so if the problem manifests itself again, you might need to repeat this process.
For the permanent solution, make sure that you check for the latest Windows 10 updates regularly.
3. Sign out of your account
- Press Ctrl + Shift + Del.
- Now click the Sign out button.

- Wait for a few moments and sign back into your account.

After signing back in, check if the problem is still there.
Sometimes, Windows 10 Start Menu and Taskbar are not working due to glitches. But, according to users, the simplest way to fix this problem is to sign out of your account and log back in.
Since your Start Menu and Start button aren’t working, you’ll need to sign out using the steps we mentioned
4. Restart Windows Explorer
- Press Ctrl + Shift + Esc to open Task Manager.
- Locate Windows Explorer on the list.
- Right-click it and choose Restart from the menu.


Once Windows Explorer restarts, check if Windows 10 Start Menu is still not working. Remember that this is a temporary solution, so you’ll have to repeat it once the problem reappears.
Many users reported that you could fix the problem with the Start Menu button simply by restarting Windows Explorer.
The Start Menu is a part of Windows Explorer, and by restarting Windows Explorer, you’ll force Start Menu to restart as well.
- Windows 10/11 taskbar not working / responding
- Windows 11’s Start menu is not working? Here’s what to do
- How to Fix MFReadWrite.dll is Missing on Windows N
5. End certain processes
- Press Windows Key + X and choose Windows PowerShell (Admin) from the menu.
- When PowerShell starts, run the command below and hit Enter.
cd C:\Users\Your_username_here\AppData\Local\Packages\Microsoft.Windows.Search_cw5n1h2txyewy
- Next, type the following two commands and hit Enter after each one.
Taskkill /F /IM SearchUI.exeRD /S /Q Settings


After the commands execute, the damaged files will be rebuilt, and you should be able to use Start Menu again without issues.
Sometimes Windows 10 can’t open Start Menu or Search due to certain Cortana files. According to users, you can fix this problem simply by deleting these files from PowerShell.
These are just temporary files; your PC will recreate them, so there’s no need to worry.
6. Modify your registry
- Press Windows key + R and enter regedit. Press Enter or click OK.
- In the left pane, navigate to this key:
HKEY_LOCAL_MACHINE\SYSTEM\CurrentControlSet\Services\WpnUserService
- In the right pane, double-click Start DWORD, set Value data to 4, and click OK.

After making these changes, restart your PC and check if the problem is resolved.
Occasionally, issues with the Start Menu button can occur due to Dropbox. Note that Dropbox can sometimes interfere with Windows processes, leading to this and many other problems.
However, you should be able to fix this problem by making a few changes to your registry.
7. Create new values in your registry
- Start Registry Editor.
- In the left pane, navigate to this key:
HKEY_CURRENT_USER\Software\Microsoft\Windows\CurrentVersion\Explorer\Advanced - In the right pane, right-click the empty space and choose New and then DWORD (32-bit) value.

- Enter EnableXamlStartMenu as the name of the new DWORD.

After doing that, close Registry Editor and restart Windows Explorer from the Task Manager. Once the Explorer restarts, your Start Menu should be working again.
The problem might be related to your registry if you’re having issues with the Start Menu button. According to users, they managed to fix this problem simply by creating new value in their registry.
8. Enter Safe Mode
- Open the Settings app and go to the Update & Security section.
- From the menu on the left, choose Recovery. In the right pane, click Restart now button in the Advanced startup section.

- A list of options will appear. Choose Troubleshoot and then choose Advanced options.

- Next select Startup Settings, and click the Restart button.
- Once your PC restarts, select any version of Safe Mode by pressing the appropriate key.
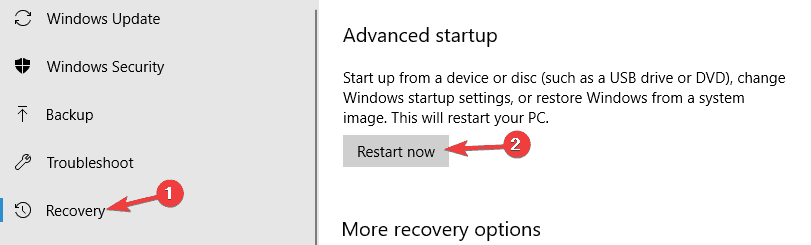


Once you enter Safe Mode, check if everything is working. If so, restart your PC, boot back to your account, and check if the issue is resolved.
According to users, you might be able to solve this problem simply by entering Safe Mode. This is quite simple to do, following the above steps.
9. Create a new user account
- Open the Settings app and go to the Accounts section.

- Navigate to Family & other people in the left pane. In the right pane, click Add someone else to this PC.

- Choose I don’t have this person’s sign-in information, then Add a user without a Microsoft account.
- Enter the desired user name and click Next.


After creating a new user account, switch to it, and check if that solves your problem.
If the problem doesn’t appear on the new account, you’ll need to move your files to the new account and check if that solves your problem.
We believe you must have repaired the Start Menu button not working issue by now. Note that these solutions are not written in any particular order, and we recommend starting with whatever solution looks most appropriate to your situation.
Remember that this isn’t the only issue you can encounter, and many reported that Windows Tiles won’t show in Start Menu.
If you have any comments, suggestions, or maybe some other solutions for this problem, write them down in the comments section.
It can be frustrating to deal with the Start menu button not working on your Windows 10 computer. It can be overwhelming to now have to use that time to fix something that you use every day. Here are some useful suggestions you can use to fix the Start Menu problems that have already caused enough inconvenience.
When your Start Menu isn’t functioning properly, it can be very frustrating. The diagnosis of the issue is not always simple, and the solutions are occasionally very drawn-out. Nevertheless, there are solutions to many common problems.
Since Windows 98, the Start menu has been a favorite feature among Windows users. Start menu provides quick access to all of your apps, settings, and other features, it is one of the most frequently used features in Windows. For this reason, if your Windows 10 Start menu is freezing or not opening, read this article for some helpful solutions.
With the Windows 10 Start menu, there are two main behaviors that can appear. Either it won’t open at all, or it opens slowly (over 5 seconds). The second behavior is the most prevalent, and it is particularly annoying because previous Windows versions always had instantaneous Start menus.
There are many reasons why this occurs, among them are:
- Temporary files for Cortana are damaged or outdated.
- A well-known Windows 10 bug that stops the Start menu from responding.
- Your particular Windows account’s Start menu is broken or not present.
- Cortana and the Windows 10 Start Menu aren’t working.
- Your system’s Windows Explorer is out of date or contains damaged files.
- The start menu button not working and won’t let Windows 10 open.
There are still bugs, just like with any operating system. Additionally, the Start Menu’s sudden failure to function is one of the more frequent bugs that Windows 10 users have encountered. When you click the Start Menu button, the open Start Menu will occasionally freeze and become unresponsive, while other times it won’t open at all. We’ll cover some quick and not-so-quick fixes in this article for any specific problems you may be experiencing with the Windows 10 Start Menu.
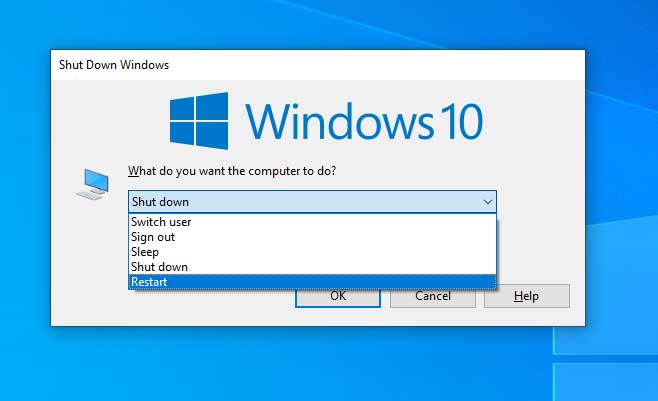
1. Restart Your Computer
Restarting the computer can sometimes resolve simple issues because it refreshes the system’s start and loads all the settings into memory at boot time. When you restart your computer, Windows has the opportunity to clear temporary files and free up RAM. Restarting your computer should solve any issues with apps that are frozen in the start menu or that are not responding.
If your Windows 10 Start menu button not working then you can’t restart your computer using the Start menu. So, you have to close all open programs and press Alt + F4 key to display the Shut Down Windows menu.
2. Restart Windows Explorer Process
Windows Explorer may become buggy if you use a Windows 10 computer for an extended period of time. Restarting this application, which also manages the Start menu, can fix a lot of Start menu-related problems. If the Start menu is not working, the error will be related to the Windows Explorer process which depends on its function.
To restart the Windows Explorer process, you need to right-click on the taskbar and select Task Manager. Scroll down the list until you find Windows Explorer under the Processes tab. Then right-click and select Restart.
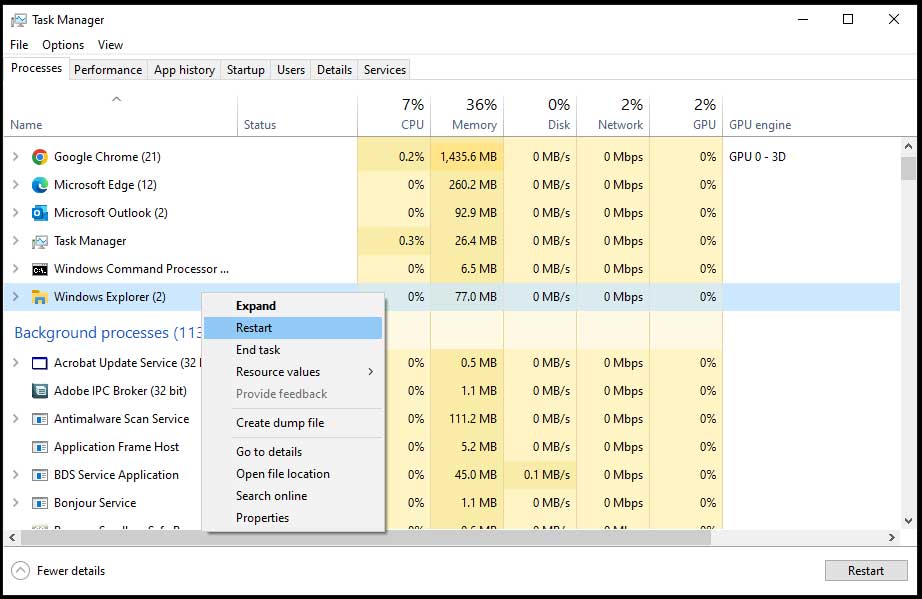
Your desktop will briefly blink, and the taskbar might actually vanish. To automatically restart Windows Explorer, give the computer a few seconds. Select the Windows 10 Start menu after that to see if the problems you were experiencing have been fixed.
3. Clear Cortana Temporary Files
If the Windows Start menu is giving you trouble, Cortana may be to blame. Cortana is seamlessly integrated into the Windows Start menu, but many people are unaware of this. The functionality of the Start menu itself may be impacted by problems with Cortana. The most frequent Cortana problem is temporary Cortana files becoming corrupted and causing lag each time you choose the Start menu. You could quickly fix the lag issue if you delete these temporary files. Follow the following instruction to clear the Cortana temp file.
- Press Windows Key + R, type “cmd” and press Ctrl + Shift + Enter to open the Command Prompt as administrator.
- Type the following commands one by one in order, and press Enter after each.
CD /d "%LOCALAPPDATA%\Packages\Microsoft.Windows.Cortana_cw5n1h2txyewy"
Taskkill /F /IM SearchUI.exe
RD /S /Q Settings
Windows will automatically restart the Cortana task, so you don’t need to. After using these commands, it wouldn’t hurt to restart your computer. Check the Start menu once more to see if the problems you were having have been fixed.
Also Read:-
- Reset 120 day RDS Grace period using Registry on Windows Server
- A Media Driver Your Computer Needs Is Missing Error
- You Can’t Access This Shared Folder Because Your Organization’s Security Policies Block
4. Check Windows Update to Fix the Start menu not working
Windows keeps track of system errors using user feedback and then creates updates for the system that include fixes for these errors. Because updating your system can fix a variety of errors, you must do so first. Ensure the most recent version of Windows is installed on your computer.
If the issue persists, it’s likely that your copy of Windows 10 is outdated and buggy. A good quick fix for this is just to make sure you have all of the latest critical Windows updates. Choose the Settings icon from the Start menu. Using Windows Key + I will bring up Settings if your Start menu isn’t functioning. Choose Security and Update.
Windows Update checks and installs all important Windows updates on your Windows. In Select Windows 10 Update, it doesn’t matter if you choose to download and install everything security or quality. When all the new updates are installed, restart your computer and try the Windows Start menu again.
5. Repair corrupted or missing Windows system files
Sometimes updates go wrong or you accidentally delete important files while digging through the file system. One of the most common causes of malfunctioning the Start menu is corrupted system files. Running system files and repairing all system files can make your Windows 10 system more useful.
If you are still having problems with the Start menu or other important Windows applications have crashed, you can restore missing or corrupt Windows data.
To do this, you’ll need to open the Command Prompt as an administrator and run the System File Checker program. Follow the following instruction to repair the Windows System file.
- Press Windows Key + R to open Run Box.
- Type
cmdand press Ctrl + Shift + Enter to open the command prompt as administrator. - Run the following commands one by one.
sfc /scannow
DISM.exe /Online /Cleanup-image /Restorehealth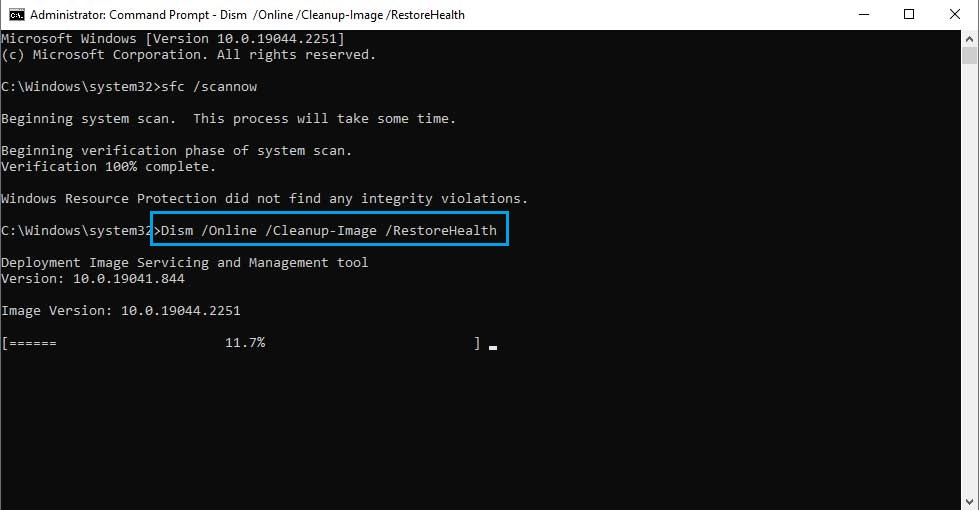
System File Checker starts scanning all system files and replaces corrupt or missing files with copied ones. Feel free to move on to something else for 5–10 minutes as this process might take a while. Just be careful not to close the window while sfc is doing its thing.
After System File Checker completes, save the open task and restart your computer if System File Checker replaces incorrect or missing files. Once you log in again, open the Start menu to see if the issue is resolved.
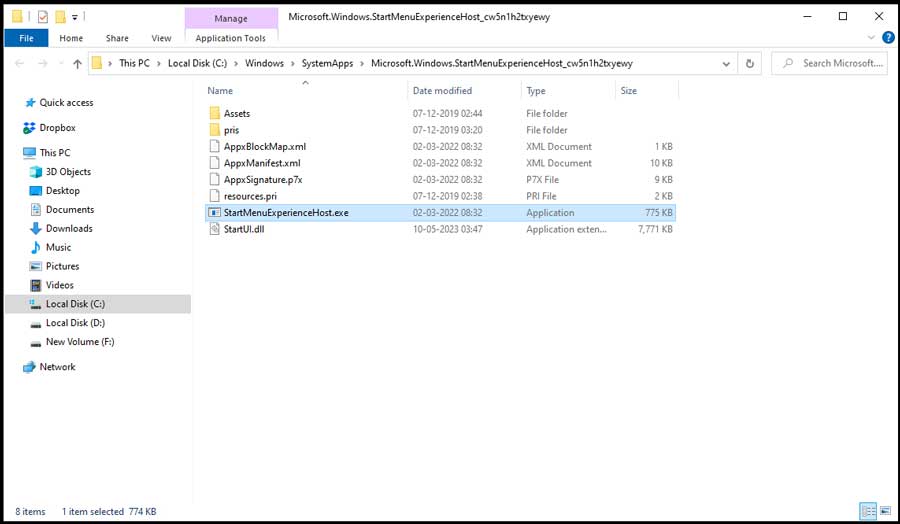
6. Restart Start Menu via File Explorer if not working
If the Windows 10 Start menu is not working and the above method does not work, you need to start it manually from File Explorer. It’s like that.
- Right-click your taskbar and select “Task Manager”, or press Ctrl + Shift + Esc.
- Press S on your keyboard until you find “Start” after selecting any application in your Task Manager. Double-click on Start processes to “Expand” it.
- Now, right-click the second Start heading below it. From the menu, select “Open file location”.
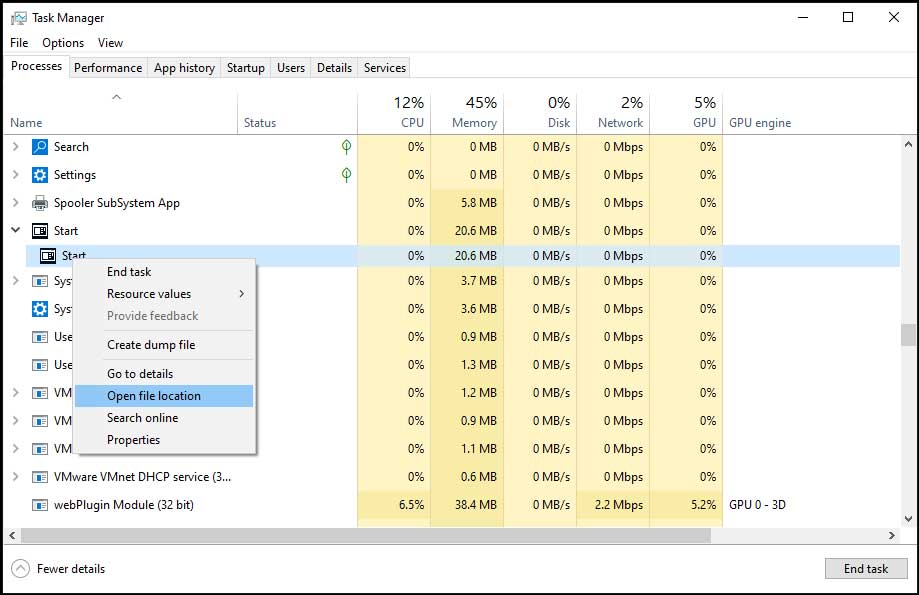
- StartMenuExperienceHost is displayed in the File Explorer window along with other files. This program should be launched by double-clicking.
Your Windows 10 Start Menu should now start operating normally. You can try different solutions to the Strat Menu freezing issue if you’re still having trouble.
Read This:-
- Fix 0x800F0950 .NET Framework 3.5 installation Error – Win 11/10
- You might not have permission to use this network resource
7. Change Your User Profile to fix the Start menu is not working
One user account may occasionally be the only one experiencing issues with the Start Menu. To determine whether the issue still exists, it is a good idea to switch to a different user account. You can choose a local user account when making a new user account so that Microsoft won’t have access to your account information.
Even though this solution won’t completely solve the problem, it’s still preferable to doing nothing. You could move to a new account and start over if your Start Menu works fine on another profile.
Final conclusion
You might become dissatisfied with your system if the Start menu button in Windows 10 is not working. The techniques above should help restore its functionality so that you can carry on being productive. Fortunately, there are some things you can do to get it back up and running again.
Hopefully, one of the solutions in this article will help you fix the freezing issue with Windows 10’s start menu so you can resume normal use.
,
If your Start menu is not working in your Windows 10/11 device, continue reading below to fix the problem. Windows 10/11 devices are known for their efficiency and improved features. This is a huge upgrade from the Windows 8.1 operating system, which has not stood the test of time. Despite this, Windows 11/10 has its own drawbacks that include glitches and unresponsive features and buttons.
For example, the Start menu, one of the most important buttons in Windows, can stop working or crash as soon as it is opened. Some users have also reported that the Start menu is not always responsive when clicked, or freezes immediately after it opens.
As you understand, the above mentioned issues with the Start menu are frustrating and can affect user productivity and performance.
In this guide we have compiled several methods for fixing the following Windows 11/10 Start menu issues:
- Windows Start menu button not working in Windows 10/11.
- After installing updates the Start menu does not work.
- Start menu is freezing or becomes unresponsive.
How to FIX: Windows 10/11 Start Menu problems.
- Install all Windows Updates.
- Restart Windows Explorer process.
- End the «Start Menu Experience Host: Task.
- Scan and Repair System files.
- Re-register the Start menu.
- Fix Start Menu problems with Registry.
- Create a New User account.
Method 1. Install all Windows Updates
Making sure your device is up to date is one way to fix glitches in the Windows Start menu, because in some cases installing pending updates can fix the unresponsive Start menu in Windows 10/11 OS.
To install all available updates if the Start menu does not work:
1. Press the Ctrl + Shift + Esc keys to open Task Manager.
2. Click the File tab from the Task Manager window, then select Run new task.

3. In the Run window, type the following command and hit OK.
- ms-settings:windowsupdate

4. Click Check for updates and wait Windows to scan for available updates. When this done, click Install now. *
* Note: If a feature update is also available, then download and install it as well.

5. When all updates are installed, select Restart.
6. As soon as the PC reboots, check if the Start menu is working.
Method 2. Restart Windows Explorer
Restarting Windows Explorer process in task manager is another way to fix Start menu. See steps below:
1. Press the Ctrl + Shift + Esc keys to open Task Manager.
2. Under the Processes tab, right-click on Windows Explorer and select Restart.

3. You will notice that the icons on the taskbar will disappear for few seconds, don’t panic they will resurface. Now check if the Start menu is working.
Method 3. Kill the Start Menu Experience Host task
The «Start Menu Experience Host» task is responsible for the Start menu. Sometimes ending it may cause Start menu to work again.
1. Press the Ctrl + Shift + Esc keys to open Task Manager.
2. Under the Details tab, right-click at StartMenuExperienceHost.exe and select End Task.

3. Now click the Start menu and check if the problem is fixed.
Method 4. Scan and Repair Corrupted System files.
If the Windows system files on the device are damaged or corrupted, the Start menu may stop working. To repair the damaged system files:
1. Press the Ctrl + Shift + Esc keys to open Task Manager.
2. From the File menu, select Run new task.
3. In the ‘Create new task’ window, type cmd, check Create this task with administrative privileges, then click OK.

4. In the command prompt window, type the command below and press Enter:
- DISM /Online /Cleanup-Image /RestoreHealth
5. Once the operation is completed, enter the command below and press Enter:
- sfc /scannow

6. Wait until the process is completed.
7. Finally, press CTRL + ALT + DEL and press the Power button (at the bottom right), to restart the computer.

8. After, restarting check that the Start menu is working.
Method 5. Re-register the Start menu.
To re-register or restore all the built-in apps and Start menu in Windows, Use the command below on Powershell.
1. Press the Ctrl + Shift + Esc keys to open Task Manager.
2. Click the File tab and select Run new task.
3. In the new task window, type powershell, check Create this task with administrative privileges and click OK.

4. Copy and paste the command below in PowerShell and press Enter.
- Get-appxpackage -all shellexperience -packagetype bundle |% {add-appxpackage -register -disabledevelopmentmode ($_.installlocation + «\appxmetadata\appxbundlemanifest.xml»)}

5. Once it is completed, close PowerShell window and the issue should be resolved.
Method 6. FIX Start menu not working issue using Registry.
Modifying the registry editor as described below is another solution to restore the functionality of the Start menu. However, it is important to carefully follow the steps below to resolve the problem.
1. Press the Ctrl + Shift + Esc keys to open Task Manager.
2. Click the File tab and select Run new task.
3. In the new task window type regedit, check Create this task with administrative privileges, then click OK.

4. In the Registry editor window, navigate to the location below:
- HKEY_CURRENT_USER\SOFTWARE\Microsoft\Windows\CurrentVersion\Explorer\Advanced
5. Right-click on Advanced, click on New and select DWORD (32-bit) Value.

6. Type EnableXamlStartMenu as the name of the new value. Leave the Data value as 0 and close the registry editor. *
* Note: If the «EnableXamlStartMenu» REG_DWORD value already exists double-click on it and change the value data to 0.

7. Finally press CTRL + ALT + DEL and press the Power button (at the bottom right), to restart the computer.
Method 7. Create a User Account.
If the current user’s profile is corrupted this may also affect the Start menu. In this case try creating a new user account and see if that solves the problem with the Start menu.
1. Press the Ctrl + Shift + Esc keys to open Task Manager.
2. From the File menu, select Run new task.
3. In the ‘Create new task’ window, type cmd, check Create this task with administrative privileges, then click OK.

4. In the command prompt window, type the following command where USERNAME is name for the new user and PASSWORD is its password. When done, press Enter: *
- net user USERNAME PASSWORD /add
* For example: To create a new user with name «wintips» and password «WIN1234», type:
- net user wintips WIN1234 /add
5. Now grant the new account administrative rights, by giving the below command (where USERNAME is the name of the new user). *
- net localgroup administrators USERNAME /add
* For example: To add the user with name «wintips» to administrators group, type this command:
- net localgroup administrators wintips /add

6. Press CTRL + ALT + DEL and press the Power button (at the bottom right), to restart the computer.
7. On the login screen, click on the new account to sign in to it.
8. Check if the Start menu is working on the new account and if yes, transfer all your files and settings from your old account to the new one. *
* Note: If you still face problems with the Start menu, resetting or reinstalling Windows 10 may be the last solution to fix them.
That’s it! Which method worked for you?
Let me know if this guide has helped you by leaving your comment about your experience. Please like and share this guide to help others.
If this article was useful for you, please consider supporting us by making a donation. Even $1 can a make a huge difference for us in our effort to continue to help others while keeping this site free:
- Author
- Recent Posts
Konstantinos is the founder and administrator of Wintips.org. Since 1995 he works and provides IT support as a computer and network expert to individuals and large companies. He is specialized in solving problems related to Windows or other Microsoft products (Windows Server, Office, Microsoft 365, etc.).
Is your Windows 10 Start button unresponsive? This guide provides a range of solutions to fix the Start button issue in Windows 10, helping you restore its functionality and regain quick access to your apps, settings, and files.

Table of Contents
We are listing down the methods you can follow to fix Windows button not working on your PC.
Method 1: Sign out and re-login on your account
Sometimes a simple re-login can help you fix the issue with your Windows key. Here is how to sign out of your account and re-login:
1. Move your cursor and click on the Windows logo or the start menu.
2. Click on your profile icon and select Sign-out.
3. Now, type your password and re-login into your account.
4. Finally, check if your Windows key is working or not.
Method 2: Disable the Game Mode in Windows 10
If you use the game mode on your Windows 10 system, then it is the reason why you are facing the issue with your start button. Follow these steps to fix the Windows button not working by disabling the game mode:
1. Click on your Windows icon from the taskbar and type settings in the search bar. Open Settings from the search results.

2. Go to the Gaming section from the menu.

3. Click on the Game Mode tab from the panel on the left.
4. Finally, make sure you turn off the toggle next to Game Mode.

After you disable the game mode, hit the Windows key on your keyboard to check if it works or not.
Also Read: Fix Windows 10 Updates Won’t Install Error
Method 3: Enable Windows key within the Registry Editor
The Windows registry editor has the ability to enable or disable your keyboard keys. You may accidentally disable the Windows key in the registry editor of your system. Therefore, to fix Windows 10 start button not working, you can follow these steps to enable the Windows key using registry edit:
1. Click on the Windows menu and type run in the search bar.
2. Once you open the run dialog box, type regedt32 in the box and click OK.
3. If you get any confirmation message, click on YES.
4. After the registry editor opens, go to HKEY_LOCAL_MACHINE.
5. Click on the System.
6. Tap on CurrentControlSet.
7. Click on the Control folder.

8. Scroll down and open the Keyboard Layouts folder.

9. Now, if you see any scancode map registry entry, make a right-click on it and click on delete.
10. Click on YES if any warning message pops up on your screen.
11. Finally, restart your computer and check whether the Windows key starts working on your system.
However, if you are unable to find the scancode map registry entry key, then it might not be available on your system. You can try the next methods to fix Windows 10 start menu frozen.
Method 4: Run System File Checker Scan
By default Windows 10 comes with a system file checker tool known as the SFC scan. You can perform an SFC scan to find corrupt files on your system. To fix Windows button not working issue, you can follow these steps to execute the SFC scan on your system:
1. Click on the Windows icon in your taskbar and search Run in the search bar.
2. Once the run dialog box opens, type cmd and click on Ctrl + Shift + Enter on your keyboard to launch the command prompt with administrative permissions.
3. Click on YES when you see the prompt message that says ‘do you want to make changes on your device.’
4. Now, you have to type the command following command and hit enter: sfc /scannow

5. Finally, wait for your system to scan and fix the corrupt files automatically. Do not shut down or exit the window on your system.
After the scan completes, you can restart your computer and check whether this method could resolve Windows 10 start button not working issue.
Also Read: How to Repair Corrupted System Files in Windows 10
Method 5: Use Powershell Command
If you want to make adjustments to your system, then the PowerShell command can help you execute various commands to fix the issues in your system. Many users were able to fix the start menu not working issue by performing the PowerShell command.
1. Click on the Windows icon and type run in the search box.
2. Open the Run dialog box from the search results and type PowerShell in the box. Click on Ctrl + Shift + Enter on your keyboard to launch the PowerShell with administrative permissions.
3. Click on YES when you see the prompt message that says ‘do you want to make changes on your device.
4. Now, you have to type the following command and hit enter. You can directly copy-paste the above command.
Get-AppXPackage -AllUsers | Foreach {Add-AppxPackage -DisableDevelopmentMode -Register “$($_.InstallLocation) \AppXManifest.xml”}

5. After the command completes, you can check if the Window key starts working on your system.
Method 6: Disable the Filter keys feature on Windows 10
Sometimes, the filter key feature on Windows 10 causes the window key from working properly. Therefore, to fix Windows 10 start menu frozen, you can disable the filter keys by following these steps:
1. Go to the search bar by clicking on the start menu in your taskbar and type the control panel.
2. Open the Control Panel from the search results.

3. Set the View mode to category.
4. Go to the Ease of Access settings.

5. Select ‘Change how your keyboard works’ under the ease of access center.

6. Finally, you can uncheck the box next to ‘Turn on Filter Keys’ to disable the feature. Click on Apply and then OK to save the changes.

That’s it; you can try using the Windows key on your keyboard and check if it works properly or not.
Method 7: Use DISM command
DISM command is pretty much similar to an SFC scan, but executing a DISM command can help you repair the image of Windows 10.
1. Open the Run dialog box by searching run in the search bar of your system.
2. Type cmd and click on Ctrl + Shift + Enter from your keyboard to launch the command prompt with administrative permissions.
3. Click on YES to allow the app to make changes on your device.
4. Type the following command in the command prompt:
Dism /Online /Cleanup-Image /StartComponentCleanup
5. After the command completes, type another command Dism /Online /Cleanup-Image /restorehealth and wait for it to complete.

6. Once the command completes, you can restart your computer and check if the Windows key starts working properly or not.
Method 8: Update Video and Sound drivers
If you are using outdated video and sound card drivers on your system, then they might be the reason why your Windows key is not working, or the start menu may get frozen. Sometimes, updating your sound and video card driver can help you resolve the issue.
1. Click on the Windows icon in your taskbar and search device manager.
2. Open the Device Manager from the search results.

3. Double-click on the Sound, video, and game controller.
4. Now, make a right-click on your Audio Driver and select Update driver.

5. Finally, click on Search automatically for drivers. Your system will automatically update your sound driver. However, you also have the option of manually updating your sound driver, but it may be time-consuming for some users.

Also Read: How to Backup and Restore Device Drivers in Windows 10
Method 9: Check for new Windows updates
You may be using an outdated Windows version on your system, and it might be the reason why your Windows key is not functioning properly. Therefore, make sure you keep your Windows 10 up to date. Windows 10 automatically download the updates, but sometimes due to unknown issues, you may have to download the updates manually. Follow these steps to check for available Windows updates for your system:
1. Go to your search bar in the taskbar and go to the Settings app.
2. Click on Update and Security.
3. Under Windows Update, click on check for updates.
4. Finally, your system will automatically show you the available updates. You can click on Install Now to download the available updates if any.

After updating your Windows 10, you can check whether this method could fix the start menu not working in Windows 10.
Method 10: Restart Windows Explorer
Some users could fix the Windows key not working in Windows 10 by restarting the Windows explorer. When you restart Windows Explorer, you will also force the start menu to restart as well.
1. Press Ctrl + Alt + Del from your keyboard and select task manager.
2. Click on the Process tab.
3. Scroll down and locate Windows explorer.
4. Finally, make a right-click and select Restart.

After the Windows explorer restarts, you can check whether your start menu is working properly or not.
Method 11: Create a New User Account
If you are still unable to access Windows 10 Start Menu, you can create a new user account. Many users were able to fix the Windows key by creating a new user account. Follow these steps to create a new user account on your system.
1. Click on your Windows icon and search settings in the search bar. Alternatively, you can click on Windows + I keys from your on-screen keyboard to open settings.
2. Click on the Accounts section.

3. Now, click on family and other users from the panel on the left.
4. Select ‘Add someone else to this PC.’

5. Now, a Microsoft account window will pop up, where you have to click on the ‘I don’t have this person’s sign-in information’ We will be creating a new user account without a Microsoft account. However, you have the option of creating a new user with a new Microsoft account.

6. Click on Add a user without a Microsoft account.

7. Finally, you can create a username and set a password for your new account. Click on next to save the changes and create the account.
That’s it; your Windows key will start functioning properly with your new user account.
Also Read: How to Fix Windows 10 running slow after update
Method 12: Run a Malware Scan
Sometimes, the malware or virus on your system may prevent the windows key from functioning properly. Therefore, you can run a malware or virus scan on your system. You can use the free version of Malwarebytes, which is good antivirus software. You have the option of using any other antivirus app of your choice. Running a malware scan will remove harmful third-party apps or software that were causing the Windows key from losing its functionality.
1. Download and install Malwarebytes on your system.
2. Launch the software and click on the Scan option.

3. Again, click on the start scan button.
4. Finally, wait for Malwarebytes to finish scanning your device for any virus or harmful apps. If you find any harmful files after the scan, you can easily remove them from your system.
Method 13: Reinstall Windows 10
If none of the above methods works, you can reinstall Windows 10 from scratch. However, make sure you have the Windows 10 product key handy. Moreover, having a fast USB thumb drive or external SSD is a plus for installing Windows 10 on your system.
Recommended: Fix Keyboard Not Typing in Windows 10 Issue
We hope that this guide was helpful and you were able to fix Windows 10 start button not working issue. If you still have any queries regarding this article, then feel free to ask them in the comments section.