В современных версиях Windows уже есть встроенный SSH сервер на базе пакета OpenSSH. В этой статье мы покажем, как установить и настроить OpenSSH сервер в Windows 10/11 и Windows Server 2022/2019 и подключиться к нему удаленно по защищенному SSH протоколу (как к Linux).
Содержание:
- Установка сервера OpenSSH в Windows
- Настройка SSH сервера в Windows
- Sshd_config: Конфигурационный файл сервера OpenSSH
- Подключение по SSH к Windows компьютеру
- Логи SSH подключений в Windows
Установка сервера OpenSSH в Windows
Пакет OpenSSH Server включен в современные версии Windows 10 (начиная с 1803), Windows 11 и Windows Server 2022/2019 в виде Feature on Demand (FoD). Для установки сервера OpenSSH достаточно выполнить PowerShell команду:
Get-WindowsCapability -Online | Where-Object Name -like ‘OpenSSH.Server*’ | Add-WindowsCapability –Online
Или при помощи команды DISM:
dism /Online /Add-Capability /CapabilityName:OpenSSH.Server~~~~0.0.1.0
Если ваш компьютер подключен к интернету, пакет OpenSSH.Server будет скачан и установлен в Windows.
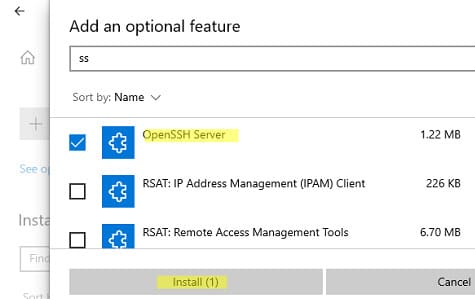
Также вы можете установить сервер OpenSSH в Windows через современную панель Параметры (Settings -> Apps and features -> Optional features -> Add a feature, Приложения -> Управление дополнительными компонентами -> Добавить компонент. Найдите в списке OpenSSH Server и нажмите кнопку Install).
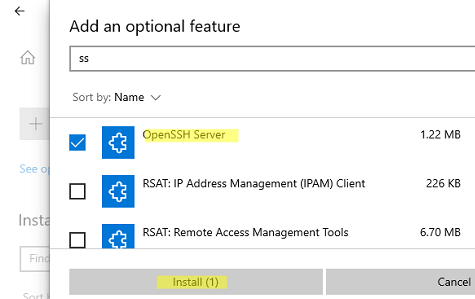
На изолированных от интернета компьютерах вы можете установить компонент с ISO образа Features On Demand (доступен в личном кабинете на сайте Microsoft: MSDN или my.visualstudio.com). Скачайте диск, извлеките его содержимое в папку c:\FOD (достаточно распаковать извлечь файл
OpenSSH-Server-Package~31bf3856ad364e35~amd64~~.cab
), выполните установку из локального репозитория:
Add-WindowsCapability -Name OpenSSH.Server~~~~0.0.1.0 -Online -Source c:\FOD
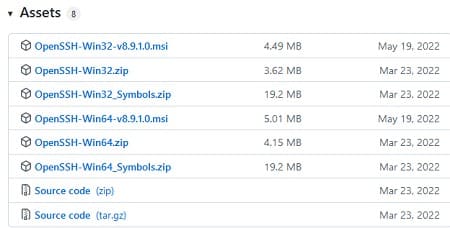
Также доступен MSI установщик OpenSSH для Windows в официальном репозитории Microsoft на GitHub (https://github.com/PowerShell/Win32-OpenSSH/releases/). Например, для Windows 10 x64 нужно скачать и установить пакет OpenSSH-Win64-v8.9.1.0.msi. Следующая PowerShell команда скачает MSI файл и установит клиент и сервер OpenSSH:
Invoke-WebRequest https://github.com/PowerShell/Win32-OpenSSH/releases/download/v8.9.1.0p1-Beta/OpenSSH-Win64-v8.9.1.0.msi -OutFile $HOME\Downloads\OpenSSH-Win64-v8.9.1.0.msi -UseBasicParsing
msiexec /i c:\users\root\downloads\OpenSSH-Win64-v8.9.1.0.msi
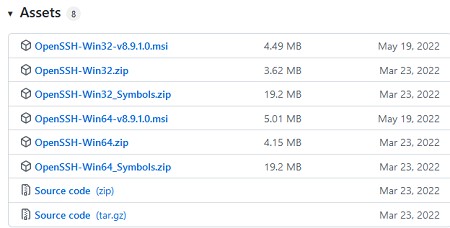
Также вы можете вручную установить OpenSSH сервер в предыдущих версиях Windows (Windows 8.1, Windows Server 2016/2012R2). Пример установки Win32-OpenSSH есть в статье “Настройка SFTP сервера (SSH FTP) в Windows”.
Чтобы проверить, что OpenSSH сервер установлен, выполните:
Get-WindowsCapability -Online | ? Name -like 'OpenSSH.Ser*'
State : Installed

Настройка SSH сервера в Windows
После установки сервера OpenSSH в Windows добавляются две службы:
- ssh-agent (OpenSSH Authentication Agent) – можно использовать для управления закрытыми ключами если вы настроили SSH аутентификацию по ключам;
- sshd (OpenSSH SSH Server) – собственно сам SSH сервер.
Вам нужно изменить тип запуска службы sshd на автоматический и запустить службу с помощью PowerShell:
Set-Service -Name sshd -StartupType 'Automatic'
Start-Service sshd

С помощью nestat убедитесь, что теперь в системе запущен SSH сервер и ждет подключений на порту TCP:22 :
netstat -na| find ":22"

Проверьте, что включено правило брандмауэра (Windows Defender Firewall), разрешающее входящие подключения к Windows по порту TCP/22.
Get-NetFirewallRule -Name *OpenSSH-Server* |select Name, DisplayName, Description, Enabled
Name DisplayName Description Enabled
---- ----------- ----------- -------
OpenSSH-Server-In-TCP OpenSSH SSH Server (sshd) Inbound rule for OpenSSH SSH Server (sshd) True

Если правило отключено (состоянии Enabled=False) или отсутствует, вы можете создать новое входящее правило командой New-NetFirewallRule:
New-NetFirewallRule -Name sshd -DisplayName 'OpenSSH Server (sshd)' -Enabled True -Direction Inbound -Protocol TCP -Action Allow -LocalPort 22
Рассмотрим, где храниться основные компоненты OpenSSH:
- Исполняемые файлы OpenSSH Server находятся в каталоге
C:\Windows\System32\OpenSSH\
(sshd.exe, ssh.exe, ssh-keygen.exe, sftp.exe и т.д.) - Конфигурационный файл sshd_config (создается после первого запуска службы):
C:\ProgramData\ssh - Файлы authorized_keys и ssh ключи можно хранить в профиле пользователей:
%USERPROFILE%\.ssh\
Sshd_config: Конфигурационный файл сервера OpenSSH
Настройки сервере OpenSSH хранятся в конфигурационном файле %programdata%\ssh\sshd_config. Это обычный текстовый файл с набором директив. Для редактирования можно использовать любой текстовый редактор (я предпочитаю notepad++). Можно открыть с помощью обычного блокнота:
start-process notepad C:\Programdata\ssh\sshd_config
Например, чтобы запретить SSH подключение для определенного доменного пользователя (и всех пользователей указанного домена), добавьте в конце файле директивы:
DenyUsers winitpro\[email protected]
DenyUsers corp\*
Чтобы разрешить подключение только для определенной доменной группы:
AllowGroups winitpro\sshadmins
Либо можете разрешить доступ для локальной группы:
AllowGroups sshadmins
По умолчанию могут к openssh могут подключаться все пользователи Windows. Директивы обрабатываются в следующем порядке: DenyUsers, AllowUsers, DenyGroups,AllowGroups.
Можно запретить вход под учетными записями с правами администратора, в этом случае для выполнения привилегированных действий в SSH сессии нужно делать runas.
DenyGroups Administrators
Следующие директивы разрешают SSH доступ по ключам (SSH аутентификации в Windows с помощью ключей описана в отдельной статье) и по паролю:
PubkeyAuthentication yes
PasswordAuthentication yes
Вы можете изменить стандартный SSH порт TCP/22, на котором принимает подключения OpenSSH в конфигурационном файле sshd_config в директиве Port.
После любых изменений в конфигурационном файле sshd_config нужно перезапускать службу sshd:
restart-service sshd
Подключение по SSH к Windows компьютеру
Теперь вы можете попробовать подключиться к своей Windows 10 через SSH клиент (в этом примере я использую putty).
Вы можете использовать встроенный SSH клиентом Windows для подключения к удаленному хосту. Для этого нужно в командной строке выполнить команду:
ssh [email protected]
В этом примере
alexbel
– имя пользователя на удаленном Windows компьютере, и 192.168.31.102 – IP адрес или DNS имя компьютера.
Обратите внимание что можно использовать следующие форматы имен пользователей Windows при подключении через SSH:
-
alex@server1
– локальный пользователь Windows -
[email protected]@server1
–пользователь Active Directory (в виде UPN) или аккаунт Microsoft/ Azure(Microsoft 365) -
winitpro\alex@server1
– NetBIOS формат имени
В домене Active Directory можно использовать Kerberos аутентификацию в SSH. Для этого в sshd_config нужно включить параметр:
GSSAPIAuthentication yes
После этого можно прозрачно подключать к SSH сервер с Windows компьютера в домене из сессии доменного подключается. В этом случае пароль пользователя не указывается и выполняется SSO аутентификация через Kerberos:
ssh -K server1
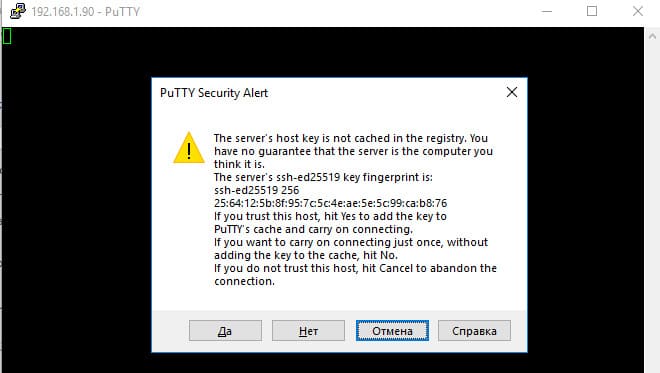
При первом подключении появится стандартный запрос на добавление узла в список известных SSH хостов.
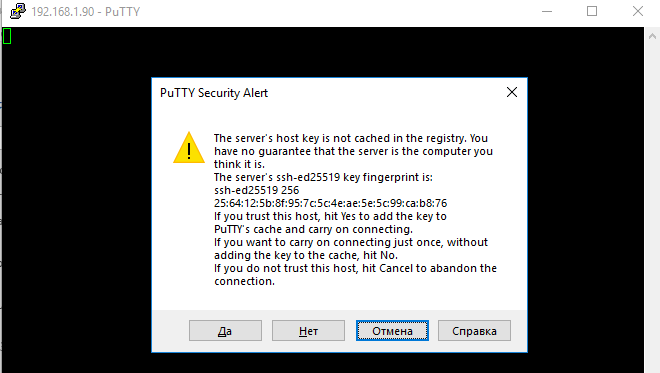
Нажимаем Да, и в открывшееся окне авторизуемся под пользователем Windows.
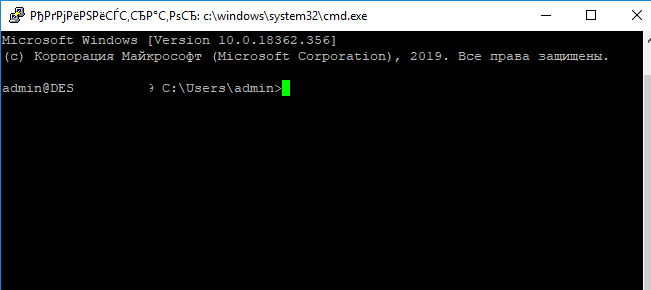
При успешном подключении запускается командная оболочка cmd.exe со строкой-приглашением.
admin@win10tst C:\Users\admin>
В командной строке вы можете выполнять различные команды, запускать скрипты и программы.
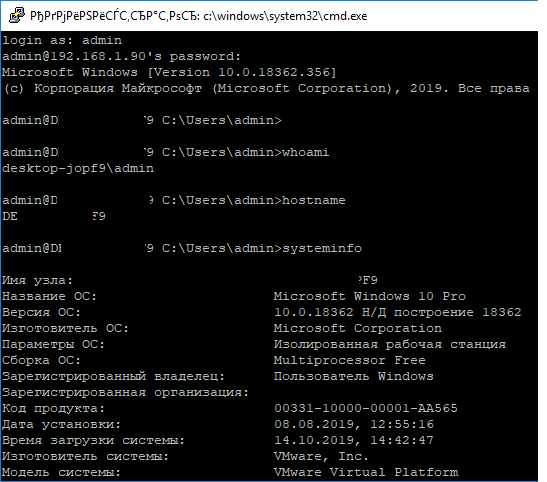
Я предпочитаю работать в командной строке PowerShell. Чтобы запустить интерпретатор PowerShell, выполните:
powershell.exe
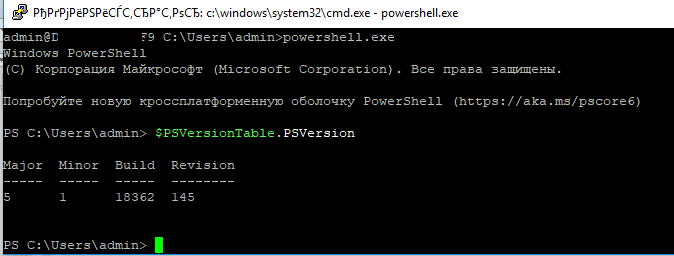
Чтобы изменить командную оболочку (Shell) по умолчанию в OpenSSH с cmd.exe на PowerShell, внесите изменение в реестр такой командой:
New-ItemProperty -Path "HKLM:\SOFTWARE\OpenSSH" -Name DefaultShell -Value "C:\Windows\System32\WindowsPowerShell\v1.0\powershell.exe" -PropertyType String –Force

Осталось перезапустить SSH подключение и убедиться, что при подключении используется командный интерпретатор PowerShell (об этом свидетельствует приглашение
PS C:\Users\admin>
).

В SSH сессии запустилась командная строка PowerShell, в которой работают привычные функции: авто дополнение, раскраска модулем PSReadLine, история команд и т.д. Если текущий пользователь входит в группу локальных администраторов, то все команды в его сессии выполняются с повышенными правами даже при включенном UAC.
Логи SSH подключений в Windows
В Windows логи подключений к SSH серверу по-умолчанию пишутся не в текстовые файлы, а в отдельный журнал событий через Event Tracing for Windows (ETW). Откройте консоль Event Viewer (
eventvwr.msc
>) и перейдите в раздел Application and services logs -> OpenSSH -> Operational.
При успешном подключении с помощью к SSH серверу с помощью пароля в журнале появится событие:
EventID: 4
sshd: Accepted password for root from 192.168.31.53 port 65479 ssh2
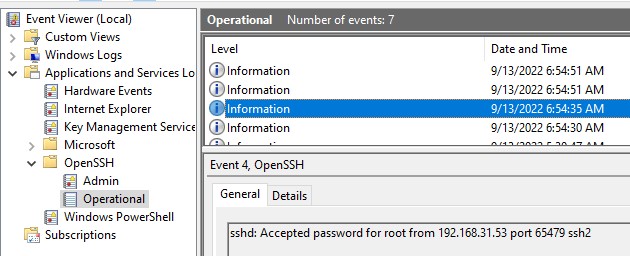
Если была выполнена аутентификация с помощью SSH ключа, событие будет выглядеть так:
sshd: Accepted publickey for locadm from 192.168.31.53 port 55772 ssh2: ED25519 SHA256:FEHDEC/J72Fb2zC2oJNb45678967kghH43h3bBl31ldPs
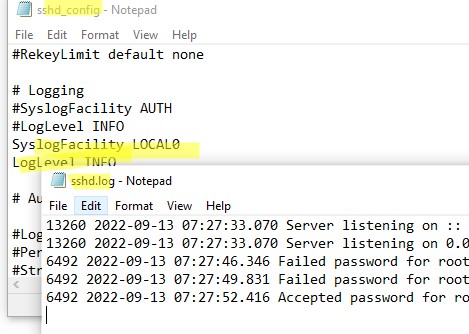
Если вы хотите, чтобы логи писались в локальный текстовый файл, нужно в файле sshd_config включить параметры:
SyslogFacility LOCAL0
LogLevel INFO
Перезапустите службу sshd и провеьте, что теперь логи SSH сервера пишутся в файл C:\ProgramData\ssh\logs\sshd.log
В этой статье рассмотрим, как установить и настроить встроенный SSH сервер на базе OpenSSH в Windows 10/11 и Windows Server 2022/2019. Вы узнаете, как подключиться к системе по защищенному SSH протоколу, как это делается в Linux.
Приобрести оригинальные ключи активации Windows Server можно у нас в каталоге от 1190 ₽
Установка OpenSSH сервера в Windows
OpenSSH сервер включен в современные версии Windows 10 (начиная с 1803), Windows 11 и Windows Server 2022/2019 как Feature on Demand (FoD). Установить его можно несколькими способами.
1. Установка через PowerShell:
Get-WindowsCapability -Online | Where-Object Name -like 'OpenSSH.Server*' | Add-WindowsCapability -Online
2. Установка через DISM:
dism /Online /Add-Capability /CapabilityName:OpenSSH.Server~~~~0.0.1.0
3. Через панель «Параметры»:
— Перейдите в Настройки -> Приложения -> Дополнительные компоненты -> Добавить компонент.
— Найдите OpenSSH Server и нажмите Установить.
4. Установка с помощью MSI пакета:
Вы можете установить OpenSSH с помощью MSI установщика, доступного на GitHub:
Invoke-WebRequest https://github.com/PowerShell/Win32-OpenSSH/releases/download/v8.9.1.0p1-Beta/OpenSSH-Win64-v8.9.1.0.msi -OutFile $HOME\Downloads\OpenSSH-Win64-v8.9.1.0.msi -UseBasicParsing
msiexec /i c:\users\root\downloads\OpenSSH-Win64-v8.9.1.0.msi
Чтобы проверить, что OpenSSH сервер установлен, выполните:
Get-WindowsCapability -Online | ? Name -like 'OpenSSH.Ser*'
State : Installed

Настройка SSH сервера в Windows
После установки OpenSSH на Windows появляются две службы:
— ssh-agent (для управления ключами если вы настроили SSH аутентификацию по ключам)
— sshd (собственно сам SSH сервер)
1. Настройка автозапуска SSH службы:
Выполните команду PowerShell для включения автозапуска SSH сервера:
Set-Service -Name sshd -StartupType 'Automatic'
Start-Service sshd

2. Проверка порта SSH:
Убедитесь, что сервер слушает на порту TCP:22:
netstat -na | find ":22"

3. Настройка брандмауэра:
Убедитесь, что брандмауэр разрешает подключения по SSH:
Get-NetFirewallRule -Name *OpenSSH-Server* |select Name, DisplayName, Description, Enabled
Если правило отключено, включите его:
New-NetFirewallRule -Name sshd -DisplayName 'OpenSSH Server (sshd)' -Enabled True -Direction Inbound -Protocol TCP -Action Allow -LocalPort 22

Если правило отключено (состоянии Enabled=False) или отсутствует, вы можете создать новое входящее правило командой New-NetFirewallRule:
New-NetFirewallRule -Name sshd -DisplayName 'OpenSSH Server (sshd)' -Enabled True -Direction Inbound -Protocol TCP -Action Allow -LocalPort 22
Конфигурация файла sshd_config
Конфигурационный файл OpenSSH сервера находится по пути C:\ProgramData\ssh\sshd_config. Вы можете отредактировать его через любой текстовый редактор. Например, откройте файл с помощью блокнота:
start-process notepad C:\ProgramData\ssh\sshd_config
1. Запрет подключения для пользователей/групп:
— Запретить подключение для определенного пользователя:
DenyUsers softcomputers\admin@192.168.1.10

DenyUsers corp\*
— Разрешить доступ только для локальной группы:
AllowGroups sshadmins
2. Изменение порта SSH:
Для смены порта измените значение директивы Port.
После изменений не забудьте перезапустить службу:
Restart-Service sshd
3. Чтобы разрешить подключение только для определенной доменной группы:
AllowGroups softcomputers\sshadmins
По умолчанию могут к openssh могут подключаться все пользователи Windows. Директивы обрабатываются в следующем порядке: DenyUsers, AllowUsers, DenyGroups,AllowGroups.
4. Можно запретить вход под учетными записями с правами администратора, в этом случае для выполнения привилегированных действий в SSH сессии нужно делать runas.
DenyGroups Administrators
Следующие директивы разрешают SSH доступ по ключам и по паролю
PubkeyAuthentication yes

PasswordAuthentication yes
5. Вы можете изменить стандартный SSH порт TCP/22, на котором принимает подключения OpenSSH в конфигурационном файле sshd_config в директиве Port.
6. После любых изменений в конфигурационном файле sshd_config нужно перезапускать службу sshd:
restart-service sshd
Подключение по SSH к Windows компьютеру
Для подключения к Windows через SSH можно использовать любые SSH клиенты (например, PuTTY или встроенный клиент Windows). Пример команды для подключения:
ssh alexbel@192.168.31.102
В этом примере alexbel – имя пользователя на удаленном Windows компьютере, и 192.168.31.102 – IP адрес или DNS имя компьютера.
Обратите внимание что можно использовать следующие форматы имен пользователей Windows при подключении через SSH:
alex@server1 – локальный пользователь Windows
alex@softcomputers.org@server1 – пользователь Active Directory (в виде UPN) или аккаунт Microsoft/ Azure(Microsoft 365)
softcomputers\alex@server1 – NetBIOS формат имени
Если используется аутентификация по Kerberos в домене, включите ее в конфигурационном файле:
GSSAPIAuthentication yes
После этого можно прозрачно подключать к SSH серверу с Windows компьютера в домене из сессии доменного подключения. В этом случае пароль пользователя не указывается и выполняется SSO аутентификация через Kerberos:
ssh -K server1
При первом подключении появится стандартный запрос на добавление узла в список известных SSH хостов.
Нажимаем — «Да»
В открывшееся окне авторизуемся под пользователем Windows.
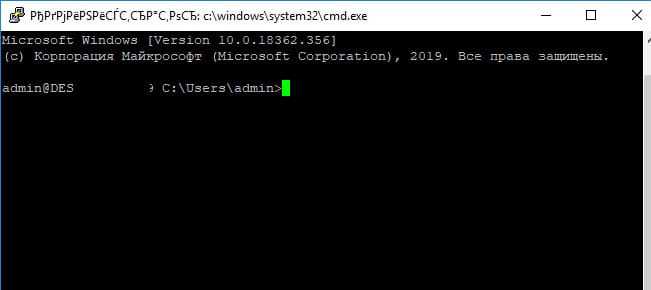
При успешном подключении запускается командная оболочка cmd.exe со строкой-приглашением.
admin@win10tst C:\Users\admin>
В командной строке вы можете выполнять различные команды, запускать скрипты и приложения.

Чтобы запустить интерпретатор PowerShell, выполните:
powershell.exe
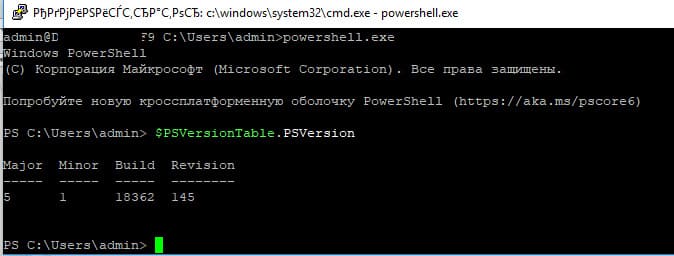
Чтобы изменить командную оболочку (Shell) по умолчанию в OpenSSH с cmd.exe на PowerShell, внесите изменение в реестр следующей командой:
New-ItemProperty -Path "HKLM:\SOFTWARE\OpenSSH" -Name DefaultShell -Value "C:\Windows\System32\WindowsPowerShell\v1.0\powershell.exe" -PropertyType String –Force

Осталось перезапустить SSH подключение и убедиться, что при подключении используется командный интерпретатор PowerShell
(об этом свидетельствует приглашение PS C:\Users\admin>).

В SSH сессии запустилась командная строка PowerShell, в которой работают привычные функции: авто дополнение, раскраска модулем PSReadLine, история команд и т.д. Если текущий пользователь входит в группу локальных администраторов, то все команды в его сессии выполняются с повышенными правами даже при включенном UAC.
Логи SSH подключений в Windows
Логи SSH подключений пишутся в журнал событий Windows через Event Tracing for Windows (ETW). Чтобы просмотреть логи:
1. Откройте Event Viewer (eventvwr.msc).
2. Перейдите в Application and Services Logs -> OpenSSH -> Operational.
Пример события успешного подключения по паролю:
EventID: 4
sshd: Accepted password for user1 from 192.168.31.102 port 55432 ssh2
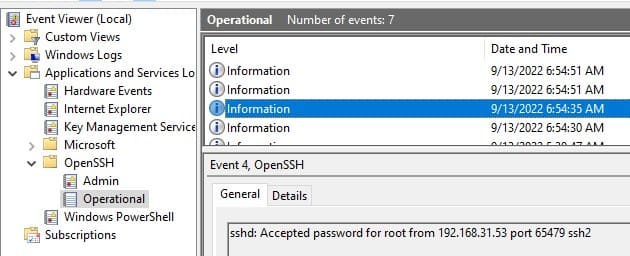
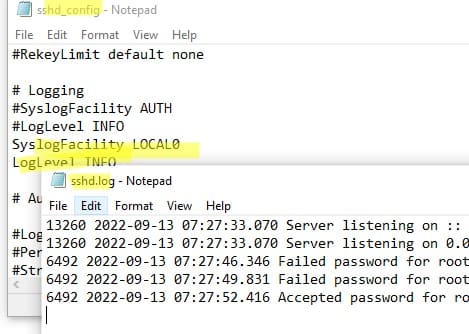
Если необходимо, вы можете настроить запись логов в текстовый файл. Для этого добавьте в файл sshd_config директивы:
SyslogFacility LOCAL0
LogLevel INFO
Перезапустите службу sshd для применения изменений и проверьте, что теперь логи SSH сервера пишутся в файл C:\ProgramData\ssh\logs\sshd.log
Теперь вы знаете, как настроить и использовать OpenSSH сервер на Windows для удаленного подключения по защищенному протоколу SSH.
The latest builds of Windows 10 and Windows 11 include a build-in SSH server and client that are based on OpenSSH.
This means now you can remotely connect to Windows 10/11 or Windows Server 2019 using any SSH client, like Linux distros.
Let’s see how to configure OpenSSH on Windows 10 and Windows 11, and connect to it using Putty or any other SSH client.
OpenSSH is an open-source, cross-platform version of Secure Shell (SSH) that is used by Linux users for a long time.
This project is currently ported to Windows and can be used as an SSH server on almost any version of Windows.
In the latest versions of Windows Server 2022/2019 and Windows 11, OpenSSH is built-in to the operating system image.
How to install SSH Server on Windows 10?
Make sure our build of Windows 10 is 1809 or newer. The easiest way to do this is by running the command:
Note. If you have an older Windows 10 build installed, you can update it through Windows Update or using an ISO image with a newer version of Windows 10 (you can create an image using the Media Creation Tool). If you don’t want to update your Windows 10 build, you can manually install the Win32-OpenSSH port for Windows with GitHub.
Enable feature
We can enable OpenSSH server in Windows 10 through the graphical Settings panel:
-
Go to the
Settings>Apps>Apps and features>Optional features(or run thecommand ms-settings:appsfeatures) -
Click Add a feature, select
OpenSSH Server(OpenSSH-based secure shell (SSH) server, for secure key management and access from remote machines), and clickInstall
Install using PowerShell
We can also install sshd server using PowerShell:
Add-WindowsCapability -Online -Name OpenSSH.Server*
Install using DISM
Or we can also install sshd server using DISM:
dism /Online /Add-Capability /CapabilityName:OpenSSH.Server~~~~0.0.1.0
If you want to make sure the OpenSSH server is installed, run the following PS command:
Get-WindowsCapability -Online | ? Name -like 'OpenSSH.Server*'
How to uninstall SSH Server?
Use the following PowerShell command to uninstall the SSH server:
Remove-WindowsCapability -Online -Name OpenSSH.Server~~~~0.0.1.0
How to Install SSH Server on Windows 11?
Also, you can add the OpenSSH Server on Windows 11.
- Go to Settings > Apps > Optional features;
- Click View Features;
Select OpenSSH Server from the list and click Next > Install;
Wait for the installation to complete.
The OpenSSH binaries are located in the C:\Windows\System32\OpenSSH\ folder.
Configuring SSH Service on Windows 10 and 11
Check the status of ssh-agent and sshd services using the PowerShell command Get-Service:
As we can see, both services are in a Stopped state and not added to the automatic startup list. To start services and configure autostart for them, run the following commands:
Start-Service sshd
Set-Service -Name sshd -StartupType 'Automatic'

Start-Service 'ssh-agent'
Set-Service -Name 'ssh-agent' -StartupType 'Automatic'
We also need to allow incoming connections to TCP port 22 in the Windows Defender Firewall. We can open the port using netsh:
netsh advfirewall firewall add rule name=”SSHD service” dir=in action=allow protocol=TCP localport=22
Or we can add a firewall rule to allow SSH traffic using PowerShell:
New-NetFirewallRule -Name sshd -DisplayName 'OpenSSH Server (sshd)' -Enabled True -Direction Inbound -Protocol TCP -Action Allow -LocalPort 22
Now we can connect to Windows 10 using any SSH client. To connect from Linux, use the command:
ssh -p 22 admin@192.168.1.90
Here, the admin is a local Windows user under which we want to connect. 192.168.1.90 is an IP address of your Windows 10 computer.
After that, a new Windows command prompt window will open in SSH session.
Hint. To run the PowerShell.exe cli instead of cmd.exe shell when logging in via SSH on Windows 10, we need to run the following command in Windows 10 (under admin account):
New-ItemProperty -Path "HKLM:\SOFTWARE\OpenSSH" -Name DefaultShell -Value "C:\Windows\System32\WindowsPowerShell\v1.0\powershell.exe" -PropertyType String -Force
Now, we change the default OpenSSH shell. From here, when connecting to Windows via SSH, you will immediately see PowerShell prompt instead of cmd.exe.
If you want to use key-based ssh authentication instead of password authentication, you need to generate a key using ssh-keygen on your client.
Then, the contents of the id_rsa.pub file must be copied to the c:\users\admin\.ssh\authorized_keys file in Windows 10.
After that, you can connect from your Linux client to Windows 10 without a password. Use the command:
ssh -l admin@192.168.1.90
Configuration
We can configure various OpenSSH server settings in Windows using the %programdata%\ssh\sshd_config configuration file.
For example, we can disable password authentication and leave only key-based auth with:
PubkeyAuthentication yes
PasswordAuthentication no
Here we can also specify a new TCP port (instead of the default TCP 22 port) on which the SSHD will accept connections. For example:
Using the directives AllowGroups, AllowUsers, DenyGroups, DenyUsers, you can specify users and groups who are allowed or denied to connect to Windows via SSH:
DenyUsers theitbros\jbrown@192.168.1.15— blocks connections to username jbrown from 192.168.1.15 hostsжDenyUsers theitbros\*— prevent all users from theitbros domain to connect host using sshжAllowGroups theitbros\ssh_allow— only allow users from theitbtos\ssh_allow connect hostю- The allow and deny rules of sshd are processed in the following order:
DenyUsers,AllowUsers,DenyGroups, andAllowGroups.
After making changes to the sshd_config file, you need to restart the sshd service:
Get-Service sshd | Restart-Service –force
In previous versions of OpenSSH on Windows, all sshd service logs were written to the text file C:\ProgramData\ssh\logs\sshd.log by default.
On Windows 11, SSH logs can be viewed using the Event Viewer console (eventvwr.msc). All SSH events are available in a separate section Application and Services Logs > OpenSSH > Operational.
For example, the screenshot shows an example of an event with a successful connection to the computer via SSH. You can see the ssh client’s IP address (hostname) and the username used to connect.
sshd: Accepted password for jbrown from 192.168.14.14. port 49833 ssh2
Клиент OpenSSH и сервер OpenSSH являются отдельными устанавливаемыми компонентами в Windows Server 2019 и Windows 10 1809. Чтобы установить сервер, открываем последовательно Параметры → Приложения → Приложения и возможности → Дополнительные возможности → Добавить компонент. Находим в списке компонент «Cервер OpenSSH» и нажимаем кнопку «Установить».

Установка сервера OpenSSH создаст и включит правило брандмауэра, которое разрешает входящий трафик SSH через порт 22.
Запускаем службу, при необходимости в Свойствах устанавливаем Автозапуск:

Проверяем подключение по ssh с другого компьютера:
$ ssh Evgeniy@192.168.110.2
The authenticity of host '192.168.110.2 (192.168.110.2)' can't be established.
ECDSA key fingerprint is SHA256:SUosMa1VPeeaxU0Uyo5nG0EKkVEifMWYshHqRGIiz7I.
Are you sure you want to continue connecting (yes/no)? yes
Warning: Permanently added '192.168.110.2' (ECDSA) to the list of known hosts.
Evgeniy@192.168.110.2's password: пароль

По умолчанию для сервера OpenSSH в ОС Windows используется командная оболочка Windows.
Настройка сервера OpenSSH
Компоненты OpenSSH хранятся в следующих каталогах:
- Исполняемые файлы OpenSSH:
C:\Windows\System32\OpenSSH\ - Конфигурационный файл
sshd_config:C:\ProgramData\ssh\ - Журнал OpenSSH:
C:\ProgramData\ssh\logs\sshd.log - Файл
authorized_keysи ключи:~\.ssh\ - При установке в системе создается новый пользователь
sshd
Следующие директивы в sshd_config разрешают доступ по ключам и по паролю:
# разрешает доступ по ключам
PubkeyAuthentication yes
# разрешает доступ по паролю
PasswordAuthentication yes
# доступ с пустым паролем запрещен
PermitEmptyPasswords no
Можно изменить порт, на котором принимает подключения OpenSSH сервер:
Port 2222
После любых изменений в конфигурационном файле нужно перезапустить службу. Если был изменен порт — нужно еще изменить правило брандмауэра.
Установка с использованием PowerShell
Запускаем PowerShell от имени администратора. Проверяем, что OpenSSH сервер и клиент доступны для установки:
> Get-WindowsCapability -Online | ? Name -like 'OpenSSH*'

Name  : OpenSSH.Client~~~~0.0.1.0
State : Installed

Name  : OpenSSH.Server~~~~0.0.1.0
State : NotPresent
Клиент уже был установлен ранее, а сервер — еще нет. Запускаем установку сервера:
> Add-WindowsCapability -Online -Name OpenSSH.Server~~~~0.0.1.0
Если клиент еще не установлен, установить его можно так:
> Add-WindowsCapability -Online -Name OpenSSH.Client~~~~0.0.1.0
Запустить, остановить или перезапустить службу:
> Start-Service sshd
> Stop-Service sshd
> Restart-Service sshd
Изменить тип запуска службы на Автоматический:
> Set-Service -Name sshd -StartupType 'Automatic'
Для удаления OpenSSH сервера и клиента:
> Remove-WindowsCapability -Online -Name OpenSSH.Server~~~~0.0.1.0
> Remove-WindowsCapability -Online -Name OpenSSH.Client~~~~0.0.1.0
Поиск:
CLI • SSH • Windows • Команда • Конфигурация • Настройка • Сервер
Каталог оборудования
Lorem ipsum dolor sit amet, consectetur adipiscing elit, sed do eiusmod tempor incididunt ut labore et dolore magna aliqua.
Производители
Lorem ipsum dolor sit amet, consectetur adipiscing elit, sed do eiusmod tempor incididunt ut labore et dolore magna aliqua.
Функциональные группы
Lorem ipsum dolor sit amet, consectetur adipiscing elit, sed do eiusmod tempor incididunt ut labore et dolore magna aliqua.
Continuing from the last post, we’ll look at how to set up a built-in SSH server starting with Windows 10 and Windows Server 1709. This method allows Windows Server to connect remotely using SSH, just like a traditional Linux server. We will also look at how you can use Remote Desktop securely without modifying your firewall settings using SSH port tunneling.
Installing and configuring OpenSSH Server
You can install OpenSSH Server the same way you installed the SSH client in the previous article.
$OpenSSHServer = Get-WindowsCapability -Online | ? Name -like ‘OpenSSH.Server*’
Add-WindowsCapability -Online -Name $OpenSSHServer.Name
After installing the OpenSSH server program, start and stop the NT service once to create the necessary initial configuration files.
$SSHDaemonSvc = Get-Service -Name ‘sshd’
Start-Service -Name $SSHDaemonSvc.Name
Stop-Service -Name $SSHDaemonSvc.Name
Apply asymmetric key authentication
It is highly recommended that you use the public key authentication method and disable the password authentication method to prevent attacks through password assignment. To enable this authentication feature, start PowerShell as an administrator and open the file in the path below with notepad. (Or you can use another text editor of your choice.)
notepad.exe $env:PROGRAMDATA\ssh\sshd_config
For the following items, uncomment the items and apply the value as follows:
PubkeyAuthentication yesPasswordAuthentication noPermitEmptyPasswords no
Then choose your preferred method of managing SSH public keys. Starting with Windows Server 2019 (or 1809), there are two ways to describe SSH public keys. One of which is the traditional way of creating an authorized_keys file in the user’s home directory.
Using $HOME\.ssh\authorized_keys
To use this method, comment out the following block of code at the bottom of the configuration file:
Match Group administrators
  AuthorizedKeysFile
  __PROGRAMDATA__/ssh/administrators_authorized_keys
Then go to the user home directory you want to log in to and create a .ssh directory.
Create an authorized_keys file (without the extension) inside the newly created directory and open it with your favorite text editor.
$authorizedKeyFilePath = “$HOME\.ssh\authorized_keys”
New-Item $authorizedKeyFilePath
notepad.exe $authorizedKeyFilePath
Add the SSH public key value you are using here.
When you save the file, you must change the file permission settings as described in the section Setting File Permissions with Authentication Key Information. If this setting is missing, the SSH connection will fail.
Using administrators_authorized_keys
This is the default used by OpenSSH included in Windows Server 2019 (1809). Instead of registering a new SSH key for each user, you can manage your files in one place.
If you use this method, all public keys must be stored in the $env: PROGRAMDATA\ssh\administrators_authorized_keys file, except for non-administrative users (that is, users who do not belong to the Administrators group). If you try, this setting will be used instead of the setting in your home directory, so if there is no key here, the connection will fail.
The administrators_authorized_keys file does not exist by default and must be created.
$authorizedKeyFilePath = “$env:ProgramData\ssh\administrators_authorized_keys”
New-Item $authorizedKeyFilePath
notepad.exe $authorizedKeyFilePath
Add the SSH public key value you are using here.
When you save the file, you must change the file permission settings as described in the section Setting File Permissions with Authentication Key Information. If this setting is missing, the SSH connection will fail.
Setting File Permissions with Authentication Key Information
A common and very tough problem that you will face about using the OpenSSH server for Windows is this. SSH key file permission should have correct and limited file permission. Windows version of SSH also follows this rule, but especially in Windows, configuring file permission can be unintuitive.
Depending on the method you chose in the previous step, you must verify the path of the authorized_keys file or administrators_authorized_keys file and change the permissions so that only the system account can access it using the icacls.exe utility and the Get-Acl and Set-Acl commands.
$authorizedKeyFilePath = "..."
icacls.exe $authorizedKeyFilePath /remove “NT AUTHORITY\Authenticated Users”
icacls.exe $authorizedKeyFilePath /inheritance:r
Get-Acl “$env:ProgramData\ssh\ssh_host_dsa_key” | Set-Acl $authorizedKeyFilePath
Changing the SSH Default Shell
Basically, for compatibility reasons, the Windows operating system has provided a shell-based interpreter that recognizes DOS commands for a long time. But now, with more and more features than working with DOS commands, PowerShell is becoming a good alternative.
If necessary, you can specify that PowerShell as the default shell for SSH instead of the DOS interpreter. However, the settings here are specific to SSH sessions, not for the Remote Desktop or console session.
New-ItemProperty -Path "HKLM:\SOFTWARE\OpenSSH" -Name DefaultShell -Value "$env:WINDIR\System32\WindowsPowerShell\v1.0\powershell.exe" -PropertyType String -Force
Staring SSH Server
You are now ready to start your SSH server. The SSH server is set to manual run by default, so you can change the startup mode to automatic. Then starts the service.
$SSHDaemonSvc = Get-Service -Name ‘sshd’
Set-Service -Name $SSHDaemonSvc.Name -StartupType Automatic
Start-Service -Name $SSHDaemonSvc.Name
Congratulations! From now, you can connect to Windows with SSH-key authentication.
How to Secure Remote Desktops
Unlike Linux, Windows still runs much of the system on a graphical interface rather than on the command line. So if you try to do something with a terminal like this, you may not have much to do as you might expect.
Remote Desktop, however, is a well-known food for many hackers and script kiddies as is well known. You may encounter the dilemma of choosing between convenience and security.
Fortunately, SSH provides the concept of tunneling, supporting the ability to relay other network connections securely. Remote desktop connections can also be protected in this way so that you can use them with confidence.
Start by blocking the TCP 3389 and UDP 3389 ports. You can do this because you will use Remote Desktop only with SSH tunneling.
Set-NetFirewallRule -DisplayName “Remote Desktop - User Mode (UDP-In)” -Action Block
Set-NetFirewallRule -DisplayName “Remote Desktop - User Mode (TCP-In)” -Action Block
Next, you must change the registry flag value so that the remote desktop server can accept the connection.
Set-ItemProperty -Path ‘HKLM:\System\CurrentControlSet\Control\Terminal Server’ -Name “fDenyTSConnections” -Value 0
And the part that I’m going to explain right now is really cool. As you saw earlier, you will not be asked for your password when you connect to OpenSSH, so you can set up a randomly generated strong password each time you use it. It is very useful to have a simple script in the system directory that can do this.
Choose the type of script you want to create a file called ChangePassword.ps1. We will keep the file in the system directory for your convenience.
$change_pwd_script_path = “$env:WINDIR\ChangePassword.ps1”
Clear-Content $change_pwd_script_path -ErrorAction SilentlyContinue
notepad.exe $change_pwd_script_path
Set your desired password
Create the contents of the ChangePassword.ps1 file as follows:
$Password = Read-Host -Prompt "Provide your new account password" -AsSecureString
Set-LocalUser -Name "$env:UserName" -Password $Password
Clear-Variable "Password"
Write-Host "Detailed settings such as remote desktop settings, WinRM connection settings, and Windows Update can be controlled using the sconfig command."
This script allows you to enter your own password. However, unless you change the policy, you can only use passwords that pass the Windows Server enhanced default password rules. You must specify a password that must meet all of the following conditions.
- English capital letters (A through Z)
- Lowercase English letters (a through z)
- Arabic numerals (0 to 9)
- Special symbols (e.g.!, $, #,%)
Generate a new password every time
Create the contents of the ChangePassword.ps1 file as follows:
Add-Type -AssemblyName System.Web
$Password = [System.Web.Security.Membership]::GeneratePassword(30,10)
Set-LocalUser -Name "$env:UserName" -Password ($Password | ConvertTo-SecureString -AsPlainText -Force)
Write-Host "Your New Password is:`r`n`r`n$Password"
Write-Host "Detailed settings such as remote desktop settings, WinRM connection settings, and Windows Update can be controlled using the sconfig command."
Clear-Variable "Password"
This way, you can set a strong password every time. If you forget your password, you can rest assured that you can still use public key authentication as a secondary means of authentication.
Try logging in to Remote Desktop with Tunneling
Now enter the following command to run the above script. After that, just set the password as guided by the script and verify that the remote desktop connection is working.
To log in to the remote desktop, run SSH as follows:
ssh -L 3389:localhost:3389 <user_id>@<host_address>
The first 3389 is the port number on the server-side, and the second address is the port number you want to use locally. If you have changed the remote desktop’s port number from the registry to another number on the server, you can enter the changed port number instead of 3389.
If you try to connect to a remote desktop using only the <host_address> part as before, the firewall will block the connection as previously set up. So no one can access the remote desktop directly unless the user has registered a public key that matches the SSH secret key with that server.
Using secure file sending and receiving
Not surprisingly, it is possible to use SSH based SFTP. This feature can be used to securely handle large file transfers in place of the remote desktop’s folder sharing feature.
Any client that supports the SFTP feature, such as FileZilla, is compatible and has an management advantage, as there is no need to apply complex firewall open policies like traditional FTP.
Wrap-up
This walks you through all the new SSH features that have been added since Windows 10 1709. Both articles are available for Windows 10 and Windows Server 2019, so please take a moment to set them up for even more security.
Credits
The following articles helped me as I wrote this article.
- https://ilovepowershell.com/2018/05/28/awesome-and-simple-way-to-generate-random-passwords-with-powershell/
- https://stackoverflow.com/questions/16212816/setting-up-openssh-for-windows-using-public-key-authentication
