
How to Enable Smart Card Logon on Windows 10
Want to make logging into your Windows 10 computer easier and more secure? Enabling smart card logon could be the perfect solution! By following the steps below, you’ll be able to log in using a smart card, reducing the need for passwords and improving your security.
Setting up smart card logon on a Windows 10 device is a relatively simple process. The following steps will guide you through configuring your system to accept smart card credentials, ensuring that your login is more secure and efficient.
Step 1: Install the Smart Card Reader
First, connect your smart card reader to your computer.
Make sure that your smart card reader is properly installed by plugging it into a USB port. Windows 10 should automatically detect and install the necessary drivers. You might need to download specific drivers from the manufacturer’s website if automatic installation doesn’t work.
Step 2: Insert the Smart Card
Next, insert your smart card into the reader.
Ensure the smart card is inserted correctly according to the reader’s instructions. The card should have a chip facing the correct direction. Some readers have an LED indicator that lights up when the card is inserted correctly.
Step 3: Configure Smart Card Service
Go to the Windows Services to configure the Smart Card service.
Press Win + R, type services.msc, and press Enter. Locate the «Smart Card» service, right-click it, and select «Properties.» Set the «Startup type» to «Automatic» and then click the «Start» button if the service is not already running.
Step 4: Configure Group Policy
Now, configure the Group Policy to enable smart card logon.
Open the Group Policy Editor by pressing Win + R, typing gpedit.msc, and hitting Enter. Navigate to Computer Configuration > Administrative Templates > Windows Components > Smart Card. Enable the policy named «Allow Smart Card.» This ensures that your system will accept smart card logon.
Step 5: Add Smart Card Certificate to the User Account
Finally, add the smart card certificate to your user account.
Open the Control Panel, go to User Accounts, and find the option to manage your certificates. Import the certificate from your smart card into your user account. This certificate is needed to authenticate your smart card during logon.
Once you’ve completed these steps, you’ll be able to log in to your Windows 10 computer using your smart card. This method is not just more secure, but also convenient.
Tips for Enabling Smart Card Logon – Windows 10
- Ensure your smart card reader is compatible with Windows 10.
- Regularly update the drivers for your smart card reader.
- Keep your smart card in a safe place when not in use.
- Use a strong PIN for your smart card to enhance security.
- Check if your organization has specific policies regarding smart card use.
Frequently Asked Questions
Do I need special software for smart card logon?
Most smart card readers work with Windows 10 out of the box, but you might need specific drivers or software from the manufacturer.
Can I use any smart card for logon purposes?
The smart card must be compatible with Windows 10 and should contain the necessary certificates for authentication.
What happens if I lose my smart card?
If you lose your smart card, you should immediately report it and get a replacement. You might need to use alternative logon methods until you receive a new card.
Is smart card logon more secure than using a password?
Yes, smart card logon is generally more secure as it combines something you have (the card) with something you know (the PIN).
Can I enable smart card logon on multiple devices?
Yes, you can enable smart card logon on multiple devices, but each device needs to be configured separately.
Summary
- Install the Smart Card Reader.
- Insert the Smart Card.
- Configure Smart Card Service.
- Configure Group Policy.
- Add Smart Card Certificate to the User Account.
Conclusion
Setting up smart card logon on Windows 10 is a great way to enhance your computer’s security. By following the steps outlined above, you can make your logon process both secure and convenient. Remember, technology is here to make our lives easier, and smart cards are a perfect example of combining security with ease of use.
Make sure to follow the tips provided to maintain a secure environment, and don’t hesitate to reach out for support if you need it. Happy configuring!
Kermit Matthews is a freelance writer based in Philadelphia, Pennsylvania with more than a decade of experience writing technology guides. He has a Bachelor’s and Master’s degree in Computer Science and has spent much of his professional career in IT management.
He specializes in writing content about iPhones, Android devices, Microsoft Office, and many other popular applications and devices.
Read his full bio here.
Enabling smart card logon on Windows 10 is easier than it sounds. Essentially, you’ll need to tweak some security settings and install the right software. Start by making sure your computer can recognize smart cards and then configure the system to use them for logging in. With the right tools and settings, you’ll be logging in with a smart card in no time.
To enable smart card logon on Windows 10, you need to configure your system to authenticate users using smart cards. This involves setting up your computer to read smart cards and modifying the Group Policy settings to allow smart card logon.
Step 1: Install Smart Card Reader Software
First, install the necessary software for your smart card reader.
Most smart card readers come with a CD or instructions to download the driver from the manufacturer’s website. This software allows your computer to interact with the smart card reader and, by extension, the smart card itself.
Step 2: Connect the Smart Card Reader
Next, connect your smart card reader to your computer via a USB port.
Make sure it’s securely plugged in. Once connected, your computer should automatically recognize the device. If not, make sure the drivers are properly installed and try again.
Step 3: Access Group Policy Editor
Open the Group Policy Editor by typing “gpedit.msc” in the Run dialog box (accessed by pressing Windows + R).
The Group Policy Editor is a tool that lets you control various settings on your computer. You’ll use it to set up smart card logon.
Step 4: Configure Smart Card Logon
Navigate to Computer Configuration > Administrative Templates > Windows Components > Smart Card.
Here, you’ll enable policies that allow smart card logon. Look for options like “Allow Smart Card Logon” and enable them. This sets your computer to accept smart card logins.
Step 5: Test the Smart Card Logon
Finally, test your setup by inserting the smart card and logging into your Windows account.
Logging in with a smart card may require a PIN or passphrase. If everything is set up correctly, you should be able to access your account without typing a password.
After enabling smart card logon, you’ll experience enhanced security and convenience. Your computer will now prompt you for a smart card and PIN instead of a regular password, offering an added layer of protection against unauthorized access.
Tips for Enabling Smart Card Logon on Windows 10
- Make sure your smart card reader is compatible with Windows 10 to avoid any technical hiccups.
- Keep your smart card reader drivers updated for smooth operation.
- Regularly check Group Policy settings to ensure no configurations have changed inadvertently.
- Use a strong and unique PIN for your smart card to maximize security.
- Always safely remove your smart card after logging off to prevent unauthorized usage.
Frequently Asked Questions
What is a smart card logon?
A smart card logon is a secure method to access your computer using a physical card that contains encrypted login credentials.
Why should I use a smart card for logging in?
Smart cards offer enhanced security by requiring a physical card and PIN, making unauthorized access more difficult.
Do all computers support smart card logon?
Most modern computers support smart card logon, but you may need a compatible card reader and software.
Can I use any smart card reader?
Ensure the reader is compatible with your smart card and Windows 10 for best results.
What if my smart card isn’t recognized?
Check that your drivers are up to date, and the reader is correctly connected to your computer.
Summary
- Install smart card reader software.
- Connect the smart card reader.
- Access Group Policy Editor.
- Configure smart card logon.
- Test the smart card logon.
Conclusion
Enabling smart card logon on Windows 10 is a straightforward process that enhances security by adding a physical layer of authentication. As technology progresses, protecting sensitive information becomes increasingly important. Smart cards, with their secure credentials and unique passcodes, are like having a key to a high-tech lock. By following the steps outlined above, you’re taking an active role in safeguarding your digital life.
It’s crucial to keep your system in check. Regular updates, password changes, and smart card maintenance can help ensure that your security measures stay one step ahead of potential threats. If you’re serious about digital security, take the time to explore additional features that might come with your smart card software or consider consulting a professional for a security audit.
Whether you’re a business professional or a casual user, knowing how to enable smart card logon on Windows 10 can make a significant difference in your overall security posture. So, why wait? Take the first step today and integrate smart card logon into your daily routine. Your peace of mind is worth it.
Matt Jacobs has been working as an IT consultant for small businesses since receiving his Master’s degree in 2003. While he still does some consulting work, his primary focus now is on creating technology support content for SupportYourTech.com.
His work can be found on many websites and focuses on topics such as Microsoft Office, Apple devices, Android devices, Photoshop, and more.
Download Windows Speedup Tool to fix errors and make PC run faster
If you have configured your Windows system to allow only smart card logon, and you need to troubleshoot some Smart Card logon problems which your computer users may be facing, then you need to change this setting, and allow Password Logon, so that you can get in an troubleshoot the issue. Smart Cards are a portable, secure, and tamper-proof way to provide security solutions for tasks such as client authentication, logging on to domains, code signing, and securing e-mail. You can use smart cards to also log on to your Windows 11/10/8/7 computers.

In some scenarios, after installing or upgrading Windows, Smart Card Plug and Play detection may not work as expected, and a user or local administrator may need to find and resolve problems that prevent Smart Card Plug and Play detection on Windows from functioning correctly. In such conditions, we need to allow password logins too, by disabling the settings that are enforcing for Smart Card logon. In this tutorial, I’ll show you how this can be done.
- First of all log in to Windows in Safe mode, this can be achieved by pressing the F8 key while the computer is booting.
- From the options available, pick Safe mode with networking and hit Enter. Then log on to the computer by using administrative credentials.
- Press Windows Key + R combination, type Regedt32.exe in the Run dialog box, and hit Enter to open the Registry Editor.
- Navigate to the following key:
HKEY_LOCAL_MACHINE\Software\Microsoft\Windows\CurrentVersion\Policies\System
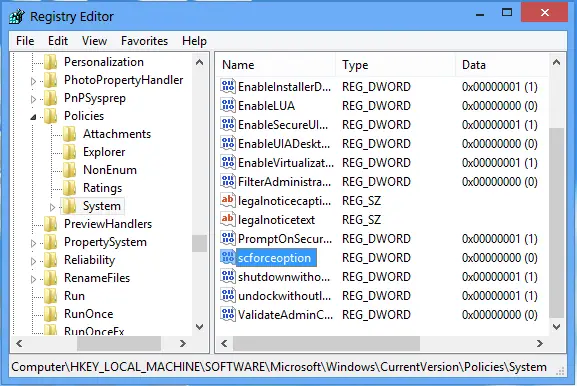
- In the right pane of this location, you’ll find a DWORD named scforceoption.
- Since your computer allows Smart Card logon only, the DWORD shows the Value data equals to 1.
- Now input 0 instead of 1 and click OK. Doing this, you will have now configured your computer to allow password login.
- Restart your computer and log in using your password.
Do note that this setting will be reset back to the default setting, which is Value ‘1’, after 90 minutes, when the next Group Policy refresh takes place. You, therefore, have a 90-minute window to troubleshoot your smart card problem.
After this period, you or your users cannot log in using their passwords. They will have to use their smart cards. This security measure ensures that users use their smart cards only.
How do I log into Windows with a smart card?
Show the small card to the machine or plug in the USB stick. Pick “Smart card” on the computer screen. The computer will know who you are from the card. Type in your PIN when asked. You should be able to login into the system right away.
What is a smart card reader in a laptop?
A smart card reader in a laptop is a small machine that can read a special card. It lets you use the card to do things on your computer, like logging in or making secure transactions. You will need to tap or scan the ID card, which authenticates for the user, and logs it into Windows PC.
An Electrical Engineer by profession, Kapil is a Microsoft MVP and a Windows Insider MVP. Please read the entire post & the comments first & create a system restore point before making any changes to your system.
Reader Interactions
Windows smart card logon is a relatively new concept for many users even though it was released quite some time back. So before we jump on to the topic of how one can use it on Windows, let’s dial back and know what it is. It is a logon to increase a user’s IT security. Normally, most users try and set a strong and unique Windows password. However, according to cyber experts, even the strongest passwords are vulnerable to hacking. For instance, a study conducted by Deloitte in 2013 revealed that 90% of passwords generated by users can be easily hacked.
High-profile companies like Twitter, Apple, and Microsoft have been hacked. In Twitter’s case, the hackers could easily attack and get the usernames, email addresses, and encrypted passwords of 2,50,000 users. Thus, even though companies today don’t feel the need to put more effort into making their security tighter, then they need to think again. It is mostly the large MNCs that are attacked.
Why use Windows Smart card logon?
Using traditional usernames and passwords to authenticate to the corporate network brings risks. For example, users tend to use bi-passwords. The company’s IT security policy forces users to set complex passwords, which are often difficult to remember causing frustration and annoyance, for end users. Some users choose to write passwords on paper, or on post-its and place them under desks, or attach them to their monitor for all to see.
In worst-case scenarios, users forget their passwords, resulting in high help desk assistance which also adds high costs for organizations.
The Alternative: Smart card
The alternative to mitigate the risks imposed by using traditional usernames and passwords is Windows smart card log-on. It brings strong two-factor authentication, which is something you know plus, something you have. Two-factor authentication seeks to reduce the probability that the requester is presenting false evidence of their identity. It is also best practice, as recommended for Microsoft to use Windows mac logon.
Using smart cards bring additional benefits, in the form of enhancing IT security such as email, digital encryption, and email digital signature. Digital encryption of files, are authenticating to VPNs. Also, smart cards can be used to gain access to company building, as physical access devices. All of this extra usage for these cards ensure maximum return on investment when compared to other security devices.
What do you need to use a smart card?
In order to implement windows market logon, you will need three components. A public key infrastructure commonly referred to as PKI. Microsoft rolled certificate services to provide a PKI for the Windows environment. Secondly, you will need physical smart cards and a smart card management system to manage the employees’ smart cards throughout their lifetime. The V6 MST series is tailored for companies of all sizes to quickly implement Windows smart card logon with the minimum cost and the highest level of security.
How to deploy a Windows card?
You can issue a Windows card logon certificate from the v6 CMS administration console. Navigate to the lifecycle page, and click on the issue oval. Now select the card template which is pre-configured to connect to the active directory and certificate authority and tap on the executive button.
Type the operator passcode and click on Okay. During this process, the card will be registered and assigned to be user selected from Active Directory, and an issue with a smart logon certificate. On completion, a short summary is presented to the operator. The smart card can now be used.
How to create a smart card for user logon in active directory?
Step 1: Go to active directory users and computers. Then click on Oracle VM virtual box.
Step 2: Select New and click on user. A new dialog box will appear with new object user title.
Step 3: Enter first name and last name. Further, enter the user logon name. Add a new password and re-type the password to confirm.
Step 4: Click on next and then finish. The name will get added in the list of active directory users. Tap on it.
Step 5: Go to the account and click on Apply. Then again go to the users list and click on the newly created user. On the new dialog box, go to the email section and enter your email. In order to enroll smart card certificate, the user must have an email defined in the active directory.
Step 6: Furthermore, go to the run command and type certmgr,msc. The current user dialog box will appear. Click on trusted root certification authorities.
Step 7: Go to All tasks, advanced operations, and tap on enrol on behalf of. Select administrator as certificate. Click on Next and select VSCard user.
Step 8: Tap on Next again and then click on Enrol. Go to select user and locate your username.
Step 9: Click on Okay. Then a new dialog box will appear that will request you to insert a smart card to save the new certificate.
Step 10: Further, click on: I want to complete this action and your screen will go blank for a second. The Windows security dialog box will ask for a pin number.
Enter the pin to login
Step 11: Type the pin and click on Okay. As soon as you do this, the certificate enrolment will start. After sometime, the status will show as succeeded. Tap on close.
Step 12: Again on the windows server, Oracle VM virtual box, go to active directory users and computers.
Step 13: Click on devices and go to USB. Furthermore, click on CBM flash disk. You will see the command to press Ctrl + Alt + Del or use the system security.
Step 14: Windows will tell you to insert the card or press Ctrl + Alt + Del to begin. From the devices at the top, go to USB and click on USB settings. Tap on CBM flash disk.
Step 15: You will see a logon message, then the system will prompt you to enter the pin.
Step 16: Enter the administrator username and password. Then click on okay after entering the pin again. Wait for some time as your system completes the process. After completion, you can finally enter using the smart card.
Note: This method is applicable only to domain users and domain environments.
How to login in using Windows card?
In order to log in using the Windows smart card, you need to simultaneously press Ctrl + Alt + Del. From a workstation connected to a domain, attach a card and enter the smart card pin to authenticate and this completes the simple demonstration.
Conclusion
A smart card user can present their cards to a card reader. However, they can also attach them to a USB security token to the computer. Further, they have to choose the smart card option from the list of users on the logon screen. The identification of the user logging in can be automatically obtained from the certificate presented by the smart card. Enter the token or security pin of the smart card as and when it prompts.
First published on TechNet on May 11, 2016
Hello Everyone, my name is
Raghav
and I’m a Technical Advisor for one of the Microsoft Active Directory support teams. This is my first blog and today I’ll share with you how to configure a Hyper-V environment in order to enable virtual smart card logon to VM guests by leveraging a new Windows 10 feature:
virtual Trusted Platform Module (TPM).
Here’s a quick overview of the terminology discussed in this post:
- Smart cards are physical authentication devices, which improve on the concept of a password by requiring that users actually have their smart card device with them to access the system, in addition to knowing the PIN, which provides access to the smart card.
- Virtual smart cards (VSCs) emulate the functionality of traditional smart cards, but instead of requiring the purchase of additional hardware, they utilize technology that users already own and are more likely to have with them at all times. Theoretically, any device that can provide the three key properties of smart cards (non-exportability, isolated cryptography, and anti-hammering) can be commissioned as a VSC, though the Microsoft virtual smart card platform is currently limited to the use of the Trusted Platform Module (TPM) chip onboard most modern computers. This blog will mostly concern TPM virtual smart cards.
For more information, read
Understanding and Evaluating Virtual Smart Cards
.
- Trusted Platform Module – (As Christopher Delay explains in his
blog
) TPM is a cryptographic device that is attached at the chip level to a PC, Laptop, Tablet, or Mobile Phone. The TPM securely stores measurements of various states of the computer, OS, and applications. These measurements are used to ensure the integrity of the system and software running on that system. The TPM can also be used to generate and store cryptographic keys. Additionally, cryptographic operations using these keys take place on the TPM preventing the private keys of certificates from being accessed outside the TPM.
-
Virtualization-based security – The following Information is taken directly from
https://technet.microsoft.com/en-us/itpro/windows/keep-secure/windows-10-security-guide
- One of the most powerful changes to Windows 10 is virtual-based security. Virtual-based security (VBS) takes advantage of advances in PC virtualization to change the game when it comes to protecting system components from compromise. VBS is able to isolate some of the most sensitive security components of Windows 10. These security components aren’t just isolated through application programming interface (API) restrictions or a middle-layer: They actually run in a different virtual environment and are isolated from the Windows 10 operating system itself.
- VBS and the isolation it provides is accomplished through the novel use of the Hyper V hypervisor. In this case, instead of running other operating systems on top of the hypervisor as virtual guests, the hypervisor supports running the VBS environment in parallel with Windows and enforces a tightly limited set of interactions and access between the environments. Think of the VBS environment as a miniature operating system: It has its own kernel and processes. Unlike Windows, however, the VBS environment runs a micro-kernel and only two processes called trustlets
-
Local Security Authority (LSA)
enforces Windows authentication and authorization policies. LSA is a well-known security component that has been part of Windows since 1993. Sensitive portions of LSA are isolated within the VBS environment and are protected by a new feature called Credential Guard. - Hypervisor-enforced code integrity verifies the integrity of kernel-mode code prior to execution. This is a part of the
Device Guard
feature.
VBS provides two major improvements in Windows 10 security: a new trust boundary between key Windows system components and a secure execution environment within which they run. A trust boundary between key Windows system components is enabled though the VBS environment’s use of platform virtualization to isolate the VBS environment from the Windows operating system. Running the VBS environment and Windows operating system as guests on top of Hyper-V and the processor’s virtualization extensions inherently prevents the guests from interacting with each other outside the limited and highly structured communication channels between the trustlets within the VBS environment and Windows operating system.VBS acts as a secure execution environment because the architecture inherently prevents processes that run within the Windows environment – even those that have full system privileges – from accessing the kernel, trustlets, or any allocated memory within the VBS environment. In addition, the VBS environment uses TPM 2.0 to protect any data that is persisted to disk. Similarly, a user who has access to the physical disk is unable to access the data in an unencrypted form.
VBS requires a system that includes:
- Windows 10 Enterprise Edition
- A-64-bit processor
- UEFI with Secure Boot
- Second-Level Address Translation (SLAT) technologies (for example, Intel Extended Page Tables [EPT], AMD Rapid Virtualization Indexing [RVI])
- Virtualization extensions (for example, Intel VT-x, AMD RVI)
- I/O memory management unit (IOMMU) chipset virtualization (Intel VT-d or AMD-Vi)
- TPM 2.0
Note
:
TPM 1.2 and 2.0 provides protection for encryption keys that are stored in the firmware. TPM 1.2 is not supported on Windows 10 RTM (Build 10240); however, it is supported in Windows 10, Version 1511 (Build 10586) and later.
Among other functions, Windows 10 uses the TPM to protect the encryption keys for BitLocker volumes, virtual smart cards, certificates, and the many other keys that the TPM is used to generate. Windows 10 also uses the TPM to securely record and protect integrity-related measurements of select hardware.
Now that we have the terminology clarified, let’s talk about how to set this up.
Setting up Virtual TPMFirst we will ensure we meet the basic requirements on the Hyper-V host. On the Hyper-V host, launch
msinfo32
and confirm the following values:
The
BIOS Mode
should state “UEFI”.
Secure Boot State
should be On.
Next, we will enable VBS on the Hyper-V host.
- Open up the Local Group Policy Editor by running
gpedit.msc
. - Navigate to the following settings:
Computer Configuration, Administrative Templates, System, Device Guard
. Double-click
Turn On Virtualization Based Security
. Set the policy to
Enabled
, click
OK
,
Now we will enable
Isolated User Mode
on the Hyper-V host.1. To do that, go to run type
appwiz.cpl
on the left pane find Turn Windows Features on or off.
Check Isolated User Mode, click OK, and then reboot when prompted.
This completes the initial steps needed for the Hyper-V host.
Now we will enable support for virtual TPM on your Hyper-V VM guest.
Note: Support for Virtual TPM is only included in Generation 2 VMs running Windows 10.
To enable this on your Windows 10 generation 2 VM. Open up the VM settings and review the configuration under the Hardware, Security section.
Enable Secure Boot
and Enable Trusted Platform Module should both be selected.
That completes the Virtual TPM part of the configuration. We will now work on working on virtual Smart Card configuration.
Setting up Virtual Smart Card
In the next section, we create a certificate template so that we can request a certificate that has the required parameters needed for Virtual Smart Card logon.These steps are adapted from the following TechNet article:
https://technet.microsoft.com/en-us/library/dn579260.aspx
Prerequisites and Configuration for Certificate Authority (CA) and domain controllers
- Active Directory Domain Services
- Domain controllers must be configured with a domain controller certificate to authenticate smartcard users. The following article covers Guidelines for enabling smart card logon:
http://support.microsoft.com/kb/281245
- An Enterprise Certification Authority running on Windows Server 2012 or Windows Server 2012 R2. Again, Chris’s
blog
covers neatly on how to setup a PKI environment.
- Active Directory must have the issuing CA in the NTAuth store to authenticate users to active directory.
Create the certificate template
1. On the CA console (certsrv.msc) right click on Certificate Template and select Manage
2. Right-click the Smartcard Logon template and then click Duplicate Template
3. On the Compatibility tab, set the compatibility settings as below
4. On the
Request Handling tab, in the
Purpose section, select Signature and smartcard logon from the drop down
menu
5. On the Cryptography Tab, select the
Requests must use on of the following providers
radio button and then select the
Microsoft Base Smart Card Crypto Provider option
.
Optionally, you can use a Key Storage Provider (KSP). Choose the KSP, under Provider Category select Key Storage Provider. Then select the Requests must use one of the following providers radio button and select the
Microsoft Smart Card Key Storage Provider option
.
6. On the General tab: Specify a name, such as TPM Virtual Smart Card Logon. Set the validity period to the desired value and choose OK
7. Navigate to
Certificate Templates
. Right click on Certificate Templates and select New, then Certificate Template to Issue. Select the new template you created in the prior steps.
Note that it usually takes some time for this certificate to become available for issuance.
Create the TPM virtual smart card
Next we’ll create a virtual Smart Card on the
Virtual Machine by using the Tpmvscmgr.exe command-line tool.
1. On the Windows 10 Gen 2 Hyper-V VM guest, open an Administrative
Command Prompt
and run the following command:
tpmvsmgr.exe create /name myVSC /pin default /adminkey random /generate
You will be prompted for a pin. Enter at least eight characters and confirm the entry. (You will need this pin in later steps)
Enroll for the certificate on the Virtual Smart Card Certificate on Virtual Machine. 1. In
certmgr.msc
, right click Certificates, click All Tasks then Request New Certificate.
2. On the certificate enrollment select the new template you created earlier.
3. It will prompt for the PIN associated with the Virtual Smart Card. Enter the PIN and click
OK
.
4. If the request completes successfully, it will display Certificate Installation results page
5. On the virtual machine select sign-in options and select security device and enter the pin
That completes the steps on how to deploy Virtual Smart Cards using a virtual TPM on virtual machines. Thanks for reading!
Raghav Mahajan