
How to recover a deleted user profile in Windows 10? Try to boot Windows 10 into safe mode, restore deleted old user profile files with recovery software, enable the administrator account, create a new user account, and replace the new account’s user profiles with restored old user profile data.
Sometimes, when the C drive gets full, people tend to delete the large files in the C drive to free up disk space. However, some people may mistakenly delete the wrong files, such as the User Profile — saved folders and files under C:/User.
As a result, when you restart Windows 10, you won’t be able to log in to the system as the files associated with your old User Account have been removed. To resolve this issue, you’ll need to recreate a new user account, bearing the loss of your files. You can also refer to the solutions provided in this guide to bring the User Profile back effectively.
Hi guys, do you know how to recover a deleted User Profile in Windows 10? My mom accidentally deleted my user profile, and all the pictures, photos, and document folders disappeared from the computer. No backups were created in Windows 10 previously. So, how can I restore the deleted User Profile with all the lost files in Windows 10? If you have a solution, please let me know. Thanks.
Losing User Profiles may cause file loss issues and some personal settings vanish errors in Windows PCs. This problem still bothers many Windows 10 users. If you have a similar issue in Windows 10/8/7, do not panic.
Below, you’ll find 3 methods in Part 1 to effectively restore deleted User Profiles and 2 ways in Part 2 to back up and protect User Profile in Windows with ease.
Restore Deleted User Profile in Windows 10/11
Note: The solutions provided in this part may also work for Windows 8 and Windows 7 users to bring the lost User Profiles back. Only some specific operations may be different.
In order to help you find a handy solution to bring lost User Profiles back, all provided methods will be listed from easy to difficult. Let’s start the restoration process now.
Before You Start, Boot Windows 10 into the Safe Mode
If you have an issue where you can’t log into Windows 10 after deleting the User Profile, follow the steps below to boot Windows 10 into Safe Mode first.
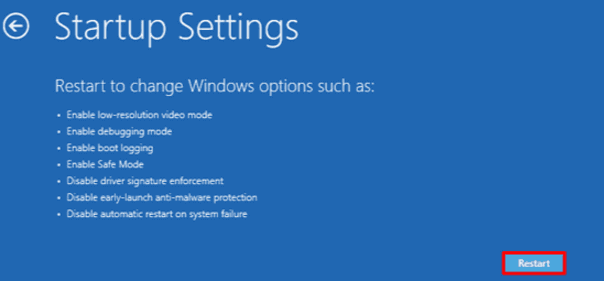
- 1. Reboot PC. On the sign-in screen, hold the Shift key and click «Power», then select «Restart».
- 2. You’ll be presented with an options screen. Here, select Troubleshoot > Advanced options > Startup Settings > Restart.
- 3. Press F4 when the computer is booting up, and it will then start in Safe Mode.
When the process finishes, continue with the following methods to learn how to bring your lost User Profiles back.
- Method 1. Restore Deleted User Profile Files and Create a New Profile
- Method 2. Manually Restore Deleted User Profile in Windows 10
- Method 3. Perform System Restore and Bring Deleted User Profile Back
Method 1. Restore Deleted User Profile Files and Create a New Profile
The most direct way to fix this issue is to restore the deleted User Profile documents and files and create a new User Profile in Windows 10. Go through the steps below and bring your lost files back immediately:
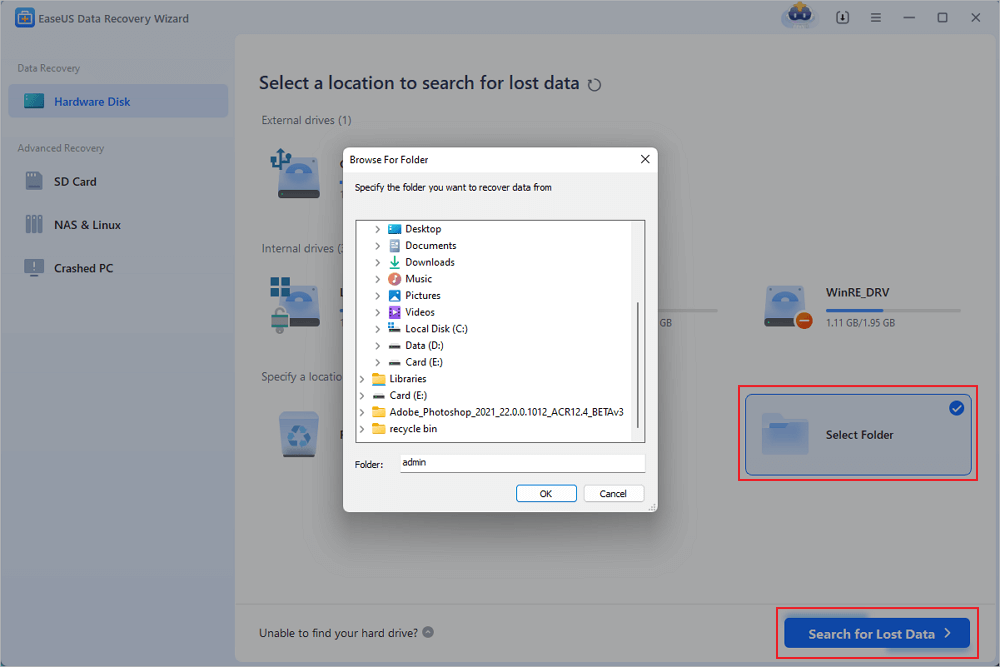
1. Restore All Deleted Old User Profile Files with File Recovery Software
Professional EaseUS Data Recovery Wizard can effectively scan and restore deleted files in Windows 10, including the User Profile files and documents. Here, we’d recommend you try EaseUS Data Recovery Wizard. It simplifies the whole file recovery process in only 3 steps:
- Recover lost files, documents, photos, audio, music, and emails effectively.
- Restore any data showing up in the result during the scan process.
- Support data recovery for sudden deletion, formatting, hard drive corruption, virus attacks, and system crashes under different situations.
Step 1. Run EaseUS Data Recovery Wizard. Choose «Select Folder» under Specify a location. Browse for the location where you lost the folder and click «OK» to scan.
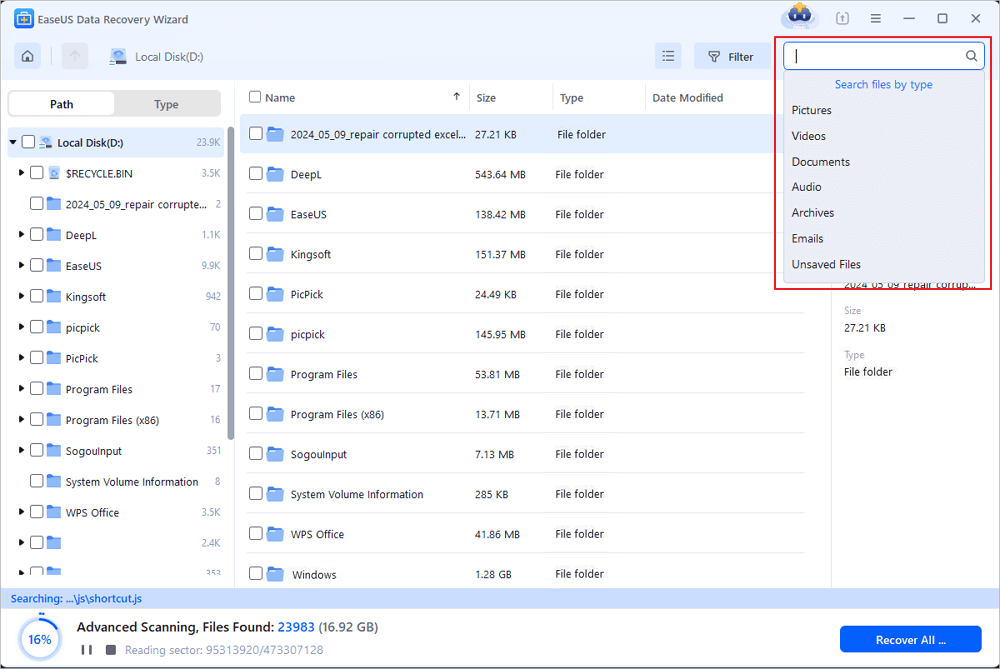
Step 2. You can search for the target folder or use the Filter feature to find a certain type of files in the folder.
Step 3. You can preview the recovered folder. Then, click «Recover» and choose a new & secure location on your PC or cloud storage to keep the recovered data.
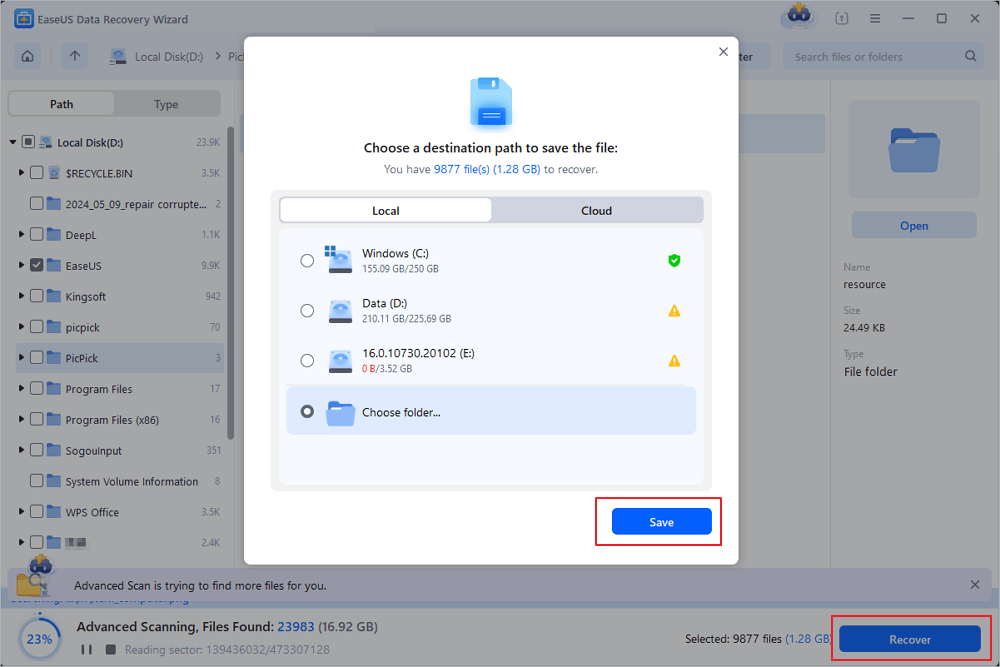
Note: After restoring the files, save the User Profiles on an external storage device. And continue with the following methods.
If you find this information helpful, please share it with others on social media to assist them in overcoming this common challenge.
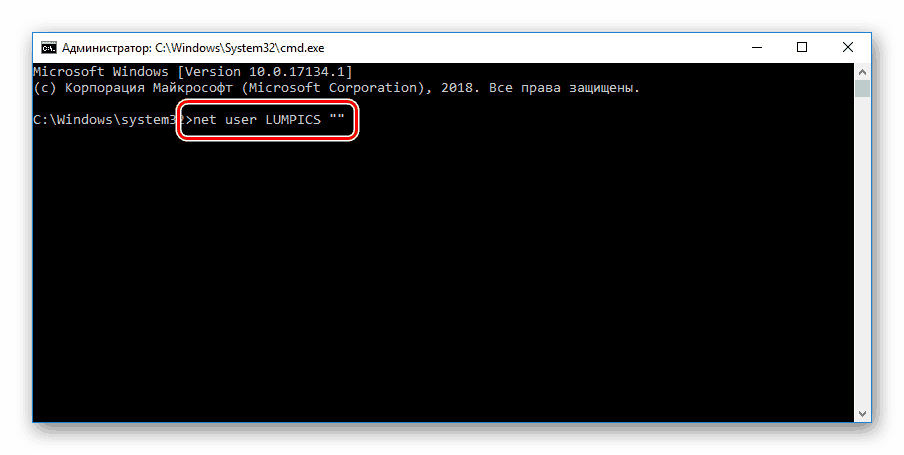
2. Enable the Administrator Account and Create a New User Account
Step 1. Right-click the Start or Windows icon, select «Search» and type: command prompt. Select Command Prompt (Admin).
Step 2. Type: net user administrator /active: yes and hit Enter.
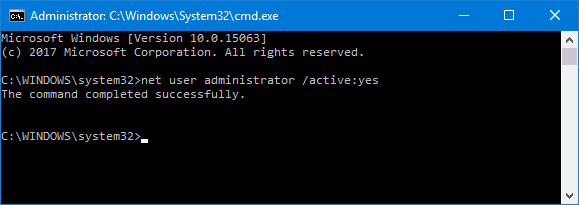
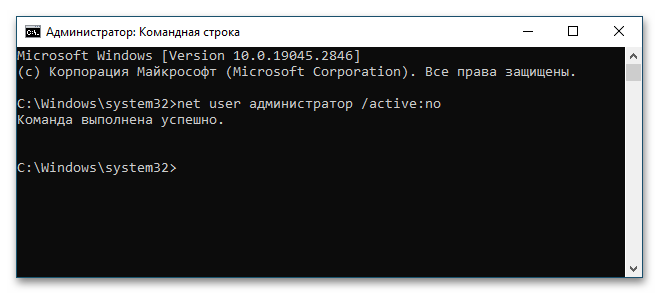
Note: You can switch «yes» to «no» when you want to reverse this in the future by running the same command.
Doing so will enable the hidden administrator account on your computer. After this, restart the computer, and you can create a new account.
3. Create a New Account — New User Account
Step 1. Go to Settings > Accounts > Family & other users.
Step 2. Click «Add someone else to this PC» and follow the on-screen guidelines to complete the process.
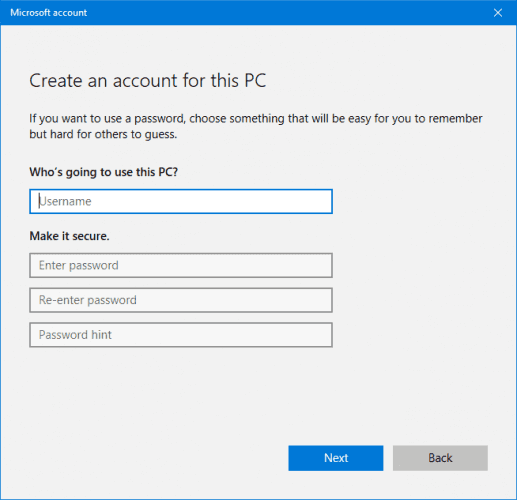
Note: If you want to recover deleted user account Windows 11 instead of a Microsoft one, click «I don’t have this person’s sign-in information» > Then select «Add a user without a Microsoft account».
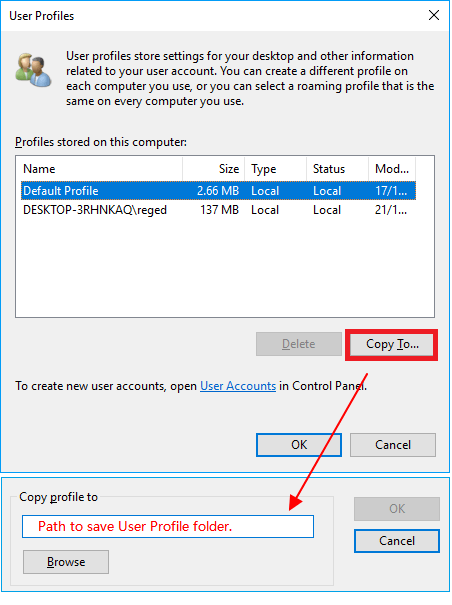
4. Replace New Account User Profiles with Restored Old User Profile Data
You can copy and paste the restored User Profile files and documents to your new account.
Step 1. Restart your PC and log into the administrator account.
Step 2. Press the Windows + R keys to open Run, type C:/Users, and hit Enter.
Step 3. Copy and paste all the restored user profiles into the new one.
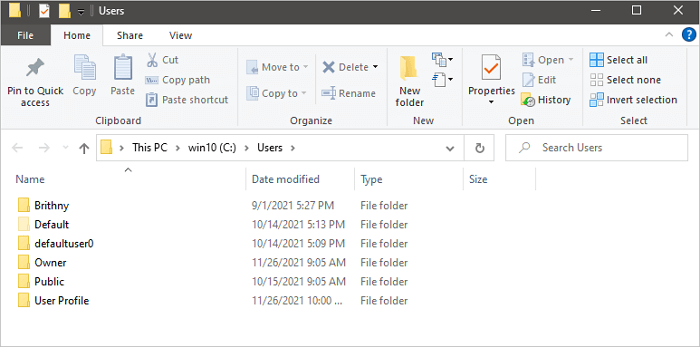
✏️Note: We suggest you do this individually for each folder in case you accidentally bring across some hidden and problematic system files.
After replacing the files in the new user account, you can restart your PC and keep all the changes. By doing so, you can use your old User Profile data with the new account again.
Method 2. Manually Restore Deleted User Profile in Windows 10
The other way that works to get a lost User Profile back is to use Registry Editor. Here are the steps to use this method:
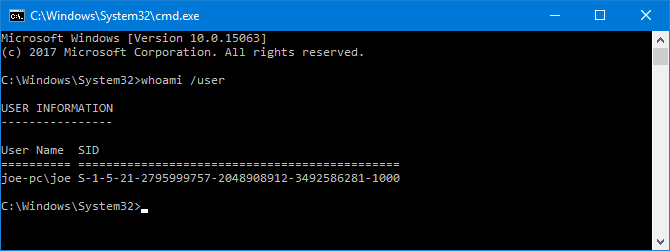
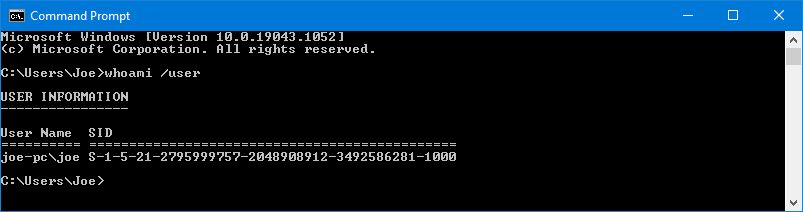
1. Find out the Security Identifier
Step 1. Open Command Prompt by right-clicking on Start or Windows icon > Click Search > Type: command prompt and hit Enter.
Step 2. Type whoami /user and hit Enter.
This command queries the system to your SID of the current account.
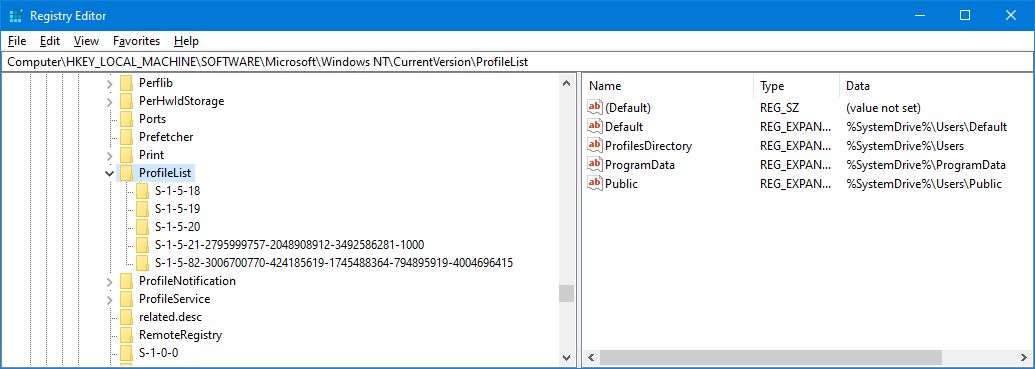
2. Edit the Registry
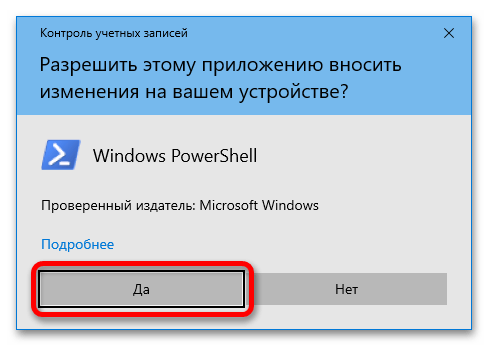
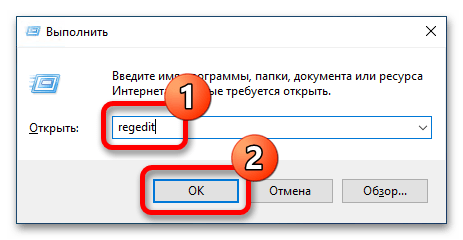
Step 1. Type: regedit in the Search and hit Enter > Click «Yes» to open Registry Editor.
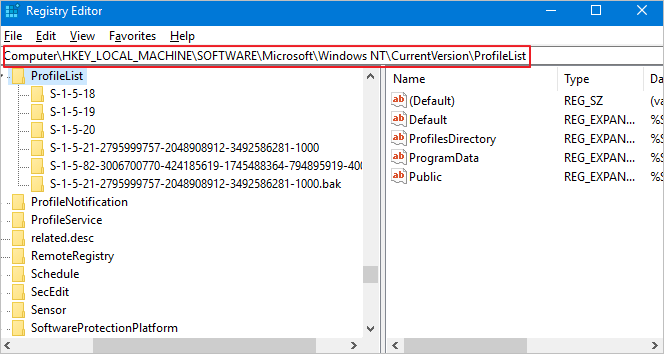
Step 2. Navigate to the below path to find your User Profile list:
HKEY_LOCAL_MACHINE\SOFTWARE\Microsoft\Windows NT\CurrentVersion\ProfileList
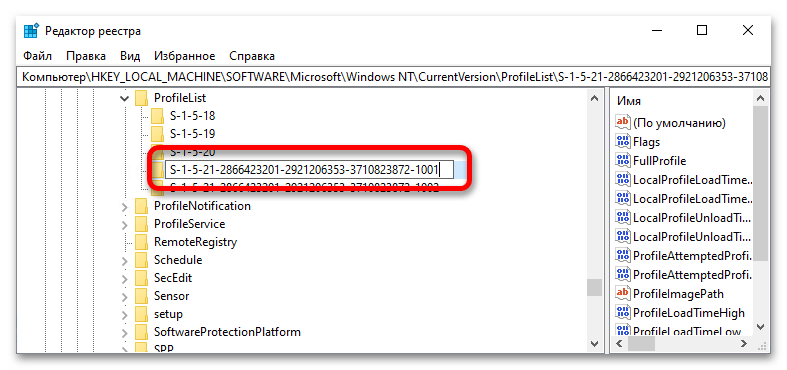
Usually, the SID will be listed twice — with or without a .BAK extension:
- SID listed with a .BAK extension, such as: S-1-5-21-2795999757-2048908912-3492586281-1000.bak
- SID listed without a .BAK extension, such as: S-1-5-21-2795999757-2048908912-3492586281-1000
Follow one of the options provided below to complete the deleted User Profile recovery process:
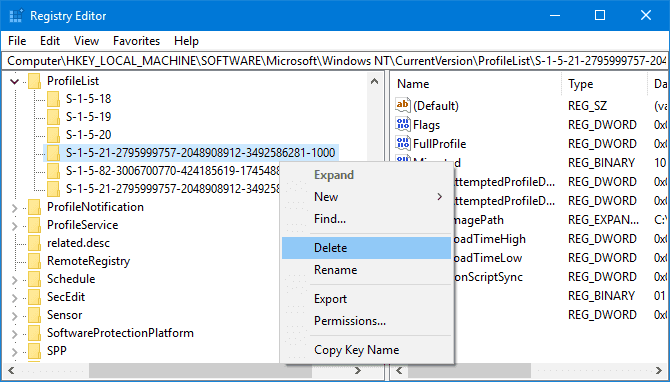
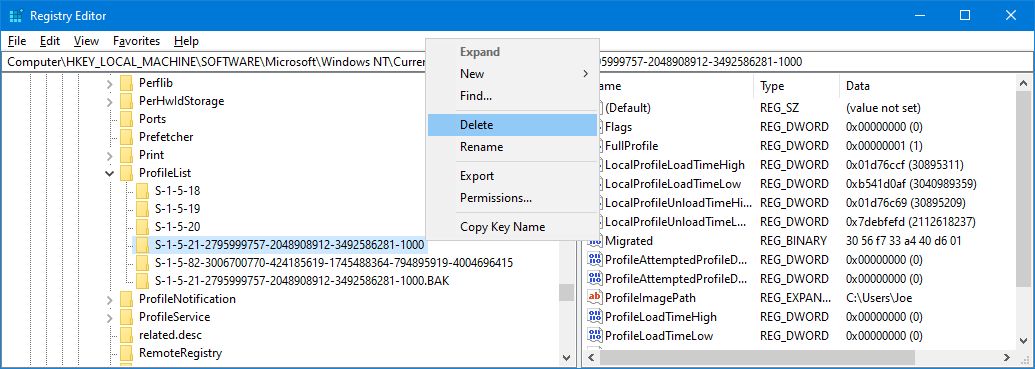
- Option 1. Delete Duplicate Folder
If the SID is listed twice, delete the folder without the .BAK extension:
1. Right-click the folder from the left-hand pane and click «Delete».
2. Click «Yes» to confirm.
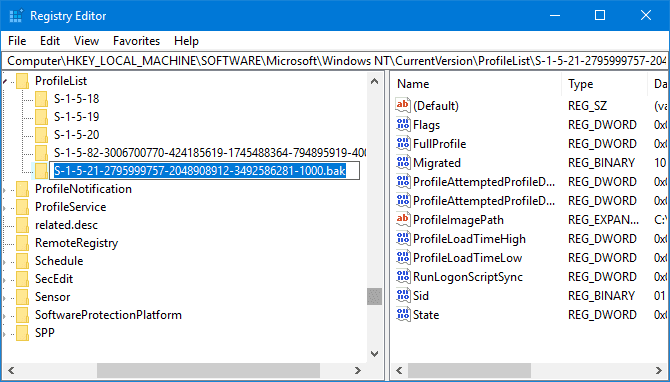
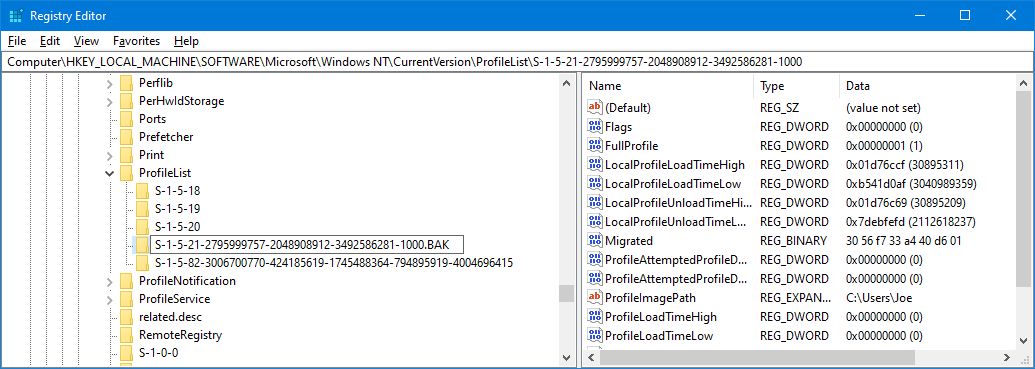
- Option 2. Rename.BAK Folder
- 1. Right-click the folder matching your SID with the .BAK extension and click «Rename».
- 2. Remove.BAK from the end of it and hit Enter to save all changes.
- Option 3. Adjust the Folder Path and State
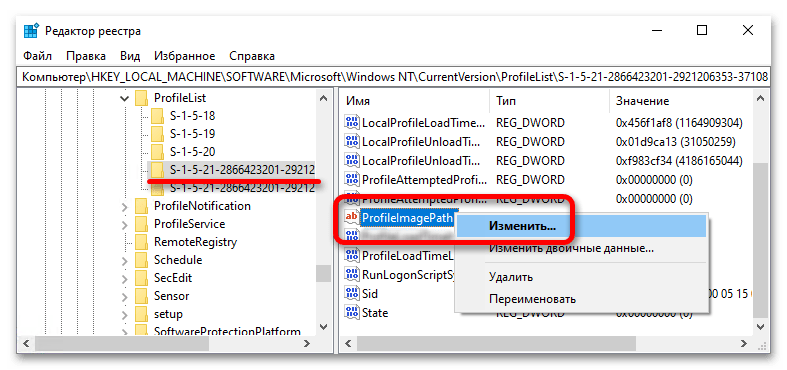
1. Click the folder on the left-hand pane that matches your SID.
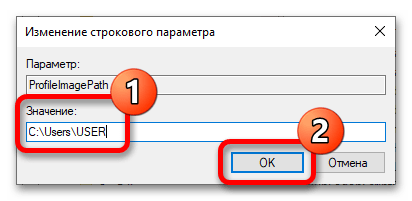
2. Locate and double-click ProfileImagePath. Input the correct path for your user profile in Value Data.
✏️Note: If you are not sure where your user profile is, press Win + R, input C:\Users, and hit Enter. Then, you’ll see the correct path of your user profile.
3. Click «OK» once you’ve written the correct Value Data.
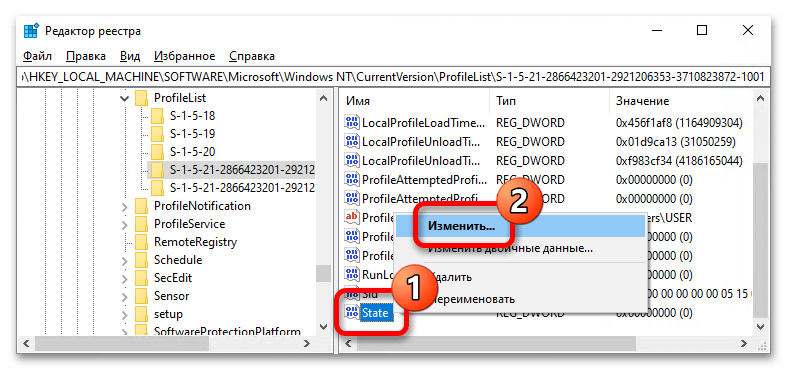
4. Double-click «State» on the right-hand registry pane, change the Value data to «0», and click «OK» to confirm.
Finally, close Registry Editor, restart your PC, and sign back into your user account. Everything you’ve deleted shall be back, and you can reuse it again.
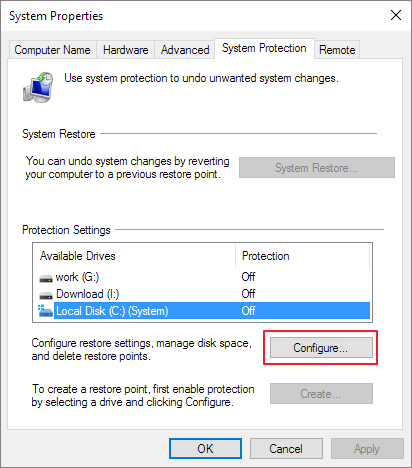
Method 3. Perform System Restore and Bring Deleted User Profile Back
💡Important: A System Restore Point will record everything on your PC, including the system state and saved files, which include the User Profile, installed programs, etc.
A System Restore Point will record everything on your PC, including the system state, saved files, User Profile, installed programs, etc. You will return your system to its previous state by performing System Restore. Of course, this will bring back your lost User Profile documents.
Step 1. Right-click on the Windows icon and select «Search».
Step 2. Type: create a restore point, and click the top result to open «System Properties».
Step 3. Click the System Restore button under the System Protection section to bring up all the restored points you’ve created.
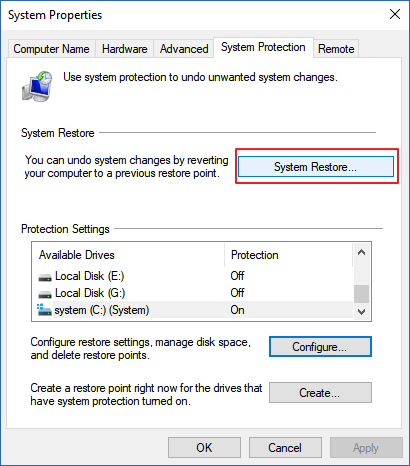
Step 4. Click «Next» and select the restore point you want to use and restore on your PC.
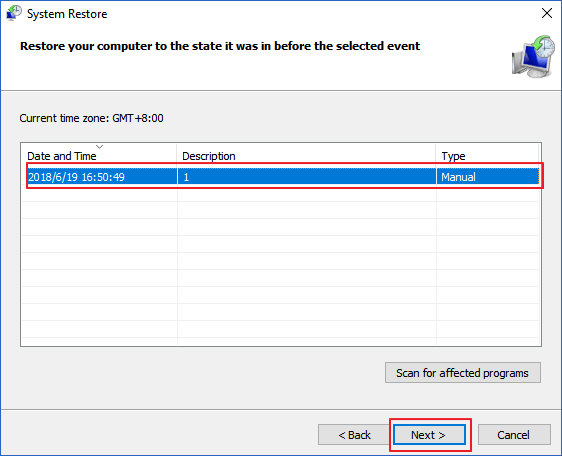
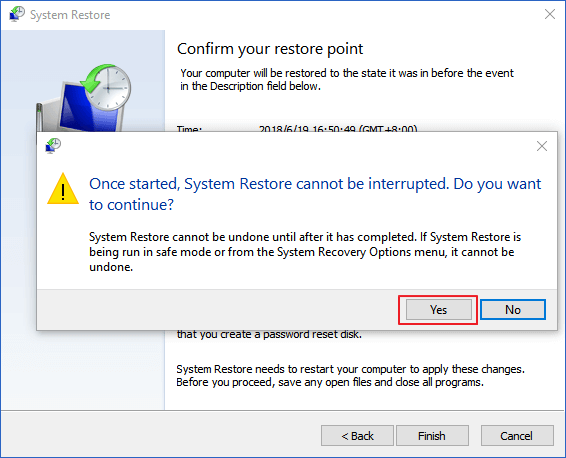
Step 5. Click «Finish» to confirm your restore point and click «Yes» to execute the System Restore on your PC.
Wait for the process to finish, and then restart your computer. Log in with your old User Account, and you’ll be able to use the User Profile documents again.
Tips to Protect Valuable User Profiles and System
Part 1 includes comprehensive solutions to help you bring all lost User Profile documents back. However, do you know that there is even an easier and better way to prevent this disaster from happening?
Here, we’ve covered several practical tips to help you protect your User Profile and Windows system. Follow along to learn how to protect your valuable files and Windows system:
- 1. Copy the User Profile with the File History
File History in Windows 10 can help you copy and save individual files as a backup. You can use this feature to back up your User Profile selectively.
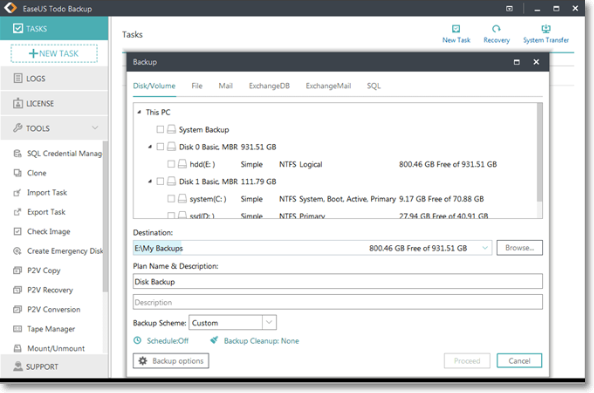
- 2. Use Windows Backup Software — EaseUS Todo Backup
This backup software enables you to selectively back up the User Profile folder or Windows system in only 3 steps. All you need to do is decide what you want to protect.
- 3. Create a Windows Restore Point
To do so, you need to first enable the System Protection by going to System Properties > clicking System Protection > Selecting System C: drive and click «Configure» > Clicking «Enable».
Then, follow the on-screen guidelines to browse to a large enough drive to create and save the Windows restore points.
Recover Deleted User Profiles and Files in Windows FAQs
Here are 4 additional questions about recovering deleted User Profiles and essential files in Windows 10. Check here for the answers.
1. What is a User Profile on Windows?
A user profile collects user settings and information for the associated user account. On the other hand, a user account is your point of entry into Windows 10. It is formed during the installation of Windows, and you can sign in to your PC with a user account and create several user accounts inside.
2. How to delete a user profile from Windows 10?
- Delete a user profile manually.
- Remove a user profile from the system properties.
- Delete a user profile using the Settings app.
You can also select to copy and transfer the user profile.
3. Can I restore the files of a deleted Windows user account?
A System Restore backs up everything on your Windows PC. It contains the system status, installed programs, saved files, the User Profile, and so on. As a result, you can restore your PC to its prior state using System Restore.
4. How do I recover a user from the deleted Users in Office 365?
This error has been associated with one of the following causes: The user profile has been corrupted or is missing. The integrity of the file system has been jeopardized due to disk write mistakes, power interruptions, or virus attacks. Search for and select one of the available users on the Deleted users page.
Не знаете, что делать, если не запускается учетная запись пользователя Windows или возникает ошибка «не удается войти в учётную запись»? Решение этих и других проблем со входом в профиль будет приведено ниже.
Содержание
- Почему происходит повреждение профиля пользователя?
- Поиск идентификатора безопасности учетной записи
- Как сделать бекап реестра?
- Возможные проблемы с восстановлением профиля
Профиль пользователя Windows является удобным функционалом системы, расширяющим возможности для использования. Сам профиль хранит в себе персональные настройки внешнего вида системы и некоторых программ. Помимо этого, один общий профиль для ПК, смартфона или другого гаджета позволяет синхронизировать действие каждого из устройств, что крайне удобно.
Утеря или повреждение профиля – достаточно неприятная ситуация, которая ограничивает доступ к некоторым функциям и данным, поэтому с данной проблемой необходимо справиться как можно быстрее.
Ошибка службы профилей пользователей (ProfSvc) имеет следующий вид:

Почему происходит повреждение профиля пользователя?
Повреждение профиля Windows может быть вызвано разными причинами.
Самыми частыми из них являются:
- Некорректно установленные обновления ОС.
- Повреждение файлов, отвечающих за профиль.
- Аварийная перезагрузка или выключение системы.
- Деятельность вредоносных программ и вирусов.
При невозможности загрузки профиля Windows пользователь увидит соответствующее сообщение с ошибкой, и ему будет предложено продолжить работу на временном профиле, который имеет ограниченный доступ к файлам, а также удаляет все созданные за сеанс данные при выходе из временного профиля или перезагрузке системы.
Поиск идентификатора безопасности учетной записи
Работа на временном профиле сильно ограничивает возможности, поэтому при выявлении подобной проблемы необходимо сразу приступить к её решению. Первое, что необходимо сделать – попробовать выйти с профиля и зайти на него вновь. Данный совет дает сама система, и этим не следует пренебрегать.
Если перезаход не помог, следует узнать идентификатор безопасности учетной записи (SID). Чтобы это сделать, понадобится командная строка или Windows PowerShell, запущенные с правами администратора.
Шаг 1. Нажимаем ПКМ по кнопке «Пуск» и выбираем пункт «Командная строка(Администратор)» или «Windows PowerShell(Администратор)».
Шаг 2. В командной строке необходимо ввести «whoami /user». Данная команда покажет SID текущего профиля.

Шаг 3. Копируем SID сочетанием клавиш Ctrl+C. Важно: SID имеет вид многозначного числового кода. В нашем случае это — S-1-5-21-4159091151-714581226-3499032617-1001.
После того, как SID был скопирован в буфер обмена, необходимо отредактировать реестр для восстановления профиля.
Как сделать бекап реестра?
Важно! Любые манипуляции с редактором реестра могут привести к неожиданным последствиям, поэтому нижеописанные шаги следует выполнять с максимальной осторожностью. Перед началом работы с реестром настоятельно рекомендуется создать запасную копию (бекап) текущего реестра.
Чтобы выполнить данную функцию, следует:
Шаг 1. Открыть редактор реестра, как описано ниже, и нажать на пункт «Файл» в верхнем левом углу. В выпадающем списке следует выбрать «Экспорт».

Шаг 2. В открывшемся окне необходимо присвоить имя запасному файлу реестра, а также сохранить его в нужном месте. Для экономии времени рекомендуется использовать сохранение только выбранной ветви реестра. Если пользователь собирается редактировать не только одну ветвь, лучше сделать бекап всего реестра.

Выполнив данные пункты, можно обезопасить себя и в любой момент восстановить реестр из созданного бекапа.
Теперь переходим к восстановлению профиля.
Шаг 1. Нажимаем ПКМ по кнопке «Пуск» и выбираем пункт «Выполнить». В открывшемся окне вводим команду regedit и подтверждаем действие кнопкой «Ок».

Шаг 2. В редакторе реестра следует перейти по пути «Компьютер\HKEY_LOCAL_MACHINE\SOFTWARE\Microsoft\Windows NT\CurrentVersion\ProfileList».

Важно: если пользователь ищет вручную и не может найти указанные папки, следует внимательно проверить правильность перехода по пути. В реестре находится множество всевозможных каталогов, среди которых очень легко запутаться.
Чтобы не терять время, рекомендуем просто скопировать Компьютер\HKEY_LOCAL_MACHINE\SOFTWARE\Microsoft\Windows NT\CurrentVersion\ProfileList и вставить в адресную строку.
В зависимости от системы и версии ОС, следующие действия могут немного различаться между собой, поэтому будут рассмотрены все варианты последующих действий, подходящих для всех случаев:
1. Если идентификатор SID указан в разделе «ProfileList» дважды, следует удалить один раздел без расширения .BAK. Это можно сделать, нажав по разделу правой клавишей мыши и выбрав пункт «Удалить».
2. Если идентификатор SID указан в разделе «ProfileList» один раз с расширением .BAK, следует нажать по нему ПКМ, выбрать пункт «Переименовать» и удалить приставку .BAK, после чего сохранить внесенные изменения.

3. Если присутствует одна папка с идентификатором без расширений, следует нажать по ней ЛКМ и перейти в пункт «ProfileImagePath». Далее нужно кликнуть по нему ПКМ и выбрать пункт «Изменить», как показано на скриншоте.

В строке «Значение» необходимо ввести правильный путь к папке своего профиля на системном диске. Проверить его можно, зайдя на диск С (диск, где установлена ОС) и выбрав папку «Пользователи». В нашем случае правильный путь к папке профиля имеет вид «C:\Users\User».
Соответственно путь в папке «ProfileImagePath» должен быть указан таким же.

Далее необходимо отредактировать параметр «State». Кликаем по нему ПКМ и выбираем пункт «Изменить».

В открывшемся окне в пункте «Значение» следует указать цифру «0».

На этом устранение ошибки Windows «не удается войти в учетную запись» можно считать законченным. После закрытия редактора реестра и перезагрузки компьютера профиль будет восстановлен.
Возможные проблемы с восстановлением профиля
В некоторых случаях восстановление профиля вышеописанными способами может не сработать. Это обусловлено сильным повреждением системных данных профиля или другими неполадками. В этом случае лучшим выходом будет создание нового профиля с правами администратора. Данная мера не позволит восстановить предыдущие настройки, поэтому подгонять новый профиль под свои нужды придется заново.
Для создания нового профиля следует загрузить систему в безопасном режиме. Загрузка безопасного режима детально описана в статье «Как загрузить безопасный режим в Windows»
После перезагрузки системы в безопасном режиме необходимо открыть командную строку или Windows PowerShell с правами администратора и ввести команду «net user administrator /active:yes».
После этого можно воспользоваться созданием новой учетной записи с правами администратора. Как это сделать, можно прочитать в статье «Изменение имени учетной записи Windows».
Часто задаваемые вопросы
Профиль Windows может повреждаться по разным причинам. Среди наиболее частых причин можно отметить действия вирусов, повреждения или удаление файлов профиля, некорректное завершение работы системы и перебои с электричеством, а также некорректно установленные обновления операционной системы. Больше информации вы можете найти на нашем сайте.
Если вам не получается восстановить профиль пользователя то наилучшим решением будет извлечь из него важные данные и создать заново. Таким образом вы сэкономите много времени.
Создайте новый профиль пользователя и воспользуйтесь программой RS Partition Recovery. Она позволит вам восстановить утерянные данные независимо от того, в каком профиле хранились данные.
Да. Однозначно стоит. Независимо от того, какие изменения вы вносите в реестр, настоятельно рекомендуется делать бекап. Это занимает совсем немного времени, зато позволяет вас обезопасить от многих проблем.
Эта ошибка значит что с вашим профилем что-то не в порядке и операционной системе не удалось его загрузить. О том, как восстановить профиль Windows пользователя читайте на нашем сайте.
Все способы:
- Вариант 1: Сброс пароля учетной записи
- Вариант 2: Редактирование реестра во временном профиле
- Вариант 3: Создание нового профиля
- Вопросы и ответы: 0
Вариант 1: Сброс пароля учетной записи
Если проблема заключается в том, что вы забили пароль от учетной записи, можно попробовать выполнить его сброс. Для локального профиля и аккаунта Microsoft инструкции будут разными. Они описаны в другой статье на нашем сайте. При необходимости воспользуйтесь представленной ниже ссылкой, чтобы ознакомиться с изложенной там информацией.
Подробнее: Сброс пароля учётной записи в Windows 10
Вариант 2: Редактирование реестра во временном профиле
Если проблема заключается в том, что вы не можете войти в свою учетную запись даже при вводе правильного пароля, необходимо будет произвести процедуру восстановления через временный профиль. В таком случае вход в него будет осуществлен автоматически. У вас на экране появится уведомление о том, что созданные файлы и изменения, выполненные в этом сеансе, не будут сохранены при перезапуске.
Обратите внимание! Если на экране появится дополнительное уведомление с рекомендацией перезагрузить компьютер, чтобы повторить попытку авторизации в основном профиле, сделайте это. Есть вероятность, что восстановление учетной записи произойдет автоматически, а это был разовый сбой.
Имея доступ к рабочему столу операционной системы, хоть и во временном профиле, можно приступить к восстановлению основной учетной записи. Все действия в этом случае выполняются в «Редакторе реестра». Но предварительно необходимо узнать идентификатор аккаунта, доступ к которому нужно будет открыть. Посмотреть его можно в оболочке Windows PowerShell, выполнив специальную команду.
- Откройте Windows PowerShell любым доступным способом. Например, сделать это можно посредством контекстного меню кнопки «Пуск». Щелкните по ней правой кнопкой мыши, а затем выберите в списке пункт «Windows PowerShell (администратор)».
Читайте также: Как открыть Windows Powershell в Windows 10
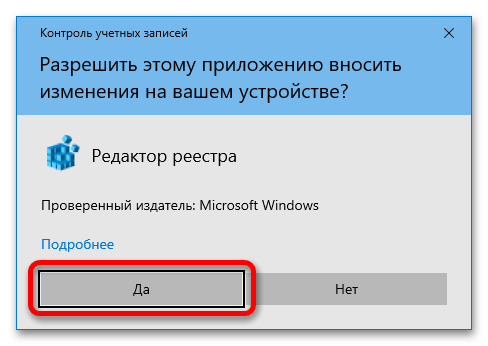
- Если на экране появится диалоговое окно контроля учетных записей, щелкните в нем по кнопке «Да», чтобы разрешить запуск приложения.
- После этого в окне консоли введите приведенную ниже команду и нажмите по клавише Enter для ее выполнения.
whoami /userВ результате в окне Windows PowerShell отобразится список всех пользователей компьютера, а напротив их имен будет размещен тот самый идентификатор. Его необходимо запомнить, чтобы в будущем найти в системном реестре соответствующий раздел.

Зная идентификатор основного аккаунта, можно переходить непосредственно к его восстановлению. Для этого выполните следующую инструкцию:
- Откройте «Редактор реестра» любым доступным способом. Например, сделать это вы можете посредством окна «Выполнить». Вызовите его сочетанием клавиш Win + R, а затем введите в поле «Открыть» команду
regeditи нажмите по кнопке «ОК». - Если на экране снова появится окно контроля учетных записей, щелкните в нем по кнопке «Да», чтобы подтвердить запуск «Редактора реестра».
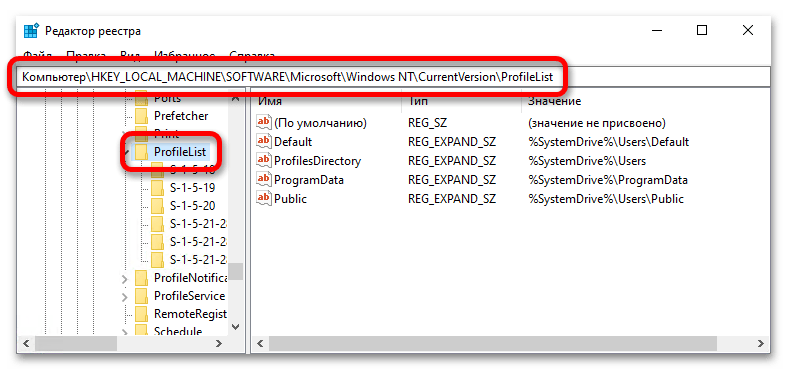
- В открывшемся окне приложения воспользуйтесь древовидной структурой каталогов в левой части интерфейса, чтобы проследовать по следующему пути:
Компьютер\HKEY_LOCAL_MACHINE\SOFTWARE\Microsoft\Windows NT\CurrentVersion\ProfileListПримечание! Вы также можете мгновенно перейти в целевую директорию, скопировав этот адрес в адресную строку. Она расположена в верхней части окна, как отмечено на изображении ниже. После того как путь будет вставлен туда, нажмите по клавише Enter.
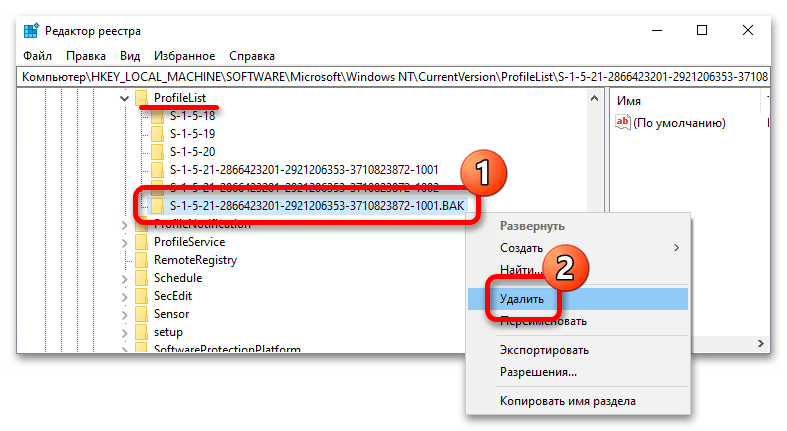
- В папке «ProfileList» необходимо найти раздел, который имеет название, аналогичное вашему идентификатору. Если вы заметите, что таких директорий несколько, но одна из них имеет в конце приписку «.BAK». Тогда такой дубль необходимо удалить. Для этого щелкните по названию правой кнопкой мыши и выберите опцию «Удалить».

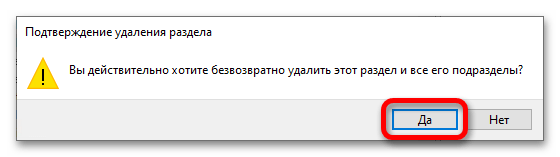
В появившемся диалоговом меню подтвердите это действие, для чего нажмите по кнопке «Да».

Если в папке «ProfileList» находится всего одна директория с идентификатором профиля, но в ее названии есть приписка «.BAK», нужно просто выполнить переименование, удалив ненужное расширение в конце. Для этого щелкните по названию папки правой кнопкой мыши и выберите опцию «Переименовать».

После этого название директории станет текстовым полем. Удалите расширение «.BAK» и нажмите по кнопке Enter для сохранения изменений.

Если в папке «ProfileList» будет всего одна директория, соответствующая идентификатору вашей учетной записи, и находиться она там будет без лишнего расширения, просто переходите к следующему пункту этой инструкции.
- Перейдите в директорию с вашим идентификатором. Для этого единожды кликните по ее названию. Далее в основном меню найдите параметр с именем «ProfileImagePath» и откройте его свойства. Для этого щелкните по названию правой кнопкой мыши и в появившемся контекстном меню выберите пункт «Изменить».
- В новом окне в поле «Значение» введите путь к вашей пользовательской папке. Обычно он начинается с «C:\Users\», а далее следует непосредственно само название аккаунта. После этого щелкните по кнопке «ОК».

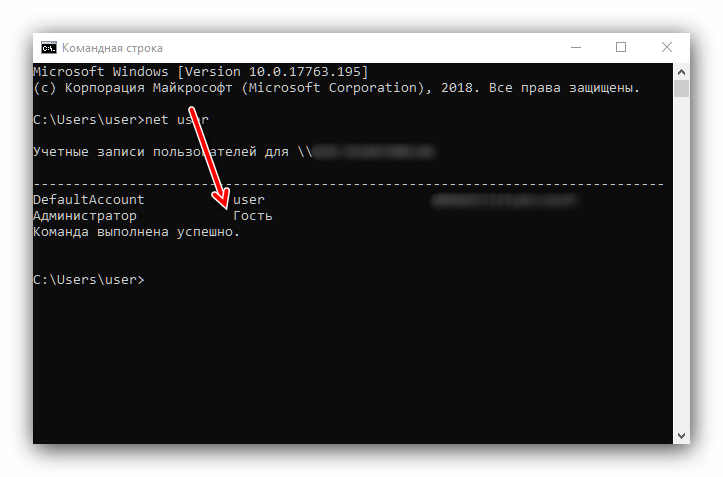
Примечание! Если вы не знаете названия своей учетной записи, нужную информацию можно посмотреть непосредственно в операционной системе. Для этого потребуется воспользоваться «Командной строкой» или «Панелью управления». Подробнее об этом вы можете прочитать в другой статье на нашем сайте, посвященной этой теме.
Подробнее: Как узнать имя пользователя компьютера в Windows 10
- Вернувшись в главное окно «Редактора реестра», найдите в списке параметр с названием «State» и откройте его свойства. Делается это через контекстное меню — нужно выбрать пункт «Изменить».
- В появившемся окне впишите в поле «Значение» цифру «0» (без кавычек), а после этого сохраните изменения, нажав по кнопке «ОК».
- Закройте окно «Редактора реестра» и перезапустите компьютер. Основная учетная запись пользователя должна будет восстановиться. Если этого не произошло, воспользуйтесь другим вариантом устранения проблемы, описанным далее в этой статье.

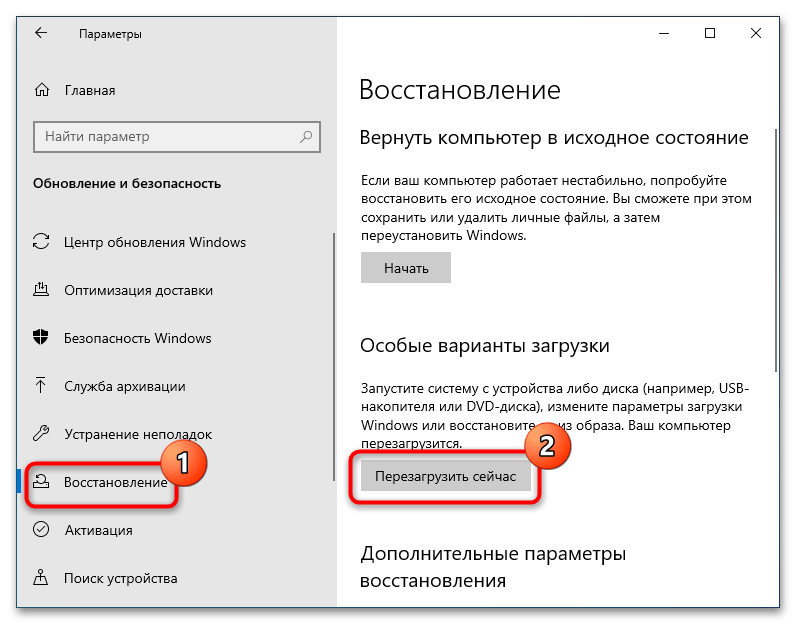
Если временный профиль автоматически не загружается и вы застряли на экране ввода пароля от учетной записи, можете активировать аккаунт «Администратора» и выполнить все описанные ранее действия через него. Для того чтобы это сделать, вам потребуется войти в среду восстановления и открыть там «Командную строку». На нашем сайте есть отдельная статья, в которой рассказывается о том, как это сделать. Учтите, что в рассматриваемом случае подойдут не все перечисленные там способы.
Подробнее: Как запустить среду восстановления в Windows 10
После этого в «Командной строке» необходимо ввести всего одну команду и нажать Enter для ее выполнения.
net user администратор /active:yes
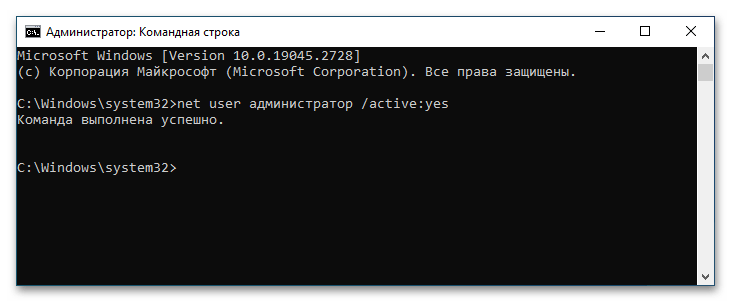
Как только это будет сделано, перезагрузите компьютер и на экране входа в систему выберите аккаунт «Администратор», который расположен в нижнем левом углу. После входа на рабочий стол выполните ранее описанную в этом варианте инструкцию.
Вариант 3: Создание нового профиля
Если предыдущие способы восстановления учетной записи не помогли, единственным вариантом будет создание нового пользователя. Недостатком этого метода является то, что все пользовательские данные, вместе с настройками операционной системы, будут потеряны. Но большую часть из них удастся сохранить посредством стандартного копирования.
Первостепенно вам необходимо войти в аккаунт администратора. В конце предыдущего варианта уже было рассказано, как это сделать через среду восстановления, но если вы имеете доступ ко временному профилю, активацию учетной записи можно произвести из него. На нашем сайте есть отдельная статья, в которой рассказывается о нескольких способах выполнения этой задачи, при необходимости ознакомьтесь с ней по представленной ниже ссылки.
Подробнее: Авторизация в учетной записи Администратора в Windows 10

Имея доступ к инструментам операционной системы, вы можете создать новый аккаунт с повышенными привилегиями. В конечном итоге по правам он не будет отличаться от того, который был утерян. На нашем сайте есть другая статья, в которой предлагается пять способов выполнения поставленной задачи. Воспользуйтесь приведенной ниже ссылкой, чтобы ознакомиться с изложенной в ней информацией.
Подробнее: Создание учетной записи администратора в Windows 10

После того как профиль администратора будет создан, необходимо скопировать в него все данные предыдущего аккаунта. Речь идет не только о пользовательских файлах, но и о настройках операционной системы. Сделать это можно посредством «Редактора реестра». Подробнее об этом вы можете прочитать в другой статье на нашем сайте.
Подробнее: Как перенести профиль пользователя в Windows 10
По итогу при входе в систему вам необходимо будет выбрать только что созданный аккаунт и авторизоваться в нем, введя заданный при создании пароль (если он есть). Попав на рабочий стол операционной системы, вы можете удалить или отключить ранее заблокированный аккаунт. Также рекомендуется отключить и профиль «Администратора». Этой теме посвящена другая статья на нашем сайте, при необходимости ознакомьтесь с ней, воспользовавшись ссылкой ниже.
Подробнее: Выход из учетной записи Администратора в Windows 10
Наша группа в TelegramПолезные советы и помощь
If an error message prevents you from signing in to your Windows 10 user account, your profile may have become corrupted. We’re going to show you how to fix it to recover your user profile or, alternatively, make a new account.
Your user account contains your personal settings, like desktop wallpaper, taskbar preferences, and some program settings like browser history. It can be very frustrating to lose this.
Without further ado, here’s how to restore a user profile in Windows 10.
Why You Shouldn’t Use the Temporary Windows Profile
If you try to sign in to your normal user account when it’s broken, you’ll be taken into a temporary account. This usually occurs if a critical Windows update has been forcibly ceased midway through the process.
You’ll see one of two errors (or sometimes both):
- You’ve been signed in with a temporary profile. You can’t access your files, and files created in this profile will be deleted when you sign out. To fix this, sign out and try signing in later. Please see the event log for details or contact your system administrator.
- We can’t sign in to your account. This problem can often be fixed by signing out of your account, then signing back in. If you don’t sign out now, any files you create or changes will be lost.

Obviously, the first thing to do here is to sign out and then back in. Chances are it won’t work, but it’s worth a shot.
Being signed in to a temporary profile is unsuitable because any changes you make will be reset every time you log out. As such, let’s look at how to recover your usual Windows profile.
Step 1: Find Your Security Identifier
First, you need to know the security identifier (SID) of the temporary user account you’re being signed in to. This unique string is what Windows uses to control permissions and group your interactions.
- Do a system search for cmd and open the Command Prompt.
- Type whoami /user and press Enter. This command queries the system to tell you the SID of the current account.
- Make a note of your SID. You can press Ctrl + M to enable highlighting, left-click and drag over the SID, and then press Ctrl + C to copy it.
Step 2: Recover Your Windows Profile With the Registry
You now need to edit the registry to recover the original profile. Editing the registry can be dangerous if you mess with the wrong thing, so please follow the instructions below carefully.
Do a system search for regedit and select the Registry Editor. Paste the following path into the address bar (go to View > Address Bar if you don’t see it) and press Enter:
Computer\HKEY_LOCAL_MACHINE\SOFTWARE\Microsoft\Windows NT\CurrentVersion\ProfileList
You will see several sub-folders within the ProfileList folder on the left-hand pane, some containing SIDs.
One of three options should apply:
- Your SID is listed twice, with and without a BAK extension.
- Your SID is listed only once with a BAK extension (e.g., S-1-5-21-2795999757-2048908912-3492586281-1000.bak).
- Your SID is listed only once without a BAK extension (e.g., S-1-5-21-2795999757-2048908912-3492586281-1000).
The process is mostly the same for all three options but with some slight differences. Follow all the steps below in order, but only those which contain your option number.
Option 1: Delete the Duplicate Folder
If your SID is listed twice—and only in this case—you need to delete the folder without the BAK extension.
- On the left-hand pane, right-click the folder that matches your SID and doesn’t have the BAK extension.
- Click Delete.
- Click Yes to confirm.
Option 1 and 2: Rename the BAK Folder
- On the left-hand pane, right-click the folder that matches your SID and has the BAK extension.
- Click Rename.
- Remove .BAK from the end.
- Press Enter to save the changes.
Option 1, 2, and 3: Adjust the Folder Path and State
- On the left-hand pane, click the folder that matches your SID.
- On the right-hand pane, double-click ProfileImagePath.
- In the Value data field, input the correct path for your user profile (for example, C:\Users\Joe).
- Click OK.
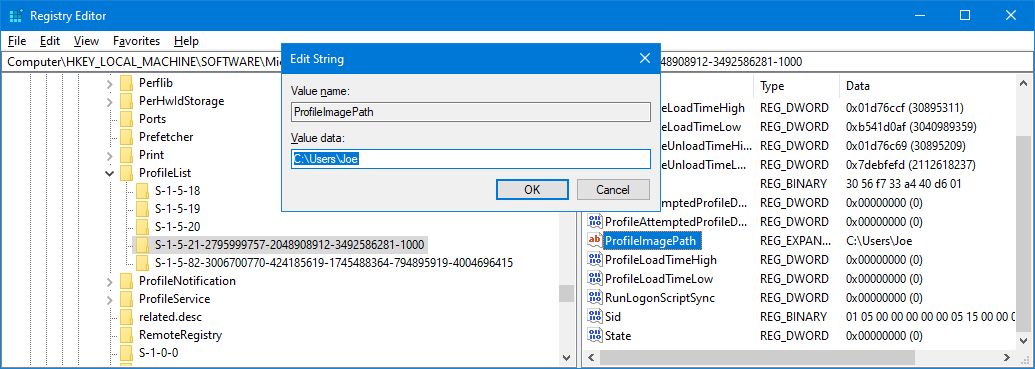
If you’re unsure what the Value data should be, press Windows key + R to open Run, input C:\Users, and press Enter. This will bring up a list of all your user profiles. You can enter the right profile and copy the path from the address bar.
Once you’ve done this, on the Registry Editor:
- On the right-hand pane, double-click State.
- Change the Value data to 0.
- Click OK.

Close the Registry Editor and restart your computer. Sign back into your user account, and you should find that everything is restored and back to normal.
If you’re still encountering problems, read on to find out how to make a new permanent user account.
How to Create a New Windows Profile
If the instructions above didn’t bring your profile back, it’s time to make a new user profile. Note that this won’t recover your desktop settings, like wallpaper or taskbar preferences, but it will mean you’ll have a permanent user account again.
Step 1: Boot in Safe Mode
To begin, you’ll need to boot your PC into Safe Mode. To do this:
- Restart your computer.
- On the sign-in screen, hold Shift and click Power > Restart.
- When this has completed, you’ll be on the Choose an option screen. Go to Troubleshoot > Advanced options > Start-up Settings > Restart.
- Your computer will restart again. Press F4 to start it in Safe Mode.
Step 2: Enable the Administrator Account
Next, you need to enable the hidden administrator account.
- Once logged in, input cmd in the Start menu search bar
- Right-click Command Prompt and select Run as administrator. This opens Command Prompt in administrator mode.
- Input net user administrator /active:yes and press Enter.
Note that you can reverse this in the future by running the same command; just switch yes for no.

This will enable the hidden administrator account on your computer. Restart and then sign in to this new account.
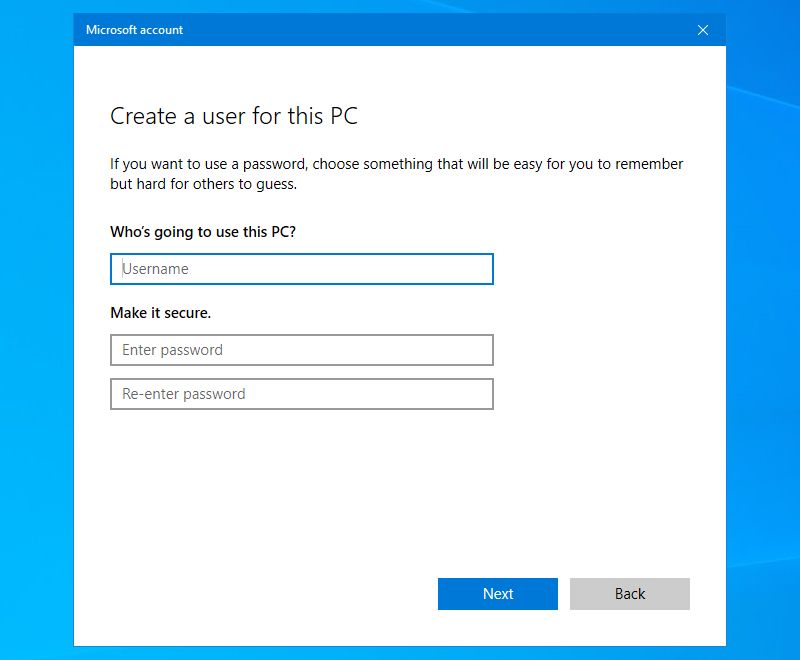
Step 3: Create a New Account
Now that you’re signed in to the administrator account, it’s time to create a new permanent Windows account.
- Press Windows key + I to open Settings.
- Go to Accounts > Family & other users.
- Click Add someone else to this PC.
- At this point, you can just follow the wizard through. However, if you want to create a local account instead of a Microsoft one, click I don’t have this person’s sign-in information and then Add a user without a Microsoft account.
Step 4: Transfer Your Files
Finally, you need to transfer the files from your broken Windows profile to the new one.
To navigate to these files:
- Restart your PC and log back into the administrator account.
- Press Windows key + R to open Run.
- Input C:\Users and press Enter.
- Navigate to your old and broken user account.
Once here, copy and paste all your user files from this old account to the new one. You’ll want to do this individually for each folder; otherwise, you might accidentally bring across some hidden and problematic system files.
To highlight all files in a folder, press Ctrl + A. To select specific ones in bulk, hold down Ctrl as you left-click. Alternatively, hold left-click and drag around the files.
Then press Ctrl + C to copy them. Navigate back to the Users folder, enter the new account, and press Ctrl + V to paste your files.
Once done, sign out of the administrator account and into your new account. All the files you transferred will be there.
Remember to Keep Your Data Backed Up
Now your Windows profile has been restored, and you have a permanent user account again. To try and stop this from happening in the future, don’t shut your computer down while it’s installing an update.
Luckily, in this scenario of profile corruption, it doesn’t result in much lost data. Regardless, you should regularly back up your files to protect against all eventualities.
Image Credit: Dooder/Shutterstock