
Для работы проектов iXBT.com нужны файлы cookie и сервисы аналитики.
Продолжая посещать сайты проектов вы соглашаетесь с нашей
Политикой в отношении файлов cookie
Операционные системы Windows похожи на швейцарский нож, предназначенный для выполнения самых разнообразных задач. Однако те настройки, что используются по умолчанию в ОС, могут идеально подходить одному пользователю и совершенно не устраивать другого. В этом небольшом материале вы узнаете, как существенно уменьшить время ввода в Windows 10/11 и стать быстрее всех в соревновательных играх.

Прежде чем переходить к редактированию скрытых настроек ОС, необходимо отключить встроенные алгоритмы сглаживания и доведения мыши, которые по умолчанию применяются в Windows.
1. Нажимаем Win+R и вводим команду control mouse.
2. В открывшемся окне выставляем настройки, как показано на скриншотах ниже.
П. С. Вы также можете дополнительно уменьшить время ввода с клавиатуры, введя команду сontrol keyboard и переведя все ползунки в правую сторону.
После отключения ненужных алгоритмов доведения и сглаживания необходимо заставить Windows переложить обработку ввода с первого ядра процессора на любое свободное. Всё дело в том, что, несмотря на появление многоядерных CPU и умения нынешних программистов качественно распараллеливать код, Windows 10/11 продолжает выполнять обработку большинства системных задач на первом ядре CPU, создавая очередь ввода и задержку. Убедиться в правдивости моих слов вы можете самостоятельно, скачав и запустив LatencyMon 7.31.
1. Скачиваем и запускаем от имени администратора утилиту intPolicy.
2. В появившемся окне программы находим xHCI-совместимый хост-констроллер USB (Название может отличаться).
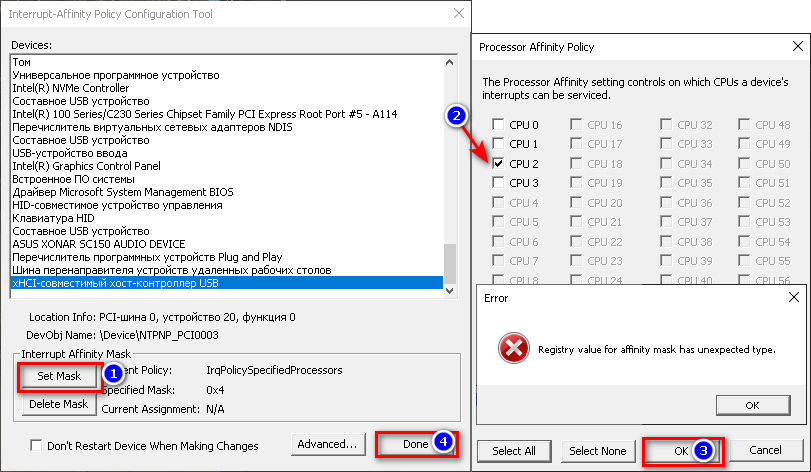
3. Кликам по найденному устройству и переходим в раздел выбора ядра (Set Mask).
4. Выбираем свободное ядро (0 — это первое ядро процессора, а 1 — его виртуальный поток). Нажимаем ОK и Done. Если всё было сделано правильно, то у вас на пару секунд отключится клавиатура и мышь.
5. Перезагружаем ПК.
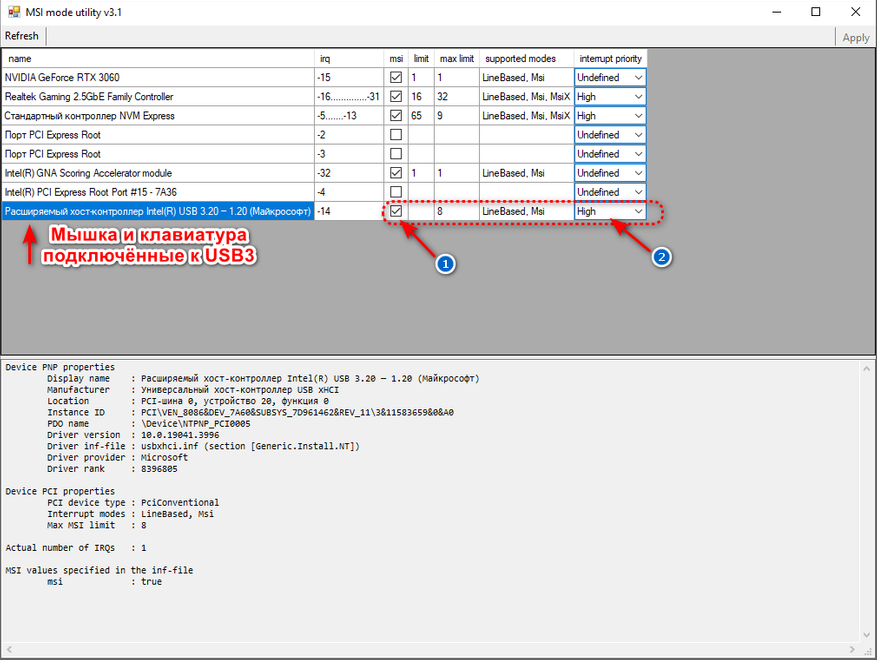
Заставляем Windows использовать альтернативный способ опроса подключённых к ПК устройств — Message Signaled Interrupts (MSI). Не стану забивать вам голову лишней технической информацией, а только скажу, что он давно применяется в серверных системах и значительно уменьшает латентность. Более подробно о MSI вы можете почитать тут.
1. Скачиваем утилиту MSI v3.1 и запускаем её от имени администратора.
2. Находим в интерфейсе программы контроллер USB и ставим напротив него галку и назначаем высокий приоритет (High).
3. Применяем твик прерывания таймера системных часов, используя команду regedit или скачиваем и запускаем от имени администратора уже заранее готовый файл.

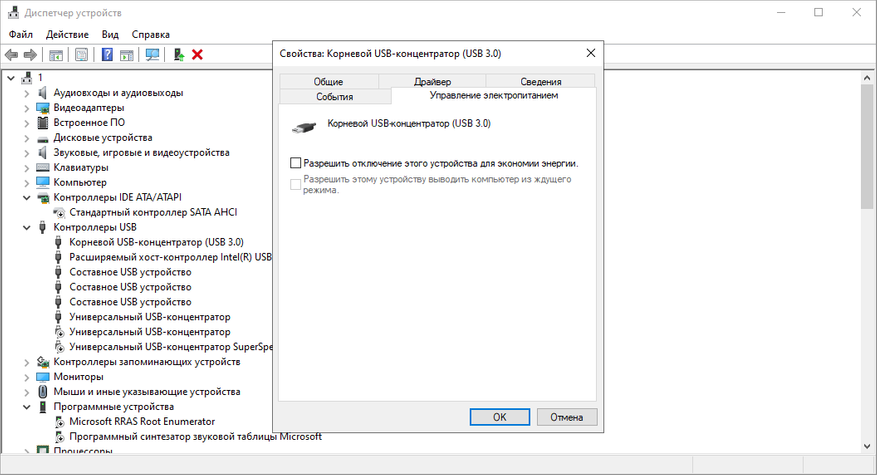
Теперь осталось запретить Windows принудительно отключать USB-устройства. Дело в том, что любой алгоритм сохранения электроэнергии не совершенен, а применяемый для USB и вовсе мешает датчикам клавиатуры и мыши.
1. Нажимаем Win+R и вводим команду devmgmt.msc.
2. В появившемся окне переходим в раздел «Вид» и нажимаем «Показать скрытые устройства».
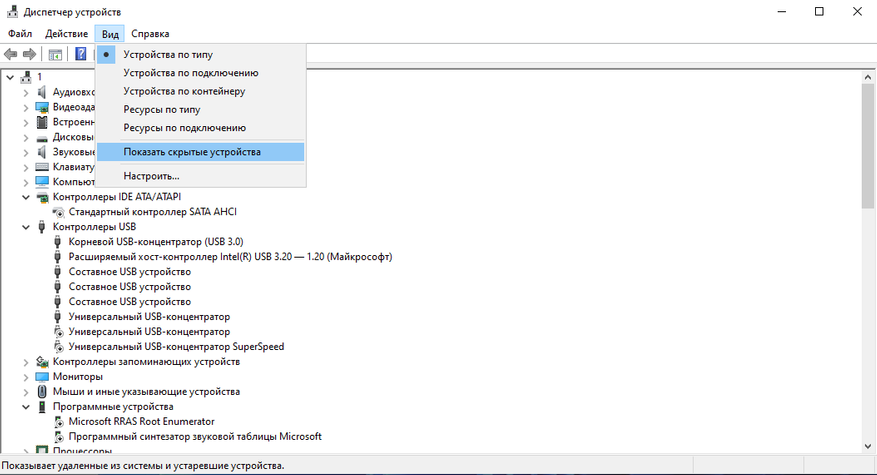
3. Осторожно удаляем все серые устройства.
4. Для оставшихся устройств через правый клик убираем галочки в разделе управления.
П. С. Вы можете дополнительно уменьшить латентность ввода, отключив все неиспользуемые устройства: USB-порты, перечислитель виртуальных дисков (Майкрософт), перечислитель виртуальных сетевых адаптеров NDIS, шина перенаправителя устройств удаленных рабочих столов, Intel(R) Management Engine Interface и т. п.
Последний пункт относится к спорным настройкам ОС и может не подходить всем пользователям Windows. Имейте это ввиду!
1. Скачиваем и запускаем от имени администратора программу Power Settings Explorer. Она нам понадобится для активации скрытых настроек электропитания Windows.
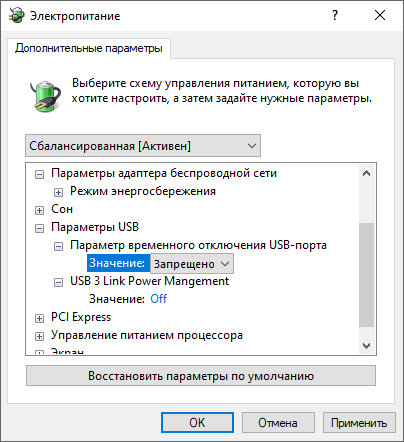
2. В интерфейсе ПО находим USB3 Link Power Management, «Разрешить состояния снижения питания» и снимаем c них галочки.
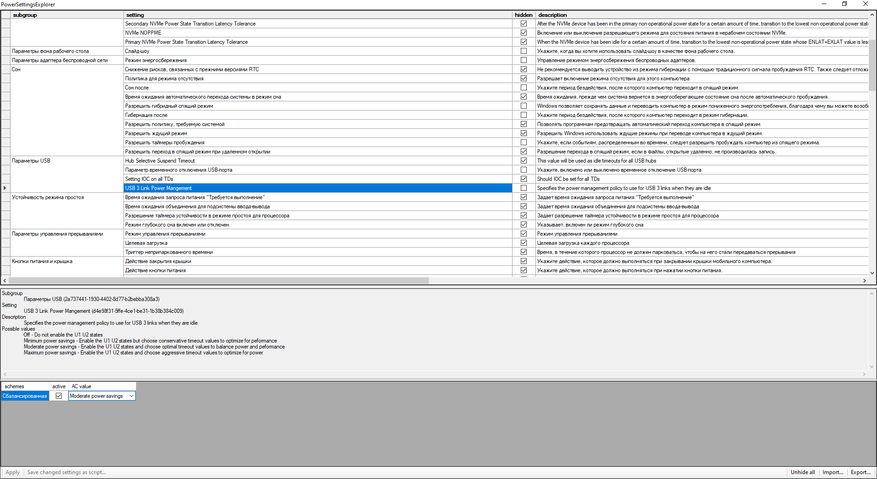
3. Нажимаем Win+R и вводим команду powercfg.cpl. В появившемся окне переходим в раздел «Настройка схемы электропитания» и уверенно нажимаем на «Изменить дополнительные параметры питания».
4. В разделе «Параметры USB» запрещаем Windows отключать питание USB-портов и регулировку подачи электроэнергии (На уровне BIOS и так всё регулируется правильно).
Вот, собственно, и всё! И хотя среднестатистическому пользователю Windows представленная инструкция может показаться очередным ребячеством, которая не стоит потраченного времени. Для всех тех, в ком ещё не погасло пламя огня, при игре в соревновательные шутеры, она обязательно окажется полезной. Уважайте свободу, используйте только проверенное ПО и ни в коем случае не позволяйте компаниям диктовать вам свои условия. С вами был Павел. Ещё увидимся!
П. С. Ещё больше уменьшить задержку ввода вы можете, воспользовавшись отдельной инструкцией по настройке и отключению системного таймера в Windows.
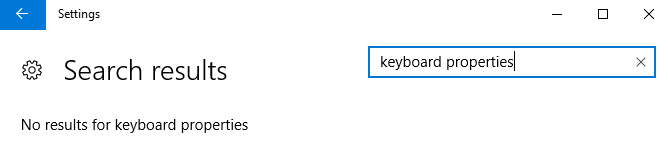
If this is what you’re looking for, you might have wondered… where the heck is it on the Windows 10 settings?
As you might have realized, Windows 10 settings doesn’t show this settings dialogue anymore. Instead, you have bunch of other useless things under settings all around keyboard settings—but none of them will help you to increase or decrease your Cursor Blink Rate, the Character Repeat such as the Repeat Delay or the Repeat Rate. And even though you type “keyboard properties” to the search console of the settings, Windows will tell you that it doesn’t know nothing about nothing:
Alright, let’s solve this.
The Keyboard Properties are still there. And Windows developers made it as difficult as possible to find it. And why would they make your life miserable? Because Microsoft can!
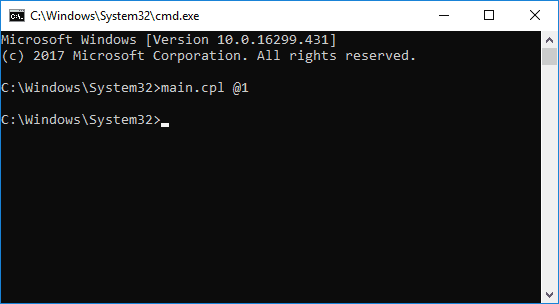
Open the commander. To do so, Press CTRL+X and click “run”. On the run field, type cmd:
And then, on the command window, type these magic words:
main.cpl @1
This is how it should look like:
And by saying these words, the magical Keyboard Properties will appear!
I hope that helped. And if it did, don’t be shy. I appreciate any comment below.
Thank you!
Top VPN Tools 2025: Tested & Reviewed
Don’t Let Them Spy on Your Data!
LIST OF TOP VPNs
Top Antivirus Tools 2025
Advertisement: Sponsored Listings
1
Norton Security Antivirus
Norton Antivirus is one of our review winners in 2025. No other antivirus software offers such impressive virus protection in the market right now. This may change in the future as the market is constantly changing.
2
AVG Internet Security
In 2025 AVG began offering unlimited install features for their antivirus software. For everyone, but especially families, this is one of the best bargains of the year. The interface couldn’t be any easier to use, and the malware protection is solid.
3
Avast Pro Antivirus
One of the advantages of Avast 2025 is not just it’s reliability and broad antivirus protection but also the price. At only $34.68, it’s one of the most affordable deals you can find among reputable antivirus tools.
4
Panda Security
Panda is not only the cheapest, but is actually one of a kind: They invented the first artificial intelligent virus protection in the world that recognizes unknown viruses. It works so well that they became extremely popular in Europe, and are being praised by hackers.
5
Kaspersky Antivirus
With over 400 million users, over 20 years of experience, and 270,000 corporate clients, Kaspersky Lab technologies is a strong cybersecurity company. This company offers an array of powerful products such as Kaspersky Total Security, Kaspersky Anti-Virus, Kaspersky Internet Security and more.
6
McAfee Antivirus
McAfee has been around for more than 30 years, making them one of the oldest virus protection companies on the market. Due to restructuring of the company over the last years, the company has successfully created a new product fit to satisfy customers in 2025.
7
Avira Antivirus Pro
AVIRA Antivirus is one of the most popular virus protection software. They’ve been famous for years for their free antivirus offering. The paid version is as good as the free version but without ads. For only $0.99, they make switching to the professional version worth it. However, support is not Avira’s forte.
Skip to content
How to Change Keyboard Character Repeat Delay and Rate in Windows 10
The repeat delay and the character repeat rate are two important parameters of the hardware keyboard. Using them, the user can make typing more comfortable. Let’s review them.
Recent Windows 10 builds two new Settings pages, Time & Language > Language and Devices > Typing. They are designed to replace the classic «Language» applet of Control Panel, which is hidden starting with Windows 10 Build 17063. However, using these new Settings pages, you can’t adjust the keyboard character repeat delay and rate. Today we will see how to access the option.
If you type a lot, changing these parameters will allow you to type much faster. The repeat delay defines the pause between pressing a key and when it starts repeating while you are holding that key. The repeat rate sets the speed at which Windows repeats the character of the key you are holding pressed.
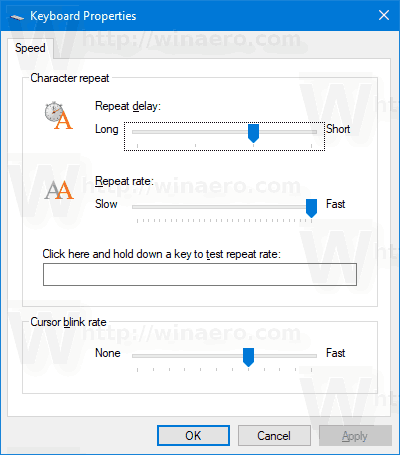
- Open the classic Control Panel app.
- Switch its view to either «Large icons» or «Small icons» as shown below.

- Click on the Keyboard applet.

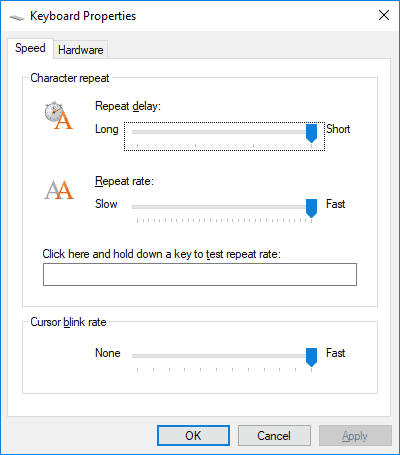
- In the keyboard dialog, change the position of the Repeat delay slider on the Speed tab to set a longer or shorter delay.

- Now, change the Repeat rate slider value to be slow or fast for what you want.
- Click on the Apply button.
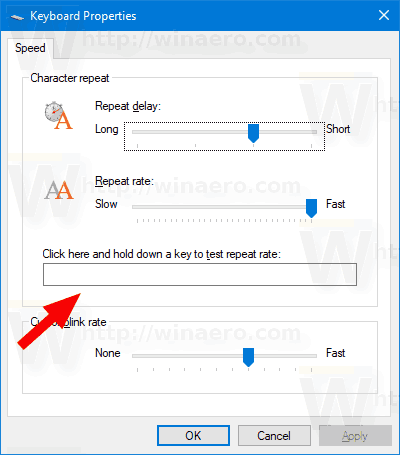
- Use the Click here and hold down a key to test repeat rate text box to test the changes you made.
- Click on OK to close the dialog.
Alternatively, the options can be configured in the Registry. Here’s how.
Change Keyboard Repeat Delay and Rate in the Registry
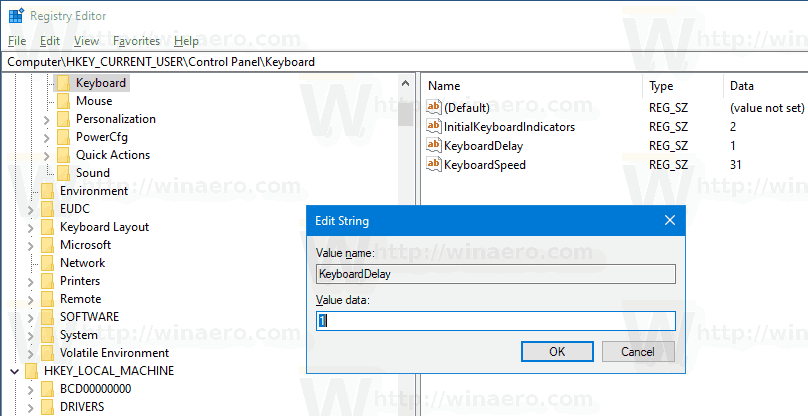
- Open the Registry Editor app.
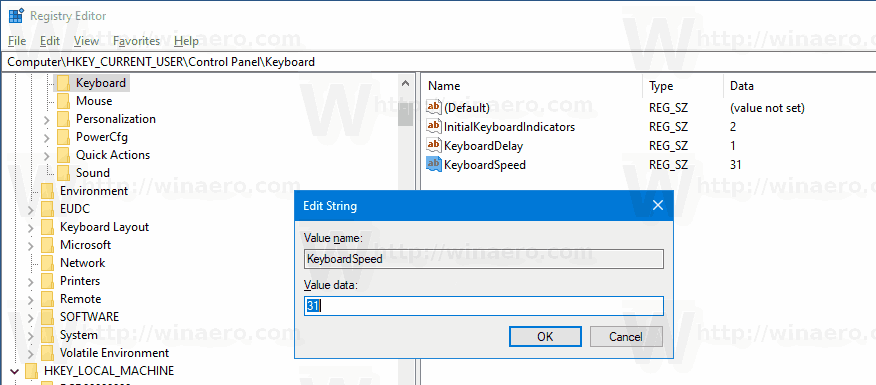
- Go to the following Registry key.
HKEY_CURRENT_USER\Control Panel\Keyboard
See how to go to a Registry key with one click. - On the right, modify or create a new string (REG_SZ) value KeyboardDelay.
- Set its value data in the range of 3 and 0, i.e. set it to 3, 2, 1, or 0. The value data of 3 is for the long delay, 0 is for short.

- Now, modify the KeyboardSpeed string value. Set its value data to a number between 0 (slow) and 31 (fast) for the repeat rate you want.

- To make the changes done by the Registry tweak take effect, you need to sign out and sign in to your user account. Alternatively, you can restart the Explorer shell.
You are done.
Articles of interest.
- How to Set Default Keyboard Layout in Windows 10
- Add or Remove Keyboard Layout in Windows 10
- Enable Per-Window Keyboard Layout in Windows 10
- Change Hotkeys to Switch Keyboard Layout in Windows 10
Support us
Winaero greatly relies on your support. You can help the site keep bringing you interesting and useful content and software by using these options:
If you like this article, please share it using the buttons below. It won’t take a lot from you, but it will help us grow. Thanks for your support!
Windows 10 is undoubtedly the best operating system for your PC. However, you might experience few technical issues such as keyboard input lag or keys getting stuck occasionally. You may have observed that your keyboard response is slow, i.e., when you type something on your keyboard, it takes forever to appear on the screen. Keyboard input lag can be frustrating, especially when you are in the middle of writing your school assignment or drafting an important work email. You need not worry! We have compiled this small guide, which explains the possible reasons behind keyboard lag and the methods you can use to fix keyboard input lag in Windows 10 systems.
What causes Keyboard Input lag in Windows 10?
Some of the reasons for keyboard input lag on your Windows 10 system are:
- If you use an outdated keyboard driver, you might experience a slow keyboard response while typing.
- If you use a wireless keyboard, you might encounter keyboard input lag more often. It is so because:
- There is not enough battery in the keyboard to function properly.
- The keyboard is unable to capture and communicate via wireless signals.
- Incorrect keyboard settings might cause a slow keyboard response in Windows 10.
- Sometimes, you may experience slow keyboard response if there is high CPU usage on your system.

Table of Contents
Listed below are the methods that you can implement to fix computer delays when typing.
Method 1: Restart your computer
Sometimes, restarting your computer can help you fix minor technical issues on your system, including slow keyboard response. Therefore, the first thing that you should do is restart your computer as follows:
1. Press the Windows key on the keyboard to open the Start menu.
2. Click on Power, and select Restart.
Method 2: Use the On-screen keyboard
You can choose to use the on-screen keyboard to temporarily fix keyboard input lag in Windows 10 computers. Follow these steps to enable an on-screen keyboard:
1. Launch Windows Settings by pressing Windows + I keys together on your keyboard.
2. Click on the Ease of Access option, as shown.

3. Under the Interaction section in the left pane, click on Keyboard.
4. Here, turn on the toggle for the option titled Use the on-screen keyboard, as depicted.

Finally, the virtual keyboard will pop up on your screen, which you can use for the time being.
For a more permanent solution, read the following troubleshooting methods to change keyboard settings to fix keyboard lag in Windows 10.
Also Read: Mouse Pointer Lags in Windows 10 [SOLVED]
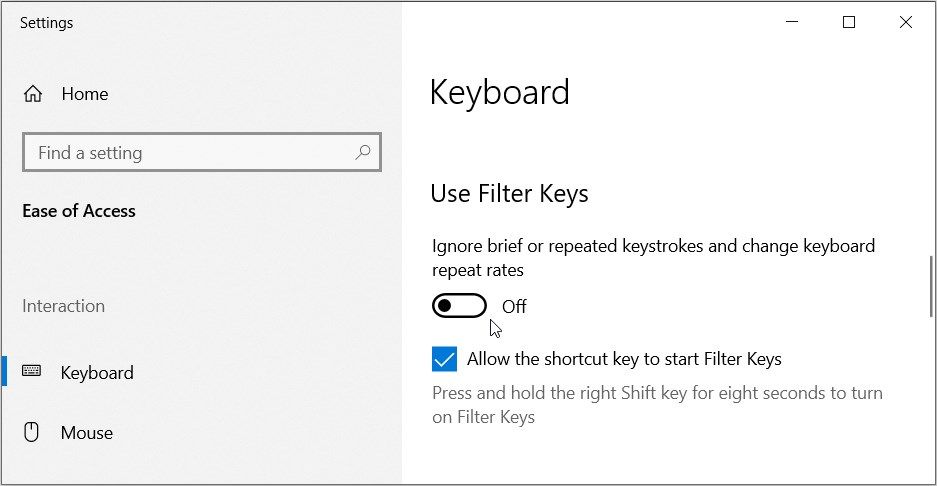
Method 3: Turn off Filter keys
Windows 10 has an in-built filter keys accessibility feature that guides the keyboard towards a better typing experience for people with disabilities. But it might be causing keyboard input lag in your case. Therefore, to fix the slow keyboard response, follow the given steps to turn off the filter keys.
1. Launch Settings and navigate to the Ease of Access option as explained in the previous method.

2. Under the Interaction section in the left pane, click on Keyboard.
3. Toggle off the option under Use Filter Keys, as depicted below.

The keyboard will now ignore brief or repeated keystrokes and change keyboard repeat rates.
Method 4: Increase Keyboard Repeat Rate
If you have set a low keyboard repeat rate in your keyboard settings, you might encounter a slow keyboard response. In this method, we will increase the keyboard repeat rate to fix keyboard lag in Windows 10.
1. Launch the Run dialog box by pressing the Windows + R keys together
2. Once the run dialog box appears, type the control keyboard and hit Enter.
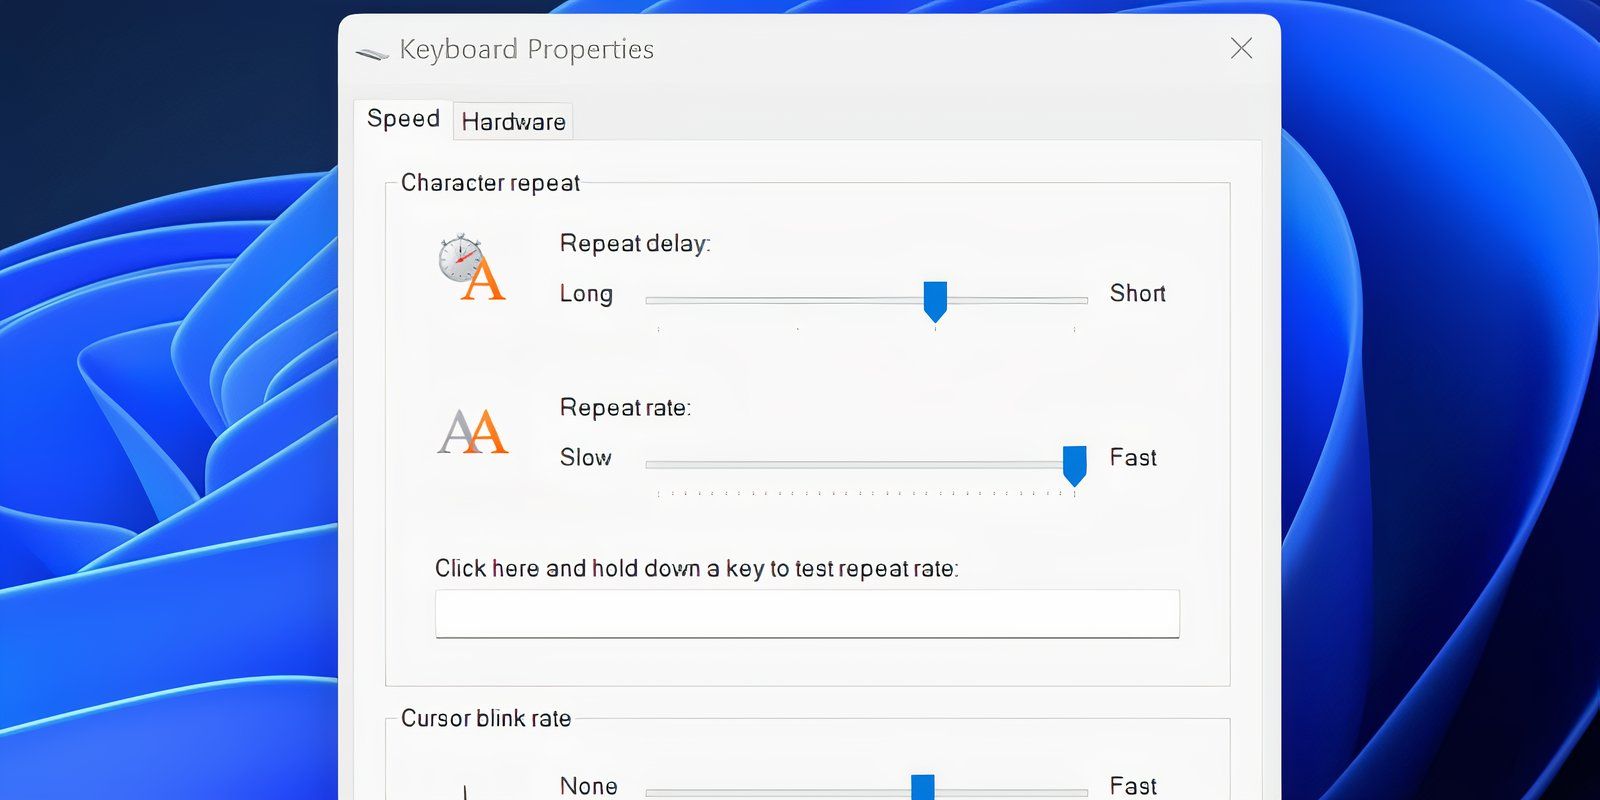
3. Under the Speed tab, drag the slider for Repeat rate to Fast. Check the screenshot for reference.
4. Finally, click on Apply and then OK to implement these changes.
Increasing the Repeat rate can help resolve the keyboard lag while typing. But, if it doesn’t, try the next fix.
Method 5: Run Troubleshooter for Hardware and Devices
Windows 10 comes with an in-built troubleshooter feature to help you fix issues with your computer hardware like audio, video, and Bluetooth drivers, etc. Implement the given steps to utilize this feature to fix Keyboard input lag in Windows 10 PCs:
Option 1: Through Control Panel
1. Search the control panel in the Windows search bar and launch it from the search results.
Or,
Open the Run dialog box by pressing Windows + R keys. Here, type the control panel in and hit Enter. Refer to pic below for clarity.

2. Click the Troubleshooting icon from the given list, as shown below.
3. Click View all from the panel of the left, as depicted.

4. Here, click on Keyboard from the list.

5. A new window will appear on your screen. Click Next to run the troubleshooter.

6. The Windows troubleshooter will automatically detect and solve issues with your keyboard including Mechanical Keyboard Double Typing.
Option 2: Through Windows Settings
1. Launch Windows Settings as instructed in Method 2.
2. Select the Update and Security option, as shown.
3. Click on the Troubleshoot tab from the left pane and then click on Additional troubleshooters in the right pane.

4. Under Find and fix other problems, click Keyboard.
5. Finally, click on Run the troubleshooter to automatically detect and fix problems with your keyboard connected to Windows 10 computer. Refer to pic below.

However, if this method is not able to resolve the keyboard input lag on your system, you can check out the next fix.
Also Read: Mouse Lags or Freezes on Windows 10? 10 Effective ways to fix it!
Method 6: Update or Reinstall the Keyboard Driver
If an outdated version of the keyboard driver is installed or your keyboard driver has become over time, then you will face keyboard delay while typing. You can either update or reinstall the keyboard driver to fix keyboard input lag in Windows 10.
Follow the given steps to do the same:
1. Launch Device Manager by searching for it in the Windows search bar, as shown below.

2. Next, locate and double-click on the Keyboards option to expand the menu.
3. Right-click on your keyboard device and select Update driver or Uninstall device.
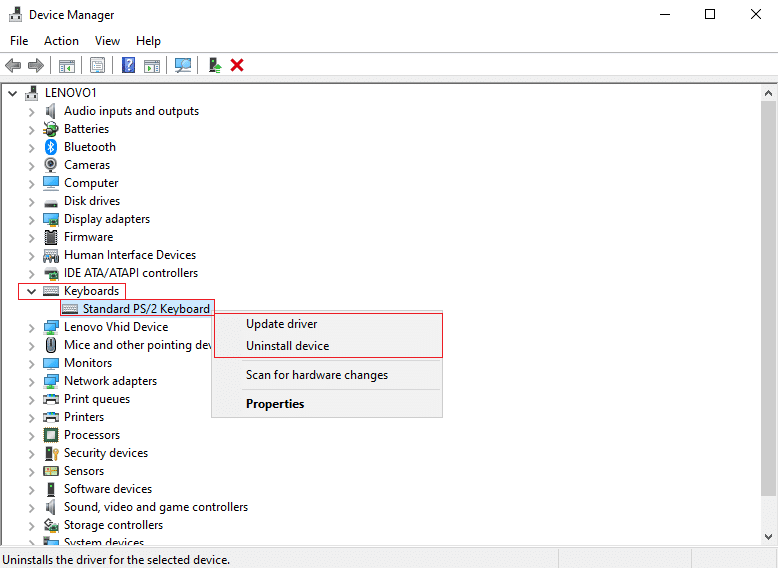
4. In the new window that appears, select Search automatically for drivers.

5. Now, your computer will automatically update the keyboard driver or reinstall the keyboard driver.
After updating or reinstalling your keyboard driver, you can restart your computer and check whether the keyboard is responding properly.
Method 7: Perform DISM Scan
An improper configuration of Windows settings or technical errors on your system might lead to slow keyboard response while typing. Therefore, you can run DISM (Deployment Image Servicing and Management) command to scan and fix problems, including Keyboard input lag in Windows 10 systems.
Here are the steps to run DISM scan:
1. Go to your Windows search bar and type Command prompt.
2. Launch it with administrator rights by clicking on Run as administrator, as shown.

3. Type the following commands one by one and press Enter after each command to execute it.
DISM /Online /Cleanup-Image /ScanHealth
DISM /Online /Cleanup-Image /CheckHealth
DISM /Online /Cleanup-Image /RestoreHealth

4. Finally, wait for the deployment image servicing and management tool to detect and fix the errors on your system.
Note: Make sure you keep the tool running and do not cancel in between.
DISM tool will take about 15-20 minutes to complete the process, but it may take longer.
Also Read: How to Reset your Keyboard to Default Settings
Method 8: Perform a Clean System Boot
If none of the above-mentioned methods have worked for you, try this solution. In order to fix keyboard input lag in Windows 10, you can perform a clean boot of your system.
Here is how to do it:
1. First, log in to your system as the administrator.
2. Type msconfig in the Windows search box and launch System Configuration from the search results. Refer to the given pic.
3. Switch to the Services tab from the top.
4. Check the box next to Hide all Microsoft services at the bottom of the screen.
5. Next, click Disable all button, as shown below.

6. Now, switch to the Startup tab click on the link Open Task Manager, as depicted.

7. Once the Task Manager window appears, right-click on each unimportant app and select Disable as depicted in the pic below. We have explained this step for the Steam app.

8. Doing so will prevent these apps from launching on Windows startup.
Finally, reboot your PC and check whether this could resolve the slow keyboard response on your system.
Method 9: Fix Wireless Keyboard Input Lag
If you are using a wireless keyboard with your Windows 10 desktop/laptop, and you are experiencing keyboard input lag, then make sure you perform the following checks:
1. Check batteries: The first thing to check is the batteries. If there is a need to change the batteries, replace the old batteries with new ones.
2. Check Bluetooth or USB connection
If you are facing keyboard input lag using a USB connection:
- Make sure that the USB receiver and your keyboard are well within range.
- Moreover, you can also resynchronize your keyboard with the USB receiver.
Alternatively, if you are using your wireless keyboard over a Bluetooth connection, try to disconnect and then reconnect the Bluetooth connection.
3. Signal interference: If your wireless keyboard is not functioning properly and you are experiencing a slow keyboard response while typing, then there may be signal interference from your Wi-Fi router, wireless printers, wireless mouse, mobile phone, or USB network
Wi-Fi. In such cases, make sure that the devices are kept at a suitable distance from each other to avoid signal interference.
Recommended:
- Steam lags when downloading something [SOLVED]
- Fix Site Can’t Be Reached, Server IP Could Not Be Found
- How To Create Windows 10 Sleep Timer On Your PC
- How To Fix Spotify Search Not Working
We hope this guide was helpful and you were able to fix keyboard input lag in Windows 10 and resolve the slow keyboard response on your system. Let us know which method worked for you. Leave your queries/suggestions in the comments below.
A laggy keyboard can drive you up the wall, especially when working on something important. If you’re tired of fighting your keyboard, then try these nine methods to fix Windows 10 and 11 keyboard woes.
Change the Keyboard Properties
Changing a few keyboard properties may help resolve the input lag. Here is all that you need to do:
- Press the Win + R keys, type «control keyboard» in the text field of the Run dialog and press Enter.
- There will be two options in the Character Delay section. Repeat delay adjusts the delay between you press-holding a key and the initiation of the repeated output of the key. Repeat rate allows you to adjust the speed at which this output is repeated.
- Shorten the Repeat delay and increase the Repeat rate to eliminate the input lag. Experiment with the levels that feel more responsive.
- Click on OK to save and exit.
Update or Reinstall the Keyboard Driver
A hardware driver tells your PC how to handle external hardware like your keyboard. If your keyboard’s driver is outdated, your computer will struggle to communicate with the hardware and might cause keyboard input lag.
There are a few ways to find and replace outdated Windows drivers. Here’s how to update or reinstall your keyboard driver using Device Manager:
- Press the Win key, type Device Manager, and press Enter.
- Right-click on the keyboard driver and choose Update driver from the context menu.
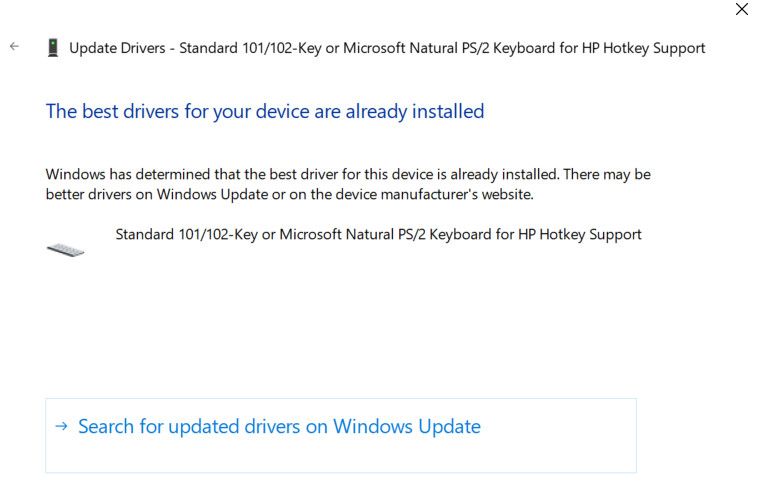
- Click on Search automatically for drivers. If your system has an updated version available, it will notify you, and you can proceed with installing it.
- Otherwise, you can choose Search for updated drivers on Windows Update and install the updated version if available.
Alternatively, you can manually download the latest version of the driver from the manufacturer’s website. Then, follow these steps:
- Repeat steps 1-3 from above and choose Browse my computer for drivers.
- Locate and select the updated version you just downloaded and install it.
Disable Filter Keys
Filter keys is an accessibility feature that instructs Windows to ignore brief or repeated keystrokes. This could potentially be a reason for the delayed output of your keyboard. You can fix this by disabling Filter keys from the keyboard settings.
- Open Settings by searching for “settings” in the Start Menu.
- Select Ease of Access and scroll down to the Keyboard section from the right pane.
- Click on Keyboard and look for Use Filter Keys.
- Under this head, you will find a toggle button. If it’s enabled, disable it and close the Settings app.
If you’re running Windows 11, you’ll find the option to disable Filter Keys in Settings > Accessibility > Keyboard > Filter Keys.
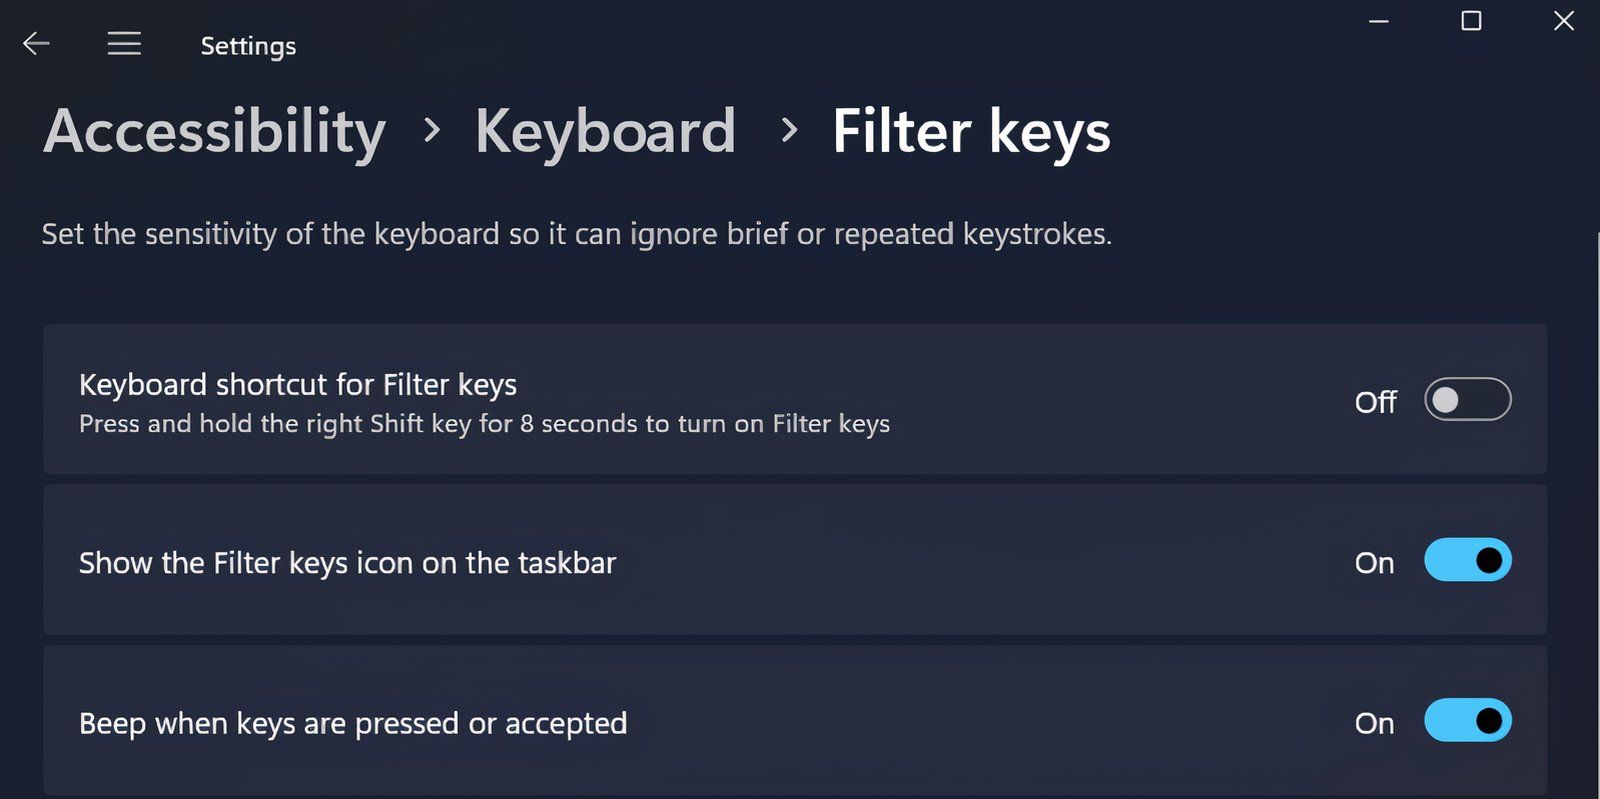
Then, try typing something into your text editor and see if it still lags.
Disable Background Programs
Sometimes, multiple background programs can result in a delay in the keyboard’s response. So, close all the unwanted programs in the background from the system tray or use Task Manager to end processes that you don’t need currently.
Disable Game Mode
Windows Game Mode can also help you curb every notorious background process while gaming. This mode has a history of causing input lag on Windows PCs, so you’re better off without it, especially while you’re not gaming.
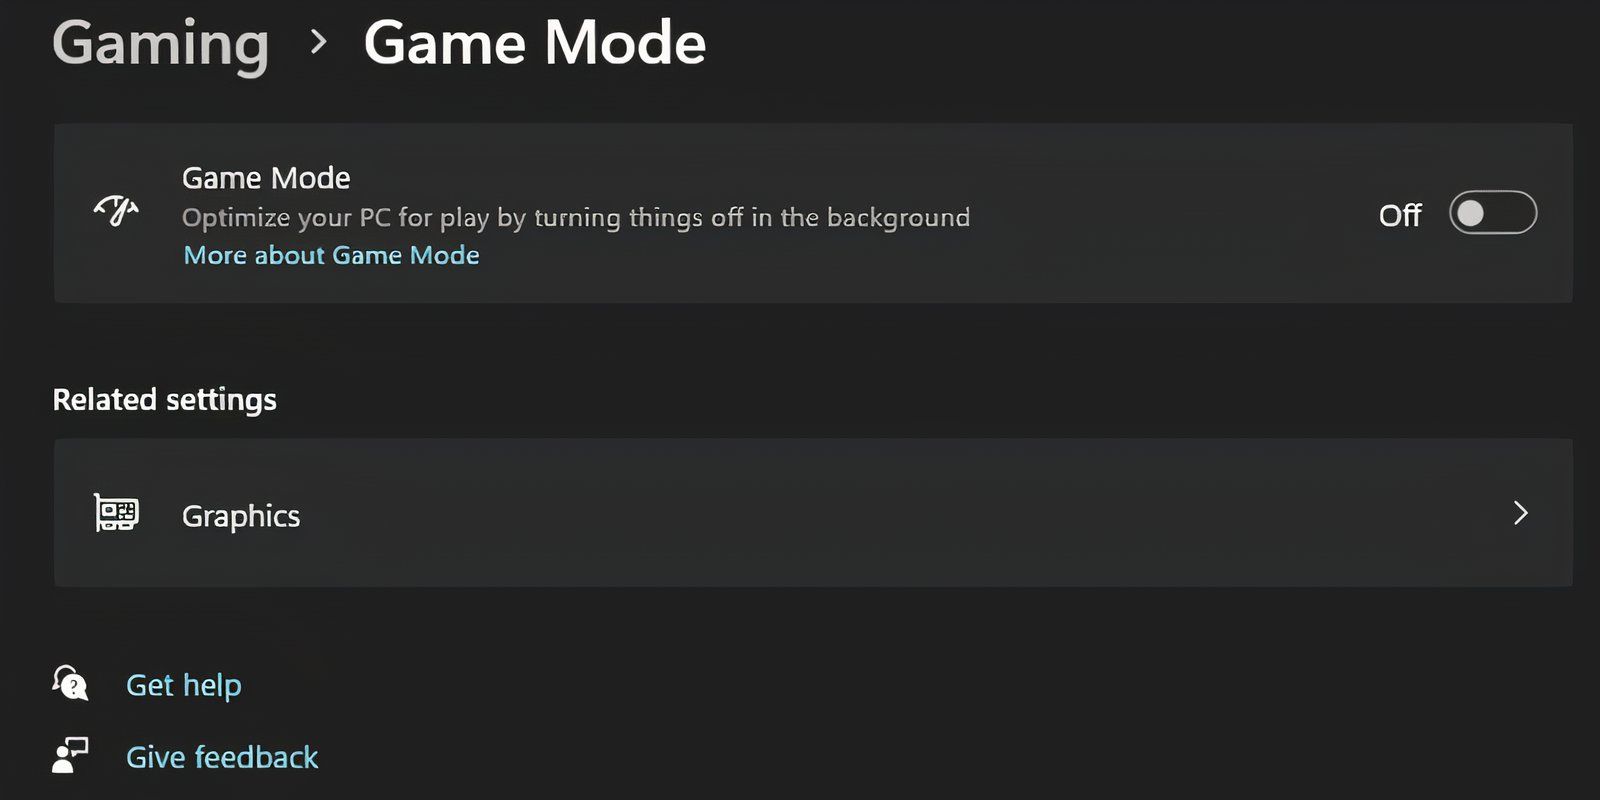
Head to Settings > Gaming > Game Mode and turn off the toggle.
Check the Keyboard in Safe Mode
Safe Mode runs Windows with bare minimum drivers and services and is a great way to isolate hardware issues. If your keyboard works fine in Safe Mode, then you must reinstall the keyboard driver from the manufacturer’s website.
Repeat the following steps to boot into Safe Mode:
- Press the Win key and click on the Power icon.
- Hold the Shift key and click on Restart.
- Your PC will boot to the Windows Recovery Environment (WinRe) page. Click on Troubleshoot and select Advanced options.
- Select Start-up settings and click on Restart.
- Press F6 to boot into Safe Mode. Check if your keyboard works fine.
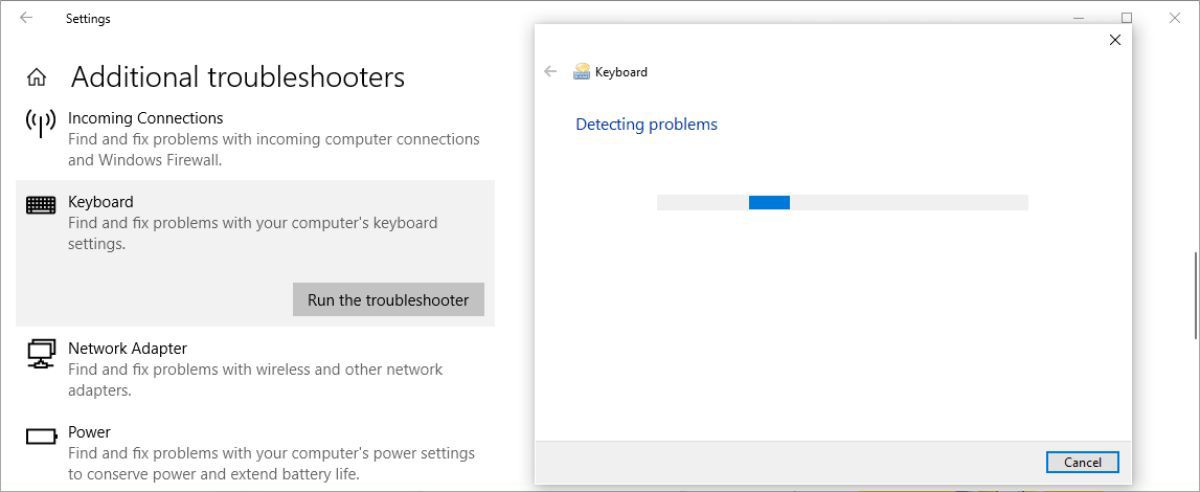
Use the Windows Keyboard Troubleshooter
Fortunately, Windows comes with some great built-in troubleshooting tools. Whether you’re experiencing input lag or your keyboard isn’t working at all, the keyboard troubleshooter can provide you with a solution. Here’s how to use it:
- Open the Settings app and navigate to Update & Security > Troubleshoot.
- You’ll now see a list of recommended troubleshooters. If there are none, simply click on Additional troubleshooters and look for Keyboard. Click on it and select Run the troubleshooter.
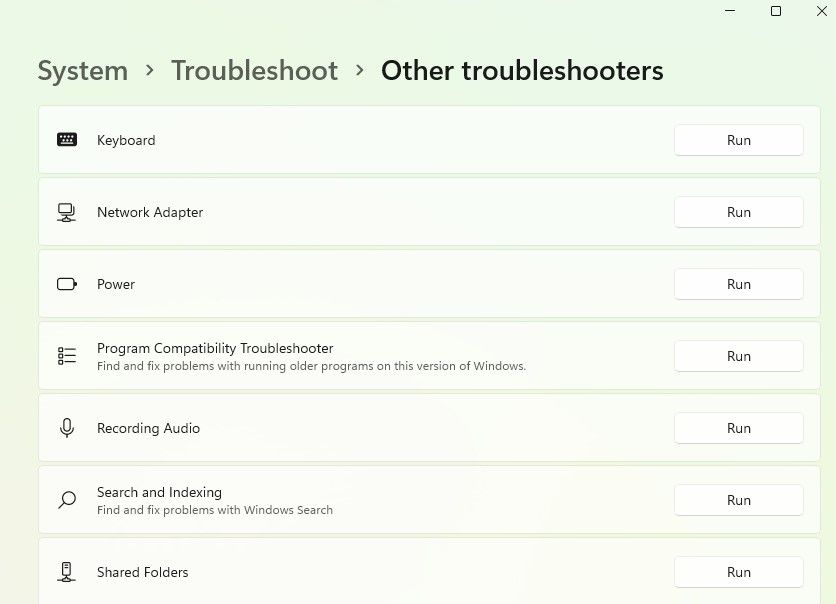
If you’re running Windows 11, you’ll find the Keyboard troubleshooter in Settings > System > Troubleshoot > Other Troubleshooter > Keyboard.
The troubleshooter will look for potential issues. If it finds something to fix, go ahead and follow the directions. Unfortunately, Microsoft plans to retire the Keyboard Troubleshooter this year, and it’s already slowly becoming unavailable on more recent versions of Windows 11.
Perform Specific Fixes for Wireless Keyboards
The above methods apply to keyboards in general. However, some issues are specific to wireless keyboards. If your keyboard is wireless, try the following fixes.
Replace the Batteries
Start by ruling out the possibility of the lag being caused by a drained battery. To do this, replace the battery or recharge your keyboard to full. If this doesn’t fix the problem, try the next solution.
Check the Connection
Start by trying to re-sync your keyboard with the USB receiver. If that doesn’t help, insert the USB receiver into a different USB port on your computer if the current port lacks enough power. Try placing the keyboard closer to the USB receiver if possible.
Remove Interference From Wireless Devices
If you’ve placed other Wi-Fi devices, such as a router or a cell phone, near the computer, move it away and see if that eliminates the input lag.
Consider Getting a New Keyboard
If none of these solutions work, it could be a sign of hardware damage. Before you start searching online for a new keyboard, connect a different keyboard that works fine on another computer to confirm hardware damage as the cause.
While you’re waiting for your new keyboard, you can use the Windows onscreen keyboard. Search for «onscreen keyboard» in the Start Menu and launch the Best Match.
Alternatively, you can use one of the several virtual keyboard apps available out there. If you don’t like the idea of virtual keyboards, you can use speech-to-text software to type, which is getting better with time.