
В данной статье мы обсудим как изменить язык если ваша лицензия Windows поддерживает только один язык интерфейса («Single Language» или «Для одного языка»).
Решить данную проблему поможет редактор реестра.
— Переходим в поиск и вводим «Реестр» => Запускаем его с правами администратора
— Проходим по следующему пути:
HKEY_LOCAL_MACHINE\SYSTEM\CurrentControlSet\Control\Nls\Language
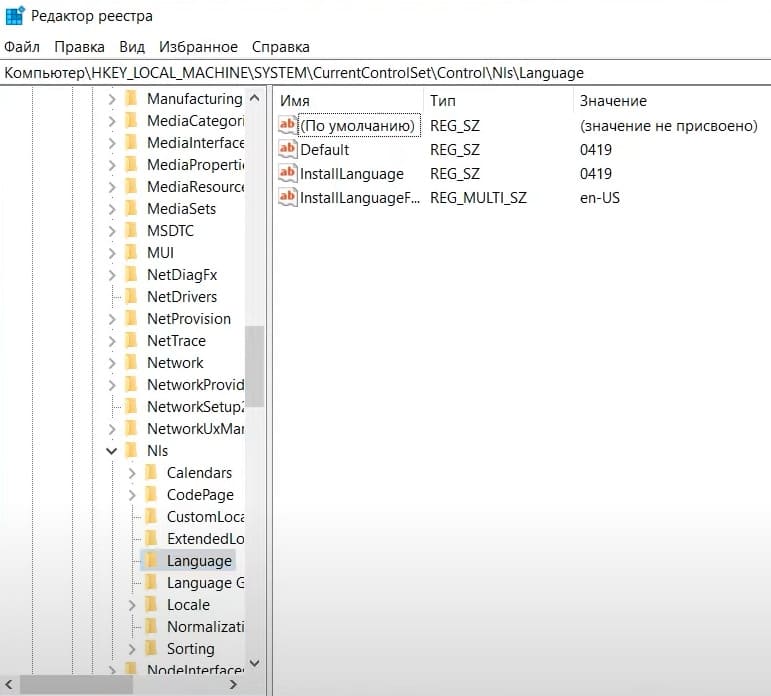
— В данном меню нас интересуют значения полей Default и InstallLanguage. В нашем примере установлены значения 0419, что соостветствует Русскому языку.
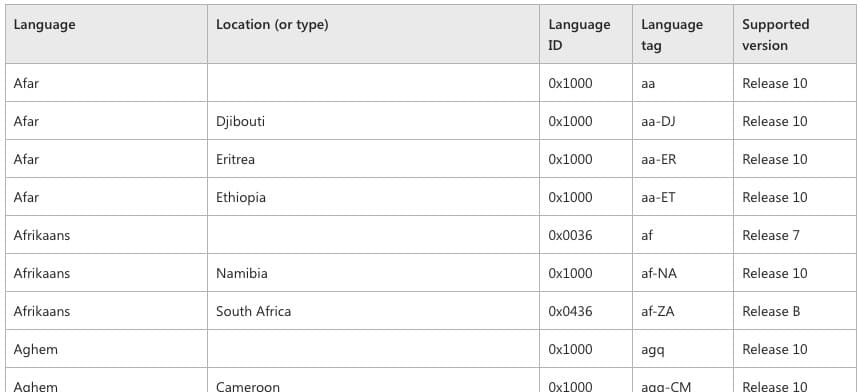
Полный список всех языков, которые соостветствуют опредленной кодировке вы сможете найти в данном документе от Microsoft
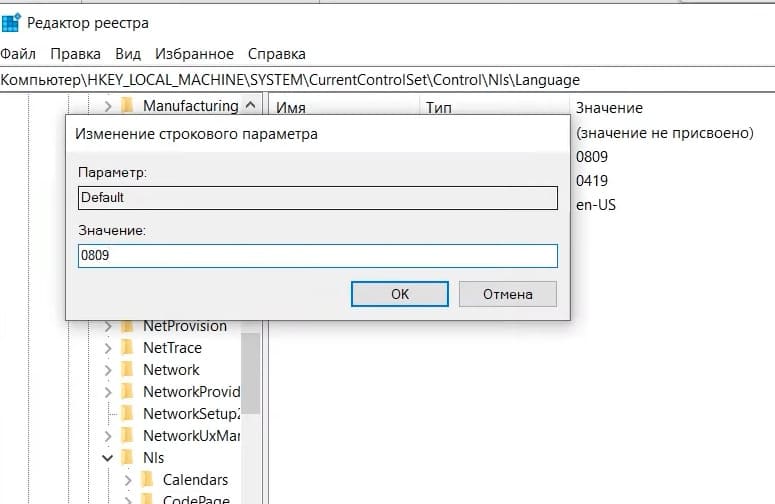
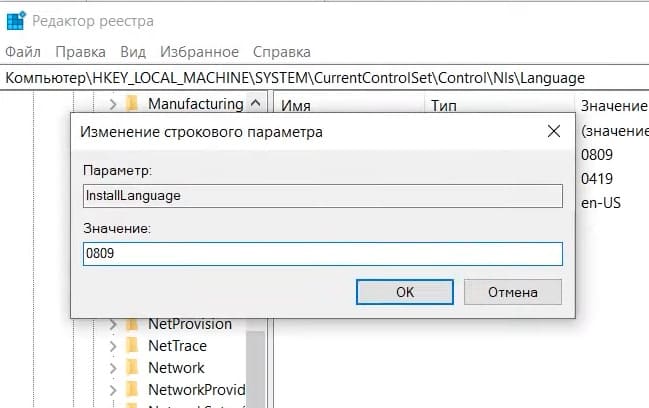
— Попробуем изменить язык на Английский, копируем последние четыри цифры кода — 0809. Вставляем его как значение Default и InstallLanguage.

— Теперь необходимо перезагрузить операционную систему.
— Не обращаем внимания если дата при входе в систему на Русском языке, это можно будет поменять в параметрах языка и даты, в разделе регионального формата.
Но как мы можем увидеть далее, все значки уже на Английском языке.

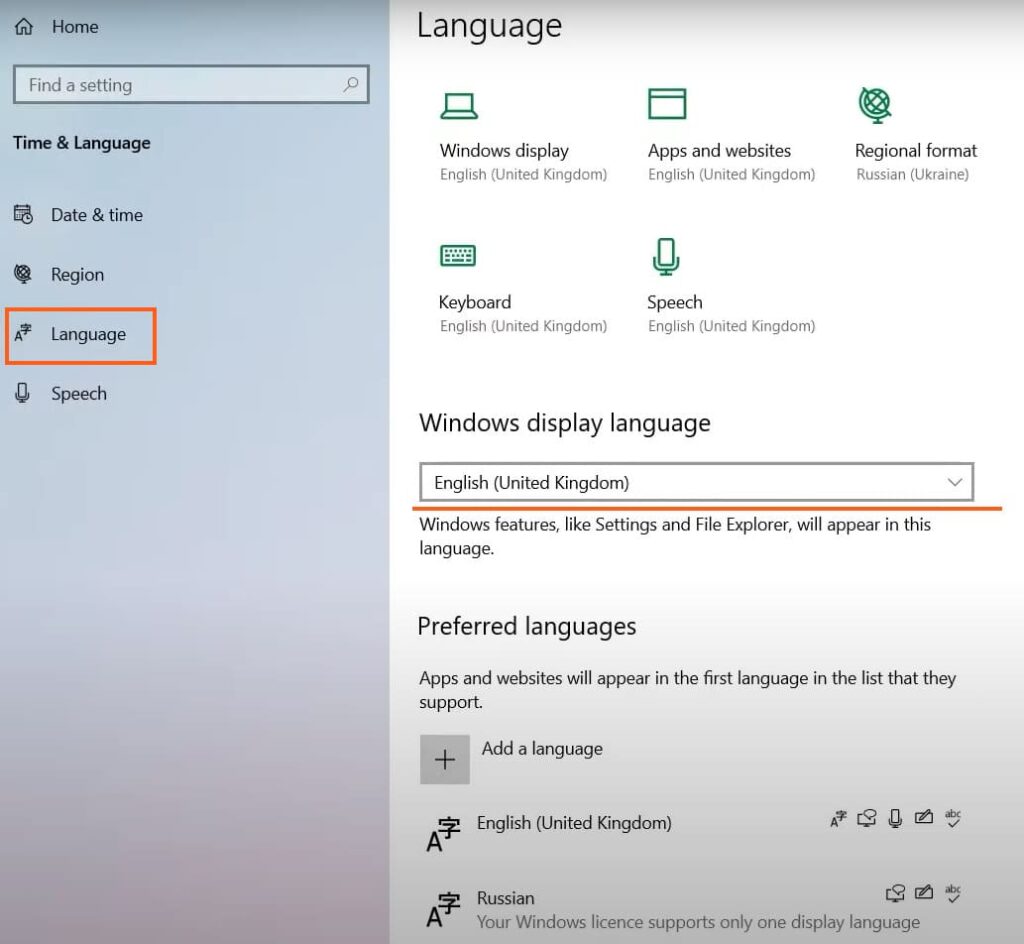
— Проверим Язык параметров. Заходим в Settings => Time & Language
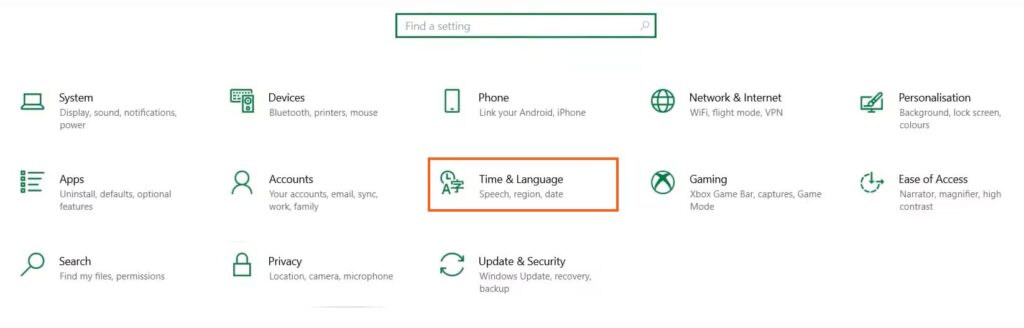
— В разделе «Language» вы увидите что уже выбран Английский Язык.
Таким образом вы можете поменять вашу систему на любой нужный вам язык, даже если ваша система поддерживает только один язык интерфейса.
Лицензионный ключ активации Windows от
You will find hundreds of articles on the internet explaining how to change the display language in Windows 10 laptops. However, most of them do not tell you that is not possible to change the display language when you have single language or core country specific Windows version. Recently, we have purchased a Huawei MateBook laptop in China and had a trouble changing the language. Here, we will explain the options available for you to change the display language of Single language version in Windows 10.
Single Language or Core Country Specific Version
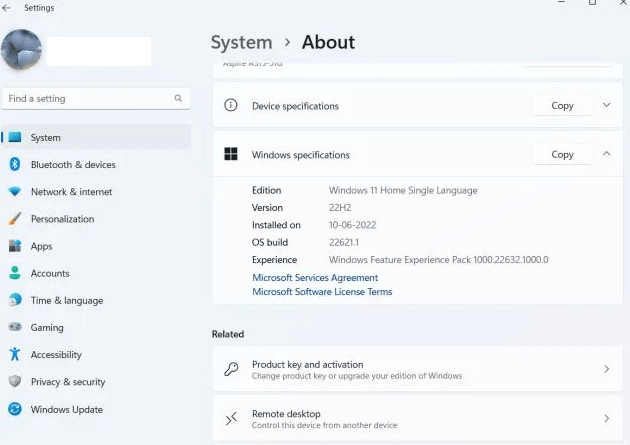
Windows 10 comes with multiple versions and many of us aware Home and Pro versions. However, there are also few other less known varieties like core country specific language or single language version. You can easily find the installed version on your computer by following the below instructions:
- Press “Win + R” keys to open Run prompt.
- Type winver and press enter key.
- You will see “About Windows” dialog box like below.
- Check the Windows version installed on your computer.

Since we have already changed the language and version, you see Windows 10 Pro in the above screenshot. Otherwise, you should see a single language like Windows 10 Home China. We have shown all screenshots in this article in English, you may need to guess and find the correct options when you have Chinese or other specific language on your computer.
Changing Display Language in Windows 10
You can find detailed information on how to change the display language in this article. However, it will not work when you have a single language Windows version installed on your laptop or desktop PC. Generally, single language version does not support changing the language as the product is licensed to use a single language. However, you can confirm whether it is possible to install language pack on your computer to change Windows display language.
- Press “Win + I” keys to open Windows Settings app.
- Click on “Time & Language” option.

- Go to “Languages” section where you can easily change the Windows display language from the dropdown. If the language is not available, you can add a new language.

- However for a single language Windows version, you will see only Chinese or any other single language from the dropdown.
- Under the “Preferred languages” section you can click on the + icon and install a new language in Windows. As you can see, the installed languages on your computer will show multiple icons next to it.

You can hover over each icon to see the name of it. You need the followings in Windows to display everything in a particular language.
- Language pack
- Text-to-speech
- Speech recognition
- Handwriting
- Basic typing with spell checker and dictionary
Mostly, you will see the language pack icon will be missing which is the indication that you can’t install any new languages with your Windows version.
Change Windows Language to English
Unfortunately, there is no easy solution available to quickly fix this issue. You have to reinstall Windows or purchase Pro version depending upon the need. Here are the options for you:
- Upgrade to Windows 10 Pro to install multiple language packs.
- Change product key with single or multiple language.
- Clean install Windows with the same product key and use English or any other single language.
1. For Using Multiple Language – Upgrade to Windows 10 Pro
This is the option we have chosen as it is easy and quickly fix the issue with $99 for Windows 10 Pro.
- Go to Windows Settings app and click on “Update & Security” option.
- Click on the “Activation” section and check under “Upgrade your edition for Windows”.
- If you have purchased Windows 10 Pro separately, you can click on “Change product key” and enter the key.
- Otherwise, click on the “Go to the Store” link. This will take you to the Microsoft Store from where you can purchase Windows 10 Pro.

- Windows 10 Pro will cost you around $99 and you can purchase by logging into your Microsoft account.
- After successful payment, right from your Microsoft account, you can choose the device and upgrade the existing Windows 10 Home Single language version to Windows 10 Pro.
In this way, you will not loose any files on your laptop and all apps will be available as it is after upgrading to Windows 10 Pro. However, you also have a choose to delete all the apps while reinstalling Windows. We recommend to delete all apps especially if you have purchased a Chinese laptop from online stores. Resellers selling Chinese laptops install unnecessary adware to show pop-up advertisements without your consent. Therefore, a complete reinstall will help to get rid of these stuffs. In our case, Huawei MateBook has a PC Manager app which will scan and reinstall all necessary drivers after installing Windows. Otherwise, you need to keep all driver installation files handy before choosing to delete all apps and content on your laptop.
Since Windows 10 Pro support multiple language installation, you can go to language settings page and install additional language packs on your laptop.
2. Change Product Key with Another Windows License
Sometimes you may have an old computer running with Windows and having a different product key. If you do not need to use the old computer, then it is a good idea to use that product key in your new laptop. When you are in the “Activation” setting screen, simply change the product key and follow the instructions to reinstall Windows based on the new key.
3. Use Different Single Language – Clean Install Windows with Same Product Key
This is a hassle method. However, you do not need to spend additional money or need another product key for this. We did not follow this as we misunderstood Windows 10 Home China version can’t be changed to a different language. After purchasing the Pro version, we went to the reseller and confirmed that the language can be changed while reinstalling Windows with the same product key. Therefore, confirm with your reseller whether your device and product key supports different language.
- First, find the product key used on your laptop.
- Go to Windows 10 media creation tool page and download the media creation tool.

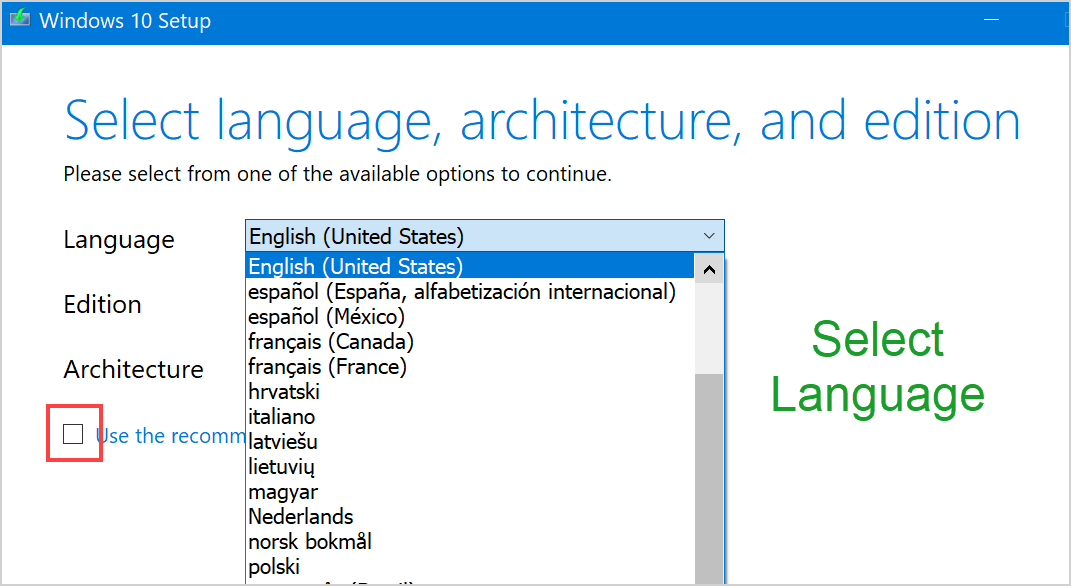
- Run the tool and select “Create installation media (USB flash drive, DVD, or ISO file) for another PC” option.

- The media creation tool will automatically detect your current language and show the details.

- Make sure to uncheck the option “Use the recommended option for this PC” and change the language, edition and architecture (32 or 64 bit) details as per your need.
- You can either create a USB flash drive by using a blank USB with more than 8GB free size. Remember, all content in the USB will be deleted while creating the flash drive. Alternatively, you can create ISO image file and later create bootable installation from ISO file. You can use this bootable USB to reinstall Windows on your laptop,
- This will update the Windows 10 Home single language version with different language as you have selected when creating the ISO file.
- When installing, you can choose to keep your apps and files or delete them all as per your need.
Note: In all the above options, you can only change the Windows display language and not individual application’s settings. For example, Office applications like Word needs separate language pack independent of the installed Windows language pack. Learn more on how to change the display language in Microsoft Office applications.
Summary
Many of us purchase laptops from online store and from another country while travelling. However, things will be different when you are purchasing laptop especially from non-English speaking countries. Make sure to check the details with the reseller or online vendor before paying for the laptop. Some resellers may help you to change Windows language or reinstall Windows to another version. But in most cases they can’t help as the product key will be linked to your Microsoft account.
How to change the language on a system with a Single Language license?
Some Windows PCs are sold with a «Single Language» License. This means that by default only one language can be used and it cannot be modified. This is probably a marketing choice made by Microsoft, to avoid the exchange of computers bought in different countries, at a lower price, that could be sold abroad.
In any case, I researched for a working solution, here it is.
Table of contents
- The solution
- Install a new language
- Removing a language
- Errors while removing packages
The solution
First of all, I was using a Windows 10 Home Single Language version 19044.2311.
To check your version, open a Command prompt (cmd) and at the first line you will see something like this:
Microsoft Windows [Version 10.0.19044.2311]That said:
- Let’s install the language we need
- Let’s remove the other language(s)
Install a new language
Important: on recent versions of Windows, the «.cab» language packs are not valid anymore. You might have found some other sources (StackOverflow for example) talking about cab files. You can still follow those guides if you have a less recent version of Windows 10, in the other case you will get some errors.
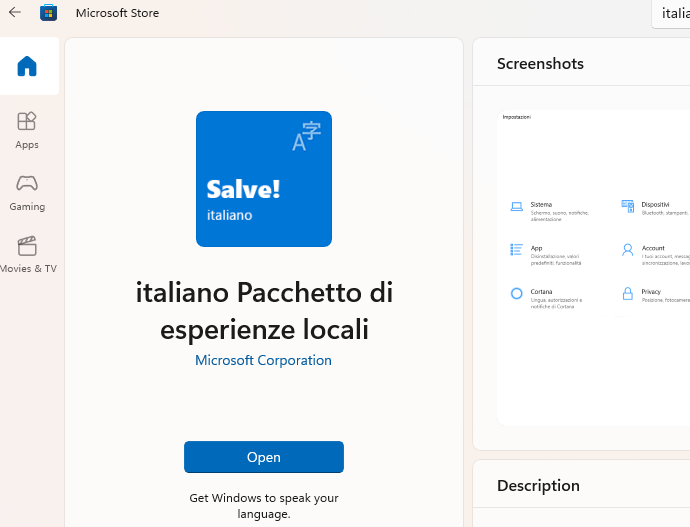
Languages can be installed directly from the Microsoft Store: Let’s open it and search for our language, for example «Italian». Let’s install the language as in the following screenshot:
Removing a language
For this operation, you can use the command prompt or the Powershell, i will use the latter, in any case you need to start them as administrator (right click > run as administrator).
Before removing a language, make sure you already installed the new language, it need to be listed as explained below here.
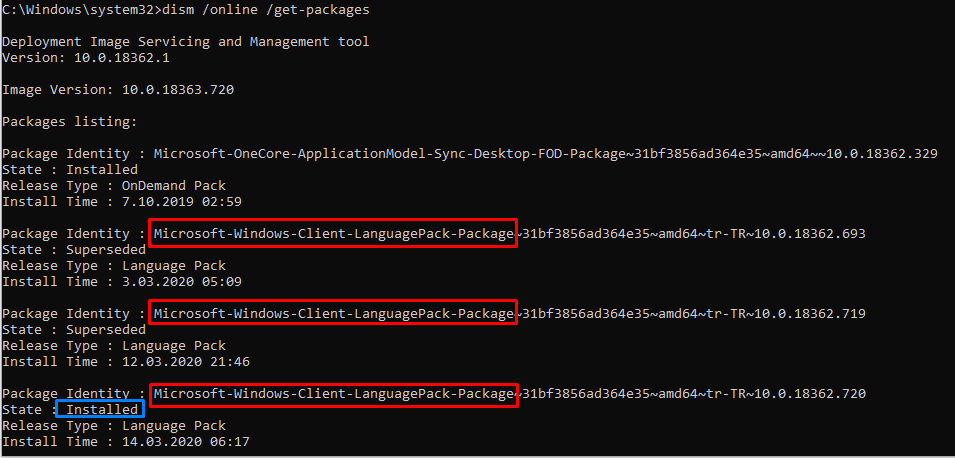
First of all we check what languages are installed with this command:
dism /online /get-packages | findstr /c:"LanguagePack"You might need to change /c: with the disk unit where your system is installed, for example /d:, this command will return us the list of packages installed for the languages.
Example:
Package Identity : Microsoft-Windows-Client-LanguagePack-Package~31bf3856ad364e35~amd64~en-US~10.0.22000.1098
Package Identity : Microsoft-Windows-Client-LanguagePack-Package~31bf3856ad364e35~amd64~en-US~10.0.22000.1219
Package Identity : Microsoft-Windows-Client-LanguagePack-Package~31bf3856ad364e35~amd64~it-IT~10.0.22000.1098
Package Identity : Microsoft-Windows-Client-LanguagePack-Package~31bf3856ad364e35~amd64~it-IT~10.0.22000.1219
Now, let’s remove the most recent one (where numbers are greater) with this command, for the language we want to remove, English in this case. You can copy paste the name of the package.
dism /online /remove-package /packagename:"Microsoft-Windows-Client-LanguagePack-Package~31bf3856ad364e35~amd64~en-US~10.0.22000.1219"Double check that the name of the package is correct and that there are no empty spaces. You can also try removing the double quotes if needed.
If everything went well, you can see the language is being removed, it might take a minute. At the end, the system will ask you to restart the PC. You can remove other languages if you want, or just restart now.
Errors while removing packages
If you get an error like «invalid package», please verify that the name you wrote in the «remove-package» command was correct and double check that the same name is installed when using /get-packages.
You can also run the same command dism /online /get-packages to get the status of all packages: the language you are trying to remove must have a status of «Installed».
-
Home
-
News
- What Is Windows 11/10 Home Single Language?
What Is Windows 11/10 Home Single Language?
By Linda | Follow |
Last Updated
What is Windows 11 Home Single Language? What’s the difference between the Windows Home edition and the Windows Home Single Language edition? How to change language in Windows 11/10 Home Single Language edition? This post from MiniTool Partition Wizard will show you all.
Windows 11/10 Home Single Language
Those people who have bought PCs abroad may encounter the Windows 11/10 Home Single Language issue. When they try to change the system language to their mother language, they are told that “your Windows license supports only one display language.” This issue prevents them from changing the system language.
Why do PC manufacturers sell PCs with the Windows 11 Home Single Language edition or Windows 10 Home Single Language edition?
The fundamental reason is that the license of the Windows Home Single Language edition is cheaper than that of the regular Home edition. In addition, the Single Language edition is usually only offered to OEMs.
Windows 11/10 vs Windows 11/10 Home Single Language
What about Windows 10 vs Windows 10 Home Single Language or Windows 11 vs Windows 11 Home Single Language? Some people may wonder about this question.
The Windows 11/10 Home edition is the same as the Windows 11/10 Home Single Language, except that the Single Language edition doesn’t allow users to change the system language after the Out of Box Experience (they have chosen one language in this process).
Tips:
Some people may see the Windows 11 Home Single Language or Windows Home Insider Preview Single Language watermark in the right bottom corner of the PC screen. In most cases, the reason for this issue is that they have joined the Microsoft Insider Program. Leaving the insider build can solve the issue.
How to Solve the Windows 11/10 Home Single Language Issue
You can the following ways to solve the Windows 11/10 Home Single Language issue.
Way 1. Upgrade to the Pro Edition
To solve the Windows 11/10 Home Single Language issue, you need to purchase a Windows 11/10 Pro license and then activate Windows 11/10 using the new license. You can refer to the detailed steps in this post: How to Upgrade Windows 11 Home to Pro – 5 Steps.
Way 2. Use Commands
This way is offered by users of the Super User forum and many people say that it works for them. So, you can also have a try.
For Windows 11 Home Single Language Issue
Step 1: Press the Windows logo key + R to open the Run dialog box. Then, type “cmd” and press Enter to open Command Prompt.
Step 2: Run the command gotten on this page. For example, if you want to change the language to en-US, the command should be:
curl -o %TEMP%\Microsoft-Windows-Client-Language-Pack_x64_en-us.cab «https://filedn.com/lOX1R8Sv7vhpEG9Q77kMbn0/Windows11/LanguagePacks/Microsoft-Windows-Client-Language-Pack_x64_en-us.cab»
dism /online /Add-Package /PackagePath:%TEMP%\Microsoft-Windows-Client-Language-Pack_x64_en-us.cab
reg add HKLM\SYSTEM\CurrentControlSet\Control\Nls\Language /v InstallLanguage /t REG_SZ /d 0409 /f
reg add HKLM\SYSTEM\CurrentControlSet\Control\Nls\Language /v Default /t REG_SZ /d 1033 /f
cd
Tips:
You should replace %TEMP% in given commands to the full path to the Temp folder like C:\Users\Linda\AppData\Local\Temp.
For Windows 10 Home Single Language Issue
Tips:
Some people report that this way doesn’t work for Windows 11 PCs.
Step 1: You should first download and install the language pack by adding a language in Settings > Time & Language > Language.
Step 2: Open Command Prompt with Administrator rights. Type dism /online /get-packages and press Enter. Look for Microsoft-Windows-Client-LanguagePack-Package as a start for Package Identity. And its State should be Installed. You can see the next 5 characters after ~ to understand which language it is (tr-TR for example).
Step 3: Press Win+R, type “regedit”, and then press Ctrl+Shift+Enter to open Registry Editor with Administrator rights. Go to \HKEY_LOCAL_MACHINE\SYSTEM\CurrentControlSet\Control\Nls\Language.
Step 4: Check the Language/region ID of the installed language in the Available languages for Windows page. Double-click the Default entry on Registry Editor and then change its Value data to the ID of the installed language. In some cases, you might need to change the InstallLanguage entry as well.
MiniTool Partition Wizard is a multifunctional tool that can migrate OS, clone disks, recover data, convert disks between MBR and GPT without data loss, etc. If you have these needs, you can try it.
MiniTool Partition Wizard DemoClick to Download100%Clean & Safe
About The Author
Position: Columnist
Linda has been working as an editor at MiniTool for 5 years. She is always curious about computer knowledge and learns it crazily. Her articles are simple and easy to understand. Even people who do not understand computer can gain something. By the way, her special focuses are disk management, data recovery and PDF editing.
У Microsoft есть специальная версия Windows, которая может доставить немало головной боли для пользователя. Называется она Windows Single Language. Ее особенность в том, что пользователь может работать только с одним языком интерфейса и не может его сменить. Если в вашем устройстве вдруг обнаружилось это издание и переустанавливать систему не вариант, эта инструкция расскажет, как изменить язык интерфейса в Windows 10 Single Language.
Примечание: руководство применимо также и для Windows 8 / 8.1.
- Для начала вам надо загрузить нужный языковой пакет. Найти его можно по ссылке.
- На системном разделе создайте папку «lp» и поместите туда скопированный файл. Не забудьте переименовать его в «lp«.
- Запустите Командную строку от имени администратора. Правая кнопка мыши по Пуск — Командная Строка (Администратор).
- Введите следующую команду: dism /Online /Add-Package /PackagePath:C:\lp\lp.cab
- Процесс может затянуться на пару минут. Дождитесь завершения, после чего командная строка предложит перезагрузить компьютер. Согласитесь.
- Теперь вам надо удалить свой основной языковой пакет. Перед этим надо узнать его полное название. Вводим следующую команду: dism /Online /Get-Packages | findstr /c:»LanguagePack». Подождите. Затем вы увидите два установленных языковых пакета. Они выглядят так:
Microsoft-Windows-Client-LanguagePack-Package~31bf3856ad364e35~amd64~en-US~6.3.9600.16384
- Четырехбуквенное сокращение поможет вам сореинтироваться в языках. en-US — английский, ru-RU — русский и так далее.
- Теперь удаляем основной языковой пакет. Для этого введите команду «dism /Online /Remove-Package /PackageName:Microsoft-Windows-Client-LanguagePack-Package~[идентификатор пакета, который надо удалить]«.
- Дождитесь завершения процесса и согласитесь на перезагрузку. Теперь к системе будет применен выбранный вами язык.