
In Windows 10, many classic Control Panel options were moved to the Settings app. Options related to the taskbar were moved there as well. This is the case since at least build 14271, which is part of Windows 10 «Anniversary Update» (Redstone 1) branch. Let’s see how to make Windows 10 always show all tray icons on the taskbar using Settings.
But default, Windows 10 hides new icons in a special tray in order to keep the taskbar clean. All the new icons are hidden in a panel which can be opened by clicking on the up arrow icon as shown below.
If you have a wide screen or small number of icons, it will be useful to have them visible all the time.
There is a special option to make them visible. There are two methods to enable them.
To always show all tray icons in Windows 10, do the following.
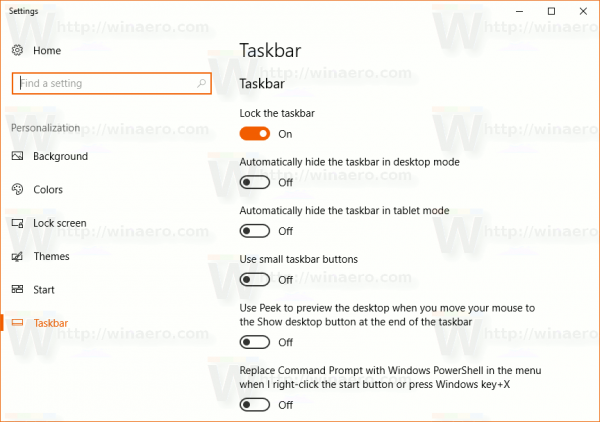
- Open Settings.
- Go to Personalization — Taskbar.

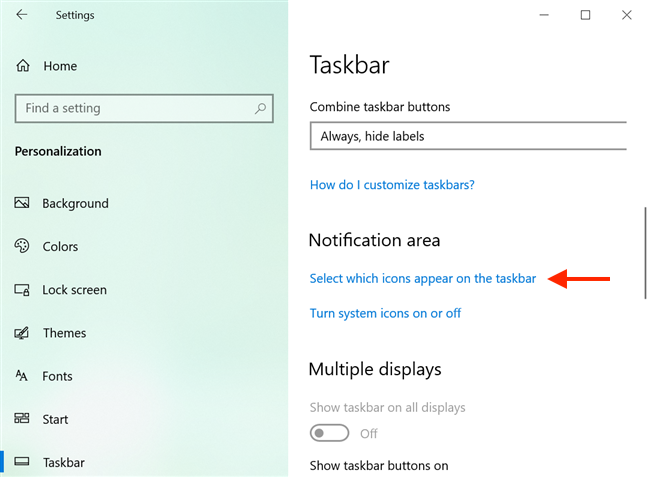
- On the right, click on the link «Select which icons appear on the taskbar» under Notification area.
- On the next page, enable the option «Always show all icons in the notification area».
Tip: If you do not like using the Settings app, there still exists the ability to open the classic Notification Area Icons dialog. Press Win + R to open the Run dialog and type the following in the Run box:
shell:::{05d7b0f4-2121-4eff-bf6b-ed3f69b894d9}
Press the Enter key. The next window will be familiar to many users:
There, tick the option «Always show all icons and notifications on the taskbar».
See the following article for reference: How to access classic notification area (tray icon) options in Windows 10.
Finally, it is possible to apply a Registry tweak to make all tray icons visible all the time. Here is how.
- Open Registry Editor (see how).
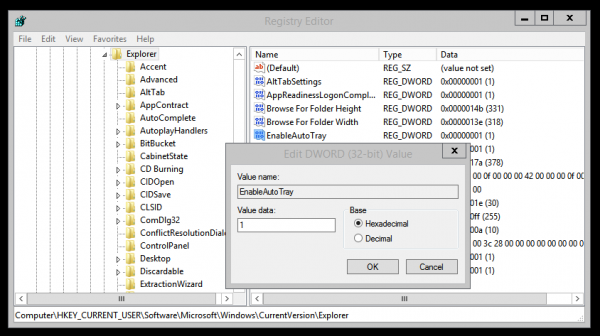
- Navigate to the following Registry key:
HKEY_CURRENT_USER\Software\Microsoft\Windows\CurrentVersion\Explorer
Tip: How to jump to the desired registry key with one click.
- On the right, create or modify the 32-bit DWORD value named EnableAutoTray.

Set it to 0 to show all notification area icons on the taskbar.
A value data of 1 will hide new icons (this is by default). - To make the changes done by the Registry tweak take effect, you need to sign out and sign in to your user account.
That’s it.
Support us
Winaero greatly relies on your support. You can help the site keep bringing you interesting and useful content and software by using these options:
If you like this article, please share it using the buttons below. It won’t take a lot from you, but it will help us grow. Thanks for your support!
Windows 10 is a versatile operating system that offers a wide range of features and customization options to its users. One of these features is the system tray, also known as the notification area, which displays icons for various system and user applications. However, by default, Windows 10 only shows a limited number of system tray icons, which can be frustrating for users who want quick access to all their applications.
In this article, we will provide a detailed tutorial on how to show all system tray icons on Windows 10. We will walk you through the steps to customize your system tray settings so that all your icons are visible at all times. Whether you are a casual user looking to access your favorite applications quickly or a power user who needs access to a wide range of tools, this tutorial will help you make the most out of your Windows 10 system tray.
Step 1: Accessing the System Tray Settings
The first step in showing all system tray icons on Windows 10 is to access the system tray settings. To do this, follow these steps:
- Right-click on the taskbar at the bottom of your screen.
- Select «Taskbar settings» from the context menu that appears.
- In the taskbar settings window, scroll down to the «Notification area» section.
Step 2: Customizing System Tray Icons
Once you have accessed the system tray settings, you can customize which icons are displayed in the system tray. Follow these steps to customize your system tray icons:
- Click on the «Select which icons appear on the taskbar» link.
- In the window that appears, you will see a list of system tray icons that are currently set to be hidden.
- Toggle the switch next to each icon to the «On» position to show it in the system tray.
- You can also drag and drop icons to rearrange their position in the system tray.
- Click on the «Back» button to save your changes and return to the taskbar settings window.
Step 3: Showing All System Tray Icons
Now that you have customized your system tray icons, you can ensure that all of them are visible at all times. Follow these steps to show all system tray icons on Windows 10:
- Scroll down to the «Notification area» section in the taskbar settings window.
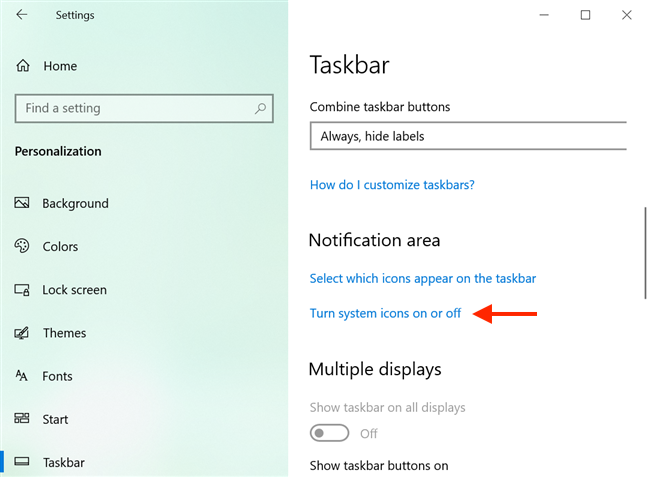
- Click on the «Turn system icons on or off» link.
- In the window that appears, you will see a list of system icons that are currently set to be hidden.
- Toggle the switch next to each icon to the «On» position to show it in the system tray.
- Click on the «Back» button to save your changes and return to the taskbar settings window.
Step 4: Adjusting System Tray Behavior
In addition to customizing which icons are displayed in the system tray, you can also adjust how they behave. Follow these steps to adjust the behavior of system tray icons on Windows 10:
- Scroll down to the «Notification area» section in the taskbar settings window.
- Click on the «Select which icons appear on the taskbar» link.
- Click on the «Always show all icons in the notification area» link.
- Toggle the switch next to «Always show all icons in the notification area» to the «On» position.
- Click on the «Back» button to save your changes and return to the taskbar settings window.
Step 5: Restarting Windows Explorer
After making changes to your system tray settings, it is a good idea to restart Windows Explorer to ensure that your changes take effect. Follow these steps to restart Windows Explorer on Windows 10:
- Press «Ctrl + Shift + Esc» on your keyboard to open the Task Manager.
- In the Task Manager window, click on the «Processes» tab.
- Scroll down and locate «Windows Explorer» in the list of processes.
- Right-click on «Windows Explorer» and select «Restart» from the context menu.
Conclusion
In this tutorial, we have shown you how to show all system tray icons on Windows 10. By customizing your system tray settings and adjusting the behavior of system tray icons, you can ensure that all your favorite applications are easily accessible at all times. Whether you are a casual user or a power user, taking advantage of the system tray customization options in Windows 10 can help you make the most out of your operating system. By following the steps outlined in this tutorial, you can personalize your system tray and create a more efficient and productive computing experience.
Located on the right side of the taskbar, the system tray, correctly called the Notification area, has been a part of Windows for over 20 years. It kept on improving since it was first introduced with Windows 95, providing easy access to system functions, notifications, and applications. The Windows 10 system tray is more customizable than ever before, as you get to configure which system and apps icons are shown in it. Whether you want to hide the volume icon, keep a particular icon always visible in the Notification area, or see nothing but the clock on your taskbar, this tutorial shows you how to do it:
NOTE: The screenshots and the instructions in this guide apply to Windows 10 May 2019 update or newer. If you do not know what version of Windows 10 you have, read: How to check the Windows 10 version, OS build, edition, or type.
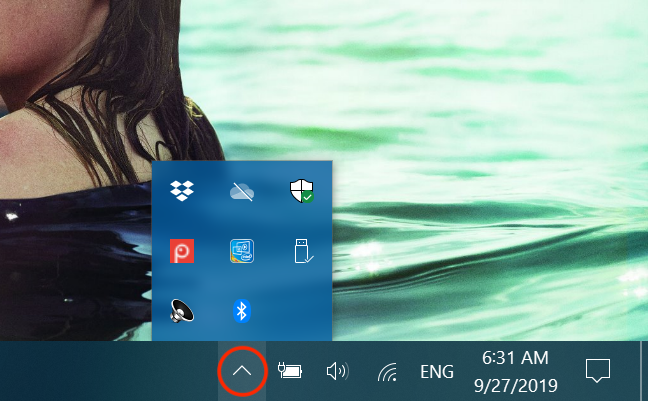
How to show hidden icons in the system tray using the mouse
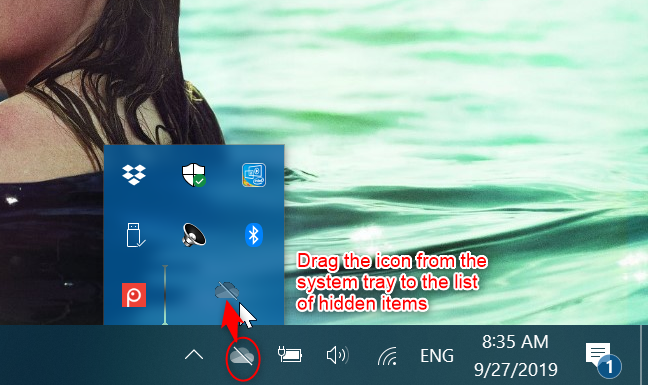
In Windows 10, a lot of icons are hidden by default in an expandable pane, giving you more space on your taskbar. To reveal them, click on the arrow left of the Notification area.
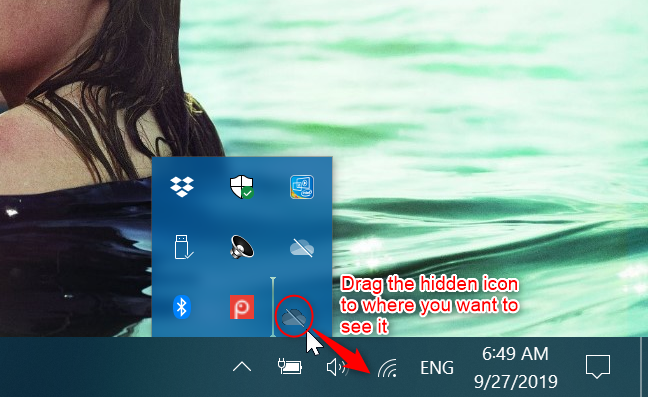
The most straightforward way to show any of these icons in your Notification area is to drag them with the cursor from the expandable pane to the taskbar.
TIP: If enabled, the setting to «Always show all icons in the notification area» makes the arrow and the expandable pane disappear. Keep reading to learn more about this option.
How to show hidden icons in the system tray using Windows 10 settings
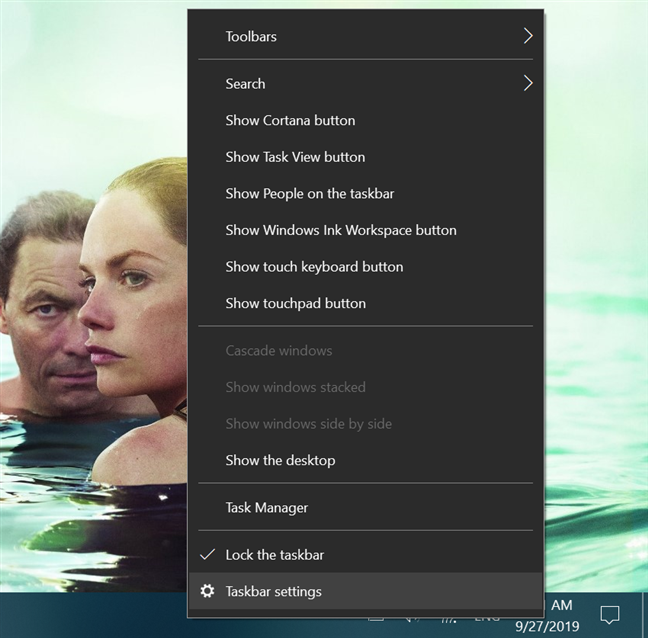
Another method for displaying the hidden icons in the system tray involves accessing the Taskbar settings. To do that, right-click or press-and-hold an unused area of the Taskbar and then click or tap Taskbar settings from its menu.

In the Taskbar section of the Settings app, scroll down the list of settings found on the right side of the window until you find Notification area. Click or tap on the «Select which icons appear on the taskbar» link.

Turn on the switch of each icon you want in the Notification area. The icons you choose to show become instantly visible on the taskbar.
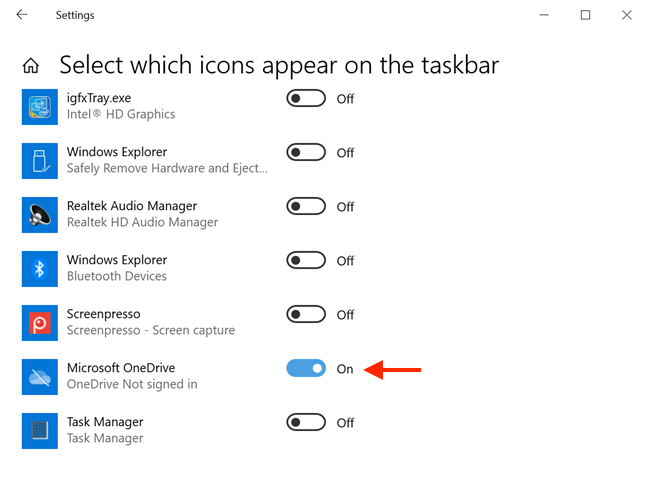
IMPORTANT: If you turned On the switch to show a certain icon and that icon is not instantly displayed on your taskbar, the corresponding app is probably not currently running on your computer. Keep in mind that the icons in your Notification area are only shown when their apps are running.
If you like to keep an eye on everything, you can use the «Always show all icons in the notification area» option at the top of the list. Turn On the switch next to it, and all the icons in the list are instantly displayed in your taskbar, while their individual settings, now obsolete, can no longer be changed.

Some system icons, like Network or Volume, can be completely turned off, which means they are not displayed in the list of taskbar icons above, and they are nowhere to be found on your taskbar or in the expandable pane. To make them appear in the Notification area, you first need to enable them. Go to the Notification area section from the Taskbar settings again and click or tap the «Turn system icons on or off» link.

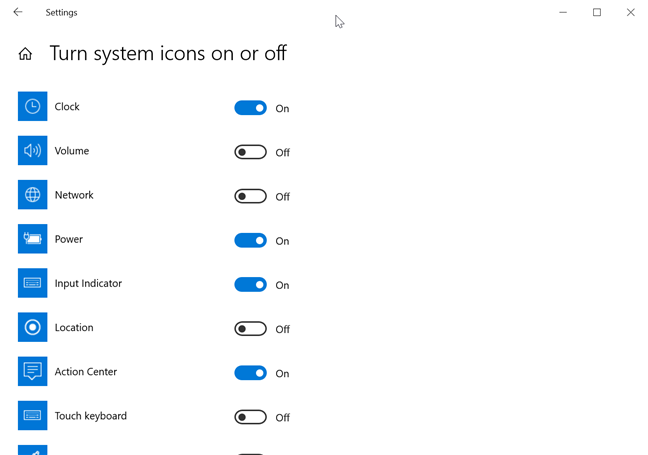
Choose which system icons are enabled by turning on the switch next to them.
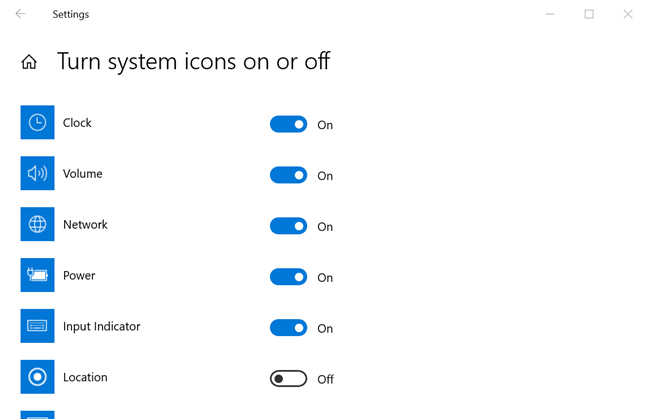
Once a system icon is turned On, you can use the instructions above to decide if you want to see it in your Notification area or access it from the expandable pane.
How to hide icons from the system tray using the mouse
Having too many icons in your Notification area (system tray) can make things a bit cluttered, while also reducing the space on your taskbar, so we recommend hiding the icons you don’t need on a regular basis. The easiest way to do this is by dragging them with your cursor from the Notification area into the hidden expandable pane.
How to hide icons from the system tray using Windows 10 settings
You can also do this from the Taskbar settings, which are accessed by right-clicking or pressing-and-holding on a free area of the taskbar, and then going to Taskbar settings.
In the list of settings found on the right side of the window, scroll down until you find the Notification area section. Click or tap on «Select which icons appear on the taskbar.»
Make sure the*»Always show all icons in the notification area»* option is turned Off and then, to hide the icons you no longer want to see in the Notification area, turn off the switch next to them. The icons are instantly hidden in the expandable pane.

When it comes to system icons, they can not only be hidden, but completely disabled, thus keeping them out of both your Notification area and its expandable pane. To do this, you first have to return to the Notification area section from the Taskbar settings, and then click or tap the «Turn system icons on or off» link.
From the list in this window, turn Off the icons that you don’t want to see in your Notification area. This makes them instantly disappear, never to bother you again.
How cluttered is your Notification area?
We like to keep things tidy, so our Notification area only displays the icons we need to keep an eye on, like the Power icon, or the ones we use daily, such as the Volume icon. What does your Notification area look like? How many icons do you have in it? Comment below and let’s discuss.
The system tray is a little section on the Taskbar where system icons such as the speaker, network, and action center icons appear. Of course since it’s Windows 10, Microsoft doesn’t keep this space to itself. Any app that wants to can add an icon to the system tray and you can access said app from this icon. Sometimes apps run entirely in the system tray, and other times, their icons are merely indicators that show they are running.
Since the system tray is supposed to be a small section of the taskbar, it stands to reason that not everything can fit there. It’s limited in size and all icons that can’t fit there are sent to the overflow menu. You can drag an icon out of it and have it show permanently on the system tray if you want but the default behavior is to send the new/extra icons into the overflow menu. If you want to change this default behavior and show all system tray icons, you can by changing one little setting.
Open the Settings app and go to the Personlization group of settings. Select the Taskbar tab and scroll to the Notification area section.
Under this section, click the ‘Select which icons appear on the taskbar’ option.
The next screen will show you a list of apps that can/have added icons to the system tray. At the very top of this list is a switch called ‘Always show all icons in the notification area’. Turn it On, and the system tray will automatically expand to show you every single app icon, including the ones in the overflow menu.
This change will also effect new apps that are installed. So any new apps that want to run in the system tray or that want to add an icon to it, will automatically be added next to the other icons. There will be no overflow menu.
This does have its downside; you get less space for app icons on the taskbar. For some apps, such as those that show CPU temperature or RAM usage, having the icon visible all the time is necessary. For others, it isn’t. You can trim this list by hiding unnecessary icons from the system tray altogether. In the list of apps, turn the switch off next to an app that you don’t want in the system tray. All your icons will still be present but the ones you don’t need will not be hidden in the overflow menu.

Fatima Wahab
Fatima has been writing for AddictiveTips for six years. She began as a junior writer and has been working as the Editor in Chief since 2014.
Fatima gets an adrenaline rush from figuring out how technology works, and how to manipulate it. A well-designed app, something that solves a common everyday problem and looks
The Windows 10 System Tray (Notification area), is located on the right side of the taskbar and provides access to system notifications, functions, and apps.
The system tray also holds shortcuts to some important settings like network, power, volume, and Action Center icons.
If you hover over the system tray and notice that the icons you use are missing, there are several reasons why this happens. You may have installed a Windows Update, which caused a glitch, or there are corrupted Registry entries that seem to conflict with Windows 10, making the system tray or icons disappear.
Here’s how you can fix the system tray or icons missing in windows 10 problem.
There are two ways to show hidden icons in the system tray: Using the mouse and using Windows 10 Settings.
Use a Mouse to Show Hidden Icons in the System Tray
To do this using your mouse, select the arrow next to the Notification area to open the system tray and reveal the hidden icons. You can also drag the icons with your cursor and drop them on the taskbar.
Use Windows 10 Settings to Show Hidden Icons in the System Tray
If you want to see all your icons in the system tray all the time, remove the arrow and expandable pane, and enable the Always show all icons in the notification area setting.
- To do this, right-click your taskbar and select Taskbar Settings.
- Next, go to the Notifications area and click the Select which icons appear on the taskbar option.
- Toggle the Always show all icons in the notification area setting at the top of the list.
Note: Icons in the system tray only appear when their corresponding apps are running.
Turn System Icons On or Off
If you still don’t see icons on your system tray, use the Turn system icons on or off setting and see if it helps.
- To do this, right-click the Taskbar > Taskbar Settings.
- In the Taskbar Settings, go to the Notification area and select Turn system icons on or off.
- Find the system icons you want to show on the system tray and toggle their sliders to On (if they’re Off).
Restart your computer for the changes to take effect.
Restart Windows Explorer
Restart Windows Explorer to reload it and restore the missing system tray or icons on your computer.
- To do this, right-click the taskbar and select Task Manager.
- Select explorer.exe under the Processes tab, right-click and select End Task.
- Next, open the App History tab, click File > Run New Task.
- Type explorer.exe in the message box that appears and select OK.
Windows Explorer (explorer.exe) will reload and the icons will appear in the system tray. If there’s an icon you don’t see, go back to the Taskbar settings, select Turn system icons on or off and check the box next to the missing icon.
Reset or Delete the IconCache
The icon cache database contains the icons you see on apps and files so that the operating system can display them on your screen. Caching icons keeps your system from slowing down by not having to look up icons every time.
However, as the icon cache database grows, corruption may creep in and the icons may not render correctly, may appear broken, or missing from the system tray.
To resolve this problem, try to reset or delete the IconCache to resolve the problem.
How to Reset the IconCache Database on Windows 10
- To reset the icon cache database, close all running applications, and then open the command prompt. Type CMD in the search bar and select the Run as administrator option.
- Type this path in the command prompt window and press Enter:
cd %homepath%AppDataLocalMicrosoftWindowsExplorer
- Next, type dir iconcache* and press Enter (a list of database files will appear).
- Stop File Explorer by typing the command: taskkill /f /im explorer.exe and then press Enter. You’ll notice your taskbar and desktop background disappear after terminating File Explorer, but it’s temporary. Closing File Explorer helps delete the icon cache files.
- Next, type del iconcache* and press Enter.
- Type dir iconcache* to confirm that you have deleted the icon cache files, and then press Enter. Start File Explorer by typing explorer.exe and press Enter.
Close Command Prompt to complete the process, and Windows will recreate the database files with new icons.
How to Delete the IconCache Database on Windows 10
- To delete the IconCache database file, right-click Start > Run and enter %appdata% in the Run window to open the Roaming folder.
- In the Roaming folder, select Appdata in the address bar.
- Select the Local folder.
- Select View and check the Hidden items option.
- Right-click IconCache in the Local folder, and select Delete.
- Close Windows Explorer, reboot your PC, and check whether the system tray and icons are visible again.
Disable Controlled Folder Access
Controlled Folder Access is an intrusion prevention feature in Windows 10 that protects your valuable data from modification by threats like malware, viruses, and ransomware. If you find system tray or icons missing in Windows 10, try disabling the Control folder access option and see if they’re restored after that.
- To disable Control folder access, select Start, type Windows Security in the search box, and select Virus & Threat protection.
- Scroll down to Ransomware protection and select Manage ransomware protection.
- Next, toggle the Control folder access option button to turn it off or disable it.
Reinstall the Taskbar
If the system tray or icons are missing on your computer, chances are the taskbar may not be working properly. To resolve this, reinstall the taskbar using Windows PowerShell.
Right-click Start > Windows PowerShell (Admin).
Copy and paste this command and press Enter:
Get-AppxPackage -AllUsers| Foreach {Add-AppxPackage -DisableDevelopmentMode -Register “$($_.InstallLocation)AppXManifest.xml”}
Check if your system tray and icons are back in the notification area.
Edit the Registry
Editing the Windows Registry helps correct errors or corruption, or prevent undesired system activity. The process can be dangerous, especially if you make a wrong edit in the wrong entry, so make sure you backup the registry before proceeding with the steps below.
- Select Start > Run and type regedit in the Run window to open the Registry Editor.
- Next, navigate to the HKEY_CURRENT_USERSoftwareClassesLocalSettingsSoftwareMicrosoftWindowsCurrentVersionTrayNotify key.
- Select the Tray Notify folder, and then right-click IconStreams and PastIconsStream to delete their values.
If nothing else works, try a System Restore as this protects and repairs your computer’s software. It saves the Windows Registry and some system files as restore points for use in case of data corruption or an install failure.
A System Restore returns the system to working condition by reverting back the settings and files saved to the restore point.
Get Your System Tray and Icons Back
We hope these steps helped you get your missing system tray and icons back. Make sure to search the rest of our site for more troubleshooting tips and tricks to help you fix other issues in different operating systems and devices.
Related Posts
- How to Fix a “This file does not have an app associated with it” Error on Windows
- How to Fix an Update Error 0x800705b4 on Windows
- How to Resolve “A JavaScript error occured in the main process” Error on Windows
- How to Fix the Network Discovery Is Turned Off Error on Windows
- How to Change Folder Icons in Windows