
Before updating, please refer to the Windows release information status for known issues to confirm your device is not impacted.
Stay Secure with Essential Windows Updates: After October 14, 2025, Windows 10 will no longer receive free software updates, technical support, or security fixes. This means your PC will be more vulnerable to security threats and malware. Consider Upgrading to Windows 11: Move to the security, speed, and innovation that Windows 11 PCs provide, available at every price point. Upgrading to Windows 11 ensures you continue to receive the latest security updates, features, and technical support, keeping your PC safe and efficient. For more information on preparing for Windows 10 end of support, see our Windows blog post.
Create Windows 10 installation media
To get started, you will first need to have a license to install Windows 10. You can then download and run the media creation tool. For more information on how to use the tool, see the instructions below.

-
Here’s when to use these instructions:
- You have a license to install Windows 10 and are upgrading this PC from Windows 7 or Windows 8.1.
- You need to reinstall Windows 10 on a PC you’ve already successfully activated Windows 10.
If you are installing Windows 10 on a PC running Windows XP or Windows Vista, or if you need to create installation media to install Windows 10 on a different PC, see Using the tool to create installation media (USB flash drive, DVD, or ISO file) to install Windows 10 on a different PC section below.
Note: Before you install Windows 10, check to make sure your PC meets the system requirements for Windows 10. We also recommend going to the PC manufacturer’s website for any additional info about updated drivers and hardware compatibility.
- Select Download tool, and select Run. You need to be an administrator to run this tool.
- On the License terms page, if you accept the license terms, select Accept.
- On the What do you want to do? page, select Upgrade this PC now, and then select Next.
-
After downloading and installing, the tool will walk you through how to set up Windows 10 on your PC. All Windows 10 editions are available when you select Windows 10, except for Enterprise edition. For more information on Enterprise edition, go to the Microsoft 365 admin center.
- If you don’t have a license to install Windows 10 and have not yet previously upgraded to it, you can purchase a copy here: get-windows-10
- If you previously upgraded to Windows 10 on this PC and you’re reinstalling it, you don’t need to enter a product key. Your copy of Windows 10 will automatically activate later using your digital license.
- When Windows 10 is ready to install, you’ll see a recap of what you’ve chosen, and what will be kept through the upgrade. Select Change what to keep to set whether you would like to Keep personal files and apps, or Keep personal files only, or choose to keep Nothing during the upgrade.
- Save and close any open apps and files you may be running, and when you’re ready, select Install.
- It might take some time to install Windows 10, and your PC will restart a few times. Make sure you don’t turn off your PC.
-
Follow these steps to create installation media (USB flash drive or DVD) you can use to install a new copy of Windows 10, perform a clean installation, or reinstall Windows 10.
Before you download the tool make sure you have:
- An internet connection (internet service provider fees may apply).
- Sufficient data storage available on a computer, USB or external drive for the download.
- A blank USB flash drive with at least 8GB of space or blank DVD (and DVD burner) if you want to create media. We recommend using a blank USB or blank DVD, because any content on it will be deleted.
- When burning a DVD from an ISO file, if you are told the disc image file is too large you will need to use Dual Layer (DL) DVD Media.
Check a few things on the PC where you want to install Windows 10:
- 64-bit or 32-bit processor (CPU). You’ll create either a 64-bit or 32-bit version of Windows 10. To check this on your PC, go to PC info in PC settings or System in Control Panel, and look for System type.
- System requirements. Make sure the PC meets the system requirements for Windows 10. We also recommend going to the PC manufacturer’s website for additional info about updated drivers and hardware compatibility.
- Language in Windows. You’ll need to choose the same language when you install Windows 10. To see what language you’re currently using, go to Time and language in PC settings or Region in Control Panel.
- Edition of Windows. You should also choose the same edition of Windows. To check what edition you’re currently running, go to PC info in PC settings or System in Control Panel, and look for Windows edition. Windows 10 Enterprise isn’t available in the media creation tool. For more info, go to the Microsoft 365 admin center.
- Microsoft Office products. If you just purchased a new device that includes Office 365, we recommend redeeming (installing) Office before upgrading to Windows 10. To redeem your copy of Office, please see Download and install Office 365 Home, Personal, or University on your PC. For more information, check How to upgrade to Windows 10 on new devices that include Office 365.
Using the tool to create installation media:
- Select Download tool now, and select Run. You need to be an administrator to run this tool.
- If you agree to the license terms, select Accept.
- On the What do you want to do? page, select Create installation media for another PC, and then select Next.
-
Select the language, edition, and architecture (64-bit or 32-bit) for Windows 10. This table will help you decide which edition of Windows 10 you’ll choose:
Your current edition of Windows Windows 10 edition Windows 7 Starter
Windows 7 Home Basic
Windows 7 Home Premium
Windows 7 Professional
Windows 7 Ultimate
Windows 8/8.1
Windows 8.1 with Bing
Windows 8 Pro
Windows 8.1 Pro
Windows 8/8.1 Professional with Media Center
Windows 8/8.1 Single Language
Windows 8 Single Language with Bing
Windows 10 Home
Windows 10 ProWindows 10 Windows 8/8.1 Chinese Language Edition
Windows 8 Chinese Language Edition with BingWindows 10 Home China - Select which media you want to use:
- USB flash drive. Attach a blank USB flash drive with at least 8GB of space. Any content on the flash drive will be deleted.
- ISO file. Save an ISO file to your PC, which you can use to create a DVD. After the file is downloaded, you can go to location where the file is saved, or select Open DVD burner, and follow the instructions to burn the file to a DVD. For more info about using an ISO file, see Additional methods for using the ISO file to install Windows 10 section below.
- After the installation media is created, follow the steps below to use it.
-
After completing the steps to install Windows 10, please check that you have all the necessary device drivers installed. To check for updates now, select the Start button, and then go to Settings > Update & Security > Windows Update, and select Check for updates. You may also wish to visit your device manufacturer’s support site for any additional drivers that may be needed.
Note: Drivers for Surface devices may be found on the Download drivers and firmware for Surface page.
Using the installation media you created (click to show more or less information)
Before you install Windows 10, it’s a good idea to save any work and back up your PC before you start. If you used the media creation tool to download an ISO file for Windows 10, you’ll need to burn it to a DVD before following these steps.
- Attach the USB flash drive or insert the DVD on the PC where you want to install Windows 10.
- Restart your PC.
If your PC does not automatically boot to the USB or DVD media, you might have to open a boot menu or change the boot order in your PC’s BIOS or UEFI settings. To open a boot menu or change the boot order, you’ll typically need to press a key (such as F2, F12, Delete, or Esc) immediately after you turn on your PC. For instructions on accessing the boot menu or changing the boot order for your PC, check the documentation that came with your PC or go to the manufacturer’s website. If you do not see the USB or DVD media device listed within the boot options, you may need to reach out to the PC manufacturer for instructions for temporarily disabling Secure Boot in your BIOS settings.
If changing the boot menu or order doesn’t work, and your PC immediately boots into the OS you want to replace, it is possible the PC had not fully shut down. To ensure the PC fully shuts down, select the power button on the sign-in screen or on the Start menu and select Shut down.
- On the Install Windows page, select your language, time, and keyboard preferences, and then select Next.
- Select Install Windows.
Additional methods for using the ISO file to install Windows 10 (click to show more or less information)
If you downloaded an ISO file for Windows 10, the file is saved locally at the location you selected. If you have a third-party DVD burning program installed on your computer that you prefer to use for creating the installation DVD, that program might open by going to the location where the file is saved and double-clicking the ISO file, or right-click the ISO file, select Open with and choose your preferred DVD burning software.
If you want to use the Windows Disk Image Burner to create an installation DVD, go to the location where the ISO file is saved. Right-click the ISO file and select Properties. On the General tab, click Change and select Windows Explorer for the program you would like to use to open ISO files and select Apply. Then right-click the ISO file and select Burn disc image.
If you want to install Windows 10 directly from the ISO file without using a DVD or flash drive, you can do so by mounting the ISO file. This will perform an upgrade of your current operating system to Windows 10.
To mount the ISO file:
- Go to the location where the ISO file is saved, right-click the ISO file and select Properties.
- On the General tab, click Change… and select Windows Explorer for the program you would like to use to open ISO files and select Apply.
- Right-click the ISO file and select Mount.
- Double-click the ISO file to view the files within. Double-click setup.exe to start Windows 10 setup.
*Your use of the media creation tools on this site is governed by the Microsoft Terms of Use for this website.
You are here:
Home » Windows 10 » How To Select Pro Edition While Installing Windows 10
Many users perform a clean install or reinstall of Windows 10 once in a year to fix issues and restore the lost speed.
To help users easily download ISO images of Windows 10, an official tool called Media Creation Tool has been available ever since the release of Windows 10, and the ISO image file that you download using Media Creation Tool now includes the latest Windows 10 feature update as well.
While the procedure to download Windows 10 ISO using the Media Creation tool is straightforward, many users who have used the Media Creation Tool have been complaining that there is no option to download the Windows 10 Pro edition.
That is, the screen where you are asked to select the edition of Windows 10 that you want to download doesn’t list the Windows 10 Pro edition. The list shows only Windows 10 and Windows 10 N editions, and there is no mention of Windows 10 Pro.

Well, the fact is that the Windows 10 ISO that you download using Media Creation Tool includes both the Home as well as Pro editions, meaning Microsoft is no longer offering separate ISOs for Home and Pro editions.
When you create a bootable USB of Windows 10 using the ISO and attempt to install Windows 10 from it, the setup of Windows 10 automatically checks your BIOS/UEFI for embedded product key (if available), and installs the right version based on its findings. And when you are installing Windows 10 on a new PC or a PC without the embedded product key, it displays the prompt asking you to select the edition of Windows 10 that you would like to install.
In simple words, for instance, if you had previously activated Windows 10 Home edition on a computer when you run the setup of Windows 10, it automatically installs the Home edition without allowing you to select the edition of Windows 10.
If you want to see the edition selection screen while installing Windows 10 on a PC that includes the product key in the BIOS, you need to edit the ISO file to include ei.cfg file or add ei.cfg file to the bootable USB.

Follow the directions in Method 1 to add ei.cfg file to the bootable USB, and follow Method 2 to include the ei.cfg file in the bootable ISO of Windows 10.
Method 1 of 2
Add ei.cfg to bootable USB to see the edition selection screen
Step 1: Create the bootable USB of Windows 10, either using Rufus, Media Creation Tool, or any other software. To create the same using Command Prompt, please refer to our how to install Windows 10 from the USB guide.

Step 2: Once the bootable USB of Windows 10 is ready, open This PC and double-click on the USB drive icon to open up the same.

Step 3: Open up Sources folder, download ei.cfg ZIP file by clicking here, extract the ZIP file to get ei.cfg file, and place it in the Sources folder.


NOTE: You can open the downloaded ei.cfg file with Notepad to see what it includes. The following is a picture of the same.

That’s all. You can now boot from the USB drive to see the edition selection screen, as shown below.
Method 2 of 2
Add ei.cfg file to bootable Windows 10 ISO
If you plan to reinstall or perform a clean install of Windows 10 from an ISO image file instead of a bootable USB/DVD, you can do so by following the step-by-step instructions given below.
Step 1: We need to extract the contents of the ISO file to the newly created Install Files using 7-Zip (free), WinRAR, or any other tool. We are using the free 7-Zip in this guide.
Step 2: Navigate to the folder containing Windows 10 ISO image, right-click on it, click 7-Zip, click Extract files, select a location with at least 5 GB of disk space. When you extract the file, 7-Zip will create a new folder and will name it after your ISO file name.


7-Zip might take a couple of minutes to complete the extraction job. Once done, proceed to the next step.
Step 3: Download ei.cfg ZIP file by clicking here, extract the ZIP file to get ei.cfg file, open up the Windows 10 folder containing extracted ISO file contents, open up the Sources folder, and then place the ei.cfg file under Sources folder as shown in the picture below.

Step 4: Next, to create a bootable ISO image of Windows 10 containing this newly added ei.cfg file, please follow the instructions in our how to create bootable 10 ISO of Windows from files/folders guide for step-by-step instructions.
NOTE: Some paid programs like UltraISO and MagicISO allow you to edit the bootable ISO without having to extract it. If you feel that this method is tiresome, simply download the ei.cfg file from the link mentioned above and place it in the Sources folder of the ISO file using one of these paid applications. Our how-to add files to bootable Windows ISO image guide might also help you.
Windows 10 Home, Pro, Enterprise, Education, S или IoT Core — выберите вариант, соответствующий вашим задачам.
Независимо от того, хотите вы обновиться до Windows 10, приобрести новый компьютер или просто переустановить систему, вам понадобится выбрать редакцию. У этой ОС есть четыре главные редакции и ещё пара побочных. Разбираемся, чем они отличаются и кому подходят.
Выбор разрядности системы
Прежде чем выбирать редакцию Windows, нужно определить разрядность системы. Microsoft предоставляет 32-разрядную версию Windows 10 для старых процессоров и 64-разрядную — для новых.
Грубо говоря, если ваш компьютер был создан после 2007 года, он скорее всего оснащён 64-разрядным процессором. Полное руководство по определению разрядности процессора вы можете посмотреть здесь.
Выбор подходящей редакции
Windows 10 Home
Начальная редакция Windows 10, предустановленная на большинстве компьютеров и ноутбуков, которые можно найти в продаже. Эта версия не имеет продвинутых инструментов для обеспечения безопасности бизнес-данных, как в старших редакциях, но они не особенно-то и нужны домашним пользователям.
В Home Edition есть все универсальные приложения от Microsoft, такие как «Календарь», «Почта», «Карты», «Фильмы» и «Фотографии».
Основной недостаток Windows 10 Home Edition — наличие рекламных приложений, которые время от времени автоматически устанавливаются в ваше меню «Пуск». Впрочем, при желании их можно удалить.
Лицензия на Домашнюю версию Windows 10 стоит 9 499 рублей.
Кому выбрать: Windows 10 Home Edition подойдёт большинству обычных пользователей. Да, в ней нет встроенных инструментов для шифрования, но при желании вы можете установить самостоятельно сторонние программы.
Windows 10 Home в Microsoft Store →
Windows 10 Pro
Windows 10 Pro — более продвинутая редакция ОС от Microsoft. Она содержит все те же инструменты и приложения, что и Home Edition, плюс несколько дополнительных функций:
- Инструмент Microsoft Hyper‑V. Используется для запуска операционных систем семейств Windows и Linux в виртуальных машинах. Полезен для разработчиков и системных администраторов, которые занимаются тестированием ПО. Обычные пользователи предпочтут применять для экспериментов более понятный VirtualBox.
- Центр обновления Windows Update for Business. Предоставляет некоторые дополнительные обновления вдобавок к тем, что доступны в редакции Home. Кроме того, позволяет откладывать установку обновлений.
- Средства безопасности Device Guard и Secure Boot. Device Guard предназначен для защиты от атак нулевого дня и полиморфных вирусов. Secure Boot защищает от буткитов, которые могут запуститься вместе с системой во время включения компьютера.
- BitLocker. Инструмент для шифрования данных. При желании можно зашифровать хоть всю систему целиком. Полезно для тех, кто хранит на компьютере важные рабочие файлы и опасается, что они окажутся не в тех руках.
- Управление групповыми политиками. Используется для работы с настройками множества компьютеров через локальную сеть. Необходимо системным администраторам.
Лицензия на Профессиональную версию Windows 10 стоит 14 199 рублей.
Кому выбрать: Windows 10 Pro ориентирована на малые предприятия. Но и обычные пользователи могут приобрести эту редакцию, если нуждаются в продвинутых инструментах безопасности и шифрования.
Windows 10 Pro в Microsoft Store →
Windows 10 Enterprise
Windows 10 Enterprise рассчитана на корпоративное применение. Она включает в себя тот же набор инструментов, что и Windows Pro. Но, помимо этого, редакция Enterprise предоставляет доступ к обновлениям Long-Term Service Branch (LTSB). Это означает, что на ваш компьютер будут устанавливаться только проверенные и самые стабильные обновления, к тому же вы сможете откладывать их получение.
В Windows 10 Enterprise отсутствуют универсальные приложения вроде «Почты», «Календаря», «Карт» и других. Кроме того, на устройства с такой операционной системой не устанавливаются рекламные приложения.
Цена на Windows 10 Enterprise зависит от количества копий, которые вы желаете приобрести. Сначала вам придётся установить на свои компьютеры Windows 10 Pro, а уж потом обновить её до Windows 10 Enterprise. Найти сертифицированных поставщиков и уточнить цены можно на сайте Microsoft или по телефону в Центре лицензирования Microsoft.
Кому выбрать: Windows 10 Enterprise разработана специально для средних и крупных предприятий и организаций. Для обычных пользователей её возможностей будет многовато.
Windows 10 Enterprise на сайте Microsoft →
Windows 10 Education
Это редакция Windows 10 для образовательных учреждений. В общем и целом она похожа на Windows 10 Enterprise, но в ней отсутствует возможность присоединиться к каналу обновлений LTSB. Упор в этой редакции Windows делается на предоставление инструментов для студентов и преподавателей.
Здесь есть приложение для настройки учебных компьютеров и инструмент для проведения тестов и экзаменов. Кроме того, пользователи Windows 10 Education получают доступ к образовательному разделу магазина Microsoft Store.
Версия доступна только через академическое лицензирование. Вам придётся сначала установить Windows 10 Home или Pro, а затем обновиться до Education.
Кому выбрать: владельцам академических учреждений. Ориентация на образовательные приложения обычным пользователям точно ни к чему.
Windows 10 Education на сайте Microsoft →
Windows 10 S
Строго говоря, Windows 10 S — это не редакция, а особый режим для Windows 10 Home или Pro, который вы можете включить, если у вас вдруг возникнет такое желание. Он доступен также в редакциях Enterprise и Education.
В Windows 10 S ограничен набор доступных приложений. Вы можете использовать только те варианты, которые устанавливаются из Microsoft Store. Просматривать страницы в интернете здесь можно только через браузер Edge. Благодаря таким ограничениям Windows 10 S значительно легче и быстрее полноценных версий ОС, но вам придётся работать только с теми инструментами, что предлагает в своём магазине Microsoft.
Этот режим чаще всего применяется на планшетах и ноутбуках-трансформерах.
Кому выбрать: Windows 10 S используют те, на чьих устройствах она уже установлена. Конечно, вы можете установить её где захотите, но приготовьтесь столкнуться с рядом ограничений.
Windows 10 S на сайте Microsoft →
Windows 10 IoT Core
Windows 10 IoT Core (IoT означает Internet of Things, «Интернет вещей») предназначена для установки на разнообразные устройства и гаджеты. Хотите запрограммировать какого-нибудь робота, собранного вами, переоборудовать своё старое радио, обеспечив ему доступ в интернет, установить Windows на свой медиацентр или собственноручно создать устройство на базе Arduino? Воспользуйтесь Windows 10 IoT Core. Версия подходит и для различных однопалатных компьютеров, таких как Arrow DragonBoard 410c и Raspberry Pi 3.
Кому выбрать: Windows 10 IoT Core предназначена для опытных пользователей, которые увлекаются электроникой. Кроме того, она пригодится, если вы создаёте какой-нибудь высокотехнологичный стартап.
Windows 10 IoT Core на сайте Microsoft →
Один из частых вопросов к инструкции про то, как установить Windows 11, или как установить Windows 10 с флешки — почему нет выбора версии (редакции) устанавливаемой версии системы, соответственно нельзя установить Pro: вместо этого сама устанавливается Windows Домашняя.
В этой инструкции подробно о том, почему так происходит и как сделать, чтобы при чистой установке Windows 11 или Windows 10 с флешки можно было выбрать Профессиональную или другую редакцию системы.
Как выбрать Windows 11 и 10 Pro или другую версию при установке и почему такой выбор может не появляться
Рассматриваемая ситуация возникает на компьютерах и ноутбуках, где при покупке была установлена лицензионная Windows 11, 10, 8.1 или 8 определенной версии.
Если на таком ноутбуке или ПК выполнять чистую установку Windows 11 и 10 в режиме UEFI, программа установки проверит, присутствует ли ключ продукта от производителя, хранящийся в БИОС (UEFI) и, если такой есть в наличии, автоматически будет установлена соответствующая редакция Windows 11/10, чаще всего — Домашняя, так как на большинстве фирменных устройств была предустановлена именно она.
В этом есть плюсы: вы получите лицензионную, автоматически активированную (после подключения к Интернету) систему. Если же вам требуется установить иную редакцию системы, например, Windows 11 Pro или 10 Pro, сделать это можно с помощью следующих простых шагов:
- На любом компьютере запустите блокнот (или другой текстовый редактор) и введите следующий текст:
[EditionID]
[Channel]
Retail
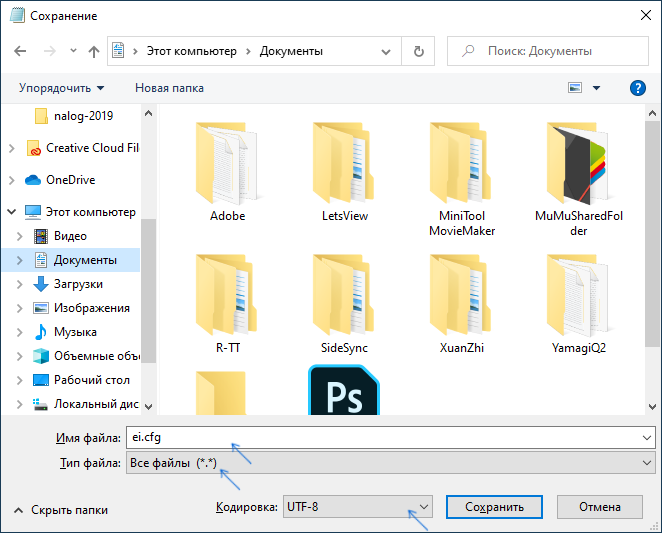
- Сохраните этот файл с именем «ei.cfg». При сохранении в блокноте обязательно в пункте «Тип файла» укажите «Все файлы», иначе к файлу добавится расширение .txt. В качестве кодировки используем UTF-8.

- Скопируйте файл ei.cfg в папку sources на загрузочной флешке Windows 11 или загрузочной флешке Windows 10.
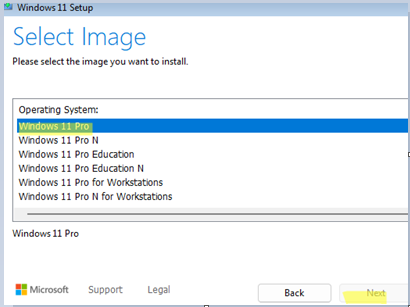
Готово, теперь при загрузке с флешки вы увидите стандартное окно выбора редакции системы, которую нужно установить.
Также, если в качестве содержимого файла ei.cfg использовать
[EditionID]
Professional
[Channel]
Retail
то выбора версии системы появляться не будет, а сразу будет устанавливаться Windows 11 или 10 Pro.
On some computers, when performing a clean installation of Windows 10 or 11 from a USB stick, you might not be able to choose the edition (version) of the operating system to install.
The “Next” button to continue the Windows installation may be greyed out for certain editions, or the installer may automatically select a specific edition without giving you the option to choose. For example, you might not be able to install Windows Pro, as the Home edition will always be installed instead.
First, make sure that the Windows installation image in the WIM (ESD) file contains all the editions you need. Open the PowerShell console and specify the path to the install.wim or install.esd file (more about the ESD format) on a bootable USB flash drive containing a Windows installation image:
Get-WindowsImage -ImagePath "e:\sources\install.wim" |select ImageName, ImageIndex
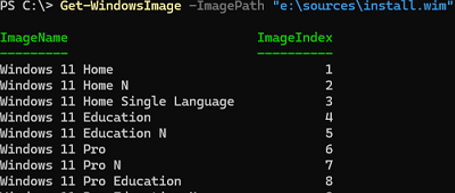
In this example, there are several editions available in the installation image, including Pro, Education, and Home. If the required Windows version isn’t listed, it means this edition has been removed from the image.
A Windows OEM product key embedded into UEFI by the device vendor is another possible cause of the problem.
This approach has been used since Windows 7 by storing a special SLIC table (
Software Licensing Description Table
) in the motherboard BIOS. The OEM vendor certificate, Windows edition, and product key are hard-coded into this table. This allows pre-installed Windows to be automatically activated (including offline scenarios).
On modern computers, Windows 10/11 product keys (OEM Embedded Keys) are written into UEFI by the manufacturer.
This is common on OEM devices that come with a specific edition of Windows pre-installed. The Windows installer looks for the SLIC table or OEM key in the UEFI (BIOS), detects the edition embedded there and automatically starts to install that edition.
This usually happens on devices with Windows Home edition preinstalled. To make the Windows installer ignore the embedded OS version information in the UEFI/BIOS, create the following ei.cfg text file in the sources directory on the installation USB flash drive:
[EditionID]
[Channel]
Retail
If you run Windows Setup from this flash drive now, a standard menu will appear, allowing you to select the edition of Windows you want to install. The product key embedded in the UEFI (BIOS) will be ignored.
To always install Windows Pro Edition automatically, update the ei.cfg file as follows:
[EditionID]
Professional
[Channel]
Retail
Configuration options available in the EI.cfg file:
- EditionID — edition identifier (possible values areHome, Professional, Enterprise, Education)
- Channel — specifies the type of Windows license to be used during installation (OEM, Retail, or Volume).
- VL — whether a volume (corporate) licensing channel is being used (
1– if volume licensing is used,0– if not)