
While none of these alternative sites are perfect replacements for Classic Maps, they’re what we’ve got for now. I haven’t checked most of these out personally yet, but I’m linking to them anyway in case you find them helpful for your purposes.
General Maps Based on Classic Maps
Note: Google has recently changed their API so that all maps now have the new-style controls. However, this doesn’t affect most of the underlying features.
Google MapMaker
This site is designed to let people make additions and corrections to Google Maps. However, it uses Classic Maps as its base map and provides some of its features including Directions (under the Edit menu), a variation of Street View/Maps split screen, and 2D satellite view.
Classy GMap
An excellent alternative to Classic Maps with some of its most popular features, this mapping solution has undergone some changes since first developed. Check out this post for the most recent update (01/18/16).
Google Maps Streetview Player of Brian Folts
A reader emailed me this link with some detailed instructions about how to use it. There’s not enough room for me to write them up here, so I’ve copied them into a comment on the original Google Maps post.
Instant Street View
Thanks to reader Sappy for sharing this find that has a lot of Classic Maps’ features (searchable, zoom, 2D satellite view). However, it doesn’t have a full split-screen Street View or directions.
Meteomodel
Thanks to reader Szymon for sending along this link for a Polish site. The map has Street View (not split-screen) but doesn’t have search or Directions.
Falk
Thanks to reader Dave for sharing this German site.
Wareko Map
T4L reader Wareko is also developing a map based on Google Classic, available in Japanese and English!
Specialty Maps Based on Classic Maps
TennisMaps
Thanks to reader James for sharing this website that he maintains to help people find tennis courts around the world.
SolarGIS
Thanks to reader S.H. for sharing this Google-based map that includes solar radiation and temperature data.
Thanks to reader John for sharing a whole slew of URLs that incorporate Classic Maps.
www.theaa.com/route-planner/index.jsp
shipspotting.com/ais/index.php
www.sunearthtools.com/dp/tools/pos_earth.php?lang=en
www.heywhatsthat.com/
www.westernhvdclink.co.uk/map-of-route.aspx
Maps Based on Other Platforms
MapQuest
One of the original mapping applications.
Bing Maps
Microsoft’s mapping site.
Yahoo Maps Directions
While Yahoo! has shut down its main Maps site, this implementation is currently still working.
OpenStreetMap
Open-source mapping software. A reader adds, «OSM is just the database: It’s up to someone to read the data and build actual maps, and possibly provide a router such as OSRM for directions.»
Wikimapia
Thanks to reader Metal for sharing this site, which describes itself as «a multilingual open-content collaborative map, where anyone can create place tags and share their knowledge.» Has both map and satellite views, but does not include a street view or directions feature.
Cycling-Focused Maps
Thanks to reader Frederic for sending me these links. Descriptions in quotations are taken directly from the site.
Ride with GPS
«Ride with GPS makes it easy to drag and draw your own custom routes with lightning fast elevation profiles to help you anticipate (or avoid) those big climbs.»
Bike Route Toaster
«BikeRouteToaster.com is a course creation application primarily aimed at Garmin Edge/Forerunner owners although other users without a GPS may also find it useful for planning rides.»
Cycle.Travel
Pretty straightforward-looking route planner built with OpenStreetMap.
Ride with GPS
From their About page: «Ride with GPS was founded by two guys that love writing cool software and riding their bikes: Zack Ham and Cullen King.»
Windows 10 is one of the most widely-used operating systems globally, known for its user-friendly interface and customizable features. Among these features is the ability to change how your mouse scrolls through windows, documents, and web pages. The default scrolling behavior in Windows 10 may not suit everyone’s preferences, especially if you frequently scroll through long documents or web pages. In this article, we will explore how to effectively change the number of lines you scroll with your mouse and discuss additional tips and tricks to enhance your scrolling experience.
Understanding Scrolling in Windows 10
Scrolling refers to the movement of visual content on the screen. When you scroll, you navigate through content that doesn’t fit entirely into the viewing area. This is often controlled by a mouse or a trackpad. In Windows 10, the default setting for the scrolling mechanism is usually set to scroll several lines at a time; however, it may vary depending on the mouse type and driver software in use.
Why Adjust Scrolling Settings?
Adjusting your scrolling settings can improve your overall efficiency and comfort while using Windows 10. Here are a few reasons to consider changing the number of lines your mouse scrolls:
-
Large Documents: For users who often read eBooks, PDFs, or long Word documents, a more tailored scroll setting can enhance the reading experience. Scrolling line by line or even page by page can help maintain focus and comprehension.
-
Web Browsing: Users who spend a lot of time scrolling through webpages may want quicker navigation, especially on long articles or social media feeds.
-
Gaming: Certain gaming environments may require rapid or slower scrolling for efficient gameplay or for the user interface.
-
Accessibility: For users with specific needs, adjusting scrolling behavior can alleviate some discomfort related to their usage patterns.
Changing Scroll Settings in Windows 10
Method 1: Using Mouse Settings
The most straightforward way to change the number of lines scrolled in Windows 10 is through the Mouse Settings. Here’s how to do it:
-
Open Settings: Click the Start Menu and select the “Settings” gear icon.
-
Navigate to Devices: In the Settings window, click on “Devices.”
-
Select Mouse: On the left sidebar, click on “Mouse.” This section contains various options related to mouse functionality.
-
Adjust the Scroll Amount:
- Here, you’ll see an option labeled “Roll the mouse wheel to scroll.” Usually, this option lets you adjust the number of lines scrolled by default.
- There will be a drop-down menu that will indicate the current setting (the default is usually 3 lines).
- You can select a value that suits your needs. Options typically range from 1 to 100 lines, or even higher in some cases, depending on the driver.
-
Test the Scrolling: After adjusting the settings, it’s a good idea to test the new scroll behavior. Open a document or a web page and scroll through it to see if the new setting suits your usage pattern.
Method 2: Using Control Panel
If you prefer the traditional Control Panel over the Settings app, you can adjust scrolling options there as well. Here are the steps:
-
Open Control Panel: Type “Control Panel” in the Windows search bar and select it from the results.
-
Select Hardware and Sound: In the Control Panel, click on “Hardware and Sound.”
-
Go to Mouse: Under the “Devices and Printers” section, click on “Mouse.” This opens the Mouse Properties dialog box.
-
Adjust Wheel Settings:
- Click on the “Wheel” tab.
- In the “Vertical Scrolling” section, adjust the number of lines to scroll as desired.
- Click “OK” to save your settings.
Method 3: Mouse-Specific Software
Many mouse manufacturers, including Logitech, Razer, and Microsoft, provide dedicated software to customize mouse settings, including scrolling behavior. Depending on the software, you may have additional options such as adjusting the scroll speed, customizing buttons, or even setting profiles for different applications or games.
-
Install the Software: Ensure you have the required software installed for your mouse. You can typically download it from the manufacturer’s website.
-
Open the Configuration Tool: Launch the software, and you’ll find options related to your mouse’s performance.
-
Adjust Scrolling Settings: Look for scrolling options, and adjust them according to your preferences.
-
Save and Test: Don’t forget to save your settings and test them out in a live environment.
Method 4: Registry Editor (Advanced Users)
For advanced users looking for more control over their scrolling behavior, you can tweak settings directly through the Windows Registry. However, be very careful while editing the registry, as incorrect changes can adversely affect your system.
-
Open Registry Editor: Press
Win + Rto open the Run dialog, typeregedit, and hit Enter. -
Navigate to Scroll Settings:
- Follow the path:
HKEY_CURRENT_USERControl PanelDesktop. - Look for the value named
WheelScrollLines.
- Follow the path:
-
Change the Value: Double-click on the
WheelScrollLinesentry, and enter your desired lines to scroll (the value should be in numeric form). -
Close Registry Editor: Exit the Registry Editor and restart your computer to apply the changes.
Additional Tips for Scrolling Experience
-
Adjusting Touchpad Settings: If you’re using a laptop, the touchpad may have its settings for scrolling, which you can access through the Settings app or Control Panel.
-
Using Smooth Scrolling: Some applications offer «smooth scrolling» features that make scrolling more fluid. Check the settings of your favorite applications for such options.
-
Scroll Lock Feature: Be mindful of the Scroll Lock key on your keyboard that may affect how scrolling behaves in some applications, especially spreadsheets.
-
Accessibility Features: Explore Windows 10’s accessibility features for users with disabilities, which might help in adjusting scrolling to more fitting configurations.
-
Troubleshooting Scrolling Issues: If you find that scrolling behaves erratically, it may be due to driver issues, a faulty mouse, or other software conflicts. Make sure your mouse drivers are up to date, and consider testing other mice if the problem persists.
Conclusion
Adjusting how many lines you scroll on Windows 10 is a simple but effective method to improve your comfort and efficiency while navigating your computer environment. Whether you choose to adjust the settings through the Mouse settings, Control Panel, specific software, or even the Registry Editor, you can tailor your experience to better meet your needs.
Remember that the ideal scrolling behavior may vary from one task to another and might take some experimentation to find the right balance. By understanding and utilizing the methods outlined in this article, you can create a more personalized and efficient working environment on Windows 10. Happy scrolling!
The default mouse scrolling behavior is typically suitable for most Windows 11 and 10 users. However, if the default settings don’t suit you and you want to tune it, you can set the number of lines to roll at a time or specify to roll one screen with a single roll. In addition to that, you can even control inactive window scrolling when you hover over them while working on another application.
In this gearupwindows article, we will guide you on changing the mouse scrolling settings on Windows 11 and 10.
How to Change Mouse Scroll Wheel Behavior Settings on Windows 11?
To change the mouse scrolling settings on Windows 11, use these steps:-
Step 1. First, open the Settings app.
Step 2. Then, select Bluetooth & devices on the left side.
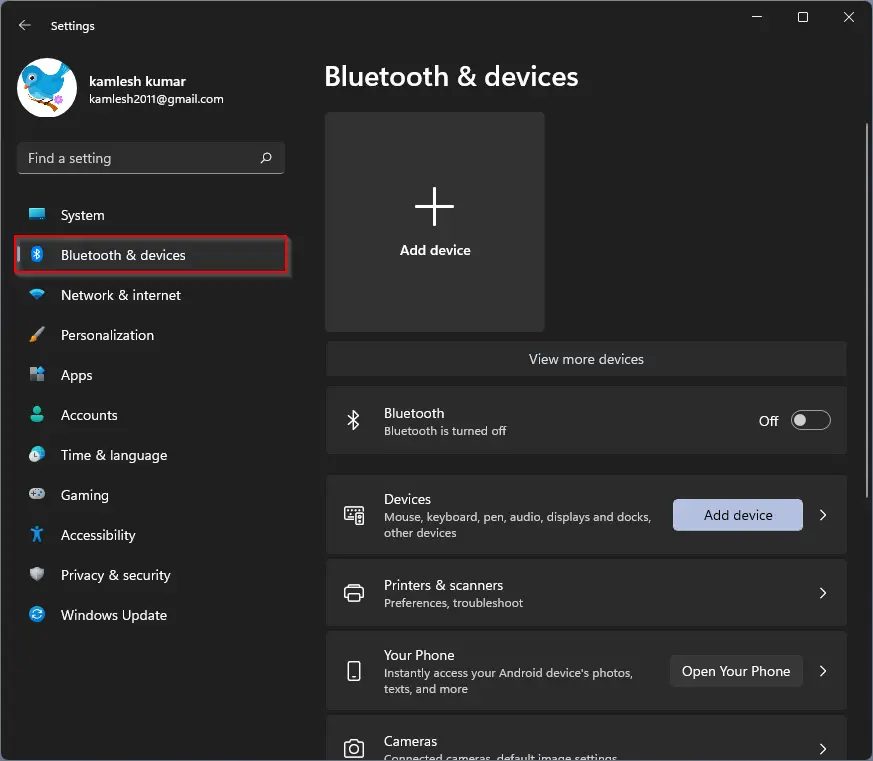
Step 3. After that, click the Mouse tile on the right side.
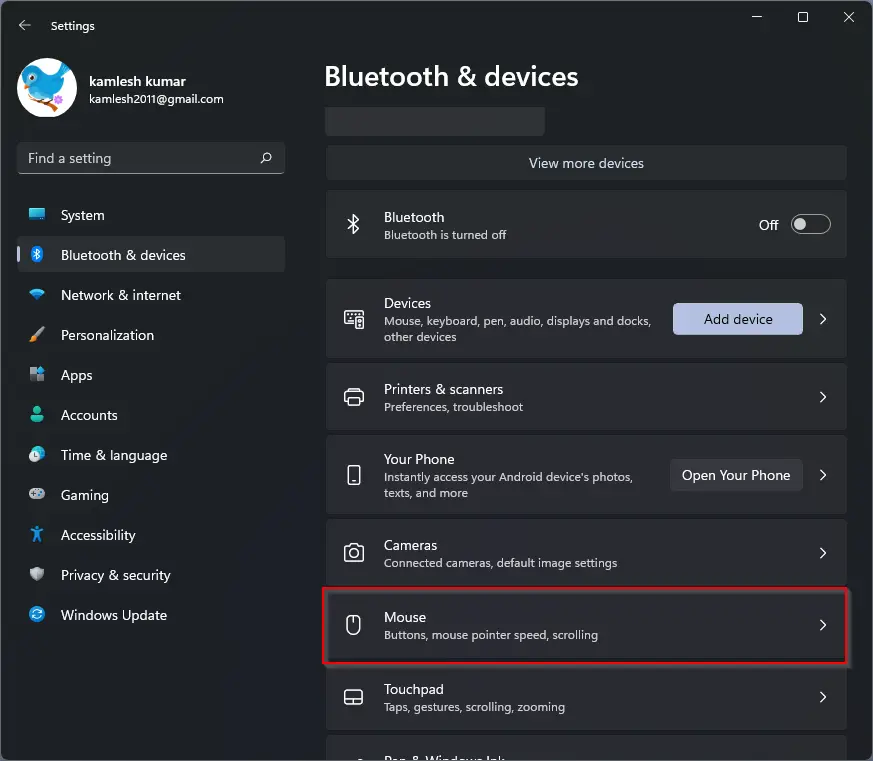
Step 4. On the Mouse settings page, under the “Scrolling” section, use the drop-down menu Roll the mouse wheel to scroll and select one of the options:-
- Multiple lines at a time.
- One screen at a time.
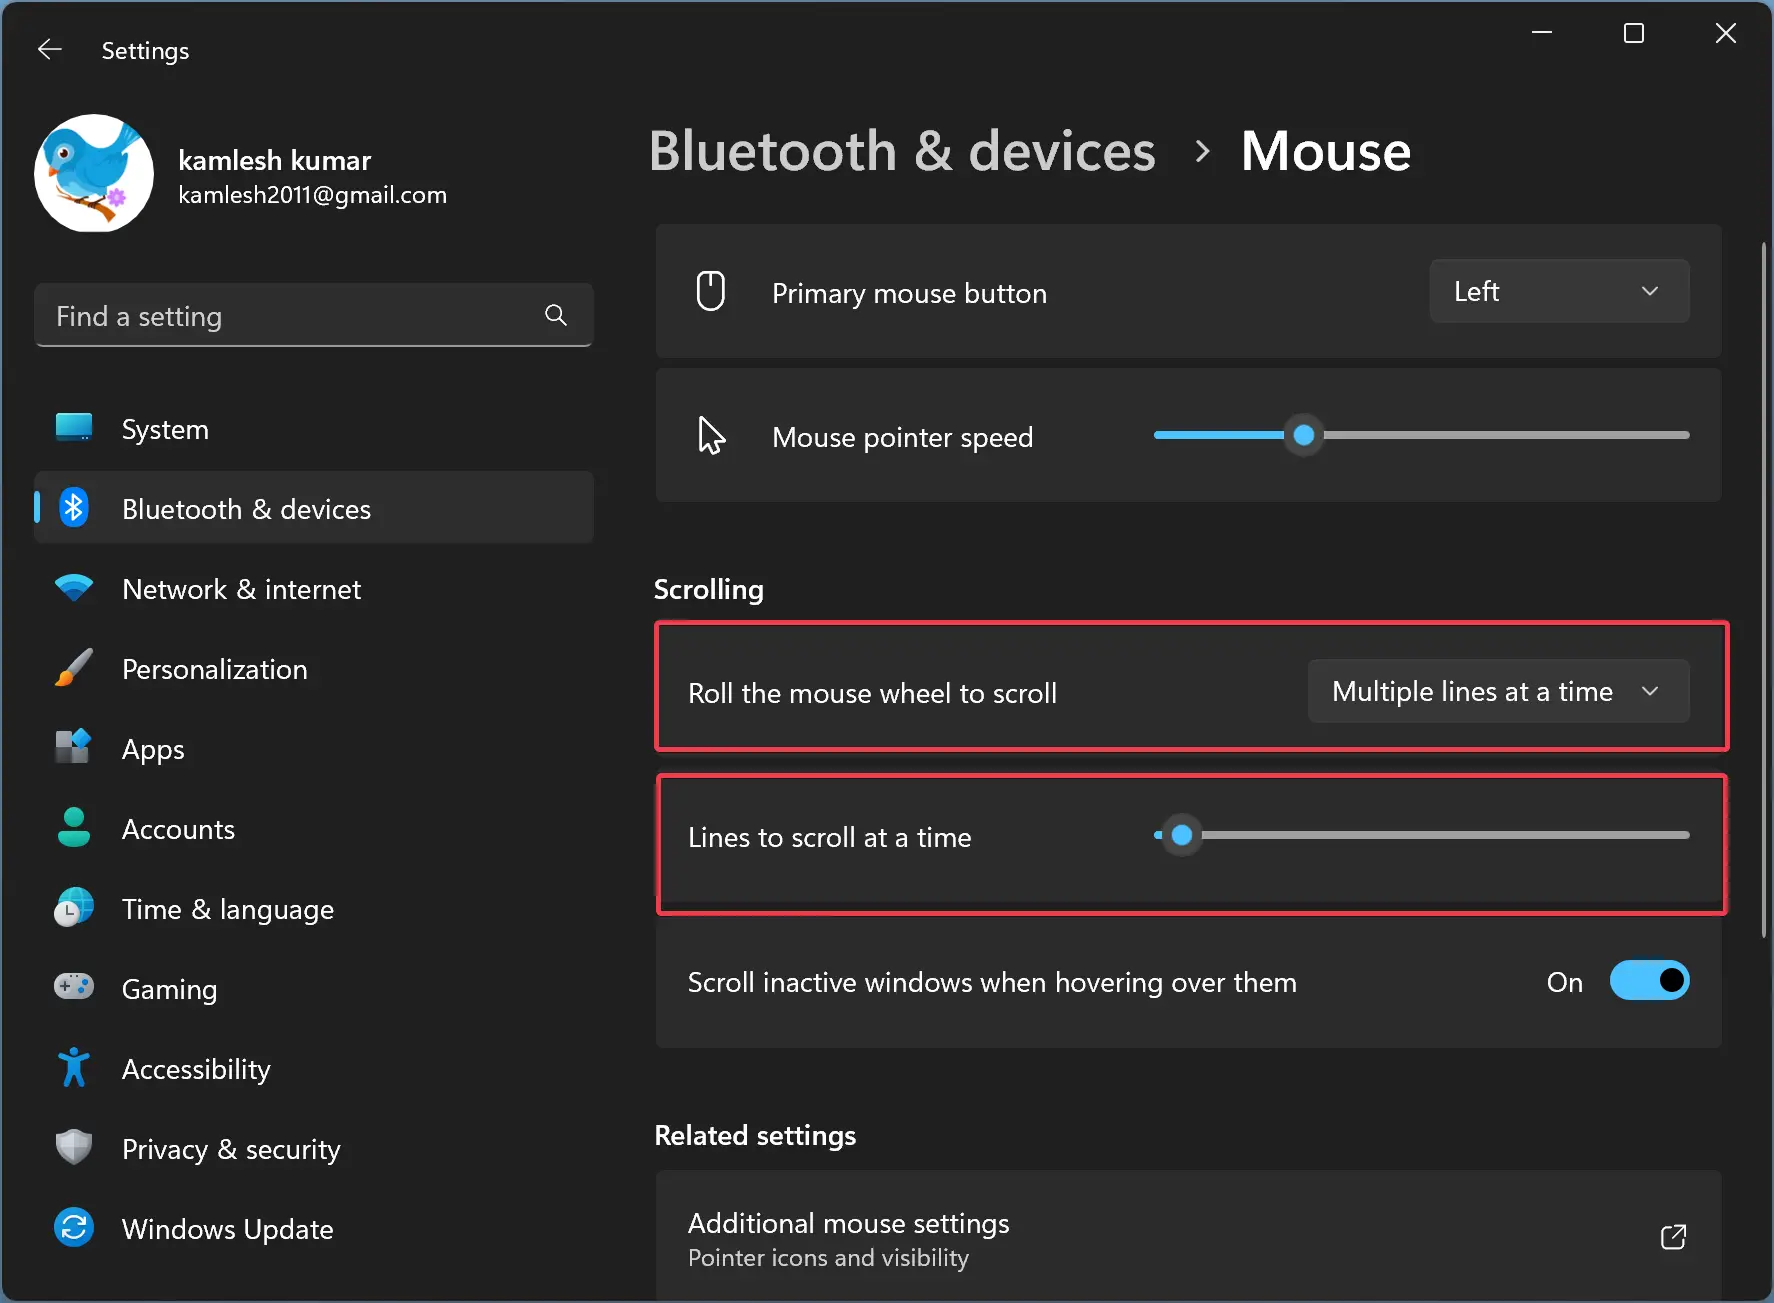
If you choose “One screen at a time,” no additional settings are required. When you scroll using the mouse, it will scroll one page at a time. However, if you select the “Multiple lines at a time” option, you will find an additional option to configure how many lines to scroll at a time. Using the “Lines to scroll at a time” slider, you can set the lines to scroll at a time.
Once you complete the above steps, the next time you roll the mouse wheel, the scrolling will be based on your configuration.
How to Adjust Mouse Scroll Wheel Behavior Settings on Windows 10?
To change or adjust the mouse scrolling settings on Windows 10, do the following steps:-
Step 1. Very first, launch the Settings app.
Step 2. Then, click on Devices.
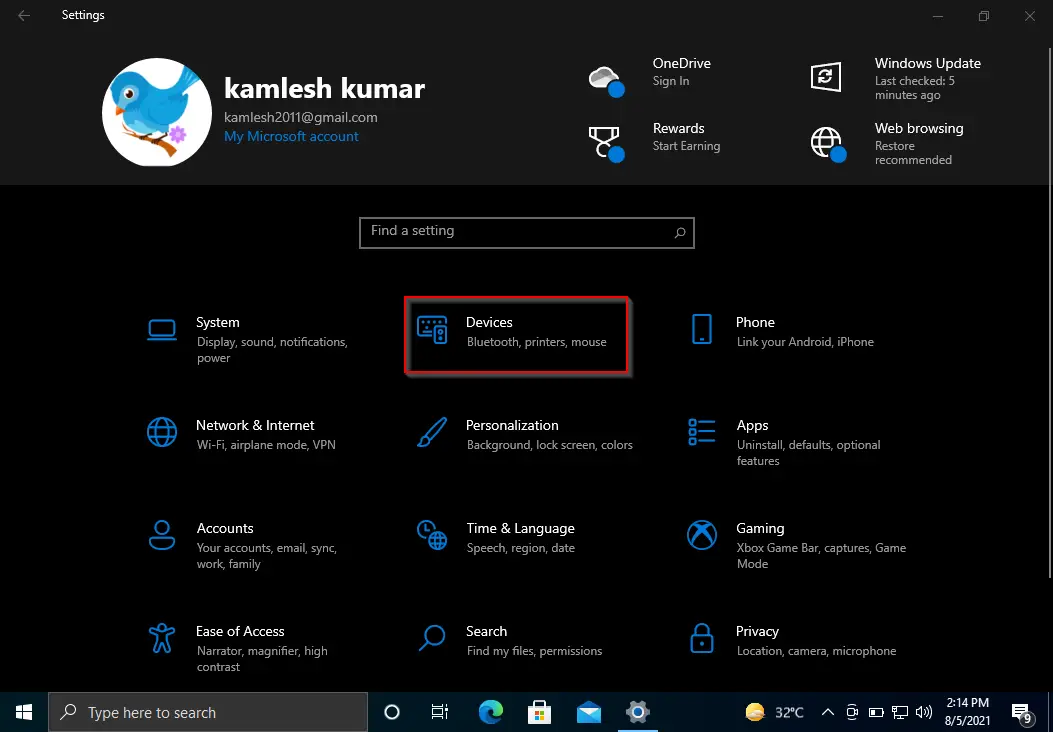
Step 3. Select the Mouse option in the left sidebar when you’re ready.

Step 4. On the Mouse settings page, use the drop-down menu Roll the mouse wheel to scroll and select one of the options:-
- Multiple lines at a time.
- One screen at a time.
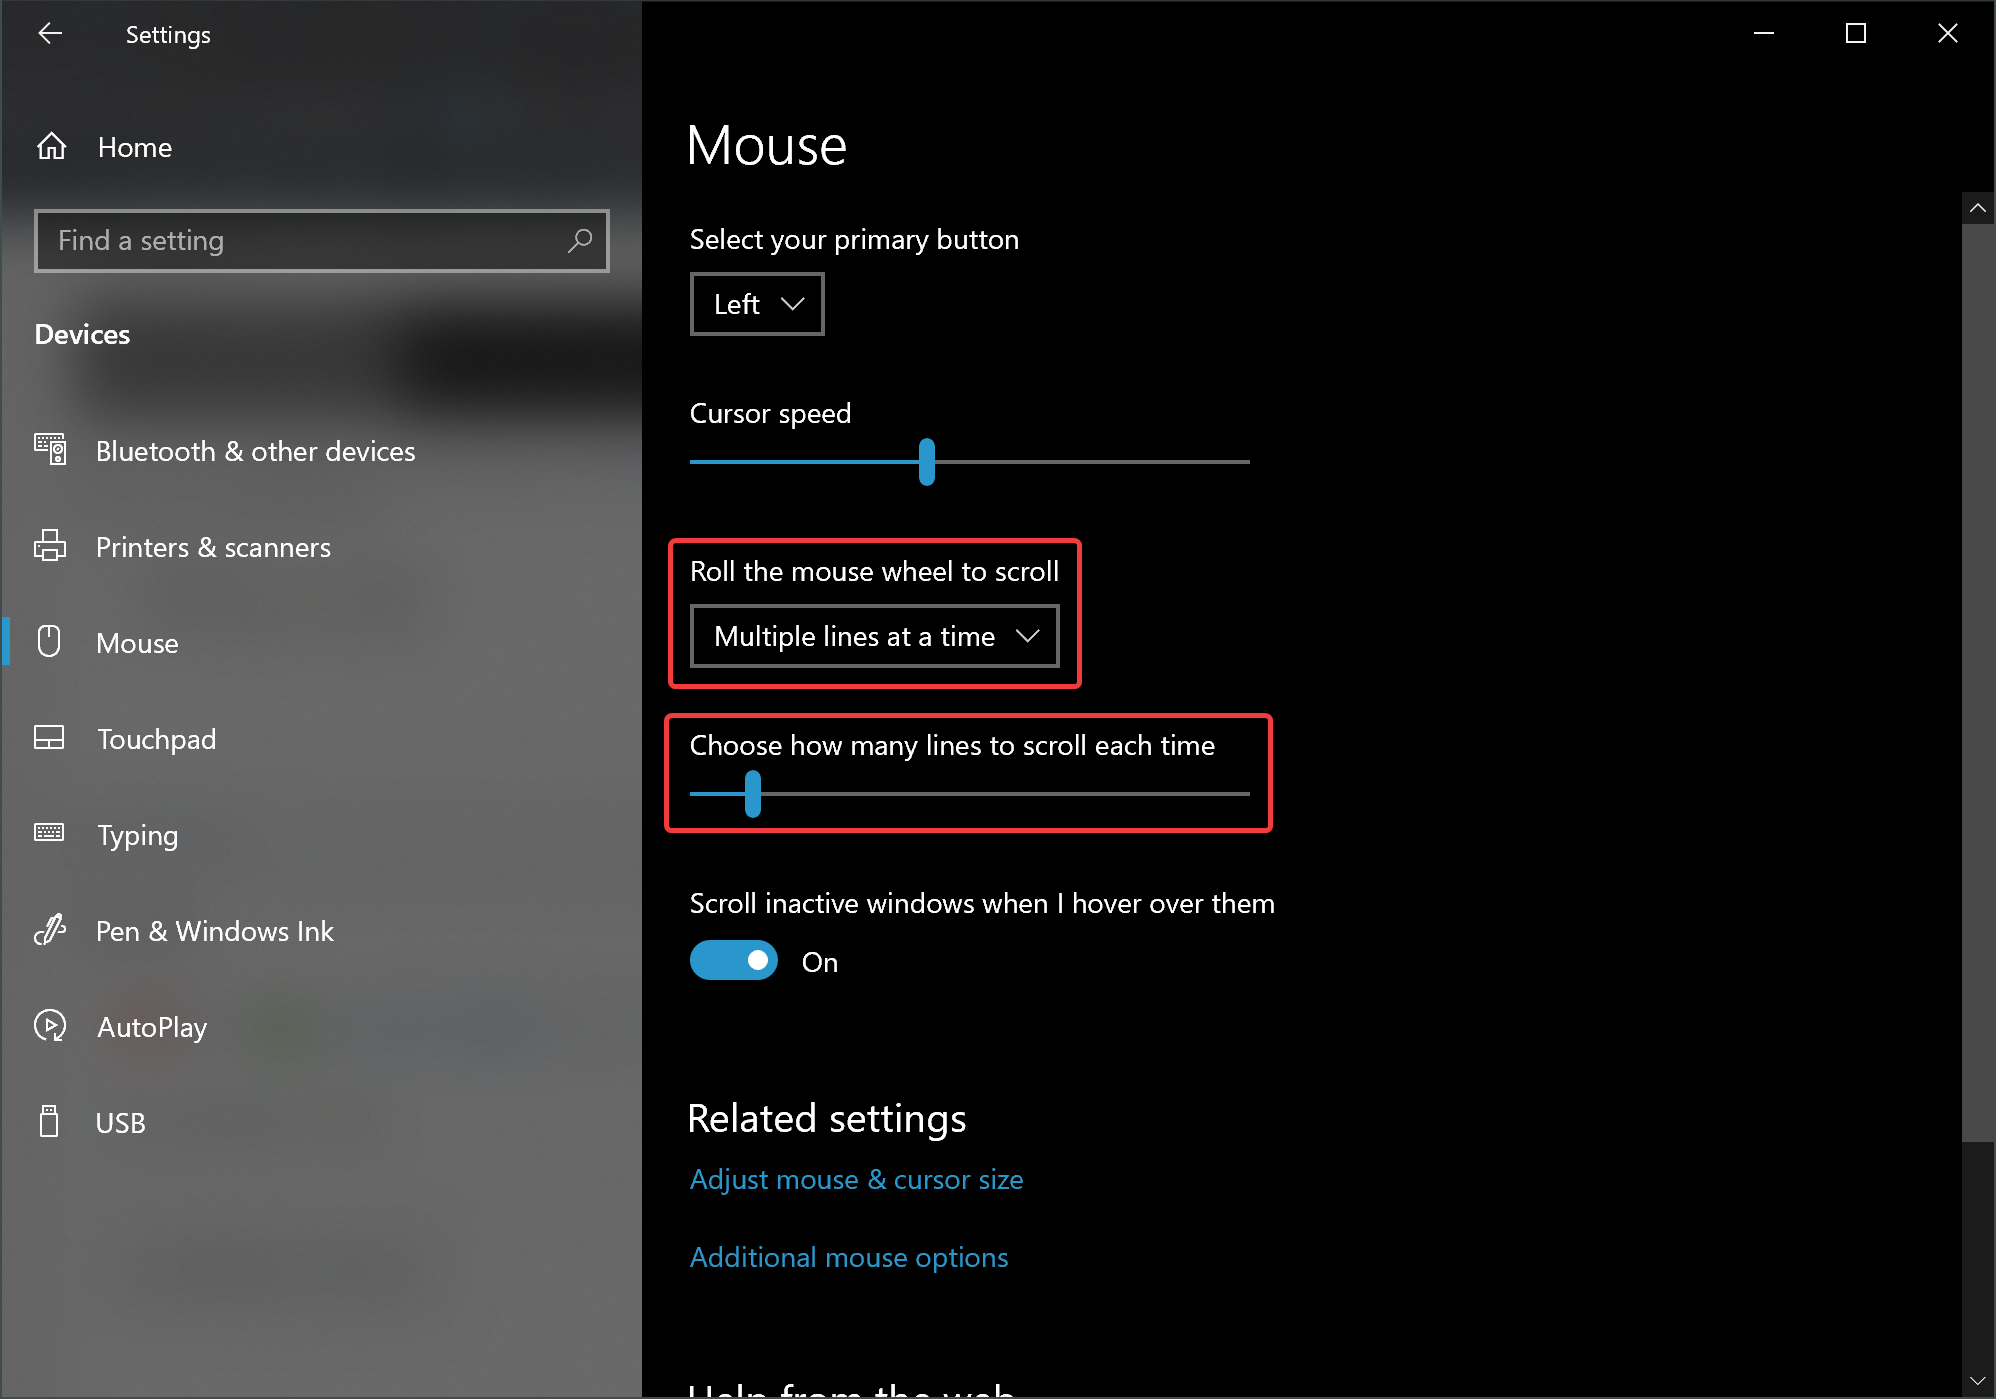
If you select “One screen at a time,” no additional settings are required. When you roll the mouse wheel, it will scroll one page at a time. However, if you pick the “Multiple lines at a time” option, you will find an additional option to configure how many lines you want to scroll at a time. Using the “Choose how many lines to scroll each time” slider, you can set the lines to scroll at a time.
Once you complete the above steps, the next time you roll the mouse wheel, the scrolling will be based on your configuration.
Conclusion
In conclusion, the default mouse scrolling behavior on Windows 11 and 10 is generally suitable for most users. However, if you prefer to customize your scrolling experience, you can adjust the settings to roll one screen at a time or specify the number of lines to roll at a time. The steps to change the mouse scrolling settings on Windows 11 and 10 are simple and straightforward. By following the instructions outlined in this gearupwindows article, you can easily modify your mouse scrolling settings to suit your needs better.
Efficiently navigating your Windows 10 device involves mastering the control of your mouse to optimize your user experience. One essential aspect of mouse control is customizing the scrolling sensitivity to suit your preferences and workflows. By adjusting the scroll sensitivity on Windows 10, you can enhance your productivity, streamline your tasks, and achieve a more comfortable computing experience.
In this comprehensive guide, we will walk you through the simple steps to adjust the scroll sensitivity on your Windows 10 system. Whether you prefer a quicker or slower scroll speed, understanding and implementing these adjustments will empower you to tailor your mouse behavior precisely to your liking, ultimately boosting your efficiency and allowing for smoother navigation on your device.
Key Takeaways
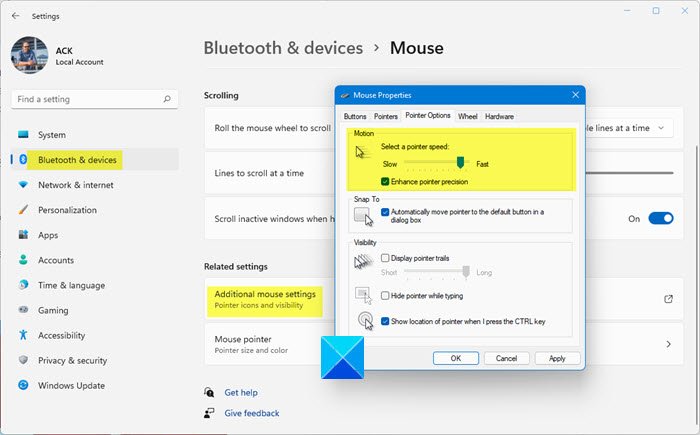
To change the scroll sensitivity on Windows 10, go to Settings > Devices > Mouse. Under “Related settings,” click on “Additional mouse options.” In the Mouse Properties window, go to the Wheel tab and adjust the number of lines per notch to increase or decrease scroll sensitivity. Click Apply and OK to save the changes.
Understanding Scroll Sensitivity
Scroll sensitivity refers to how fast or slow your mouse scrolls through content on your screen based on the movement of your scroll wheel. Understanding scroll sensitivity is crucial as it directly impacts your scrolling experience while navigating through documents, web pages, and other applications on your Windows 10 system. By adjusting scroll sensitivity to your preference, you can enhance your workflow efficiency and overall user experience.
When scroll sensitivity is too high, even a slight movement of the scroll wheel can lead to overshooting your intended position, making it challenging to achieve precise scrolling. Conversely, low scroll sensitivity may require several wheel rotations to move through content, resulting in a slower navigation process. Finding the right balance of scroll sensitivity that matches your scrolling habits and preferences is key to optimizing your productivity and comfort when using your mouse on Windows 10.
By mastering the adjustment of scroll sensitivity settings on Windows 10, you can customize your scrolling experience to suit your individual needs. Whether you prefer a faster-paced scrolling action for quick browsing or a smoother, more controlled scrolling motion for detailed navigation, understanding scroll sensitivity empowers you to tailor your mouse control to enhance your digital interactions.
Navigating Windows 10 Settings
Navigating Windows 10 Settings to adjust scroll sensitivity is a simple process that can greatly enhance your user experience. Begin by opening the Start menu and clicking on the gear icon to access the Settings menu. From there, choose the ‘Devices’ option, followed by ‘Mouse’ on the left-hand side panel. This will lead you to the mouse settings where you can customize various features, including scroll sensitivity.
Within the Mouse settings, locate the ‘Scrolling’ section to find options related to scroll speed and sensitivity. You can adjust the ‘Roll the mouse wheel to scroll’ setting to control how many lines the screen scrolls with each wheel movement. Additionally, you can fine-tune the scroll sensitivity to your preference by using the slider provided. Experiment with different sensitivity levels to find the one that best suits your scrolling habits and workflow.
Remember to click ‘Apply’ or ‘OK’ after making changes to ensure they are saved. Navigating Windows 10 Settings to adjust scroll sensitivity is a quick and effective way to tailor your mouse experience to your liking, providing smoother and more efficient scrolling as you navigate through your digital workspace.
Customizing Mouse Properties
In the customization of mouse properties on Windows 10, users gain the ability to fine-tune various settings for a personalized and efficient scrolling experience. By accessing the Control Panel and selecting the “Mouse” option, a window will appear with multiple tabs offering different customization options. Within the “Pointer Options” tab, users can adjust the pointer speed and motion settings to suit their specific preferences. This setting allows for more precise control over the mouse pointer’s speed and responsiveness, catering to individual needs.
Moreover, users can delve into the “Wheel” tab to specifically adjust the scroll wheel properties. Here, the number of lines scrolled per notch can be altered, providing a tailored scrolling experience based on personal preference. Additionally, users have the option to enable smooth scrolling for a more fluid and seamless scrolling motion. Overall, customizing mouse properties in this manner enables users to optimize their scrolling experience on Windows 10 according to their unique requirements and comfort levels.
To adjust scroll speed on Windows 10, you can easily customize the scrolling experience to suit your preference. By tweaking the scroll speed settings, you can make scrolling faster or slower to match your comfort level. To get started, open the Settings menu on your Windows 10 system and navigate to the Devices section. From there, select the Mouse option to access the mouse settings.
Once you are in the Mouse settings window, choose the Wheel tab to adjust the scrolling speed. Here, you can experiment with different scroll speed settings using the slider provided. Move the slider to the left to decrease scroll speed for a slower scrolling experience, or to the right to increase the speed for faster scrolling. Test out different scroll speeds until you find the one that feels most comfortable and efficient for your needs.
Customizing the scroll speed on Windows 10 can greatly enhance your overall productivity and user experience. By making simple adjustments to the scroll speed settings, you can navigate through documents, web pages, and apps with ease and precision. Take the time to fine-tune your scroll speed preference to optimize your mouse control and streamline your workflow on Windows 10.
Fine-Tuning Scroll Acceleration
Fine-tuning scroll acceleration allows you to customize the responsiveness of your mouse scrolling to suit your preferences and work style. By adjusting the scroll acceleration settings on Windows 10, you can control how quickly or slowly the scroll wheel moves through web pages, documents, and other content. This feature is particularly useful for those who want precise control over scrolling speed and acceleration.
To fine-tune scroll acceleration on Windows 10, navigate to the Mouse settings in the Control Panel or Settings app. Look for the option that allows you to adjust scroll wheel settings and experiment with different acceleration levels until you find the one that best fits your needs. Keep in mind that finding the perfect balance may take some trial and error, so don’t hesitate to tweak the settings until you achieve the desired scroll acceleration that enhances your overall user experience. Adjusting scroll acceleration can significantly improve your productivity and comfort while using your mouse in Windows 10.
Testing And Refining Settings
Once you have adjusted the scroll sensitivity settings on your Windows 10, it’s essential to test and refine the changes to ensure they meet your preferences. Begin by navigating different types of content such as web pages, documents, or spreadsheets to assess how the new sensitivity levels impact your scrolling experience. Pay close attention to how smoothly and accurately the scroll responds to your mouse movements.
If you find that the scrolling is too fast or slow in certain applications, consider fine-tuning the sensitivity settings further until you achieve the desired scrolling speed across all tasks. It may take some trial and error to find the perfect balance that enhances your productivity and comfort while using the mouse. Remember, the goal is to customize the settings to align with your unique scrolling habits and workflow.
Don’t hesitate to revisit the sensitivity settings periodically to make any necessary adjustments based on your evolving needs and preferences. Regularly testing and refining the scroll sensitivity will help you optimize your mouse control experience on Windows 10 and ensure smooth and efficient scrolling in all your daily tasks.
Utilizing Third-Party Tools
When it comes to adjusting scroll sensitivity on Windows 10, third-party tools can offer advanced customization options beyond what is available natively. These tools provide additional settings and features to fine-tune your mouse control to suit your preferences and enhance your overall user experience.
One popular third-party tool for customizing scroll sensitivity on Windows 10 is X-Mouse Button Control. This program allows users to adjust various mouse settings, including scroll speed and sensitivity, with a user-friendly interface. By utilizing X-Mouse Button Control, you can achieve precise control over your mouse scrolling behavior and tailor it to your specific needs.
Another handy third-party tool is AutoHotkey, which offers powerful scripting capabilities to customize mouse controls, including scroll sensitivity adjustments. With AutoHotkey scripts, you can create personalized mouse scrolling settings and automate various mouse functions according to your workflow requirements. By leveraging these third-party tools, Windows 10 users can take their mouse control to the next level with enhanced flexibility and control options.
Tips For Efficient Scrolling
Efficient scrolling can greatly enhance your overall productivity and comfort when using your computer. To improve your scrolling experience, consider utilizing keyboard shortcuts in tandem with your mouse scrolling. For example, pressing the space bar will scroll down a full page, providing a quick and efficient way to navigate through lengthy documents or web pages. On the other hand, holding down the Shift key while scrolling allows for horizontal scrolling, which can be particularly useful when viewing wide spreadsheets or websites.
Additionally, adjusting the scroll speed to suit your preferences can make a significant difference in your scrolling efficiency. Finding the right balance between speed and control will ensure smooth and accurate scrolling without feeling too slow or too fast. Experiment with different scroll sensitivity settings in your Windows 10 system to discover what works best for you. Lastly, consider investing in a mouse with customizable buttons or scroll wheels, allowing you to tailor the scrolling experience to your specific needs and workflow. By implementing these tips and tricks, you can master mouse control and streamline your scrolling process for a more efficient and enjoyable computer usage experience.
Frequently Asked Questions
What Is Scroll Sensitivity On Windows 10?
Scroll sensitivity on Windows 10 refers to the speed at which the content on your screen moves when you use the scroll wheel on your mouse or trackpad. It determines how quickly or slowly you have to scroll to navigate through web pages, documents, or other applications. Adjusting the scroll sensitivity settings can help provide a smoother and more customized scrolling experience based on your preferences and needs, allowing you to scroll through content at a comfortable pace.
How Can I Adjust Scroll Sensitivity On Windows 10?
To adjust scroll sensitivity on Windows 10, go to Settings > Devices > Mouse. Under “Related settings,” click on “Additional mouse options.” In the Mouse Properties window, go to the Wheel tab. Here, you can adjust the number of lines the screen scrolls per notch on the mouse wheel. Alternatively, you can also adjust scroll sensitivity by customizing mouse settings in the Control Panel. By adjusting these settings, you can fine-tune scroll sensitivity to better suit your preferences and improve your user experience.
Does Adjusting Scroll Sensitivity Affect Other Functions Of The Mouse?
Adjusting scroll sensitivity typically only affects how quickly or slowly the scroll wheel moves the page up or down. It does not usually impact other functions of the mouse, such as the movement of the cursor or the functioning of the left and right buttons. However, in some cases, highly sensitive scroll settings may cause the scroll wheel to be more responsive, potentially impacting the overall user experience if not set to a comfortable level. It is important to find the right balance between scroll sensitivity and other mouse functions for optimal use.
Can I Customize Scroll Sensitivity For Specific Applications?
Yes, you can customize scroll sensitivity for specific applications on some operating systems. For example, on Windows, you can adjust the scroll wheel settings in the Control Panel or through the mouse settings in the system tray. Similarly, on macOS, you can adjust scrolling behavior in the System Preferences under the Mouse or Trackpad settings. By customizing scroll sensitivity for specific applications, you can tailor your scrolling experience to better suit your needs and preferences while using different programs.
Are There Any Third-Party Tools Available To Help Adjust Scroll Sensitivity On Windows 10?
Yes, there are third-party tools like XMouse Button Control and WizMouse that can help adjust scroll sensitivity on Windows 10. These tools allow users to customize the scrolling behavior, such as adjusting the speed and direction of the scroll wheel, to better suit their preferences. Additionally, they offer additional features like enabling scroll wheel functionality for inactive windows and customizing button actions.
Conclusion
By adjusting scroll sensitivity on Windows 10, users can enhance their computing experience and optimize workflow efficiency. Mastering mouse control is a fundamental aspect of navigating through the digital realm seamlessly. Customizing scroll sensitivity allows individuals to personalize their devices to better suit their unique preferences and needs. Whether for professional productivity or leisurely browsing, fine-tuning these settings can significantly improve user comfort and effectiveness.
With the straightforward steps outlined in this guide, users can easily make adjustments to their scroll sensitivity settings on Windows 10. By taking control of this feature, individuals can make their computing experience more tailored to their liking, ultimately increasing productivity and satisfaction. Embracing these simple customization options can empower users to navigate their digital environments with greater precision and ease.
In Windows 11/10 the default scroll value for the Mouse wheel is automatically set to 3. If you want to increase or fine-tune the speed of the mouse scrolling to make things easier for you, it should be configured the way you just like it. Let’s see how can you can increase, slow down or change the Mouse Scroll and Cursor Speed in Windows 11/10 via Settings or Registry.

To increase, slow down, or change the Mouse Scroll and Cursor Speed in Windows 11:
- Open Settings
- Open Bluetooth and Device settings
- Click on Additional mouse settings
- Mouse Properties box will open
- Open the Pointer Options tab
- Under Motion, see the Pointer speed using the slider.
- Click Apply and exit.
Similarly, you can do it in Windows 10.

Many advanced mouses and touchpads feature specialized drivers with many additional options that show up under separate tabs in the Mouse Properties window. To configure these settings, you are required to refer to your hardware’s user manual. The other basic features of your mouse can be configured by accessing the Settings app.
First things first, click the Start Menu by clicking the Start button in the bottom left corner of the screen.
Next, click on Settings to open the app. When the Settings app shows up, click on Devices.
Select Mouse from the menu on the left to open up the mouse configuration screen.
You should see a slider. You can use it to change the Cursor speed.
Read: How to change Mouse Double Click Speed in Windows
You can also use the to set how many lines the scroll wheel should skip at a time for every scroll. Simply hold and drag the slider to the number you want.
By default, the value of the slider is already set at “3”. If required, you can fine-tune it to respond at any sensitivity between 1 – 100.
If you want to enter a value of your choice for your scroll wheel’s sensitivity open up the link that reads “Additional mouse options”.
When the mouse dialog pops up, chose the “Wheel” tab adjacent to the pointer options under Mouse Properties window.
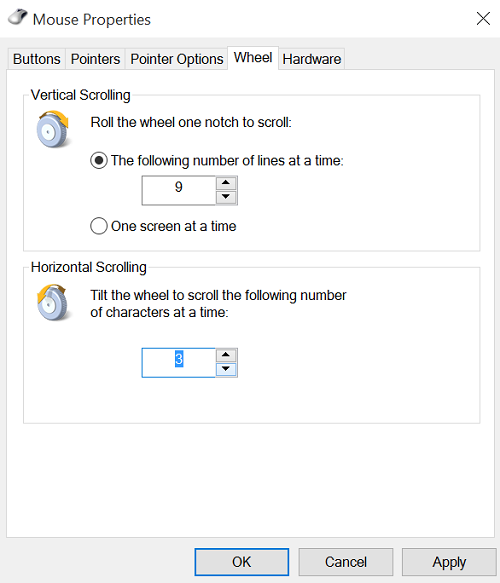
In the box that is displayed, enter the value for the scroll wheel sensitivity you want. In the same box, you’ll find the option to link your scroll wheel to the “One page at a time” function.
Read: Should you turn off Enhance Pointer Precision in Windows?
For every scroll you make, the wheel will skip an entire page of content at once, instead of going through it line by line. The same could also be used to adjust the settings for what’s known as “horizontal scrolling”.
Change Mouse Scroll Speed in Windows 11/10 using Registry Editor
Another option to change mouse scroll speed in Windows 11/10 computer is by using the Registry Editor. This option also lets you roll the mouse wheel to scroll one screen at a time or multiple lines at a time. But first, take a backup of Registry Editor. It is important because if something goes wrong, then Registry backup will be there to restore the Registry. After that, use the following steps:
- Open the Windows Registry
- Access the Desktop key
- Access the WheelScrollLines value
- Change the value data of WheelScrollLines value
- Press the OK button
- Sign out or sign in to your computer.
Now have a look at all these steps in detail.
In the very first step, you are required to open your Windows 11/10 computer Registry. To open it, type regedit in the Search box, and hit the Enter key.
When Windows Registry is opened, access the Desktop key. To access this Registry key, use this path:
HKEY_CURRENT_USER\Control Panel\Desktop

On the right-hand section of this Desktop Registry key, access the WheelScrollLines name String value.
Now you have to change its value data. For that, double-click this WheelScrollLines String value. This will open an Edit String box for this value. In that box, enter any value between 1 to 100 to scroll multiple lines. For example, if you want to scroll 20 lines in a webpage or a document, then add 20 in the Value data field.

On the other hand, if you want to scroll one screen at a time, then put -1 in the Value data field of WheelScrollLines value.
Press the OK button and then you can close the Registry Editor.
In the final step, you need to sign out or sign in or simply restart your Windows 11/10 computer to save the changes.
If you want to keep the default scroll speed (which is 3) for the mouse wheel using Registry Editor, then follow the above steps, and add 3 in the Value data field of WheelScrollLines String value. Hit the OK button and then restart the computer to successfully apply the changes.
Can you change the scroll wheel speed?
Yes, you can easily change mouse wheel scroll speed in Windows OS. Whether you are using Windows 10 or Windows 11 computer, the Settings app provides the option to change the scrolling speed of the mouse wheel. Apart from that, you can also tweak Windows Registry to set the mouse wheel scrolling speed. Both the options are covered in this post.
How do I change scroll settings in Windows 10?
If you want to change vertical and horizontal scrolling settings for the mouse wheel in Windows 10, then you can do this by accessing the Mouse Properties. If you want, you can also use the Settings app to change the mouse wheel scroll speed, cursor or pointer speed, primary button, and other settings for the mouse.
If you are using Windows 11 computer, then you can use its Settings app to change mouse pointer speed, scrolling settings, primary mouse button, etc. Just access the Mouse section available under the Bluetooth & devices category of the Windows 11 Settings app and adjust the settings as per your needs.
Now read: How to disable Ctrl Scroll zoom in Windows.