
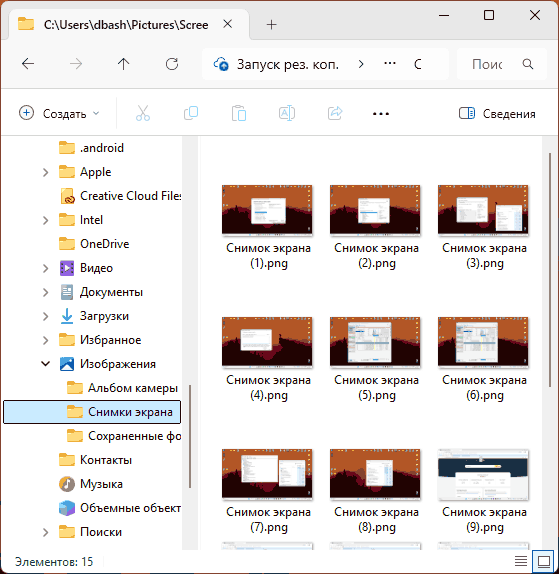
При создании снимков экрана встроенными средствами Windows 11/10 с параметрами по умолчанию и при использовании клавиш Print Screen, Win + Print Screen, Win + Shift +S (подробнее о клавишах — в этой статье) они сохраняются в папке «Изображения\Снимки экрана» (Pictures\Screenshots) текущего пользователя. Для некоторых это может быть неудобным.
В этой простой инструкции о том, как изменить место сохранения скриншотов по умолчанию в Windows. На близкую тему: Куда сохраняются скриншоты Windows при использовании разных способов их создания.
Изменение места сохранения снимков экрана в свойствах папки
Первый, простой и основной метод изменения места сохранения скриншотов — настройка свойств соответствующей папки. Необходимые действия:
- Создайте папку, где вы планируете сохранять снимки экрана. Обязательно следует создать отдельную папку для этого: использование корня диска не следует использовать вовсе, рабочего стола — нежелательно.
- Откройте «Проводник», перейдите в папку «Изображения», нажмите правой кнопкой мыши по папке «Снимки экрана» и выберите пункт «Свойства».
- В свойствах папки перейдите на вкладку «Расположение», нажмите кнопку «Переместить» и укажите папку, куда следует сохранять скриншоты.
- Нажмите кнопку «Ок» или «Применить». Вам будет предложено переместить уже имеющиеся скриншоты в новую папку — решение на ваше усмотрение.
Готово, место сохранения новых снимков экрана по умолчанию изменено.
Учитывайте: выполненные настройки относятся к штатным средствам Windows. Если вы используете сторонние программы, NVIDIA App, панель Xbox или иные инструменты, настройки расположения сохраняемых снимков экрана можно найти в них самих.
Редактор реестра
Те же действия при необходимости можно выполнить в редакторе реестра. Для этого:
- Нажмите клавиши Win+R на клавиатуре, введите regedit и нажмите Enter.
- Перейдите к разделу реестра
HKEY_CURRENT_USER\SOFTWARE\Microsoft\Windows\CurrentVersion\Explorer\User Shell Folders
- Нажмите правой кнопкой мыши в пустом месте правой панели редактора реестра и создайте новый расширяемый строковый параметр с именем
{B7BEDE81-DF94-4682-A7D8-57A52620B86F} - Дважды нажмите по созданному параметру и укажите путь к папке (она должна быть создана заранее) для сохранения скриншотов.

- Закройте редактор реестра и перезагрузите компьютер, чтобы изменения вступили в силу.

Учитывайте, что при использовании этого метода, ранее сделанные снимки экрана продолжат находиться в стандартной папке и лишь вновь создаваемые будут помещаться в указанную в реестре.
Where are screenshots saved and how to find screenshots on Windows 10? This post mainly talks about 4 things: Windows 10 screenshots folder (where are screenshots saved), how to restore screenshot folder in Windows 10 if you can’t find it, how to take a screenshot on Windows 10, and best free screenshot software for PC. To recover deleted or lost files, try free MiniTool Power Data Recovery.
Wonder where are screenshots saved in Windows 10? Check the Windows 10 screenshots folder to find your screenshots. If you can’t find the screenshot folder, check how to restore the screenshot folder and retrieve your screenshots in Windows 10.
Also, you can learn how to take a screenshot on Windows 10 PC, and some best free screenshot software is also listed for your reference in this post.
Also read: Discover expert tips and tricks for hard drive recovery service that could potentially save you from losing irreplaceable memories.
Windows 10 Screenshots Folder – Where Are Screenshots Saved
As for where are screenshots saved in Windows 10, it depends on how you take a screenshot on Windows 10 PC.
By default, when you press Windows + Print Screen keyboard shortcut to screenshot on Windows 10 PC, your screenshots will be saved into Windows 10 Screenshots folder. You can find your screenshots in This PC -> Pictures -> Screenshots folder. Using this way to capture a screenshot on Windows 10, this is the location of screenshot images.
If you like, you can change the default location of your screenshots in Windows 10.
How to change where screenshots are saved in Windows 10:
- Open File Explorer in Windows 10, and open the location where you want to the screenshots go. Right-click the blank space and create a folder called “Screenshots”.
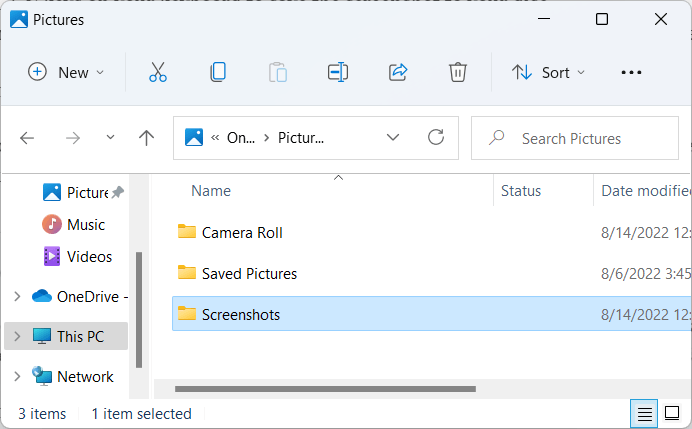
- Next, go to This PC -> Pictures -> Screenshots, right-click Screenshots folder, and select Properties.
- In the Screenshots Properties window, click Location Here you can see the default Windows 10 screenshots folder location.
- Click Move button, find and select the new Screenshots folder you created in Step 1. Click Select Folder to change the path for your screenshots.
After this, the screenshots you use the Windows + Print Screen method to take will be stored in the new location.
How to reset screenshot location in Windows 10:
If you want to restore the default location for your Windows 10 screenshots folder, you can go to This PC -> Pictures, right-click Screenshots folder, and select Properties. Click Restore Default button to change the location of screenshots to the default folder.
How to Find Screenshots on Windows 10 – Fix Can’t Find Screenshots Folder
If you find that Windows 10 screenshots are not being saved in Pictures folder, that might because you didn’t use the Windows + Print Screen method to take the screenshot on Windows 10 PC.
You have many ways to take a screenshot in Windows 10.
If you only press the Print Screen key to create the screenshot, then you can’t find the screenshot in any folder on your Windows 10 computer. The screenshot is saved in your computer’s clipboard. You have to paste it into an image editor program and then you can save it to your computer.
Windows 10 also has a built-in snipping tool, named Snip & Sketch in newer Windows 10 versions. You can use the snipping tool shortcut Windows + Shift + S to quickly take a screenshot on Windows 10 PC with Snip & Sketch. Still, using Windows 10 snipping tool to take the screenshot, the screenshots are also saved to the clipboard but not saved in a folder. You can open the image in Snip & Sketch and save it to a folder on your computer.
How to restore screenshot folder in Windows 10:
If the Windows 10 screenshots folder is missing and you can’t find the Screenshot folder in your Windows 10 computer, you may also use a free file recovery program to see if it can help you recover the screenshot folder.
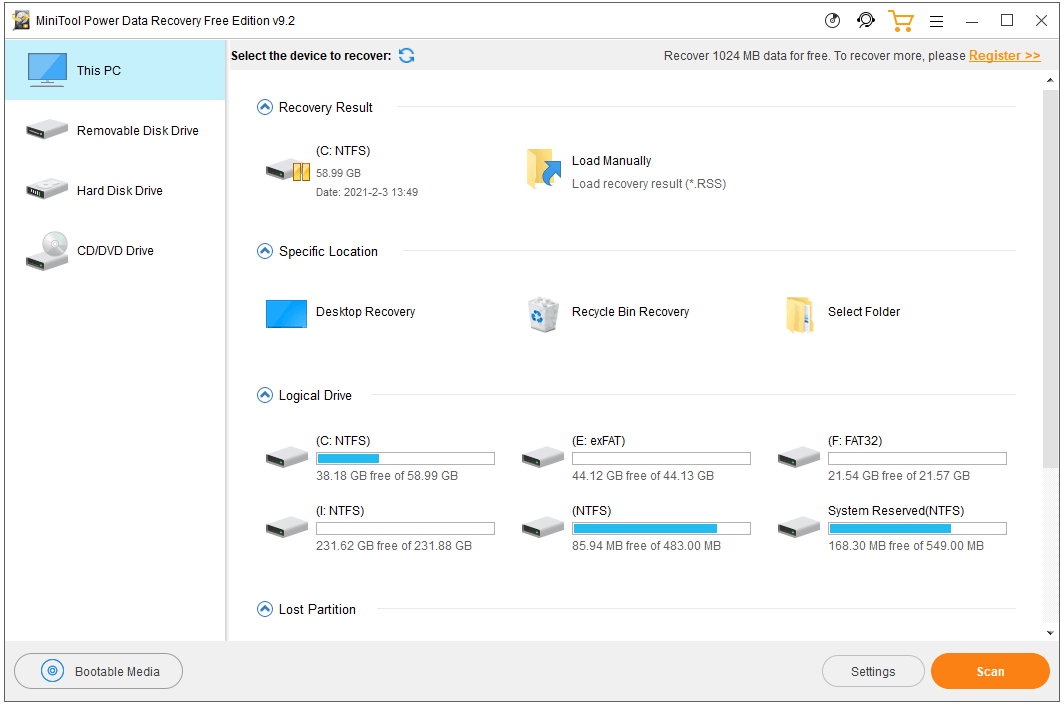
MiniTool Power Data Recovery is the best free data recovery software for Windows 10 computer designed by MiniTool Software.
You can use MiniTool Power Data Recovery to recover any deleted or lost files, folders, photos, and any other files from Windows 10 PC or laptop. Besides, you can also use this program to easily recover data from USB flash drive, memory card, external hard drive, SSD, etc.
Download and install the 100% clean MiniTool Power Data Recovery on your Windows computer, and check how to use it to restore the missing Windows 10 Screenshots folder below.
MiniTool Power Data Recovery FreeClick to Download100%Clean & Safe
- Launch MiniTool Power Data Recovery. Click This PC and click C drive. If the screenshot folder is located in another hard drive, you can select that drive. Click Scan button.
- After the scan is finished, you can check the scan result to find the screenshots folder, check it and click Save button to store the recovered folder in a new location.
How to Take a Screenshot on Windows 10 – Top 6 Free Screenshot Software for PC
Aside from using Windows + Print Screen, Print Screen, Windows + Shift + S, these three Windows built-in methods to screenshot on Windows 10 PC, you can also use some other best free screenshot software to capture screenshots on Windows 10.
1. Game Bar
Another Windows 10 built-in free screenshot software & screen recorder tool lets you capture screenshots or record screen and audio on Windows 10.
Xbox Game Bar is originally designed for Windows users to record gameplay on PC. However, you can enable Game Bar on Windows and also use it to take a screenshot on Windows 10 PC.
To enable it, you can press Windows + I, click Gaming -> Game bar, and turn on the “Record game clips, screenshots, and broadcast using Game bar” option. Then you can press Windows + G to open Game bar and press Windows + Alt + Print Screen shortcut to take a screenshot on PC.
2. Snagit
Snagit is one of the most popular screen capture and recording software that lets you capture your screen with screenshots and videos. You can use it to easily take a screenshot and edit your screenshot image. It allows you to easily capture your entire desktop, a region, a window, or a scrolling screen.
3. Lightshot
Lightshot is a top free screenshot software for PC and Mac. It allows you to select any area on your desktop and take a screenshot. It features a simple and intuitive interface and offers a screenshot editor that lets you edit screenshots instantly.
4. Gyazo
Gyazo is an open-source and free screenshot program for Windows, Mac, and Linux. This tool lets you capture unlimited screenshots on PC, record screen GIFs and videos, capture HD replay videos, etc.
5. Greenshot
Greenshot is another easy-to-use free PC screenshot software. You can use this tool to quickly create screenshots of a selected region, window or full screen on Windows 10. It also lets you capture scrolling web pages in browser. You can export the screenshot in different ways, e.g. save to file, send to printer, copy to clipboard, etc.
6. TinyTake
TinyTake is a popular free screen capture and recording tool for Windows and Mac. With it, you can capture images and videos of your computer screen, add annotations, and share them with others. You can choose to take a screenshot of a region, window, full screen, or webcam. It also lets you capture video on the PC screen and record webcam video.
As for how to screenshot on Windows 10 PC, you can also use one of the 6 free screenshot software for PC above.
Conclusion
This post introduces the Windows 10 screenshots folder, how to find screenshots on Windows 10, how to take a screenshot on Windows 10 PC, and some best free screenshot software for your reference. Hope it helps.
If you are interested in MiniTool Software company and its products, you can visit www.minitool.com. Have problems with using MiniTool Software products? You can contact [email protected].
Click to Tweet
Windows 10 Screenshots Folder FAQ
Where do screenshots get saved?
Where do screenshots go? If you capture the screen of your Windows 10 computer, Android or iOS phone or tablet with the built-in tools, the screenshots should be automatically saved in the Screenshots folder on your device. You can check the details in this post to find your screenshots in Windows 10.
Where are F12 screenshots saved?
You can use the F12 key to capture Steam game’s screenshots and save them to a folder on your computer. The screenshots of each Steam game are stored in a separate folder. You can click View menu in the Steam app and select Screenshots to find the screenshots.
Where do you find screenshots on your computer?
If you use Windows + Print Screen to take the screenshot of the entire screen, the screenshot will be saved in Windows 10 Screenshots folder that is located in This PC -> Pictures. However, if you use only press the Print Screen key, the screenshot won’t be saved in a folder but only be saved to the clipboard.
How do I take a screenshot on my Windows computer?
You have many ways to take a screenshot on PC. To capture the entire screen and automatically save it to Windows 10 screenshots folder, you can press Windows + Print Screen (or PrtScn). You can find the screenshot in This PC -> Pictures -> Screenshots. This tutorial also introduces some other ways and some free screenshot software to let you easily take a screenshot on PC.
Where Are Screenshots Saved on Windows 10 and Windows 11?
Screenshots are one of the most fundamental and popular forms of capturing moments on screens, be it for work, tutorials, gaming experiences, or capturing important visual information. Both Windows 10 and Windows 11 offer a variety of ways to take screenshots, each providing distinct functionalities and saving mechanisms. Understanding where these screenshots are saved can significantly enhance your workflow and help keep your digital workspace organized. In this deep dive, we will explore the different methods for capturing screenshots, as well as where each method saves the captured images.
Capturing Screenshots on Windows 10 and Windows 11
Before diving into the specifics of where screenshots are saved, it’s important to understand the various methods available for taking screenshots in both Windows 10 and Windows 11.
1. Using Print Screen (PrtScn) Button
The most common way to take a screenshot is by using the Print Screen button on your keyboard. It works like this:
- Full-Screen Screenshot: Press the
PrtScnbutton. This captures the entire screen and copies it to your clipboard. - Active Window Screenshot: Press
Alt + PrtScn. This captures only the active window. - Directly Save Full-Screen Screenshot: Press
Windows + PrtScn. This captures the entire screen and saves it directly as a file.
2. Using Snipping Tool
The Snipping Tool is an in-built application in Windows that allows for more control over your screenshots. You can select the area you want to capture and save it afterward. Here’s how to use it:
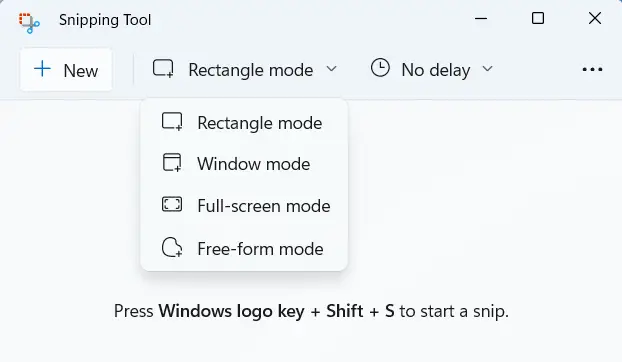
- Open the Snipping Tool from the Start menu.
- Click on «New» to initiate a snip.
- You can choose different modes: Free-form, Rectangular, Window, or Full-screen.
- Once you’ve captured your desired snip, you can save it directly to your device.
3. Using Snip & Sketch
In Windows 10 and 11, Snip & Sketch offers a more refined way of taking screenshots with added editing features. To use:
- Press
Windows + Shift + S. This brings up a snipping toolbar. - Select the area you want to capture.
- The screenshot goes to your clipboard, and a notification appears, allowing you to open it within Snip & Sketch for editing.
4. Using Windows Game Bar
For those interested in gaming, the Windows Game Bar offers an effective way to take screenshots.
- Start the Game Bar by pressing
Windows + G. - Click on the camera icon to take a screenshot, or use the shortcut
Windows + Alt + PrtScn.
Where Are Screenshots Saved?
Now that we’ve covered how to take screenshots, let’s dive into where these screenshots are saved in both Windows 10 and Windows 11.
1. Screenshots Taken with PrtScn Button
-
Using
PrtScnorAlt + PrtScn: These combinations do not save the screenshot as a file. Instead, the images are copied to your clipboard. To save them, you’ll need to paste them into an image editing program like Paint or Word and then save them manually. -
Using
Windows + PrtScn: When you use this combination, the screenshot is automatically saved in the Pictures folder. More specifically:- Navigate to this path:
C:Users[Your Username]PicturesScreenshots - Every time you use this method, a new file will be created, typically named «Screenshot (X).png,» where X is an incrementing number starting from 1.
- Navigate to this path:
2. Screenshots Taken with Snipping Tool
When using the Snipping Tool:
- Once you take a screenshot, you must manually save the snip.
- You can click on
File > Save As, and then choose the location where you wish to save the screenshot, including your desktop or any folder within your file system.
3. Screenshots Taken with Snip & Sketch
Similar to the Snipping Tool, Snip & Sketch requires that you save the screenshot manually:
- Click on the notification that appears after your screenshot is taken.
- Once in the Snip & Sketch window, click on the disk icon or
File > Save Asto choose the destination folder.
4. Screenshots Taken with Windows Game Bar
Screenshots taken via the Windows Game Bar are saved automatically:
- You can find them in the Videos folder, specifically in a sub-folder titled Captures.
- Navigate to:
C:Users[Your Username]VideosCaptures
- Navigate to:
- The files saved here will be in PNG format.
Managing Your Screenshots
With different methods of taking screenshots saved in various locations, it’s essential to maintain an organized system to manage these files effectively. Here are a few tips to streamline your screenshot management:
-
Create a Dedicated Folder: Consider creating a dedicated folder to store all your screenshots. You can periodically move the files from their default locations into this new folder.
-
Name Your Files: After saving screenshots, rename them to reflect their contents. This makes them easier to find later.
-
Regularly Organize and Delete: Set a routine to manage your screenshot folder. Periodically delete unneeded images to free up space and keep only the most important screenshots.
Additional Tips for Effective Screenshot Management
In addition to managing where your screenshots are saved, there are various tools and applications available that can enhance your screenshot workflow.
1. Utilize File Organization Tools
Consider using apps like OneDrive or Google Drive for cloud backups. They not only save space but also keep your files secure and accessible across different devices.
2. Use Third-party Applications
If you find the built-in tools inadequate, there are various third-party applications available, such as Snagit and Greenshot. These tools often provide advanced features such as:
- Direct uploading to cloud storage
- Advanced editing capabilities
- Screenshot management systems
3. Shortcuts and Automation
You may want to create keyboard shortcuts or utilize automation tools that can automatically rename, compress, or upload screenshots to your preferred location. Software such as AutoHotkey allows for creating custom scripts to handle repetitive tasks.
Conclusion
Understanding where screenshots are saved on Windows 10 and Windows 11, along with taking advantage of the various capturing methods available, can significantly enhance your productivity. Whether you’re taking full-screen shots, active window captures, or using in-built snipping tools, knowing exactly where to find and how to manage these screenshots is crucial for a seamless workflow.
Investing a bit of time in organization, exploration of tools, and automation can lead to a more efficient experience when dealing with screenshots. Ultimately, it’s about finding what works best for your personal workflow and making sure that important visual information is readily available when needed. So the next time you need to capture a moment on your screen, you’ll be well-equipped to handle the task efficiently!
When you take a screenshot in Windows, where does it get saved? It depends on how you take the screenshot because there are different ways to do so. Let’s explore all the different methods of capturing screenshots and see where they get saved.
Both Windows 10 and Windows 11 offer multiple ways to take screenshots, which is why they are located in different places. You won’t have any trouble taking screenshots on Windows 11 if you know how to do it on Windows 10. Here are all the ways to capture a screenshot and where they go.

1] When You Use Print Screen (PrtScn)
Print Screen does not save screenshots by default if you press it to take a screenshot. The picture will instead be copied to a temporary clipboard that can be pasted and copied. In order to save your screenshot to your computer, paste it into a program like Microsoft Paint and save it where you want.
In the same way, you can also take a screenshot by pressing Windows + Shift + S or Alt + Print Screen. These results will be copied to the clipboard rather than saved.
If you need to save a screenshot from your clipboard to your hard drive, use the below steps:
- Click on Start and search for Paint, and then select it from the results.
- Once you’re in the Paint app, press Ctrl + V to paste the image.
- Now press the Ctrl + S keys on your keyboard to save the screenshot to your disc.
- Select the location where you want to save the screenshot, type the filename, and then click Save to save it on your computer.
2] When you’re using Windows + Print Screen
When you press the Windows+Print Screen keyboard shortcut to capture a portion of the screen, it saves the picture in the Pictures > Screenshots folder. If you want to find it, navigate to the following path:
C:\Users\(username)\OneDrive\Pictures\Screenshots
Note: Here, (username) represents the account that you were using at the time of the screenshot.
If you use this method to take a screenshot, it takes a screenshot of your whole screen and then saves it as a PNG file. File Explorer provides easy access to the ‘Pictures’ folder. The screenshots taken this way are stored in a folder called Screenshots.
3] When you’re using Snipping Tool or Snip & Sketch
Windows 11 uses Snipping Tool to capture screenshots, while there is Snip & Sketch tool if you’re on Windows 10. To take a screenshot, press Windows + Shift + S on your keyboard. Taking a screenshot will appear at the top of the screen, and it makes the screen dim slightly.
After you take the screenshot, you will receive a notification in the bottom right corner of the screen. Clicking that notification will open the screenshot in the Snipping Tool for editing it. If you take a screenshot using the Snipping tool, the image will be saved to the clipboard, which you can paste into any specific program to edit. Click the Save button at the top right to save it.
4] If you use the Xbox Game Bar
Taking screenshots with the Game Bar is another option, even if it might not be your first choice. It’s common for gamers to take screenshots and record videos through this method. You can take a screenshot by pressing Win + Alt + Prt Scr. In addition, you can capture an active window by selecting the camera icon in the Game Bar when you press Win + G.
5] When You Use a Third-Party Screenshot Tool
If you want to take screenshots with an application that’s not developed by Microsoft, you’ll have to check the settings of that application to determine where it stores screenshots. If you are still having trouble finding your files, you might try looking in either the Documents or Pictures folders in File Explorer.
6] What to do if you can’t find your screenshots
Can’t find your screenshots? Here’s a tip that may help.
To begin with, take a new screenshot. Next, go to File Explorer and search for recently modified files. Follow these steps to do so:
- Press the Windows + E keys to open the File Explorer window.
- Then, type datemodified:today into the search bar and press Enter.
Note: If you suspect it might be on one drive or folder, narrow down your search by browsing to that drive or folder first.
- In the search results list, you will soon see files created recently.
- If you find the screenshot file you just captured, right-click on it and select Open File Location from the context menu.
- The location of the saved screenshot will be open in File Explorer, and you may also find other screenshots there.
Read Next: How to prevent Apps from taking screenshots in Windows 10
Have you ever taken a screenshot and couldn’t figure out where it was saved? That’s likely the case if you’re reading this article. With different Windows versions and various methods to capture screenshots, it’s not always clear where these files end up. This confusion is understandable, given that the location varies based on your chosen method of capturing a screenshot. Worry not; we’ll walk you through where your screenshots are saved in Windows 10 and 11 so you can find them fast.
QUICK ANSWER
Screenshots are typically saved in the Pictures > Screenshots folder, but this can change based on the method you use to capture the screenshot.
JUMP TO KEY SECTIONS
- Where are screenshots saved in Windows 10 and 11?
- Can you change where screenshots are saved on Windows 10 and 11?
Where are screenshots saved in Windows 10 and 11?
If you use the Print Screen or Alt+Print Screen shortcut on your keyboard, the screenshot will not be directly saved as a file. Instead, it is copied to the clipboard — a temporary storage area for copy-and-paste operations. To save the image as a file, paste it into an image editor like Paint, and save it as a new file. The same process applies if you use Windows+Shift+S to capture a portion of the screen.
However, using the Windows+Print Screen keyboard shortcut, Windows will automatically save the screenshot as a PNG file in your Pictures > Screenshots folder, located at C:\Users[User Name]\Pictures\Screenshots. To be clear, “[User Name]” should be replaced with your Windows account name.

Adam Birney / Android Authority
The file will be named “Screenshot (#).png,” with the number counting based on the number of screenshots previously taken. If you’re using an older Surface device or certain tablets, using Windows+Fn+Print Screen or Power+Volume Down will result in the same file location.
Can you change where screenshots are saved on Windows 10 and 11?
Yes, you can change the save location for screenshots in both Windows 10 and 11. You can go to the Pictures folder and right-click on the Screenshots folder. Select Properties > Location > Move and select where you want your screenshots saved.
Both Windows 10 and 11 also include the Snipping Tool, and Windows 10 has another similar tool called Snip & Sketch. Both allow you to capture custom screenshots and manually choose your save location for each file. If you’re not sure where your last screenshot was saved, these tools remember the last place you saved a file. To find out, you can take another screenshot and see where the tool prompts to save the new file.

Roger Fingas / Android Authority
If you still can’t find your screenshot, check your Documents or Pictures folders under This PC in the File Explorer.
FAQs
Saved screenshots are typically located in the Pictures > Screenshots folder, found at C:\Users[User Name]\Pictures\Screenshots.
F12 is not a default shortcut for screenshots on Windows 10. If you’re using a program that assigns F12 to capture screenshots (like some Steam games), the save location will depend on the program’s settings.
If you can’t find your screenshots, it’s possible they were saved in a different location, or they might not have been saved at all. For example, if you use Print Screen or Alt+Print Screen, the screenshot is copied to the clipboard. You need to manually paste it into a program like Paint, then save the image.
If your screenshots aren’t in the Screenshots folder, it’s possible the save location has been changed, or the screenshots were taken using a method that doesn’t automatically save to this folder. Try checking other folders or using the search function in File Explorer.