
Windows 10 offers a wide range of productivity and customization tools to keep your device running smoothly and securely. However, in some cases, these same personalization features can often lead to various compatibility and performance-related issues. If your screensaver is not working anymore after you’ve installed the latest Windows updates, you’re not alone.
Some of the common scenarios that can stop your screen saver from working are Windows 10 screensaver settings, driver update issues, or problems with the latest updates or installations.
In this guide, we will walk you through some of the potential Windows 10 screensaver problems and how to fix them to get things working again.
Common Windows 10 Screensaver Problems:
Let’s have a look at some of the potential screensaver issues that you can encounter on Windows 10 machine:
- Windows 10 screensaver fails to activate: This problem might occur if your screensaver isn’t configured properly.
- Windows 10 screensaver won’t start anymore: If your screensaver stopped working and won’t ever start, then check the screen saver settings and make sure it’s enabled.
- Screensaver won’t turn off: This might happen if you’ve recently installed the latest Windows 10 updates. Keep reading this guide to troubleshoot issues with your Windows updates.
- Windows 10 screensaver freezes: If you experience such freezing problems, restart your computer, and check if that helps fix the issue.
How to Fix Windows 10 Screensaver Problems?
The following solutions are listed in order, so let’s straight move to the first one, check if that helps, and then jump to the next one if it doesn’t.
Solution 1: Update Windows
By keeping Windows up-to-date you can solve Windows 10 screensaver not working issues. Here is how to do that!
Step 1: Hit the win and I key at a time from your Keyboard to launch Windows Settings.
Step 2: Then, look for the Update & Security option and click on it.

Step 3: Thereafter, choose Windows Update from the left pane and then click on the Check For Updates option.

Now, Windows will automatically install the available updates. Windows update can fix the various issues.
Solution 2: Check Windows 10 Screensaver Settings
If your Windows 10 Screensaver is not working, the first and obvious thing you should try is ensuring that your screensaver settings are correct. If these settings are not properly configured or disabled then the screensaver related problems may arise on your Windows 10 machine.
To check for Screensaver Settings on Windows 10:
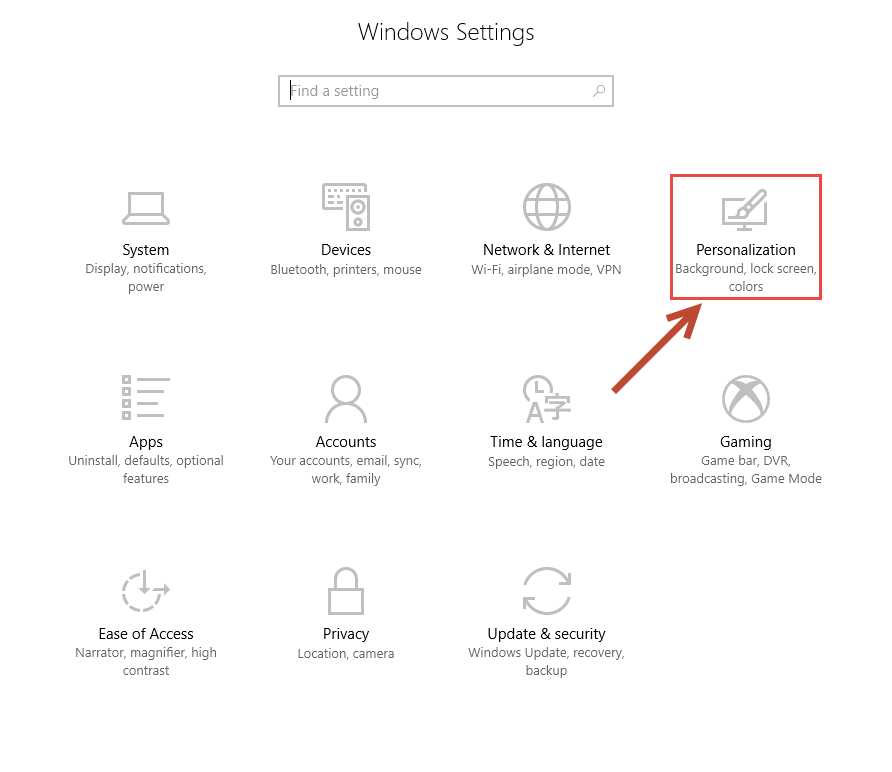
- Click the Start menu button and search for Settings, then select Personalization.

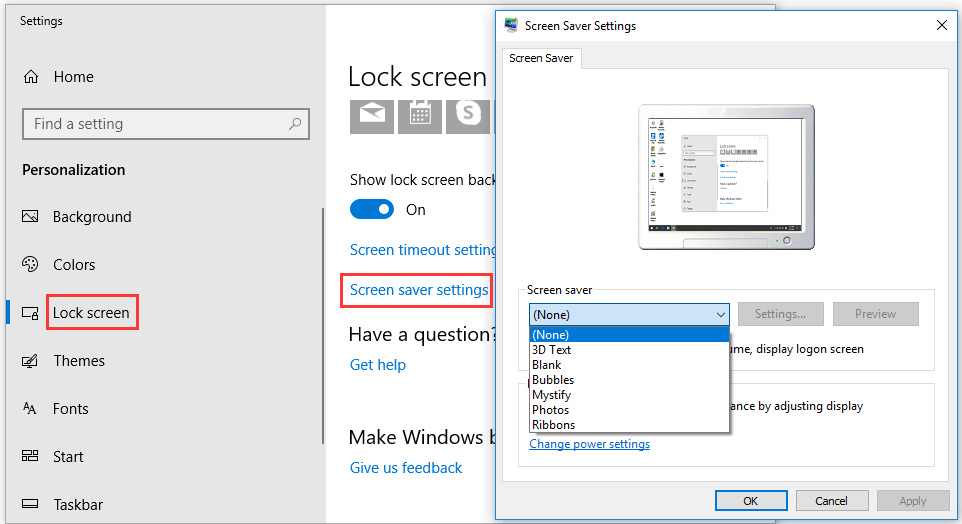
- From the left pane click on the Lock screen and select Screen saver settings.

- This will open the Screen Saver Settings window, choose a screen saver of your choice from the drop-down list.
- Now, click the Apply and Ok buttons to save new windows 10 screensaver settings.
Still, Windows 10 screensaver isn’t working? Continue to the next solution.
Solution 3: Update Device Drivers
Using outdated or corrupted drivers, you may start getting various compatibility, sound or screensaver-related errors that can adversely impact the performance of your Windows 10 computer.
Keeping Windows drivers updated to the latest manufacturer-recommended versions helps crush all sorts of problems related to display, stuttering, or sound. However, downloading and installing the latest driver updates manually is a tedious and time-consuming task, plus there’s a risk of installing infected or wrong device drivers that can make the problems even worse.
Therefore, you need an automatic Driver Update Utility which not only helps you install the latest official driver updates but also boosts the processing speed of your Windows 10 machine.
If you’re having trouble shortlisting the perfect one, see the Best Driver Updater Software (Comparative Analysis).
Solution 4: Reset Power Management Settings
Screensaver is a power management tool which is firmly associated with the power saving settings. Simply put, if your power plan settings have been corrupted or changed lately, there’s a chance that your Windows 10 screensaver won’t work properly.
Therefore, it is recommended to bring your power-saving settings back to default to resolve Windows 10 screensaver issues. Follow the steps below to get it done:
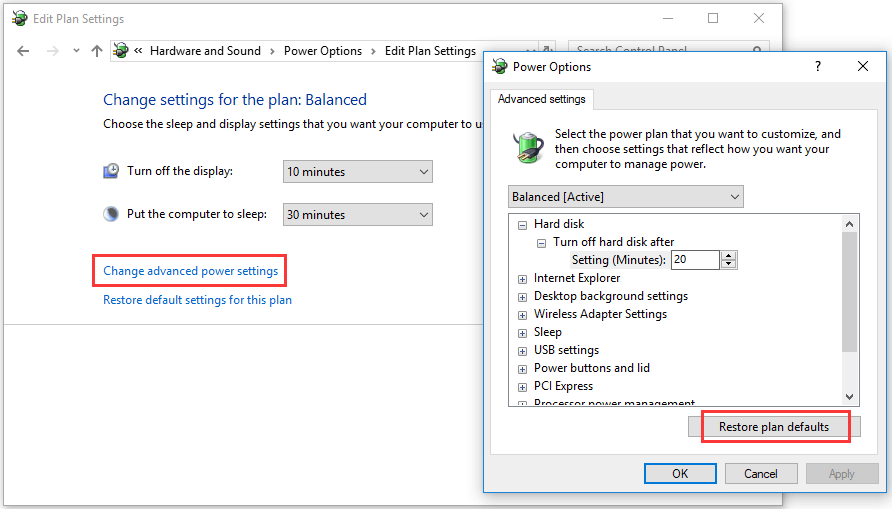
- To adjust power settings, open Control Panel > Hardware and Sound > Power Options.

- Now, select the ‘Balanced’ power plan and click on the ‘Change plan settings’.
- On the next screen, click ‘Change advanced power settings’.

- In the Advanced power settings window, select the ‘Restore plan defaults’ option.

- Now, click the ‘Yes’ button to restore the power plan to default settings.

If your screensaver still not starting after carrying out the aforementioned steps, move on to the other solutions.
Solution 5: Unplug All Unnecessary Peripheral Devices
As we are all aware that screensaver is a computer program that automatically starts whenever the system is an idle state for a long time. However, some faulty plugged-in devices, especially game controllers, Keyboards or mouse, tend to send false signals of user activity to your system.
In general, these false signals of user activity makes the computer think it is still in use, which eventually stops the screensaver from showing up. Therefore, it is advised to clean the dust from your mouse optical sensor and unplug all external devices one at a time until you find the defective one.
Solution 6: Run Windows Power Troubleshooter
Windows 10 comes with an in-built troubleshooter tool that not only helps you figure out the cause of common Windows 10 problems but also provides potential solutions to fix them.
If your Windows 10 screensaver still refuses to work, then run the power troubleshooter to diagnose the problem.
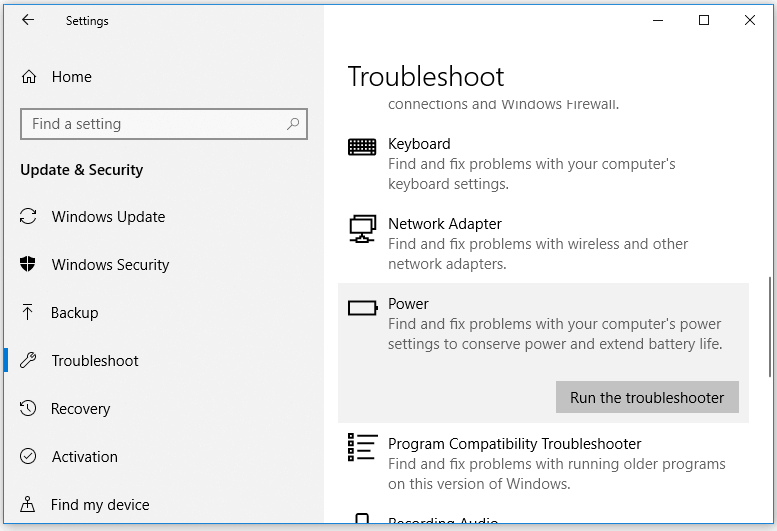
- First, open your ‘Settings’ app and select Update & Security.

- From the left pane click on the Troubleshoot, select Power, and then click on the ‘Run the troubleshooter’ option to find and fix problems.

- Once the process gets completed, restart your PC and check if that helps fix the screensaver issue on Windows 10.
Solution 7: Using a Clean Mouse Sensor and Mouse Pad
If your mouse is placed in an area where it recognizes any changes then it is running to keep your system awake. And, it will restrict the screensaver from being triggered and it will continue until you keep your mouse trivial. Hence, you have to make sure that you are using a clean mouse sensor and dust-free mouse pad to fix the screensaver not working issue. Plus, keep your mouse on a flat surface where no uneasiness occurs. Maybe, you find it a bit simple comparatively but this can cause your system not to wake up accurately. So, trying this method can prove helpful to you.
So, this was all folks! This concludes our guide that will give you a clear insight on how to resolve Windows 10 screensaver not working problems.
We hope these aforementioned simple tips & tricks helped you troubleshoot common problems affecting your Windows 10 screensaver. If you think we’ve missed any other troubleshooting steps, do share your thoughts on the subject in the comments section below.
-
Home
-
News
- 6 Tips to Fix Windows 10 Screensaver Won’t Start Issue
By Alisa |
Last Updated
If you meet the Windows 10 screensaver won’t start error, you can check the 6 tips in this tutorial to fix this problem. As a top computer software provider, MiniTool software offers users free data recovery software, hard drive partition manager, system backup and restore software, video maker, video downloader, etc.
If you are facing the Windows 10 screensaver won’t start issue, this tutorial provides several possible solutions to help you fix this problem. Check the detailed guides below.
Tip 1. Update Windows 10
You can click Start -> Settings -> Update & Security. Click Windows Update in the left pane. And click Check for updates button. Windows will automatically check and install available updates.
Tip 2. Make Sure Windows 10 Screensaver Is Enabled
- You can right-click the blank space of your computer desktop, and click Personalize.
- Click Lock screen in the left panel, and click Screen saver settings option.
- In Screen Saver Settings window, you can now choose a screensaver mode by click the down-arrow icon. If the status is None, then Windows 10 screensaver is not activated. You can choose one mode to enable screen saver in Windows 10.
Tip 3. Reset Power Management Option
- You can click Start, type power, and select Choose a power plan.
- Next choose Change plan settings next to your current power plan.
- Click Change advanced power settings, and click Restore plan defaults button to reset power management settings. Check if this helps you fix Windows 10 screensaver won’t start issue.
Tip 4. Disconnect External Devices
You can try to disconnect all external devices like Xbox/PlayStation game controllers and check if Windows 10 screensaver can work.
Tip 5. Run Power Troubleshooter
- You can press Windows + I to open Windows settings, and click Update & Security.
- Click Troubleshoot in the left panel. And scroll down in the right window to find Power option.
- Click Power and click Run the troubleshooter button to start troubleshoot computer power problems.
- Restart your computer and check if the Windows 10 screensaver won’t start error has been fixed.
Tip 6. Run SFC Scan
- You can press Windows + R, type cmd, and press Ctrl + Shift + Enter to open elevated Command Prompt in Windows 10.
- Next type sfc /scannow in Command Prompt window, and press Enter.
- After the SFC scan finishes, you can close CMD and restart your computer.
Best Windows 10 Screensavers
Screensavers are designed to reduce the energy consumption of computers. Top third-party Windows 10 screensavers include: Screensaver Wonder 7, Fliqlo Flip Clock, NES Screensaver, 3D Earth Screensaver, Wikipedia Screensaver, IMAX Hubble 3D, Briblo, etc.
Bottom Line
To fix Windows 10 screensaver not working or won’t start problem, hope one of the 6 tips can help.
If you lost some data or mistakenly deleted a need file and emptied the recycle bin in Windows 10, you can easily recover the deleted or lost file from your Windows 10 computer with MiniTool Power Data Recovery.
MiniTool Power Data Recovery is a top data recovery application for Windows. It can help you recover data from Windows computer, external hard drive, SSD, USB pen drive, SD card, etc. in 3 simple steps. Its free edition allows you to recover up to 1 GB data for free. It is very simple to use and even novice users can operate it with no hassle.
About The Author
Position: Columnist
Alisa is a professional English editor with 4-year experience. She loves writing and focuses on sharing detailed solutions and thoughts for computer problems, data recovery & backup, digital gadgets, tech news, etc. Through her articles, users can always easily get related problems solved and find what they want. In spare time, she likes basketball, badminton, tennis, cycling, running, and singing. She is very funny and energetic in life, and always brings friends lots of laughs.

The screensaver is a pretty old feature of Windows and usually consists of a set of rotating images or graphics that turns on if you haven’t interacted with your computer for a set amount of time. The screensaver is a feature from the CRT era, where displaying the same thing on screen for a long time could cause burn-in and damage the monitor. Screensavers avoided this issue by displaying a moving graphic or a rotating set of images.
But sometimes, even when you have set it, the screensaver may not work. If you are facing this issue, these are few tips to fix the Windows 10 screensaver not working issue.
Recommended for you:
Nintendo Switch Not Charging – Fix
Installing Kodi On Xbox One Simplified
Tips for when Windows 10 screensaver not working:
1. Disconnect any unneeded peripherals or devices
Sometimes, a faulty peripheral or device may be raising interrupts even when you aren’t using the device. This keeps the system from starting the screensaver. So try disconnecting any unused peripherals or devices such as joysticks, external HDDs etc.
2. Check your screensaver settings
Next, you can check your screensaver settings to see whether the screensaver is turned on, and set to the one you like.

- Open the Windows 10 Settings app.
- Click on Personalisation > Lock Screen.
- Scroll to the bottom and click on Screen saver settings. A Windows 7 style settings window should pop up.
- Here you can choose what screensaver you want(if you choose None, that turns off the screensaver). Choose the screen saver you want.
- Below that, you can choose the amount of time the computer has to stay idle before the screensaver is started. You can also preview how your screensaver will look by clicking on the Preview button.
Now, leave your computer idle and check if the screensaver is working correctly (If you set it to trigger after 5 minutes of idling, you’ll have to wait for 5 minutes, and so on…).
3. Check your power settings
It is also possible that your power usage settings are interfering with your screensaver. To change the settings:

- Open the Settings app. Go to System > Power & sleep.
- Click on Additional power settings. A control panel window will open, with a list of power plans and the currently selected one marked.
- For the currently selected power plan, click on Change plan settings. A new window will open, showing the amount of time after which the display will turn off when plugged in and on battery.
- Here, make sure that the “Turn off the display after” time is MORE than the time after which the screen saver will be started. So for example, you could set it so that after 10 minutes of inactivity, the screensaver is started(via the screensaver settings mentioned in the previous point), and then after 5 more minutes(ie 15 minutes in total), the display turns off.
- Click on Save changes and close the window. Leave your PC idle to test if the screen saver and power settings are working as intended.
These are a few tips for when the Windows 10 screensaver not working. If you’re using an LCD display, then the screensaver is not necessary. But for those using CRT or the new OLED displays, the screensaver can save you from problems such as display burn-in, so make sure that you have set it up correctly.
I have been a fulltime gamer on YouTube for almost 3 years. Now I want to venture out do some real news posting. Here at Gamers Suffice, I usually post about big names and bring what they are up to. Contact me at [email protected]
My wife is in love with the Windows-version of the Aerial screensaver which pulls videos from Apple’s Apple TV screensaver source. (I too have the Mac version running on my Macs.) Unfortunately, recently, my wife’s Windows 10 machine has had some issues activating the screensaver. Sometimes it would not launch the screensaver after the appropriate wait-time. And other times, it would just go directly to a lock screen after activation where she would have to enter her password. And, due to changes with more recent versions of Windows 10, finding the actual screensaver settings has become a bit of a chore. But her biggest complaint is that she simply couldn’t get this beautiful screensaver to even launch. And, I spent several hours trying to figure out why it wasn’t launching, why it was going to a lock screen, and where the heck Microsoft had moved the screensaver control panel. But have no fear, I found a solution to all of these issues! Read on for more!

So let’s outline the issues we were encountering because if you found this article, I’m guessing that you are having the same or similar issues as well. There may be other issues that are not addressed in the article so I encourage you to leave a comment and ask. I will be happy to answer, or there may be others who have a solution (or similar issue). Here’s what I will be answering in this article:
- How to find the screensaver settings in newer versions of Windows 10
- How to disable the quick lock screen prompt
- How to ensure that your Win10 screensaver is actually launching
I may update this article if other issues or questions are asked and I find an answer. And if any of these solve your problems with the Windows 10 screensaver, please do share this article with others!
How to Find the Screensaver Settings in Windows 10
In the past, the easiest way to locate the Windows 10 screensaver settings was to simply launch the Start Menu and type in “screensaver”. But guess what, the version that my wife has running now no longer shows the screensaver control panel. The only thing that comes up under Settings is “Turn the lock screen slideshow on or off”. That’s not what I was looking for.
So after doing some digging around the new(er) Windows 10 Settings app, I was able to discover where the screensaver settings were hidden. Here’s how to find the screensaver settings:
Go to Windows Settings
You can launch Windows Settings from the Start Menu or just type in “Settings” and select that.
Go to Lock Screen
Within Windows Settings, click on the Personalization icon. From there, head over to Lock Screen.
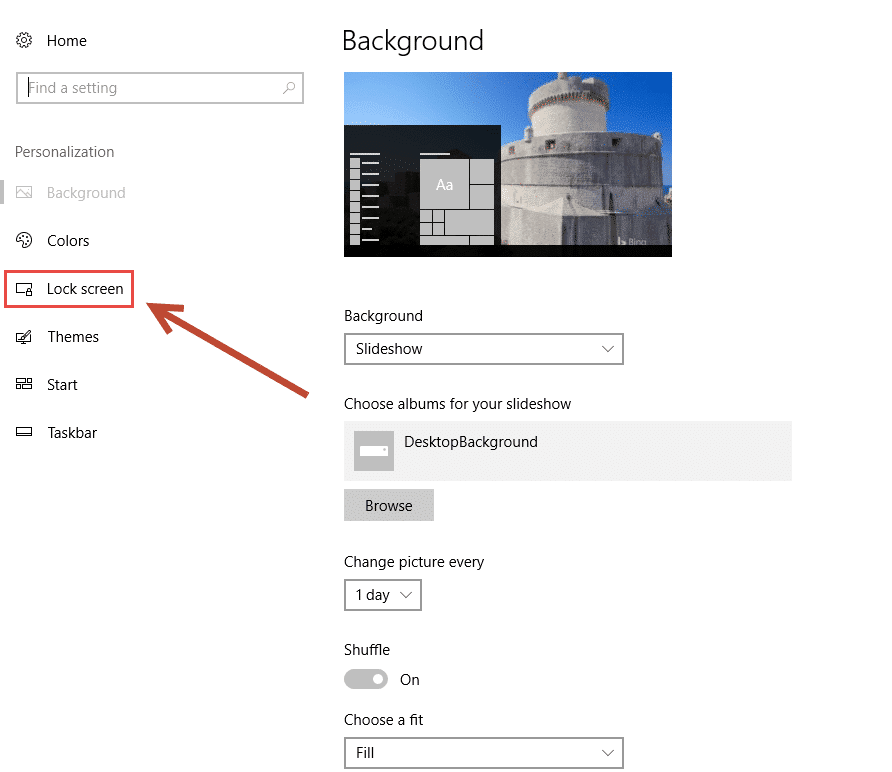
Once you are in the Lock Screen settings, scroll down until you see two other settings, specifically Screen timeout settings and Screen saver settings.
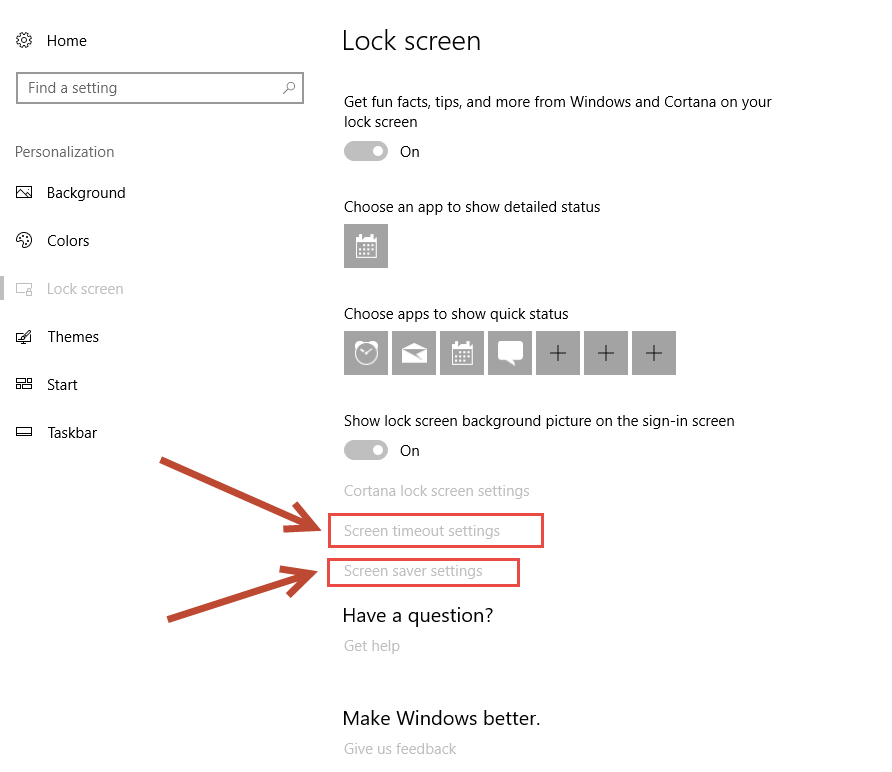
These are the two items that are critical to the next step of fixing your Windows 10 Screensaver.
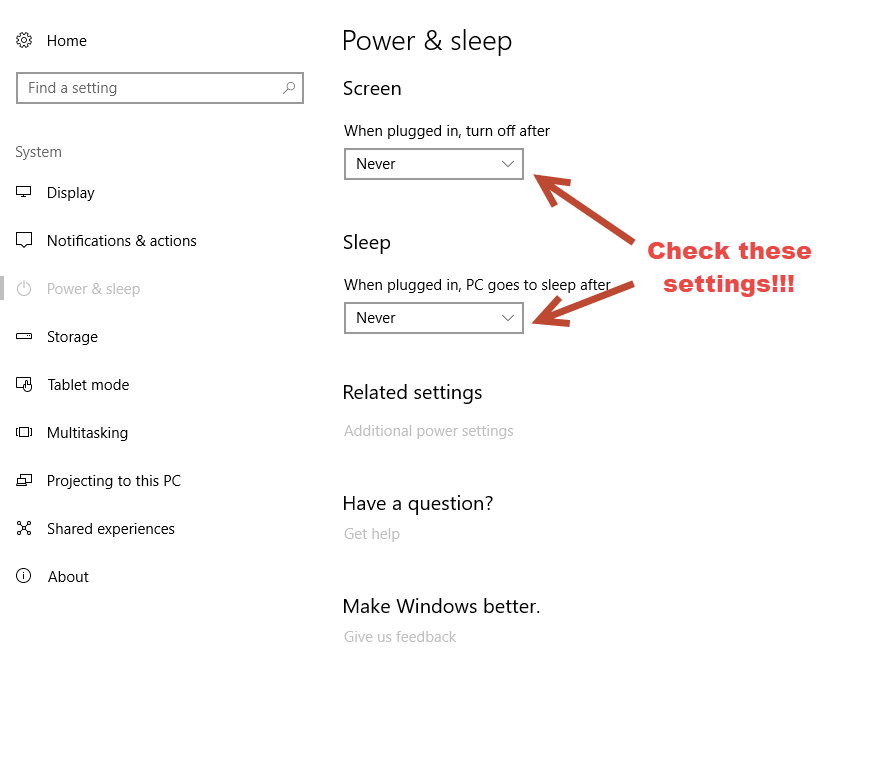
First, as a check, go to the Power & sleep settings. Sometimes I have found that instead of activating the screensaver, the power settings are actually overriding any screensaver settings. For testing, under the Screen section, you may want to set the When plugged in, turn off after to “Never.” That will prevent your screen from turning off (while you test some of the other items here). Then also, under the Sleep section, set the When plugged in, PC goes to sleep after setting to “Never” as well. Remember, for good energy conservation, you may want to turn those back to something reasonable later.
Next, let’s address that quick lock screen prompt.
How to Disable the Quick Lock Screen Prompt
One of the issues that my wife was encountering was that when her screen “timed out” (perhaps trying to go to a screen saver), she was always prompted to log in. While this is a good security setting to have (especially in a workplace), she didn’t want to be prompted all of the time to log in while at home.
So, remember that setting under the Lock Screen panel above? The one that says “Screen saver settings”? That is the one to actually launch the screensaver control panel that now isn’t really showing up anymore, even when searching for it.
Open the Screen Saver Settings panel and take a look at what configuration is set.
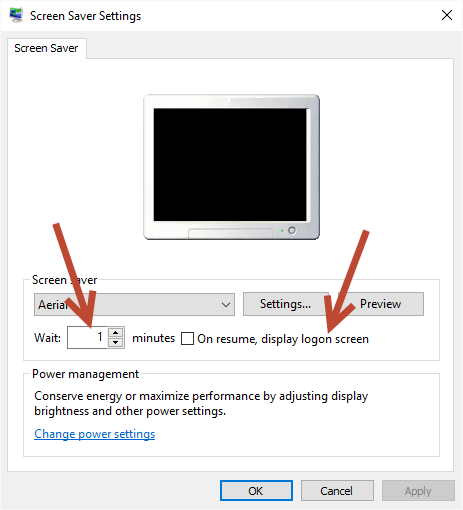
Interestingly, when I looked at my wife’s settings, there were two things wrong. First, the Screen Saver drop-down menu was actually blank. I’m not sure if this was part of an upgrade, but there was nothing set in the Screen Saver settings. So, I changed that to the Aerial screen saver (but you could use whatever screen saver you want).
Then, I noticed that the “On resume, display logon screen” was checked. This was not something we had actually done so again I was wondering if it was because of a Windows 10 update. I un-checked that and the login prompt went away.
Next, be sure you set the “Wait” setting to whatever you want. We set ours to 1 minutes.
Now, hopefully, your screen saver will be back to normal. Is it?
Unfortunately, for us, the screen saver still did not start automatically. (And my wife was hitting the Preview button just to get her Aerial glory.
How to Ensure the Windows 10 (or other Windows version) Screen Saver is Launching
Since the screensaver was not automatically launching, I started testing a bunch of other fixes. I won’t list them out because I don’t think they had anything to do with what I found to be the resolution. In fact, what I discovered to be the solution to the screen saver not launching was probably something that other people might not encounter frequently. But it was such a frustrating period, I wanted to document it in case others run into a similar scenario.

It turns out that the culprit was the combination of a web browser (in this case, Chrome) plus an open (actually pinned) tab of a streaming video service. My wife had two tabs that met that criteria pinned, namely: Netflix and Dish Anywhere.
It seems that those services since they are video streaming, prevent the screen from going to sleep. And it makes absolute sense. You wouldn’t want to be watching a show or a movie and have your screen saver kick in, right?
I’m sure that other video streaming services might have this same effect, but I haven’t tested it. Also, I haven’t tested if just an active tab on a browser will prevent the screen saver from launching, or if a non-active pinned tab might produce the same effect. Nor do I know if other browsers are affected or not.
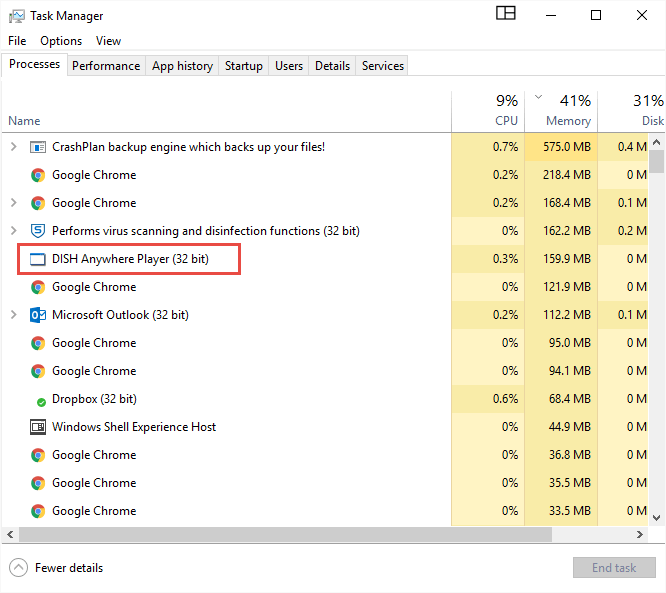
Updated 9/16/17: So, the screen saver stopped working again. So, I thought about the sentences above and went to check the Windows Task Manager. It turns out that two instances of the Dish Anywhere Player. So, I killed those two processes and the screensaver started running as expected.
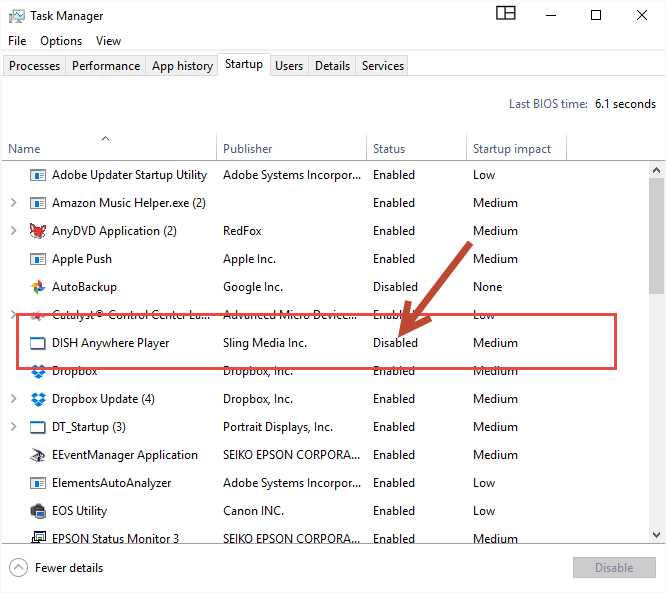
But, I wasn’t convinced that would fix the issue, so I checked the Startup tab of the Task Manager to see if the Dish Anywhere app was there. It was so I set it to disabled.
I will continue to monitor this issue and provide updates and fixes as I or others discover them.
So, if your screensaver is not triggering as expected, check to see if you have an open window or tab on your browser that has a streaming video service. Also, this may be true with other video playback applications. Best bet, close those down.
[easy-tweet tweet=”This #tip from @hightechdad helped me fix my #Win10 screensaver issue! ” via=”no” usehashtags=”no”]
Anyway, the fix worked for us and the Aerial screen saver is now triggering and working properly. But more importantly, my wife is happy!
Do leave a comment if this fix worked for you and share this article. (I still find it odd that Microsoft decided to hide that screensaver settings panel.)
HTD says: When properly configured, the Windows 10 screen saver can provide you with lots of great eye candy. However, when it doesn’t work, it can be frustrating. But there’s always a fix!
How to Fix Screensaver not working in Windows 10. Most of the users keep screen saver in their Windows system. But sometimes users having complaint of Screensaver not working properly in windows 10. The issue of Screensaver settings is of various forms. Few of them are as under: –
1. Windows 10 screensaver won’t turn off
- This problem occur when your system failed to screen out. It remains showing even after you try to remove it. To resolve this issue, simple restart your system once.
2. Windows 10 screen saver won’t start
- If your screensaver won’t start, it may be in disable mode. You should enable screensaver in Windows 10 to resolve the problem.
3. Screensaver doesn’t show up
- If your screensaver not displaying when you turn off your windows 10 monitor. Re-verifying screensaver settings may fix this issue.
How to Disable Automatic Lock Screen settings in Windows 10
4. Windows 10 screensaver won’t activate
- When you try to set a screensaver in your system and it is not activated in your system.
5. Windows 10 screen saver won’t stop
- Even after clicking on your windows screen, screensaver still showing is a typical problem.
6. Screensaver is struck
- In this case, the screensaver displays in hang mode, strucking on screen. Consider rebooting the PC to fix this issue.
7. Windows 10 screensaver won’t work
- Even after applying restart system, if your Screensaver won’t start itself.
8. Windows 10 screensaver freezes
- This problem occurs when your system screensaver stop at one place and failed to remove by any means.
9. Screensaver doesn’t stop
- Generally, when the mouse movement is detected, the Screensaver should automatically go off. If you see that it is not going off, then press Ctrl+Alt+Del and restart your system.
How to Fix Screensaver not working in Windows 10
In first para of this article, you have known to various types of Screensaver issues appear in Windows 10 system. Now we will try to fix it through various methods.
Solution-1: Enable Screensaver in Windows 10
Initially, Screensaver is not activated in system by default. If your windows 10 system not having enabled Screensaver, it won’t appear on your screen. So you should enable it first by following steps: –
- Press Windows key + R shortcut key.
- Run Command will open.
- Type control desk.cpl,,@screensaver command in Run dialog box and press Ok button.

- Screen saver settings window will open now.
- Under the screensaver, choose the screensaver option of your choice from the drop-down menu. Avoid to select the option None.
- In the below screenshot, Ribbons screensaver is an example.
- Now choose a preferable Wait time.
- Also Tick the option On resume, display logon screen.

- Finally click on Apply and then click on OK button to save the changes.
Solution-2: Install Windows Latest Updates
- Press Windows key + I shortcut key to open Windows settings.
- Go to the Update & Security section.
- From the left pane of setting page, click on Windows update.
- Thereafter go to the right side of page.
- Here you will find the option Check for Updates.

- If no any updates are available to install, it will show, you’re up to date.
- But if any of the updates available, it will appear just below.
- Then click on Download and Install option.

Solution-3: Ensure correct Screensaver settings
If your screen saver isn’t appearing, it might be because it isn’t configured correctly. To check the screen saver settings, go through these steps: –
- Go to Windows search option.
- Type cp in it.
- Select Control Panel from the Top result appeared.
- Now go to the Appearance and Personalization category.
- Thereafter select the option Change Screen saver.

- Now Screen Saver settings window will open.
- Here choose a screen saver.
- Set correct Wait time before appearing screensaver.
Solution-4:Update Device Driver
Outdated Device drivers may be a cause of Windows 10 Screensaver not working properly. You should keep up to date. You can also find Driver updates through Windows Update, but this doesn’t work for every piece of hardware available and your manufacturer might use a custom hardware component that requires a custom driver. Follow these updates: –
- Go to the Manufacturer’s Website.
- Enter the serial number and model type of your System device driver.
- Now a list of Device drivers will open.
- Download and Install required Device Drivers.
Now that all the Device Drivers are updated, check if the screensaver feature is working as required. If not, try the next fix listed.
Solution-5: Change Power Plan settings as Default
If any changes occur in Power Plan settings unknowingly, it may lead to non-appearance of Screensaver in Windows 10. Because Screen saver a Power based feature in Windows system. So you should restore default settings of your System Power Plan settings. To set default Power Plan settings, go through these steps: –
- Press Windows key + R shortcut key.
- Run Command will open.
- Type control desk.cpl,,@screensaver command in Run dialog box and press Ok button.
- Screen saver settings window will open now.
- Here click on Change Power settings.

- Thereafter choose the option Change Plan settings.

- Edit Plan settings window will open now.
- Select the option Restore default settings for this plan.

- A small window will pop up.
- Click on Yes to confirm.
Solution-6: Apply Power Troubleshooter
- Open Run dialog Box.
- Type ms-settings:troubleshoot in it and press Ok button.
- Windows settings will open.
- From the left pane of settings page, select Troubleshoot.
- Thereafter from the right side, click on Additional troubleshooters.

- Now find out the Power Troubleshooter option from the available list.
- If found, make a click on it expand.
- Now Click on Run the troubleshooter.
- Windows will now check and fix any power related issue in your windows 10 system and fix them accordingly.
Now check, whether screen saver is appearing or not.
Solution-7: Run System File checker sfc \scannow
- Go to Cortana search.
- Write cmd in it.
- Command Prompt window will appear on top result.
- Now go to the right side of page and choose the option Run as Administrator.
- Thereafter type sfc /scannow command in Command Prompt window and press Enter key.

Solution-8: Use DISM tool to fix Windows 10 screensaver not working
- Go to Cortana search.
- Write cmd in it.
- Command Prompt window will appear on top result.
- Now go to the right side of page and choose the option Run as Administrator.
- Type the following command in Command Prompt window followed by Enter key: –
- DISM /Online /Cleanup-Image /RestoreHealth
That’s all.