
Applies ToWindows 11 Windows 10
Take a snapshot to copy words or images from all or part of your PC screen. Use Snipping Tool to make changes or notes, then save, and share.
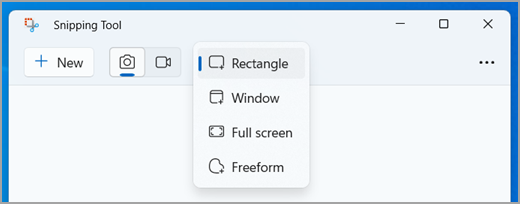
Capture any of the following types of snips:
|
Freeform |
Draw a freeform shape around an object. |
|
Rectangle |
Drag the cursor around an object to form a rectangle. |
|
Window |
Select a window, such as a dialog box, that you want to capture. |
|
Full screen |
Capture the entire screen. |
|
Video snip |
Capture a video clip of a rectangular selection of any part of the screen you like. |
When you capture a snip, it’s automatically copied to the Snipping Tool window where you make changes, save, and share.
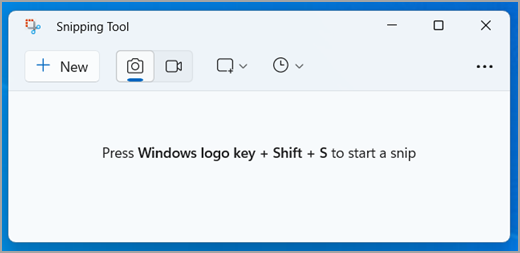
Open Snipping Tool
There are four ways to open Snipping Tool:
-
Select the Start button, enter snipping tool, then select Snipping Tool from the results.
-
Press Windows logo key + Shift + S for a static image snip.
-
Press Print Screen (PrtSc) for a static image snip.
-
Press Windows logo key + Shift + R for a video snip.
Work with your screenshots
With Snipping Tool open, select one of the following to create and work with your screenshots.
In Snipping Tool, select Mode. In earlier versions of Windows, select the arrow next to the New button. Next, when you choose the kind of snip you want, you’ll see the whole screen change slightly to gray. Then, choosing from anything currently displayed on the screen, select the area of your screen that you want to capture.
After you capture an image snip, you can:
-
Write or draw on or around it by selecting the Pen or Highlighter buttons.
-
Add shapes or emojis to the snip by selecting the Shapes button.
-
Select Eraser to remove the lines or shapes you’ve added.
-
Crop the image by selecting the Image crop button.
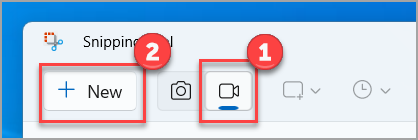
To capture a video snip, open Snipping Tool, select the Record button, then select New recording, or press Windows logo key + Shift + R. Select the area of the screen you wish to record, then select Start. When you are done, select Stop. At this point you can save the recording as-is or select Edit in Clipchamp to work with it in the Clipchamp video editor.
When you finish recording a video snip, select the Edit in Clipchamp button to add Captions or Audio.

Generate and add captions
-
Navigate to the Captions tab and select the Transcribe media button.
-
Choose your language and filter options from the pop-up.
-
Navigate and select Transcribe media to generate captions.
Add and detach audio from the video snip
-
Select the Audio tab from the sidebar.
-
Adjust the volume within a range of 0 to 200%.
-
To download the audio separately, select the Detach audio button.
-
To access the downloaded audio file, press the Windows logo key + R and type «downloads» in the dialog box.
For more information, refer to Add captions and audio description to a Snip video.
Notes:
-
To add an auto caption to the video snippet, refer to How to use autocaptions in Clipchamp.
-
To use the text to speech feature, refer How to use the text to speech feature.
-
After you capture a snip, select the Save as button.
-
In the Save As box, type a file name, location, and type, and then select Save.
After you capture a snip, select the See more menu on top right, and then select Share.
Once you’ve captured a snip, select the Text actions button to activate the Optical Character Recognition (OCR) feature. This allows you to extract text directly from your image. From here, you have the option to either select and copy specific text or use the tools to Copy all text or to Quick redact any email addresses or phone numbers in the snip. All text recognition processes are performed locally on your device.
|
Press these keys |
To do this |
|---|---|
|
Alt + M |
Choose a snipping mode. |
|
Alt + N |
Create a new snip in the same mode as the last one. |
|
Shift + arrow keys |
Move the cursor to select from different types of snips. |
|
Alt + D |
Delay capture by 1-5 seconds |
|
Ctrl + C |
Copy the snip to clipboard |
|
Ctrl + S |
Save the snip |
With your capture open in Snipping Tool, select Edit > Edit with Paint to use features for sizing, color, text, and many other enhancements.
In the folder where you’ve saved your snip, right click on the snip. Select Print from the options and make choices for how you want to print your image.
In the search box on the taskbar, type snipping tool. You’ll see the Snipping Tool app and a list of actions you can take. Select Pin to taskbar.
First, identify the menu or other components you want to capture. In Snipping Tool, select Delay and then select, for example, 5 seconds. Select Mode to start the 5-second countdown. Within 5 seconds, open a menu or otherwise compose your image. At 5 seconds, when you see the screen turn gray, use the mouse to draw around the area you want.
Need more help?
Want more options?
Explore subscription benefits, browse training courses, learn how to secure your device, and more.
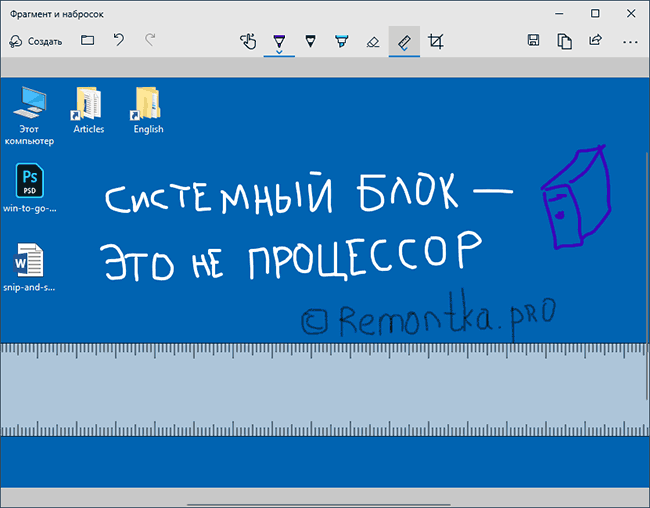
В осеннем обновлении Windows 10 версии 1809 появился новый инструмент для создания скриншотов экрана или его области и простого редактирования созданного снимка экрана. В разных местах системы этот инструмент называется слегка по-разному: Фрагмент экрана, Фрагмент и набросок, Набросок на фрагменте экрана, но имеется в виду одна и та же утилита.
В этой простой инструкции о том, как сделать скриншот Windows 10 с помощью новой функции, которая в будущем должна будет заменить собой встроенную утилиту «Ножницы». Остальные способы для создания снимков экрана продолжают работать так же, как и раньше: Как создать скриншот Windows 10.
Как запустить «Фрагмент и набросок»
Я нашел 5 способов запустить создание скриншотов с помощью «Фрагмент экрана», не уверен, что все они пригодятся вам, но поделюсь:
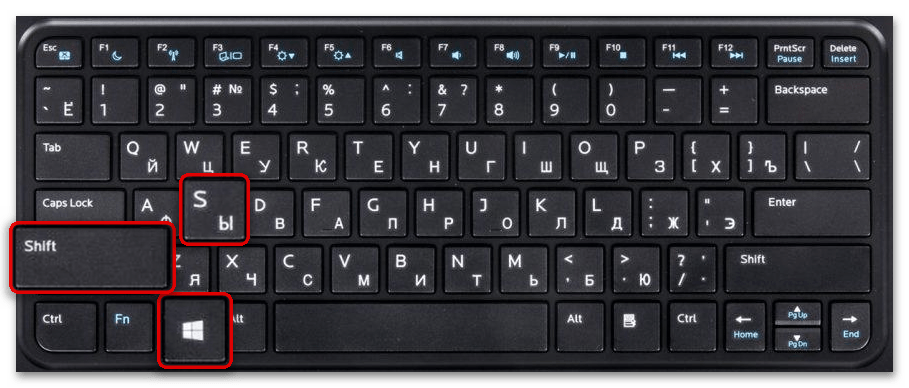
- Использовать горячие клавиши Win + Shift + S (Win — это клавиша с эмблемой Windows).
- В меню пуск или в поиске на панели задач найти приложение «Фрагмент и набросок» и запустить его.
- Запустить пункт «Фрагмент экрана» в области уведомлений Windows (может отсутствовать там по умолчанию).
- Запустить стандартное приложение «Ножницы», а уже из него — «Набросок на фрагменте экрана».
Также есть возможность назначить запуск утилиты на клавишу Print Screen: для этого зайдите в Параметры — Специальные возможности — Клавиатура.
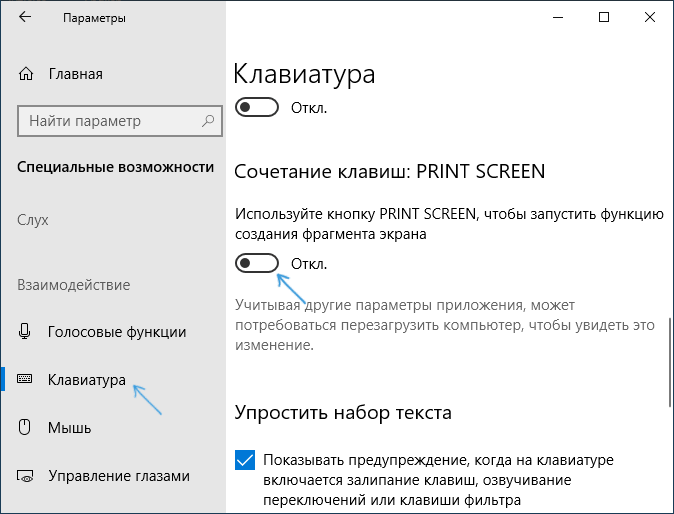
Включите пункт «Используйте кнопку Print Screen, чтобы запустить функцию создания фрагмента экрана».
Создание снимка экрана
Если запускать утилиту из меню Пуск, поиска или из «Ножницы», откроется редактор созданных скриншотов (где нужно нажать «Создать» для того, чтобы сделать снимок экрана), если же использовать остальные способы — сразу откроется создание скриншотов, работают они слегка отличающимся образом (будет отличаться второй шаг):
- Вверху экрана вы увидите три кнопки: для создания снимка прямоугольной области экрана, фрагмента экрана произвольной формы или скриншота всего экрана Windows 10 (четвертая кнопка — для выхода из инструмента). Нажмите по нужной кнопке и, если требуется выберите нужную область экрана.

- Если вы запускали создание скриншота в уже запущенном приложении «Фрагмент и набросок», вновь созданный снимок откроется в нём. Если с помощью горячих клавиш или из области уведомлений, скриншот будет помещен в буфер обмена с возможностью вставить в любую программу, а также появится уведомление, по нажатию на которых откроется «Фрагмент экрана» с этим изображением.

В приложении «Фрагмент и набросок» вы можете добавить надписи на созданный скриншот, удалить что-то с изображения, обрезать его, сохранить его на компьютер.
Здесь же присутствуют возможности для копирования отредактированного изображения в буфер обмена и стандартная для приложений Windows 10 кнопка «Поделиться», позволяющая отправить его через поддерживаемые приложения на компьютере.
Не берусь оценить, насколько новая возможность удобна, но, думаю, для начинающего пользователя будет полезна: большинство функций, которые могут потребоваться, присутствуют (кроме, разве что создания скриншота по таймеру, эту возможность вы можете найти в утилите «Ножницы»).
Skip to content
In the upcoming Windows 10 version, currently referred to as «Redstone 5», Microsoft is going to rework the built-in tools for taking screenshots. The recently released build 17661 comes with a new Screen Snip feature that has been added to Windows 10 to quickly snip and share a screenshot.
Windows 10 already includes a bunch of options for taking screenshots. I’ve covered them in the article
Take A Screenshot In Windows 10 Without Using Third Party Tools
In short, you can use
- The Win+Print Screen hotkey
- Only the PrtScn (Print Screen) key
- The Alt+Print Screen keys
- The Snipping Tool application, which also has its own Win + Shift + S shortcut. Tip: You can also create a shortcut to capture a screen region in Windows 10.
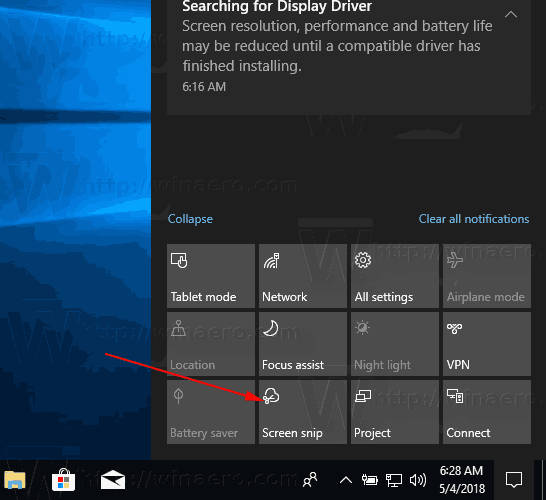
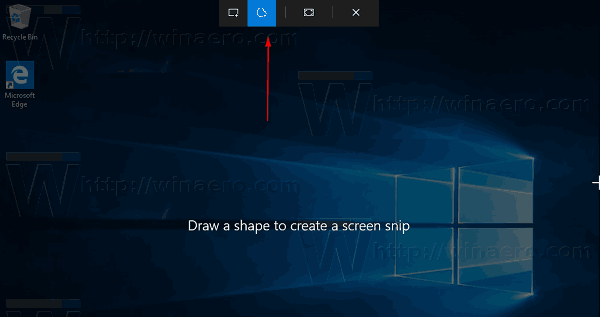
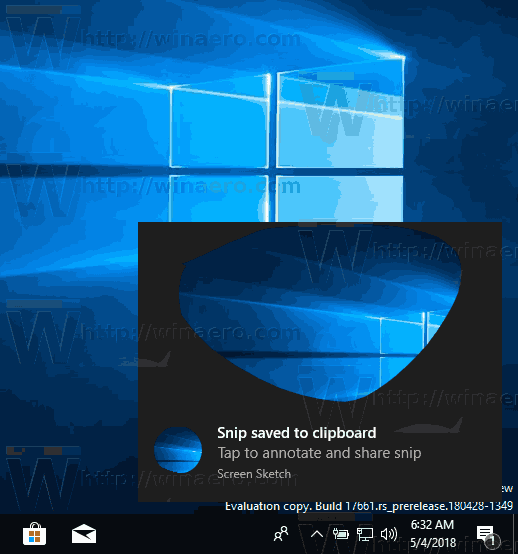
Using the new tool, you can capture a rectangle, snip a freeform area, or take a full screen capture, and copy it directly to the clipboard. Immediately after taking a snip you’ll now get a notification that will take you and your snip to the Screen Sketch app where you can annotate and share away. In the current implementation, other traditional tools available in the Snipping Tool (Delay, Window snip, and ink color, etc) are missing.
To take a screenshot with Screen Snip in Windows 10, do the following.
- Press the Win + Shift + S keys. Alternatively, you can press the Print Screen key or click on the pen tail button (if you have a pen). Finally, you can use the Screen snip quick action button in the Action Center.

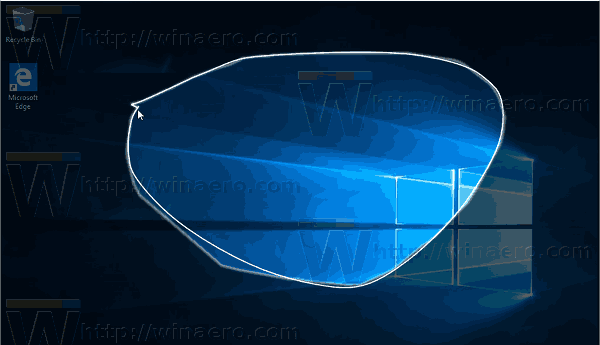
- A snipping toobar will open. Select to snip a rectangle, freeform, or full screen.

- Take a snip using the desired tool.

- A notification will appear informing you that your capture is saved to the clipboard. Now you can paste it to any supported document.

That’s it.
Related articles:
- Take A Screenshot In Windows 10 Without Using Third Party Tools
- How to Take a Screenshot of a Screen Region in Windows 10
- Fix: The screen does not dim when you take a screenshot using Win+PrintScreen in Windows 10
- How to Take a Screenshot of Login Screen in Windows 10
Support us
Winaero greatly relies on your support. You can help the site keep bringing you interesting and useful content and software by using these options:
If you like this article, please share it using the buttons below. It won’t take a lot from you, but it will help us grow. Thanks for your support!
Все способы:
- Запуск приложения
- Интерфейс
- Настройки
- Создание скриншота
- Редактирование снимка
- Сохранение готового изображения
- Набросок на фрагменте экрана
- Вопросы и ответы: 0
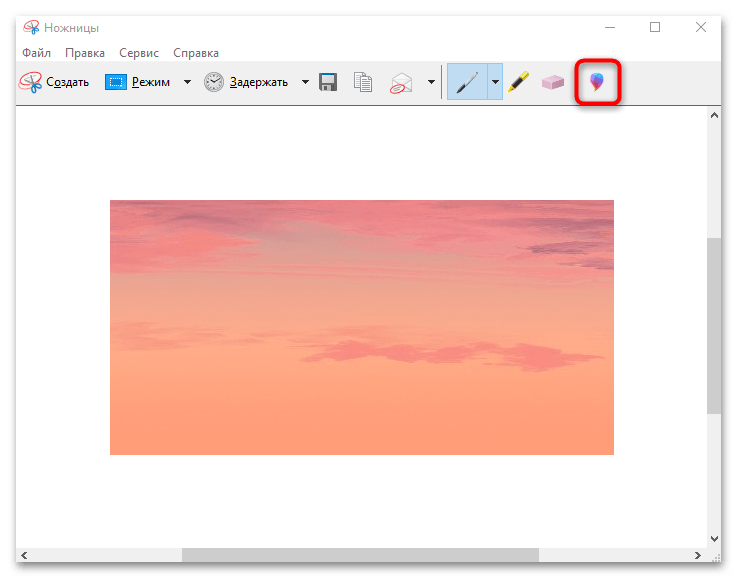
Встроенное приложение для создания скриншотов «Ножницы» — простое программное решение, которое распространяется бесплатно, оснащенное минимумом функций, но при этом способное делать скрины различного типа, а также редактировать их, используя базовые средства.
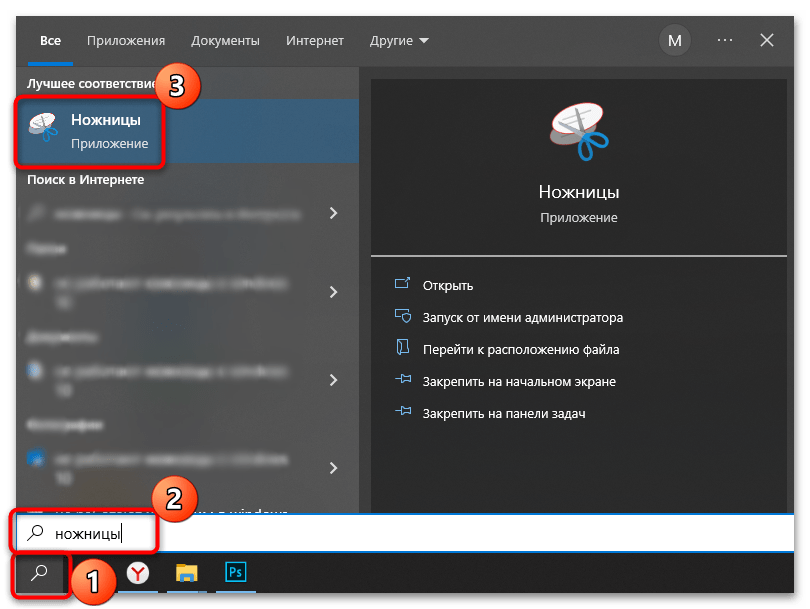
Запуск приложения
По умолчанию штатное средство «Ножницы» располагается в главном меню Windows 10, и запустить его можно с помощью системной поисковой строки. Разверните «Пуск» и начните набирать название скриншотера. В меню отобразится наиболее подходящий результат – щелкните по нему.
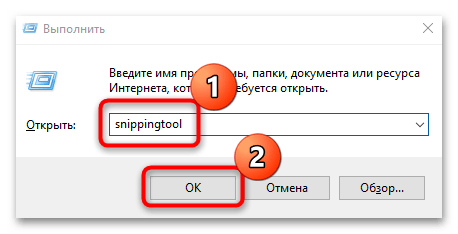
Вы также всегда можете воспользоваться альтернативным вариантом. Одновременно зажмите клавиши «Win + R», чтобы открыть окно «Выполнить». В строке напишите snippingtool, затем кликните по кнопке «ОК».
Можно самостоятельно задать комбинацию для запуска приложения, что удобно для быстрого создания скрина.
- Найдите через поиск «Пуска» приложение и выберите из списка «Перейти к расположению файла».
- В окне «Проводника» вы увидите список ярлыков штатных инструментов. Найдите в нем «Ножницы», кликните по этому названию ПКМ и из контекстного меню выберите «Свойства».
- На вкладке «Ярлык» в строке «Быстрый вызов» нужно задать клавишу для запуска. По умолчанию она будет уже в сочетании с «Ctrl + Alt». Поставьте курсор в соответствующем поле и нажмите удобную клавишу, например «E». Примените и сохраните настройки ярлыка.


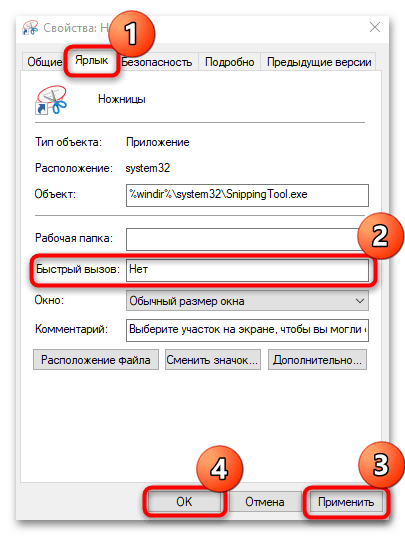
После того как комбинация была задана, достаточно запомнить ее и использовать при необходимости – окно приложения «Ножницы» запустится без поиска среди установленных приложений на ПК.
Интерфейс
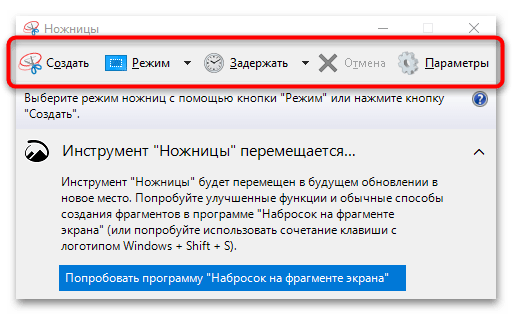
После запуска «Ножниц» отобразится небольшое окно. Он состоит из нескольких вкладок с основными параметрами:
| Вкладка | Описание |
|---|---|
| «Создать» | Кнопка, нажатие на которую запускает непосредственное ручное создание скриншота |
| «Режим» | Разворачивается меню с выбором типа захвата: произвольная форма, прямоугольник, определенное активное окно или весь экран |
| «Задержать» | Функция задержки создания снимка, позволяющая задать время от 1 до 5 секунд: выбор доступен в разворачивающемся меню |
| «Отмена» | Кнопка становится активна после того, как выбрана функция создания скриншота, и позволяет вернуться в обычный режим |
| «Параметры» | Переход в настройки приложения |
Это и есть основные функции «Ножниц», но в приложении дополнительно предусмотрен простой редактор, который становится активным уже после создания снимка. О нем мы поговорим ниже.
Следует отметить, что «Ножницы», в отличие от большинства аналогичных программ, не позволяют изменять уже готовые изображения, которые хранятся на жестком диске или другом накопителе.
Настройки
Разберем параметры приложения, их не слишком много. Чтобы перейти в раздел с настройками, кликните по кнопке «Параметры» на верхней панели.
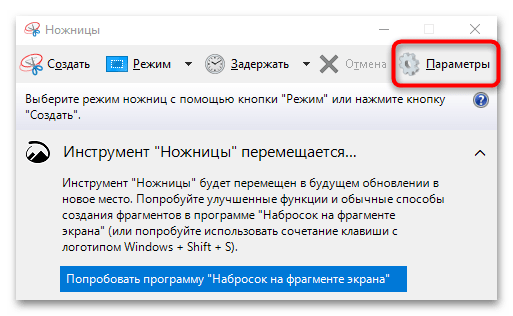
Отобразится дополнительное окошко с двумя разделами: настройками функции выделения и самого приложения. В первом случае пользователь может определить некоторые простые, но полезные опции, например запрос сохранения файла перед выходом из режима редактирования или же включение копирования снимков в буфер обмена, что позволяет вставить сделанный скриншот в любое другое место, такое как окно стороннего редактора или документ. В настройках приложения доступен выбор цвета чернил при изменении снимка экрана, а также отображение линии выделения после создания скрина.
Если вы изменили параметры приложения, не забудьте нажать на «ОК», чтобы настройки вступили в силу.
Создание скриншота
Создание скриншота происходит в несколько кликов. В интерфейсе приложения сначала выберите тип захвата экрана, нажав на кнопку «Режим». После этого сразу запустится инструмент для захвата.
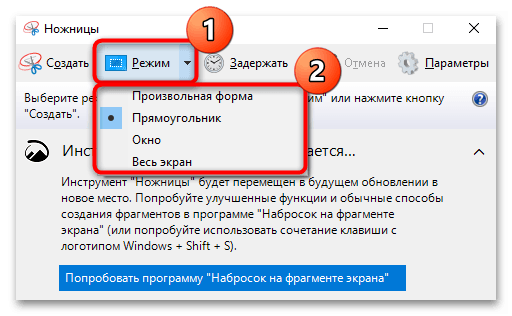
Если режим уже выбран, кликните по «Создать». Дальнейшие действия зависят от выбранного режима: если это «Весь экран», то никаких действий не требуется, а при выборе типа захвата «Окно» понадобится просто указать то окно, скрин которого нужно сделать. Оно будет окантовано красным цветом. «Произвольная форма» и «Прямоугольник» подразумевают ручной выбор области захвата путем перетаскивания курсора с зажатой левой кнопкой мыши.

Когда область для захвата выделена, просто отпустите ЛКМ.
Если вы передумали делать скрин или решили выбрать другой режим, нажмите на кнопку «Отмена» или клавишу «Esc».
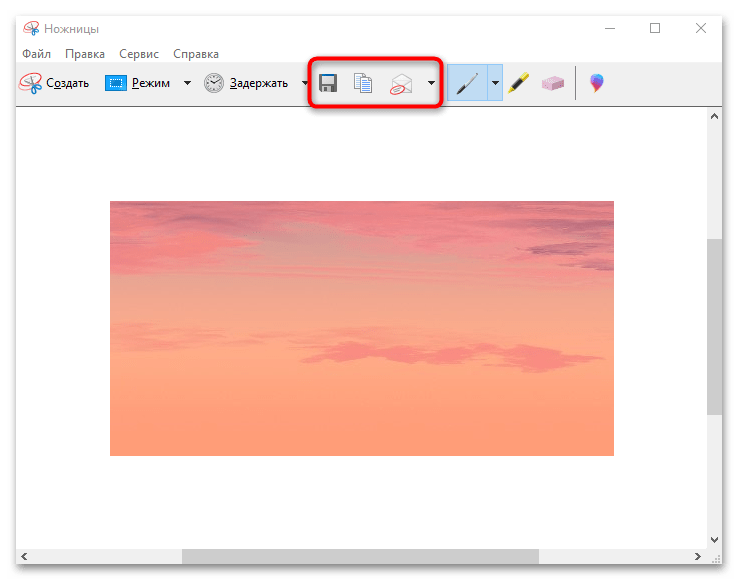
Редактирование снимка
После того как скриншот создан, автоматически откроется окно встроенного редактора. Он располагает простыми инструментами для изменения изображения. Панель с ними находится в правом верхнем углу:
| Инструмент | Описание |
|---|---|
| «Перо» | Есть выбор из нескольких цветов, а также переход в более тонкие настройки, где можно задать толщину линии и тип |
| «Маркер» | Инструмент, с помощью которого выделяются важные объекты на изображении |
| «Ластик» | Средство, убирающее ранее внесенные изменения, например, выделения или подчеркивания |
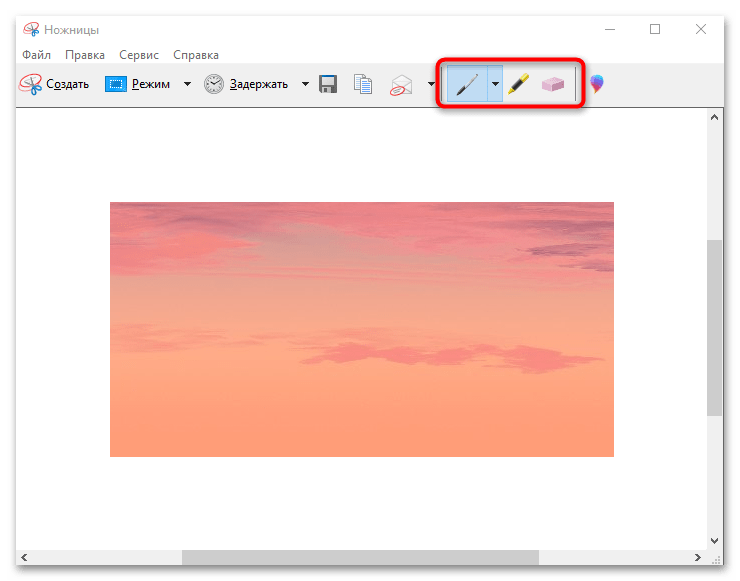
Для более расширенного изменения изображения можно перенести снимок напрямую во встроенный редактор Paint 3D. Через его интерфейс накладываются различные эффекты и текст, доступен выбор маркеров и карандашей, а также инструмент для обрезки лишних областей снимка.
В середине панели инструментов есть кнопки для действий со скриншотом: сохранение, копирование в буфер обмена и прямая отправка на адрес электронной почты.
Сохранение готового изображения
При выборе кнопки «Сохранить» запустится окно системного «Проводника», где нужно указать путь и задать имя файлу и выбрать формат изображения, если это необходимо. По умолчанию снимок будет сохранен с расширением PNG.
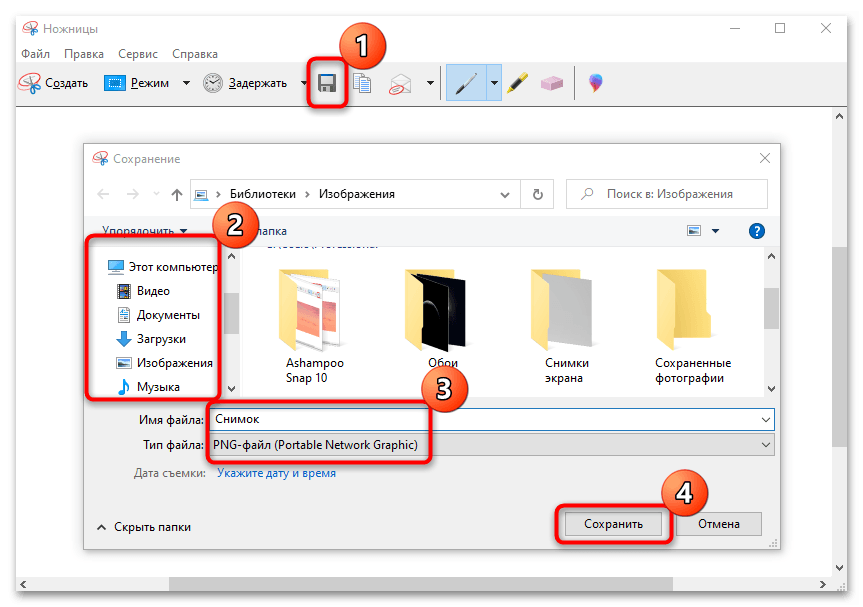
«Проводник» также может быть запущен, если просто закрыть окно встроенного редактора (при условии, что опция запроса установлена в разделе с параметрами приложениями).
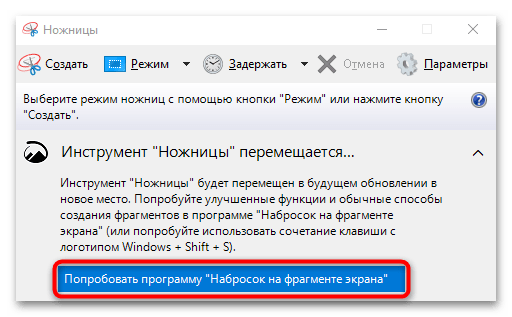
Набросок на фрагменте экрана
Следует отметить, что в более новых версиях «десятки» функции и инструменты «Ножниц» постепенно переносятся в другое встроенное средство – «Набросок на фрагменте экрана». Его панель инструментов запускается нажатием сочетания клавиш «Win + Shift + S».
Перейти в новое приложение пока что можно прямо из интерфейса «Ножниц». Для этого кликните по «Попробовать программу «Набросок на фрагменте экрана»» в главном окне.
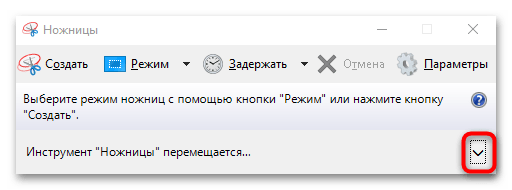
Если кнопки нет, то, вероятно, блок находится в свернутом состоянии, и чтобы его развернуть, кликните по стрелочке. Также новое приложение Windows 10 отсутствует в устаревших сборках.
Читайте также: Обновление Windows 10 до последней версии
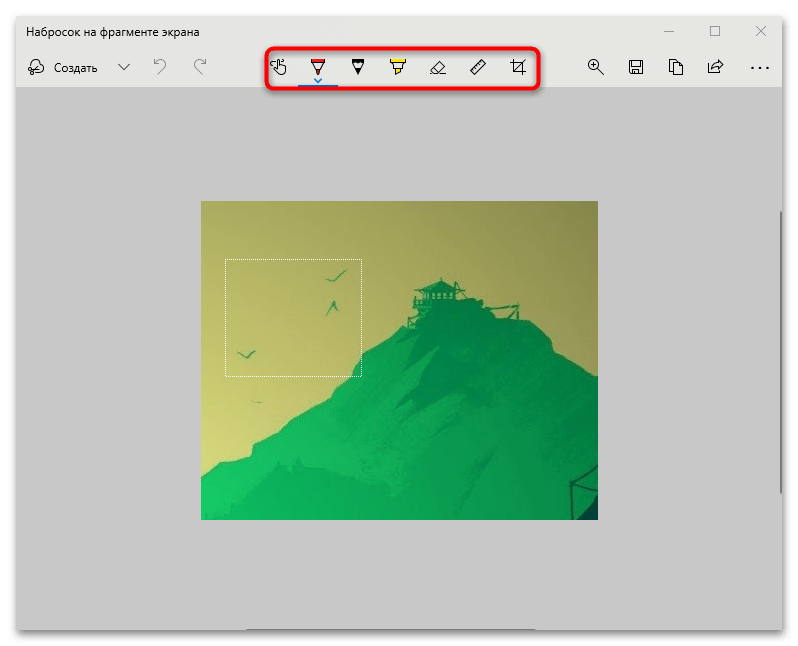
При запуске только панели (сочетанием клавиш) редактирование скриншотов, которые могут быть также захвачены в нескольких режимах, не предусматривается: созданный снимок автоматически отправляется в буфер обмена.
А вот если делать снимок из интерфейса «Наброска на фрагменте экрана», после станут доступны дополнительные инструменты для редактирования изображения: маркер, ручка, карандаш, линейка, обрезка и другие средства.
Наша группа в TelegramПолезные советы и помощь
How to Use Snipping Tool in Windows 10 to Capture Screenshot – We had already covered few topics on Windows 10 on our website. Today we bring you an interesting description of one of the tools of Windows 10 that most of us would surely learn and apply. Snipping Tool is amongst the other famous tools of the Windows operating system that allows you to Capture a copy of anything that happens on your screen.
Windows 10 has also a Snipping Tool option with which you can Capture a snapshot of any happening on your screen. The snapshots are saved as PNG formats, but it also gives the option to save it as GIF, HTML or JPEG format. One of the best features of the Snipping Tool is that it allows you to Capture a snapshot of the whole screen and also of the particular part of the screen that you need. You can even make a note of the snip you have taken. Moreover, it also allows you to email it to others directly from the Snipping Tool Window.
You may like to Read:
- Windows 10 – How to Take Screenshots Using Default Tools
- How to View Remote Desktop on Network and Capture Screenshots
How to Use Snipping Tool in Windows 10
So by now, you have understood that today our topic of explanation is Snipping Tool of Windows 10. Lets’ go to the details of open and use Snipping Tool in Windows 10.
How to Open Snipping Tool in Windows 10
- Take yourself to the Start Menu of Windows 10.
- Look for the Snipping Tool in the Cortana search bar.
- Click on the Snipping Tool option to open it.
- Now here at this point, you should know that there are four types of snips provided by the tool.
- Free Form Snip – As the name sounds, you can draw a line or anything as per your need around the area that you want to capture.
- Rectangular Snip – Here you have to hold and drag the cursor around the area to form a rectangular snip.
- Window Snip – This option will allow you to capture a dialog box or a browser window. So open the window that you want to capture and then choose this option and go ahead.
- Full – Screen Snip – You can understand by the name itself. It will capture the full screen.
How to take Snip in Windows 10
- Open the Snipping Tool as explained above.
- Click the small arrow near the New option.
- Select the type of snip that you want to use.
- After selecting the type of snip, crop the area that you want to capture.
- Now save the snapshot in your desired format.
How to Capture Snip of Start Menu in Windows 10
- Open the Snipping Tool on your Windows 10 operating system.
- Now open the menu (for example – Start Menu) whose snapshot you want.
- Now press Ctrl and PrtSc keys on your keyboard.
- This will pop up the Snipping Tool on your screen.
- Now easily capture the Start Menu.
How to Save a Snip in Windows 10
- You know that after taking a snapshot, you need to save it.
- To do so click on the File option and choose the option Save as on the Snipping Tool window.
- Or click the Save As button on the Snipping Tool window.
- Provide a name and choose the file type and save it to your desired location.
How to Share Snip in Windows 10
- In order to use the Snipping tool to share, take the snip of the desired area.
- Click on the arrow which is beside Send Snip option.
- Now you have two options.
- Either send the snip as an email recipient or as an attachment.
How to Change Ink Color of Snipping Tool in Windows 10
- Click on the Options choice when you want to Use Snipping Tool to change ink color.
- Snipping Tool Options window is popped up on the screen.
- On the lower part of the window, you will find the Ink Color Selection.
- Use the drop-down menu and select the color of your choice.
- Then select the checkbox which says to Show selection ink after snips are captured.
- Click Ok to save the changes.
How to Annotate a Snip
- Once you capture a snip, you can draw or write anything around it. You can either choose the Pen or Highlighter button.
- To remove the editing, click the Eraser button.
How to Remove the URL
When you take a snapshot from a browser window and save it as an “HTML” file, the URL shows up below the snip. But if you don’t prefer the URL to appear, do the following.
- Click the Options button in the interface of the Snipping Tool.
- Snipping Tool Options box will appear. Here, uncheck the option namely Include URL below snips (HTML only).
- Click OK to save the changes.
How to Crop or Enlarge the Snip
- When your capture is already open in the Snipping Tool, click Edit on the menu bar.
- Select the option Edit with Paint 3D. Now, you can use features color, text, sizing, and more other enhancements.
Keyboard Shortcuts
| Shortcut Keys | Functions |
| Alt + M | To select a snipping mode. |
| Alt + N | Generates a new snip in the same mode as you did in the previous one. |
| Shift + arrow keys | Move the cursor around to choose a rectangular snip portion. |
| Alt + D | It will delay the capture by 1-5 seconds. |
| Ctrl + C | Doing so will copy the snip to the clipboard. |
| Ctrl + S | Save the snip on your preferred location. |