
Время на прочтение4 мин
Количество просмотров90K

В середине июля 2020 года эксперты портала Tom’s Hardware опубликовали инструкцию по установке Windows 10 на Raspberry Pi 4. Вдобавок они проверили, как работают некоторые сторонние программы (GIMP Photo Editor, Arduino IDE и Python 3.8) в этой связке микрокомпьютера на ARM и последней версии Windows.
Вопрос «зачем» тут не особо уместен, так как экспериментаторам был важен сам факт того, что это можно сделать и все будет работать. Да, медленно и с тормозами и проблемами, но будет.
Официально, единственная операционная система Microsoft для Raspberry Pi — это устаревшая на текущий момент версия Windows 10 IoT Core, которая, например, позволяет выполнять код Visual Studio на микрокомпьютере, но там даже нет графического интерфейса. Тем не менее, разработчики (например, проект «Windows on Raspberry Pi» в Discord) своими силами сделали необходимы программы и нашли способ по установке и запуску полноценной версии Windows 10 на Raspberry Pi 4.
Эксперты портала Tom’s Hardware дополнительно уведомили, что они не могут ручаться за безопасность или законность любых пользовательских файлов, созданных сообществом «Windows on Raspberry Pi», поэтому все действия далее они делали на свой страх и риск.
В 2019 году эксперты портала Tom’s Hardware уже попытались установить Windows 10 на Raspberry Pi 3, но тогда этот трудный процесс у них закончился по большей части проблемами, ошибками и тормозами после установки.
В настоящее время даже после всех стараний команды проекта «Windows on Raspberry», после установки Windows 10 на Raspberry Pi 4 не работают встроенные в микрокомпьютер порт Ethernet, модули Wi-Fi, Bluetooth и GPIO, аудио через HDMI также недоступно. Для сетевого подключения нужно использовать Wi-Fi USB-адаптер, а для вывода звука Bluetooth через USB-адаптер.
Для установки Windows 10 на Raspberry Pi 4 понадобятся:
- последняя версия Raspberry Pi 4 с 4GB или 8GB ОЗУ;
- карта памяти microSD на 16 GB или больше;
- ПК с Windows 10 и доступом в сеть интернет для создания нужной загрузочной сборки;
- адаптер USB to Ethernet или WiFi dongle;
- Bluetooth dongle (если нужен Bluetooth).
Инструкция по установке Windows 10 на Raspberry Pi 4:
- нужно скачать и распаковать на ПК последнюю версию инструмента WoR 2.0.0 alpha 3, там будет архив на 4.7G;
- зайти на Windows on Raspberry Pi Discord server в разделе Downloads channel скачать последнюю стабильную версию Windows on ARM (0.2.1), ссылка на этот файл PublicFlukeByte.iso;
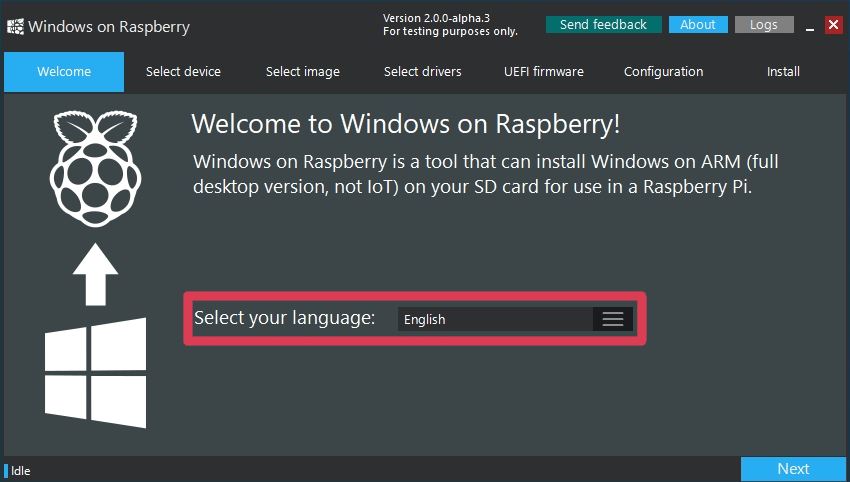
- запустить WoR Alpha tool и выбрать язык установки;
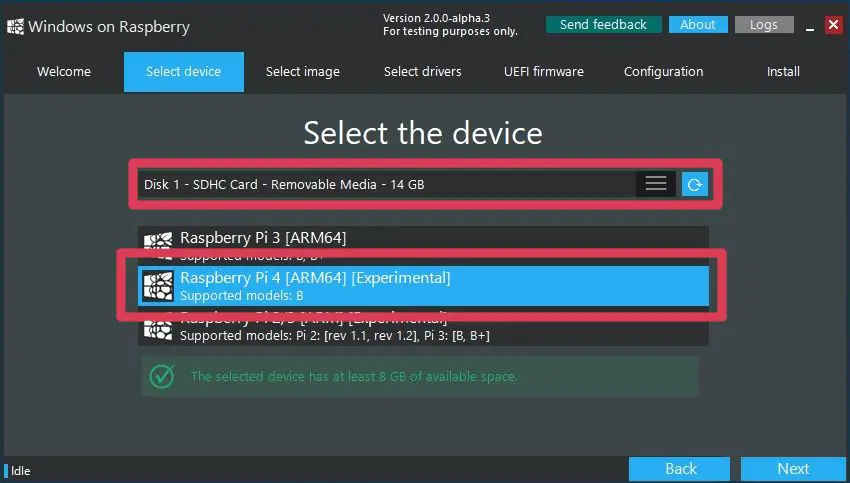
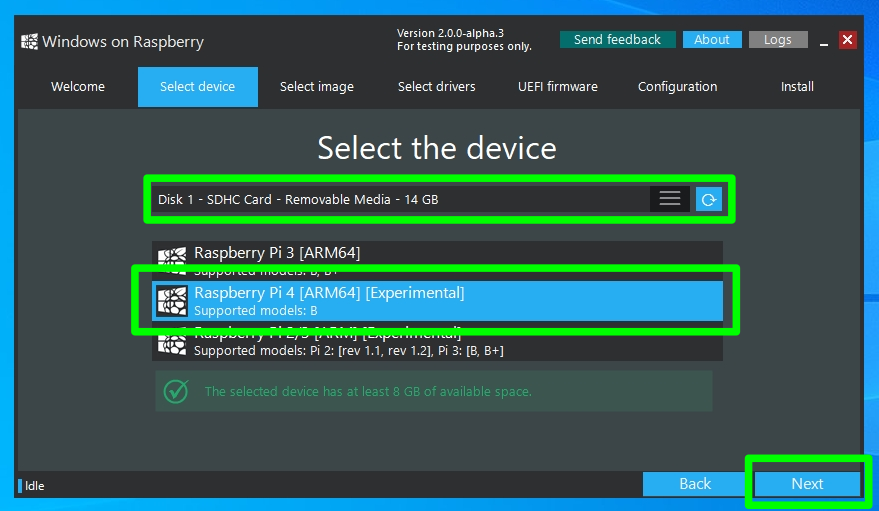
- вставить в ПК карту памяти и выбрать ее в WoR Alpha tool в разделе «Select device», там же выбрать режим «Raspberry Pi 4 experimental mode»;
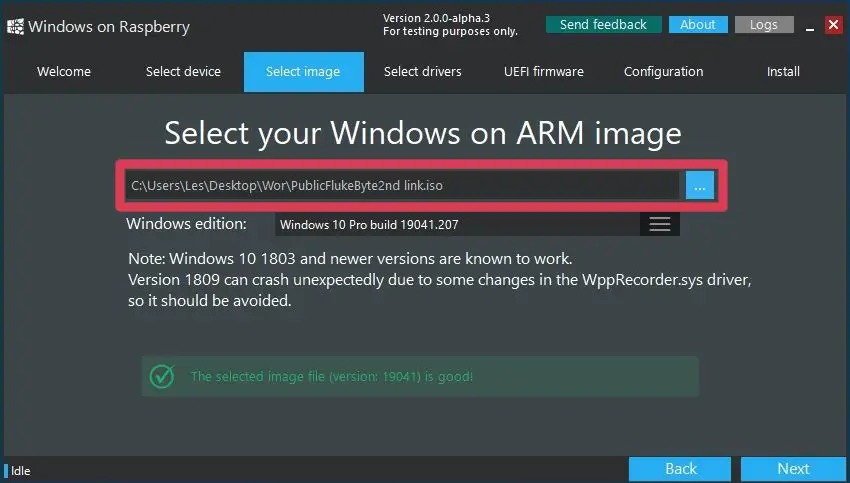
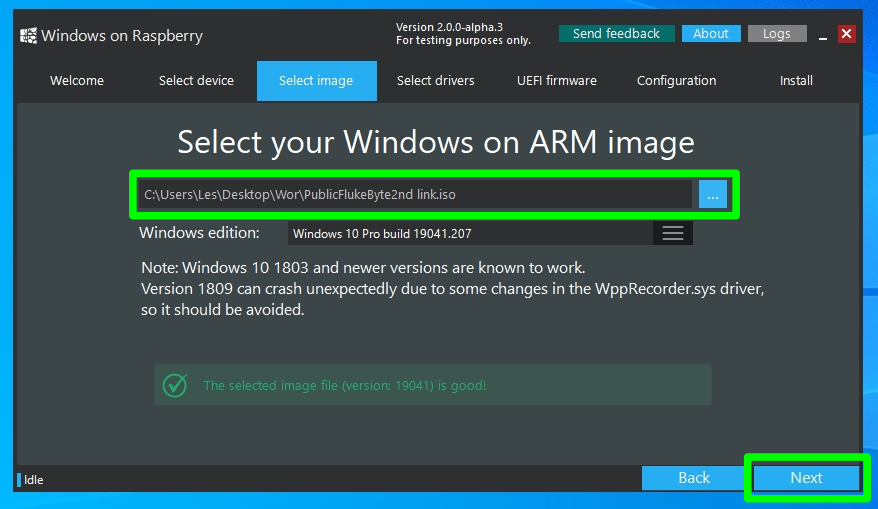
- далее в разделе «Select image» указать место расположения на ПК ранее скаченного файла PublicFlukeByte.iso;
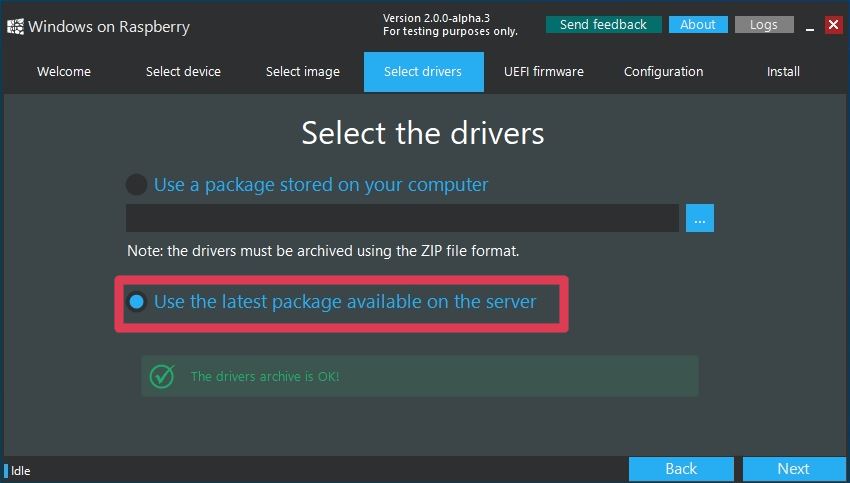
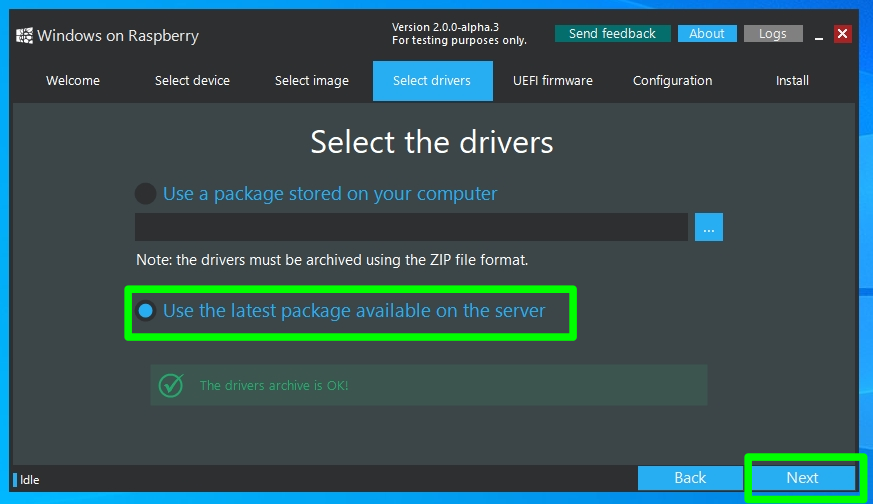
- далее в разделе «Select drivers» выбрать опцию «Use the latest package available on the server.»;
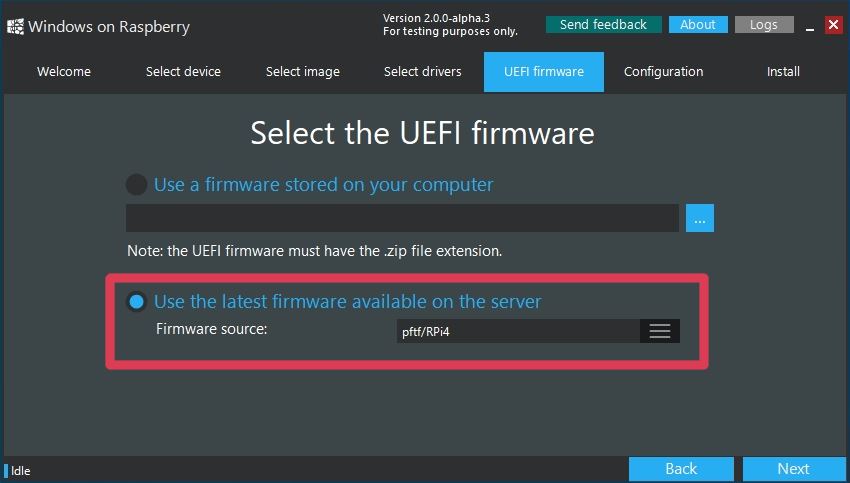
- далее в разделе «UEFI firmware» выбрать опцию «Use the latest firmware available on the server.»;
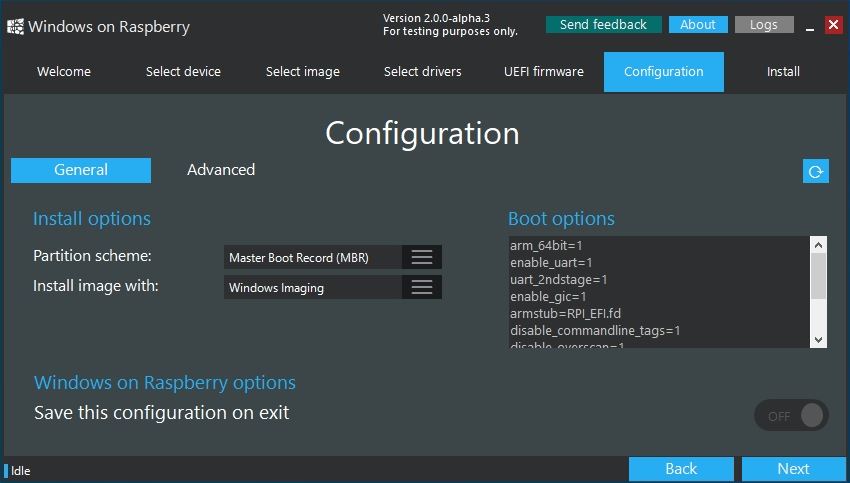
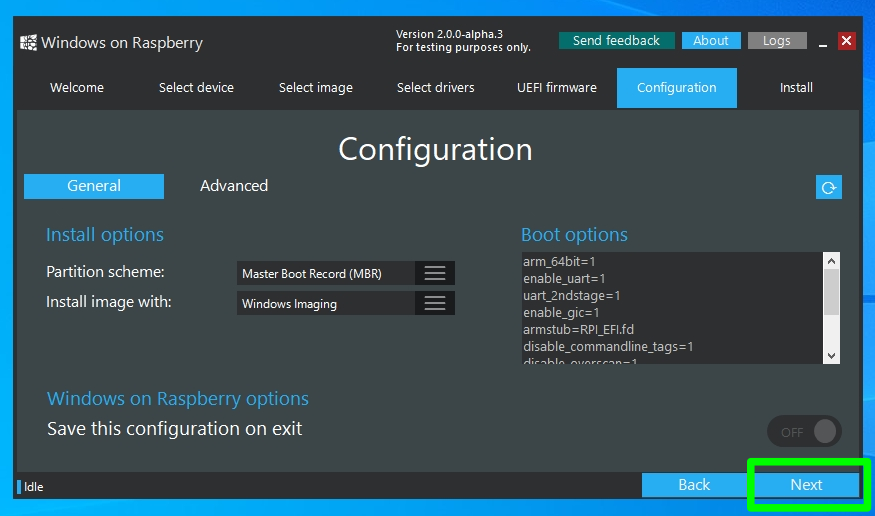
- потом нужно проверить конфигурацию загрузочной сборки и начат ее записать на карту памяти, причем запись может продолжаться более двух часов, в зависимости от параметров карты памяти;
- скачать и распаковать на ПК патч для Raspberry Pi 4 по активации USB-портов и 3 ГБ ОЗУ в Windows 10, скопировать файл winpatch.exe в корень диска C: на ПК;
- пропатчить сборку на карте памяти: в командной строке на ПК выполнить
«winpatch X:\Windows\System32\drivers\USBXHCI.SYS 910063E8370000EA 910063E8360000EA 3700010AD5033F9F 3600010AD5033F9F», где Х — буква диска с картой памяти; - рекомендуется также «разогнать» в настройках Raspberry Pi, но тогда лучше заранее обеспокоиться установкой на микрокомпьютер системы охлаждения, для этого необходимо в файле config.txt на загрузочном карте памяти выставить параметры: «over_voltage=6» и «arm_freq=2000»;
- теперь можно извлечь загрузочную карту памяти из ПК, вставить ее в Raspberry Pi 4 и начать стандартную установку ОС Windows 10;
- после окончания процесса установки Windows 10 на Raspberry Pi 4 необходимо активировать в ОС возможность полноценно использовать 3 ГБ ОЗУ, для этого нужно под администратором в командной строке запустить: «bcdedit /deletevalue {default} truncatememory», далее необходимо перезагрузить микрокомпьютер;
- далее можно подключить сетевые USB-адаптеры, настроить их и скачивать и устанавливать из интернета необходимые для работы приложения, включая браузеры и другое ПО.
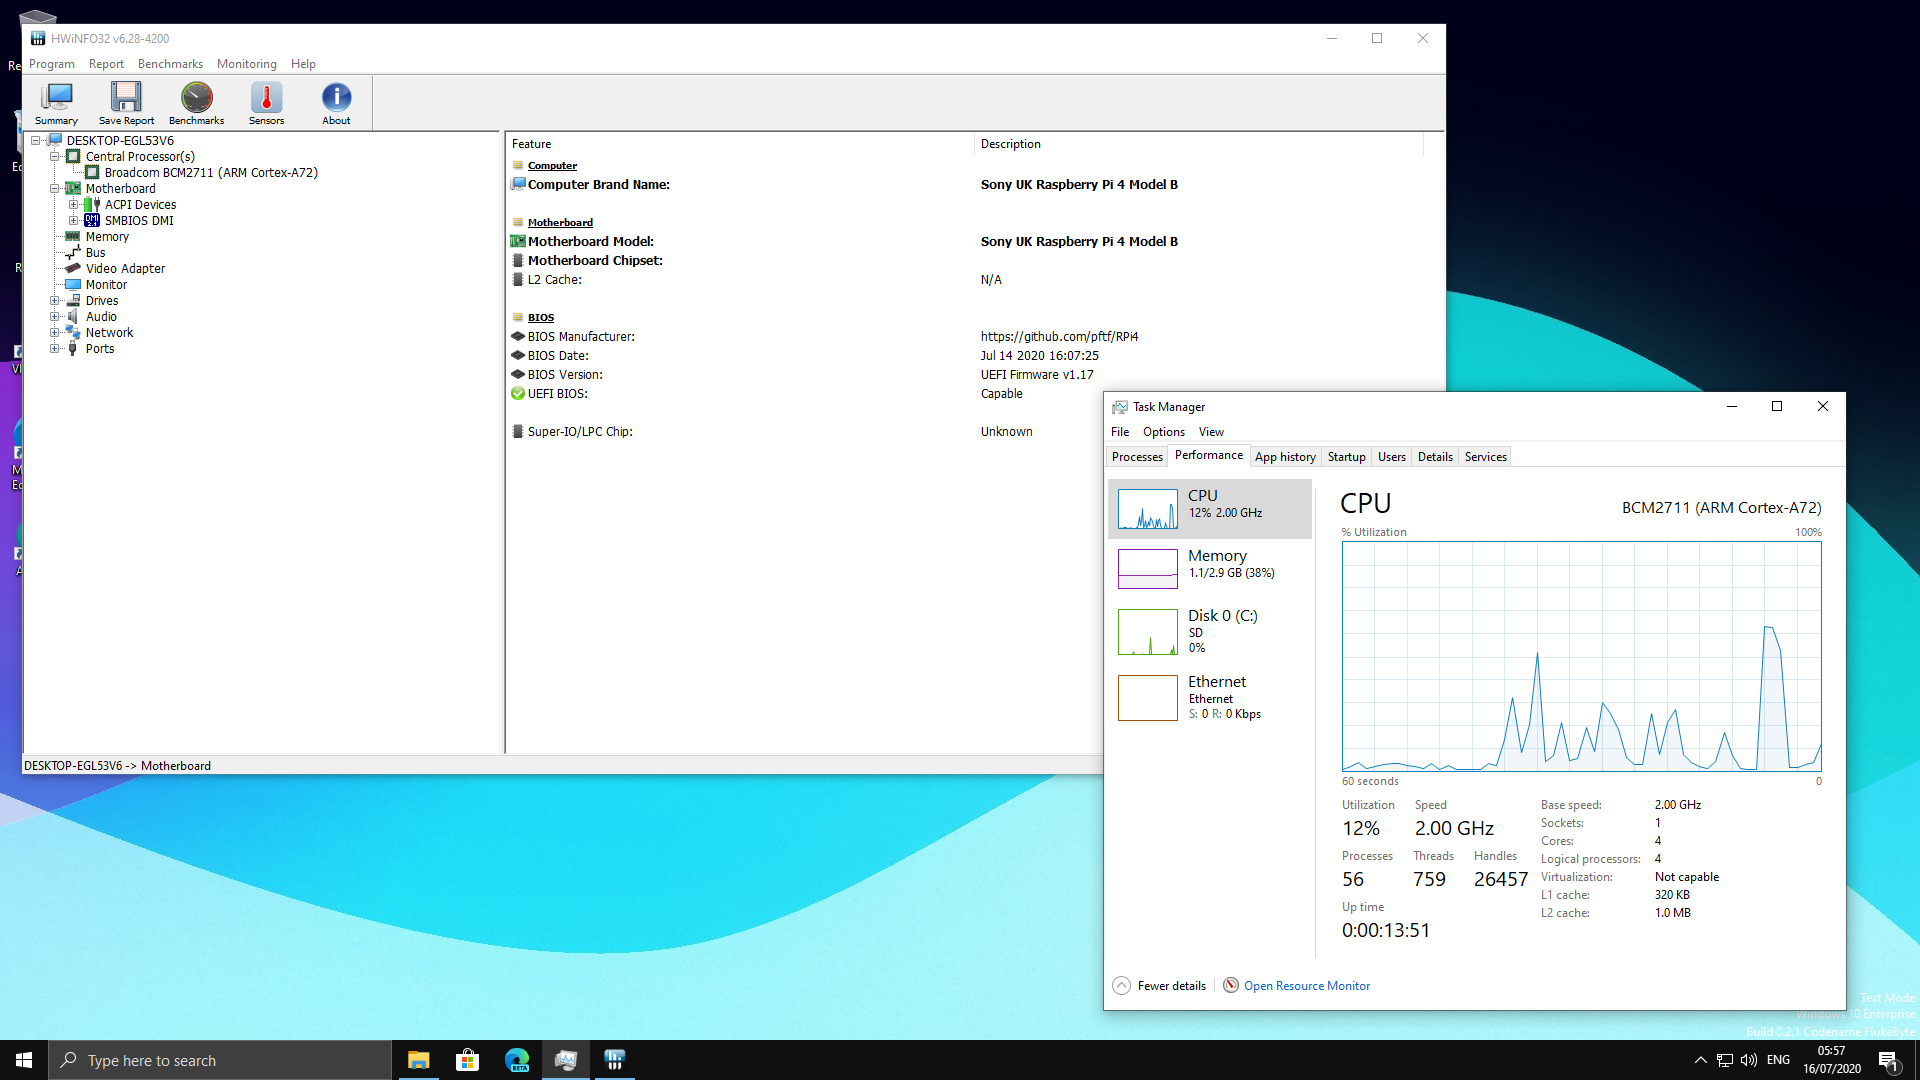
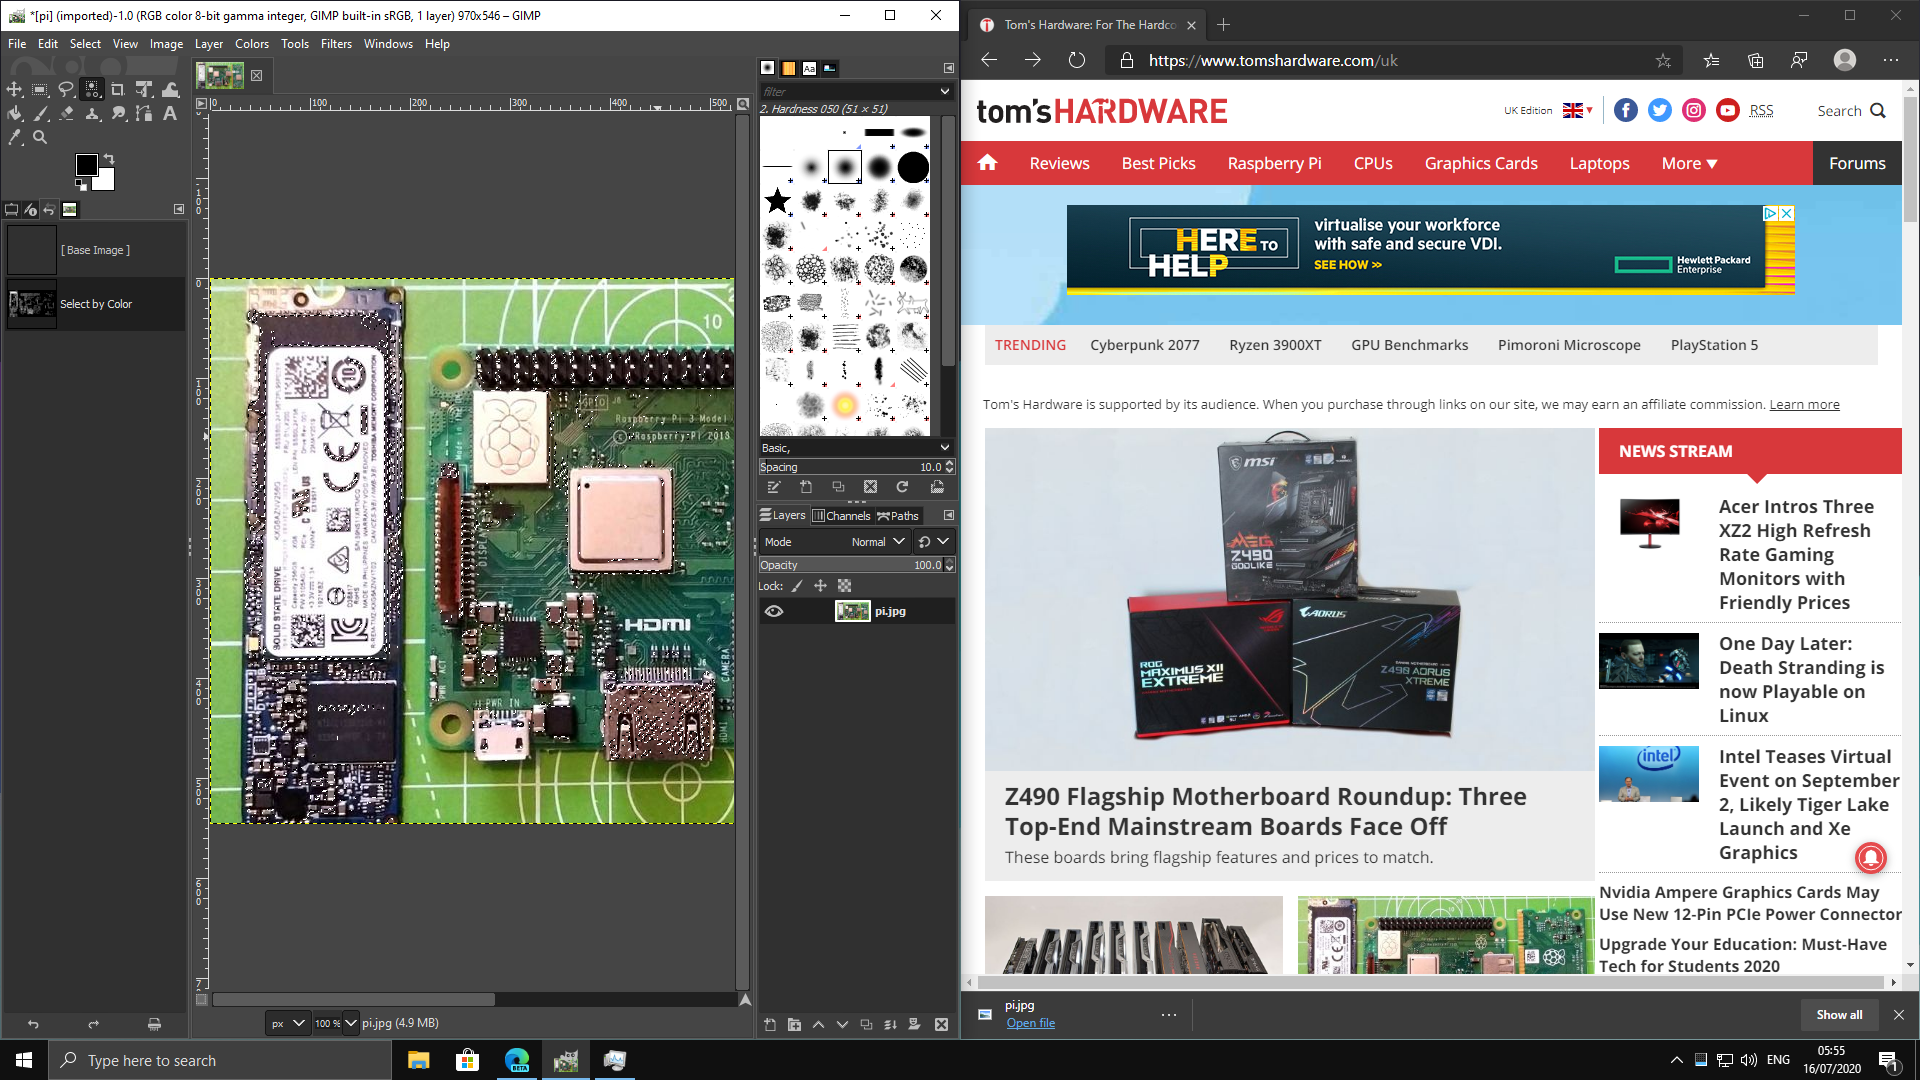
Эксперты портала Tom’s Hardware установили на Raspberry Pi 4 с Windows 10 браузер Microsoft Edge, программы GIMP Photo Editor, Arduino IDE и Python 3.8 с оболочкой Python REPL. Все программы запускались и работали нормально. По скорости работы с этой ОС микрокомпьютер оказался на уровне Intel Celeron или Atom начального уровня. Время загрузки ОС Windows 10 составило 2 минуты 12 секунд. Просмотр видео в YouTube возможен, но со средними настройками разрешения роликов. Из проблем — на эту сборку не удалось установить редактор кода Visual Studio Code. Также не работал модуль Python под названием GPIO Zero, который используется для взаимодействия с GPIO Raspberry Pi. Возможно, что в будущем эти моменты будут доработаны разработчиками проекта «Windows on Raspberry Pi».
Ранее в феврале 2020 года Raspberry Pi Foundation выпустил обновленную версию (v1.2) Raspberry Pi 4, в которой было исправлено несколько проблем, включая совместимость с различными USB-C кабелями. Тогда микрокомпьютер не распознавал некоторые кабели как источник питания из-за проблем со схемой питания.
В конце мая 2020 года в продажу поступила 8-гигабайтная модель Raspberry Pi 4. Она доступна по цене в $75. Вдобавок создатели портативного ПК сняли с продажи версию с 1 ГБ оперативной памяти, теперь за $35 можно приобрести Raspberry Pi 4 с 2 ГБ ОЗУ.
См. также:
- «Raspberry Pi Foundation захостила свой сайт на Raspberry Pi 4. Теперь этот хостинг доступен всем»
- «Протокол UASP ускоряет передачу файлов на Raspberry Pi 4 в полтора раза»
- «Любитель подключил PCIe к Raspberry Pi без контроллера USB»

The Raspberry Pi is usually associated with Linux operating systems like Raspberry Pi OS (formerly known as Raspbian), Ubuntu, etc. But what about running Windows 10 on your Raspberry Pi? Well, it would be great for sure. However, Windows 10 is still not officially supported for Raspberry Pi. Microsoft’s only OS for Pi is the old Windows 10 IoT Core that just lets you execute Visual Studio codes but cannot work as a standalone OS with its GUI.
Though it is so, it didn’t stop some passionate developers to find a way to run a full desktop version of Windows 10 on Raspberry Pi. They have made it possible with the WoR project. With that, they developed a tool to flash an ARM image of Windows 10 on an SD Card (or an SDD), that can boot on a Raspberry Pi.
In this guide, I’ll walk you through the exact steps to install Raspberry Pi Windows 10.
Contents
- Requirements
- Steps to Install Windows 10 on Raspberry Pi 4/3/2
- Step 1: Download the Required Files
- Step 2: Update Raspberry Pi Firmware
- Step 3: Build Windows 10 ISO File on your PC
- Step 4: Flash the ISO File with WoR Tool
- The First Boot
- Overclock the Raspberry Pi
- How Does Raspberry Pi Windows 10 Perform?
- Now it’s your turn..
Requirements
- Raspberry Pi 4/3/2
- MicroSD Card (Faster is better, so a class A2 card is recommended)
- Ethernet Cable or Wi-Fi dongle
- Keyboard, Mouse, and Monitor
Step 1: Download the Required Files
In order to get started with the installation, you have 2 things to download.
1. The WoR Tool [https://www.worproject.ml/downloads]
When you download this you will get a zip file with everything inside it. Keep it for now. We’ll use it later.
2. UUP file for Windows 10 ARM
For downloading a UUP file you can use any one of the following websites. Each of them works a bit differently. On these websites, you only have to choose a Windows version, build number, language, and edition like Pro, Home, Ultimate, etc.
- https://uupdump.net/ (for Linux or Mac PC)
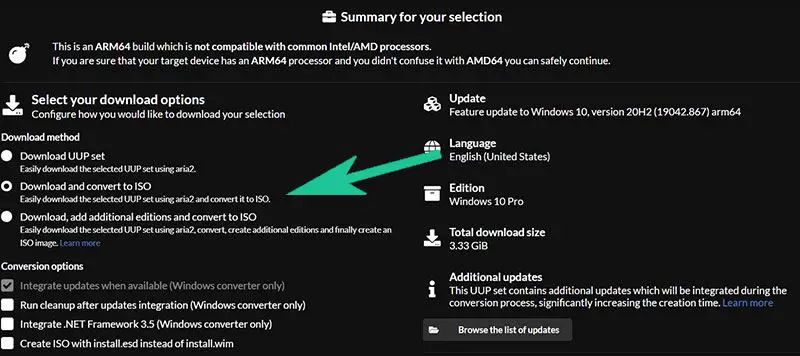
Download the file from this website only if your computer is not running on Windows OS. While on the website, I recommend selecting only one edition to keep the file size smaller and make the installation faster. Only check the required edition and leave others unchecked. Now choose the Download and convert to ISO option.
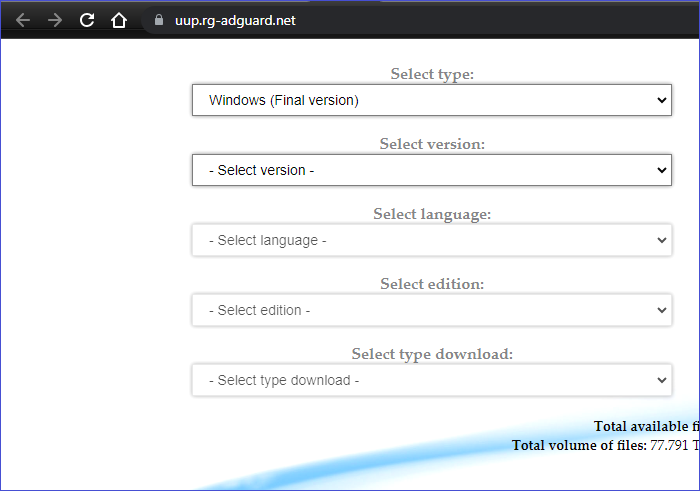
- https://uup.rg-adguard.net/ (for Windows PC only)
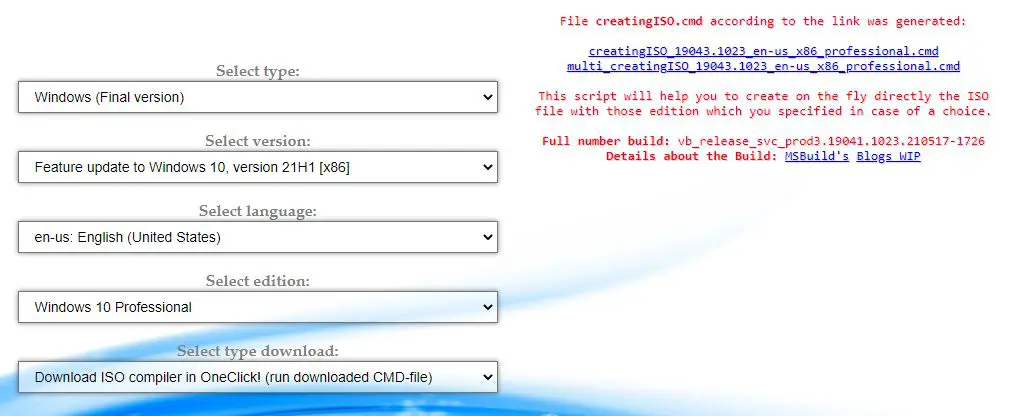
This site has got a much more intuitive interface where you can easily download the file. Use the drop-down arrows to choose the required version number, edition, build number, etc. Then click on the Download ISO compiler in One click! option in the download type. Download the cmd file by clicking on the link appearing on the right side. This will look something like this:
Step 2: Update Raspberry Pi Firmware
As usual, before doing something big, we have to update the firmware of our Raspberry Pi. To do the same, open a terminal and type the following command.
sudo apt update
sudo apt full-upgrade
Once done with that, stop your device and you don’t need the Raspberry Pi OS (Raspbian) anymore.
Step 3: Build Windows 10 ISO File on your PC
The next step is to build the Windows 10 ISO image file using the cmd file that we’ve download in step 1. If you downloaded the file from the second website you will get the direct cmd file whereas if you have downloaded it from the first website (uupdump.net) then you need to extract the zip file to see a file named “uudp_download_windows.cmd“.
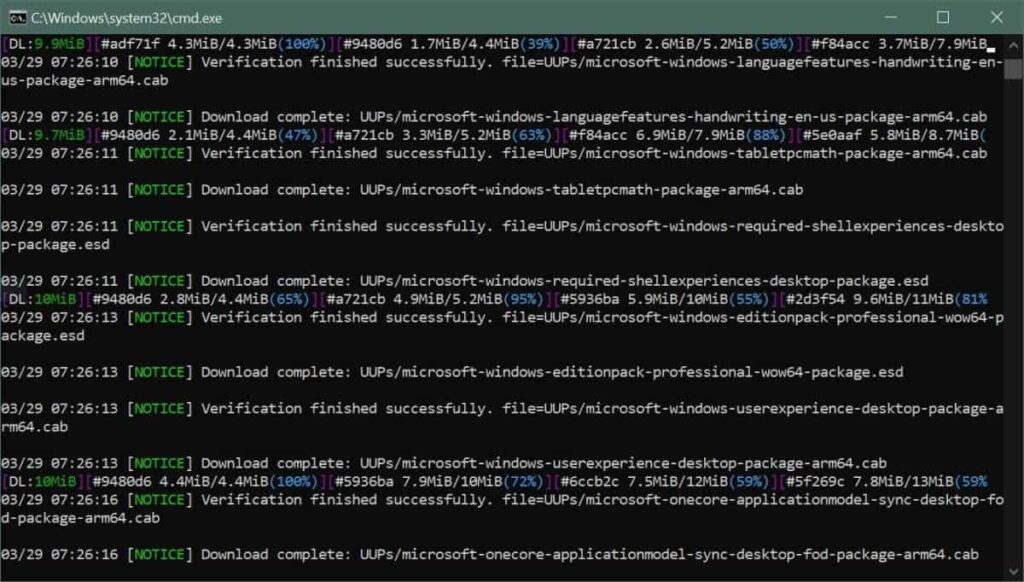
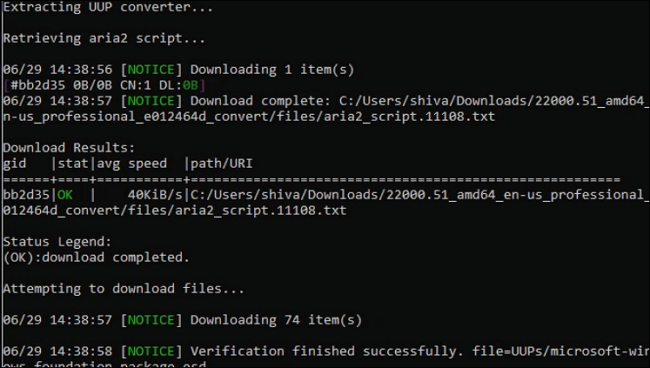
- Double click on the cmd file and you will see a terminal window. Press 0 when asked. It will immediately start to download some files for the process. This will be of a few gigabytes and take a lot of time if your internet connection is slow.

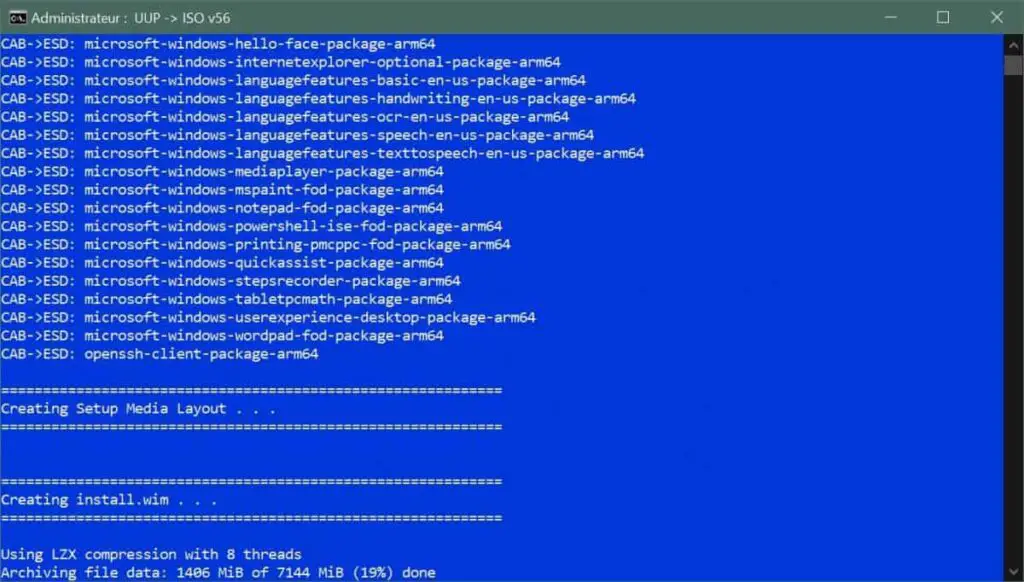
- Once the downloads are complete it will automatically start to build the ISO image file.
- This also will take some time. If you encounter any stuck somewhere in the process just press the Enter.


Step 4: Flash the ISO File with WoR Tool
Now it’s time to flash the ISO file that we build just now. Here comes the use of the WoR tool. It is a simple and easy-to-use flashing tool. To flash the ISO, follow the below steps.
- Firstly, extract the WoR_Release_….zip archive to a new folder on your computer.
- Find the wor.exe file and double-click on it.
- Select your preferred language from the drop-down list.
- Choose the target drive (your SD Card or SSD drive) and the model of your Raspberry Pi board.
- Once all those selected, now navigate and choose the ISO file that we’ve built.
- The next step is to select the driver package from the server. Simply select the latest package.
- Then select the UEFI firmware to flash. Here also select the latest version available.
- Check the configuration and click Next.
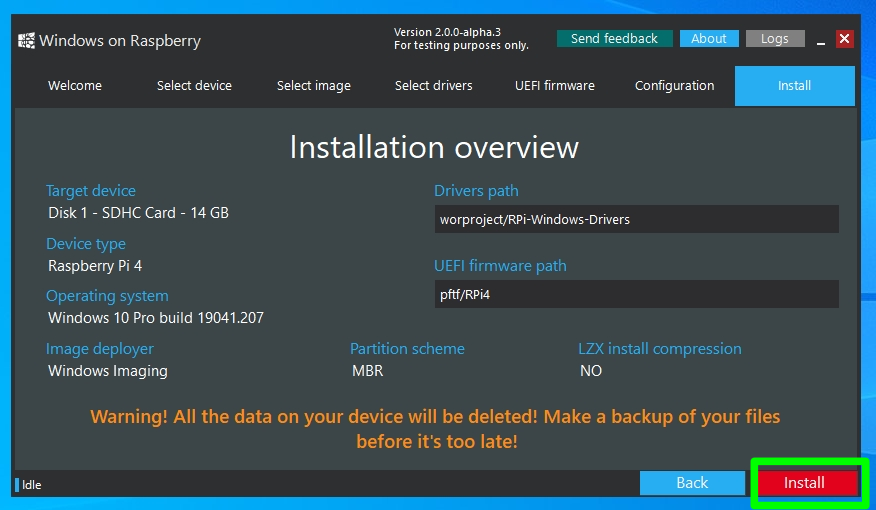
- So you have selected all the things to get started with the install. Just double-check everything and click Install.
The installation may take as long as 1.5 to 2 hours, depending on the write speed of your SD Card. This is why I recommend getting an A1 or A2 class SD Card or else an SSD drive to get the job done much faster. On an SSD drive, it may take only about 15 minutes or so.
The First Boot
And now once the Raspberry Pi Windows 10 installation is completed and your device is ready, you can directly plug it (if you have an SSD) into the Pi or insert it if you have an SD card. Then boot it up.
Since it is the first boot, it will take some time to completely initialize and configure things according to your device and boot up. However, from the second boot onwards everything will be fine and will work as normal. If you are a beginner and don’t know how to set up a remote desktop on your Raspberry Pi, just relax – I’ve got that covered for you. Head over to this link: How to Setup Raspberry Pi Remote Desktop on Windows/ Linux/ Mac (5 Methods)
As usual with a typical Windows installation, you will need to configure some things manually: for example Cortana and the privacy policies that Windows normally tries to disable for you.
Once done with that, you will enter into a full-fledged Windows 10 on your cute little Raspberry Pi.
Overclock the Raspberry Pi
Now that you have successfully completed the Raspberry Pi Windows 10 installation, and thinking to boost the performance?
Well. That’s indeed a right thought. Overclocking a Raspberry Pi will help you get the most out of your SBC and take your projects to the next level. For this purpose, I have written a comprehensive article on how to overclock Raspberry Pi board. You can click on the link and refer to the article.
How Does Raspberry Pi Windows 10 Perform?
In my testing, the overall performance is pretty much decent and it’s smoothly usable. However, it has the following limitations.
- Resource limits will be reached quickly with some usage.
- CPU usage is almost 100% while streaming YouTube in Google Chrome.
- Bluetooth support is also limited as the RTS/CTS lines are not exposed.
- Problems with HDMI audio out.
Though it is having some limitations, you will get a nice Windows 10 experience on your tiny computer. You can get partially get rid of the resource exhausting problem by providing an A2 class 32/64 GB SD card or a super-fast SSD drive.
Now it’s your turn..
It’s now your turn to try the Raspberry Pi Windows 10 installation and share your experience. I’ve tried to make this tutorial as simple as possible and still if you have any queries just drop them in the comment section below.
Found an issue with this article? Report it here, so that I can resolve it.
The Raspberry Pi is commonly associated with Linux operating systems such as Raspberry PI OS. But what about running Windows 10 on your Raspberry Pi? Officially, Microsoft’s only operating system for the Pi is an old version of Windows 10 IoT Core, which just lets you execute Visual Studio code on the computer but doesn’t work as a standalone OS with a GUI (in other words, no “windows”). However, the lack of support from Microsoft hasn’t stopped some ambitious developers from finding a way to run a full desktop version of Windows 10 on Raspberry Pi.
In 2019, we tried installing a hacked version of Windows 10 on a Raspberry Pi 3 and it ran, but it was extremely painful to use. Recent developments have now made it possible to run Windows 10 somewhat-competently on a Raspberry Pi 4, at least as a proof-of-concept We’ll show you how to install Windows 10 on your Raspberry Pi below.
However, before you begin, please note that this is not an official Microsoft product and the source of the images and software used is from a passionate and vibrant community working together to create this project. Amir Dahan is the creator of Windows 10 Lite, Marcin is responsible for UEFI and Pete Batard responsible for the 3GB RAM fix. The Windows 10 image file and RAM fix you’ll need to make this work are constantly changing as are their download locations so you’ll need to find them via the Windows on Raspberry Pi Discord Group, which is where all the developers hang out and share updates. We can’t vouch for the safety or legitimacy of any of the custom files the community has created for this project so proceed at your own risk.
At the time of writing this project runs surprisingly well (see below for more details) but has a lot of caveats. . The Raspberry Pi’s onboard Ethernet, Bluetooth and GPIO do not work so you’ll need a USB Ethernet or USB Wi-Fi dongle to get online (there’s no list of supported dongles so we can’t guarantee yours will work). Audio via HDMI is also not available but Bluetooth audio via a USB Bluetooth dongle is possible.
What you will need to install Windows 10 on a Raspberry Pi 4
- Raspberry Pi 4 4GB or 8GB
- 16GB or larger microSD card, (see best microSD cards for Raspberry Pi)
- Windows 10 PC
- USB to Ethernet or WiFi dongle
- Bluetooth dongle (if you want Bluetooth)
- Keyboard, mouse, HDMI and power for your Raspberry Pi
How to Install Windows 10 on the Raspberry Pi 4
1. Download the latest pre-release version of WoR tool https://www.worproject.ml/downloads and extract the files.
2. Visit the Windows on Raspberry Pi Discord server and go to the Downloads channel to Download the latest stable image, currently 0.2.1.
3. Open the WoR Alpha tool and select your language.
Get Tom’s Hardware’s best news and in-depth reviews, straight to your inbox.

4. Insert microSD card and select the drive. The Raspberry Pi 4 mode is currently experimental, but has worked reliably in our tests.
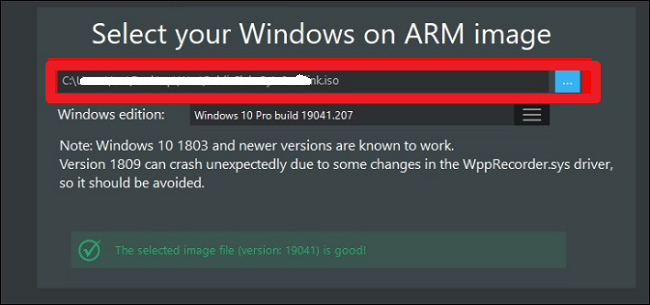
5. Select your Windows on ARM image.
6. Select the latest package of drivers from the server.
7. Use the latest UEFI firmware available.

8. Check the configuration and when happy click Next.
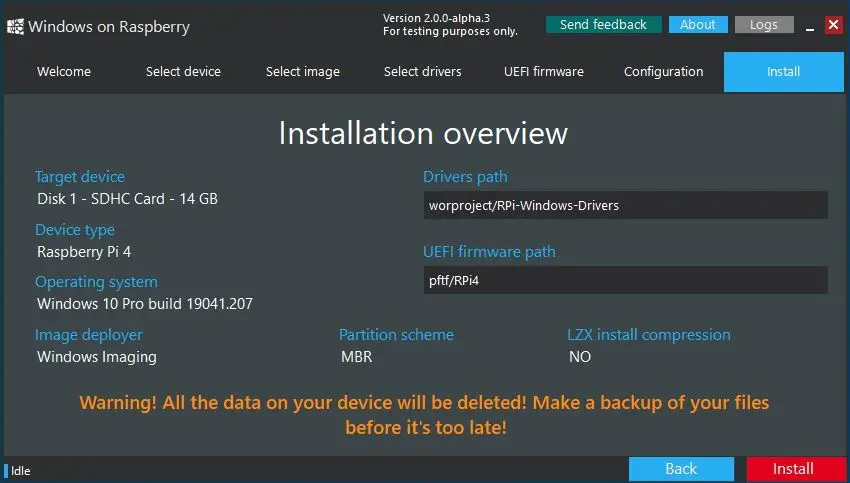
9. Double check everything before clicking Install.
The installation process can take as long as two hours to complete, depending on the speed of the microSD card.
10. Download the RAM fix for Rpi 4 file from the Windows On Raspberry Pi Discord server. Extract the contents.
11. Copy winpatch.exe to the root of C: drive.
12. Locate the drive containing the Windows 10 on ARM installation, make a note of the drive letter.
13. Open a Command Prompt as Administrator and go to the root of C: drive.
cd \
14. Patch the USB driver to enable USB ports on the Raspberry Pi 4. Change the drive letter to match your installation.
winpatch X:\Windows\System32\drivers\USBXHCI.SYS 910063E8370000EA 910063E8360000EA 3700010AD5033F9F 3600010AD5033F9F
15. Overclock the Raspberry Pi. This step is optional but highly recommended (though you’ll want a cooling fan). Edit the config.txt file found in BOOT drive. Add these two lines at the end of the file. Overclocking will require cooling for your Raspberry Pi.
over_voltage=6
arm_freq=2000
16. Eject the microSD card and insert it into the Raspberry Pi 4. Connect your keyboard, mouse etc and power on the Pi.
17. Follow the standard Windows 10 install process and after a short while you are ready to use Windows 10 on your Raspberry Pi 4.
18. As an administrator open a Command Prompt and run this command to enable 3GB of RAM. Press Enter to run the command.
bcdedit /deletevalue {default} truncatememory
19. Reboot the Raspberry Pi for the update to take effect.
20. For network access, use a USB to Ethernet or a compatible WiFi dongle.
21. Install Microsoft Edge by double clicking on the Microsoft Edge desktop icon.
22. Installing software works in the same manner as a typical Windows 10 install. We tested GIMP Photo Editor and the Arduino IDE and both installed, albeit slowly and were usable for basic tasks.
How does Windows 10 on Raspberry Pi Perform?
In our testing, overall performance is akin to a low end Intel Celeron / Atom CPU. Windows 10 on Raspberry Pi is usable, but more as a proof-of-concept than a daily driver. . Boot times were considerably longer than Raspberry Pi OS, at a sluggish 2 minutes 12 seconds.
Once the desktop was loaded the overall feel of Windows 10 on Raspberry Pi was responsive. The Edge web browser provided a good browsing experience. Heavy sites such as YouTube proved troublesome but that was compounded by our sluggish 100 Mbps Ethernet USB dongle and is not indicative of the OS as a whole.
We installed three applications in WIndows 10 on Raspberry Pi: GIMP Photo Editor, Arduino IDE and Python 3.8. We downloaded each program’s 32-bit installer and set it up without any issues. GIMP ran well and, while it would not be up to speed for a professional photo editor, it was quick enough for hobbyists to use.
The Arduino IDE was slow, mainly due to the way that the IDE uses Java behind the scenes. Again if you have a little patience, then the experience is good. Not every application can be installed, though. We tried Visual Studio Code and it flat out refused to install. But Python 3.8 was easily installed and ran well. The Python REPL (interactive shell) was available and the core modules were available for use. We installed an additional module, GPIO Zero, which is used to interact with the GPIO of the Raspberry Pi. Sadly, despite our best efforts, we were unable to use the GPI via Python 3.8 on Windows 10.
MORE: Windows 10 on Raspberry Pi: Hands-On
Updated on Apr 28, 2025
If you’re a Raspberry Pi 4 user, you may wonder whether installing and running Windows 10 on it is possible. Recently, we’ve seen Windows 10 getting supported on ARM platforms like Samsung Exynos and Qualcomm Snapdragon. Does this also apply to Raspberry Pi 4? In this article, you’ll learn whether installing Windows 10 on Raspberry Pi 4 is possible.
You’ll learn the hardware and software requirements you must meet before installing Windows 10 on your Raspberry Pi 4 computer. Also, EaseUS will lead you to learn how to use a third-party tool to burn/flash a Windows 10 ISO file on an SD card before booting it on your Raspberry Pi 4.
| ⏱️Duration | Several hours |
| ✍️Difficulty | Hard but you can find a simple step-by-step guide |
| ⛏️Required Software |
✔️Format tool — EaseUS Partition Master ✔️Raspberry Pi ISO burner — WoR |
| 👣Steps |
|
| 🧑💻Suitable for | Install Windows 10 on Raspberry Pi 4 |
Initially, Microsoft only allowed users to run the old version of Windows 10 IoT Core on their Raspberry Pi devices. This would only allow users to execute Visual Studio on their Pi devices but not access a standalone OS backed up by GUI. This, therefore, meant that no Windows OS was officially supported.
With recent developments, however, it’s now possible to fully run Windows 10 on Raspberry Pi 4. The next part will discuss how to run a full desktop version of this OS on your Raspberry Pi 4 device.
For other solutions to install Windows without product key, please check the following article:
What Do You Need to Install Windows 10 on Raspberry Pi 4?
Like installing the default OS on your computer, you also need to fulfill some requirements before installing Windows 10 on Raspberry Pi 4. This allows you to run the operating system error-free and without any downtime scenarios. Below is a table showing the hardware and software requirements needed.
| Hardware Requirements |
|
| Software Requirements |
|
How to Prepare the Raspberry Pi 4 SD Card to Install Windows 10
In addition to the above requirements, you need to make another need before installing Windows 10 on Raspberry Pi: you’ll need to format your SD card into a Raspberry Pi 4-supported file format (FAT32). This requirement needs you to finish it on Windows.
If you’re unsure how to format your Raspberry Pi 4 SD card, we recommend using EaseUS Partition Master. This software lets you quickly format your SD card from any other file format to FAT32. Even if you are new to computer, you can master the format skills.
Step 1. Find your SD card and right-click the partition you want to format and choose «Format».
Step 2. Set a new partition label, file system (NTFS/FAT32/EXT2/EXT3/EXT4/exFAT), and cluster size to the selected partition, then click «OK».
Step 3. Click «Yes» on the pop-up window to continue.
Step 4. Click the «Execute 1 Task(s)» button on the toolbar, then click «Apply» to start formatting your SD card.
Further Reading:
How to Install Windows 10 on Raspberry Pi 4
Now that you have all the necessary hardware and software, you can install Windows 10 on Raspberry Pi 4. This process entails several stages/steps and may also consume some time. You should be patient as you navigate from one stage to the next. Follow the steps to install the OS on your Raspberry Pi.
- Notice:
- The tutorials in this article have been testified from the official Raspberry Pi tips. And summarized in addition to the most suitable guidance programs. You can fully trust this guide.
Stage 1. Update Your Raspberry Pi Firmware
Using the latest firmware for your Raspberry Pi 4 computer enables it to work correctly. Here are the steps to update your firmware:
Step 1. Launch Raspberry Pi and click on the Terminal icon to open Command-Line. Alternatively, you can press Ctrl + Alt + F1 to access the command line.
Step 2. Next, paste the following commands on Command Line:
sudo apt update
sudo apt full-upgrade
The above commands will update your Raspberry Pi 4 firmware to the latest version. You can switch off your device and proceed to the next stage.
Stage 2. Download the Necessary Tools
The most important tools you need to have before installing Windows 10 on Raspberry Pi include a UUP file and the WoR tool. Here, the WoR tool allows you to flash/burn the ISO file to your SD card, while the UUP file allows you to build the Windows 10 Raspberry ISO file on your computer.
Step 1. Download and install WoR on your computer.
Step 2. Visit this website to download the UUP file. Ensure you choose the correct «Type,» «Version,» «Language,» «Edition, and «Type Download» from the dropdown on the download page. Next, click the «Download ISO compiler in One Click!» option. Click on the first link to download the cmd file.
Having downloaded the necessary tools, you can move to the next stage.
Stage 3. Create Windows 10 Raspberry Pi ISO File
If you want to install Windows 10 on your Raspberry Pi, you’ll need to create an ISO file specifically for the Raspberry Pi rather than a general Windows 10 file.
Step 1. Double-click the cmd file on your computer and click Yes in the User Account Control window.
Step 2. The terminal window will download many essential files, so make sure your computer is connected to a stable internet connection.
Step 3. The tool will automatically create the Windows 10 Raspberry Pi ISO file.
Stage 4. Flash the ISO File to the SD Card
Once you have downloaded the Windows 10 ISO file, you need to proceed to burn the ISO file to the SD card. For general Windows ISO files, you can choose EaseUS Partition Master. While Windows 10 ISO image for Raspberry Pi needs to use WoR.
- For Windows 10 ISO burning: Burn ISO to USB on Windows 10
- For Windows 10 Raspberry Pi ISO burning, follow the steps:
Step 1. Connect the SD card to your computer.
Step 2. Run the WoR.exe file.
Step 3. Click «Next.» Select the SD card and choose Raspberry Pi 4 from Device Type.
Step 4. Select the ISO file you just created and choose the Windows version.
Step 5. On the next page, select Use Latest Package.
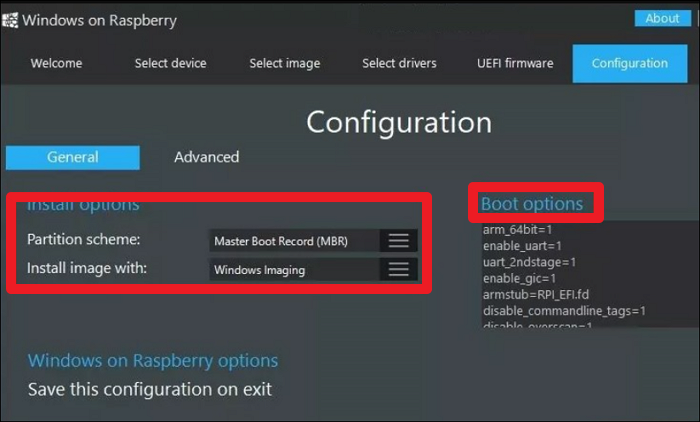
Step 6. Set the partitioning scheme, boot options, install options and other configurations, and click Next. And start installing the Windows ISO file to the SD card.
Once you’ve burned the ISO file to your SD card, you can eject it from your computer and proceed to Stage 5 below.
Note: If you need to burn Windows 10/11 ISO files to USB, EaseUS Partition Master is your wise choice. It is one of the best free ISO burners on Windows. You can use it to create bootable media and then boot different laptops from USB.
Here are some topics related to using the burning feature of EaseUS Partition Master:
Stage 5. Install Windows 10 on Raspberry Pi 4
Now that your SD card is bootable, you can switch to your Raspberry Pi 4 device to install Windows 10 ISO files. This process is not as complex as most people think, and you can follow the steps below to complete it.
Step 1. Connect the flashed SD card to your Raspberry Pi 4 computer. Next, connect other peripherals like the power cable, keyboard, mouse, and HDMI cable.
Step 2. Restart your Raspberry Pi 4 computer and ensure you set your SD card as the boot drive.
Step 3. Once the system detects your bootable SD card, follow the onscreen instructions to finish the Windows installation process.
Step 4. Once the system has finished installing, open Command Prompt and paste the command below to enable 3GB of RAM.
bcdedit /deletevalue {default} truncatememory
Step 5. Restart your device to implement the changes above.
Step 6. Lastly, connect your Raspberry Pi 4 computer to a network and install the programs you want to run on it. You should first install the Microsoft Edge browser.
Additionally, if your Raspberry Pi is experiencing any boot-related issues, you can bypass the SD card and boot the Raspberry Pi from USB. Click on the connection below for detailed information.
That’s it! You’ve now installed Windows 10 on your Raspberry Pi 4, and you can start enjoying all the features it comes with. If you enjoy the full guide, you can also share it with more people and help them to install Windows 10 on Raspberry Pi 4!
For users who require professional help, our specialized support team is trained to provide assistance in various formats.
EaseUS experts are available to provide you with 1-on-1 manual services (24*7) and help fix different Windows configuration issues. Our experts will offer you FREE evaluation services and efficiently diagnose and resolve Windows update errors, Windows installation, or daily OS issues using their decades of experience.
- 1. Fix Windows update errors, such as update failure, unable to upgrade Windows, etc.
- 2. Serve to download and install the latest Windows operating system on PC with success.
- 3. Provide fixes for daily Windows system errors with drivers, permission, account settings, etc., issues.
Conclusion
This article has helped clarify whether installing Windows 10 on Raspberry Pi 4 is possible. We’ve determined that it’s possible to do that from our discussion. First, you need to prepare all the hardware and software, including using EaseUS Partition Master to format the Raspberry Pi SD Card. Then, you’ll need the Windows 10 ISO file and a flashing tool to burn the setup on an SD card.
FAQs About Install Windows 10 on Raspberry Pi 4
Follow through the questions below about how to install Windows 10 on Raspberry Pi 4.
1. Can Raspberry Pi Run Windows Apps?
Once you’ve successfully installed a Windows operating system on your Raspberry Pi, it’s possible to run supported Windows apps. You’ll only need to download and install the apps on your Raspberry Pi computer, and you’re good to go!
2. Can I Set Up Windows on Raspberry Pi 4?
Yes, it’s possible to run Windows 10 on Raspberry Pi 4. You’ll first need to download a Windows 10 ISO file, burn it to an SD card, then connect the bootable SD card to Raspberry Pi 4 computer to install your operating system.
3. Is It Good to Install Windows on Raspberry 4?
Installing Windows on your Raspberry Pi 4 gadget allows you to access the Windows features that you need for your project. You can run Windows programs on your Raspberry Pi computer, provided you’ve installed the operating system. Therefore, it’s good to install Windows on Raspberry Pi 4.
- Home
- Blog
-
Step-by-Step Procedure to Install Windows 10 on A Raspberry Pi 4
/
/

There are a number of reasons why you might need to run Windows 10 on Raspberry Pi. One reason is for educational purposes, as running Windows 10 on the device can provide a great platform to teach coding skills and even create projects with the Windows IoT Core technology. Additionally, running Windows 10 on Raspberry Pi can be useful for small businesses or hobbyists who need a small and affordable device for running Windows applications or controlling hardware connected to the Pi. Finally, running Windows 10 on Raspberry Pi can be great for home automation projects, as it provides a platform for connecting to internet-enabled devices like smart light bulbs and thermostats. All in all, running Windows 10 on Raspberry Pi is a great way to get started with a powerful and affordable device. Let’s see the step-by-step procedure to install Windows 10 on a Raspberry Pi.
A Short Introduction To WoR Project
Windows on Raspberry Pi is a project that provides an easy-to-use way to get Microsoft Windows 10 running on the popular single board computer, Raspberry Pi. This project has been around for several years and has gone through various iterations, but it continues to be actively developed by a dedicated team of developers who are passionate about providing users with the latest and greatest Windows experience on the Raspberry Pi.
The main goal of this project is to give users a full-featured version of Windows 10 that runs well on the Raspberry Pi. This includes providing drivers for peripherals such as cameras, keyboards, and mice, as well as support for industry-standard networking protocols such as Wi-Fi and Bluetooth. By running Windows on the Raspberry Pi, users are also able to take advantage of a wide range of software that has been written specifically for the Windows operating system.
The project provides an easy-to-use installer that walks users through setting up and installing Windows 10 on their Raspberry Pi in just a few simple steps. The installation process is designed to be as streamlined and automated as possible, taking the guesswork out of setting up a Windows environment on the Raspberry Pi.
Prerequisites to Install Windows 10 on A Raspberry Pi
Let’s see what hardware and software are required to install Windows 10 on a Raspberry Pi:
Hardware:
-
Raspberry Pi Board: Well, you can use any Raspberry Pi module 4, or 400. Preferably, Raspberry Pi 3 and 4 with 4 GB RAM.
-
Micro SD Card with Card Reader: This is to write Windows 10 images.
-
USB Drive: This is to install windows operating systems. It is optional. This is required only if you boot your Pi from USB storage.
-
IO Peripheral: Keyboard, Mouse, HDMI Cable, Ethernet Cable, and USB Cable, depending on your requirements.
-
PC or Mac with an Internet connection: This is required to download the Windows 10 ISO file with Imager and write the Windows 10 to the SD Card or USB Storage Drive.
Software:
-
Windows on Raspberry imager: A free utility released by WoR Project for flashing content to SD cards and USB drives on your Raspberry Pi.
-
Internet: An Internet connection is a must to have to download the imager and create windows 10 ISO image.
How to Install Windows 10 on A Raspberry Pi 4?
Once you get all the things listed in the previous section ( Required Hardware & Software) you are good to start the installation procedure. Let’s see how to install Windows 10 on a Raspberry Pi in just a few simple steps.
Installing Windows operating systems on Raspberry Pi is not straight forward as installing other Linux operating systems. You will not get a bootable Windows image to flash on the SD card or USB drive. You should prepare a Windows ISO image on your own using the UUP Dump script and flash the created Windows image to an SD card or USB drive using the ‘Windows on Raspberry imager‘ tool from the WoR project. Don’t worry. We will show you everything that you need to install Windows 10 on a Raspberry Pi in this post.
Step 1. Download the UUP Dump Script to Create Windows 10 Image
We encourage you to take a look at the Getting Windows Images guide before you proceed. This guide will help you to choose the right version of the operating system. We are not going with the ESD image as it supports the WoR-PE package.
Since there is no official Windows ISO image is available for download. You should download the UUP dump scripts.
1. Go to https://uupdump.net
2. You will be greeted with four versions of Windows. Dev Channel, Windows 11, Windows Server, and Windows 10. As soon as you click on Windows 10, a dropdown will appear. Select the latest available build. We have 22H2 as the latest build available at the time of publishing this post.3. Select the Release Type you want to download. We have chosen ‘Feature update to Windows 10‘ that comes with the updated build for regular usage.4. Each Windows image is made available in multiple Architectures. 1. x64, 2. x86, 3. Arm64, and 4. Amd64. Click on the Arm64 as your Raspberry Pi’s processor is made of Arm architecture.5. In the next Window, choose Language, then Click Next.6. In the next step, choose Windows Edition. You can choose Home or Pro or both.7. In the Next Window. Choose the Download and Convert to ISO option. And, under the conversion options, select Include updates as shown in the below diagram.8. At last, click on the Create Download Package button. The package will start downloading as soon you click on it.
Step 2. Create a Windows ISO image running the UUP Dump script
The script will be downloaded as a zip archive file. You should extract the content of the zip file to a different directory. Imp Note: The directory name shouldn’t have any space char.
We have unzipped the file into F:\WindowsForRPI directory. You are free to choose your own path.
In the extracted files, you will see scripts created to run on Windows, mac and Linux since we are using Windows PC in this demo. We ran Windows script: uup_download_windows.cmd.
As soon as you run the file as ‘Run As Administrator,’ the script will start downloading the required files and creating the Windows ISO image to write on the SD card or USB drive.
Note: this is a very time-consuming process. It may take up to 1 hr, depending on your internet and computer processing speed. You should wait until the process gets completed.
Once you are done with the process, you will see the “Press 0 to Exit” message. This indicates that the process is successfully completed. There is an ISO image file in the directory of the script. Imp Note: we would suggest disabling the Antivirus program before you run the UUP Dump script. We ended up in failure in our initial attempts. We got success only upon disabling the Antivirus protection.
For more details, you can join the WoR Discord channel.
Step 3. Download and Run the Windows on Raspberry imager tool
Windows on Raspberry imager is a free tool that you need to download. We downloaded v2.3.1, which is the latest available, while we published this post.
Move the zip file to a different location and unzip it. You will see the ‘WoR.exe’ file upon unzipping. Run the ‘WoR.exe’ file to run the Windows on the Raspberry imager tool.Note: There is a separate imager is made available for download for PE-based installation. We are not covering PE-based installation in this post. If you want to know more about the PE-based installer, please visit this link.
Step 4. Select the Storage device & Device type
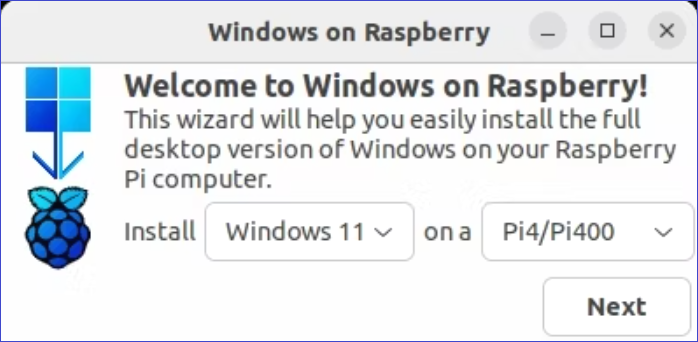
Immediately upon hitting the Next button, you will be asked to select the Storage drive, which is your SD card or USB drive, and the Device type, which is your Raspberry Pi device module. Select both the storage and devise type, then click Next.
Note: If you are using a USB drive, then you should use the GPT partition scheme with the latest boot loader.
Step 5. Select the Windows ISO image
Browse the Windows ISO file created in Step 2. click Next.
Step 6. Select the Driver
Select the first option, which is “Use the latest package option available on the server.” Click Next.
Step 7. Select the UDFI Firmware
Select the first option, which is “Use the latest firmware available on the server.” Click Next.
Step 8. Configure Install and Boot options
There are a few Install and Boot options available to configure as per your needs. We are not going to tweak anything for now. It is not required either. Click Next with the same default configurations.
Step 9. Take a look at the Installation Overview
On this screen, you will see the overview of the installation. If you feel you want to change the settings, just go back and tweak the change you want to go with. If not, everything looks perfect. Click Install.
Step 10. Complete the Installation process
The process will start with formatting the drive and creating partitions before installing the Windows operating system. Depending on your system resources and storage device R/W speed, this process may take several minutes. Let the process complete. Click Finish to complete the installation process.
Step 11. Boot the Raspberry Pi inserting the flashed SD card or USB drive
Connect all the peripheral devices like Mouse, Keyboard, power adopter, and monitor to your Raspberry Pi. Insert the Windows image flashed micro SD card or plugin the USB drive fire up the Raspberry Pi.
Step 12. Set up the Windows on Raspberry Pi
Since you are booting Windows on the Raspberry Pi for the first time, it asks to set up your Windows as in the case of your Windows PC. Set up the Language, Keyboard layout, time zone, account, password, security questions, network, and everything that it asks to set up.
Upon finishing the Windows set up process. Your windows 10 desktop is ready to use.
That’s all. This is how you should install Windows 10 on a Raspberry Pi.
Running Windows 10 on Raspberry Pi 4
Once the installation is complete, users can start exploring the Windows 10 operating system and all its features from their Raspberry Pi. With the help of this project, users are able to experience the full power of Windows 10 on the popular single board computer, Raspberry Pi. Windows on Raspberry Pi provides an easy and affordable way to get the most out of your Raspberry Pi with the power of Windows 10. So why wait? Get started today!
We hope this post would help you learn how to install Windows 10 on a Raspberry Pi. Thanks for reading this tutorial post. Visit our social media page on Facebook, LinkedIn, Twitter, Telegram, Tumblr,Medium & Instagram,and subscribe to receive updates like this.
You may also like these articles:
Arun KL
Arun KL is a cybersecurity professional with 15+ years of experience in IT infrastructure, cloud security, vulnerability management, Penetration Testing, security operations, and incident response. He is adept at designing and implementing robust security solutions to safeguard systems and data. Arun holds multiple industry certifications including CCNA, CCNA Security, RHCE, CEH, and AWS Security.