
Applies ToWindows 11 Windows 10
Support for Windows 10 will end in October 2025
After October 14, 2025, Microsoft will no longer provide free software updates from Windows Update, technical assistance, or security fixes for Windows 10. Your PC will still work, but we recommend moving to Windows 11.
Learn more
The Recovery Drive utility in Windows is a valuable tool designed to back up essential system files needed to restore a PC to its original state. This utility creates a USB recovery media that can help you restore your Windows device to its factory settings, even if you replace the hard drive or completely wipe the drive. The recovery media includes built-in Windows files, any updates installed at the time of media creation, and any customizations from the PC manufacturer, ensuring a reliable backup solution for bare metal recovery scenarios.
Creating a recovery media is a proactive measure to ensure that you can quickly and efficiently restore your system in case of major issues such as hardware failure. This media can be used for bare metal recovery on the device it was created for, ensuring a smooth and efficient restoration process.
It’s recommended to recreate the recovery media annually to include the latest Windows updates and improvements. Additionally, it’s important to note that the recovery media doesn’t include your personal files. Therefore, you should use a different backup method, such as Windows Backup or File History, to back up your personal data separately.
Create a recovery drive
Warning: Use an empty USB drive because this process will erase any data that’s already stored on the drive.
-
To open Recovery Drive you can use one of the following methods:
-
From Start, search for Recovery Drive and select it
-
Use the command recoverydrive.exe
-
-
When the tool opens, make sure Back up system files to the recovery drive is selected and then select Next
-
Connect a USB drive to your PC, select it, and then select Next
-
Select Create. Many files need to be copied to the recovery media, so this might take a while
Reinstall Windows with a recovery drive
Follow these steps to reinstall Windows using the recovery media:
-
Start your device from the USB drive that was created with Recovery Drive. The process to boot from a USB drive may vary by manufacturer, so refer to your device’s manual if needed
-
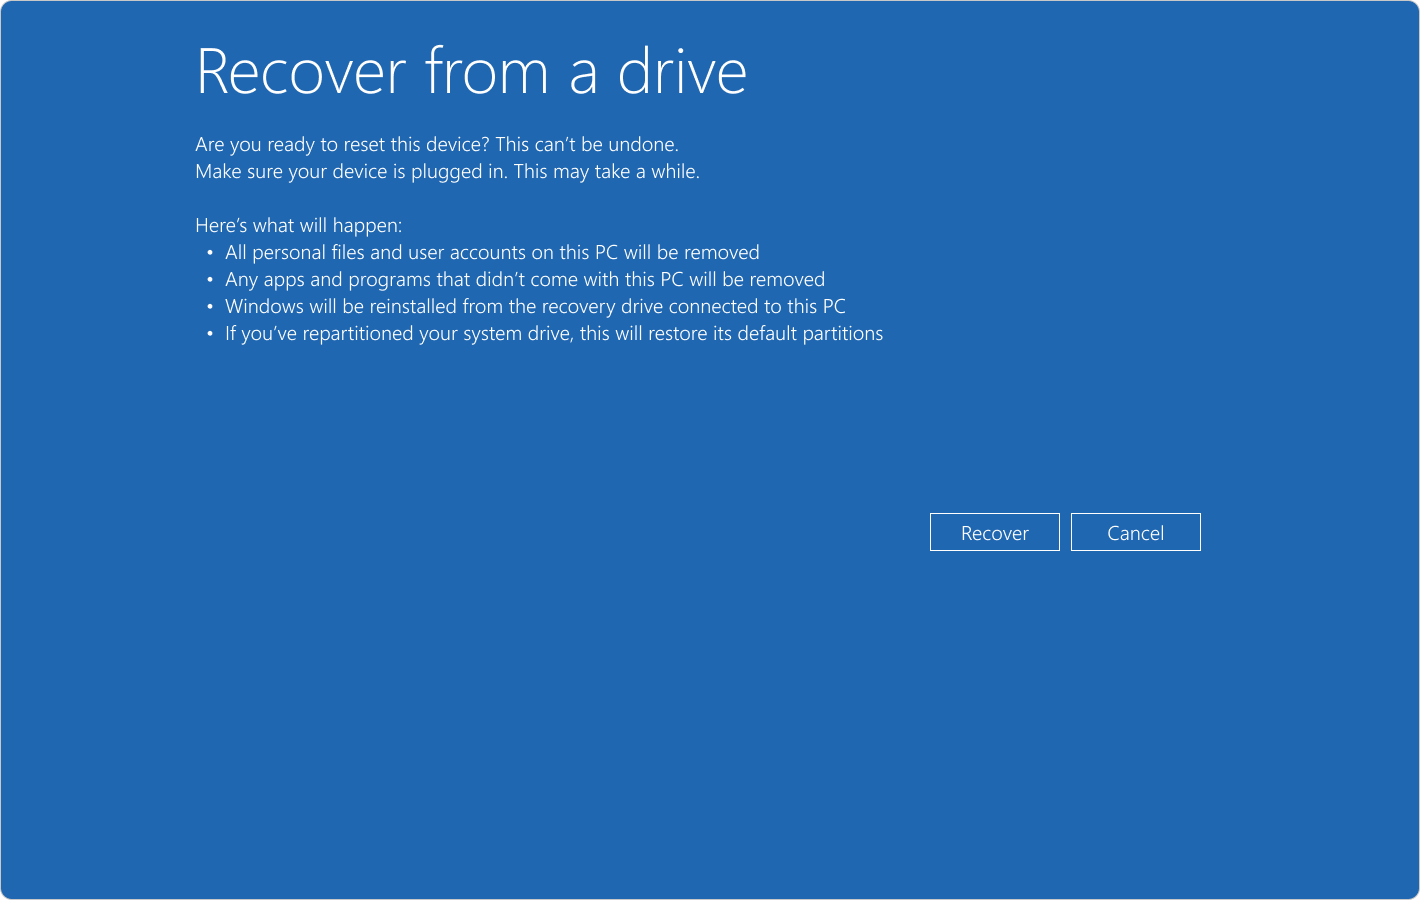
Once Windows Recovery Environment (Windows RE) loads, select Recover from a drive
-
Choose either Just remove my files of Fully clean the drive, depending on your preference
-
Select Recover to confirm and start the recovery process

Need more help?
Want more options?
Explore subscription benefits, browse training courses, learn how to secure your device, and more.
Updated on Apr 28, 2025
Discover how to repair Windows 10 from USB device to regain control over your computer’s performance. Follow our expert guidance to resolve errors, crashes, and software glitches effectively. This comprehensive passage offers detailed instructions, tips, and insights on repairing Windows 10 from a USB drive. Gain the knowledge and tools to tackle common system problems for a smoother Windows 10 experience.
View the Necessary Information to Repair Windows 10 from USB:
| ⏱️Duration | 5-10minutes |
| 🎈Preparations |
✔️Prepare a USB drive and format it as FAT32 ✔️Download ISO file and burn it to USB ✔️Windows Installation tool — EaseUS Partition Master |
| 👣Steps |
1️⃣Create the Windows 10 Bootable USB 2️⃣Boot from the Installation USB 3️⃣Choose the Suitable Tool to Repair Windows 10 From USB |
| 🧑💻Suitable Users | Easy steps, and it’s suitable for all users |
Yes, you can repair Windows 10 from USB. Windows provides many Windows boot repair tools such as Command Prompt, System Restore, and Startup Repair. If your computer is not booting, then you will not be able to use these tools. Therefore, you need to create Windows 10/11 installation USB media and repair Windows from USB.
The need for a Windows 10 repair boot USB arises when your system encounters crashes or fails to boot. By preparing a bootable drive in advance, you can troubleshoot and fix various issues impacting your operating system’s functionality. Keep reading, continue to understand the entire process, and take extraordinary measures in advance to avoid any annoyance in the future. If you like this guide, click the buttons and share it with others.
How to Repair Windows 10 From USB?
With the significance of a Windows 10 repair boot USB in mind, let’s explore the detailed process of repairing Windows 10 using a USB drive. This comprehensive guide will provide step-by-step instructions, ensuring a clear path towards repairing Windows 10 from USB. Repairing Windows 10 from USB consists of three processes:
1️⃣Create the Windows 10 Installation USB
2️⃣Boot Windows 10 PC from the Installation USB
3️⃣Choose the Suitable Tool to Repair Windows 10 From USB
This comprehensive guide will provide step-by-step instructions, ensuring a clear path towards repairing Windows 10 from USB.
Guide 1. Create the Windows 10 Bootable USB
Before we can repair Windows 10 from a USB drive, creating a bootable USB with the necessary Windows 10 installation files is essential. Follow these steps to make a Windows 10 bootable USB using EaseUS Partition Master, a reliable and versatile partition manager tool. This tool allows you easily burn Windows 10 ISO to USB.
1. Prepare a USB drive with at least 8 GB of space and format USB to FAT32:
- Right-click on the Windows icon in the taskbar and select «Disk Management.»
- Right-click on the target USB and click «Format.»
- Follow the on-screen instructions to format the USB.
2. Go to the Windows 10 software download page and download the Windows ISO file.
- Open the download link: https://www.microsoft.com/en-ca/software-download/windows10
- Under Create Windows 10 installation media, choose Download tool now.
3. Burn Windows 10 ISO to USB using EaseUS Partition Master
After you have downloaded the Windows ISO file, you need to burn it onto a USB drive with a professional tool. EaseUS Partition Master provides the «Burn ISO» feature specially designed for creating Windows installation disks. With simple pages, even newcomers can operate it easily.
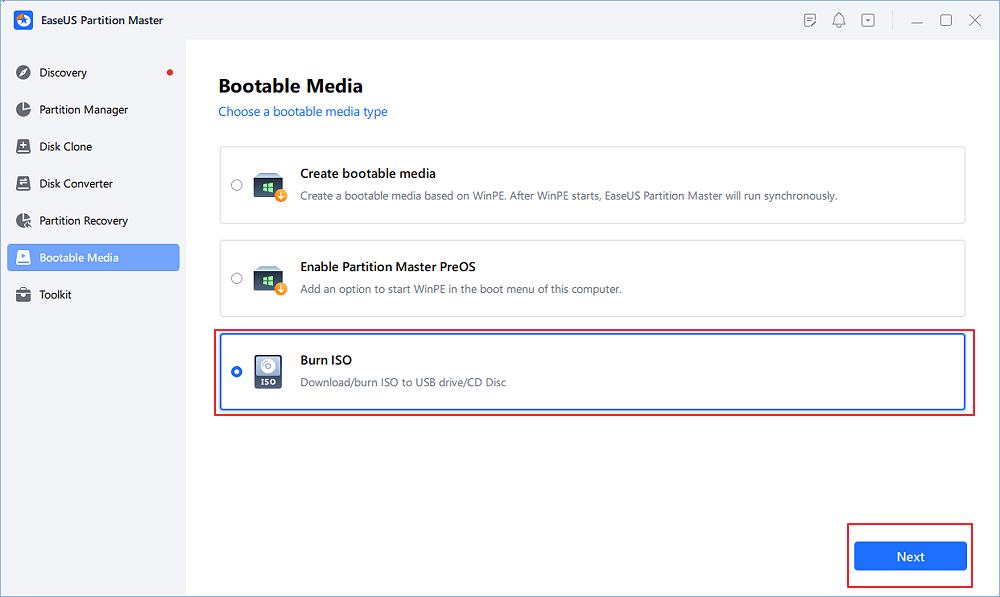
Step 1. Launch EaseUS Partition Master and go to the Bootable Media section. Click «Burn ISO» and click «Next».
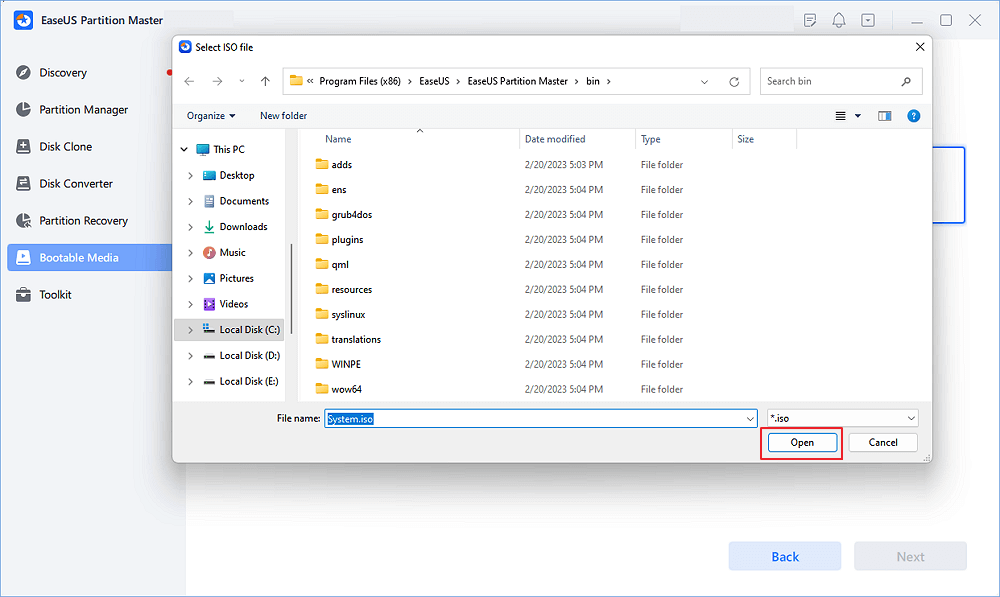
Step 2. Select the ISO image that you have downloaded on your PC, and click «Open».
Step 3. Click «Next» and select the target USB as destination and click «Burn» to execute the operation.
As one of the best free ISO burners, you can also apply EaseUS Partition Master to the following occasion:
Guide 2. Boot from the Installation USB
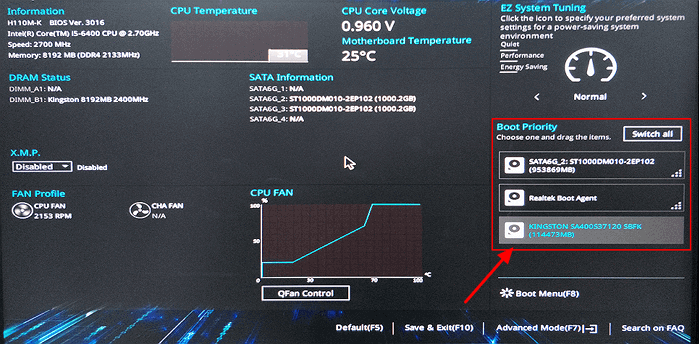
So, as you know, before starting to boot from the installation USB, we have to create the installation media by following the above guide 1, which will be read by your computer and used to boot up. After creating a bootable USB, you must change the BIOS boot drive. By performing this action, you will elevate the USB flash drive’s position in the boot order priority list, resulting in your computer prioritizing the reading of files from it. As a result, your computer will load the installation media rather than the pre-existing system.
1. Change the Boot Order
Follow the steps to change the boot drive in BIOS before booting from the installation USB:
Step 1. Power on your computer and access the BIOS Setup by pressing ESC, F1, F2, F8, or F10 during startup.
Step 2. Navigate to the BOOT tab using the arrow keys in the BIOS Setup.
Step 3. Adjust the boot priority to make the USB drive the first device.
Step 4. Save the changes and exit the BIOS Setup.
Step 5. The computer will reboot using the new settings, booting from the USB drive.
Step 6. Stay alert for a prompt to press any key to boot from the external device, as you only have a few seconds to respond.
Changing the boot order is important when you want to boot from other external hard drives. You may also like the following topics:
2. Boot from the Installation USB
Following these steps, you can change the boot drive in the BIOS and boot from the installation USB. Now, it’s time to learn how to boot from the installation USB, but we recommend if you have crucial data on your device, please try to create a backup to preserve your data and avoid data loss.
Follow the steps to boot from the installation USB:
Step 1. Connect your bootable USB to your PC/Laptop and power it on. You might receive a prompt to press a key to initiate the USB booting process.
Step 2. Select your preferred language, timezone, currency, and keyboard settings and click «Next.»
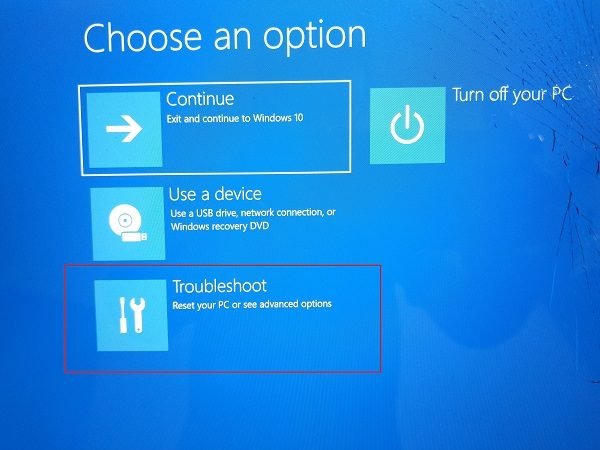
Step 3. Click on «repair your computer» in the lower left corner and go to «Troubleshoot.»
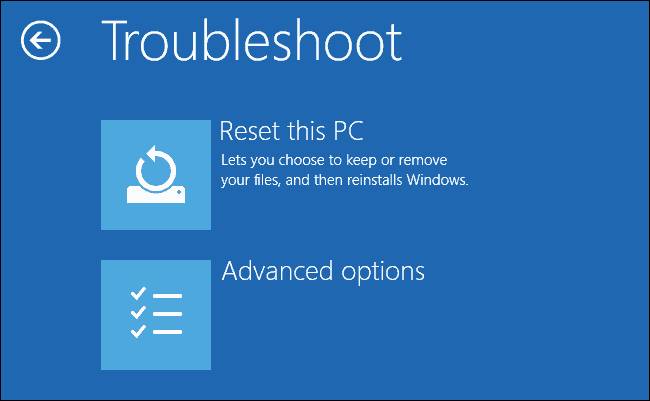
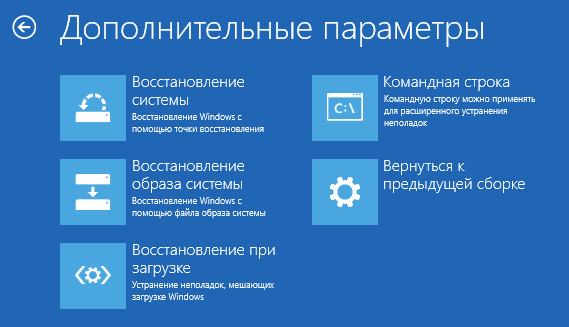
You will then be taken to the advanced options screen. In the advanced options screen, you will see different tools to help you repair Windows 10.
Guide 3. Choose the Suitable Tool to Repair Windows 10 From USB
When repairing Windows 10 from a USB drive, it’s important to select the right tools to address the specific issues you’re facing. Windows 10 offers various tools to repair your Windows 10 system from USB. Here are the steps to follow:
Step 1: Choose the Suitable Tool to Repair Windows 10.
Windows 10 provides several tools that can help in repairing your system. You can select the appropriate tool depending on the specific issue you’re facing. Here are three common tools:
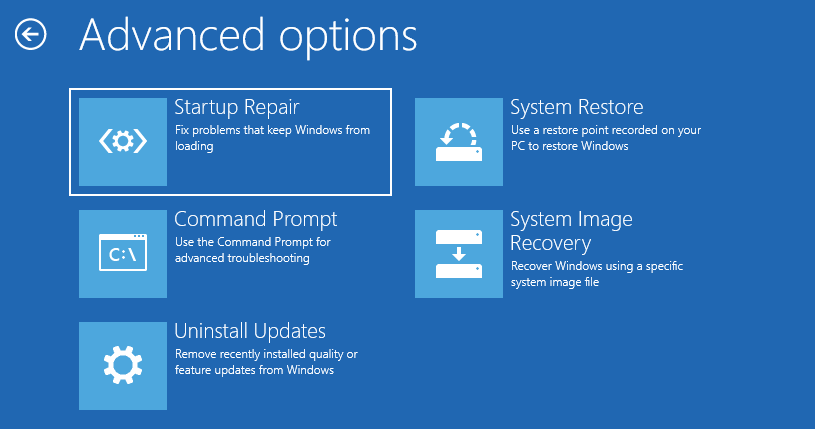
1. Startup Repair: This tool is designed to fix problems that prevent Windows from starting correctly, such as missing or corrupted system files. It scans for system issues and attempts to repair them automatically.
2. Command Prompt: The Command Prompt allows you to execute commands to troubleshoot and fix various problems manually. It provides a command-line interface to run specific commands to repair your system. You can use the appropriate command to perform the repair operation. For example:
- Use the CHKDSK command to check the volume file system for errors.
- Use BCDBoot to repair a corrupted boot file system.
You can also use other functions, such as DISM, SFC, etc., as long as you are proficient with the commands.
3. Uninstall Updates: This feature is typically used when your computer is having problems after installing a quality update or feature update. You can uninstall the most recent update to see if the problem is resolved.
4. System Restore: This tool lets you restore your computer to a previous working state. If you have created a system restore point before encountering the issue, you can use this tool to revert your system files, registry, and settings to that point.
5. System Image Recovery: This feature is a copy of the drive that Windows needs to run. You can use it to recover your computer in case your hard drive or device stops working.
If you want to know more about repair tools on Windows 11, click the link below:
Step 2: Choose the appropriate tool based on your specific needs.
Consider the nature of the problem you’re experiencing and select the tool that is most likely to address it effectively. For example, try Startup Repair if your computer fails to start properly. If you prefer manual control over the repair process, Command Prompt might be the tool of choice. And if you recently installed new software or drivers that caused problems, System Restore can be a valuable option.
Note: The available tools may vary depending on the Windows 10 version and any specific recovery or repair options you have installed on your USB. Remember to follow each tool’s on-screen instructions to initiate the repair process effectively.
Conclusion
This guide taught us how to repair Windows 10 from a USB drive. We discussed the importance of having a Windows 10 repair boot USB and provided step-by-step instructions for creating one. We also explored the process of booting from the USB and selecting the suitable tool to repair Windows 10.
The best solution depends on the specific issue you’re facing. Startup Repair is useful for fixing startup-related problems, Command Prompt provides manual control for troubleshooting, and System Restore is effective for reverting to a previous working state. Following this guide’s instructions, you can effectively repair your Windows 10 system from a USB drive and restore your computer’s performance.
FAQs About Repair Windows 10 From USB
If you have further questions about repairing Windows 10 from a USB drive, we have gathered a list of frequently asked questions (FAQs) to provide more information. Read on to find answers to common queries.
1. How to repair Windows 10 from the command prompt?
To repair Windows 10 from the command prompt, you can use various commands to troubleshoot and fix issues manually. SFC (System File Checker) is a command-line utility that scans for and repairs Windows’s corrupted or missing system files. It helps fix startup problems and other computer issues. To use SFC to repair Windows 10/11, follow these steps:
Step 1. Open the Command Prompt as an administrator.
Step 2. Type «sfc /scannow» and press Enter.
If SFC fails to fix the problem, it might be due to a broken Windows image. In that case, you can try an alternative solution.
2. How to repair install Windows 10 with ISO file?
If you want to repair install Windows 10 using an ISO file, follow these steps:
Step 1. Create a bootable USB or DVD from the Windows 10 ISO file.
Step 2. Boot your computer from the USB or DVD.
Step 3. Select «Install Now» and choose the «Upgrade» option.
Step 4. Track the on-screen instructions to finish the installation.
3. Why unable to repair Windows 10 from USB?
You might be unable to repair Windows 10 from a USB drive for several reasons. Here are a few possibilities:
- The USB drive is not properly created or formatted as a bootable device.
- The USB drive is not recognized or detected by your computer during the boot process.
- The Windows 10 installation files on the USB drive are corrupt or incomplete.
- Your computer’s BIOS settings are not configured correctly to boot from a USB device.
Readers help support Windows Report. We may get a commission if you buy through our links.
Read our disclosure page to find out how can you help Windows Report sustain the editorial team. Read more
There are times your PC encounters issues like the dreaded BSOD, and you might find it hard to boot it. In this case, you are left with no option but to try to repair Windows 10 with a USB.
While this process might seem complex, it is actually straightforward with little guidance. In this guide, we will show provide you with detailed steps to follow to repair and restore your PC using a USB drive.
Can I repair Windows 10 corrupted files with USB?
More often than not, issues with Windows 10 are caused by problems with your system files. Fortunately, there are different options available to repair your system files, even with a USB drive.
You only need to run commands like the usual DISM or SFC scans or, in some cases, the bootrec command to fix your boot files. However, you still need to know how to go about this, and we will show you how to do it.
How to repair Windows 10 from USB?
1. Download and create the installation media
- Visit the official Windows 10 download website on another PC.
- Click the Download Now button under the Create Windows 10 installation media section.

- Now, open File Explorer, go to the Downloads folder and run the downloaded file.
- Next, click the Accept button on the Agreement and license page.

- Tick the radio button for Create installation media (USB flash drive, DVD, or ISO file) for another PC and click the Next button.
- Select your language, PC architecture, and other important information, and click the Next button.
- Next, insert a USB flash drive (at least 8GB).
- Finally, choose the USB flash drive option, select your flash drive, and follow the onscreen instruction to complete the process.


The first thing to do in the quest to repair your Windows 10 PC using a USB drive is to create an installation media. However, you need to get a working system for this task.
Also, your USB drive should have at least 8GB of free space. Using a new and clean drive is advisable because this process will wipe the drive’s content.
2. Repair your PC
- Insert the Windows 10 installation media inside your PC and power it on. Your PC should boot from it automatically. If this does not happen, you need to enter your BIOS and change the boot order.
- Select your language and other information, and click the Next button.

- Now, choose the Repair your computer option in the bottom left corner.

- Next, select Troubleshoot.

- Choose Advanced options on the next page.

- Finally, you will be presented with different repair options.


At this stage, you can now choose from the repair options available to repair Windows 10. One option is to use Command Prompt to run some commands to repair your system files.
- Microsoft Office Lens: A Powerful Tool for Capturing and Organizing Information
- Swap Left/Right Speaker in Realtek Audio Console [How to]
- How to Get DirectX 12 End-User Runtime and Fix Installation Issues
- Overclocking in OMEN Gaming Hub: How to Use it
Also, you can use the System Restore option to restore your PC, while the Startup Repair option can help you fix startup-related problems.
Lastly, if you want to boot into Safe Mode, you can select the Startup Settings option and follow the onscreen instructions to complete the process.
How to repair Windows 10 from USB using Command Prompt?
- Follow the steps in the solution above and select the Command Prompt option in Step 6.
- To repair corrupt system files, type the command below and hit Enter to run it:
DISM /online /cleanup-image /restorehealth - Wait for the command to finish running. Now, run the command below:
sfc /scannow - If you want to repair your boot records, type the commands below and hit Enter after each:
bootrec /RebuildBcdbootrec /fixMbrbootrec /fixboot - Finally, to repair bad disk sectors, run the command (replace C with your drive letter) below:
chkdsk c: /f /r

That is how you can repair corrupt system files on Windows 10 from USB using Command Prompt. While we have listed the major forms of repairs you can perform, there is still so much more you can do.
With this, we can now conclude this guide on how to repair Windows 10 using USB. You should now be able to restore your PC and fix most issues with the details in this article.
If you want to know how to perform Windows 10 repair upgrade, check our detailed guide to do it quickly.
Feel free to let us know in the comments below if you encounter any issues performing the steps above.
Ola-Hassan Bolaji
Windows Hardware Expert
A Computer Engineering graduate, he has spent most of his life reading and writing about computers.
He finds joy in simplifying complex topics into simple solutions for PC users. The quality of his work and providing step-wise tested and proven solutions to PC issues are all that matter to him.
Away from computers, he is either reading or watching football!
В этой инструкции подробно о том, как создать диск восстановления Windows 10, а также о том, как использовать загрузочную флешку или DVD с установочными файлами системы в качестве диска восстановления, если возникла такая необходимость. Также ниже присутствует видео, в котором все шаги показаны наглядно.
Диск восстановления Windows 10 способен помочь в случае самых различных проблем с системой: когда она не запускается, стала неправильно работать, требуется восстановить систему, выполнив сброс (возврат компьютера в исходное состояние) или использовав заранее созданную резервную копию Windows 10.
Во многих статьях на этом сайте есть упоминание диска восстановления, как одного из инструментов решения проблем с компьютером, а потому и было решено подготовить данный материал. Все инструкции, имеющие отношение к восстановлению запуска и работоспособности новой ОС вы можете найти в материале Восстановление Windows 10.
Создание диска восстановления Windows 10 в панели управления
В Windows 10 предусмотрен простой путь сделать диск восстановления или, вернее USB флешку через панель управления (способ для CD и DVD также будет показан далее). Делается это в несколько шагов и минут ожидания. Отмечу, что даже если ваш компьютер на запускается, вы можете сделать диск восстановления на другом ПК или ноутбуке с Windows 10 (но обязательно с той же разрядностью — 32-бит или 64-бит. Если у вас нет другого компьютера с 10-кой, в следующем разделе описывается, как обойтись без него).
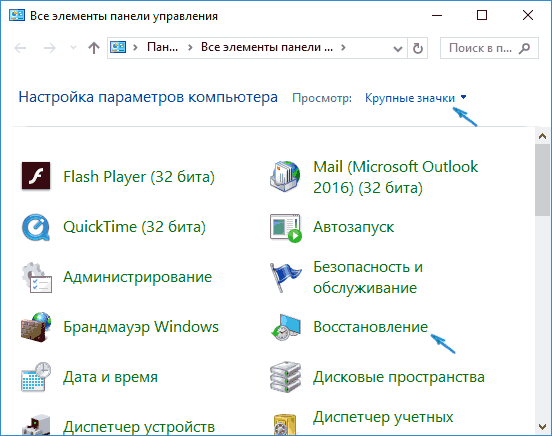
- Зайдите в панель управления (можно кликнуть правой кнопкой мыши по Пуску и выбрать нужный пункт).
- В панели управления (в пункте Просмотр установите «Значки») выберите пункт «Восстановление».

- Нажмите «Создание диска восстановления» (требуются права администратора).
- В следующем окне вы можете отметить или убрать пункт «Выполнить резервное копирование системных файлов на диск восстановления». Если сделать это, то будет занят значительно больший объем места на флешке (до 8 Гб), зато, упростится сброс Windows 10 в исходное состояние, даже если встроенный образ восстановления был поврежден и требует вставить диск с отсутствующими файлами (т.к. необходимые файлы будут находиться на накопителе).

- В следующем окне выберите подключенную флешку, из которой будет создан диск восстановления. Все данные с нее будут удалены в процессе.
- И, наконец, дождитесь, когда создание флешки будет завершено.


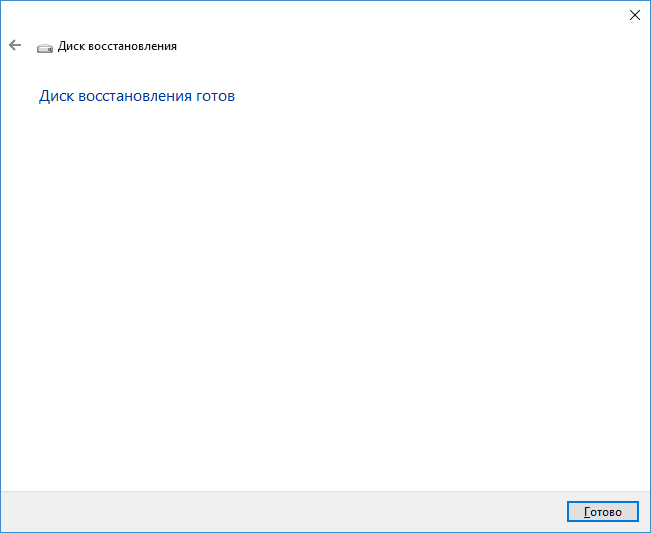
Готово, теперь у вас в наличии есть диск восстановления, поставив загрузку с которого в БИОС или UEFI (Как зайти в БИОС или UEFI Windows 10, или используя Boot Menu) вы можете войти в среду восстановления Windows 10 и выполнить многие задачи по реанимации системы, включая откат ее к изначальному состоянию, если ничто другое не помогает.
Примечание: вы можете продолжать пользоваться USB накопителем, из которого сделали диск восстановления, для хранения своих файлов, если есть такая необходимость: главное, чтобы в результате не оказались затронуты уже размещенные там файлы. Например, вы можете создать отдельную папку и пользоваться только ее содержимым.
Как создать диск восстановления Windows 10 на CD или DVD
Как можно заметить, в предыдущем и основном для Windows 10 способе создания диска восстановления, под таким диском подразумевается только флешка или иной USB накопитель, без возможности выбрать CD или DVD для этой цели.
Однако, если вам требуется сделать диск восстановления именно на компакт-диске, такая возможность всё еще присутствует в системе, просто в немного другом расположении.
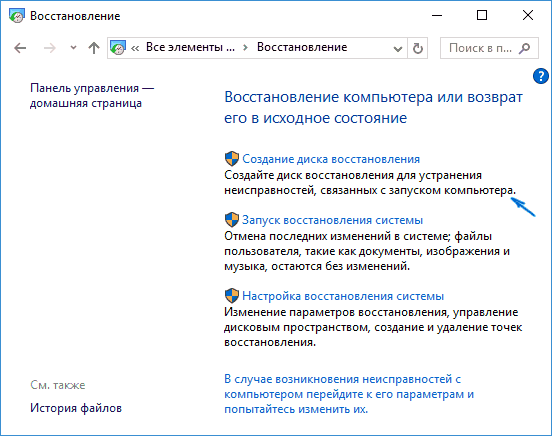
- В панели управления откройте пункт «Резервное копирование и восстановление».

- В открывшемся окне средств резервного копирования и восстановления (при этом не придавайте значения тому, что в заголовке окна указано Windows 7 — диск восстановления будет создан именно для текущей установки Windows 10) слева нажмите «Создать диск восстановления системы».


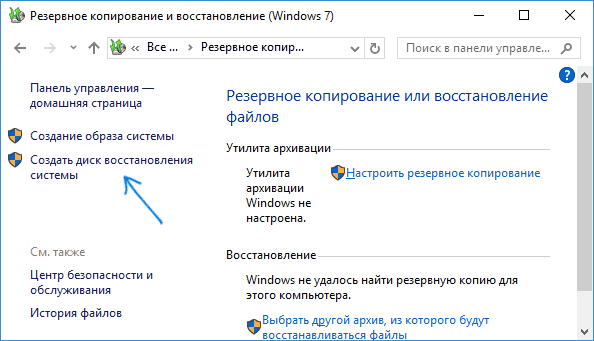
После этого вам останется выбрать привод с чистым диском DVD или CD и нажать «Создать диск» для записи диска восстановления на оптический компакт диск.

Его использование не будет отличаться от создаваемой в первом способе флешки — достаточно поставить загрузку с диска в BIOS и загрузить компьютер или ноутбук с него.
Использование загрузочной флешки или диска Windows 10 для восстановления
Сделать загрузочную флешку Windows 10 или установочный диск DVD с этой ОС проще простого. При этом, в отличие от диска восстановления, возможно практически на любом компьютере, вне зависимости от версии установленной на нем ОС и состоянии ее лицензии. При этом такой накопитель с дистрибутивом можно потом использовать на проблемном компьютере как диск восстановления.
Для этого:
- Поставьте загрузку с флешки или диска.
- После загрузки, выберите язык установки Windows
- В следующем окне внизу слева выберите пункт «Восстановление системы».


В результате вы попадете в ту же среду восстановления Windows 10, что и при использовании диска из первого варианта и сможете выполнить все те же действия по исправлению проблем с запуском или работой системы, например, использовать точки восстановления системы, проверить целостность системных файлов, восстановить реестр с помощью командной строки и не только.
Как сделать диск восстановления на USB — видео инструкция
И в заверешение — видео, в котором все описанное выше показано наглядно.
Ну а если у вас остались вопросы — не стесняйтесь задавать их в комментариях, я буду стараться отвечать.
This post will show you how to repair Windows 11/10 installation using the bootable Installation USB or DVD media without losing data. In a situation where Windows Advanced Options troubleshooting options are not accessible from within the Windows, you need to use a USB or DVD media.
The steps involved to repair Windows 11/10 installation using the bootable Installation USB or DVD media are:
- Download Windows ISO
- Create a Bootable USB or DVD drive
- Boot from the media and choose “Repair your computer.”
- Under Advanced troubleshooting, choose Startup Repair
If you cannot boot into Windows 11/10 and cannot access your files, Windows Startup Repair can fix some of the most common problems using the advanced recovery method. Your data will not be lost during the repair process.

1] Download Windows ISO
While not compulsory, make sure to download the same Windows ISO version as installed on your computer. The Advanced troubleshooter is not dependent on the Windows version but can come in handy when you need to install a fresh copy of Windows.
2] Create Bootable USB or DVD drive
Once you have the ISO, use one of these tools to create a bootable USB drive. Next, boot into the BIOS or UEFI of your computer, and select the USB device as the first boot device, followed by the hard disk. We recommend using Rufus, as it can download the ISO as well.
3] Boot from the media and choose “Repair your computer.”
When you boot from the USB drive, it will kickstart the Windows installation. Do not have a craving to keep hitting next, or you will end up installing Windows. On the first installation screen, look for a link “Repair your computer.” Click on it. It will boot your computer into Advanced Recovery.
Read: How to reinstall Windows 11 using Windows Update
4] Under Advanced troubleshooting
When at the advanced troubleshooting, select Advanced Options.
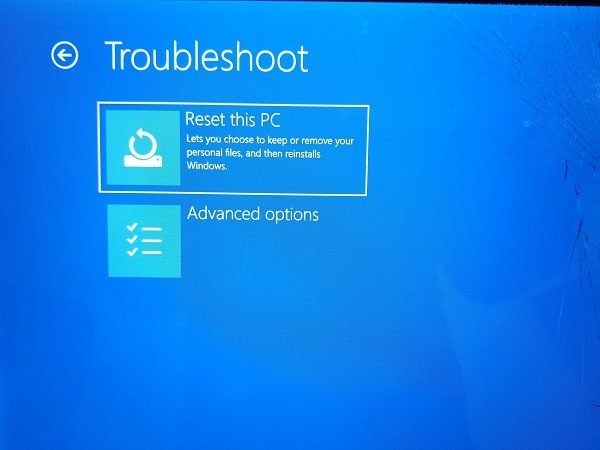
Select Troubleshoot.
Under the Advanced options screen, you will see Startup Repair.
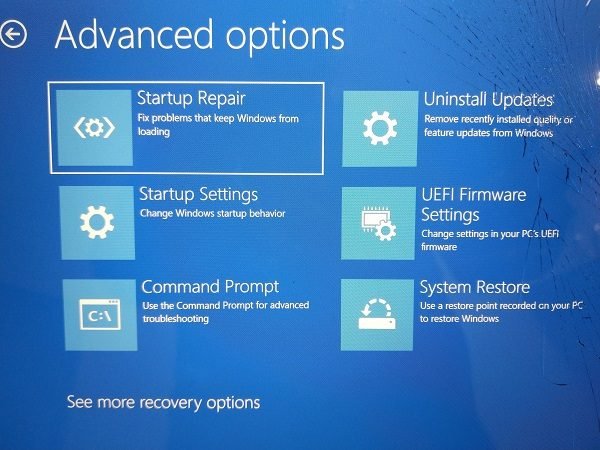
Click on it and follow the instructions.
This solution will fix the problems that prevent you from booting into the computer. The next screen will display the admin account with its name. Click on it and verify using the account password related to the email associated with it.
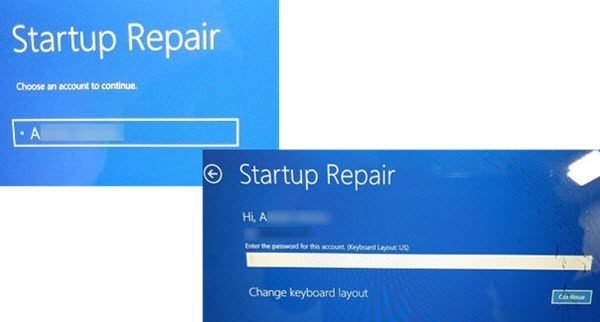
After verification, it will start diagnosing the computer and resolve any issue related to the boot. This post will help you in case this step fails and you are stuck on diagnosing your PC screen.
Once the problem is resolved, the computer should reboot as usual, and you should be able to use it.
The process doesn’t wipe or delete personal files from your account, so you don’t have to worry about it.
Post that may help you if your computer does not boot:
- Windows PC will not boot up or start
- Windows Startup & Boot problems – Advanced Troubleshooting
How do I repair corrupted Windows 11/10?
If you are unable to boot into Windows PC, i.e., cannot access the login screen, because of corruption, you can repair it using bootable USB media. Once you have it, change the boot order to USB in the BIOS or UEFI to boot using the USB drive.
While it will show a regular Windows installation, the option to repair Windows will appear at the bottom left of the screen. Clicking on it will then reveal the advanced recovery mode.
Locate the Command Prompt in the tools, and then run the following DISM Tools and System File Checker command.
DISM /Online /Cleanup-Image /RestoreHealth

SFC /scannow
Once the repair is done, restart the computer, and you should be able to boot into Windows. If the MBR of the PC is missing, you can use the bootrec /FixMbr command.
Related: How to repair Windows 11 without losing data or programs
How do I repair Windows 11/10 with Command Prompt?
Similar to the above option, if you can log in to Windows 10 and use it to repair Windows. It comes in handy when some of your system files are corrupt, resulting in errors. Use the DISM and SFC commands to fix the problem. The commands will need admin permission to be executed and the repair completed.
How do I repair Windows 11 with USB?
It means you need to create a bootable USB drive, then use it to boot into Advanced Recovery. Then use the command tool to run the commands to fix any corrupt file which might be blocking the PC to boot in the normal way. If you need to perform Startup Repair, this is the right way to do it.
Can you still upgrade to Windows 11 for free?
Yes, you can if you have a valid Windows license key. That means if you are running an activated version of Windows, you can use the Windows 11/10 installer to upgrade. In case you don’t, it may not be possible. You will need to buy a new license key to activate Windows.
When upgrading, the installer will check for compatibility of the hardware and software. Make sure to take a backup of your personal files and then upgrade.
I hope the post was easy to follow and that you were able to repair Windows 11/10 or boot into Windows using the Media Installation guide.