
Некоторые пользователи сталкиваются с тем, что в правом нижнем углу рабочего стола Windows 10 появляется надпись «Тестовый режим», содержащая далее сведения о редакции и сборке установленной системы.
В этой инструкции подробно о том, почему появляется такая надпись и о том, как убрать тестовый режим Windows 10 двумя способами — либо действительно отключив его, либо убрав только надпись, оставив тестовый режим включенным.
Как отключить тестовый режим
В большинстве случаев, надпись тестовый режим появляется как следствие ручного отключения проверки цифровой подписи драйверов, также встречается, что в некоторых «сборках», где была отключена проверка, со временем появляется такое сообщение (см. Как отключить проверку цифровой подписи драйверов Windows 10).
Одно из решений — простое отключение тестового режима Windows 10, однако в некоторых случаях для некоторого оборудования и программ (если они используют неподписанные драйверы), это может вызывать проблемы (в такой ситуации можно снова включить тестовый режим, а потом убрать надпись об этом на рабочем столе вторым способом).
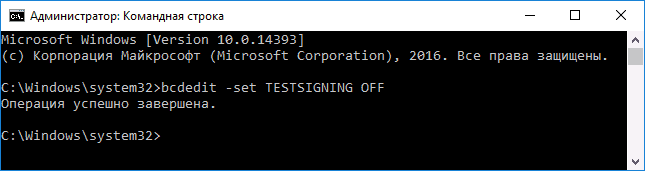
- Запустите командную строку от имени администратора. Сделать это можно, введя «Командная строка» в поиск на панели задач, нажав правой кнопкой мыши по найденному результату и выбрав пункт запуска командной строки от имени администратора. (другие способы открыть командную строку от имени администратора).
- Введите команду bcdedit.exe -set TESTSIGNING OFF и нажмите Enter. Если команда не сможет быть выполнена, это может говорить о том, что требуется отключить Secure Boot (по завершении операции можно снова будет включить функцию).

- Если команда выполнена успешно, закройте командную строку и перезагрузите компьютер.
После этого тестовый режим Windows 10 будет отключен, а сообщение о нем на рабочем столе не появится.
Как убрать надпись «Тестовый режим» в Windows 10
Второй способ не предполагает отключение тестового режима (на случай, если без него что-то не работает), а просто убирает соответствующую надпись с рабочего стола. Для этих целей есть несколько бесплатных программ.
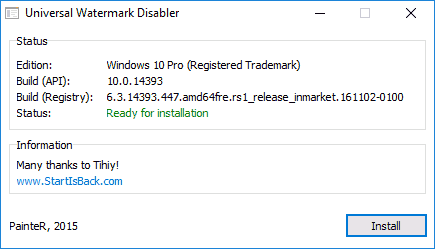
Проверенная мной и успешно работающая на последних сборках Windows 10 — Universal Watermark Disabler (некоторые пользователи ищут популярную в прошлом My WCP Watermark Editor для Windows 10, мне работающей версии найти не удалось).
Запустив программу, достаточно выполнить следующие простые шаги:
- Нажать Install.

- Согласиться с тем, что программа будет использована на не протестированной сборке (я проверял на 14393).

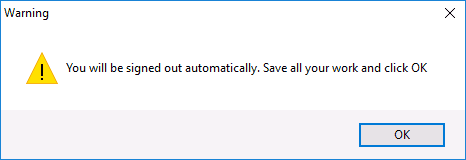
- Нажать Ок для перезагрузки компьютера.


При следующем входе в систему сообщение «тестовый режим» отображаться не будет, хотя по факту ОС продолжить работать в нём.
Скачать Universal Watermark Disabler можно с официального сайта http://winaero.com/download.php?view.1794 (будьте внимательны: ссылка на загрузку находится под рекламой, которая часто носит текст «скачать» и над кнопкой «Donate»).
How to Remove Test Mode Windows 10
If you’ve ever seen that pesky «Test Mode» watermark on your Windows 10 desktop and wondered how to get rid of it, you’re in luck. It’s actually pretty simple to remove. You’ll need to use the Command Prompt with administrative privileges and run a specific command to turn off Test Mode. This will clear up your screen and get things back to normal without much hassle.
Removing Test Mode from Windows 10 will make that annoying watermark disappear for good. Follow these steps to get rid of it.
Step 1: Open Command Prompt as an Administrator
To begin with, click the Start button, type «cmd,» then right-click on «Command Prompt» and select «Run as administrator.»
This is crucial because you need admin rights to make system-level changes. If prompted by User Account Control (UAC), click «Yes» to proceed.
Step 2: Type the Command
Type bcdedit -set TESTSIGNING OFF and press Enter.
This command tells Windows to turn off Test Mode, essentially stopping the system from running in a test-signing environment.
Step 3: Restart Your Computer
After running the command, restart your computer for the changes to take effect.
A reboot ensures that the system settings are updated and the Test Mode watermark is removed.
Step 4: Check for the Watermark
Once the computer restarts, check your desktop to see if the Test Mode watermark is gone.
If it’s still there, double-check the steps or repeat the process. Sometimes, it may take a second try to make the changes stick.
Once you’ve completed these steps, the Test Mode watermark should be gone, and your Windows 10 should be back to its regular state.
Tips to Remove Test Mode Windows 10
- Always run Command Prompt as an administrator when making system changes.
- Double-check your typing to avoid errors in the command.
- Ensure that your system is fully updated before trying the steps.
- If the watermark doesn’t disappear, try restarting your computer a second time.
- Keep your system secure by avoiding unnecessary changes to the boot configuration.
Frequently Asked Questions
What is Test Mode in Windows 10?
Test Mode is a special mode used by developers to test software without needing official driver signatures.
Why does Test Mode appear on my Windows 10?
It often happens when unsigned drivers or software are installed that require testing.
Will removing Test Mode affect my installed software?
No, removing Test Mode won’t uninstall any software or drivers from your system.
Can I re-enable Test Mode if needed?
Yes, you can re-enable Test Mode by running the command bcdedit -set TESTSIGNING ON.
What if the Test Mode watermark doesn’t go away?
If it’s persistent, ensure you’ve typed the command correctly and run the Command Prompt as an administrator.
Summary
- Open Command Prompt as an Administrator.
- Type
bcdedit -set TESTSIGNING OFF. - Restart your computer.
- Check for the watermark.
Conclusion
Getting rid of the Test Mode watermark in Windows 10 is a straightforward process if you follow the steps correctly. By using the Command Prompt with administrative privileges and running a simple command, you can turn off Test Mode and keep your screen clean. Remember to double-check each step and don’t hesitate to repeat the process if necessary. Removing Test Mode ensures your system is running in a stable environment without unnecessary distractions. If you found this guide helpful, consider exploring other tips to enhance your Windows 10 experience. Happy computing!
Matt Jacobs has been working as an IT consultant for small businesses since receiving his Master’s degree in 2003. While he still does some consulting work, his primary focus now is on creating technology support content for SupportYourTech.com.
His work can be found on many websites and focuses on topics such as Microsoft Office, Apple devices, Android devices, Photoshop, and more.
Do you notice Test mode Windows 10 Pro Build Watermark seating at the far lower right of your desktop? If so, then this feature is enabled on your OS and your computer is running in the mode. In case, you don’t prefer this Test mode mark to always appear on your desktop, you can remove it using a command. Follow the similar type of article Remove Password Showing Icon from Windows 10 Login Screen.
But before we proceed towards steps, let us first clear the meaning of Test mode and how it gets visible on the desktop. See a guide RegistryChangesView to Take a Snapshot of Registry Editor in Windows.
What is Test mode?
In Windows 10 OS, Test mode is a feature that empowers you to install and test programs that don’t possess a genuine certificate. This feature is very useful when you have certain applications that are not digitally signed by Microsoft.
For reference, read our guide on How to Find the System Files Not Digitally Signed on Windows 10.
So, when you see Test mode Windows 10 Pro Build Watermark, it clears that a program you installed a little while back has started on this feature. For example – installing Trackpad ++ enables Test mode on your Windows 10 computer.
Well, you can follow our guide on How to Control Installation of Apps in Windows 10.
Now, let us move towards the series of steps and see how to turn on off this message on your desktop.
How to Remove ‘Test mode Windows 10 Pro Build’ Watermark
Step 1 – Open Command Prompt with admin rights to Remove “Test mode Windows 10 Pro Build” Watermark. To do so, first, type cmd on the Cortana. Cortana shows the same on the top, right-click on it and henceforth choose “Run as administrator“.
You may also desire to Launch Elevated Command Prompt on Windows 10 using some variant methods.
Step 2 – Click Yes when UAC prompt comes up on the PC screen. Run the below commands as per your need whether you want to Show or hide the watermark.
To Add
Bcdedit.exe -set TESTSIGNING ON
To Remove
Bcdedit.exe -set TESTSIGNING OFF
Step 4 – After completion, restart your PC to perfectly add or Remove Test mode Windows 10 Pro Build Watermark.
Conclusion
In most cases, while installing certain programs that don’t carry a valid certificate enables this Test mode feature. However, this is quite helpful as it lets you know that your PC is running on Test mode. Well, give a shot to the above commands if you prefer to add or remove this watermark.
If you’ve found yourself with a pesky «Test Mode Windows 10» watermark on your screen, don’t worry. This guide will show you exactly how to remove it. You’ll be tweaking some system settings, but it’s nothing too complicated. Let’s dive in and get rid of that test mode message for good!
Here’s a step-by-step guide to help you remove the «Test Mode Windows 10» watermark from your screen. By the end, you’ll have a clean display without any annoying distractions.
Step 1: Open Command Prompt as Administrator
To start, you need to open Command Prompt with administrative privileges.
Right-click on the Start button and select «Command Prompt (Admin)» from the menu. This will open a new Command Prompt window with the necessary permissions to make system changes.
Step 2: Enter the Command to Disable Test Mode
Next, you’ll disable test mode by entering a specific command.
Type bcdedit -set TESTSIGNING OFF into the Command Prompt window and press Enter. This command tells Windows to turn off test mode, which is usually used for driver development and testing.
Step 3: Restart Your Computer
After entering the command, it’s time to restart your system.
Close the Command Prompt window and reboot your computer. This restart is crucial because it applies the changes you’ve just made.
Step 4: Check if Test Mode is Disabled
Once your computer restarts, verify that test mode has been disabled.
Look at the bottom-right corner of your desktop. If the «Test Mode Windows 10» watermark is gone, then you’ve successfully disabled test mode. If it’s still there, repeat the steps above carefully.
Step 5: Optional – Run Additional Commands if Needed
If test mode is still enabled, you might need to run some additional commands.
Open Command Prompt as an administrator again and enter bcdedit /set nointegritychecks OFF followed by bcdedit /set loadoptions ENABLE_INTEGRITY_CHECKS, pressing Enter after each command. These commands ensure that all integrity checks are re-enabled.
Once you’ve followed these steps, your computer should no longer display the «Test Mode Windows 10» watermark. Your system will now operate in normal mode, which is safer and more stable.
Tips for Removing Test Mode Windows 10
- Always Run Command Prompt as Administrator: Administrative privileges are required to make system changes.
- Double-Check Your Commands: Typing errors can prevent the desired changes from taking effect.
- Regularly Restart Your Computer: After making system changes, a reboot is often necessary to apply them.
- Keep Your OS Updated: Sometimes, updates can fix issues related to test mode being enabled.
- Backup Your System: Before making any changes, it’s smart to create a backup, just in case something goes wrong.
Frequently Asked Questions
Why did my Windows enter test mode?
Windows may enter test mode if you install unsigned drivers or certain software that requires it. Test mode allows these applications to run without restrictions.
Is it safe to disable test mode?
Yes, it’s generally safe to disable test mode. Test mode is mainly used for development purposes, and disabling it ensures your system runs in a more secure environment.
What if the watermark is still there after following the steps?
If the watermark persists, double-check the commands you entered. You may also want to redo the steps, ensuring you follow each one carefully.
Can I enable test mode again if needed?
Yes, you can re-enable test mode by running bcdedit -set TESTSIGNING ON in Command Prompt as an administrator.
Does removing test mode affect my installed software?
Disabling test mode should not affect your installed software unless that software specifically requires test mode to function.
Summary
- Open Command Prompt as Administrator
- Enter the Command to Disable Test Mode
- Restart Your Computer
- Check if Test Mode is Disabled
- Optional – Run Additional Commands if Needed
Conclusion
Removing the «Test Mode Windows 10» watermark is a straightforward process that can make your desktop look much cleaner. By following the steps outlined above, you can easily turn off test mode and ensure your system is running in a stable, secure environment.
Remember, keeping your system updated and backing up your data is always a good practice. This way, you can avoid any potential hiccups while making these changes. If you have any more questions or run into issues, don’t hesitate to look up more resources or reach out to tech support. Happy computing!
Kermit Matthews is a freelance writer based in Philadelphia, Pennsylvania with more than a decade of experience writing technology guides. He has a Bachelor’s and Master’s degree in Computer Science and has spent much of his professional career in IT management.
He specializes in writing content about iPhones, Android devices, Microsoft Office, and many other popular applications and devices.
Read his full bio here.
You are here:
Home » Windows 10 » How To Remove Test Mode Watermark From Windows 10 Desktop
If Test Mode watermark is appearing on your Windows 10 desktop and you are not sure why this watermark with Windows 10 build number appears at the lower right corner of the desktop, continue reading this article to know what is Test Mode and how to enable or disable Test Mode in Windows 10.

Well, the message or watermark Test Mode is appearing on your Windows 10 desktop because Test Mode is enabled on your PC and your PC is running in Test Mode.
What is Test Mode?
Test Mode is a feature in Windows operating system which allows users to install and use drivers that are not digitally signed by Microsoft. The feature comes in handy for users who want to run or test programs that don’t have an authenticate certificate.
In short, the Test Mode message indicates that you have turned on the Test Mode or a program/driver which you recently installed turned on the Test Mode. For instance, when you install Trackpad++ program, it turns on the Test Mode.
If you didn’t turn on the Test Mode, it’s a good idea to turn off the Test Mode.
Turn on or off Test Mode in Windows 10
Here is how to turn on or off the Test Mode feature in Windows 10.
IMPORTANT: Please remember that turning off the Test Mode feature may force the program/driver which is not digitally signed stop working.
Step 1: Open Command Prompt as administrator. To do so, type CMD in Start menu search to see Command Prompt in the search result. Right-click on Command Prompt entry and then click Run as administrator option. Click Yes button when you see the User Account Control screen.
Step 2: At the Command Prompt window, execute the following commands:
To enable the Test Mode:
Bcdedit.exe -set TESTSIGNING ON
To disable the Test Mode:
Bcdedit.exe -set TESTSIGNING OFF
If the above command didn’t work, this one must work:
Bcdedit.exe -set loadoptions ENABLE_INTEGRITY_CHECKS
Bcdedit.exe -set TESTSIGNING OFF
You may exit the Command Prompt now.
If the Test Mode message/watermark is still appearing, reboot your PC once.
You might also want to know how to boot into Safe mode in Windows 10 guide.