
В проводнике Windows 10 в панели слева присутствует пункт «Быстрый доступ», для быстрого открытия некоторых системных папок, и содержащий часто используемые папки и последние файлы. В некоторых случаях пользователь может захотеть удалить панель быстрого доступа из проводника, однако сделать это просто системными настройками не получится.
В этой инструкции — подробно о том, как убрать быстрый доступ в проводнике, если он не требуется. Также может пригодиться: Как удалить OneDrive из проводника Windows 10, Как убрать папку Объемные объекты в «Этот компьютер» в Windows 10.
Примечание: если вы хотите просто убрать часто используемые папки и файлы, оставив при этом панель быстрого доступа, сделать это можно проще, с помощью соответствующих настроек проводника, см: Как убрать часто используемые папки и последние файлы в проводнике Windows 10.
Удаляем панель быстрого доступа с помощью редактора реестра
Для того, чтобы удалить пункт «Быстрый доступ» из проводника потребуется прибегнуть к изменению системных параметров в реестре Windows 10.
Порядок действий будет следующим:
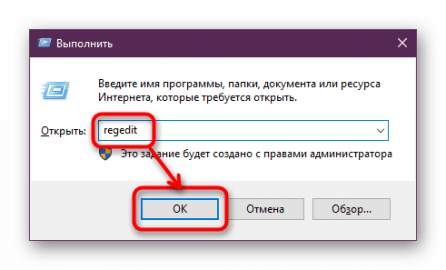
- Нажмите клавиши Win+R на клавиатуре, введите regedit и нажмите Enter — это откроет редактор реестра.
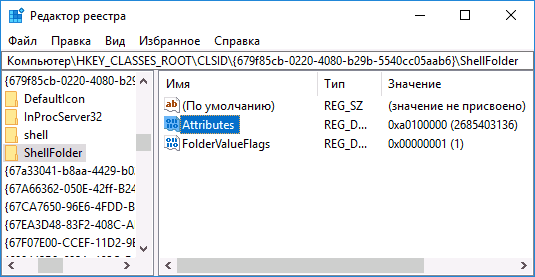
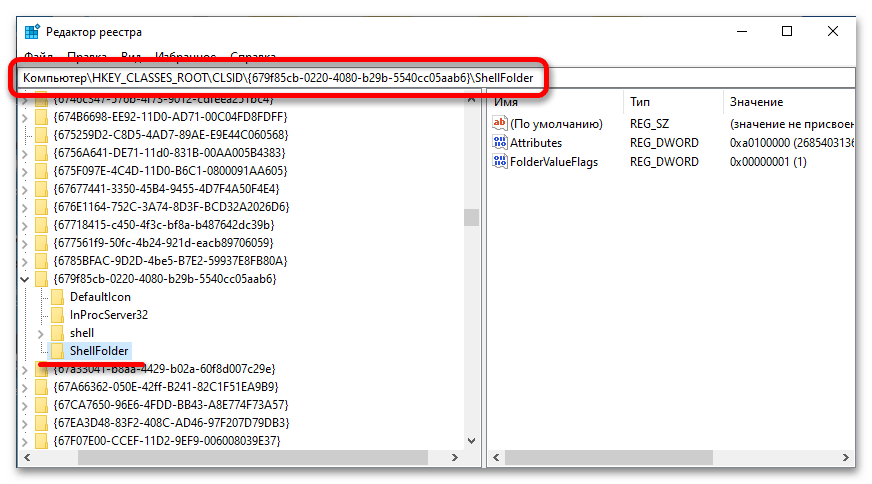
- В редакторе реестра перейдите к разделу HKEY_CLASSES_ROOT\ CLSID\ {679f85cb-0220-4080-b29b-5540cc05aab6}\ ShellFolder

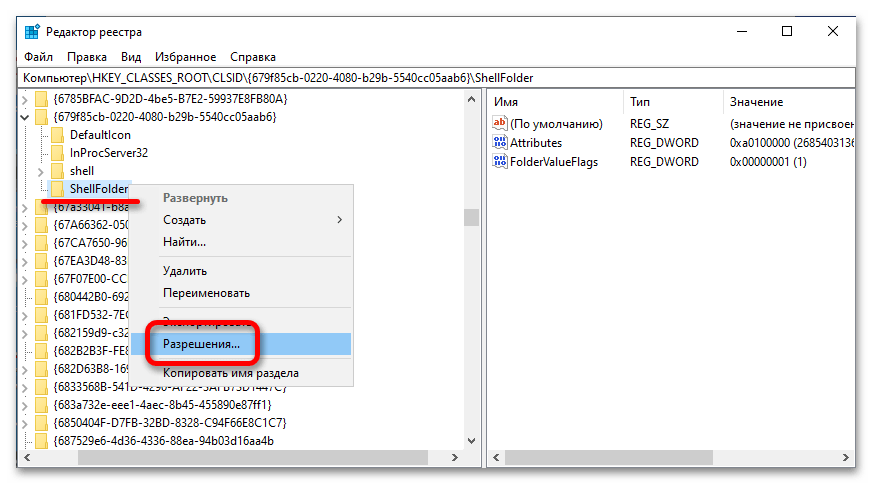
- Нажмите правой кнопкой мыши по имени этого раздела (в левой части редактора реестра) и выберите пункт «Разрешения» в контекстном меню.
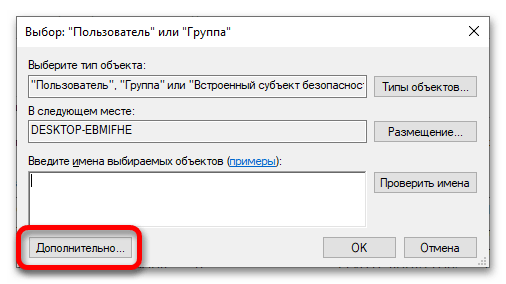
- В следующем окне нажмите кнопку «Дополнительно».
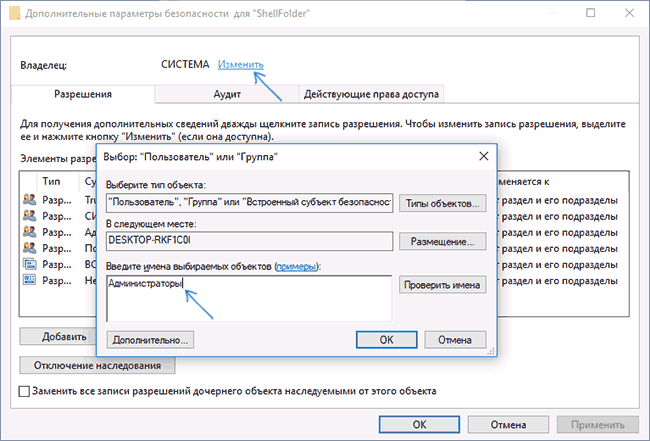
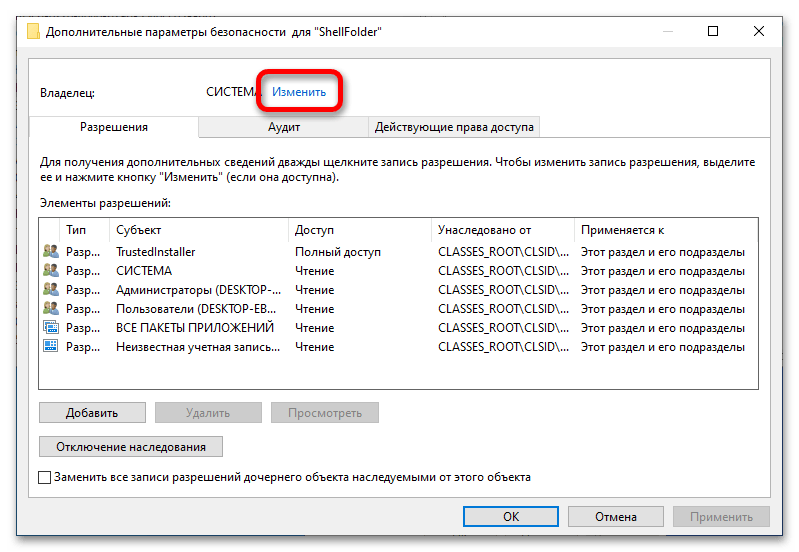
- Вверху следующего окна в поле «Владелец» нажмите «Изменить», а в следующем окне введите «Администраторы» (в изначально англоязычной версии Windows — Administrators) и нажмите Ок, в следующем окне — тоже Ок.

- Вы вновь вернете в окно разрешений для раздела реестра. Убедитесь, что в списке выбран пункт «Администраторы», установите «Полный доступ» для этой группы и нажмите «Ок».
- Вы вернетесь в редактор реестра. Дважды кликните по параметру «Attributes» в правой панели редактора реестра и задайте для него значение a0600000 (в шестнадцатеричной системе счисления). Нажмите Ок и закройте редактор реестра.
Еще одно действие которое предстоит сделать — настроить проводник таким образом, чтобы он не «пытался» открыть ныне отключенную панель быстрого доступа (иначе появится сообщение об ошибке «Не удается найти»). Для этого выполните следующие шаги:
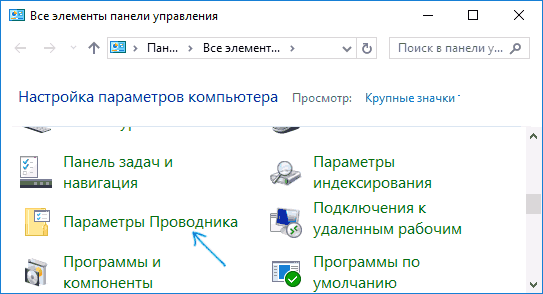
- Откройте панель управления (в поиске на панели задач начните набирать «Панель управления», пока нужный пункт не будет найден, затем откройте его).
- Убедитесь, что в панели управления в поле «Просмотр» установлено «значки», а не «категории» и откройте пункт «Параметры проводника».

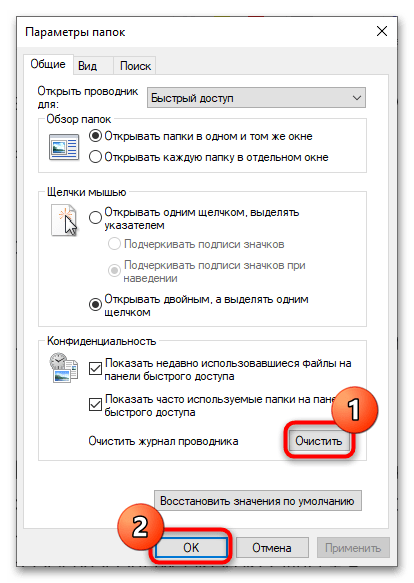
- На вкладке «Общие» в пункте «Открыть проводник для» установите «Этот компьютер».
- Также может иметь смысл снять обе отметки в пункте «Конфиденциальность» и нажать кнопку «Очистить».
- Примените настройки.
На этом всё готово, остается либо перезагрузить компьютер, либо перезапустить проводник: для перезапуска проводника вы можете зайти в диспетчер задач Windows 10, выбрать «Проводник в списке процессов» и нажать кнопку «Перезапустить».
После этого, при открытии проводника через значок на панели задач, «Этот компьютер» или клавишами Win+E, в нем будет открываться «Этот компьютер», а пункт «Быстрый доступ» будет удален.
Ещё один простой метод: создайте reg-файл со следующим содержимым и примените его к системе, а затем перезапустите проводник или перезагрузите компьютер.
Windows Registry Editor Version 5.00

[HKEY_LOCAL_MACHINE\SOFTWARE\Microsoft\Windows\CurrentVersion\Explorer]
"HubMode"=dword:00000001
Важно! В этой статье будет рассказано о том, как полностью убрать раздел «Быстрый доступ» из навигационной панели, расположенной в левой части интерфейса файлового менеджера «Проводник». Если вам необходимо только очистить его содержимое, воспользуйтесь другим руководством на нашем сайте, перейдя по ссылке ниже.
Подробнее: Как очистить панель быстрого доступа в Windows 10
Вариант 1: При запуске «Проводника»
В операционной системе Windows 10 есть встроенная функция, которая позволяет настроить работу файлового менеджера так, чтобы при его запуске открывался раздел «Этот компьютер», а не «Быстрый доступ». Таким образом вы сможете его скрыть, а при необходимости воспользоваться — взывать через навигационную панель. Для реализации задуманного, выполните следующие действия:
- Откройте «Проводник» любым доступным способом. Сделать это вы можете с помощью сочетания клавиш Win + E или посредством иконки, по умолчанию закрепленной на панели задач.

Читайте также: Как открыть «Проводник» в Windows 10
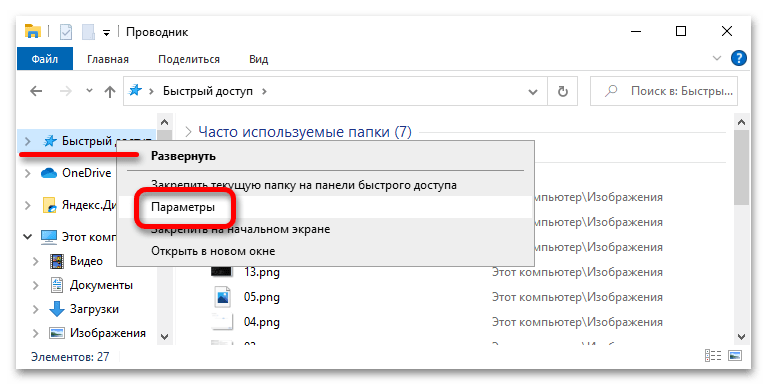
- Откройте окно параметров папок. Для этого кликните правой кнопкой мыши по ярлыку «Быстрый доступ», расположенному в верхней части навигационной панели, и в появившемся контекстном меню выберите пункт «Параметры».
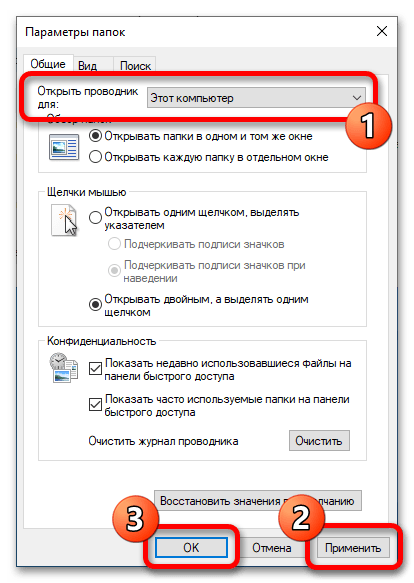
- В появившемся окне, оставаясь во вкладке «Общие», выберите из выпадающего списка «Открыть проводник для» значение «Этот компьютер». Затем сохраните внесенные изменения, поочередно нажав по кнопкам «Применить» и «ОК».

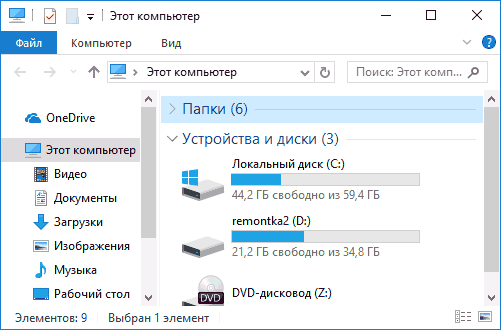
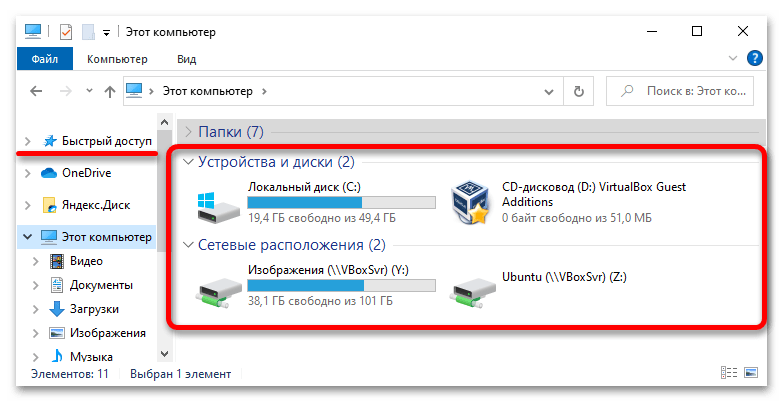
После выполнения этой инструкции вы можете сразу проверить изменения, открыв новое окно «Проводника». Вместо ожидаемого раздела «Быстрый доступ» отобразится «Этот компьютер» с перечислением всех дисков, подключенных к компьютеру. Обратите внимание, что раздел «Быстрый доступ» все так же доступен в навигационной панели.
Вариант 2: Панель навигации
Если раздел «Быстрый доступ» необходимо убрать с панели навигации полностью, тогда придется вносить правки в реестр операционной системы, так как для реализации задуманного отдельный параметр в настройках Windows 10 отсутствует.
Важно! Помимо вероятности внести некорректные правки в реестр системы у этого способа решения поставленной задачи есть один недостаток. После его реализации раздел «Быстрый доступ» исчезнет с навигационной панели «Проводника», но в дальнейшем станет заблокированной функция переноса данных зажатой левой кнопкой мыши во все оставшиеся разделы. Если это не является проблемой, выполните описанные ниже действия.
- Откройте «Редактор реестра» любым доступным способом. Сделать это можно, например, через окно «Выполнить». Вызовите его комбинацией клавиш Win + R, а затем введите в поле «Открыть» команду
regeditи щелкните по кнопке «ОК».
Читайте также: Как открыть «Редактор реестра» в Windows 10
- В появившемся окне «Редактора реестра», воспользовавшись навигационной панелью слева, проследуйте по указанному ниже пути:
HKEY_CLASSES_ROOT\CLSID\{679f85cb-0220-4080-b29b-5540cc05aab6}\ShellFolderТакже вы можете вставить его в адресную строку, расположенную в верхней части интерфейса, и нажать на клавишу Enter. После этого будет совершен мгновенный переход в указанную директорию.
- Откройте окно редактирования прав доступа папки «ShellFolder». Для этого щелкните по ней правой кнопкой мыши и в появившемся контекстном меню выберите пункт «Разрешения».
- Откройте дополнительные параметры прав доступа к директории, щелкнув по соответствующей кнопке в нижней части окна.
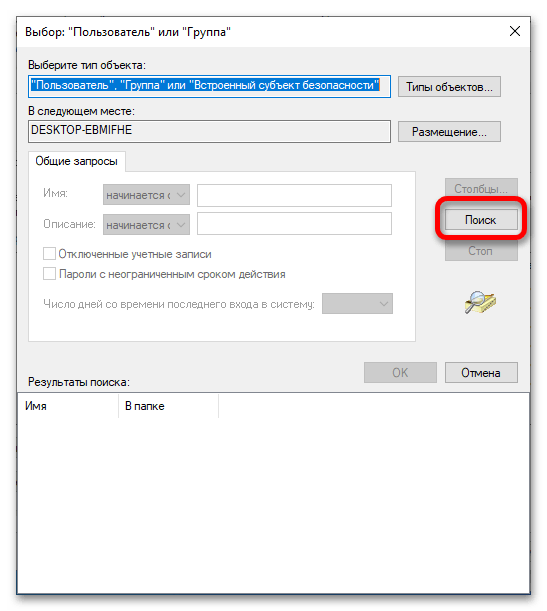
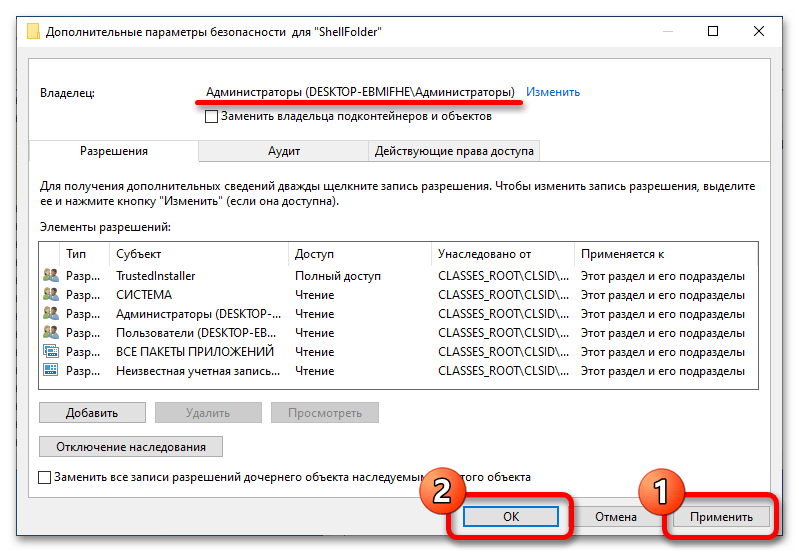
- Измените владельца каталога, для чего нажмите по ссылке «Изменить», находящейся напротив строки «Владелец» рядом со словом «СИСТЕМА».
- В появившемся окне кликните по кнопке «Дополнительно», чтобы открыть доступ к списку всех учетных записей компьютера.
- Отобразите в нижней части интерфейса перечень профилей операционной системы, нажав по кнопке «Поиск».
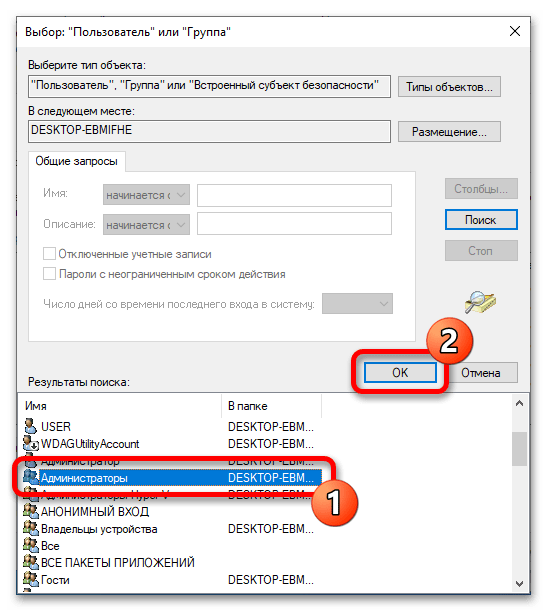
- Найдите в списке пользователя с именем «Администраторы», выделите его и выберите, щелкнув по кнопке «ОК».
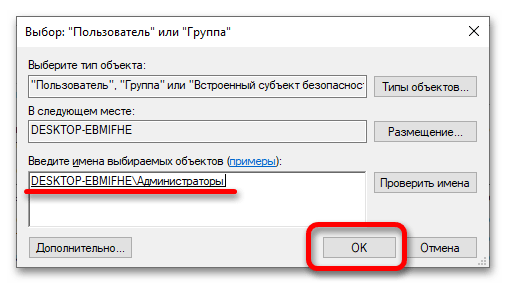
- Вернувшись в предыдущее окно, удостоверьтесь, что в поле «Введите имена выбираемых объектов» указан только что выбранный вами пользователь, и щелкните по кнопке «ОК».
- В окне дополнительных параметров прав доступа в строке «Владелец» теперь должна отображаться надпись «Администраторы». Если это так, сохраните внесенные изменения, для чего поочередно нажмите «Применить» и «ОК».
- В окне «Разрешения для группы «ShellFolder»» найдите в списке «Группы и пользователи» наименование «Администраторы» и выделите его. Затем в блоке «Разрешения для группы «Администраторы»» установите отметку в квадратике, расположенном на пересечении строки «Полный доступ» и столбца «Разрешить». Все перечисленные элементы графического интерфейса выделены на изображении ниже. В завершение щелкните по кнопке «ОК», чтобы сохранить внесенные изменения.
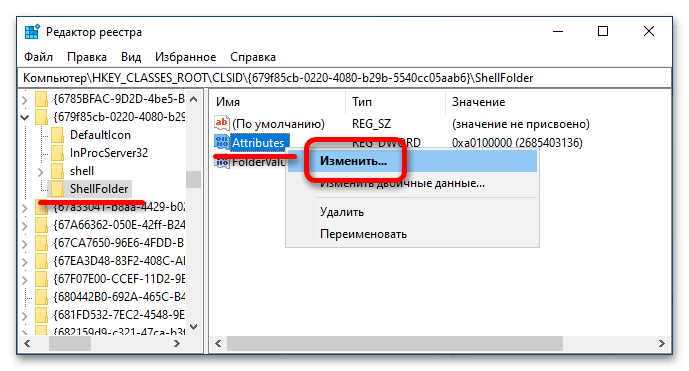
- Вернувшись после изменения прав доступа в окно «Редактора реестра», откройте свойства параметра «Attributes», находящегося в папке «ShellFolder». Для этого щелкните по его имени правой кнопкой мыши и выберите в контекстном меню пункт «Изменить».
- В появившемся окне измените данные в поле «Значение», заменив находящуюся там строку на указанную ниже. Затем сохраните правки, щелкнув по кнопке «ОК».
a0700000После этого окно «Редактора реестра» можно закрыть, оно больше не понадобится.
После внесения изменений раздел «Быстрый доступ» из файлового менеджера сразу не исчезнет, необходимо будет перезапустить «Проводник». Сделать это можно стандартной перезагрузкой компьютера или через «Диспетчер задач». Во втором случае откройте окно утилиты любым доступным способом. Сделать это можно посредством горячих клавиш Ctrl + Shift + Esc или через контекстное меню панели задач. Для этого щелкните по ней правой кнопкой мыши и выберите пункт «Диспетчер задач».
Читайте также: Как открыть «Диспетчер задач» в Windows 10
Затем во вкладке «Процессы» отыщите в списке «Проводник» и кликните по кнопке «Перезапустить», расположенной в нижнем правом углу окна.

Читайте также: Как перезапустить «Проводник» в Windows 10
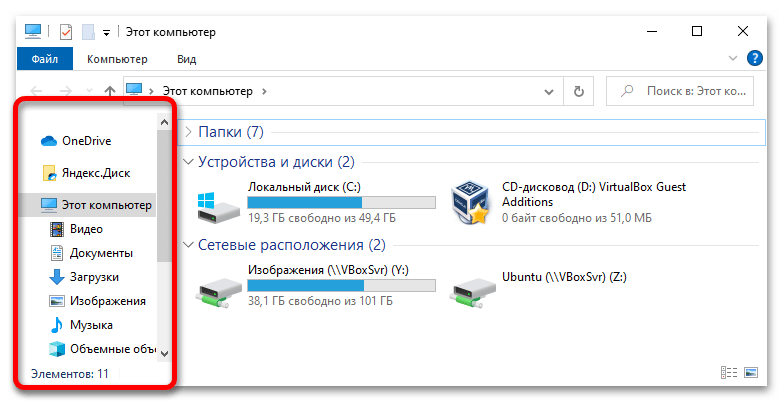
После непродолжительного времени файловый менеджер будет перезапущен. Открыв его, вы увидите, что из навигационной панели исчез раздел «Быстрый доступ». Поставленную задачу можно считать решенной.
Примечание! Чтобы отобразить раздел снова, потребуется вернуть изначальное значение «a0100000» (без кавычек) измененному параметру в реестре операционной системы.
Наша группа в TelegramПолезные советы и помощь
Quick Access is one of the several new features introduced with Windows 10. As you might have noticed by now, when you click or tap the File Explorer icon in the taskbar or Start, Windows 10 launches Quick Access instead of This PC. The Quick Access folder displays recently used files and frequently used folders so that you can quickly open them, eliminating the need to navigate to file or folder’s actual location.
With default settings, Quick Access appears in the navigation pane of File Explorer (Windows Explorer) as well. The Quick Access list in the navigation pane shows desktop, downloads, documents, pictures, and up to four frequently used folders by default. While Quick Access is more useful than the now-discontinued Favorites, the problem with it is that File Explorer opens to Quick Access by default in Windows 10.

Not all users like seeing recently used files and frequently used folders upon launching the File Explorer. While it’s possible to navigate to This PC from Quick Access, users need to go through an extra step.
To take care of those users, there are options under Folder Options to stop displaying frequently used folders and recently used files in Quick Access. But if you prefer disabling Quick Access in Windows 10 so that you can directly open This PC by skipping Quick Access, you can do so as well.
In this guide, we will show how you can make This PC default in Windows 10 by disabling Quick Access as well as how to remove the Quick Access from the navigation pane.
Method 1 of 5
Note that this method doesn’t completely remove the Quick Access feature. The feature will continue to appear in the navigation pane (left pane) of File Explorer. Please check Method 2 (scroll down to see) to get rid of Quick Access from the navigation pane.
Step 1: Open Folder Options. To do so, open File Explorer, click View, click the small down arrow icon just below the Options, and then click Change folder and search options to open Folder Options dialog.

Step 2: Under the General tab of Folder Options, select This PC from the drop-down box next to Open File Explorer to, and then click Apply button. That’s it! From now onwards, when you click the File Explorer icon or use Windows + E keyboard shortcut, Windows 10 will launch This PC instead of Quick Access.
Method 2 of 5
Remove Quick Access from the navigation pane
UPDATE: It’s now possible to completely remove the Quick Access from the File Explorer navigation pane. You need to edit the Registry to make it happen. Here is how to do that quickly.
Step 1: Launch the Registry Editor and navigate to the following key:
HKEY_LOCAL_MACHINE\SOFTWARE\Microsoft\Windows\CurrentVersion\Explorer
Step 2: On the right side, right-click on an empty spot, click New, click DWORD (32-bit) Value and then name it as HubMode.

Step 3: Finally, double-click on the HubMode entry and set its value data to 1 to remove the Quick Access from the navigation pane of File Explorer.
Method 3 of 5
Remove a pinned folder from Quick Access
Step 1: Right-click on the pinned folder and then click Unpin from Quick access option.

Method 4 of 5
To Stop Windows 10 from showing frequently used folders and files
Step 1: Open Folder Options by following the steps mentioned in Method 1.
Step 2: Under the General tab of Folder Options, uncheck options titled Show recently used files in Quick Access and Show frequently used folders in Quick Access.
Step 3: Click the Apply button. That’s all!
Method 5 of 5
Turn off Quick Access via Registry
In this method, we edit the default values of the Windows Registry. We recommend you create a manual system restore point before making changes to Registry. Note that this method doesn’t remove Quick Access from the navigation pane.
Step 1: Open Registry Editor. To open it, type Regedit in Start menu search box, and then press Enter key. Click Yes button when you see the User Account Control box to launch Registry Editor.
NOTE: One can also type Regedit in Run command box and then press Enter key to open Registry Editor.
Step 2: Navigate to the following registry key:
HKEY_CURRENT_USER\SOFTWARE\Microsoft\Windows\CurrentVersion\Explorer\Advanced

Step 3: On the right side, look for the entry named LaunchTo. Double-click on it and change its value to 0 (zero) to turn off Quick Access.
Do you find the Quick Access feature useful?
Removing Quick Access from Windows 10 is a simple process that involves changing some settings in File Explorer. By following a few straightforward steps, you’ll be able to hide or disable the Quick Access feature, making your File Explorer cleaner and more to your liking. Here’s how you can do it:
Removing Quick Access from Windows 10 involves modifying how File Explorer displays frequently used files and folders. This guide will help you achieve a cleaner and more organized File Explorer.
Step 1: Open File Explorer
First, open File Explorer by clicking on the folder icon in your taskbar or pressing the Windows key + E.
When you open File Explorer, you’ll see the default view, which includes Quick Access on the left-hand side. This is where we will start making changes.
Step 2: Access Folder Options
Next, click on the «View» tab at the top of File Explorer, then select «Options».
The Folder Options window is where you can change various settings in File Explorer. It controls how files and folders are displayed and handled.
Step 3: Modify Privacy Settings
In the Folder Options window, go to the «Privacy» section at the bottom and uncheck both boxes labeled «Show recently used files in Quick access» and «Show frequently used folders in Quick access».
Unchecking these options will stop Quick Access from displaying your recently and frequently used items, making it less cluttered.
Step 4: Clear File Explorer History
Still in the «Privacy» section, click the «Clear» button next to «Clear File Explorer history».
Clearing the history will remove any existing items from Quick Access, ensuring it no longer shows past used files or folders.
Step 5: Set File Explorer to Open to «This PC»
Finally, in the same Folder Options window, use the dropdown menu next to «Open File Explorer to:» and select «This PC». Click «OK» to save your changes.
Setting File Explorer to open to «This PC» instead of Quick Access means you’ll see your drives and folders first whenever you open it.
After completing these steps, Quick Access will no longer display frequently or recently used files and folders. File Explorer will be set to open to «This PC» by default, giving you a cleaner interface.
Tips for Removing Quick Access from Windows 10
- Backup Settings: Before making changes, consider noting your original settings in case you want to revert back.
- Use Group Policy Editor: If you’re using Windows 10 Pro, you can use Group Policy Editor for more control.
- Reset Folder Options: If something goes wrong, you can reset Folder Options to default settings.
- Personalize This PC: Customize «This PC» by adding or removing folders to suit your needs.
- Regularly Clear History: Keep your File Explorer clutter-free by regularly clearing its history.
Frequently Asked Questions
Why remove Quick Access?
Some users prefer a cleaner File Explorer without recently or frequently used files cluttering the view.
Will this delete my files?
No, these steps only change how File Explorer displays folders and files; your data stays intact.
Can I still access recent files?
Yes, you can manually navigate to folders where your recent files are saved or use shortcuts.
Is this reversible?
Absolutely. You can re-enable Quick Access by reversing the steps in Folder Options.
Does this affect other users?
These changes are user-specific, so other users on the same computer won’t be affected.
Summary
- Open File Explorer.
- Access Folder Options.
- Modify Privacy Settings.
- Clear File Explorer History.
- Set File Explorer to Open to «This PC».
Conclusion
Removing Quick Access from Windows 10 is a great way to personalize your File Explorer experience. Whether you’re aiming for a cleaner look or simply prefer not to see recently used files, following the steps outlined above will help you achieve your goal. Remember, these changes are easy to reverse if you ever decide to bring Quick Access back.
If you’re looking for further reading, consider exploring more customizations for Windows 10 File Explorer or delve into advanced settings using Group Policy. For now, enjoy your streamlined File Explorer, free from the clutter of Quick Access!
Matt Jacobs has been working as an IT consultant for small businesses since receiving his Master’s degree in 2003. While he still does some consulting work, his primary focus now is on creating technology support content for SupportYourTech.com.
His work can be found on many websites and focuses on topics such as Microsoft Office, Apple devices, Android devices, Photoshop, and more.
Removing Quick Access in Windows 10 is a simple process that involves tweaking your File Explorer settings. You can hide Quick Access from view and prevent it from displaying your recent files and frequently used folders. This guide will walk you through the necessary steps to achieve this.
By following these steps, you’ll be able to remove or hide Quick Access from your File Explorer, making it cleaner and more organized according to your preferences.
Step 1: Open File Explorer
You can open File Explorer by clicking on the folder icon in your taskbar or by pressing the Windows key + E.
When you open File Explorer, you’ll see Quick Access right at the top. This is where you start making the changes.
Step 2: Access Folder Options
Click on the «View» tab at the top of the File Explorer window, then click on «Options» on the far right.
The Folder Options window is where you can make changes to how File Explorer behaves and what it displays.
Step 3: Change File Explorer Opening Setting
In the Folder Options window, find the «Open File Explorer to» dropdown menu and change it from «Quick Access» to «This PC.»
This change makes File Explorer open to This PC, displaying your drives and folders instead of Quick Access.
Step 4: Clear File Explorer History
Under the Privacy section in the Folder Options window, click the «Clear» button to remove the history of recent files and frequently used folders.
By clearing your history, you ensure that Quick Access doesn’t display any old information even if you revisit it temporarily.
Step 5: Uncheck Privacy Options
Uncheck the boxes for «Show recently used files in Quick access» and «Show frequently used folders in Quick access.»
This step ensures that Quick Access remains empty and doesn’t update with new files or folders going forward.
After you’ve completed these steps, Quick Access will no longer be visible in your File Explorer or will be empty if you remove it from the view.
Tips for Removing Quick Access in Windows 10
- If you change your mind later, you can easily revert these settings in the Folder Options window.
- Use This PC view for a more traditional file management experience.
- Clearing your File Explorer history regularly can help maintain privacy.
- Disabling Quick Access might improve File Explorer performance on older systems.
- Customize your File Explorer view further by exploring other options in the Folder Options window.
Frequently Asked Questions
How do I restore Quick Access if I change my mind?
You can restore Quick Access by opening Folder Options and changing the settings back to show recent files and frequently used folders.
Will removing Quick Access delete any of my files?
No, removing Quick Access does not delete any files. It simply changes what is displayed in File Explorer.
Can I still access my recent files and folders?
Yes, without Quick Access, you can still find your recent files in the Recent Files folder or by searching directly.
Is this change permanent?
No, you can always go back to Folder Options and re-enable Quick Access if you decide you prefer it.
Will this affect other users on my computer?
These changes are specific to your user account, so other users won’t be affected by your settings.
Summary
- Open File Explorer.
- Access Folder Options.
- Change File Explorer opening setting.
- Clear File Explorer history.
- Uncheck privacy options.
Conclusion
Removing Quick Access in Windows 10 can make your File Explorer cleaner and more tailored to your needs. While Quick Access is helpful for some, others find it unnecessary or cluttered. Follow the steps above to make the change, and enjoy a more streamlined file management experience. If you ever want to revert the changes, you can do so easily by adjusting the same settings. For more tips on customizing Windows 10, keep exploring our guides. Removing Quick Access is just the beginning of making your computer truly yours.
Matthew Burleigh is the head writer at solveyourtech.com, where he covers topics like the iPhone, Microsoft Office, and Google apps. He has a Bachelor’s and Master’s degree in Computer Science and has over 15 years of IT experience.
He has been writing online since 2008 and has published thousands of articles that have been read millions of times.
You can read his full bio here.