
Windows10Debloater
Script/Utility/Application to debloat Windows 10, to remove Windows pre-installed unnecessary applications, stop some telemetry functions, stop Cortana from being used as your Search Index, disable unnecessary scheduled tasks, and more…
Donate a cup of coffee
Be sure to look at the Contributors’ GitHubs to see if they have GitHub sponsorships as well since they have contributed to this open-source project. (https://github.com/Sycnex/Windows10Debloater/graphs/contributors)
Disclaimer
WARNING: I do NOT take responsibility for what may happen to your system! Run scripts at your own risk!
Also, other variants of this repo are not technically «new» versions of this, but they are different in their own respective ways. There are some sites saying that other projects are «new» versions of this, but that is inaccurate.
How To Run the Windows10Debloater.ps1 and the Windows10DebloaterGUI.ps1 files
There are different methods of running the PowerShell script. The methods are as follows:
First Method
- Download the .zip file on the main page of the GitHub and extract the .zip file to your desired location
- Once extracted, open PowerShell (or PowerShell ISE) as an Administrator
- Enable PowerShell execution
Set-ExecutionPolicy Unrestricted -Force - On the prompt, change to the directory where you extracted the files:
e.g. —cd c:\temp - Next, to run either script, enter in the following:
e.g. —.\Windows10DebloaterGUI.ps1
Second Method
- Download the .zip file on the main page of the GitHub and extract the .zip file to your desired location
- Right-click the PowerShell file that you’d like to run and click on «Run With PowerShell»
- This will allow the script to run without having to do the above steps but Powershell will ask if you’re sure you want to run this script.
Remember this script NEEDS to be run as admin in order to function properly.
How To Run the Windows10SysPrepDebloater.ps1 file
For the WindowsSysPrepDebloater.ps1 file, there are a couple of parameters that you can run so that you can specify which functions are used. The parameters are:
-SysPrep, -Debloat and -Privacy.
To run this with parameters, do the following:
- Download the .zip file on the main page of the GitHub and extract the .zip file to your desired location
- Once extracted, open PowerShell (or PowerShell ISE) as an Administrator
- On the prompt, change to the directory where you extracted the files:
e.g. —cd c:\temp - Next, to run either script, enter in the following:
e.g. — .\Windows10SysPrepDebloater.ps1 -Sysprep -Debloat -Privacy
Sysprep, Interactive, and GUI Application
There are now 3 versions of Windows10Debloater — There is an interactive version, a GUI app version, and a pure silent version.
-
Windows10SysPrepDebloater.ps1-> The silent version now utilizes the switch parameters: -Sysprep, -Debloat -Privacy. The silent version can be useful for deploying MDT Images/sysprepping or any other way you deploy Windows 10. This will work to remove the bloatware during the deployment process. -
Windows10Debloater.ps1-> This interactive version is what it implies — a Windows10Debloater script with interactive prompts. This one should not be used for deployments that require a silent script with optional parameters. This script gives you choices with prompts as it runs so that you can make the choices of what the script does. -
Windows10DebloaterGUI.ps1-> There is now a GUI Application named Windows10DebloaterGUI.ps1 with buttons to perform all of the functions that the scripts do. This is better for the average user who does not want to work with code, or if you’d prefer to just see an application screen.
Switch Parameters
There are 3 switch parameters in the Windows10SysPrepDebloater.ps1 script.
-
-SysPrep, which runs the command within a function: get-appxpackage | remove-appxpackage. This is useful since some administrators need that command to run first in order for machines to be able to properly provision the apps for removal. -
-Debloat, switch parameter which does as it suggests. It runs the following functions: Start-Debloat, Remove-Keys, and Protect-Privacy.
Remove-Keys removes registry keys leftover that are associated with the bloatware apps listed above, but not removed during the Start-Debloat function. -
-Privacy, adds and/or changes registry keys to stop some telemetry functions, stops Cortana from being used as your Search Index, disables «unnecessary» scheduled tasks, and more.
This script will remove the bloatware from Windows 10 when using Remove-AppXPackage/Remove-AppXProvisionedPackage, and then delete specific registry keys that are were not removed beforehand. For best results, this script should be run before a user profile is configured, otherwise, you will likely see that apps that should have been removed will remain, and if they are removed you will find broken tiles on the start menu.
These registry keys are
EclipseManager,
ActiproSoftwareLLC,
Microsoft.PPIProjection,
Microsoft.XboxGameCallableUI
You can choose to either ‘Debloat’ or ‘Revert’. Depending on your choice, either one will run specific code to either debloat your Windows 10 machine.
The Debloat switch choice runs the following functions
Debloat,
Remove-Keys,
Protect-Privacy,
Stop-EdgePDF (If chosen)
The Revert switch choice runs the following functions
Revert-Changes,
Enable-EdgePDF
The Revert option reinstalls the bloatware and changes your registry keys back to default.
The scheduled tasks that are disabled are
XblGameSaveTaskLogon,
XblGameSaveTask,
Consolidator,
UsbCeip,
DmClient
These scheduled tasks that are disabled have absolutely no impact on the function of the OS.
Bloatware that is removed
3DBuilder,
ActiproSoftware,
Alarms,
Appconnector,
Asphalt8,
Autodesk SketchBook,
MSN Money,
Food And Drink,
Health And Fitness,
Microsoft News,
MSN Sports,
MSN Travel,
MSN Weather,
BioEnrollment,
Windows Camera,
CandyCrush,
CandyCrushSoda,
Caesars Slots Free Casino,
ContactSupport,
CyberLink MediaSuite Essentials,
DrawboardPDF,
Duolingo,
EclipseManager,
Facebook,
FarmVille 2 Country Escape,
Flipboard,
Fresh Paint,
Get started,
iHeartRadio,
King apps,
Maps,
March of Empires,
Messaging,
Microsoft Office Hub,
Microsoft Solitaire Collection,
Microsoft Sticky Notes,
Minecraft,
Netflix,
Network Speed Test,
NYT Crossword,
Office Sway,
OneNote,
OneConnect,
Pandora,
People,
Phone,
Phototastic Collage,
PicsArt-PhotoStudio,
PowerBI,
Royal Revolt 2,
Shazam,
Skype for Desktop,
SoundRecorder,
TuneInRadio,
Twitter,
Windows communications apps,
Windows Feedback,
Windows Feedback Hub,
Windows Reading List,
XboxApp,
Xbox Game CallableUI,
Xbox Identity Provider,
Zune Music,
Zune Video.
Quick download link
iwr -useb https://git.io/debloat|iex
Allowlist and Blocklist
There may be some confusion, but when using the Allowlist/Blocklist, the checkmark means it is on the blocklist, and that it will be removed.
Credits
Thank you to a60wattfish, abulgatz, xsisbest, Damian, Vikingat-RAGE, Reddit user /u/GavinEke, and all of the contributors (https://github.com/Sycnex/Windows10Debloater/graphs/contributors) for the suggestions, code, changes, and fixes that you have all graciously worked hard on and shared! You all have done a fantastic job!
Windows 10 originates bunch of apps that may seem useful but possible is never needed. This is one of the struggles that are not only limited to Windows 10. The Other Windows version also has a certain amount of useless apps known as Bloatware or Crapware.
The Manufactures fill the new laptops, PC, tablets, and phones with pre-installed applications that not only use hard disk space but sometimes cause different issues. So it is better to remove bloatware & crapware on Windows 10.
Unluckily, Windows 10 doesn’t want users to uninstall Universal apps like Money, People, Maps and others. However, this doesn’t mean you can’t get rid of Windows 10 bloatware or preinstalled crapware.
Today, in this article I am going to help you to identify the unwanted piece of software and how to remove bloatware from Windows 10?
What is Bloatware /Crapware?

Bloatware and crapware both are similar things, but in actual they are different. So, know both of them individually.
Bloatware came pre-installed in the machine or with some other software; the main purpose of this is to make extra money to their partners. However, it can be valuable for you. For instance, McAfee antivirus comes with other programs such as Adobe products. Possibly you won’t install it but have it in your system.
Crapware is software that gets installed on your system without your will. This generally comes pre-installed by the system manufacturer or accidentally get installed with some program installed by you.
Well, the Crapware is of no use and are often a kind of browser toolbar, default browser change, an unnecessary program that starts with the machine, and others. Crapware’s only purpose is making extra money for the system manufacturer or developer of the program install on your PC/laptop.
So, it is very important to say goodbye bloatware and crapware, to free-up hard disk space and make Windows 10 perform better. Here learn different probable ways to remove Windows 10 bloatware/crapware.
How to Remove Windows 10 Crapware/ Bloatware?
Now you know what crapware and bloatware are, and you probably want to get rid of them. Luckily, just like any other third-party program, you can easily remove them without any harm to your computer. There are a couple of ways to remove unwanted software from your computers, and I’m going to show you all of them.
Solution 1 – Uninstall Bloatware/Crapware Manually
Well, some Windows 10 bloatware are easily removed or uninstalled. There are several apps such as news, sports, Money, Silverlight, PC Cleaners, Java, and others.
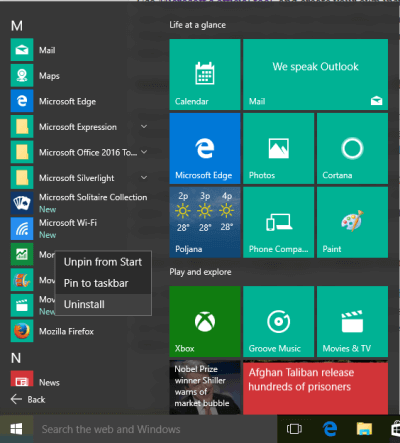
Locate the application that you need to remove > right-click > choose Uninstall.
Microsoft made the removing process easy for many items in Windows 10. But later you will find out Microsoft does not consider entire apps equal.
Considerably the apps that Microsoft considered as a part of Windows 10 core experience need using the PowerShell commands to remove bloatware Windows 10.
Solution 2- Use PowerShell to Remove Bloatware
If the above steps won’t help you to get rid of Windows 10 bloatware, then you can use PowerShell to remove Windows 10 bloatware.
PowerShell is an essential part of Windows system management. It is a command and script language and provides more control over Windows installation.
So, in this case, you can use a series of PowerShell commands to remove bloatware Windows 10.
To do so, first open PowerShell command > type PowerShell in Start menu > click on Windows PowerShell on Run as admin.
And look what you need to remove; the PowerShell could remove any useless software or bloatware from Health and fitness to Windows Calculator.
So, in this way you can remove Windows 10 bloatware or preinstalled crapware.
Solution 3 – Use Third-Party Uninstaller
If you are unable to remove Windows 10 bloatware installed on your computer manually, then you can download the third-party removal tool to say goodbye bloatware & crapware.
Well, there are plenty of third-party uninstallers available on the web and it is completely your will to use whatever you like.
But as per my opinion and other user’s recommendation you can make use of the Revo Uninstaller or CCleaner. You need to just download the tool and open it, this search for entire apps and features considered as bloatware/crapware and uninstall it simply.
You can repeat the process if you find more than one program as bloatware and automatically get rid of Windows 10 bloatware.
Solution 4 – Use DISM Command to Remove Bloatware
Just like PowerShell command, you can use the DISM (Deployment Imaging Service and Management) command to uninstall bloatware apps.
This is a very powerful command and used to service Windows OS in various different ways. So make use of it to remove extra apps from your machine.
Follow the steps to use DISM command:
- Use the given command to check the variety of system bloatware
- DISM /Online /Get-ProvisionedAppxPackages | select-string Packagename
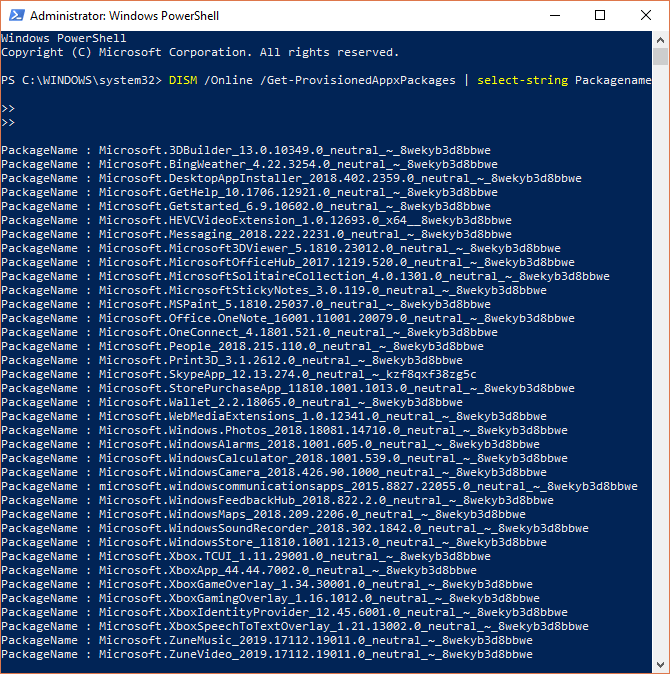
- Now the list of installed apps appears, so now in the list utilize the package names for removing them. Use the given command:
- DISM /Online /Remove-ProvisionedAppxPackage /PackageName:PACKAGENAME

Note – PACKAGENAME is the name of the app, you can see it in the image given below.
- As the whole process is completed successfully, restart your Windows 10 system to let the cod to take effect.
And in this way, you can remove bloatware Windows 10.
Solution 5 – From the Browser Remove Crapware Toolbars
As now you are well aware of the bloatware and also how to uninstall it, here check out how to remove the annoying Crapware toolbars and other software that comes with the system.
Many of the Crapware toolbars look like normal programs but are very dangerous. And to uninstall them follow the steps given below.
As per my opinion, you can make use of the Adwcleaner, this easily uninstalls the preinstalled Crapware toolbars.
Follow the steps to use it:
- Download AdwCleaner
- And click on Scan button
- As the whole scanning process is completed, analyze everything you want to clean like Services, Files, Folders, etc.
- Next, after selecting everything click Clean option > and that’s it the AdwCleaner will remove the toolbars.
Solution 6 – Start From Scratch
This is the last solution that you can follow to remove bloatware from Windows 10. This solution is basically for the users who are not sure that every piece of bloatware/crapware is removed from their PC/laptop.
You can re-install the Windows 10 OS from scratch. This is good of your PC/laptop is from a well-known manufacturer as it comprises its sponsored bloatware into the system. And to remove Windows 10 Bloatware, you need to perform a clean install Microsoft’s copy of Windows 10.
To do so you can utilize the Microsoft official tool and after that create an installation media of Windows 10 with a fresh copy of the system on it.
Well, this method takes more time then uninstalling bloatware with previous methods. But also you need to be sure that the copy of Windows 10 is free from third-party bloatware completely.
So, this is all about how to remove bloatware from Windows 10 and free up the hard disk and system memory. But also you need to make sure to prevent installing unnecessary software, apps in the future.
# Tips – How to Prevent Installing Bloatware and Crapware.
Now, after cleaning all the mess from your Windows 10 PC/laptop it is also important to keep the system stays in that way.
Therefore, here check out some of the helpful tips to avoid installing the crapware and bloatware to keep your system possibly clean and new.
Follow the given tips:
- Make sure to download the programs from the official site or download page.
- Carefully install the program as much unwanted software gets installed in your system due to accidental approval. So assure checking entire checkboxes that prompt to you.
- Check for the extra programs that may come silently while downloading the apps and software
- During the program installations read the “Agree” certificate and don’t click on every Agree page as once again you accidentally agree to download something that you don’t want.
The Way Forward:
Undoubtedly the Windows 10 bloatware and crapware are worthless, so, it is best to uninstall them to free up system resources and increase Windows 10 performance.
Accordingly, here I had discussed the entire possible solution to say goodbye to bloatware and crapware & make your Windows 10 PC/laptop clean.
Also try some easy tweaks to maintain your system performance such as deeply scan your system with a good antivirus program or Windows Defender, delete temp files, uninstall unwanted software, apps, files, folder, clean up your system internally and externally, update Windows system & drivers, etc.
Despite this, if you are not technically advanced then you can try the PC Repair Tool, to fix common and uncommon Windows related issues and errors automatically and optimize your PC/laptop performance.
Hope the article helps you to clear all your doubts, queries if you have any suggestion, comments, and questions then just follow us on Facebook Page.
Good Luck!!!
Hardeep has always been a Windows lover ever since she got her hands on her first Windows XP PC. She has always been enthusiastic about technological stuff, especially Artificial Intelligence (AI) computing. Before joining PC Error Fix, she worked as a freelancer and worked on numerous technical projects.
It is frustrating when your Windows system contains some prebuilt, unneeded apps. This unnecessary bloatware can reduce your PC performance if you use a low-end computer.
Although Windows developers understand this issue from their Windows 10, so they removed several unwanted bloatware from their new Windows 11 system. But after all, some apps still remain that can drastically decrease your PC using experience.
I recently bought a higher-end PC, but previously I used a simple low-end computer full of bloatware. During that time, I researched bloatware removal options and successfully removed them from my old computer.
So without skipping, read the full article to find out which methods I used to uninstall them.
Let’s start!
Does Windows 11 Have Less Bloatware Than Windows 10?
Technically speaking, Yes, Windows 11 has less bloatware than Windows 10. But there is still plenty of bloatware that remains in Windows 11. However, it is more polished than Windows 10.
Here is the list of bloatware that remains on the Windows 11 system:
- OneNote
- Your Phone
- Sticky Notes
- Xbox Console Companion
- Solitaire Collection
- Power Automate Desktop
- Movies & TV
- Xbox Game Bar
- Mail and Calendar
- Mixed Reality Portal
- Get Help
- Microsoft People
- Paint 3D
- Corel Paintshop pro
- Tips
- Clipchamp
- To do
- Microsoft News
- Cortana
- uTorrent
The demonstrated list is a small portion of your bloatware as there are still many more unmentioned. I just wanted to give you a heads up about the unwanted apps.
Follow our guide to Fix Win+Shift+S Not Working on Windows 11/10.
How to Remove the Bloatware from Windows 11/10 with Windows Settings
You can remove bloatware from your computer with the help of the Start menu. Also, you can navigate to the Apps & Features settings to remove the unwanted apps. Sometimes the Control panel settings come in handy in case of bloatware removal.
Here are the steps to remove the bloatware with Windows settings:
All used and unused apps are stored in the start menu, and when we hover through that option, we can see several apps. Likewise, you can remove your desired bloatware from here.
Here are the steps to use the start menu to remove the bloatware:
The bloatware is removed from your computer.
Note: The System apps will not show any Uninstall option when you right-click on them.
2. Apply the Apps & Features Settings to Remove the Unwanted Apps
The Apps & Features option offers you a fantastic opportunity to modify your apps. With these settings, you can uninstall bloatware.
Here are the steps to apply the apps & features settings to uninstall the bloatware:
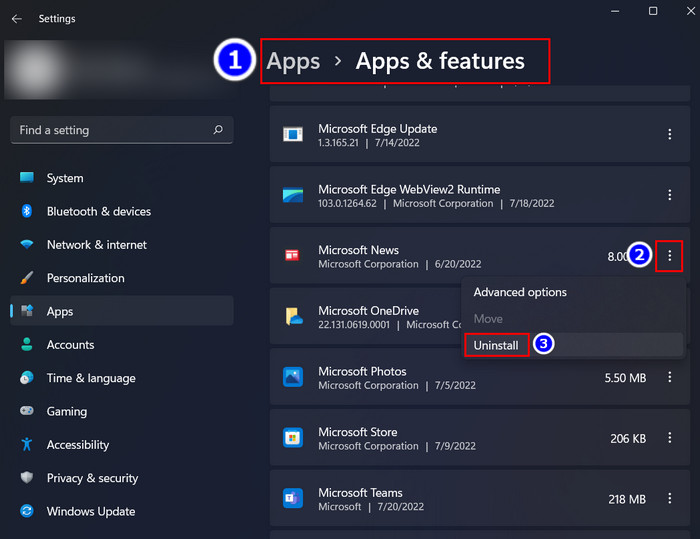
- Right-click on the Windows icon.
- Choose the Apps & Features option.
- Scroll down and select the bloatware you want to delete.
- Click on the three dots beside the bloatware.
- Select the Uninstall option.

You successfully uninstalled the bloatware from your Windows 11/10 system.
Check out the easiest way to Fix Yahoo Mail App Error 0x8019019a on Windows 11/10.
3. Utilize the Control Panel to Uninstall the Bloatware
You can easily manage all your apps and features from the control panel. So move to the Control Panel, select the bloatware and uninstall it.
Here are the steps to use the control panel to uninstall the bloatware:
- Move to the Search bar.
- Type Control Panel and select the app.
- Navigate to the View by option and choose the Large icons option.
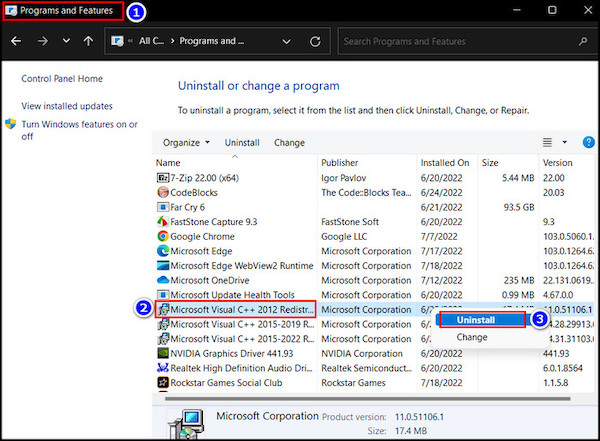
- Select the Programs and Features section.

- Double-click on the desired bloatware and choose Yes when the Uninstall window pops up.
The desired bloatware is removed from your Windows 11 PC.
How to Uninstall Bloatware from Windows 11 with Powershell Command
PowerShell command helps us to detect and eradicate many unwanted apps with a single command line. Therefore, if you want to use this command line to remove any bloatware, follow the instructions below.
Here are the steps to remove bloatware with the PowerShell command:
1. Select & Remove Bloatware with Powershell Command
Open the PowerShell with administrative privilege and write the command line appropriately to remove any bloatware.
Here are the steps to select & remove unwanted apps with PowerShell:
Now Microsoft one drive sync is completely removed from your computer. I hope you understand how to delete bloatware from your device using PowerShell.
Follow our guide to know Mount, Burn, Create & Unmount ISO File in Windows 11.
2. Remove All The Bloatware with A Single Command
You can remove all the bloatware from your system with the help of a single command line. But remember, during the process, you can see multiple red error lines on your command window. That error line appears when some bloatware apps are running in the background.
However, there is nothing to worry about because this command will delete the entire unused bloatware; the rest will remain.
Here are the steps to remove all the bloatware with a single command:
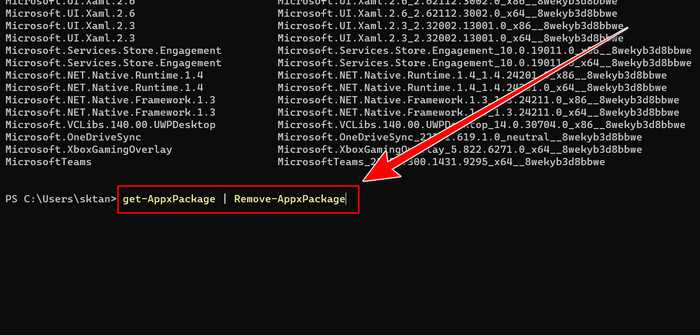
- Move to the Search bar and type Windows PowerShell.
- Select the Run as administrator option.
- Type get-AppxPackage | Remove-AppxPackage and hit the Enter key.

- Wait for some time and let the process finish.
- Restart the computer.
All the bloatware from your PC is now deleted with a single PowerShell command.
3. Use Dism Command to Delete the Bloatware
Dism command can help you eliminate some repetitive and useless bloatware. You just need to follow the instructions mentioned here.
Here are the steps to use the Dism command to remove bloatware:
Dism command removed the desired bloatware from your Windows 11/10 system.
Also read, Fix Mail Recipient Missing from Send to Menu in Windows 11.
How To Remove Bloatware Using A Third Party App
Using a third-party bloatware removal tool can help you to remove unwanted apps. You will find available tools claiming to delete all the bloatware without hassle.
Here are some bloatware removal tools:
- Bloatware removal utility
- ThisIsWin11
- IObit Uninstaller
- Revo Uninstaller
- Windows Debloater
Always keep in mind that these third-party apps are not safe and can damage your PC. Also, these apps are hazardous to your security, so try to avoid them.
Related content you should read: Disable Rounded Corners in Windows 11.
FAQs
What is the best app to remove bloatware?
You must use Windows Powershell instead of any third-party app to remove the bloatware.
Is it safe to delete Windows PowerShell?
Yes, you can delete Windows PowerShell if you don’t use it. But sometimes, Windows Powershell is a must thing to modify your Windows system.
Should I disable Windows PowerShell?
Sometimes you can disable your Windows PowerShell when there is a chance that the user can type some malicious commands that will damage your system.
Final Thoughts
Removing the bloatware from your Windows system is a straightforward process, and the Windows PowerShell command is the best option for that. Also, the control panel and start menu option can ease your task so that you can try those methods.
Moreover, there are plenty of in-built Windows systems with which you can easily uninstall unwanted apps. So before using any third-party app, you must use the methods that I mentioned in this article.
Do you have any questions regarding this article? Feel free to ask me in the comment.
Last updated on April 22, 2024
Page navigation About & Bloatware Removal:
Please provide the English content you would like translated, and I will do my best to translate it into Chinese.
**Viable Solutions and Step-by-Step Troubleshooting**
| **Effective Solutions** | **Step-by-Step Fault Resolution** |
| — | — |
| What are pre-installed apps? Which apps fall under this category? | Unnecessary pre-installed apps; view common pre-installed software…Full Steps |
| How to remove pre-installed apps from Windows 10/11? |
1. Uninstall pre-installed apps from the Start menu…Full Steps
2. Remove pre-installed apps using PowerShell…Full Steps
3. Delete unnecessary apps from Control Panel…Full Steps
4. Uninstall pre-installed apps from Settings…Full Steps
|
| How to speed up Windows and free up space without removing pre-installed apps? | No need to delete pre-installed apps, use third-party software to free up disk space…Full Steps |
| More Tips: How to remove pre-installed apps from an Android device? | Step 1. Tap on Settings on your Android phone…Full Steps |
Please note that the links (#1 through #4) are for illustrative purposes and may need to be replaced with actual hyperlinks in the actual page content.
What is bloatware? Which apps come pre-installed on Windows 10/11?
“Bloatware” is what you get when you look up the term in a dictionary: unnecessary software that manufacturers include on new computers or mobile devices. It does not say that bloatware is malware. On the contrary, it is legitimate and secure. So think of it as a common presale marketing ploy to get you to try a product before downloading something from a rival.
However, when the trial period ends, it can wreak havoc on Windows 11 or 10. And having them installed in the first place slows down your computer. So, if you have no use for this junk, why not get rid of it?
Popular preloaded apps:
- OneNote
- Xbox Game Bar
- Windows Terminal
- Get Help
- People
- Movies & TV
…. (This is an ellipsis, indicating omitted content or continuation.)
If you’re looking to shrink the size of Windows, the next section will teach you how to remove bloatware from Windows 11/10.
How to Remove Pre-installed Apps in Windows 10/11?
Uninstall Pre-installed Apps from the Start Menu
In Windows 11, all your apps are located in the Start menu, making it easy to uninstall programs.
Step 1: Click the «Start» icon. You’ll see some apps pinned to the panel.
Step 2: Right-click the app and select “Uninstall” from the drop-down menu.
Uninstall bloatware from the Start menu

Step 3: Find other apps: Click on All Apps > Scroll down to find the app > Right-click on it and select “Uninstall.”
Okay, here’s the sentence translated into American English:
2. Remove pre-installed software using PowerShell.
Step 1: Open the Start menu, search for Windows PowerShell, and then click «Run as Administrator.»
Step 2: Click «Yes» to proceed. When PowerShell opens, type the command and press Enter.
Get-AppxPackage *appName* | Remove-AppxPackage

Replace appName with the bloatware you want to uninstall.
The content in the table is as follows:
| Application | Command |
| — | — |
| Microsoft People | Get-AppxPackage «Microsoft.People*» | Remove-AppxPackage |
| Xbox | Get-AppxPackage *xbox* | Remove-AppxPackage |
| Weather | Get-AppxPackage *bingweather* | Remove-AppxPackage |
| Photos | Get-AppxPackage *photos* | Remove-AppxPackage |
| Sports | Get-AppxPackage *bingsports* | Remove-AppxPackage |
| Movies & TV | Get-AppxPackage *zunevideo* | Remove-AppxPackage |
| OneNote | Get-AppxPackage *onenote* | Remove-AppxPackage |
| Mail & Calendar | Get-AppxPackage *windowscommunicationsapps* | Remove-AppxPackage |
These commands are used to uninstall pre-installed apps in Windows 10. Running these commands in PowerShell with administrative privileges will remove the corresponding applications. Please note that this may affect system functionality, so make sure you understand the implications before proceeding.
Step 3. Repeat the above steps to remove any additional applications.
Remove unwanted apps from the Control Panel
Step 1. Type “Control Panel” in the search box.
Step 2. Open Control Panel > Programs > Programs and Features
Step 3: Find the program you want to remove, click on it with your right mouse button, and select “Uninstall.”

Uninstall pre-installed apps from settings
Step 1: Click on «Settings» from the Start menu.
Click “Settings” in the Start menu:

Step 2. Click on “Apps” on the left > click on “Apps & features” on the right > Scroll down under the missing app to find what you want to remove from your Windows device.
Or you can search for the app on your box.

Step 3: Tap on the three dots and select “Uninstall.”

Speed up your Windows system without uninstalling bulky software to free up space
Windows 11 has less bloatware than Windows 10. So, if you don’t need to remove the pre-installed apps, here’s another option to improve Windows 11 performance and free up C drive space – use a tool — Partition Master.
«Partition Master is a valuable software that enables you to manage your disk space with features such as resizing/moving partitions, migrating the operating system from HDD to SSD, and cloning disks.»
Download a disk cleanup utility:
Steps to free up disk space:
Step 1: Free up unallocated space on drive C:
If there’s no unallocated space on the system disk, go to the Disk Management utility, right-click on the partition next to Drive C, and select «Resize/Move.»
Slide the partition’s left panel inwards to shrink it and leave unallocated space behind the System C drive, then click «OK.»
Step 2: Increase the C drive space.
1. Right-click on the C drive and select «Resize/Move.»

2. Drag the endpoint of the system partition to the unallocated space to add space to the C drive, and then click “OK”.

Step 3: Keep all changes to extend C drive.
Click “Run the Task” and then “Apply” to save all changes and extend your system C drive.
Confirm extending system C drive

Want to get rid of bloatware on your Android device? Read on.
Preloaded software on smartphones:
- Weather app
- Sports app
- Finance app
- Music app
- Video app
- News app
How to Remove Preloaded Apps on Android
Much like the unwanted programs that come pre-installed on Windows PCs, some Android devices come with bloatware installed before you even buy them from the store. Manufacturers include a suite of apps in pursuit of profit. Some of these apps start up automatically. We recommend disabling these:
Step 1: Open the «Settings» option on your Android phone.
Step 2. Go to Settings > Apps & notifications > See all apps.
Step 3. Select the app you want to remove, then tap «Uninstall» or «Disable» to get rid of the bloatware on your Android phone.
In short,
There are several ways to uninstall bloatware from Windows 11 and Windows 10: via the Start menu, Settings, Powershell, and Control Panel. Alternatively, if your PC is free of bloatware, you can download and run the Partition Master Tool to free up disk space.
Many individuals who use Windows 10 as their operating systems frequently attempt to discover approaches to eliminate bloatware from their computer. For the individuals who don’t have the foggiest idea, the term bloatware is a scourge for everyone who owns any tech devices like computers, etc.

Tech Manufacturers fill your glossy new PC, tablet, or smartphone with preloaded unnecessary software and applications that create a mess in your systems.
Microsoft is no more unusual to bloatware. Windows 10 may look like it, yet in the background, there is plenty of software you basically needn’t bother with. Fortunately, you can free yourself from the bloatware. But before removing bloatware you should know why do you really need to delete bloatware apps.
Is it necessary to delete Windows bloatware applications?
While the Windows bloatware doesn’t occupy a lot of actual storage space, it is more about practicing total control over your computer system and framework, particularly prior to utilizing a new PC. Many consider the default preloaded applications (like Cooking Fever, Candy Crush Saga, and Candy Crush Friends) as “trash” and I would definitely agree with some cases but there are many other Windows default applications that are important and we should not remove them.
In case you want to remove bloatware I have mentioned some of the easiest methods in the next section that you can follow and can get rid of the bloatware in your Windows system.
Methods to Remove Bloatware
#1. Removing bloatware using System > Apps & Features
Some bloatware includes inside the System > Apps and Features list which you typically use to uninstall a program. Hence you can easily remove such bloatware using the System > Apps and Features.
To further proceed with this method follow the steps mentioned below.
1) Press the Windows logo, type Apps & Features, and click on it
2) Scroll down to the application which you want to remove, click on it, and afterward click Uninstall.

3) A pop-up will open asking you to confirm your choice, you just need to click on the Uninstall button.
That’s it, now you can repeat these processes to remove other such bloatware applications, and then you can exit Apps & features.
Well, this was one of the easiest methods to remove any bloatware. If in case this method doesn’t work for you then you can go on with the next method.
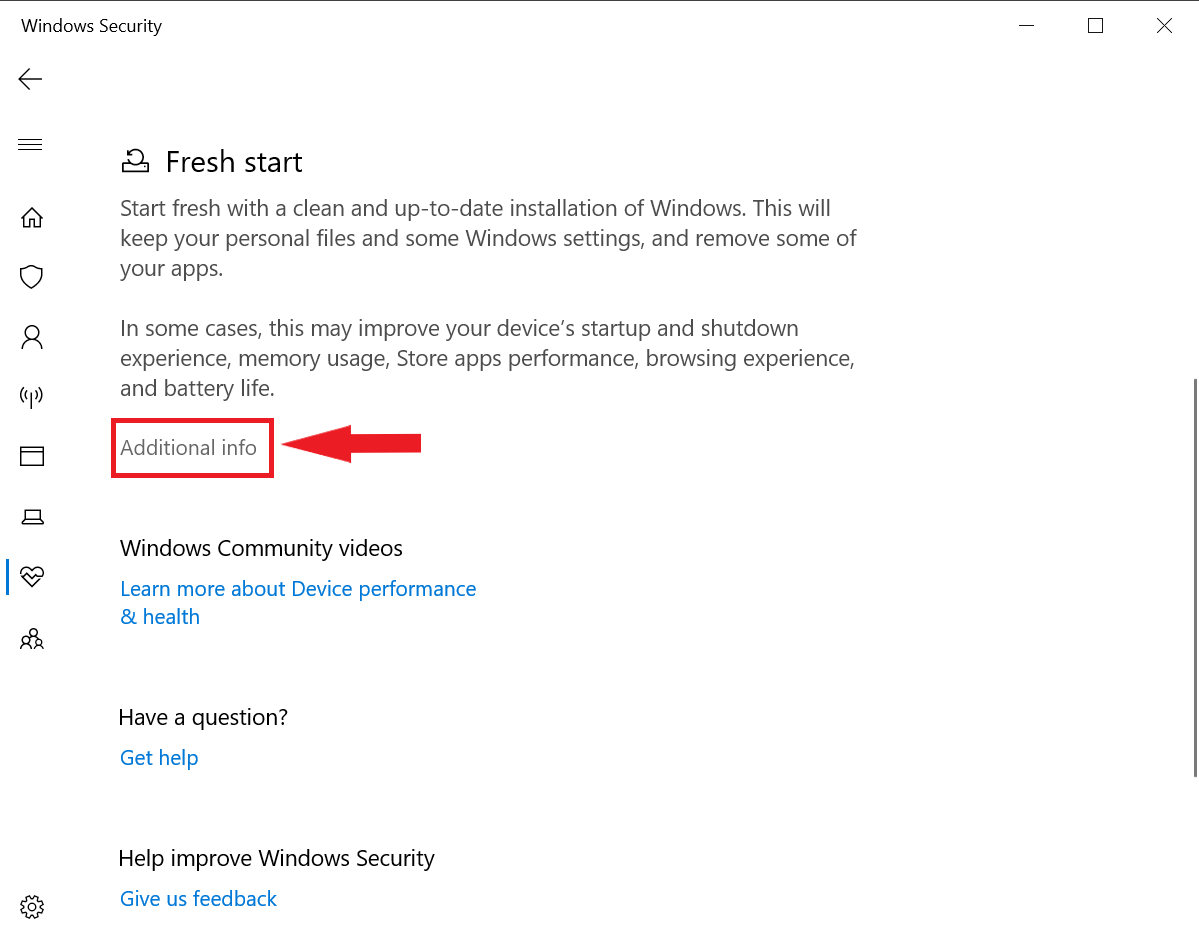
#2. Removing bloatware using Fresh Start
Some bloatware does not include inside the System > Apps and Features list and hence the above method will not work for such applications. And hence you can use Windows inbuilt Fresh Start tool or say feature so as to successfully remove bloatware from the Windows system.
As the name hints, it will reset your computer and just install the important stuff that is needed to run Windows 10 system. Truly, I have been using this tool for a long while now, and hence I would like to say that Fresh Start doesn’t erase the files and folders available on your PC. However, it’s recommended to create a backup of all your files before proceeding with this method.
Note: Fresh Start tool additionally holds some of your Windows Settings. During the process, it also updates your Windows to the latest version so you don’t need to download any huge updates later on.
To further proceed with this method follow the steps mentioned below.
- In the search box type Settings and click on it
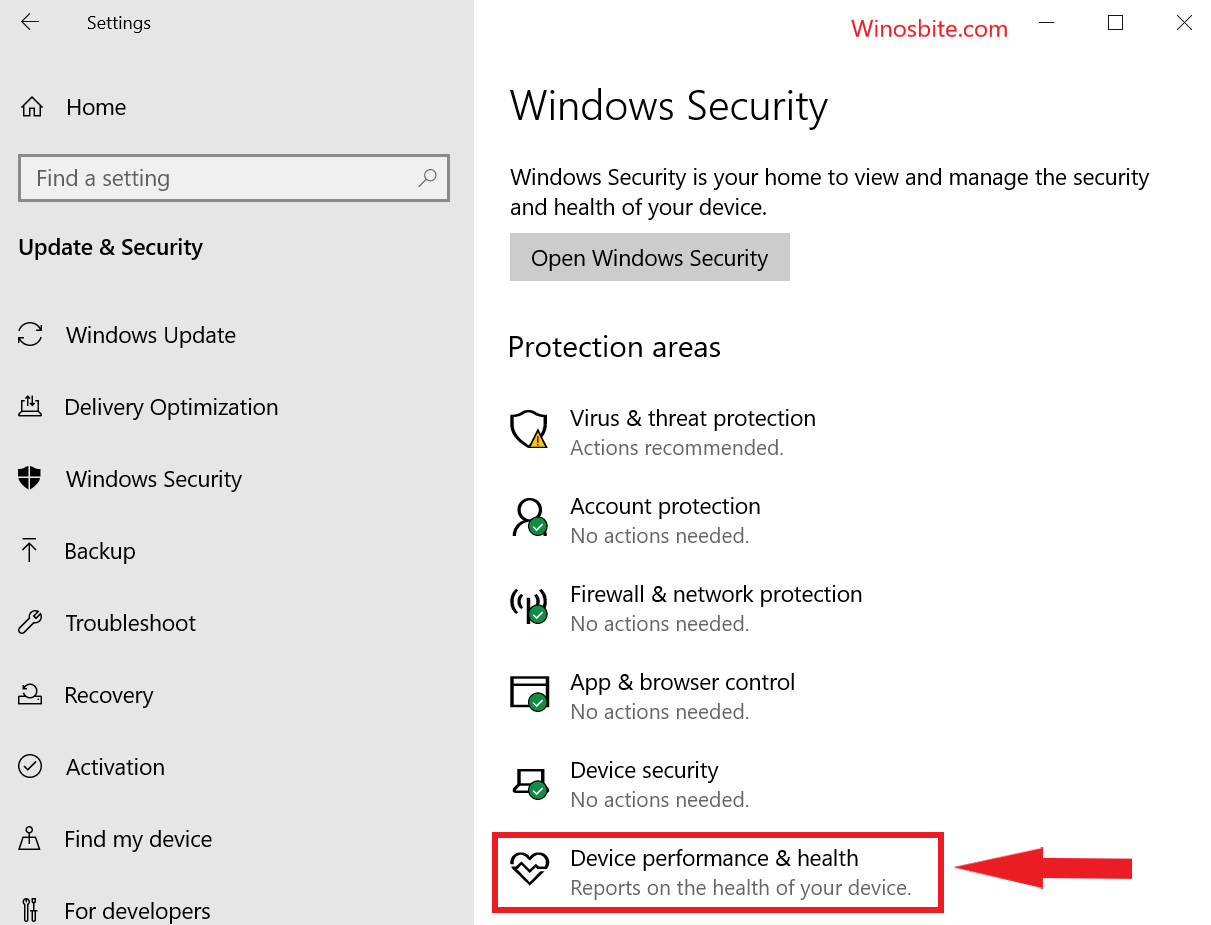
- Now open Update & Security, and then further open Windows Security.
- Now under Windows Security select Device performance & health.

- Now scroll a bit and you will see a section with the header saying “Fresh start”, now just right-click on the additional info link present at the bottom.

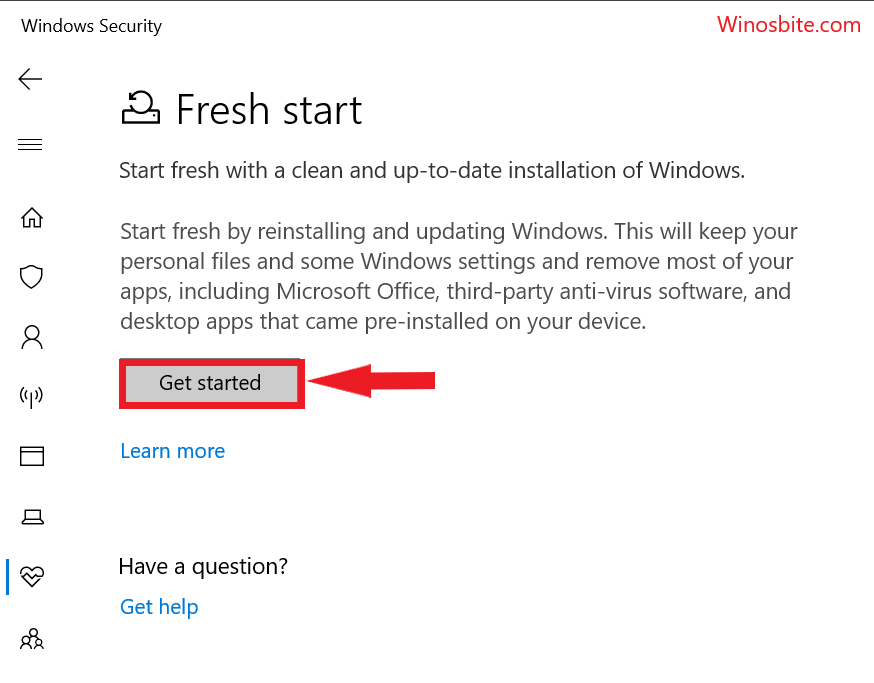
- To further proceed just click on Get Started and then just accept the UAC (User Account Control) prompt.

- Now when the Fresh start interface will pop open you just need to click on Next.

- Now the Fresh Start tool will show a list of Windows bloatware that is going to be removed.
- You just need to review the list presented and then click on Next.

- That’s it now just click on the Start button, after this the Windows reinstallation process will begin.


Well, this is the way you can eliminate all the bloatware applications from your Windows 10 PC. Here, you should take note that Windows doesn’t remove any third-party applications that are available in Microsoft Store. The rest will be removed, which you can reinstall later on the off chance that you need them.
That’s it this was all you should know to remove bloatware from your Windows computer. I hope you find my article interesting and useful. Feel free to comment below if you encounter any problem while removing the bloatware.
Also read:
- How to Remove Hyperlinks from MS Word
- What is avlaunch.exe and how to Remove it