
- Posted on
Сейчас многие сотрудники компаний перешли на удалённый режим работы и используют удалённый рабочий стол (Windows Remote Desktop) для подключения к рабочей машине и доступа к программному обеспечению, в том числе ArcGIS.
Не секрет, что для оптимальной работы ArcGIS Pro необходим графический процессор и выделенная видеопамять, тем более если необходимо работать с 3D. Ознакомиться с системными требованиями и проверить свой компьютер на их соответствие можно на страничке https://pro.arcgis.com/ru/pro-app/get-started/arcgis-pro-system-requirements.htm
Однако работа с ArcGIS Pro или другим ПО, использующим графический процессор, через удалённый рабочий стол будет затруднено по причине того, что Microsoft Windows Remote Desktop по умолчанию не использует возможности графического процессора для рендеринга. Что приводит к ошибкам при попытке инициализировать драйверы отображения DirectX или OpenGL, и низкой производительности (медленная перерисовка меню, карт и т.д.).
Эту проблему можно легко исправить, изменив групповую политику на рабочей машине (где запускается программа) чтобы разрешить использование графического процессора и нативной поддержки DirectX 11 / OpenGL 3+ во время сеанса удаленного рабочего стола (необходимы права администратора).
Для этого необходимо выполнить следующие действия (Windows Server 2016 / Windows 10 RDP):
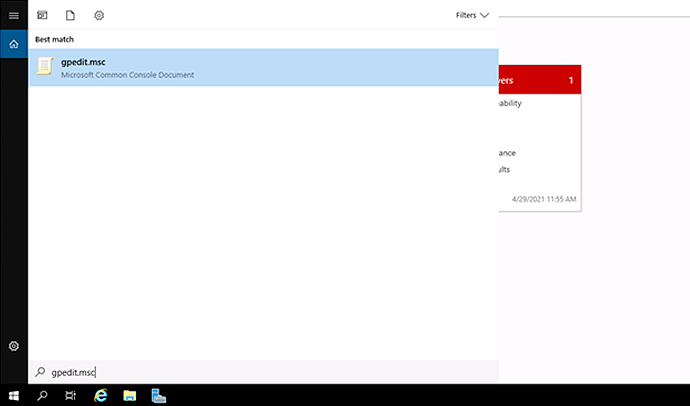
- Откройте средство редактирования групповой политики на панели управления или воспользуйтесь диалоговым окном поиска Windows (клавиша Windows + R, затем введите gpedit.msc)
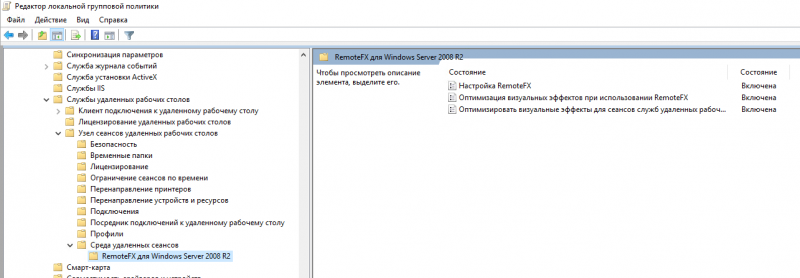
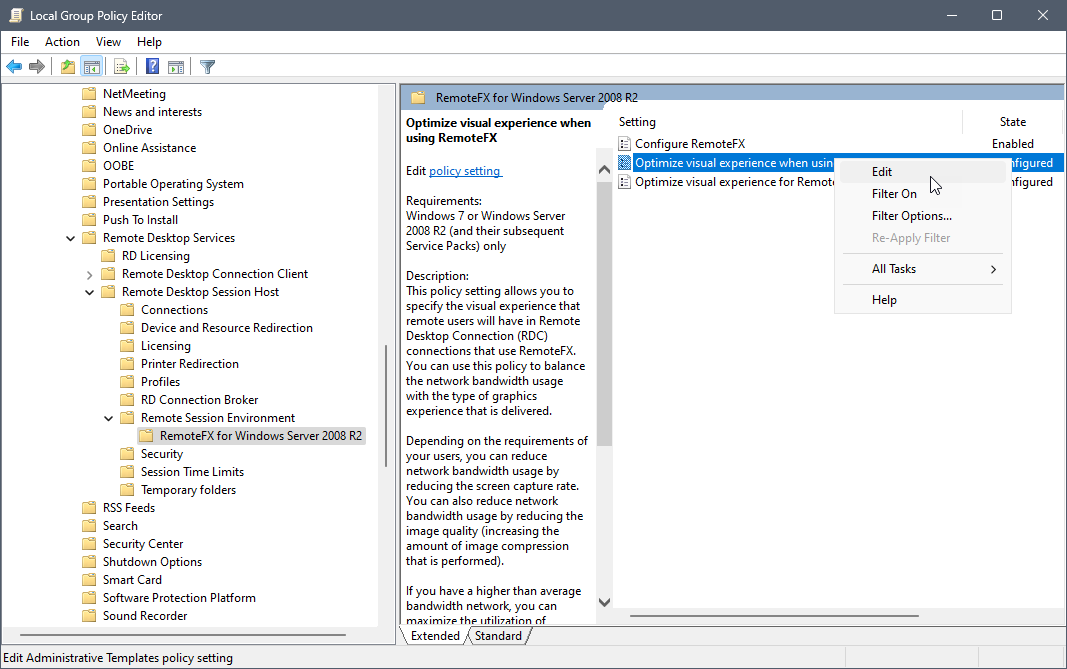
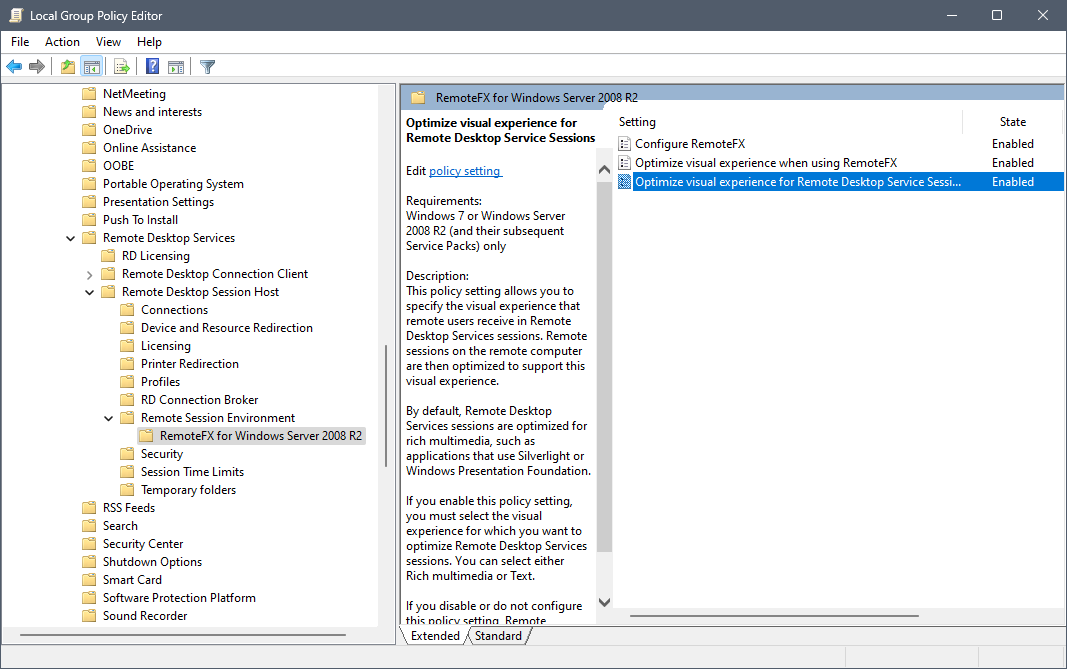
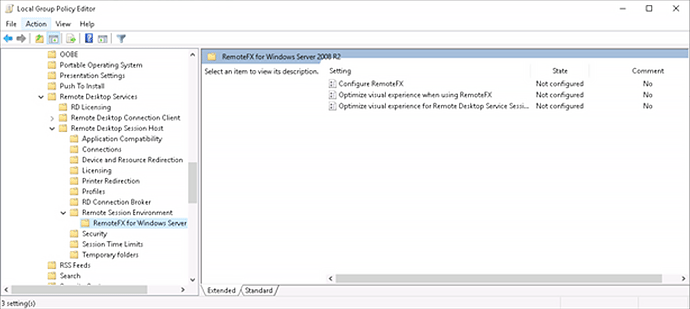
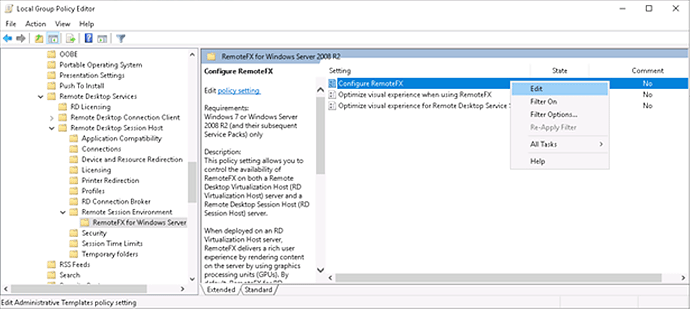
- Перейдите в Административные шаблоны > Компоненты Windows > Службы удаленных рабочих столов > Узел сеансов удаленных рабочих столов > Среда удалённых сеансов > RemoteFX для Windows Server 2008 R2 (Administrative Templates > Windows Components > Remote Desktop Services > Remote Desktop Session Host > Remote Session Environment > RemoteFX for Windows Server 2008 R2) и включите:
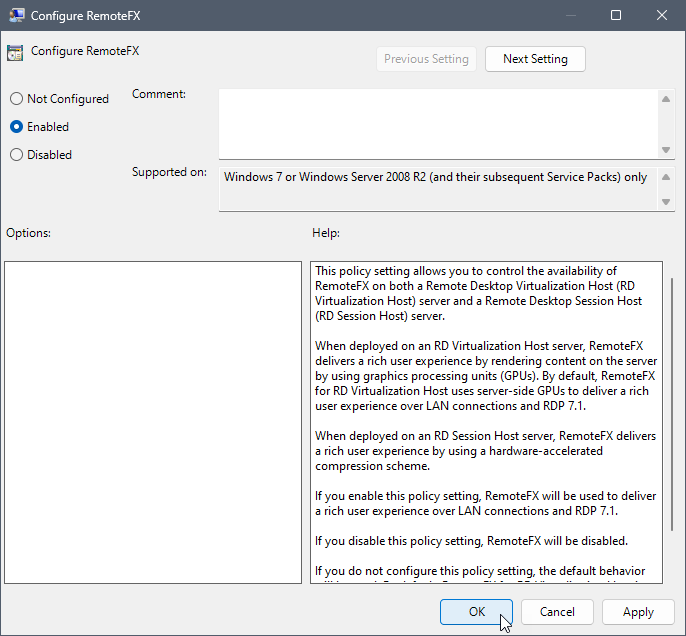
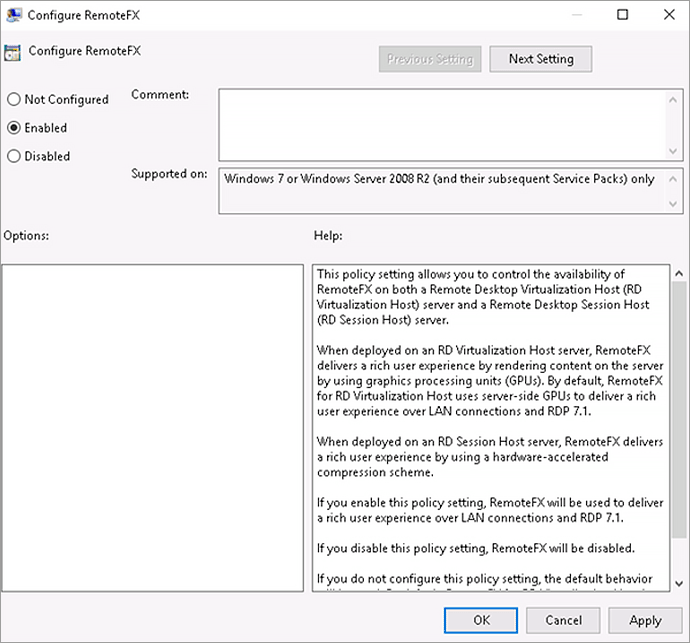
- Настройка RemoteFX
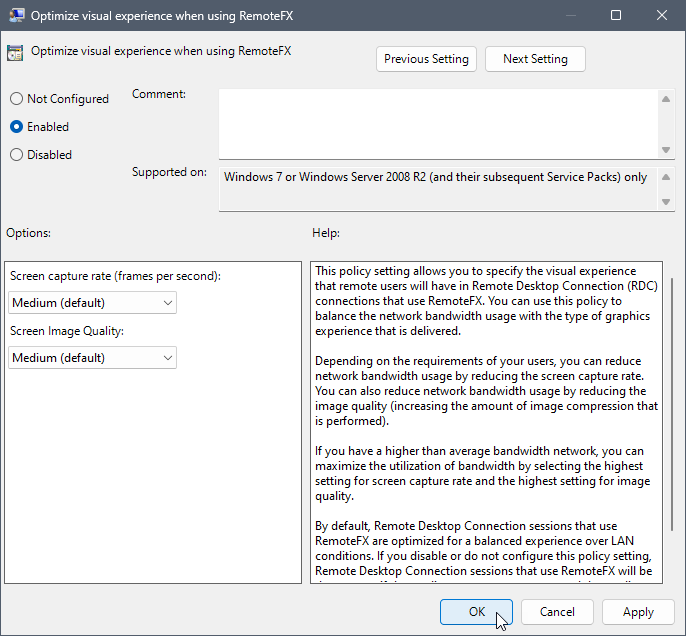
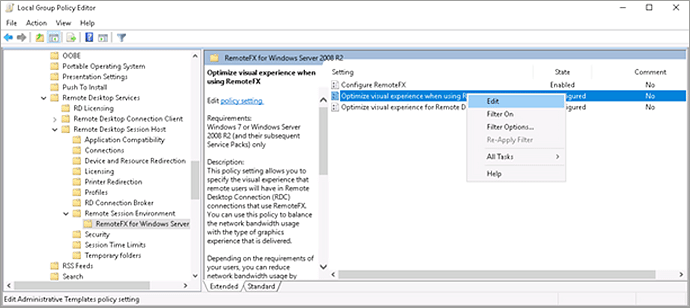
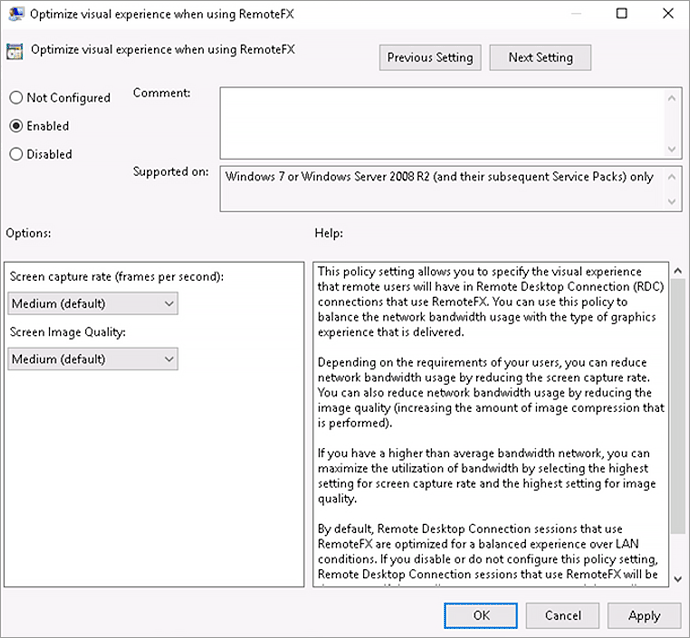
- Оптимизация визуальных эффектов при использовании RemoteFX
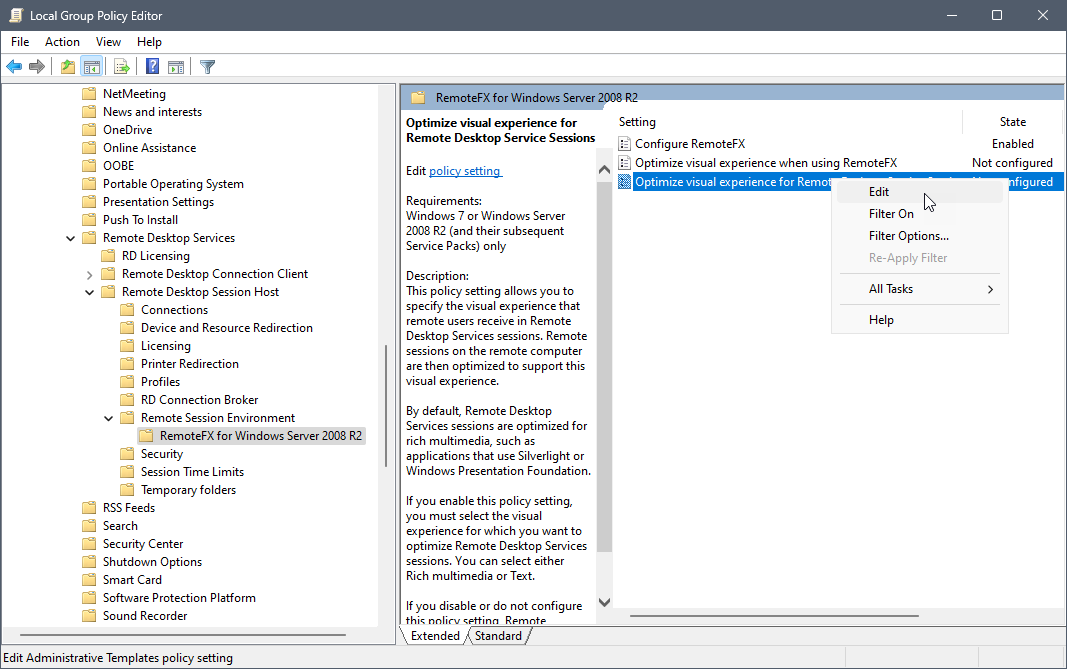
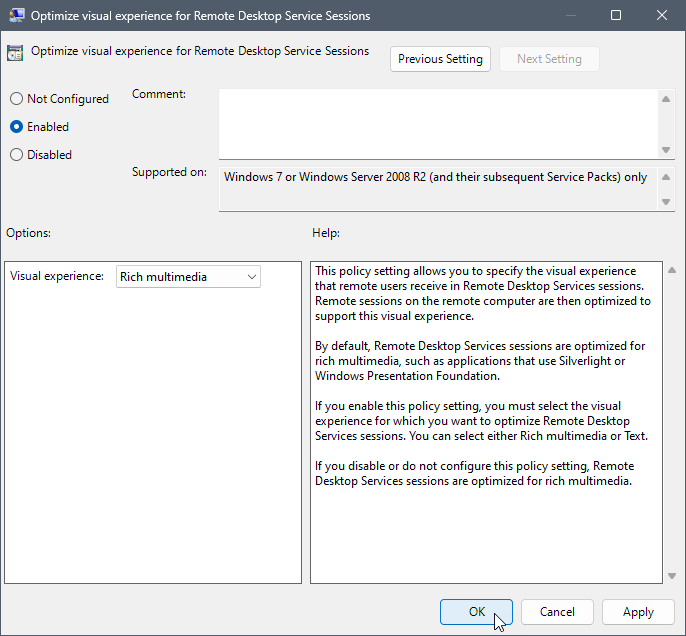
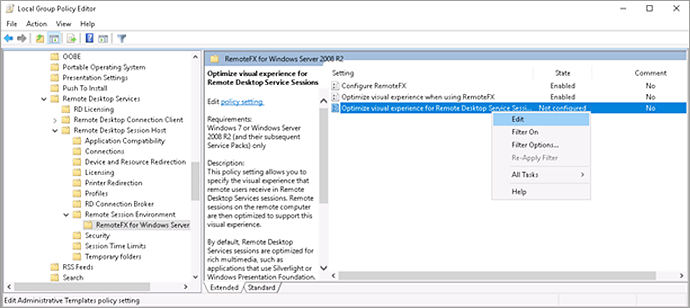
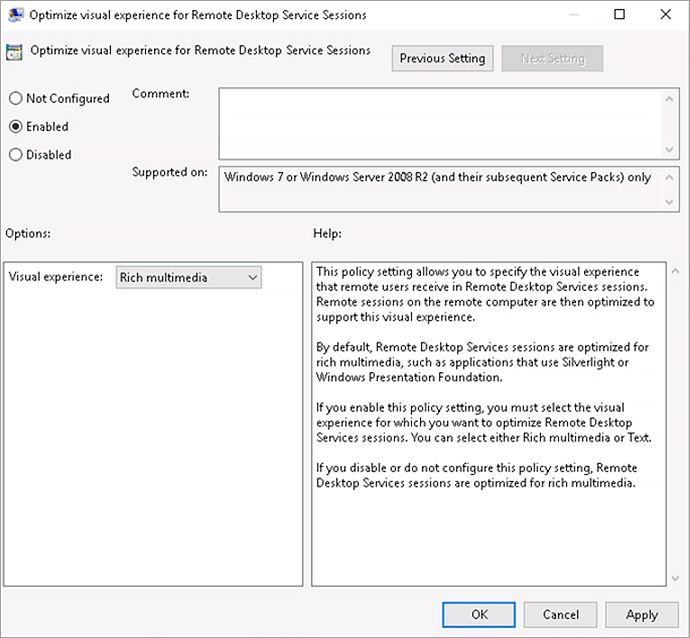
- Оптимизировать визуальные эффекты для сеансов служб удаленных рабочих столов
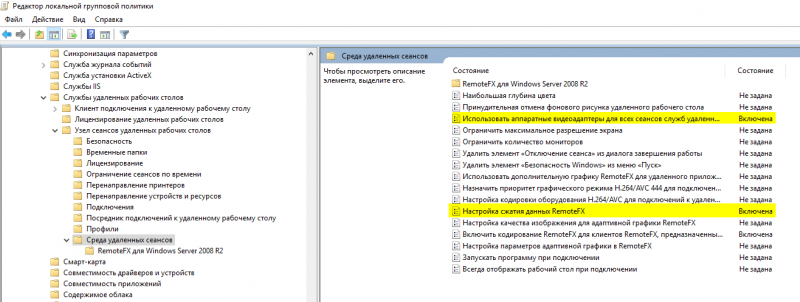
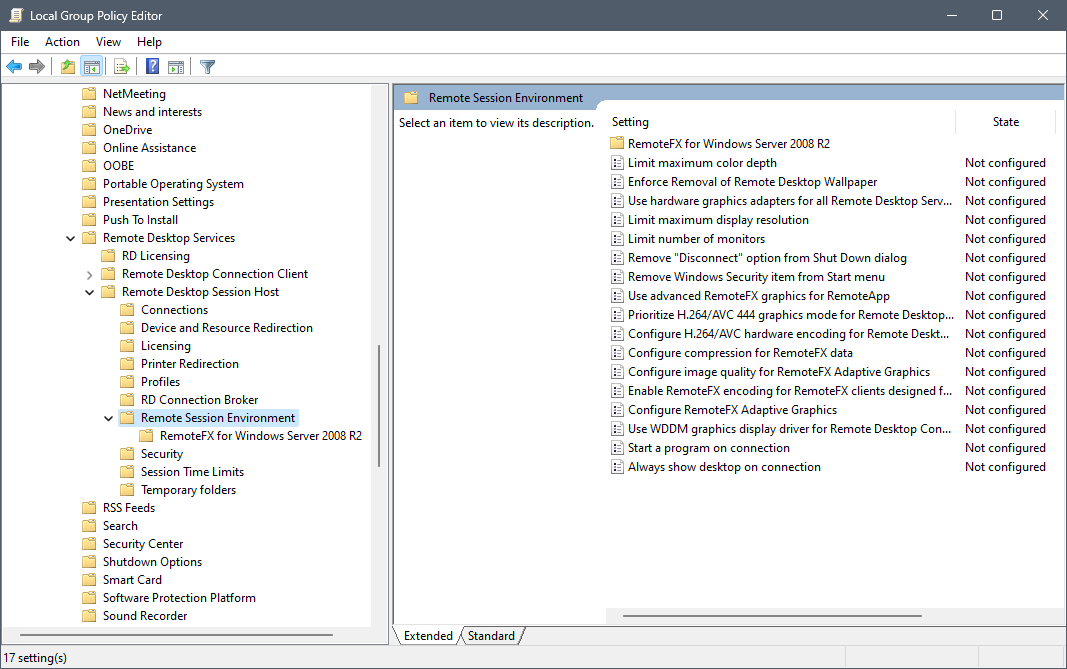
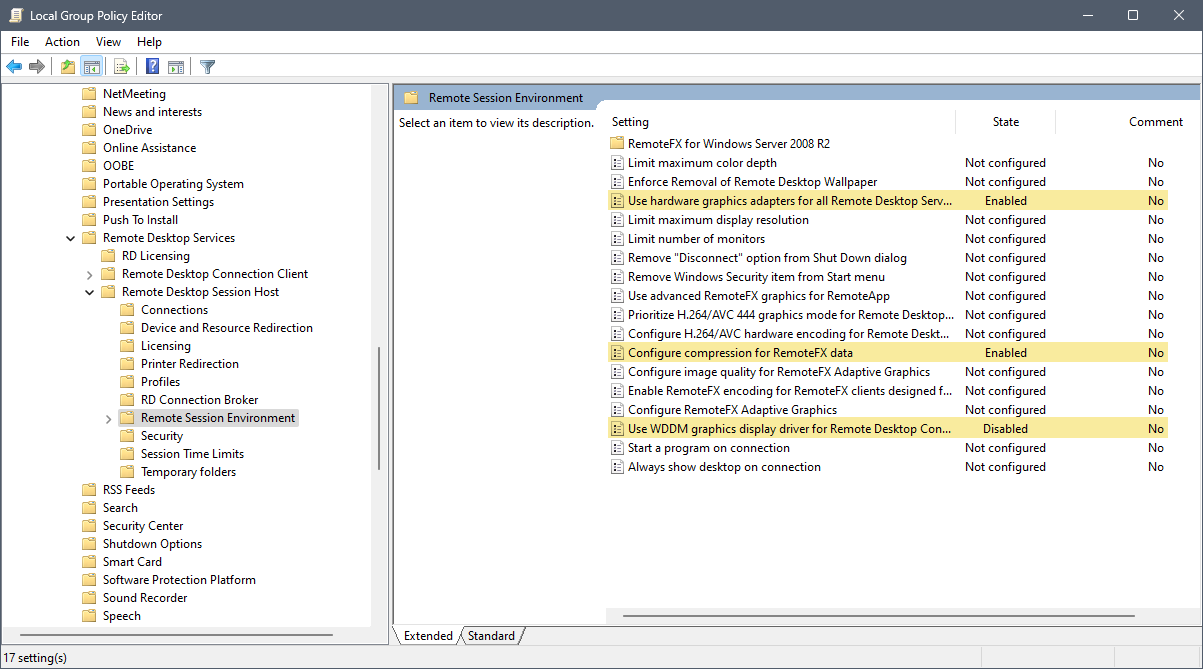
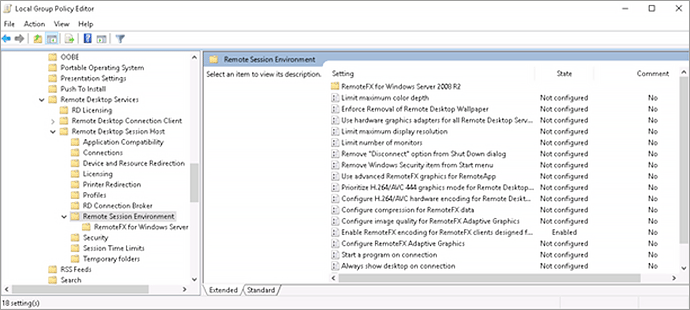
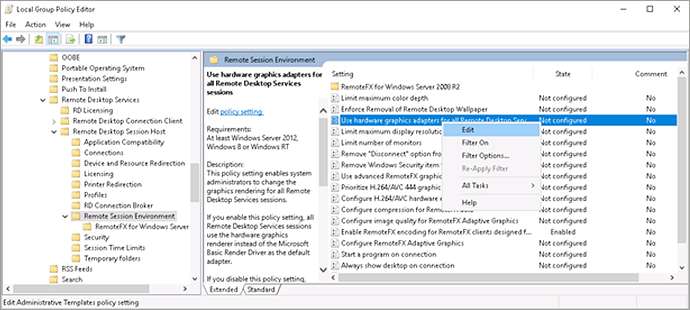
- Прейдите в раздел Среда удалённых сеансов и включите:
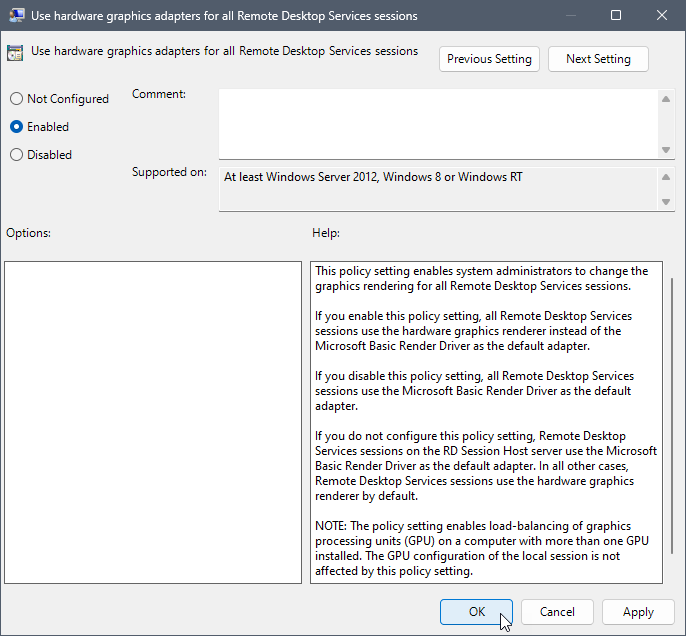
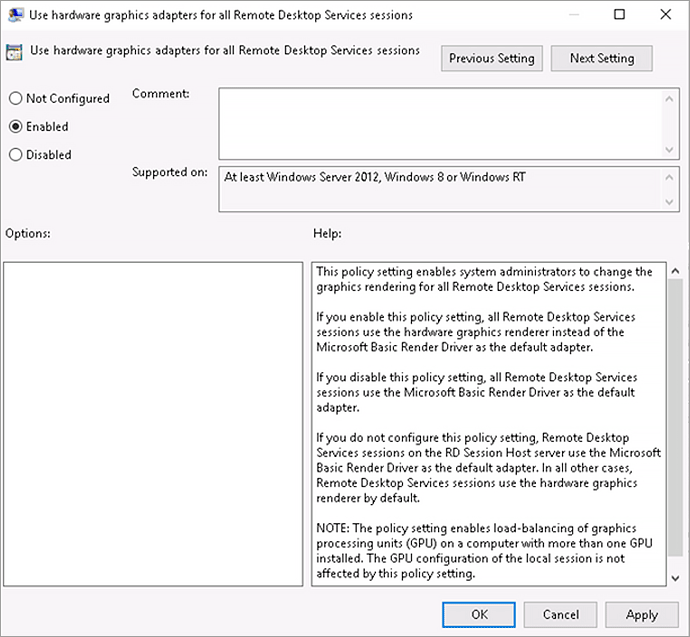
- Использовать аппаратные видеоадаптеры для всех сеансов служб удаленных рабочих столов
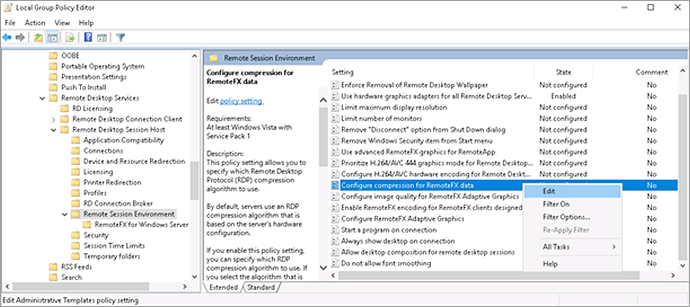
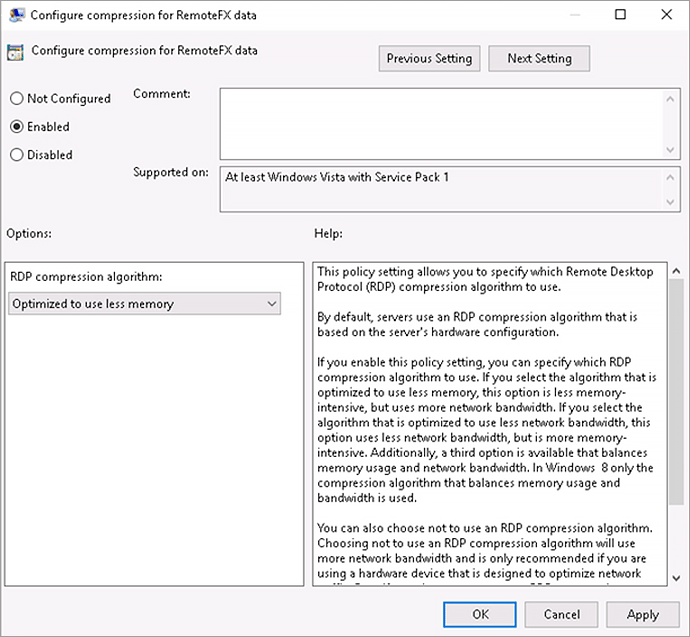
- Настройка сжатия данных RemoteFX
- Перезагрузите рабочую машину, чтобы изменения, внесенные в групповую политику, вступили в силу.
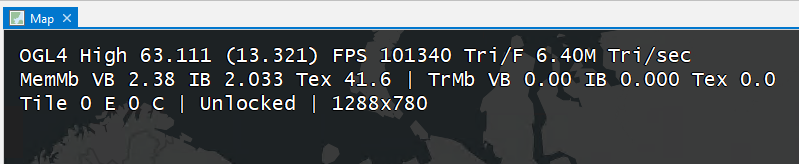
Эта процедура активирует поддержку DirectX/OpenGL и графический процессор через RDP. Можно убедиться в этом, запустив ArcGIS Pro, открыв карту, а затем нажав Shift + E, это отобразит информацию о используемом рендеринге в текущем сеансе ArcGIS Pro.

Плюс пару дополнений.
- Если при удалённом подключении возникают проблемы с разрешением – экран рабочей машины выглядит размытым. Масштабирование приходит с клиентской машины, и если на домашнем компьютере стоит 125%, то и на рабочей машине будет так же. В магазине приложений Windows 10 есть «современный» клиент. В нем можно настроить DPI.
- Если в своей работе вы используете сразу несколько сеансов удаленных рабочих столов, то можно например воспользоваться решением Remote Desktop Manager Free Edition для их каталогизации и удобства доступа https://remotedesktopmanager.com/?utm_source=rdm&utm_medium=native&utm_campaign=about
Статья написана с использованием следующих материалов:
- https://community.esri.com/t5/implementing-arcgis-questions/enabling-gpu-rendering-on-windows-server-2016-windows-10-rdp/td-p/658522
- https://knowledge.civilgeo.com/knowledge-base/enabling-gpu-rendering-for-microsoft-remote-desktop/
- https://habr.com/ru/post/501132/
Обновление.
По рекомендации наших читателей дополнили статью материалами как другие известные системы поддерживают удалённую работу с приложениями, интенсивно использующими GPU.
У Citrix есть решение для использования GPU при удалённом доступе к физическим машинам, так и виртуальным. А так же профессиональное решение для виртуализации ПО для работы с 3D с использованием NVIDIA GRID.
NVIDIA предлагает использовать своё решение для виртуализации программного обеспечения интенсивно использующего графический процессор, как для отображения так и расчётов Quadro vDWS. Для пользователей Esri подготовлен отдельных документ с информацией о том, как развернуть рабочую станцию виртуального центра обработки данных NVIDIA Quadro с поддержкой ArcGIS Pro.
Просмотров:
40 216
Метки
- 3D
- 3D-картография
- ArcGIS Pro
- оптимизация
- производительность
Some software—such as CivilGEO’s engineering software—uses powerful display graphics and the GPU (Graphics Processing Unit) for quick rendering of the display. However, running engineering software and other graphics-heavy software in a Remote Desktop environment can be challenging for the principal reason that Microsoft Windows Remote Desktop does not allow GPU rendering by default. Starting up the graphics-heavy software can generate errors as the software attempts to initialize DirectX or OpenGL GPU display drivers on the host computer.
This issue can be easily corrected by modifying the group policy on the host computer to allow the use of GPU rendering during a Remote Desktop session.
To fix this issue, follow the steps below:
- Display the Windows Run dialog box by pressing the Win + R keys (the Windows key and the “R” key at the same time) on the keyboard. This will display the Windows Run dialog box.
- Type gpedit.msc in the Open entry and then press the Enter key or click the [OK] button.
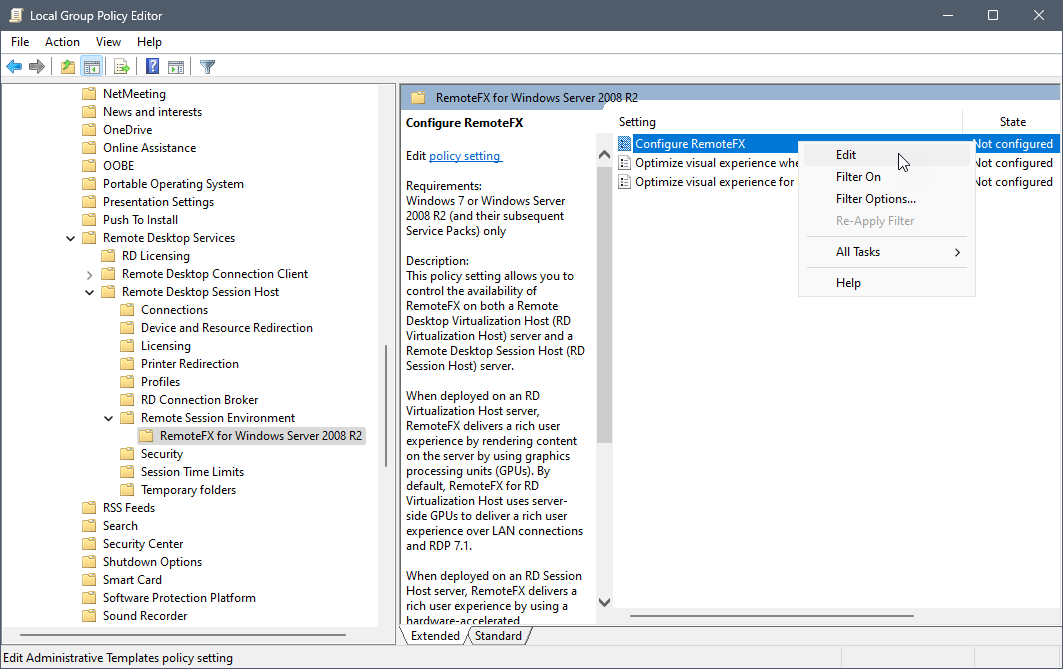
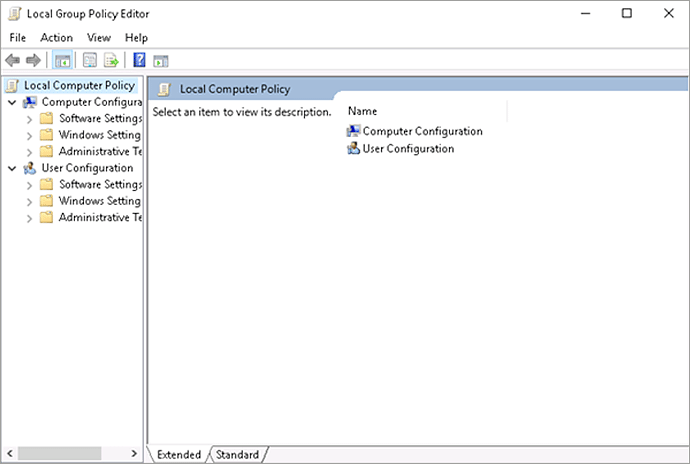
- The Local Group Policy Editor application will be displayed. Using the navigation panel on the left side, select Administrative Templates > Windows Components > Remote Desktop Services > Remote Desktop Session Host > Remote Session Environment > RemoteFX for Windows Server as shown below.

- On the displayed panel, right-click the Configure RemoteFX entry and then select Edit from the displayed context menu.
- The following dialog box will be displayed. Select the Enabled radio button entry and then click the [OK] button.

- Select and right-click the Optimize visual experience when using RemoteFX entry and then select Edit from the displayed context menu.

- Select the Enabled radio button entry and then click on the [OK] button.
- Select and right-click the Optimize visual experience for Remote Desktop Service Sessions entry and then select Edit from the displayed context menu.
- Select the Enabled radio button entry and then click on the [OK] button.
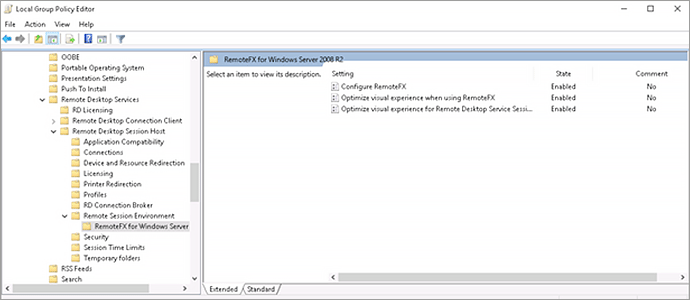
- Notice that the Configure RemoteFX, Optimize visual experience when using RemoteFX and Optimize visual experience for Remote Desktop Service Sessions Group Policies status are set to Enabled.
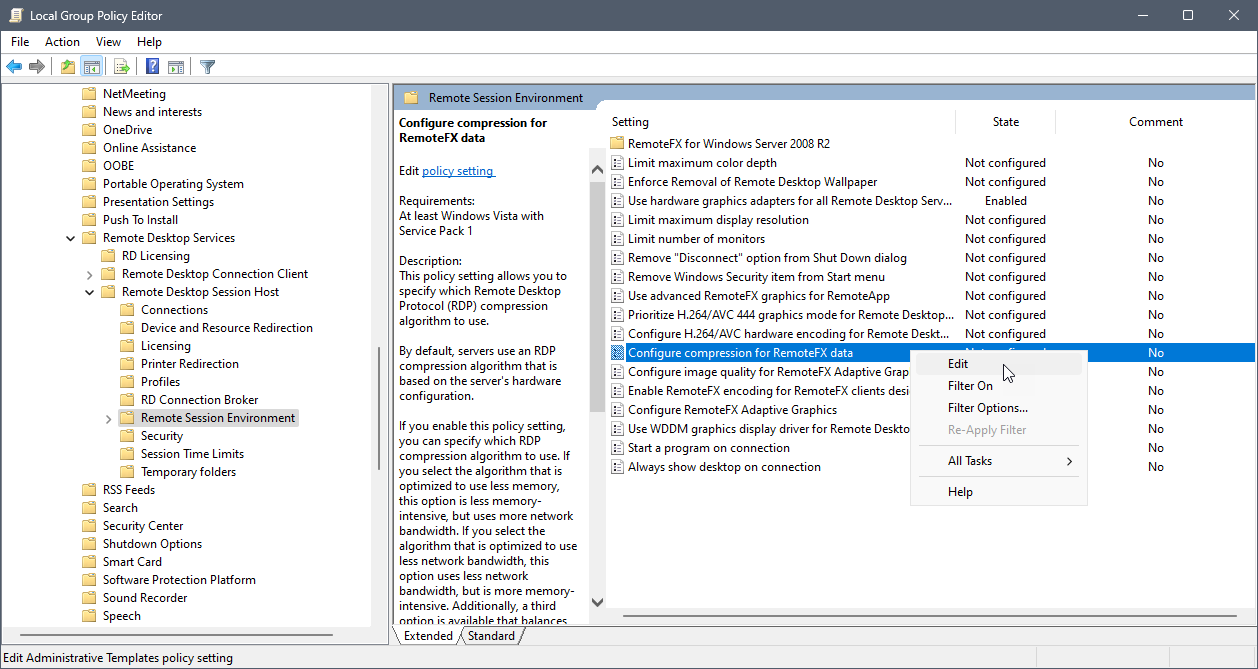
- From the navigation panel on the left side, select Remote Session Environment as shown below.
- On the displayed panel, right-click the Use the hardware default graphics adapter for all Remote Desktop Services sessions entry and then select Edit from the displayed context menu.

- Select the Enabled radio button entry and then click on the [OK] button.
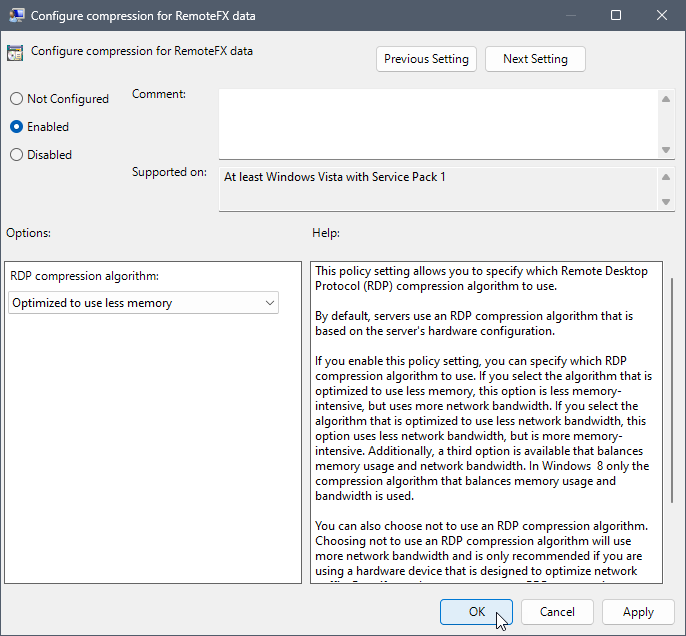
- Select and right-click the Configure compression for RemoteFX data entry and then select Edit from the displayed context menu.
- Select the Enabled radio button entry and then click on the [OK] button.
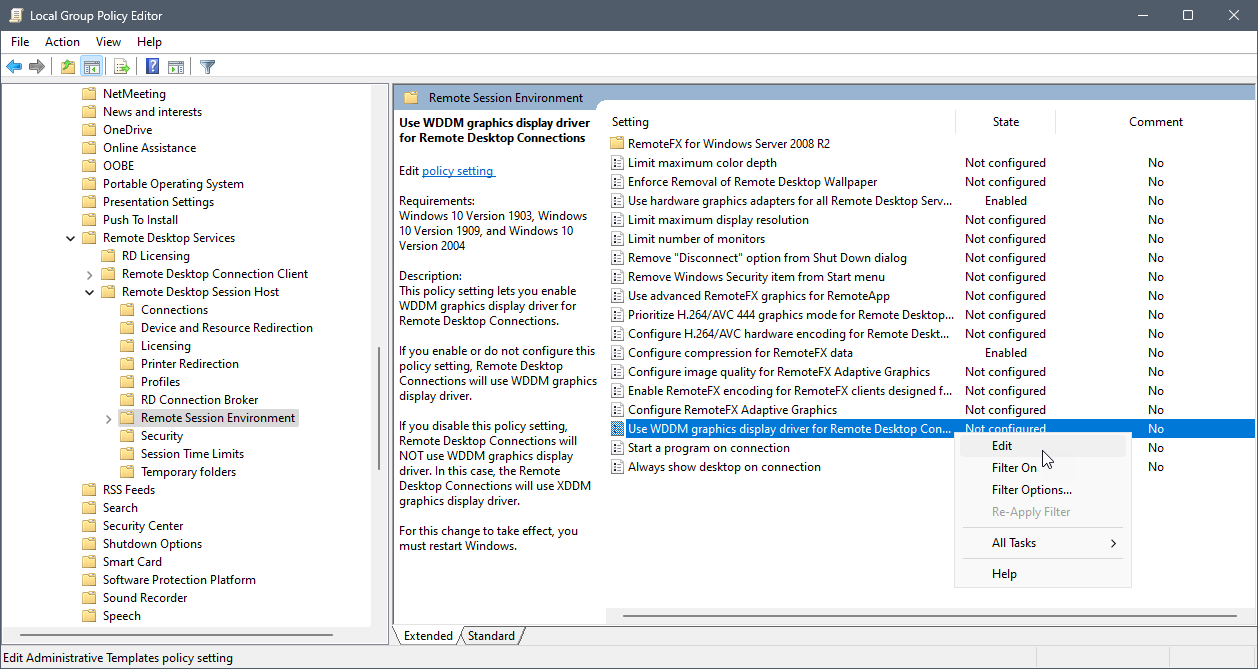
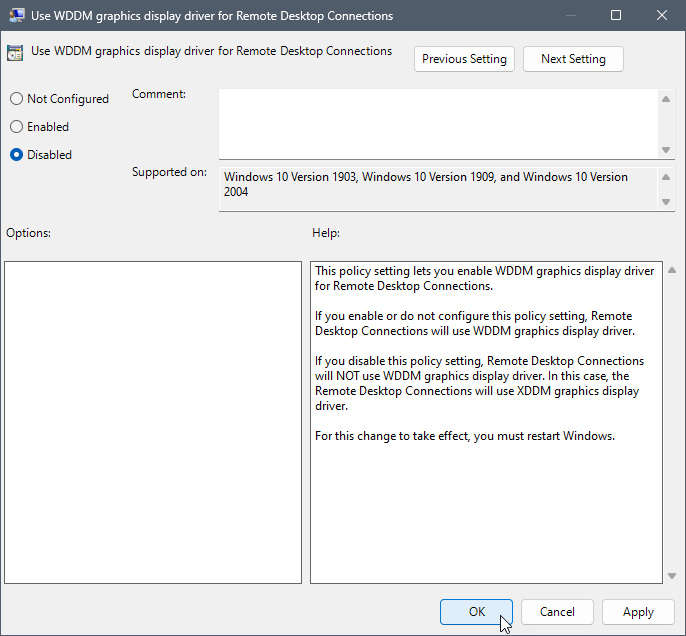
- Select and right-click the Use WDDM graphics display driver for Remote Desktop Connections entry and then select Edit from the displayed context menu.
- Select the Disabled radio button entry and then click on the [OK] button.
- Notice that the Use the hardware default graphics adapter for all Remote Desktop Services sessions and Configure compression for RemoteFX data Group Policies status are set to Enabled while the Use WDDM graphics display driver for Remote Desktop Connections Group Policy status is set to Disabled.

- Restart the host computer and the changes made to the Group Policy will take effect. The engineering software can then be operated from the host computer using Remote Desktop.


Нужен ли графический процессор при терминальном RDP подключении?
Нет. RDP подключение никак не использует ресурсы графического процессора, и на работу RDP наличие или отсутствие GPU не влияет.
В результате чего приходит вывод что для терминального сервера нужен графический процессор,
Вы сделали неправильные выводы. Такое бывает.
подключил к нему 30 пользователей с той-же задачей и тут пошли жуткие тормоза, процессор был загружен на 90%.
Логично. Браузер это приложение активно использующее ресурсы GPU. При его отсутствии нагрузка ложиться на процессор. Этим и обусловлена сильная загрузка процессора.
На терминальных серверах обычно не используют приложения активно использующие GPU- вроде трехмерных графических редакторов, браузеров, и.т.д.
А если и используют — тогда для них ставят GPU, и настраивают его работу.
Да, всё верно. Мы живем уже в то время, когда браузерам нужно декодировать кучу браузерного видео. Даже обычные офисные программы начинают использовать ресурсы карты. Поэтому я не представляю себе современного терминального сервера без видеокарты.
Для проброса видеокарты в ВМ лучший выбор вы можете сделать сами, сравнив стоимости видеокарт в продаже, для которых есть драйверы на windows server. А если хочется остренького, то можете даже попробовать пробросить geforce и поставить обычные драйверы, но надо будет поизучать опыт. На мой взгляд серия quadro имеет на сегодня доступный бюджет, на фоне geforce.
Some
programs used in modern video editing, engineering design and 3D modelling
require the use of GPU resources for fast rendering and displaying the image.
Massive
software packages used in the Remote Desktop environment often require GPU
rendering. Remote Desktop does not support this option by default. It must be
enabled on its own; otherwise, launching rendering programs can lead to various
errors related to the initialisation of DirectX or OpenGL GPU drivers.
How can
this issue be resolved? To do this, you need to change the Group Policy on the
server you are connecting to during your Remote Desktop session. In this
tutorial, we’ll show you how to enable GPU rendering on LeaderGPU servers.
To enable
this option on LeaderGPU, you will need to do the following.
1.
Connect
to the remote desktop using the credentials that were sent to your email when
ordering a plan in LeaderGPU.
2.
Scroll
to the bottom of the window, click on the magnifying glass (search) icon, and
then enter in the field: gpedit.msc
3.
Press
Enter. You will see the Local Group
Policy Editor window.
4.
In
the navigation window on the left, select the following path: Administrative Templates > Windows
Components > Remote Desktop Services > Remote Desktop Session Host >
Remote Session Environment > RemoteFX for Windows Server.
5. Select the Configure RemoteFX option and right-click on it. Click Edit:
6.
The
Configure RemoteFX dialogue box
appears. Click the Enabled option,
then click OK.
7.
Right-click
the «Optimize visual experience
when using RemoteFX» entry, then click Edit.
8.
Repeat
the process. Click the Enabled
option, and then click the OK
button.
9.
Finally,
do the same for the «Optimize
visual experience for Remote Desktop Service Sessions» item. Select Edit from the context menu:
10.
Click
Enabled, then click OK.
11.
Make
sure that all three points of group policies are now enabled.
12.
Select
the Remote Session Environment item
in the panel on the left.
13.
Right-click on the entry «Use the hardware default graphics adapter for all Remote Desktop
Services sessions«. Select Edit:
14.
Click Enabled,
then click OK.
15.
Look for the entry “Configure compression for RemoteFX data”, then click Edit in the context menu.
16.
Click
Enabled, then click OK.
Done! Now you need to restart the server. This
can be done in the LeaderGPU console using the Reboot button.
Тема: Win 10 RDP драйвер видеокарты (Прочитано 13727 раз)
Приветствую всех,
Ребята подскажите, очень нужно. Настроил win 10 pro как терминальный сервер. на несколько пользователей.
Но при подключении по RDP — windows использует свой видео адаптер microsoft remote display.
А мне нужно чтобы в программах была задействована видеокарта
Хотел завести видеокарту на hyper v но там отключили remote fx
в случае если с RDP не возможно использовать видеокарту, то получится ли запустить remote fx на win server 2012 ? и так же подключаться по RDP?
а еще есть remoteapp — так и не понял что это.
Спасибо за любую помощь
Похоже вам нужен ВМ на Hyper-V на Windows Serever 2016 или ниже. В Server 2019 насколько я помню настроку Remote-FX из GUI отключили, но можно через powershell:
You can also use RemoteFX vGPU feature on Windows Server 2019. Although the config UI of RemoteFX vGPU has been removed from Hyper-V Manager of Windows Server 2019, you can configure RemoteFX vGPU by using Powershell on Windows Server 2019.
1) Check your Host GPU (You need RemoteFX Compatible GPU Card and Remote Desktop Virtualization Host role)
Get-VMRemoteFXPhysicalVideoAdapter
CompatibleForVirtualization: True
Enabled: True
2) Enable/Disable Host GPU for RemoteFX vGPU
Disable/Enable-VMRemoteFXPhysicalVideoAdapter
3) Add RemoteFX vGPU to your VM:
Add-VMRemoteFx3dVideoAdapter -VMName <vmname>
4) Open VM Settings dialogbox, you can configure RemoteFX vGPU.
5) Start VM