
Если вы пользуетесь удалённым компьютером для запуска одного/двух приложений в RDP сессии, скорее всего вам будет удобнее запускать эти программы в режиме RemoteApp. Технология RemoteApp это одна из возможностей терминальной службы Remote Desktop Services, которая позволяет запускать приложения, установленные на удаленном RDS (RDP) сервере так, как будто они запускаются на клиенте локально. Т.е. на монитор клиента доставляется не весь рабочий стол удаленного Windows хоста, а только окно опубликованного приложения.
Несмотря на то, что официально RemoteApp поддерживаются только в Windows Server с развернутой ролью RDS, вы можете опубликовать любое установленное приложение в виде RemoteApp в том числе и на десктопных версиях, таких как Windows 10 или 11. В этой статье мы покажем, как создать RemoteApp приложение и запустить его на удаленном компьютере с Windows 11 (требуется Pro или Enterprise редакции.)
Настройка удаленного компьютера (RDP сервера), на котором будет выполняться приложение RemoteApp:
- Включите RDP доступ к компьютеру
- Установите приложение
- Добавьте пользователя, который будет запускать приложение в локальную группу
Remote Desktop Users
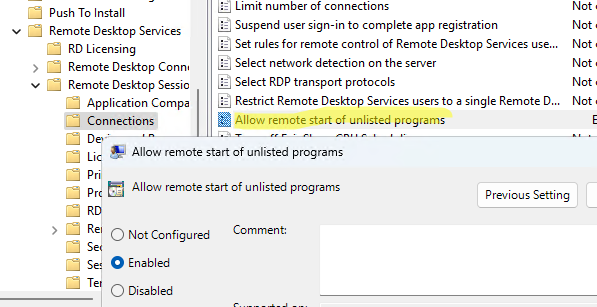
или в локальную политику безопасности Alow log on through Remote Desktop Services - Разрешите запуск любого локального приложения в виде RemoteApp. Для этого откройте редактор локальной GPO (
gpedit.msc
), перейдите в раздел Computer Configuration -> Administrative Templates -> Windows Components -> Remote Desktop Services -> Remote Desktop Session Host -> Connections. Включите политику Allow remote start of unlisted programs
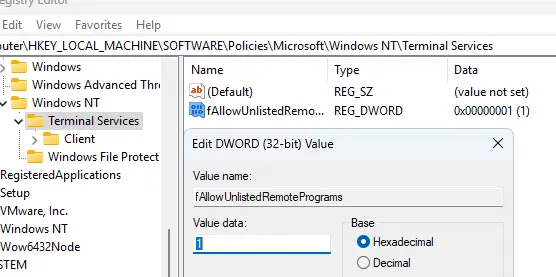
Либо создайте параметр реестра fAllowUnlistedRemotePrograms со значением 1:
reg add "HKEY_LOCAL_MACHINE\SOFTWARE\Policies\Microsoft\Windows NT\Terminal Services" /v fAllowUnlistedRemotePrograms /t REG_DWORD /d 1

- Перезагрузите удаленный компьютер.

Если вы хотите ограничить список локальных приложений, которые удаленный пользователь может запускать в виде RemoteApp, нужно для каждого приложения создать отдельную ветку в ветке реестра
HKLM\SOFTWARE\Microsoft\Windows NT\CurrentVersion\Terminal Server\TSAppAllowList\Applications
. Пример описания REG файла для публикации Adobe Reader в виде RemoteApp на RDS в рабочей группе без домена:
Windows Registry Editor Version 5.00
[HKEY_LOCAL_MACHINE\SOFTWARE\Microsoft\Windows NT\CurrentVersion\Terminal Server\TSAppAllowList\Applications\MyAdobeReaderApp]
"CommandLineSetting"=dword:00000000
"RequiredCommandLine"=""
"Name"="Adobe Reader"
"Path"="C:\\Program Files\\Adobe\\Acrobat DC\\Acrobat\\Acrobat.exe"
"ShortPath"="C:\\PROGRA~1\\Adobe\\Acrobat DC\\Acrobat\\Acrobat.exe"
"IconPath"="C:\\PROGRA~1\\Adobe\\Acrobat DC\\Acrobat\\Acrobat.exe"
"IconIndex"=dword:00000000
"ShowInTSWA"=dword:00000001
"SecurityDescriptor"=""
Настройка RDP клиента.
Теперь, на клиенте (на котором вы хотите показывать окно RemoteApp приложение), нужно настроить ярлык для RDP подключения.
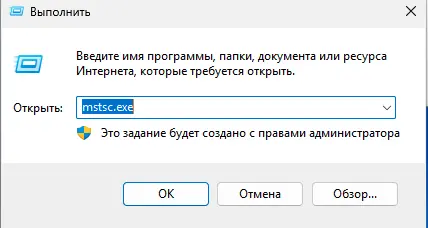
- Откройте клиент
mstsc.exe
, введите имя (IP) удаленного RDP сервера и имя пользователя для входа - (Опционально) Настройте необходимые параметры удаленного подключения на остальных вкладках клиента RDP (проброс устройств, дисков, буфера обмена и т.д.)
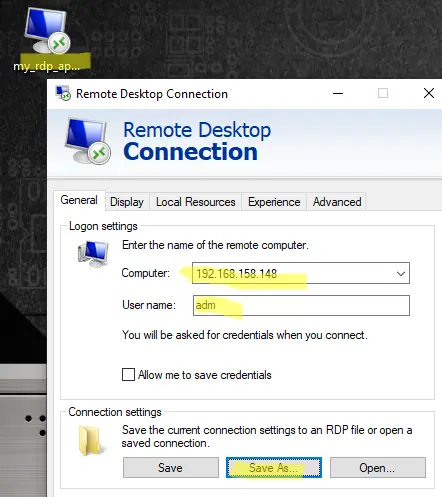
- Сохраните настроенное подключение в файл с расширением
*.RDP
(Save As) - Откройте этот *.RDP файл с помощью любого текстового редактора. Добавьте в конец файла строки:
remoteapplicationmode:i:1
RemoteApplicationName:s:КАК ДОЛЖЕН НАЗЫВАТЬСЯ ЗАГОЛОВОК ОКНА ПРОГРАММЫ В ПАНЕЛИ
RemoteApplicationProgram:s:"ПУТЬ К ИСПОЛЬНЫЕМОМУ ФАЙЛУ ПРИЛОЖЕНИЯ НА RDP СЕРВЕРЕ"
DisableRemoteAppCheck:i:1
Prompt for Credentials on Client:i:0
Alternate Shell:s:rdpinit.exe - Если нужно задать дополнительные параметры запуска приложения, добавьте строку:
RemoteApplicationCmdLine:s:АРГУМЕНТЫ ЗАПУСКА ПРИЛОЖЕНИЯУбедитесь, что указанные опции не заданы выше в имеющихся параметрах RDP подключения. Это может вызвать конфликт.
- Сохраните файл с настройками RDP подключения.
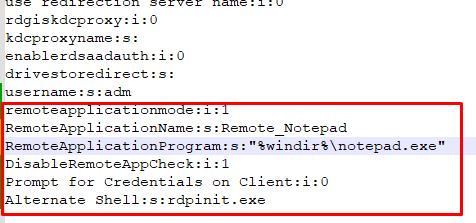
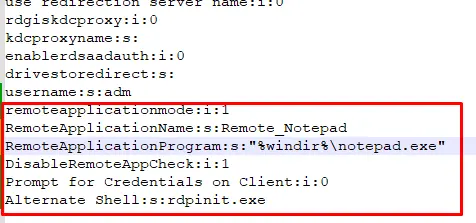
Например, для запуска обычного блокнота (
notepad.exe
) в виде RemoteApp, добавьте такие строки в RDP файл:
remoteapplicationmode:i:1
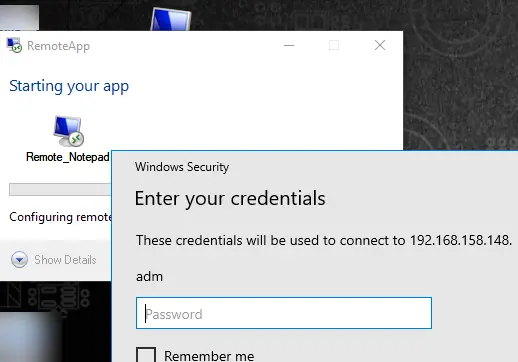
RemoteApplicationName:s:Remote_Notepad
RemoteApplicationProgram:s:"%windir%\notepad.exe"
DisableRemoteAppCheck:i:1
Prompt for Credentials on Client:i:0
Alternate Shell:s:rdpinit.exe
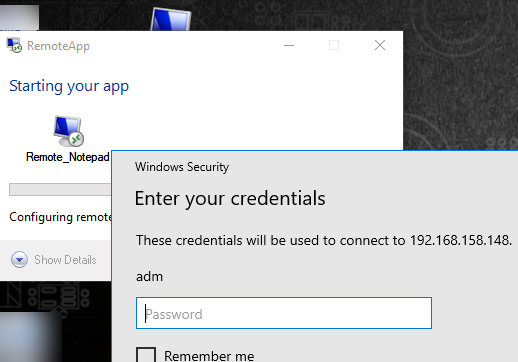
Запустите сохраненный RDP файл. Должно появится окно с запросом пароля, подтверждение что вы доверяете RDP сертификату и через некоторое время на вашем компьютере появится окно запущенного RemoteApp приложения.
Для запуска приложения Microsoft Store в виде RemoteApp, нужно указать его имя в поле RemoteApplicationProgram в таком формате:
start shell:AppsFolder\Microsoft.WindowsCalculator_8wekyb3d8bbwe!App
В данном случае имя APPX нужно скопировать из значения
PackageFamilyName
и добавить в !App конце.
Get-AppxPackage | Select-Object Name, PackageFamilyName | Where-Object { $_.Name -like "*calc*" }

Если вам часто приходится создавать ярлыки для запуска RemoteApp, для удобной генерации RDP или MSI файлов для клиентов можно использовать бесплатную RemoteApp Tool (https://github.com/kimmknight/remoteapptool). Утилита позволяет в том числе настроить ассоциации файлов, изменить иконку и другие параметры RemoteApp приложения (позволяет в том числе настроить RDP хост, в том числе таймауты завершения отключенных сессий).

Описанный способ публикации RemoteApp на десктопных компьютерах с Windows 10 или 11 не требует развертывание отдельного сервера лицензирования RDS и приобретения терминальных лицензий (RDS CAL). Однако вы сможете подключиться к такому компьютеру только одной одновременной RemoteApp сессией (для обхода ограничения на количество одновременных RDP соединения с Windows 10/11 можно использовать RDP Wrapper).
Технология RemoteApp, входящая в состав Remote Desktop Services (RDS), позволяет запускать приложения на удаленном сервере так, будто они выполняются локально. Вместо полного рабочего стола на клиентском устройстве отображается только окно выбранного приложения. Хотя RemoteApp официально поддерживается на Windows Server с ролью RDS, её можно настроить и на десктопных версиях Windows 10 или Windows 11 (редакции Pro или Enterprise). В этой статье мы разберем, как опубликовать приложение в режиме RemoteApp и настроить его запуск на клиентском компьютере.
Приобрести оригинальные ключи активации Windows Server можно у нас в каталоге от 1190 ₽
Настройка удаленного компьютера для RemoteApp
Для запуска приложения в режиме RemoteApp необходимо подготовить удаленный компьютер (RDP-сервер), на котором установлено приложение.
Шаги настройки
1. Включите Удаленный рабочий стол:
— Откройте Параметры → Система → Удаленный рабочий стол.
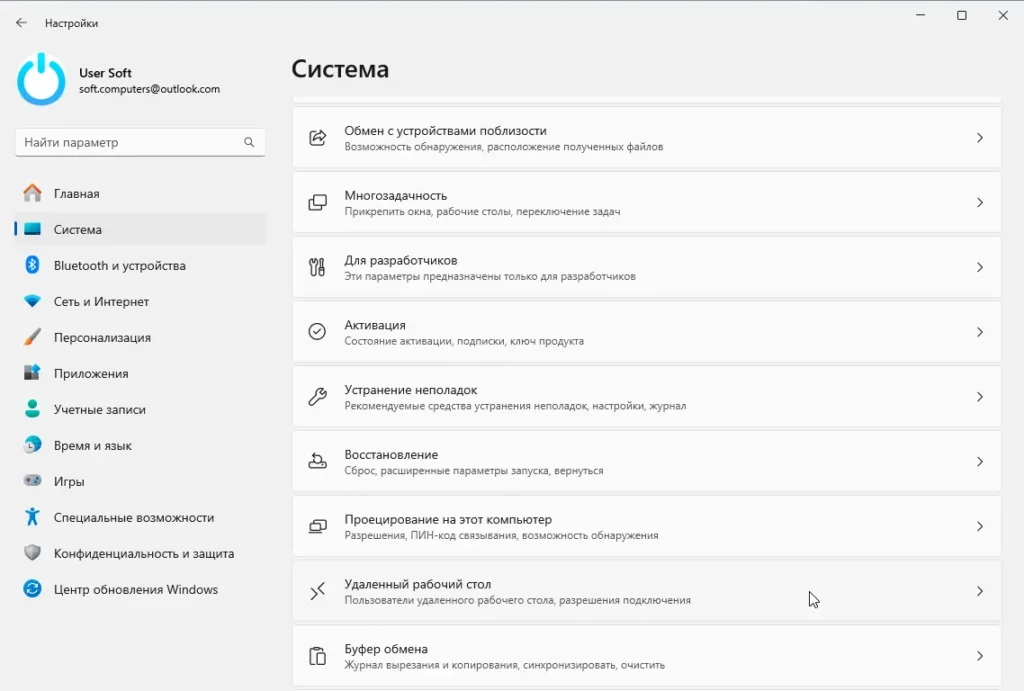
— Активируйте переключатель Включить удаленный рабочий стол.

2. Установите приложение:
— Убедитесь, что нужное приложение (например, Adobe Reader или Блокнот) установлено на удаленном компьютере.
3. Настройте доступ пользователя:
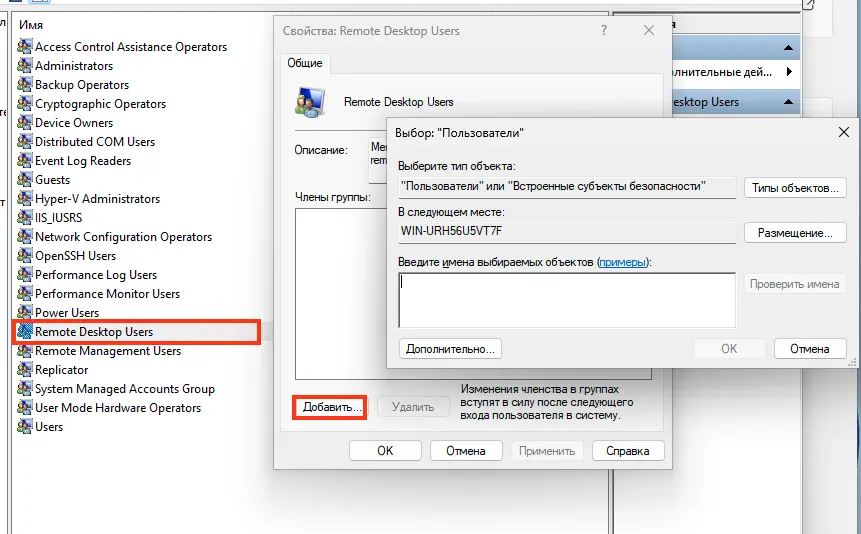
— Добавьте учетную запись пользователя в локальную группу Пользователи удаленного рабочего стола:
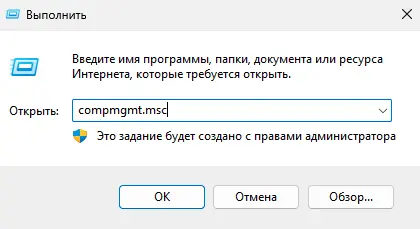
— Откройте Управление компьютером (Win+R, введите compmgmt.msc).
— Перейдите в Локальные пользователи и группы → Группы.
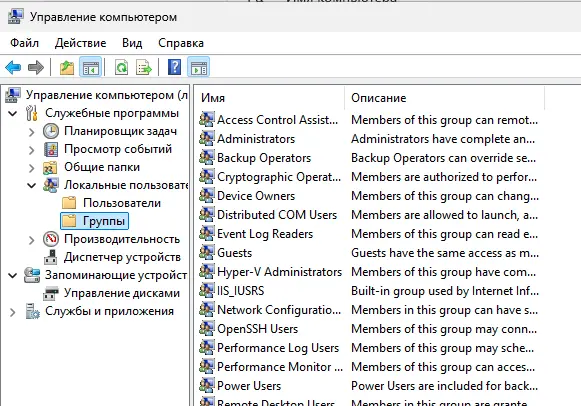
— Добавьте пользователя в группу Пользователи удаленного рабочего стола.
— Или разрешите вход через Удаленный рабочий стол в локальной политике:
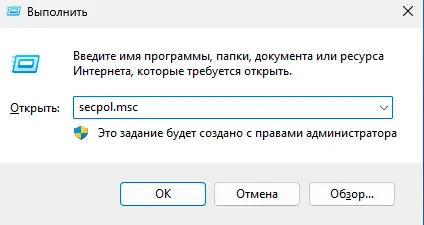
— Откройте Редактор локальной политики безопасности (Win+R, введите secpol.msc).
— Перейдите в Локальные политики → Назначение прав пользователя.
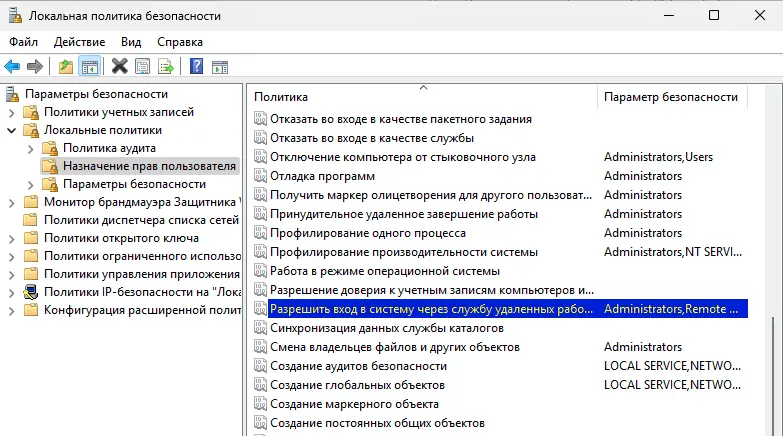
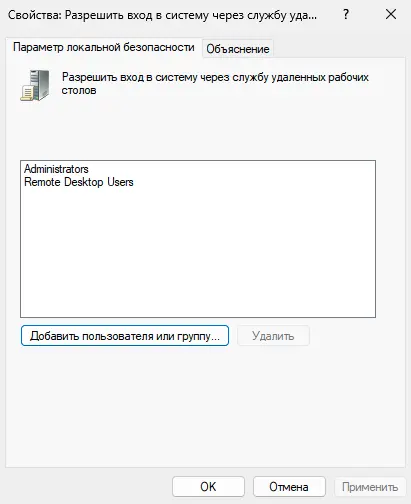
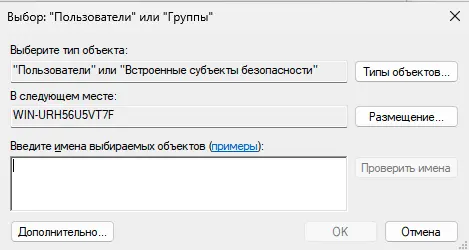
— В параметре Разрешить вход через службы удаленного рабочего стола добавьте пользователя.
4. Разрешите запуск любых приложений в режиме RemoteApp:
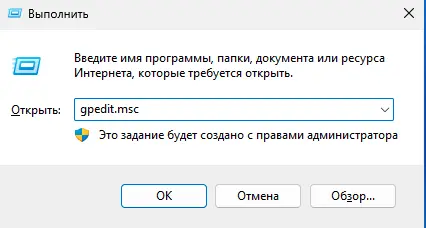
– Откройте Редактор локальной групповой политики (Win+R, введите gpedit.msc).
– Перейдите в Конфигурация компьютера → Административные шаблоны → Компоненты Windows → Службы удаленного рабочего стола → Узел сеансов удаленных рабочих столов → Подключения.
– Включите политику Разрешить удаленный запуск неперечисленных программ.

– Или создайте параметр реестра:
reg add "HKEY_LOCAL_MACHINE\SOFTWARE\Policies\Microsoft\Windows NT\Terminal Services" /v fAllowUnlistedRemotePrograms /t REG_DWORD /d 1
5. Перезагрузите удаленный компьютер.
Настройка RDP-клиента
На клиентском компьютере, где будет отображаться окно RemoteApp, создайте и настройте RDP-файл для подключения.
Создание RDP-файла
1. Запустите Подключение к удаленному рабочему столу:
– Нажмите Win+R, введите mstsc.exe и нажмите Enter.
2. Укажите параметры подключения:
– Введите имя или IP-адрес удаленного компьютера.
– Укажите имя пользователя для входа.
– (Опционально) Настройте параметры на вкладках Экран, Локальные ресурсы (например, проброс дисков или буфера обмена).
3. Сохраните подключение:
– Нажмите Сохранить как и сохраните файл с расширением .rdp (например, RemoteApp.rdp).
Редактирование RDP-файла
1. Откройте сохраненный .rdp-файл в текстовом редакторе (например, Блокнот).
2. Добавьте в конец файла следующие строки для запуска приложения в режиме RemoteApp:
remoteapplicationmode:i:1

RemoteApplicationName:s:Название окна приложения

RemoteApplicationProgram:s:"Путь к исполняемому файлу на сервере"

DisableRemoteAppCheck:i:1

Prompt for Credentials on Client:i:0

Alternate Shell:s:rdpinit.exe
3. (Опционально) Добавьте параметры запуска приложения:
RemoteApplicationCmdLine:s:Аргументы запуска
4. Пример для запуска Блокнота:
remoteapplicationmode:i:1

RemoteApplicationName:s:Remote_Notepad

RemoteApplicationProgram:s:"%windir%\notepad.exe"

DisableRemoteAppCheck:i:1

Prompt for Credentials on Client:i:0

Alternate Shell:s:rdpinit.exe
5. Убедитесь, что новые параметры не конфликтуют с существующими в файле.
6. Сохраните файл.
Запуск RemoteApp
1. Дважды щелкните по .rdp-файлу.
2. Введите пароль для учетной записи, если требуется.
3. Подтвердите доверие сертификату RDP.
4. Через несколько секунд откроется окно приложения, запущенного на удаленном компьютере.
Запуск приложений Microsoft Store в RemoteApp
Для запуска приложений из Microsoft Store (например, Калькулятора) в режиме RemoteApp нужно указать их PackageFamilyName.
Поиск PackageFamilyName
Выведите список приложений Microsoft Store и найдите нужное (например, Калькулятор):
Get-AppxPackage | Select-Object Name, PackageFamilyName | Where-Object { $_.Name -like "*calc*" }
Пример вывода:
Name: WindowsCalculator
PackageFamilyName: Microsoft.WindowsCalculator_8wekyb3d8bbwe

Настройка RDP-файла
Добавьте в .rdp-файл строку с именем приложения:
RemoteApplicationProgram:s:start shell:AppsFolder\Microsoft.WindowsCalculator_8wekyb3d8bbwe!App
Сохраните и запустите файл.
Использование RemoteApp Tool
Для упрощения создания RemoteApp-подключений используйте бесплатную утилиту RemoteApp Tool.
Возможности утилиты
– Генерация RDP— и MSI-файлов для клиентов.
– Настройка ассоциаций файлов для приложений.
– Изменение иконок и параметров подключения.
– Управление таймаутами отключенных сессий.
Использование
1. Скачайте и установите RemoteApp Tool.
2. Укажите путь к приложению, имя сервера и параметры подключения.
3. Сгенерируйте RDP-файл или MSI-пакет для распространения.
Рекомендации и ограничения
– Ограничение подключений: На Windows 10/11 (Pro/Enterprise) поддерживается только одна одновременная RDP-сессия. Для обхода этого ограничения можно использовать RDP Wrapper, но это неофициальный метод.
– Лицензирование: Настройка RemoteApp на десктопных версиях не требует лицензий RDS CAL, в отличие от Windows Server.
– Безопасность: Используйте сложные пароли и включите Сетевую проверку подлинности (NLA) в настройках Удаленного рабочего стола.
– Производительность: Для улучшения работы RemoteApp настройте сжатие и отключите ненужные визуальные эффекты в RDP-клиенте.
Настройка RemoteApp на Windows 10 или Windows 11 позволяет запускать приложения на удаленном компьютере, отображая только их окна на клиентском устройстве. Настройка через Групповые политики, реестр и RDP-файлы делает этот процесс доступным без развертывания RDS-сервера. Утилита RemoteApp Tool упрощает создание подключений, а поддержка приложений Microsoft Store расширяет возможности. Этот метод идеально подходит для сценариев, где требуется доступ к одному или нескольким приложениям без передачи полного рабочего стола.
(Image credit: Future)
On Windows 10, the «Remote Desktop» app makes connecting to other computers easy over the local network and internet. It’s also the experience that replaces the built-in legacy «Remote Desktop Connection» program, which is still available.
The app is user-friendly, but depending on the computer you need to establish a connection, the app is only one of the steps since you may have to configure additional settings, including forwarding the appropriate port in the router to connect to another device. Also, there’s a small problem. You can install the Remote Desktop app on any edition of Windows 10. However, the remote desktop protocol (RDP) that makes the connection possible is only available on the «Pro» edition and business variants of the operating system. (Windows 10 Home doesn’t allow remote connections.)
This guide will walk you through the steps to allow remote connections from within the local network or internet and how to use the Remote Desktop app to start a remote session.
How to allow remote connections on Windows 10
Remote Desktop makes it easy to connect to other computers. However, the configuration will depend on whether the connection happens over the local network or through the internet.
Enable remote connections
In a local area network (LAN), you only need to enable the option to allow remote desktop connections on your computer. You can complete this task from the Settings app or Control Panel.
Settings app
All the latest news, reviews, and guides for Windows and Xbox diehards.
To enable the Remote Desktop feature using the Settings app, use these steps:
- Open Settings.
- Click on System.
- Click on Remote Desktop.
- Turn on the «Enable Remote Desktop» toggle switch.
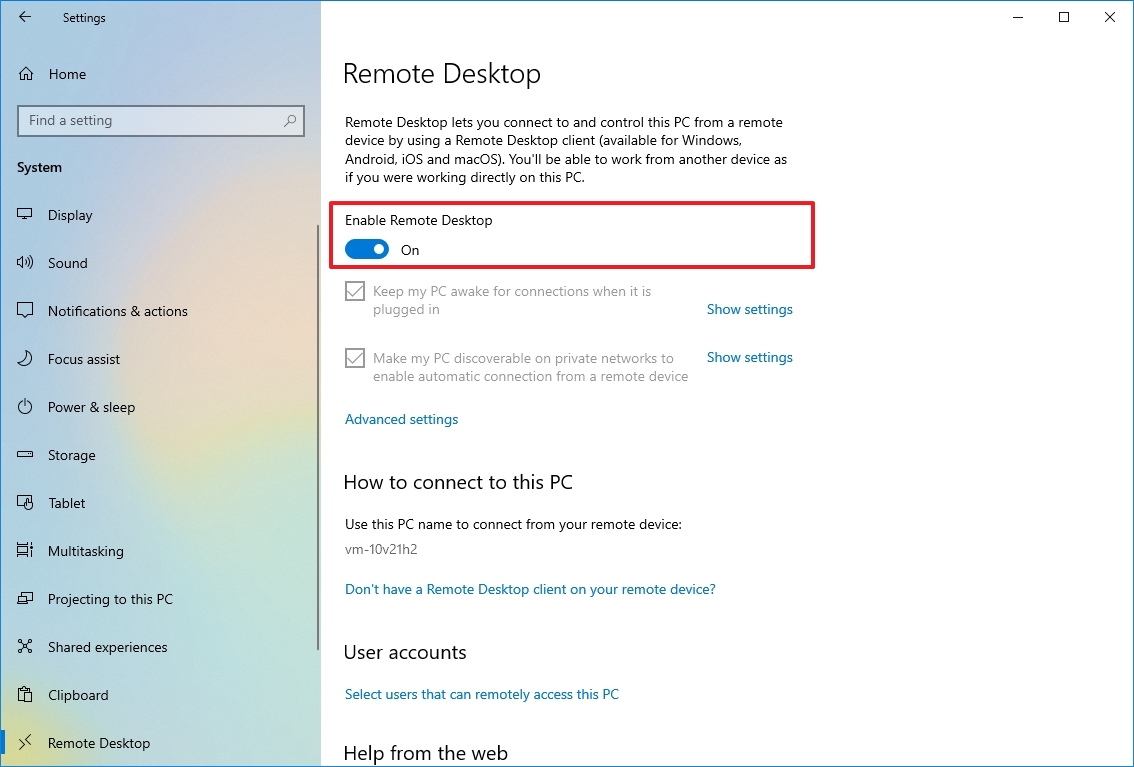
- Click the Confirm button.
Once you complete the steps, remote desktop connections will be allowed on the device. Windows 10 will also add the necessary rules in the built-in Microsoft Defender Firewall. However, you may need to configure the rules manually if you have a third-party security solution.
Control Panel
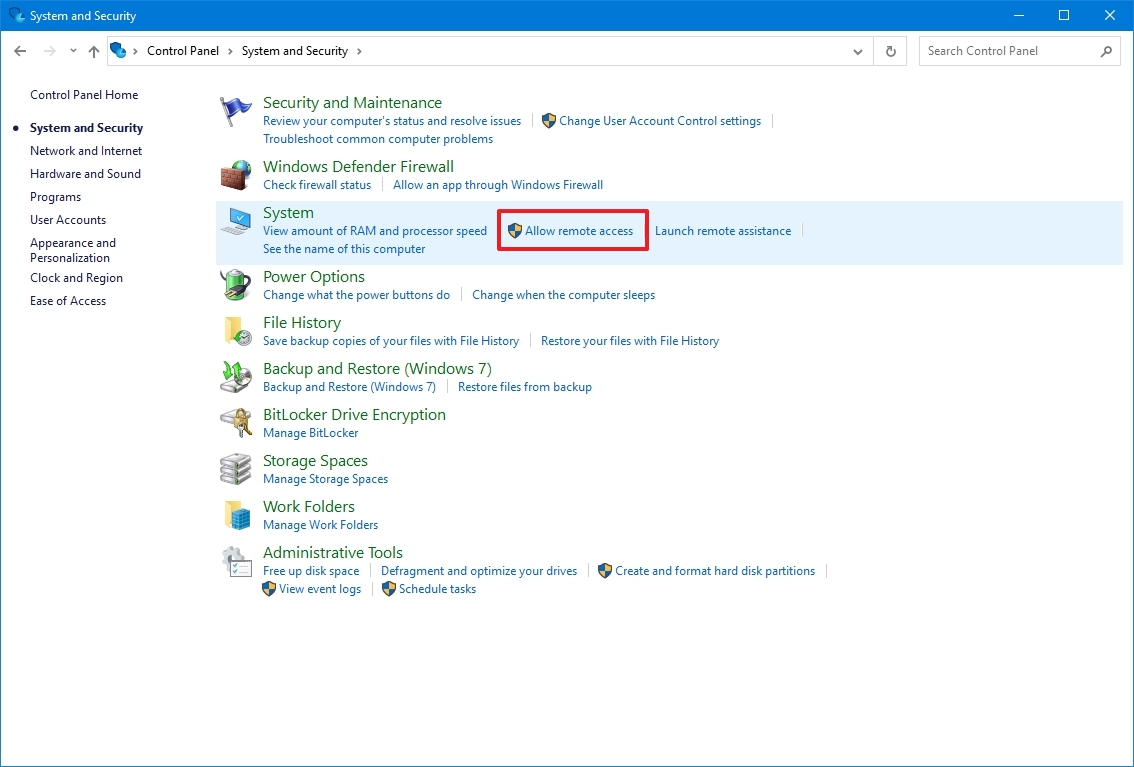
To enable remote connections on Windows 10, use these steps:
- Open Control Panel.
- Click on System and Security.
- Under the «System» section, click the «Allow remote access» option.
- Click the Remote tab.
- Under the «Remote Desktop» section, check the «Allow remote connections to this computer» option.
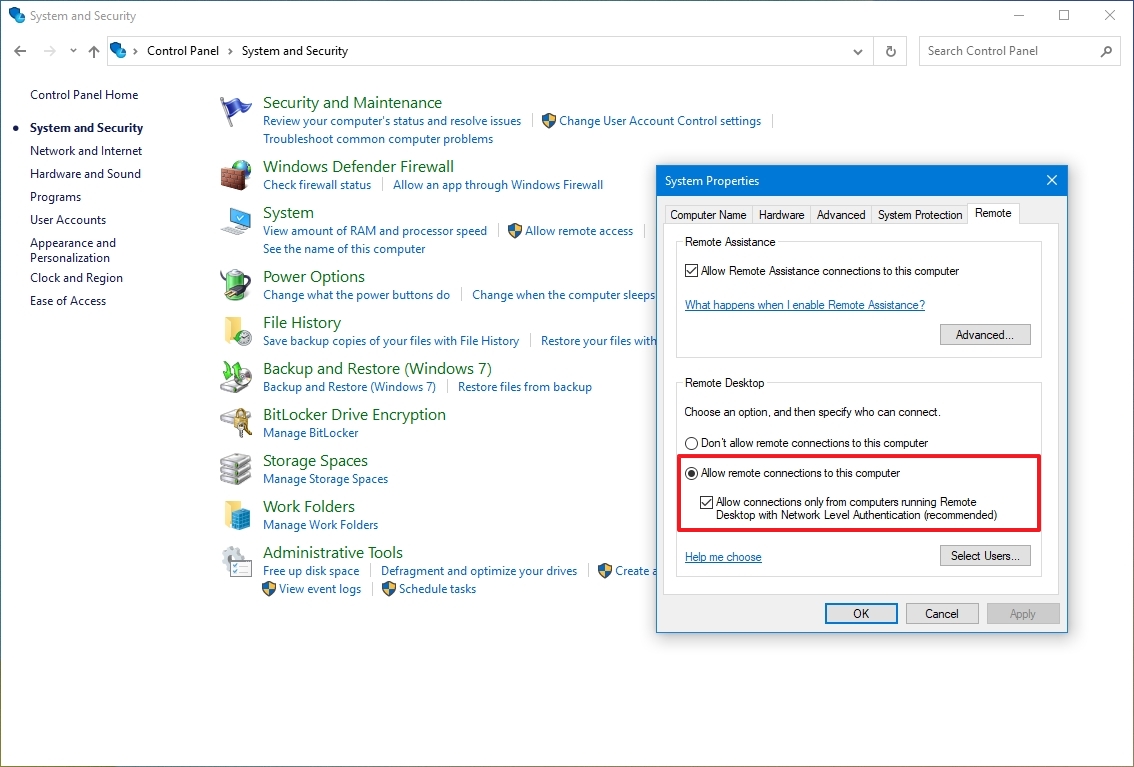
- Check the «Allow connections only from computers running Remote Desktop with Network Level Authentication» option.
- Click the OK button.
- Click the Apply button.
- Click the OK button.
Continue with the steps below if you need to configure a remote desktop using an internet connection. If you have to connect to another device within the local network, skip to the steps below, and continue with the start a remote desktop connection instructions.
Enable remote connections on router
If the remote connection happens over an internet connection, you will also have to configure the router to allow the remote connection. In addition, you will need to know the public address to contact the remote computer.
Configure static IP address
A computer usually receives a dynamic IP address from the DHCP server (router), which means it can change. If you plan to use the remote desktop feature for some time, you may want to configure a static IP address to avoid reconfiguring port forwarding on the router when the device changes the network configuration.
Control Panel
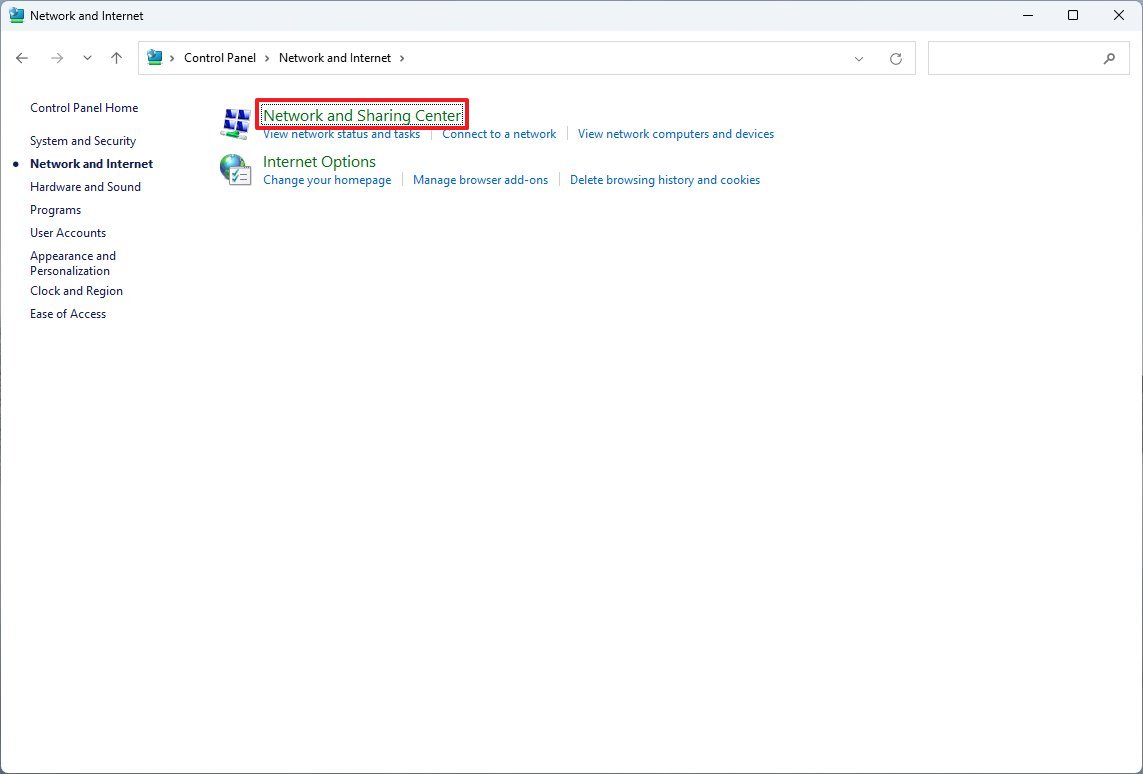
To configure a permanent network configuration, use these steps:
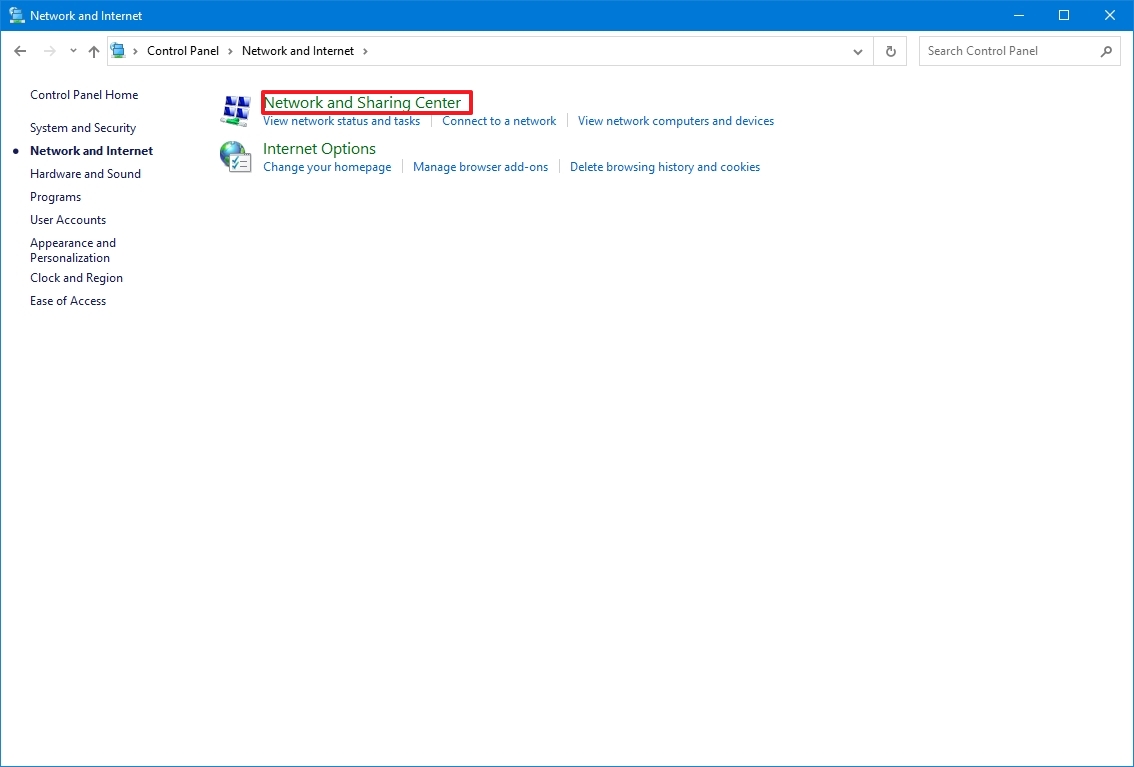
- Open Control Panel.
- Click on Network and Internet.
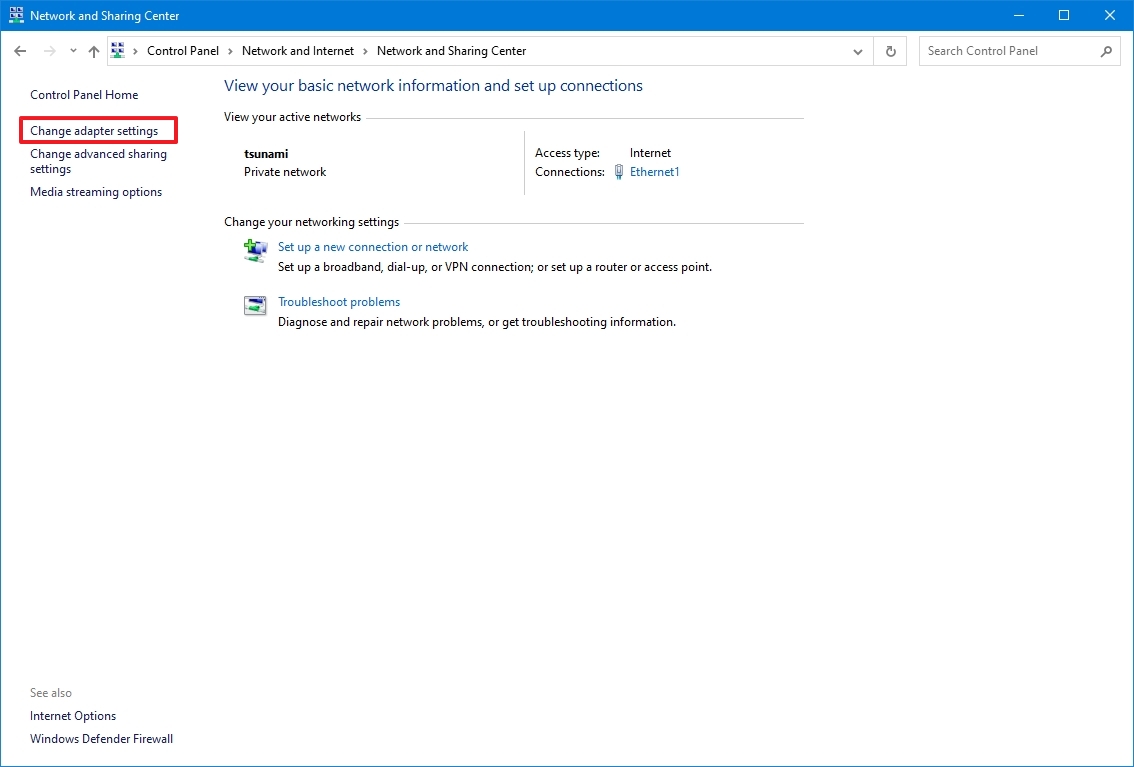
- Click on Network and Sharing Center.
- Click the «Change adapter settings» option from the left navigation pane.
- Right-click the active network adapter and select the Properties option.
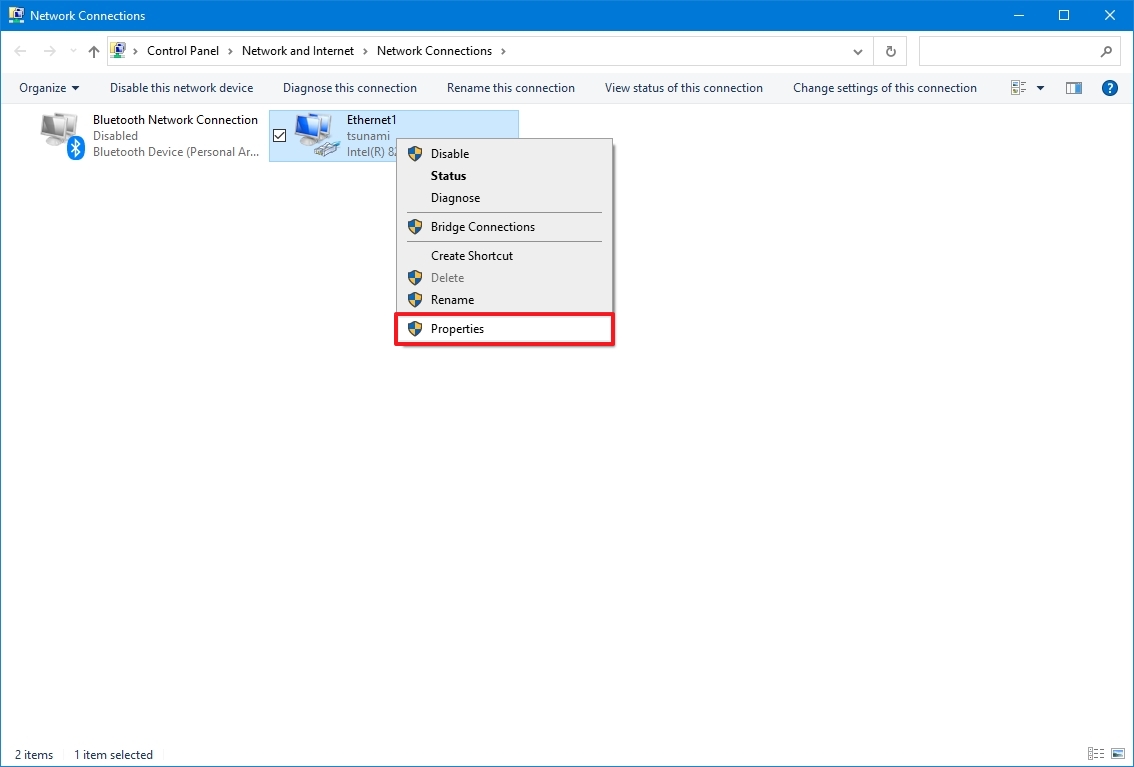
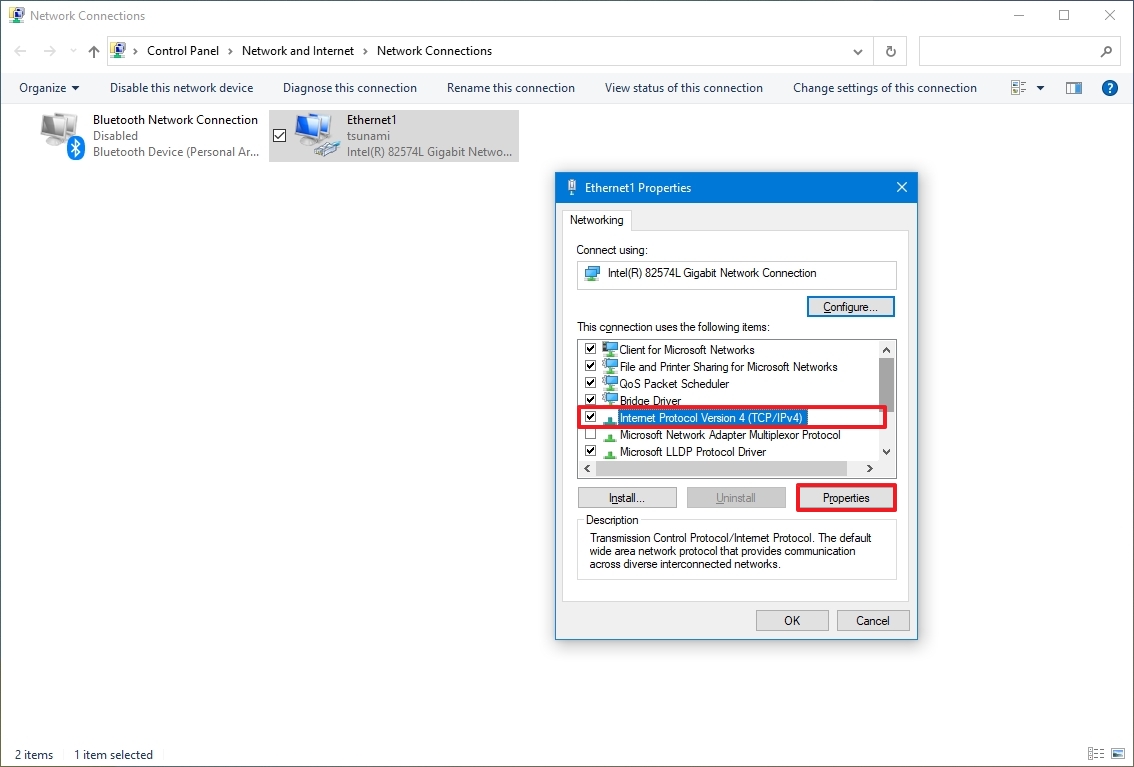
- Select the «Internet Protocol Version 4 (TCP/IPv4)» option.
- Click the Properties button.
- Click the General tab.
- Select the «Use the following IP address» option.
- Specify a local IP address outside the local DHCP scope to prevent address conflicts – for example, 10.1.4.201.
- Quick tip: Usually, you’ll find this information inside the DHCP settings section on the router. Since not every router is created equal, you may need to consult your manufacturer support website for more specific details to find this information. If you’re unsure of the configuration you have to use, use your current TCP/IP configuration as a reference, which you can review with the ipconfig /all command in Command Prompt.
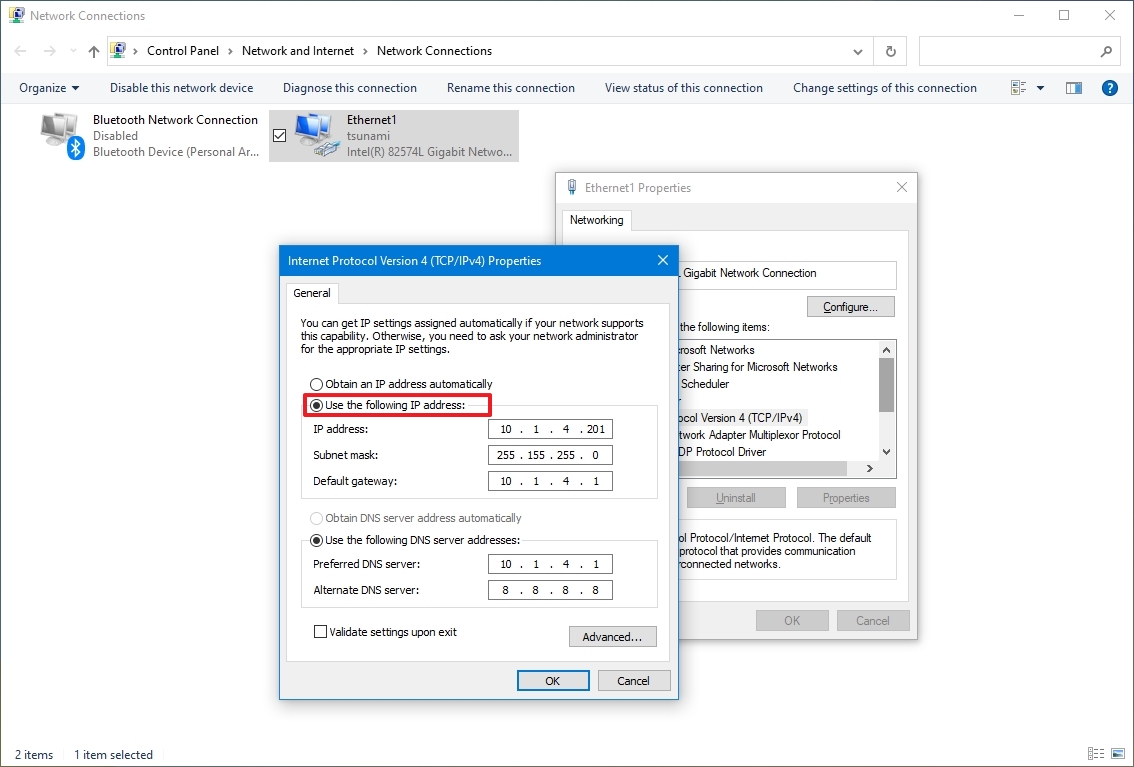
- Specify a subnet mask for the network (255.255.255.0), but the system usually fills this information from you based on the «IP address.»
- Specify the default gateway address, which should be the router’s address — for example, 10.1.4.1.
- Under the «Use the following DNS server addresses» section, in the «Preferred DNS server» field, specify the IP address of your DNS server, which in most cases is also the router’s address — for example, 10.1.4.1.
- Quick tip: If you can’t connect to the internet, try using one of the Google Public DNS addresses (such as 8.8.8.8) for the «Alternate DNS server» option.
- Click the OK button.
- Click the Close button.
After you complete the steps, the network configuration will apply, and the IP settings will never change.
Some routers include a feature to make the current TCP/IP configuration static. If you want to use this option, consult your manufacturer support website for specific steps to complete this task.
Identify network public IP address
You will also need the remote network’s public IP address to contact the device over the internet.
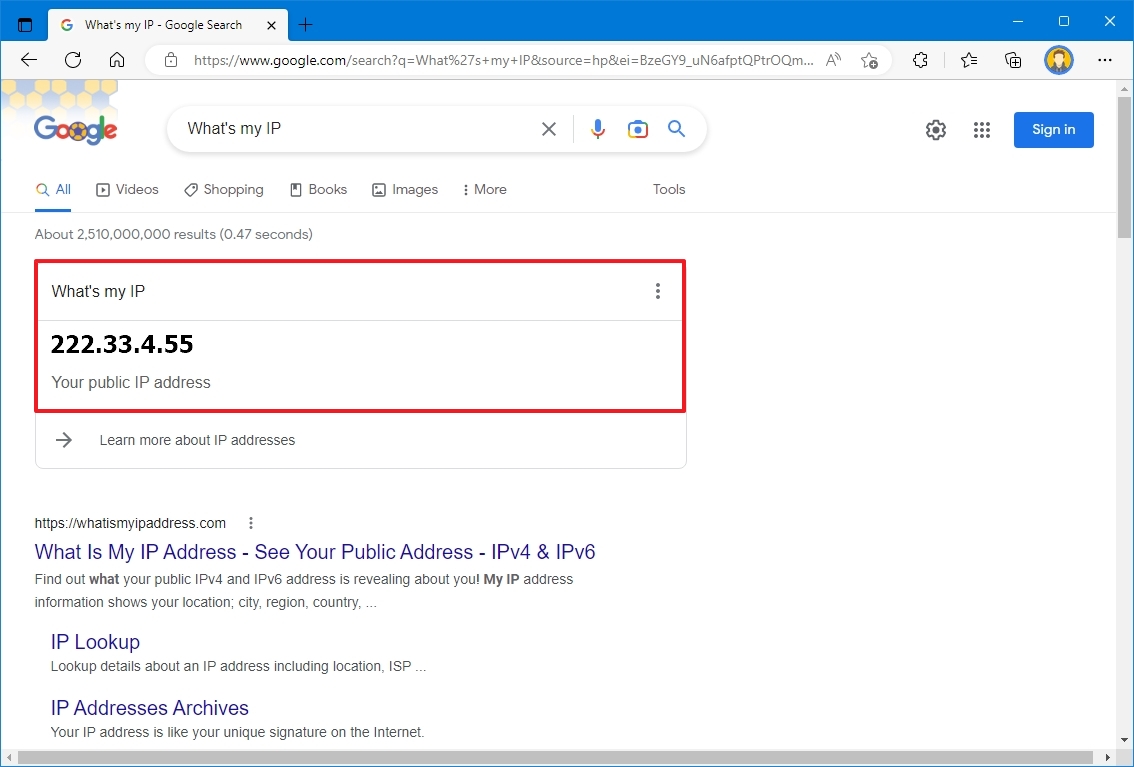
To determine the IP address assigned by the Internet Service Provider (ISP), use these steps:
- Open the web browser.
- Visit Bing.com or Google.com.
- Search for «What’s my IP.»
- Confirm the public IP address in the first result.
Typically, internet providers also offer dynamic public IP addresses for residential customers, which means that your public IP address may change from time to time.
If you need a more reliable solution, you may want to look into «Dynamic Domain Name System» (DDNS) services (such as DynDNS, OpenDNS, No-IP, or Asus.com for Asus routers), which can track public IP changes. Alternatively, you can also contact your ISP to request a static IP address, which might cost you extra since this is typically a feature reserved for businesses.
Configure port forwarding
You must also forward the TCP port 3389 on the router to allow connections through the internet to the computer in the local network.
Quick note: The router interface experience can vary depending on the manufacturer. However, you can use these instructions as a reference to configure your router. You can always check the manufacturer support website for more specific details.
To forward a port on your router, use these steps:
- Open Start.
- Search for Command Prompt and click the top result to open the app.
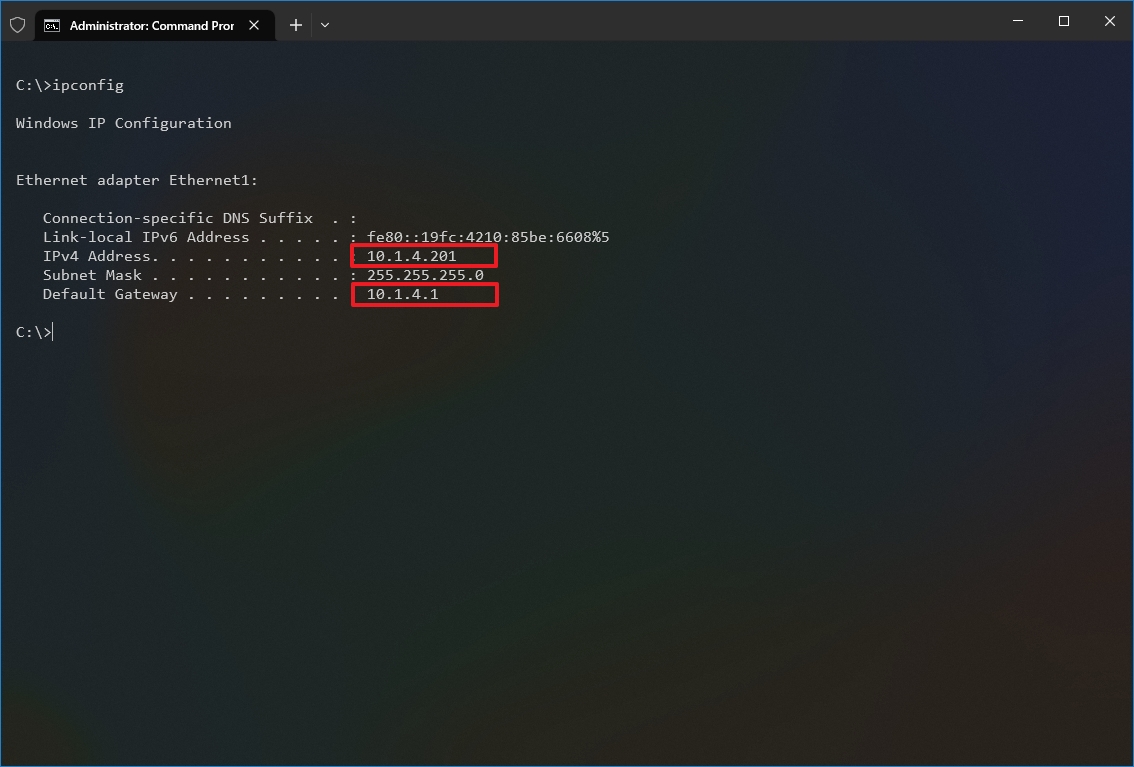
- Type the following command to check the current TCP/IP configuration and press Enter: ipconfig
- Under the «IPv4 Address» field, confirm the device address — for example, 10.1.4.201.
- Under the «Default Gateway» field, confirm the device gateway address (the router address) — for example, 10.1.4.1.
- Open your preferred browser.
- Type the router’s IP address (default gateway) in the address bar and press Enter.
- Sign in to the router using the correct username and password.
- Quick tip: If you have never done this, and you are using the router provided by the ISP, you may be able to find the information on a sticker attached to the device.
- Open the Port Forwarding settings page.
- Confirm that the Port Forwarding service is enabled (if applicable).
- Under the port forwarding list, click (in this case) the Add profile button.
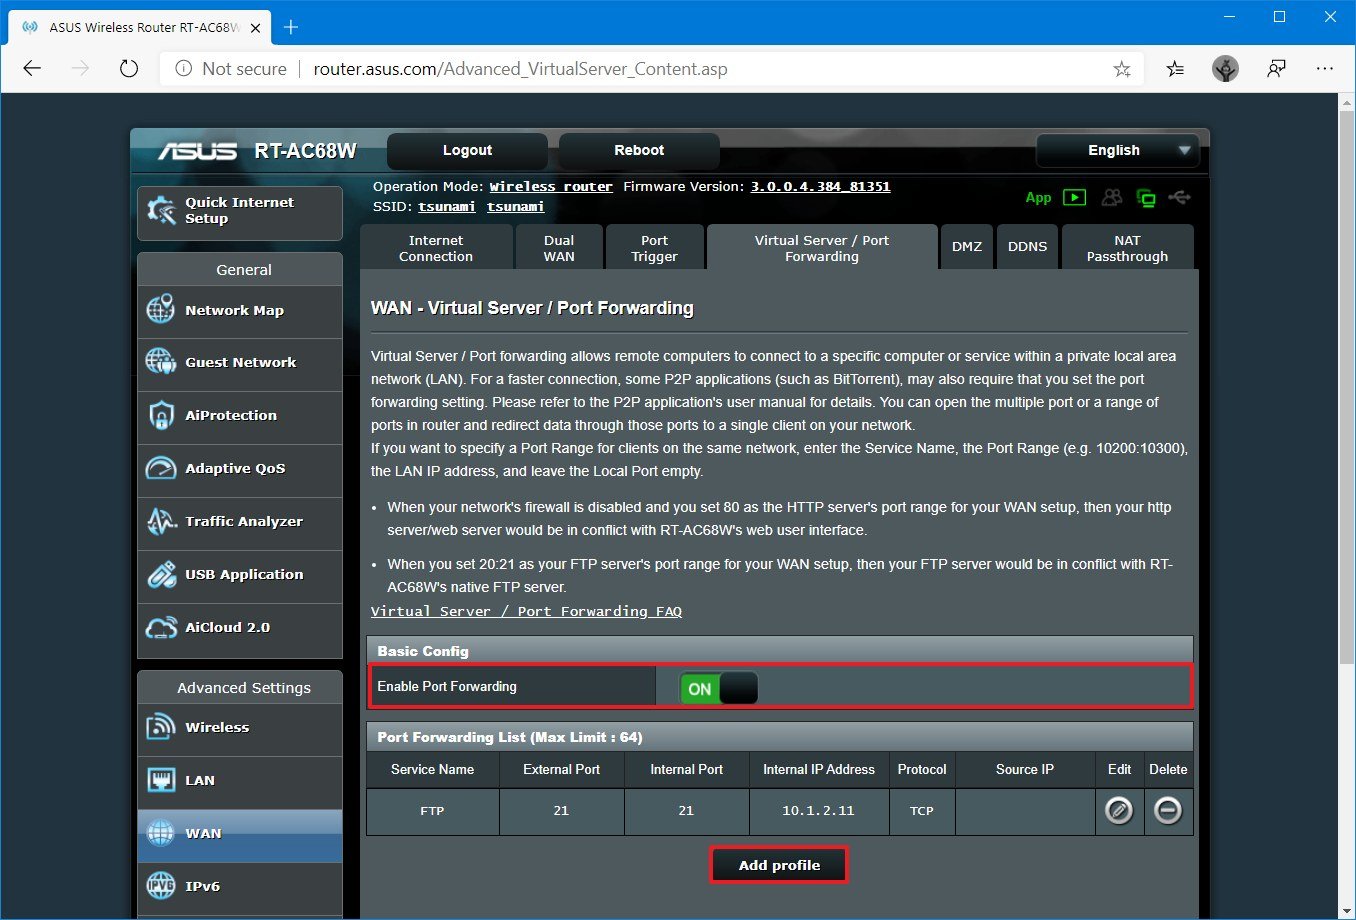
- Create a new port forward with the required information — for example:
- Service name: (optional) Specify the reference name for the service.
- Protocol: TCP.
- External Port: 3389.
- Internal Port: 3389.
- Internal IP Address: Specify the IP address of the computer you’re trying to connect — for instance, 10.1.4.100.
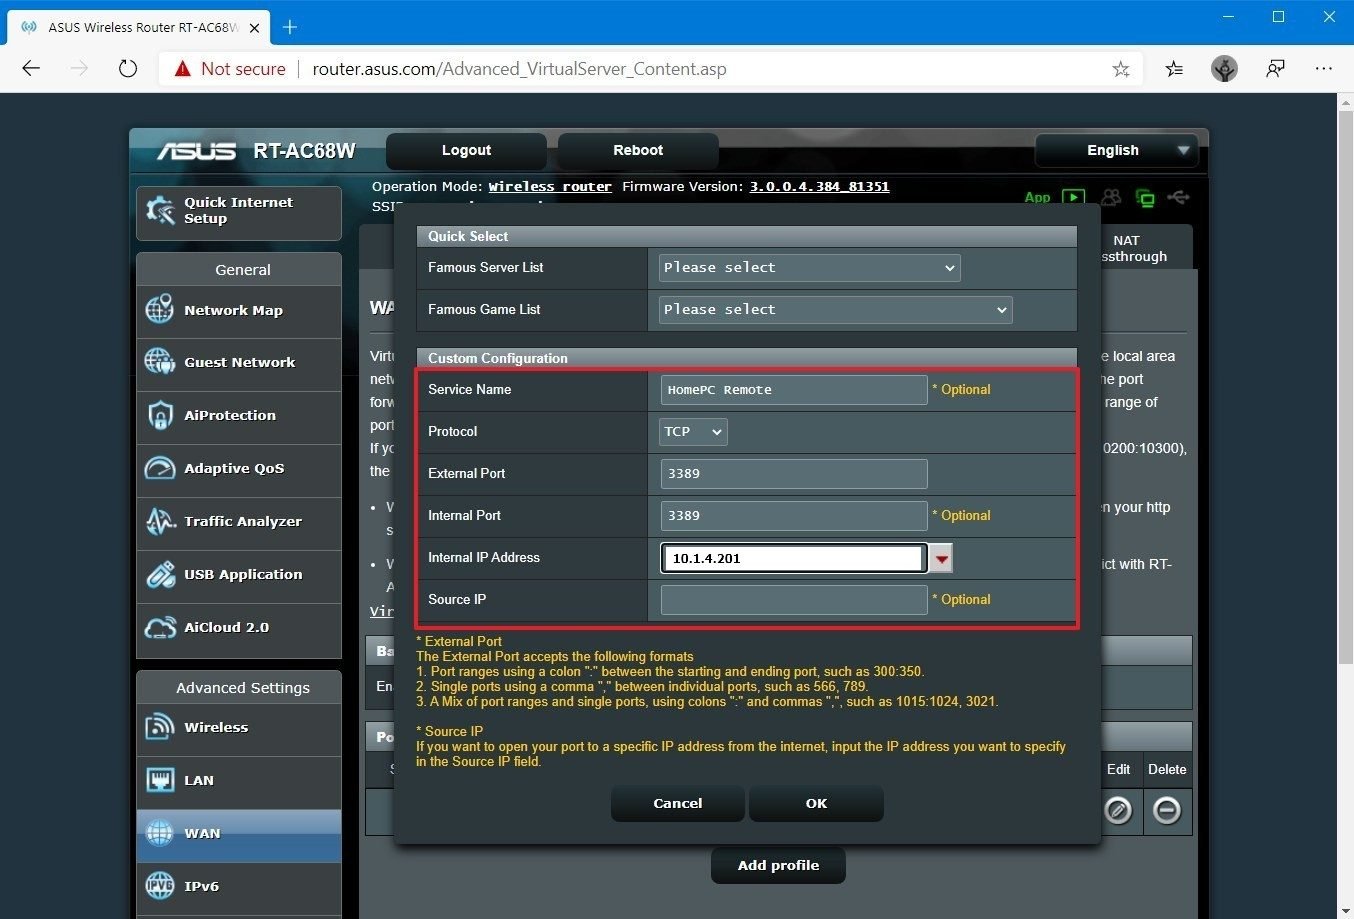
- Click the OK button.
Once you complete the steps, the port will open on the router, allowing remote desktop connections through the internet to that specific device.
How to establish remote desktop connection on Windows 10
After setting up the computer and router, you can initiate a remote connection using the Remote Desktop app on Windows 10.
Install Remote Desktop app
The Remote Desktop app should already be available on Windows 10, but you can always install it from the Microsoft Store.
To install the Remote Desktop app on Windows 10, use these steps:
- Open Microsoft Remote Desktop app page.
- Click the Get (or Install) button.
- Click the Open Microsoft Store button.
- Click the Get (or Install) button.
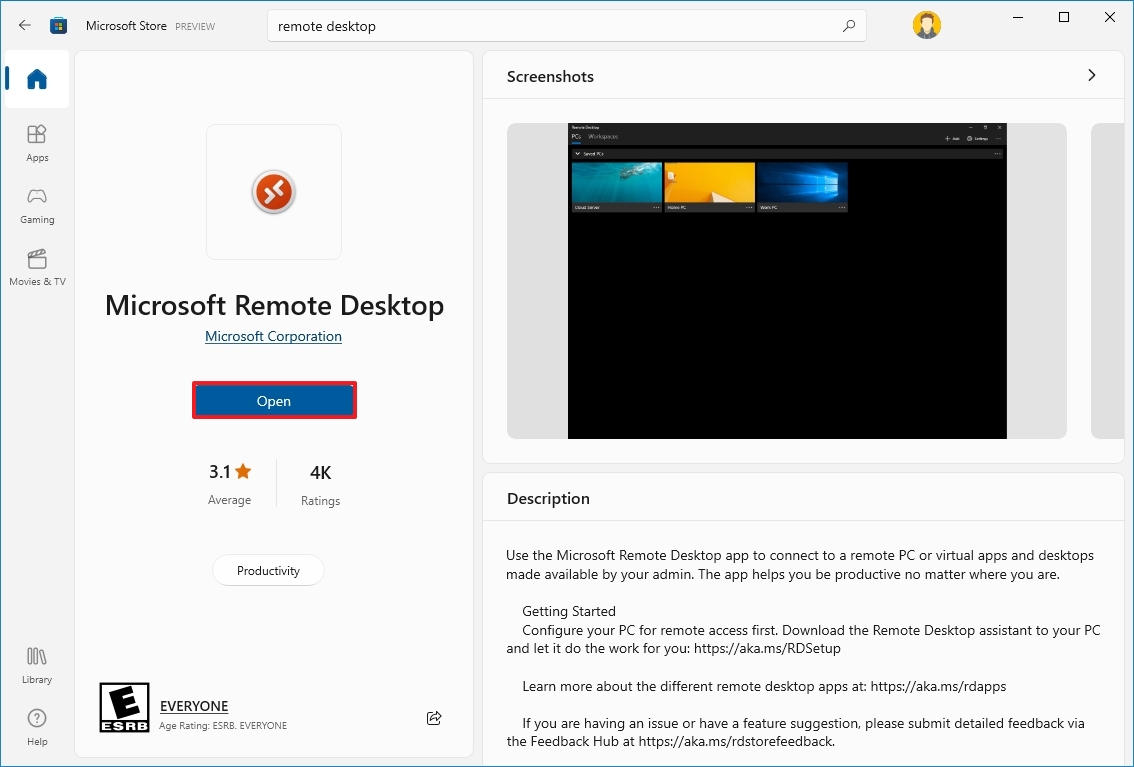
Once you complete the steps, open the app from within the Microsoft Store or Start menu.
Start remote desktop connection
To connect to a computer remotely on Windows 10, use these steps:
- Open the Remote Desktop app.
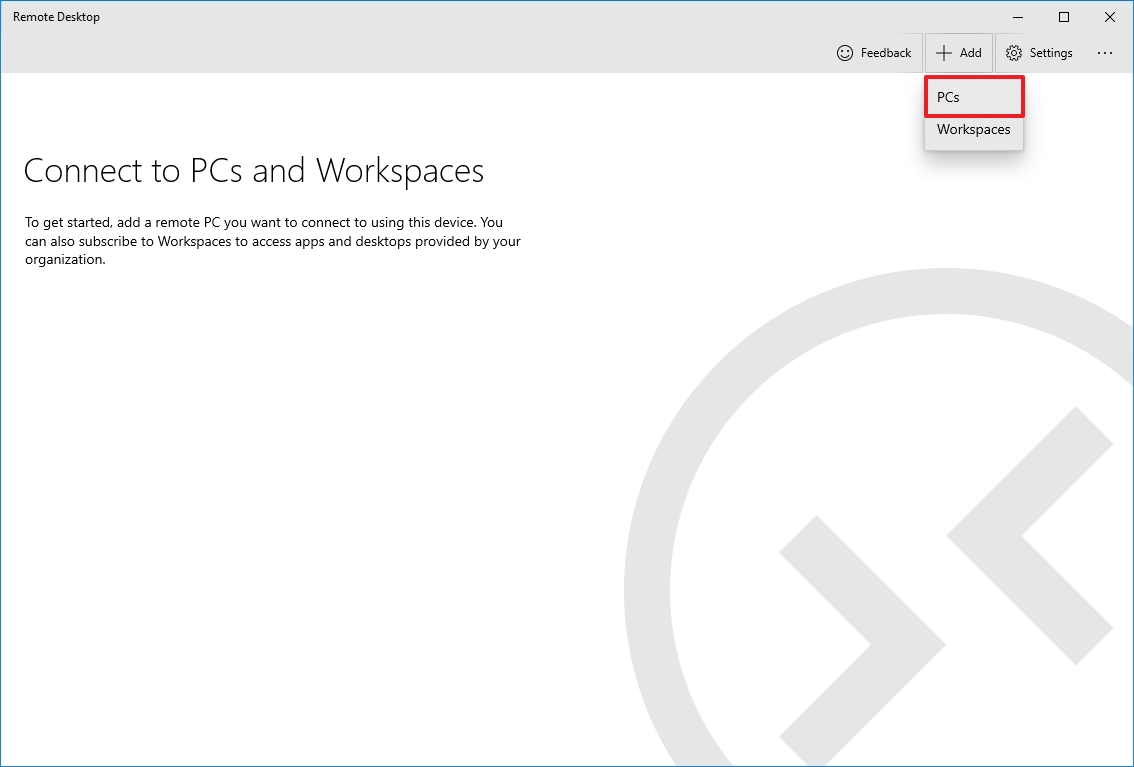
- Click the + Add button in the top right.
- Click the PCs option.
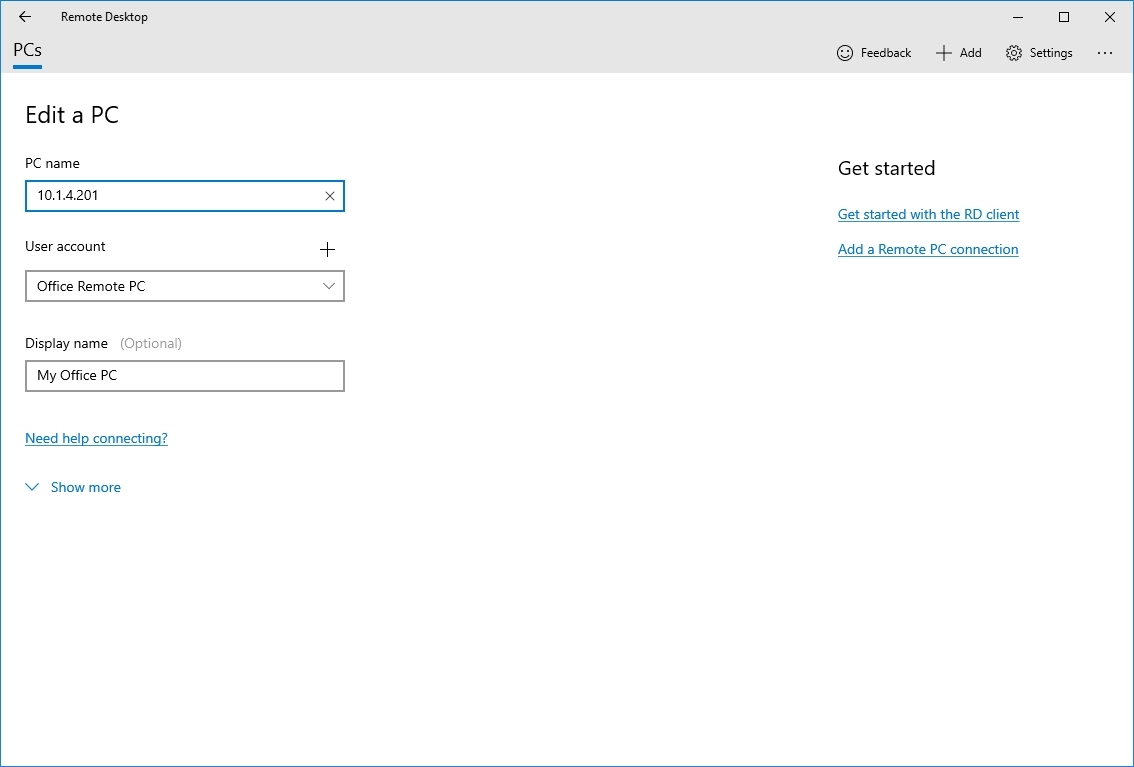
- Under the «PC name» section, specify the TCP/IP address of the remote computer:
- If the device is inside a private network, enter the local IP address.
- If the device is in a remote network (via the internet), enter the public IP address.
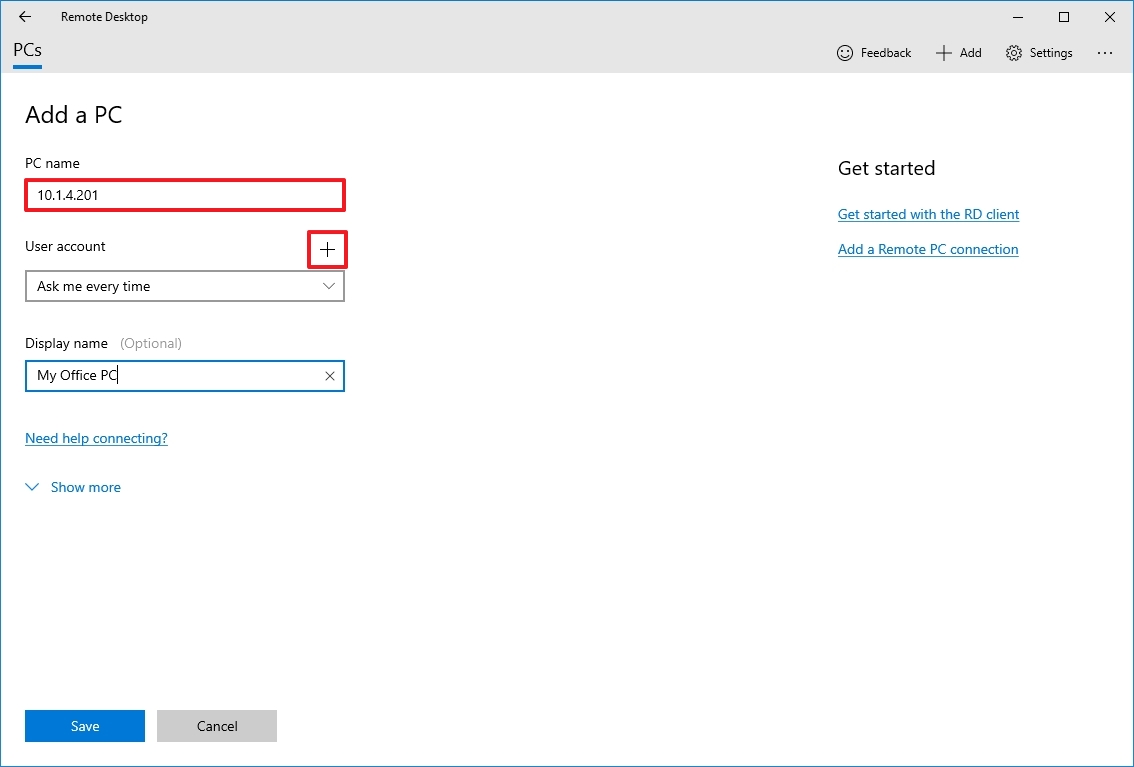
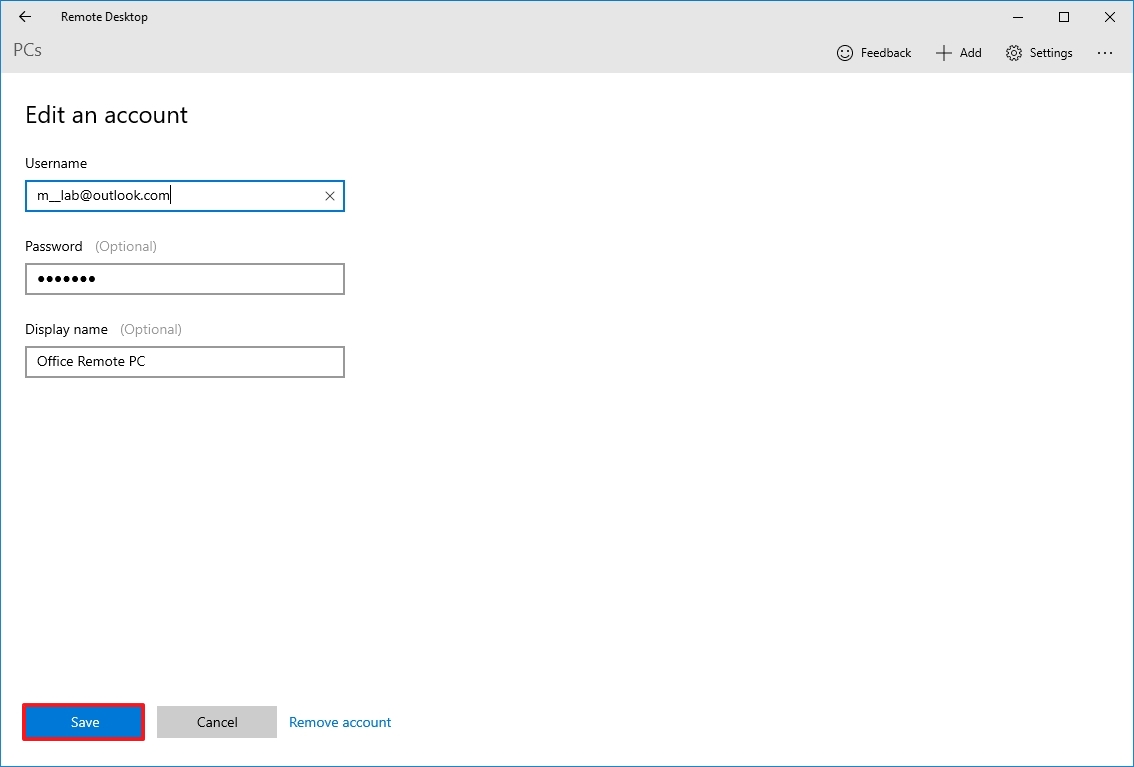
- Under the «User account» section, click the + (plus) button in the top right.
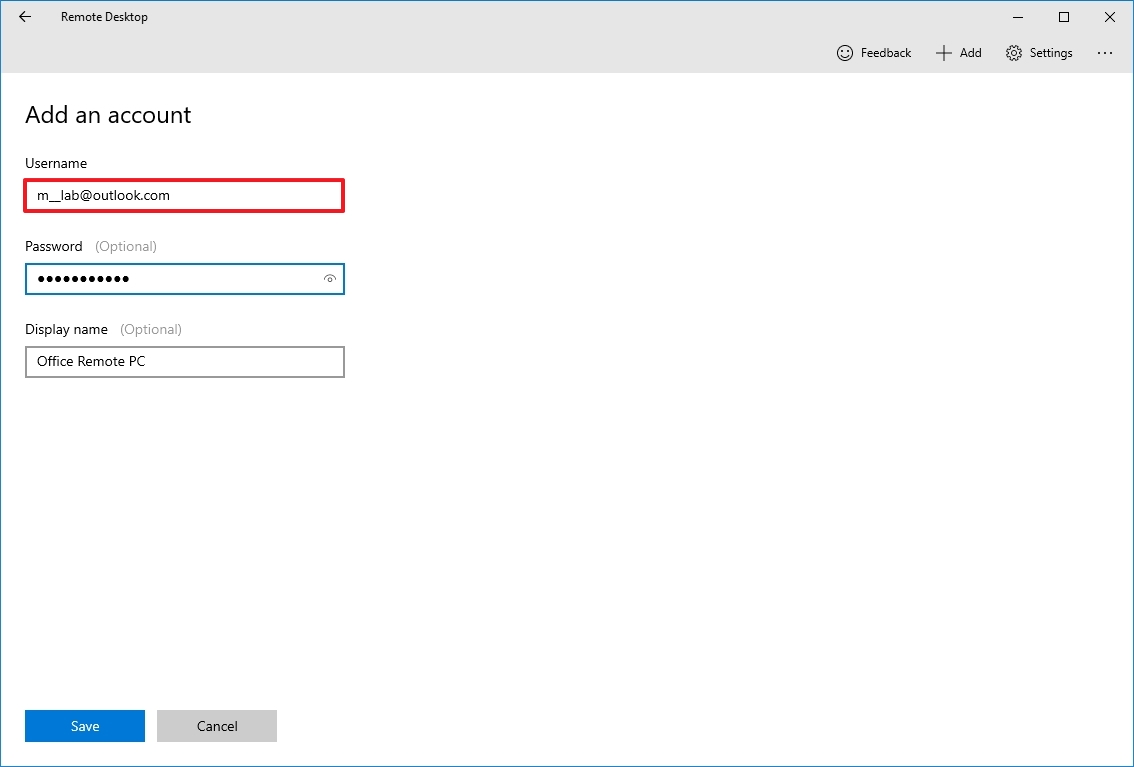
- Confirm the account information to sign in to the remote computer:
- If the remote device is using a Microsoft account, enter that Microsoft account sign-in information.
- If the remote device uses a local account, enter the local username and password to sign in.
- (Optional) Under the «Display name» section, specify the account settings’ name.
- Click the Save button.
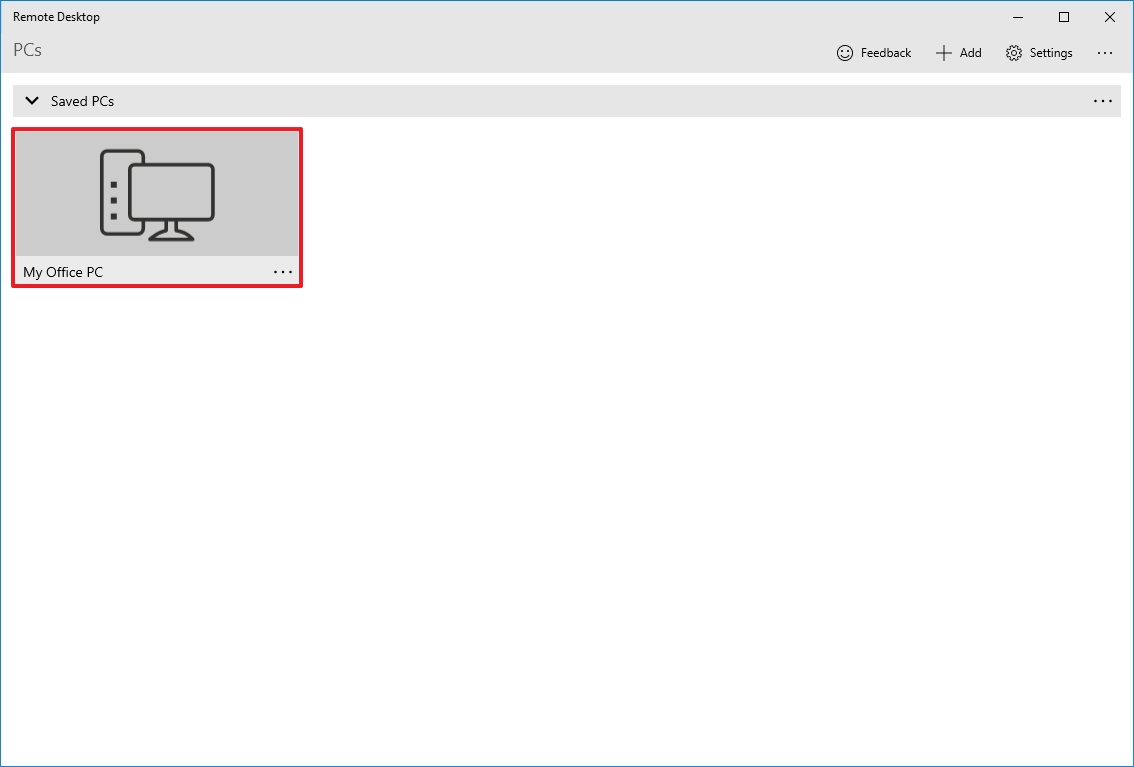
- (Optional) Under the «Display name» section, specify the connection’s name — for example, Office Remote PC.
- Click the Show more option.
- (Optional) Select additional settings as necessary.
- Quick tip: The additional settings include the option to connect using an admin session, set the remote session resolution, and clipboard, among others. Typically, you don’t need to configure these options, and you should only use them depending on the scenario.
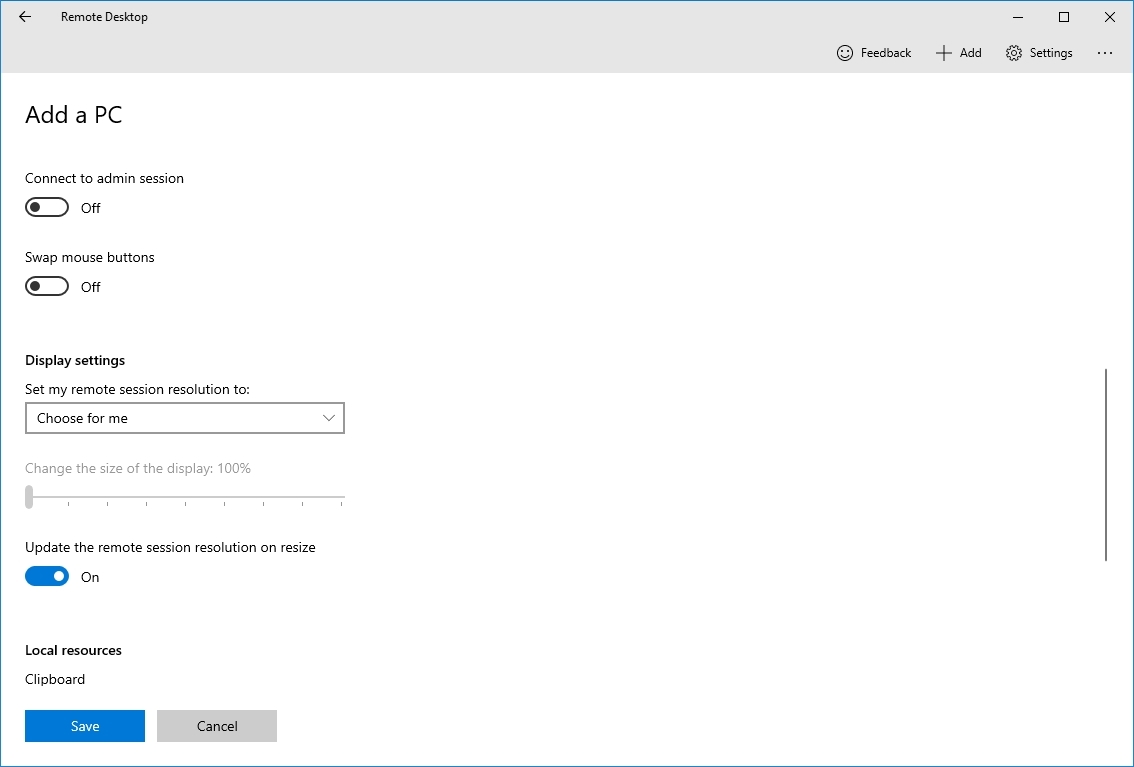
- Click the Save button.
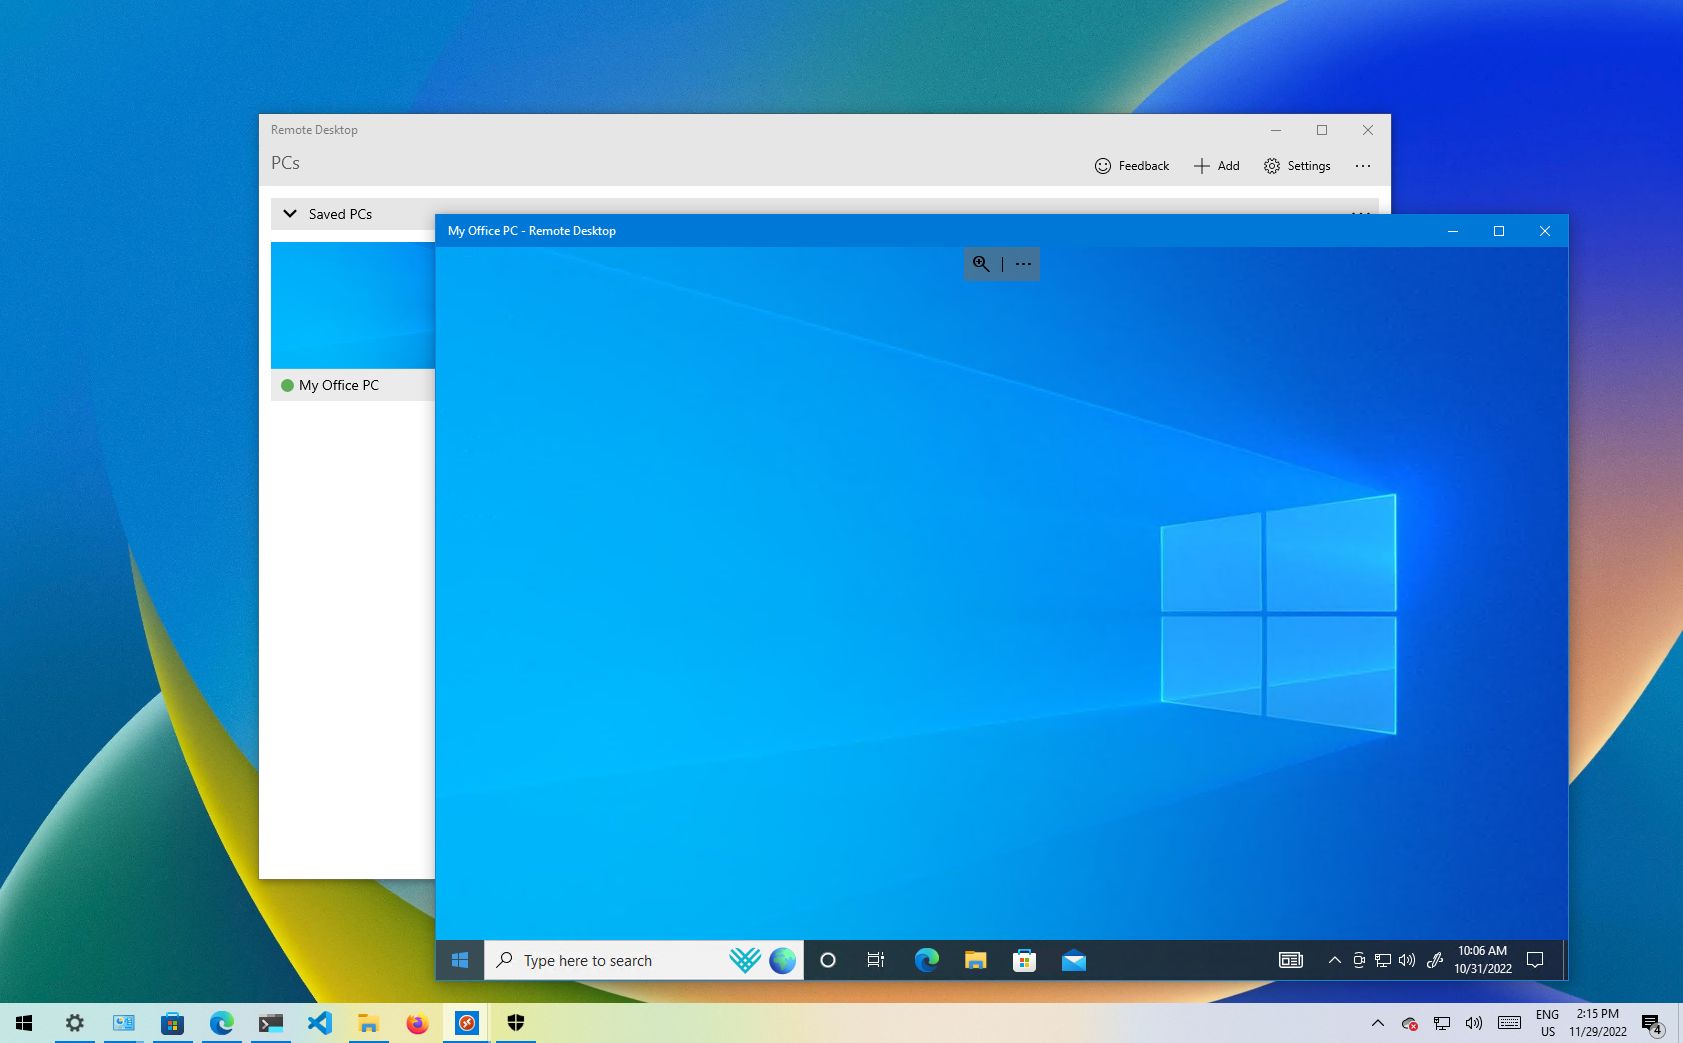
- Under the «Saved Desktops» section, click the connection to start a remote session.
- Check the «Don’t ask about this certificate again» option (if applicable).
- Click the Connect button.
After you complete the steps, the remote connection should establish without problems if everything has been configured correctly.
If you want to terminate the session, you can close the window, click the three-dotted menu button from the top-middle and then click the Disconnect button.
Change app and connection settings
On Windows 10, the Remote Desktop app allows you to customize various settings, including additional configuration options, and modify existing settings.
Change general settings
To change general settings in the Remote Desktop app, use these steps:
- Open the Remote Desktop app.
- Click the Settings button in the top right.
- Select the user account from the list.
- Click the Edit (pen) button to adjust the settings.
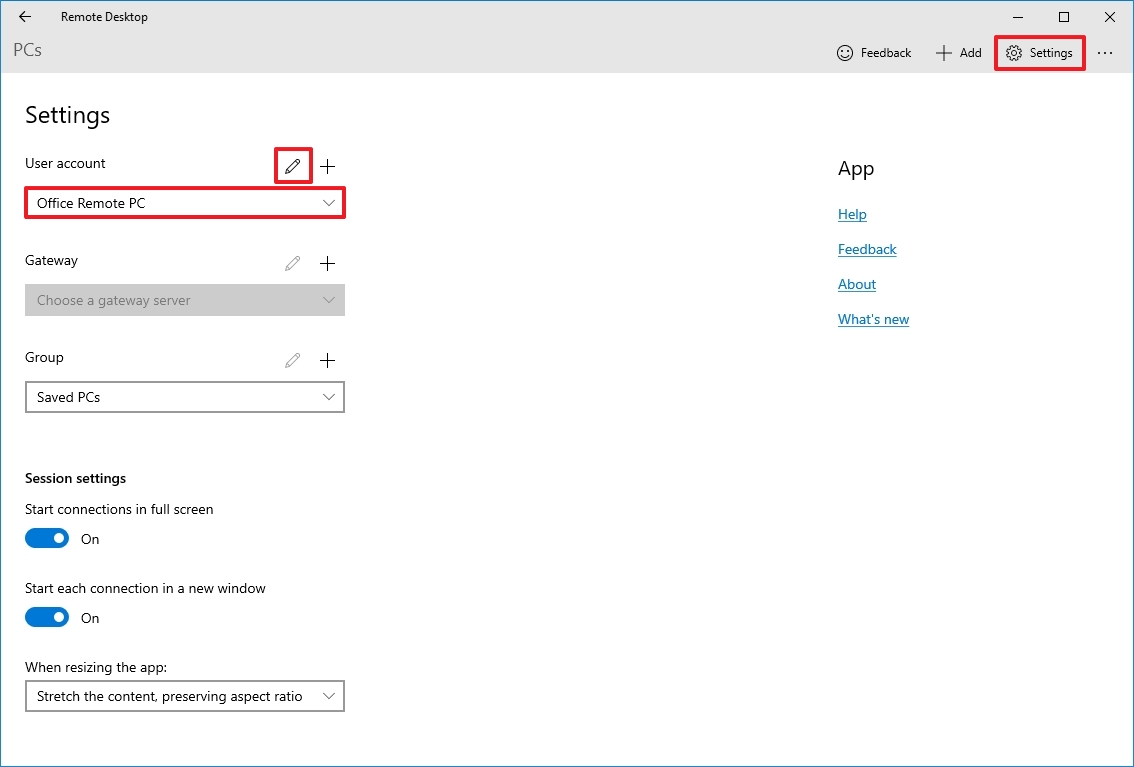
- Click the Save button.
You can also pre-add additional user accounts (with the plus + button) that you can use later to connect to other devices or as a different user.
The Gateway option allows you to set a gateway server, but you’ll rarely need to use this option. Also, the Group option enables you to organize connections into different and more manageable groups.
Change session settings
To change the session settings for Remote Desktop on Windows 10, use these steps:
- Open the Remote Desktop app.
- Click the Settings button in the top right.
- Turn on or off the «Start connections in full screen» toggle switch.
- Turn on or off the «Start each connection in a new window» toggle switch.
- Use the «When resizing the app» drop-down menu to choose how the remote desktop session will look as you resize the app:
- Stretch the content, preserving aspect ratio (recommended).
- Stretch the content.
- Show scroll bars.

- Use the «Use keyboard command with a» drop-down menu to choose whether shortcuts (such as «Ctrl + C» and «Ctrl + V») work only locally or on the remote desktop. Options available include.
- My local PC only.
- My remote session when it’s in full screen (recommended).
- My remote session when it’s in use.
- (Optional) Turn on the «Prevent the screen from timing out» toggle switch.
Alongside editing the account and session settings, you can also enable the option to show a preview of the remote desktop in the connection, which adds a visual queue to make it easier to find the connection in the app.
Change connection settings
To edit the settings of a remote connection, use these steps:
- Open the Remote Desktop app.
- Click the menu (three-dotted) button in the connection and select the Edit option.
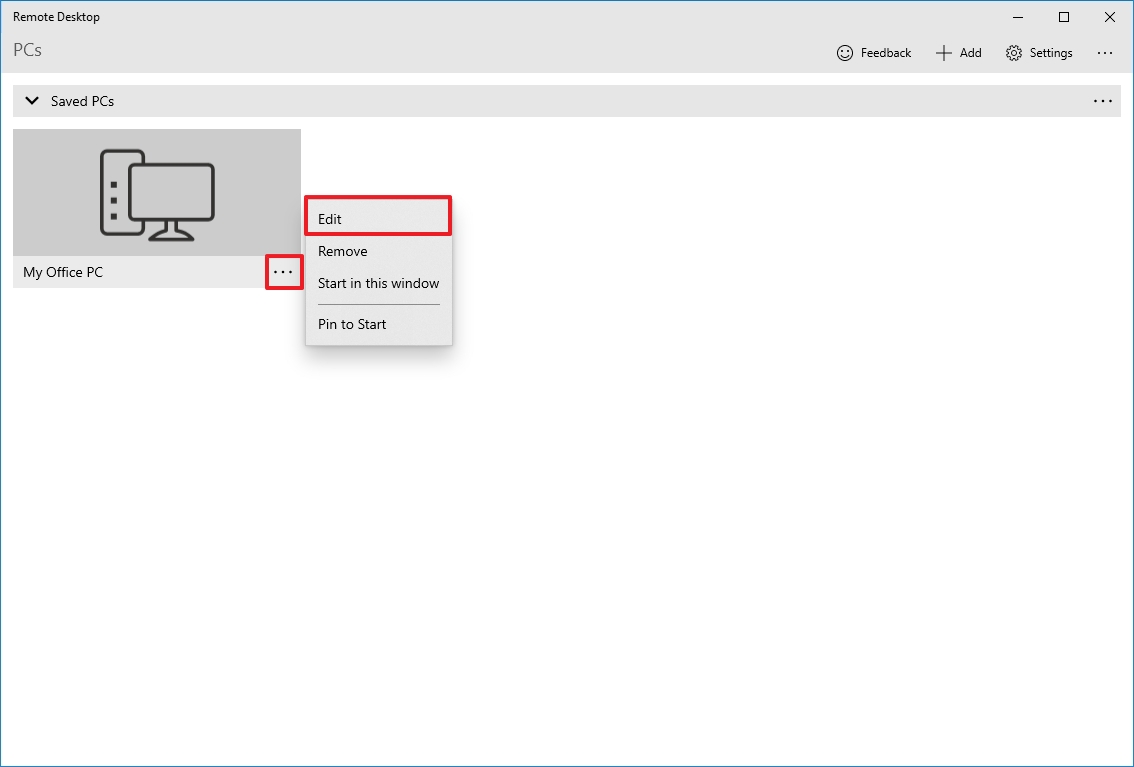
- Change the device name, account, and settings as needed.
- Click the menu (three-dotted) button in the connection and choose the Remove option to delete it.
- Click the menu (three-dotted) button in the connection, and choose the Pin to Start option to quickly access the remote computer from the Start menu.
Once you complete the steps, the settings will save and apply automatically in the connection.
How to troubleshoot remote desktop connection on Windows 10
Typically, you won’t find issues using the Remote Desktop app, but if you cannot connect to a device, you will need to troubleshoot the problem.
Confirm firewall settings
Windows 10 opens the required firewall ports automatically when you configure Remote Desktop, but it might not always be the case. If the connection fails, check the firewall to ensure it’s allowing the Remote Desktop service.
To enable remote connections through the firewall on Windows 10, use these steps:
- Open the Windows Security app.
- Click on Firewall & network protection.
- Click the «Allow an app through firewall» option.
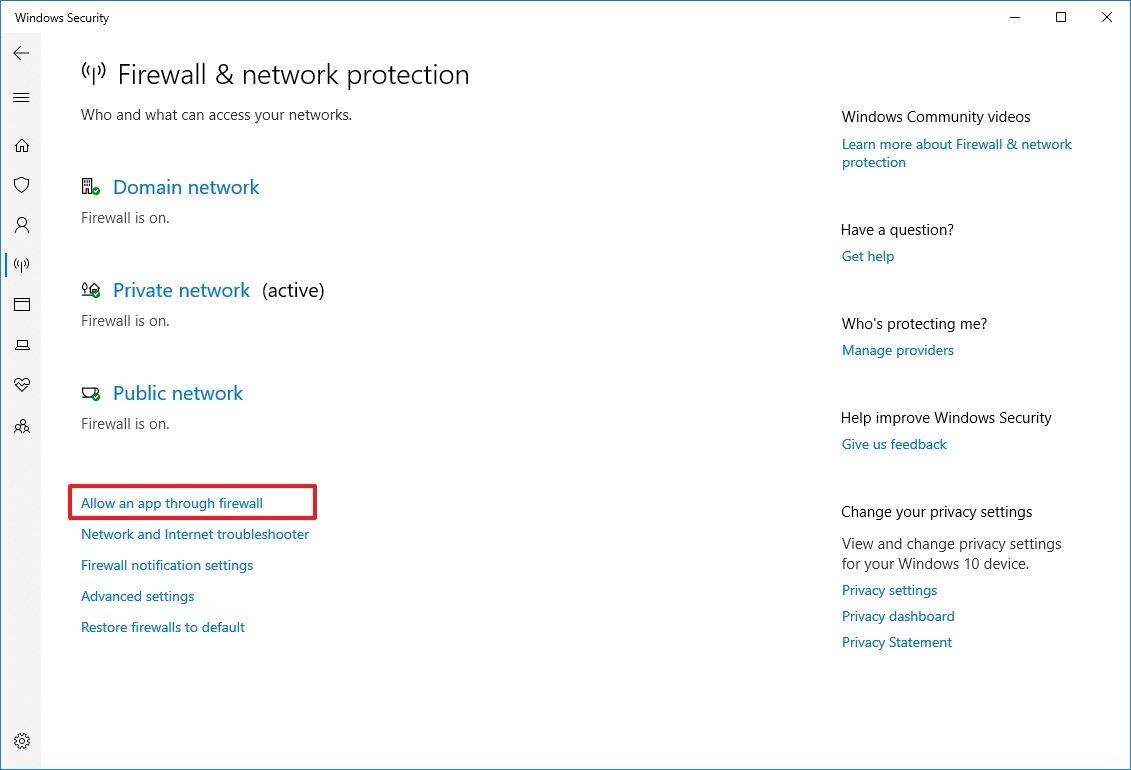
- Click the Change settings button.
- Check the Remote Desktop option and check the options for Private and Public.
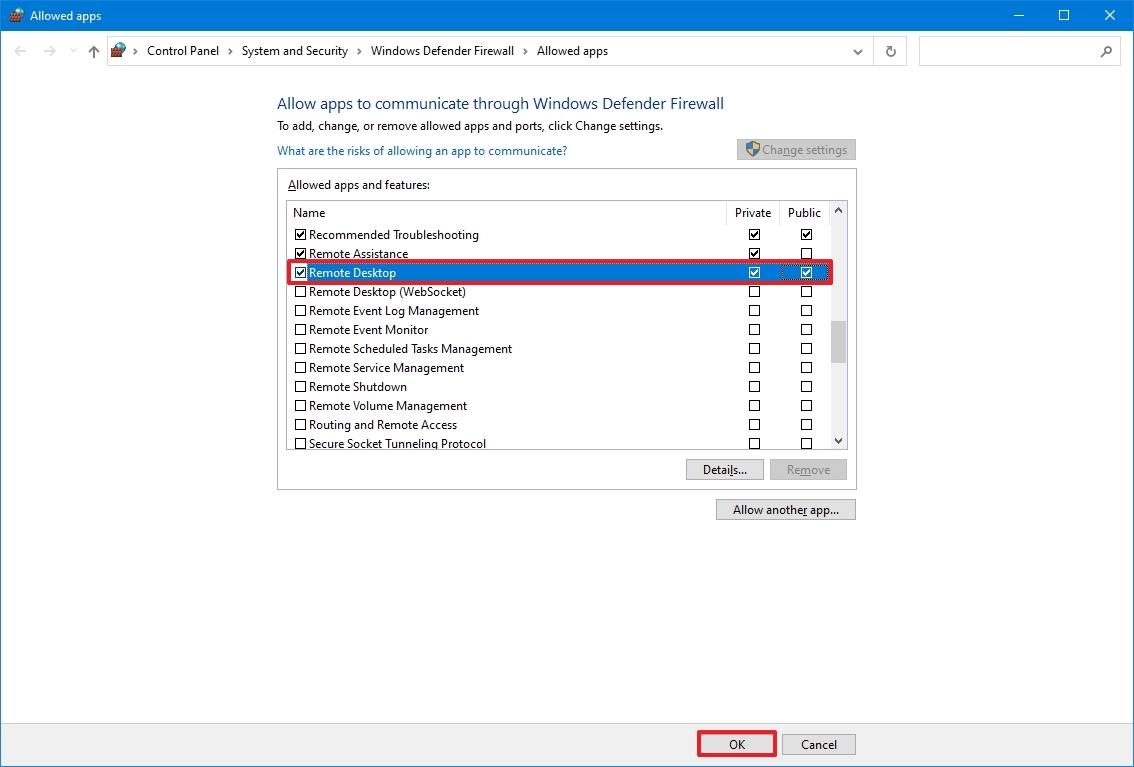
- Click the OK button.
If you have a third-party firewall or antivirus, you may want to disable these security applications to check if you can connect. You may need to check the software support website for more specific details to complete this task.
Unblock the remote connection port
If the settings are correct, and you still can’t connect, there’s a chance the internet provider is blocking the remote desktop port for security reasons. In this case, you may want to contact the ISP directly to resolve the issue.
Use the computer IP address (not the name)
When using the Remote Desktop app, it’s better to use the device’s IP address instead of the computer name. Otherwise, you may stumble upon some resolution issues.
Also, when adding a new computer, remember to enter the appropriate IP address. For example, use the local IP address to connect remotely from within the private network and use the correct public IP address to connect over the internet.
Confirm remote desktop service
You may also be unable to connect because the required remote desktop services are not running on Windows 10.
To determine whether the remote desktop service is running on your device, use these steps:
- Open Start.
- Search for Services and click the top result to open the app.
- Select the «Remote Desktop Service» and check that the «Status» column reads Running.
- If it’s not running, right-click the service and select the Start option.
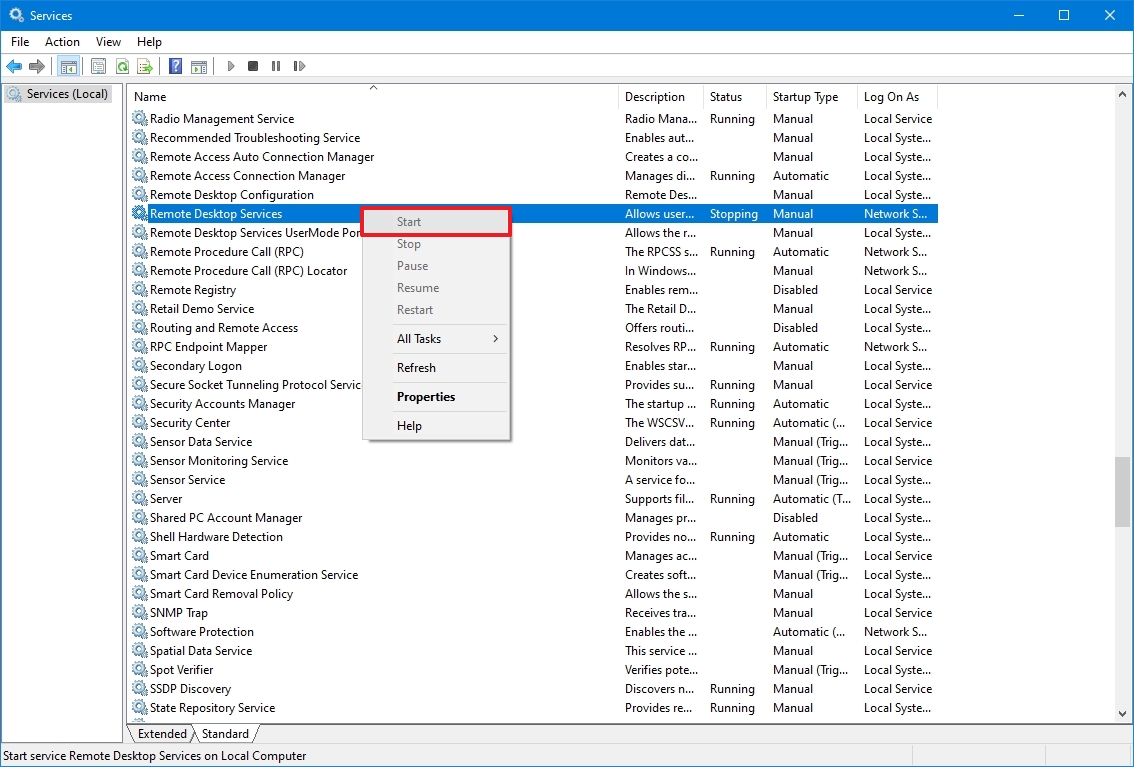
After you complete the steps, you should be able to establish a remote session on Windows 10.
Switch to Internet Protocol Version 4 (TCP/IPv4)
Windows 10 can use both networking stacks, IP version 4 (IPv4) and version 6 (IPv6) — also known as dual-stack — but sometimes, it’ll choose version 6 for the connection, which may cause problems with the remote desktop protocol (RDP).
To set IPv4 as the default networking stack on Windows 10, use these steps:
- Open Control Panel.
- Click on Network and Internet.
- Click on «Network and Sharing Center.»
- Click the «Change adapter settings» option from the left navigation pane.
- Right-click the active adapter and select the Properties option.
- Clear the «Internet Protocol Version 6 (TCP/IPv6)» option.

- Click the OK button.
- Restart the computer.
Once you complete the steps, you should now be able to connect using a remote connection.
Use local account instead of Microsoft account
If you try to connect, but the authentication fails, and you are using a Microsoft account, it’s probably a problem with the authentication method. For instance, you may encounter issues if the Microsoft account has the two-step verification or passwordless security feature enabled. You may consider creating and using a local account for remote access if this is the case.
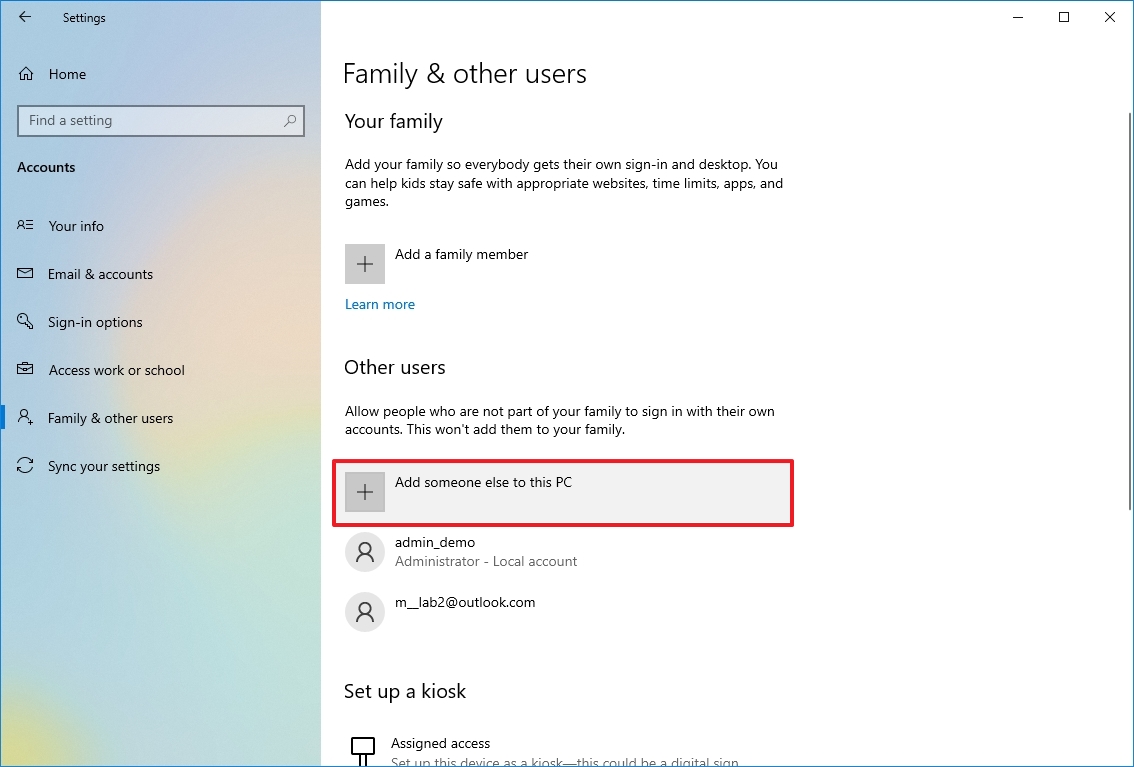
To create a local administrator account on Windows 11, use these steps:
- Open Settings.
- Click on Accounts.
- Click on Family & other users.
- Under the «Other users» section, click the «Add someone else to this PC» option.
- Click the «I don’t have this person’s sign-in information» option.
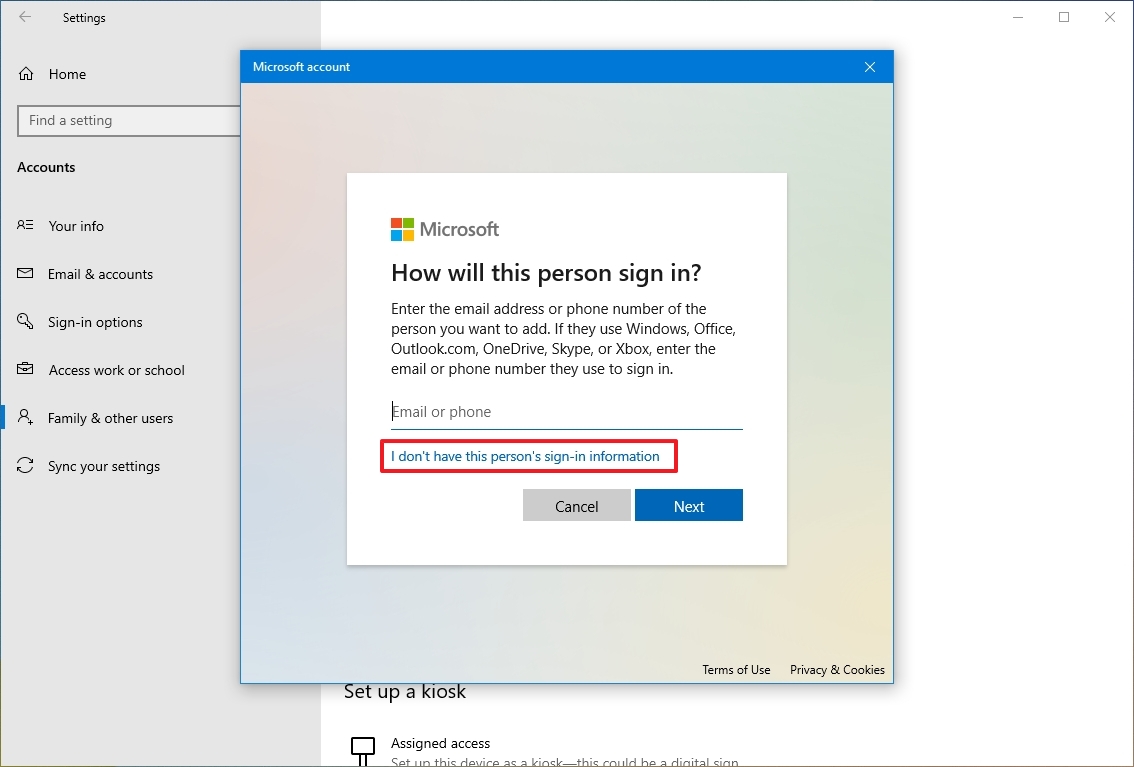
- Click the «Add a user without a Microsoft account» option.
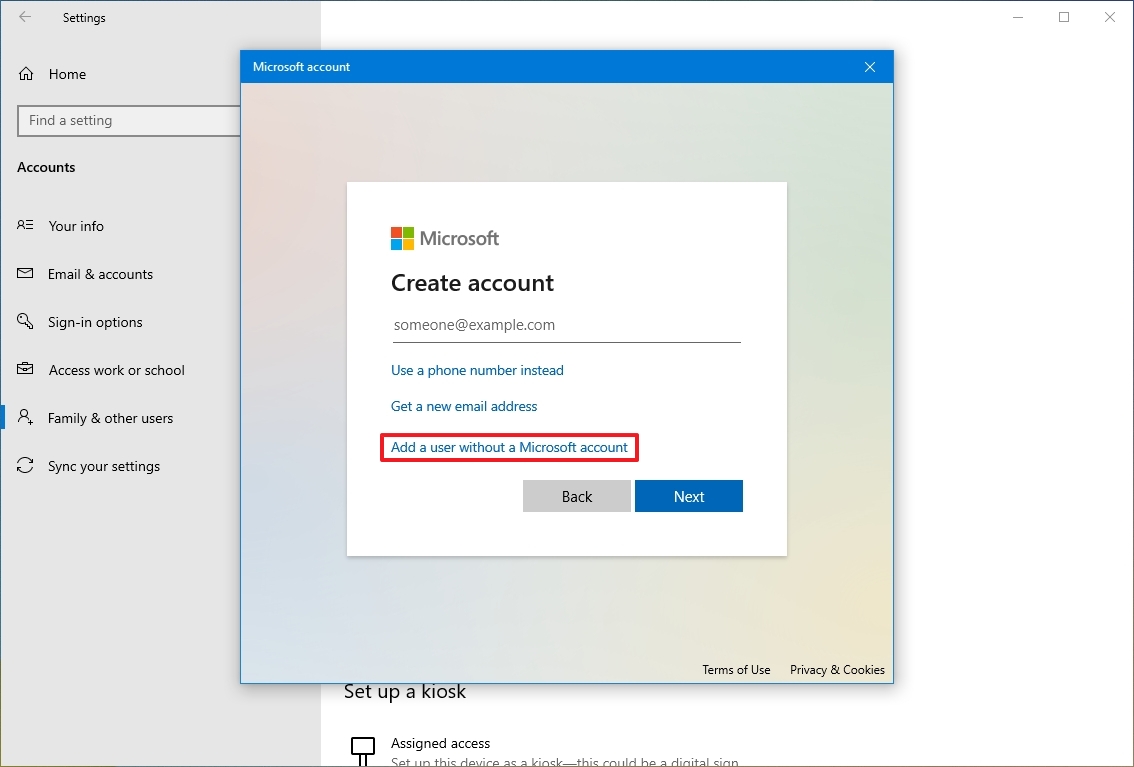
- Confirm the username.
- Create a strong password.
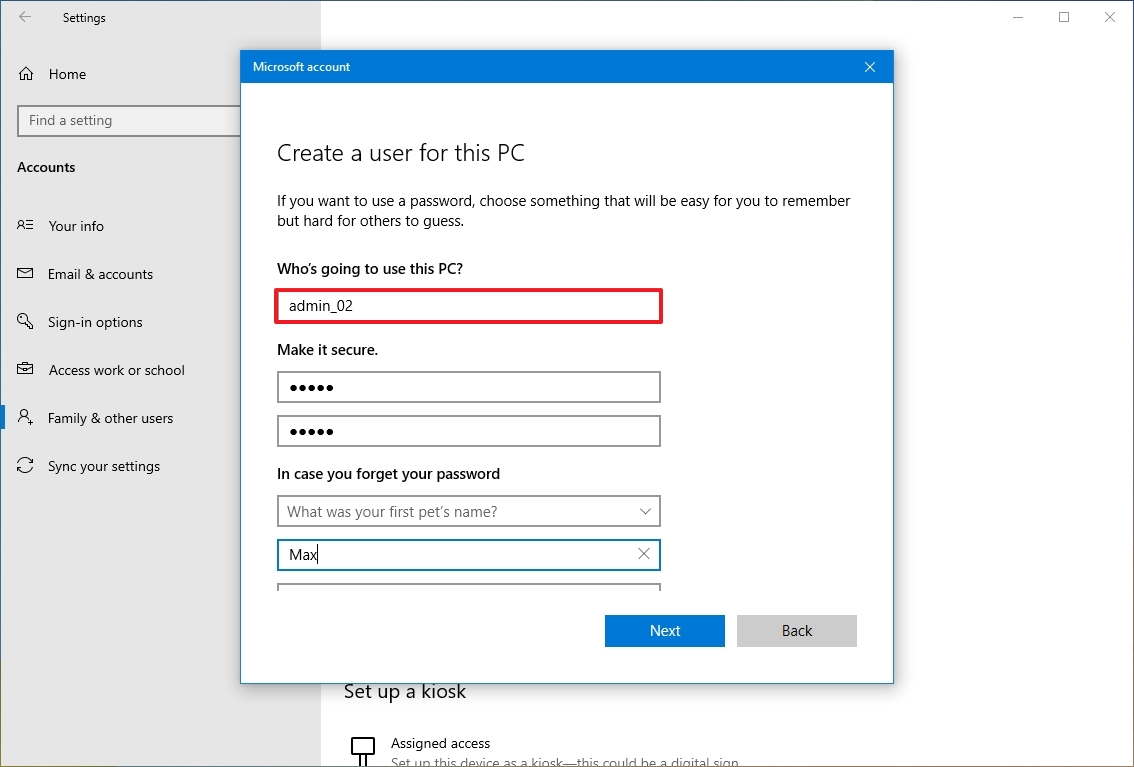
- Complete the security questions to allow password reset from the Sign-in screen.
- Click the Next button.
- Select the newly created account and click the «Change account type» button.
- Choose the Administrator option.
- Click the OK button.
After you complete the steps, you can use the local account information instead of the Microsoft account to connect to a remote desktop session.
We outlined the steps to connect to a device inside a private network and through the internet. However, allowing remote desktop connections (mainly through the internet) could be a security risk.
Remember that having the remote desktop protocol enabled and opening ports could allow malicious individuals to gain unauthorized access to the computer. If you need to use this feature, use a strong password, disable the remote desktop service and remove the port forwarding settings from the router when they are no longer needed.
More resources
For more helpful articles, coverage, and answers to common questions about Windows 10 and Windows 11, visit the following resources:
- Windows 11 on Windows Central — All you need to know
- Windows 10 on Windows Central — All you need to know
Mauro Huculak has been a Windows How-To Expert contributor for WindowsCentral.com for nearly a decade and has over 15 years of experience writing comprehensive guides. He also has an IT background and has achieved different professional certifications from Microsoft, Cisco, VMware, and CompTIA. He has been recognized as a Microsoft MVP for many years.

19 сентября 2024 года Microsoft официально выпустила стабильную версию приложения Windows App для Windows, macOS, iOS, iPadOS и веб-браузеров. Это обновлённая версия Remote Desktop для подключения к удалённым рабочим столам Windows.

Также Windows App доступно для устройств на Android, но эта версия по-прежнему помечена как общедоступная предварительная версия.
В Microsoft пояснили, что приложение Windows App было разработано, чтобы предоставить как конечным пользователям, так и системным администраторам более унифицированный интерфейс для любой платформы. Это решение позволяет пользователям подключаться к удалённым, локальным и облачным службам ПК, таким как Windows 365, Azure Virtual Desktop, Remote Desktop, Remote Desktop Services, Microsoft Dev Box и другим.
Microsoft заявила, что Windows App позволяет пользователям настраивать домашний экран и использовать такие функции, как перенаправление устройств, оптимизация Microsoft Teams, поддержку настроек с несколькими мониторами и динамические разрешения экрана. Также предполагается, что приложение предоставит пользователям быстрый способ переключения своих учётных записей в Windows.
Ранее переименование достаточно популярного продукта вызвало негативную реакцию среди пользователей. Фактически новое название может вызвать путаницу при поиске Remote Desktop, работе с приложением или предоставлении технической поддержки неопытным клиентам. С другой стороны, переименование Microsoft Remote Desktop на Windows App на платформах, отличных от Windows, на самом деле разумно, потому что это буквально шлюз к удалённым системам Windows или в облаке сервисы.
Стабильную версию Windows App можно скачать для Mac из Центра загрузки. Это приложение также доступно в Microsoft Store для систем Windows 10/11.
Технология RemoteApp позволяет настроить удалённый доступ к отдельному приложению. Пользователь не сможет работать с другими элементами операционной системы — при входе в учётную запись он будет сразу видеть окно программы, которую подключил администратор.
Использование встроенных инструментов
Технология RemoteApp доступна на Windows 10 Professional. Настроить подключение можно двумя способами: через прямую правку реестра или с помощью файла конфигурации. Посмотрим, как это сделать, на примере программы 1С.
Правка реестра
Запускаем редактор реестра (Win+R — regedit). Переходим на ветку HKLM\SOFTWARE\Microsoft\Windows NT\CurrentVersion\Terminal Server\TSAppAllowList\Applications\. Кликаем по папке Applications правой кнопкой, выбираем опцию «Создать» — «Новый раздел» и задаём ему имя 1С RemoteApp (указываем название программы, к которой будет подключаться пользователь).
Выбираем новый каталог. Создаём внутри него несколько параметров («Создать» — «Строковый параметр»).
- Название — Name, значение — 1C RemoteApp
- Название — Path, значение — C:\Program Files (x86)\1cv8\common\1cestart_start.exe (это полный путь к исполняемому файлу программы).
- Название — VPath, значение — C:\Program Files (x86)\1cv8\common\1cestart_start.exe.
- Название — RequiredCommandLine, значение — пустая строка.
- Название — CommandLineSetting, значение — 0x00000001.
- Название — IconPath, значение — C:\Program Files (x86)\1cv8\common\1cestart_start.exe.
- Название — IconIndex, значение — 0x00000000.
- Название — ShowInTSWA, значение — 0x00000000.
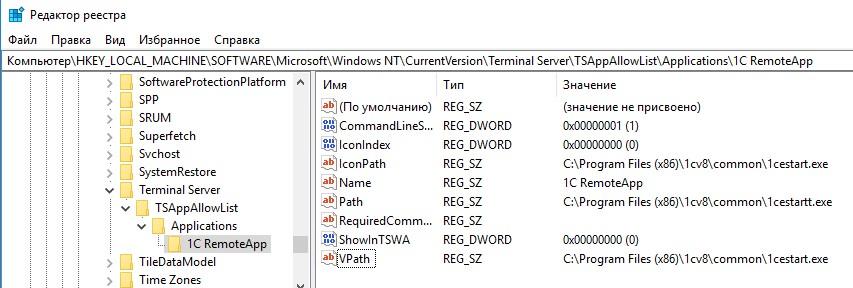
Так должен выглядеть раздел RemoteApp
Правка файла конфигурации
Аналогичного результата можно добиться с помощью файла конфигурации. Открываем любой текстовый редактор и вставляем в него следующий текст:
Windows Registry Editor Version 5.00
[HKEY_LOCAL_MACHINE\SOFTWARE\Microsoft\Windows NT\CurrentVersion\Terminal Server\TSAppAllowList\Applications\1C RemoteApp]
«Name»=»1C RemoteApp»
«Path»=»C:\\Program Files (x86)\\1cv8\\common\\1cestart.exe»
«VPath»=»C:\\Program Files (x86)\\1cv8\\common\\1cestart.exe»
«RequiredCommandLine»=»»
«CommandLineSetting»=dword:00000001
«IconPath»=»C:\\Program Files (x86)\\1cv8\\common\\1cestart.exe»
«IconIndex»=dword:00000000
«ShowInTSWA»=dword:00000000
Указываем полный путь к исполняемому файлу программы, к которой будет подключаться пользователь. Сохраняем документ с расширением .REG — например, 1C RemoteApp.reg.
Следующий шаг — создание ярлыка для подключения. Для этого нужно знать адрес, по которому доступен удалённый рабочий стол. Например, пусть он будет 192.168.0.9:3569. Создаём новый текстовый документ и вставляем в него текст:
allow desktop composition:i:1
allow font smoothing:i:1
alternate full address:s:192.168.0.9:3569
alternate shell:s:rdpinit.exe
devicestoredirect:s:*
disableremoteappcapscheck:i:1
drivestoredirect:s:*
full address:s:192.168.0.9:3569
prompt for credentials on client:i:1
promptcredentialonce:i:0
redirectcomports:i:1
redirectdrives:i:1
remoteapplicationmode:i:1
remoteapplicationname:s:1C RemoteApp
remoteapplicationprogram:s:||1C RemoteApp
span monitors:i:1
use multimon:i:1
Сохраняем файл с расширением .RDP — например, 1C RemoteApp.rdp.
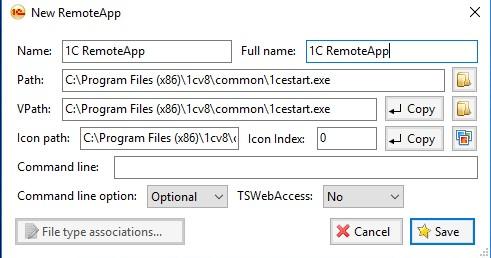
Настройка через RemoteApp Tool
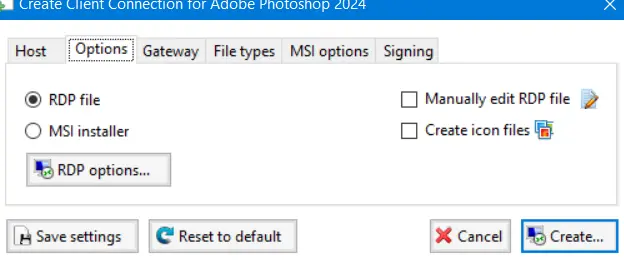
Можно обойтись без ручной правки реестра и настроить подключение с помощью бесплатной утилиты RemoteApp Tool.
- Раскрываем меню File и выбираем опцию New Remote App.
- Заполняем поля, как показано на скриншоте. Указываем имя подключения, а также полный путь к исполняемому файлу программы, с которой будет устанавливаться соединение.

Настройки подключения к удалённому приложению
- Нажимаем Save.
Чтобы создать ярлык подключения, выбираем в списке RemoteApp и нажимаем на кнопку Create Client Connection. Отмечаем RDP File, указываем адрес сервера и номер порта. Нажимаем Create для сохранения конфигурации.
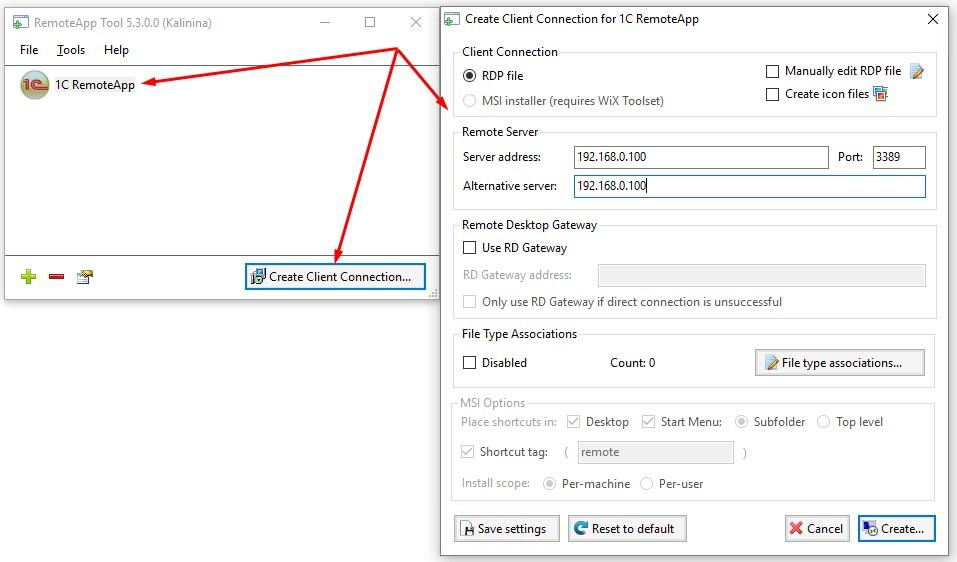
Создаём подключение к удалённому рабочему столу, на котором будет доступна только одна программа
Настройка через RemoteApp Tool завершена. Фактически мы указали те же данные, что и в редакторе реестра, только сделали это через удобный графический интерфейс.
Post Views: 7 526