
Sharing folders on a network allows remote access to files, streamlining collaboration among multiple users. In Windows, the Command Prompt approach ensures consistency by enabling script-based automation. It is especially beneficial for administrators who manage multiple systems.
The net share utility in Windows offers direct commands to establish, list, and remove folder shares. This method bypasses the graphical interface and reduces manual steps for repetitive tasks. Security and permissions can be strictly controlled by combining net share with Windows security settings.
Relying on command-line folder sharing fosters a systematic environment that is easier to document and replicate. Errors are minimized through automated scripts, and remote management becomes more efficient. This approach aligns with technical requirements in enterprise or lab settings where stable and predictable configurations are crucial.
-
Open Command Prompt with administrator privileges.
-
Navigate to or create the folder you want to share.
C:\>mkdir shared
-
Use the net share command to share the folder on the network.
C:\>net share mysharedfolder=c:\shared
mysharedfolder was shared successfully.
-
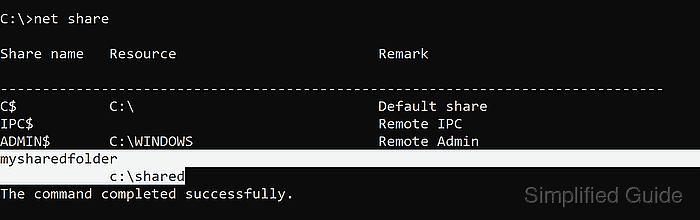
Verify the folder’s shared status.
C:\>net share Share name Resource Remark ------------------------------------------------------------------------------- C$ C:\ Default share IPC$ Remote IPC ADMIN$ C:\WINDOWS Remote Admin mysharedfolder c:\shared The command completed successfully. -
To stop sharing, remove the shared folder using the net share command.
C:\>net share /delete mysharedfolder
mysharedfolder was deleted successfully.
Discuss the article:
Comment
anonymously. Login not required.
To share files using command line and manipulating is faster and more professional then GUI. Networking task has much command-line utility which works like a charm. With the following command line guide, you can do more than share files using the command line.
Preferably, you need to know the basic of command-line interfaces. In Windows, you can do it with command prompt or Powershell. Both of them works perfectly for this article. I prefer to use Powershell rather than a command prompt. Some commands are really needed to execute in Powershell.
How to Share Files Using Command-Line?
It’s not just sharing files. You should enable network discovery, enable the firewall, viewing shared files, and connecting to the share a folder or create a map network drive. So let’s do it step by step with Windows PowerShell.
1. Change Computer Name with Command
When your Windows installation has finished, at the final step ask you to set a name. In the network, if the computer name is not related to computer, it should be changed to find it easy. The Rename-Computer PowerShell command works exactly for changing a computer name.
Firs type “hostname” command to know the current computer name. Then type “Rename-Computer -NewName Win10 -Restart” and press enter.
In command, Win10 is the new name of my computer. The –restart switch will restart the system after rename.
2. Assign IP Address with Command
A computer in a network needs to have an IP address like a mobile with a number. Assigning an IP address to a computer, preform with Netsh command. I refer you to “Configure Windows IPv4 Networking with Netsh” article. Assigning IP address is covered clearly.
3. Creating Folder with Command
Creating a folder is not just performed with right-click and select New then Folder. Command-line has few commands to create a folder or directory. So let’s do it with mkdir or md command.
While Powershell is opened, type “dir” to list all directories of the current path. Then type
A folder named “ShareFolder” has been created. Type “dir” or “list” to see the created folder.
The “Ls” command is not working on command prompt, instead, use dir.
4. Share a Folder with Command
Now the folder is created successfully and need to share for the network. Before sharing a new folder, once type “net share” command to see what is shared currently on your system. Type net share and press enter.
There is nothing shared currently on this computer. So to share a folder, type “net share NetworkFiles=C:\SharedFolder /grant:everyone, full” then press enter.
- The NetworkFiles is the share name of SharedFolder which previously created with command.
- The /grant:everyone,full assign shared permission to everyone’s group. You can assign /change or /read permission.
Note: When you assign permission, you must specify the group name or a user name.
Type “net share” to see the result.
Well done, the folder has been created and shared successfully. Now go to the next step, enabling network discovery services with command.
5. Enable Network Discovery with Command
Network discovery is a network setting that affects whether your computer can find other computers and devices on the network and whether other computers on the network can see your computer. By default, Windows Firewall blocks network discovery, but you can enable it with command.
To enable network discovery, type “netsh advfirewall firewall set rule group=”Network Discovery” new enable=Yes”
The Firewall rules are updated. Now the network discovery is enabled and you should see the computer’s name when executing “net view” command.
The net view is another useful command-line utility which shows network computers.
6. Connect to Shared Folders with Command
Now I’m on another Windows which is Windows 8.1. I’m trying to connect to shared folder’s of Windows 10 through the network with the command line.
While you are on the other computer on the network, type “net share” to see network computers
Both Windows 10 and Windows 8 are in the same network. Type “net view \\Win10” to see the shared folders of Windows 10.
So let’s connect to shared folders of Windows 10 form Windows 8. Type “net use Y: \\Win10\NetworkFiles” then press enter to create a network map drive for NetworkFiles folder.
Here is the result of executing “net use” command. It shows network map drives. Read more about net use command on How to Create Map Network Drive In Windows 10 and Server? article.
Navigate to drive Y: and see what files the Windows 10 folder has?
Let’s copy some files from the shared folder to our computer with command. It performs by
“copy” command. Type “copy ‘Windows 10 Reports.txt C:\Users\Shais\Desktop” then press enter.
See the Windows 10 Reports text file has been copied to my desktop on Windows 8. You can copy files with the copy command. But to copy a full directory with its contents, use “xcopy” command.
That’s all share files using the command line. Hope you find this article helpful and replay to this question. Command-line is simple or hard?
Comment us your answer about share files using command and etc. It will help users to create more beneficial and helpful articles.
We can use net share command to create, configure and delete network shares from command line . Below you can find syntax and examples for net share command.
Create a network share from command line
The syntax for creating a share is as follows.
net share sharename=folderpath /grant:username,permissions

sharename: You can assign name to the share you are going to create
username : Login id of the user whom you want to share the folder with
permission: Read, Change or Full
For example to share the folder E:\Docs with everyone in the domain and to give full permissions
net share Docs=E:\Documents /grant:everyone,FULL
If you are allowing multiple users to access the share, you can limit the number of users accessing the share simultaneously. This will prevent performance impact on your system. The below command will set the limit to 10 users.
net share Docs=E:\Documents /grant:everyone,FULL /users:10
Command to share with a specific user and to grant only read rights:
net share Docs=E:\Documents /grant:username,READ
Delete network share(i.e to disable sharing of the folder) from command line
net share sharename /delete
For example, to delete the share created above, the command would be as below.
net share docs /delete
Alternatively, we can use the folder physical location also to disable sharing
net share E:\Docs /delete
List the shared created on the local computer
net share
Delete the share on a remote computer
net share sharename \\remotepc /delete
Блогпост
Сборщик заметок, файловые заначки
Работа с командной строкой всегда была полезным навыком для любого «оператора» ПК. Навык этот может пригодится и для создания ярлыков запуска скрипта открытия доступа к папке на компьютере.
Собственно сама команда управления общими ресурсами:
NET SHARE
использование команды:
net share Documents=D:\Documents /grant:everyone,READ ,где:
- Documents — имя папки при входе на ПК через сеть;
- D:\Documents — путь папки на искомом ПК;
- everyone — имя пользователя, в русской локализации — все;
- READ — доступ «только чтение», также возможные варианты CHANGE, FULL — «изменение» и «полный доступ» соответственно.
Полный синтаксис команды можно посмотреть, например, тут.
Или набрав в окне cmd команду net share /help .
Процеcс предоставления общего доступа к папке через графический интерфейс более длителен чем через командную строку и к тому же не всегда есть возможность выполнить его таким способом. Например, операционная система запущена от имени пользователя, а для предоставления общего доступа к папке необходимо обладать правами администратора. Поэтому необходимо будет сменить учетную запись и уже от имени администратора выполнять все процедуры.
В случае с командной строкой все гораздо проще. Под текущей учетной записью запускаем cmd от имени администратора и вводим команду:
net share sharename=c:\sharefolderгде sharename — это имя общей папки в сети
sharefolder — это путь к папке на компьютере
Чтобы дать доступ к сетевой папке конкретному пользователю с определенными правами на чтение, изменение или полные, необходимо указать команду net share с параметром /GRANT.
net share sharename=d:\foldername /GRANT:domainname\username,FULLПараметр /GRANT может принимать значения READ, CHANGE, FULL, что означает соответственно ЧТЕНИЕ, ИЗМЕНЕНИЕ, ПОЛНЫЙ.
Для удаление общего ресурса используется параметр /DELETE.
net share sharename /DELETE