
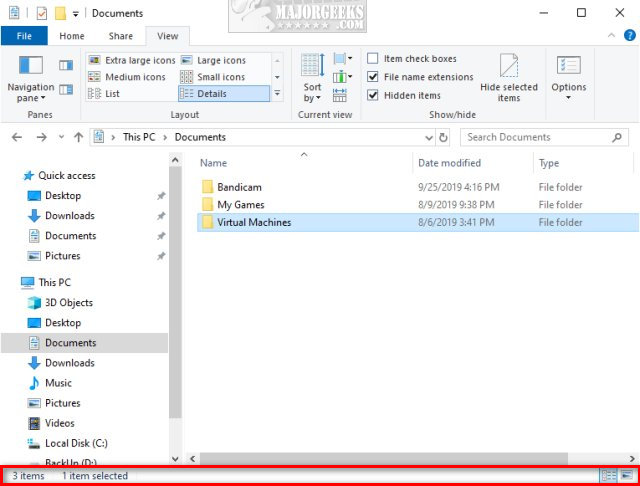
Enable or Disable Status Bar in File Explorer in Windows 10: The Status Bar in the File Explorer will show you how many items (file or folders) are present inside a particular drive or folder and how many of that items you have selected. For example, a drive has 47 items and you have selected 3 items from them, the status bar will show something like this: 47 items 3 item selected

The status bar is located at the bottom of the File Explorer as you can see in the above image. Another use of the status bar is that there is two button available in the far right corner of the bar which change the current folder layout to details view or large icons view. But not many users utilize the status bar and thus they are looking for a way to disable status bar. Anyway, without wasting any time let’s see How to Enable or Disable Status Bar in File Explorer in Windows 10 with the help of the below-listed tutorial.
Table of Contents
Make sure to create a restore point just in case something goes wrong.
Method 1: Enable or Disable Status Bar in File Explorer using Folder Options
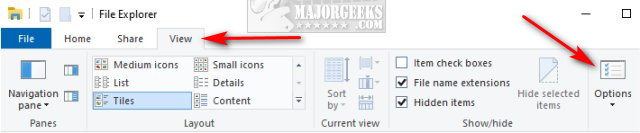
1.Press Windows Key + E to open File Explorer then click on View then Options.

Note: If you have disabled the Ribbon simply press Alt + T to open the Tools menu then click Folder Options.
2.This will open Folder Options from where you need to switch to the View tab.
3.Now scroll to bottom then check or uncheck “Show Status bar” according to:
Check “Show Status bar”: Enable Status Bar in File Explorer in Windows 10
Uncheck “Show Status bar”: Disable Status Bar in File Explorer in Windows 10
4.Once you have made your choice, simply click Apply followed by OK.
Method 2: Enable or Disable Status Bar in File Explorer using Registry
1.Press Windows Key + R then type regedit and hit Enter to open Registry Editor.
2.Navigate to the following registry key:
HKEY_CURRENT_USER\Software\Microsoft\Windows\CurrentVersion\Explorer\Advanced
3.Select Advanced then in right window pane double-click on “ShowStatusBar” DWORD and change it’s value to:

To Enable Status Bar in File Explorer in Windows 10: 1
To Disable Status Bar in File Explorer in Windows 10: 0
4.Once done, click OK and close everything.
5.Reboot your PC to save changes.
Recommended:
- Do not Automatically Encrypt files moved to Encrypted folders in Windows 10
- How to Export Saved Passwords in Google Chrome
- Enable or Disable Numerical Sorting in File Explorer in Windows 10
- How to Change Chrome Default Download Folder Location
That’s it, you successfully learned How to Enable or Disable Status Bar in File Explorer in Windows 10 but if you still have any questions regarding this tutorial then feel free to ask them in the comment’s section.
The Windows 10 File Explorer is one of the most used Windows apps by many and comes with numerous options to customize it exactly as you wish. One such setting is the ability to hide or show the status bar. Here’s how.
Start by opening File Explorer.
Click on View > Options.
Click on the View tab.
Scroll down and check, or uncheck Show status bar.
Click on OK.
That’s it.
Advanced users can also accomplish this or try to resolve problems by editing the registry. While that may seem pointless, it’s worth checking if your status bar isn’t working by using settings.
Open the Registry Editor and navigate to HKEY_CURRENT_USER\Software\Microsoft\Windows\CurrentVersion\Explorer\Advanced.
Double-click on the ShowStatusBar DWORD on the right side:
1 = Show the Status Bar.
0 = Hide the Status Bar.
Similar:
comments powered by Disqus
As you know, the Windows File Explorer is quite a responsive program and contains tons of features. It allows you to do various customizations by changing Settings or changing the value of a Registry key or Group Policy modification. Either way, you will be guided on how you can enable or disable the Status Bar in File Explorer on your Windows 10 computer.
The Status Bar is located at the bottom of the File Explorer and shows you how many items are inside the folder and how many items you’ve selected. In addition, it also shows you information about each item and can display items using large thumbnails with just a single click.
In order to enable or disable the Status Bar in File Explorer, you can use the two given options below as reference. You can either use the Folder Options or the Registry Editor.
Option 1 – Enable or Disable Status Bar via Folder Options
- Tap the Win + E keys on your keyboard to open File Explorer.
- Then tap the Alt + F keys and click on Options.
- From there, make sure that you are in the View tab and look for the “Show Status Bar” option in the list that gets populated.
- After that, check if the Show Status Bar option is enabled or disabled. It is supposed to be enabled by default so if it is enabled and you want to disable it, just simply uncheck its checkbox otherwise, leave it as it is.
- Now click on Apply and then OK to save the changes made
Option 2 – Enable or Disable Status Bar via Registry Editor
- Tap the Win + R keys to open the Run dialog box.
- Then type “Regedit” in the field and hit Enter to pull up Registry Editor.
- Next, navigate to this registry key: HKEY_CURRENT_USERSoftwareMicrosoftWindowsCurrentVersionExplorerAdvanced
- Afterward right-click on Advanced and select New > DWORD (32-bit) Value and then input “ShowStatusBar as the name of the newly created DWORD.
- Now double click on the new DWORD and change its value to “0” if you want to disable Status Bar and “1” if you want to enable it.
- Then exit the Registry Editor and restart your computer to apply the changes made.
Do You Need Help with Your Device?
Our Team of Experts May Help
Troubleshoot.Tech Experts are There for You!
GET HELP
Troubleshoot.Tech experts work with all versions of Microsoft Windows including Windows 11, with Android, Mac, and more.
Share this article:
You might also like
Error 404 — What is it?
Error 404 is a HTTP status code. You may come across the error code 404 while browsing online. The message indicates the web page you are trying to log on to couldn’t be found on the server. This error code is frequently customized by individual websites.
Most of the time it is displayed by:
- “404 Error»
- «404 Not Found»
- «Error 404»
- «404 File or Directory Not Found»
- «HTTP 404 Not Found”
- «The requested URL [URL] was not found on this server.»
- «HTTP 404»
- «404 Page Not Found»
- “Error 404 Not Found»
The error message 404 can occur in any browser including Firefox, Internet Explorer and Google Chrome. It can also occur is any operating system. In addition to this, the error 404 may also occur during Windows updates.
Solution
Error Causes
Technically, the error 404 is a client-side error that implies you couldn’t access the desired web page because either you typed the wrong URL or either the page has been removed from the website.
Other causes of this error code include:
- Junk files in the browser
- Junk registry entries
- Browser cache issues
- DNS server problems
Further Information and Manual Repair
If the error code does not occur due to web page removal from the owner of the website, then this means there is some other underlying issue from the error code 404. To avoid inconvenience and to access the website, it is advisable to resolve the error right away.
To help you resolve the error 404 on your PC, we have listed some of the best and easy DIY solutions. Try these methods to fix the issue on your system:
Method 1
Press F5 to retry accessing the web page. F5 is the refresh/reload button. If the error is temporary this will resolve the issue immediately.
Method 2
Check the URL — ‘The error 404 not found’ may also appear because the URL was typed wrong. Search for the page on the popular search engines. Insert the correct URL for the web page you want to access. This will most likely fix the error.
Method 3
Clear your browser’s cache – For this, simply go to the history and clear up your browser’s cookies.
Method 4
Change the DNS Servers — If the entire website you want to access is giving you error 404 and if the site is available to others on different servers then you might want to try changing your DNS server. 404 errors are not particularly common unless your ISP or government filters or censors websites.
Method 5
Remove Junk files and Junk registry entries — Another way to resolve the error is to clean the registry. The underlying cause of the error could be accumulation of the junk, invalid and bad registry entries.
You can remove them manually, but that process will require technical expertise and will be quite time-consuming.
Nonetheless, the easy and efficient way to clean up the registry is to download Restoro. This is an advanced, highly functional and next-generation Registry Cleaner.
Why Use Restoro?
- It is deployed with a cutting-edge and intuitive algorithm that detects, scans, and removes all the registry issues on your entire PC in seconds.
- This registry cleaner wipes out all bad entries and junk files saved on the disk immediately, fixes the damaged and corrupt files, and restores the registry back to normal.
- Besides functioning as a registry cleaner, this software is also integrated with several other utilities such as an antivirus that removes all kinds of malicious software from your system, a system optimizer for optimum PC functioning, and Active X controls and Class ID scanner.
- It is safe to download, user-friendly and efficient. This error tool is compatible with all Windows versions.
To resolve error 404 on your PC, click here to download Restoro today!
Read More
Recently, some users reported that they were unable to access a website and only got the Error 1005 Access Denied instead. Specifically, users experience this issue when trying to open the Crunchyroll website – one of the largest anime and manga websites. This particular error is encountered not just on Crunchyroll but on a variety of websites like blogs, video streaming, forums, and so on.
Here’s the full context of the error message:
“Error 1005 Access Denied – The owner of this website has banned the autonomous system number (ASN) your IP address from accessing this website.”
Usually, this error occurs when the website administrator decides to block an IP address or IP range. To fix this error, here are some suggestions you can try:
Option 1 – Uninstall the VPN service you are using or use a different provider
If you are using a VPN service, you might want to uninstall it. As mentioned, website administrator blocks IP ranges if they notice any malicious activities and because of this, your IP address might fall into the banned range even if you didn’t do anything at all. To uninstall the VPN service, follow the steps below.
- Tap the Win + R keys to open the Run dialog box
- Then type “appwiz.cpl” in the field and hit Enter to open the Programs and Features in Control Panel.
- From there, look for the VPN service you are using, select it and then click on Uninstall to remove it.
- After that, restart your computer and try to install the latest version of the program again. It should work now. If not, proceed to the next available option below.
Option 2 – Try disabling the Proxy server
There are some users who reported that they’ve fixed the problem after they’ve disabled the use of a proxy server using the built-in way. Follow the steps below to disable proxy server.
- Tap the Win + R keys to open the Run dialog box.
- Then type “inetcpl.cpl” in the field and hit Enter to pull up the Internet Properties.
- After that, go to the Connections tab and select the LAN settings.
- From there. Uncheck the “Use a Proxy Server” option for your LAN and then make sure that the “Automatically detect settings” option is checked.
- Now click the OK and the Apply buttons.
- Restart your PC.
Note: If you are using a third-party proxy service, you have to disable it.
Option 3 – Use the Google Public DNS
You might want to change your DNS to Google Public DNS as it could also help you in fixing the ERR_CERT_COMMON_NAME_INVALID error in Chrome. To do so, follow the steps below.
- The first thing you have to do is right-click on the network icon in the Taskbar and select Network and Sharing Center.
- Next, click on the “Change Adapter Settings” option.
- After that, search for the network connection that you are using to connect to the internet. Note that the option might be “Wireless Connection” or “Local Area Connection”.
- Right-click on your network connection and click on Properties.
- Then select the new window to choose the “Internet Protocol 4 (TCP/IPv4)” option.
- After that, click on the Properties button and click the checkbox in the new window for the option “Use the following DNS server addresses”.
- Type in “8.8.8.8” and “8.8.4.4” and click OK and exit.
Option 4 – Try contacting the website administrator
If the first three given options didn’t work, you might want to consider contacting the website administrator especially if you’ve already determined that the issue does not occur due to a VPN or proxy server that you’re using. This option can be quite tricky since you won’t be able to submit a contact form since you’re banned from accessing the website but you can contact the admin via the form section if available.
Read More
One of the useful things you can use on your laptop is touchpads. They help users in achieving tasks through the gestures and multi-finger tap or touch support it brings in the scope for various shortcuts. However, not all times touchpad brings productivity as it can also encounter some issue every now and then. One of these issues has been reported on a couple of Lenovo laptops that use touchpad drivers from the Alps Pointing Device. According to the reports, an error saying, “Set user settings to driver failed” when they use the touchpad.
This type of error on the touchpad usually occurs when a computer boots up and it could be caused by a faulty update on the Alps pointing device driver which is being installed in the background. To fix this error on the touchpad, you could try to disable the Alps pointing device entry from the MSConfig or you could try to get the latest version of the driver or uninstall the driver altogether. Before you proceed with the troubleshooting tips given below, make sure that you create a System Restore point first. Once you have that covered, proceed to the following options.
Option 1 – Try disabling the entry of the Alps pointing device from MSConfig
This first given option was able to fix the problem for many users so to get started, follow these steps:
- In the Start Search box, type “MSConfig” and select System Configuration from the search results.
- Next, go to the Services tab and look for the Alps pointing device entry from the list that appears, and uncheck it.
- Then click the Apply and OK buttons to save the changes made.
- Now restart your computer and see if the error in the touchpad is now fixed.
Option 2 – Try to download and install the latest version of the driver
The next option you can check out to fix the error is to download and install the latest version of the driver from the official website of Lenovo support. Note that an updated version of the touchpad driver will most likely get rid of the error. However, you have to make sure that the version you’re going to get is compatible with your existing Windows version.
Option 3 – Try to uninstall the Alps Pointing device driver
If the first two given options didn’t work, you can try uninstalling the Alps Pointing-device driver instead. You can do this under the Mice and other pointing devices section. After you uninstall the driver, restart your computer and delete the driver’s leftover folder inside this location in File Explorer (C:/Program Files). Once you’re done, restart your computer and check if the error is now gone. Keep in mind that after you’ve uninstalled the driver, any extra configuration features that Lenovo drivers offered before the uninstallation will no longer be available.
Read More
Microsoft allows its users to download a copy of Windows to install on PCs. However, when you enter the key after the installation and you got the Activation Error 0xC004F212 instead, then it means that the license key and the Windows version you’ve just installed, do not match.
When you encounter this error, you will see the following error message on your screen:
“The product key used on this PC didn’t work with this edition of Windows. Activation Error 0xC004F212.”
Every time Microsoft generates a license for a copy of Windows, it is associated with one particular Windows variant. Windows comes in many editions like Enterprise, Home, Professional, and so on. For instance, if you bought a license for Windows 10 Enterprise but you have installed Windows 10 Professional instead, then the activation will surely fail and you’ll encounter the Activation Error 0xC004F212.
You will be asked to select which edition you want to install when you reinstall Windows 10 using a digital license. If you opted for an edition other than the one you are licensed to use, then you will most likely get the Activation Error 0xC004F212. If you have purchased your license key from a store or some website, you might want to check back with them about the exact version of Windows. Doing so will help you narrow down the problem. And if you have second thoughts about the license key’s validity, you can just reach out to a Microsoft Support agent to check the validity of the license key.
Also, if have bought it from the store, there should be an option to get a refund. That way you can choose to buy the right version of Windows.
Option 1 – Try running the Windows 10 Activation Troubleshooter
The first thing you can do to resolve the Activation Error 0xC004F212 is to run the Windows 10 Activation Troubleshooter. To do so, follow these steps:
- Go to Settings and then select Activation.
- After that, click on the Windows Activation and then troubleshoot. This will help you address most of the commonly found activation issues in Windows devices.
The Windows 10 Activation Troubleshooter will determine if your license key is a valid Windows 10 digital license for an edition that is not currently installed. If it turns out that it’s not, then the troubleshooter will show you how to install the correct edition.
Option 2 – Try forcing Windows 10 ISO to use the right version
You can also try to force Windows 10 ISO to use the correct version depending on the product key. Note that this option only works between Windows 10 Home and Professional version since they both have a common ISO. So if it’s Enterprise, then this option won’t work for you.
- Extract the Windows 10 ISO files using an extractor.
- Then browse to the folder you created and go to the sources folder.
- From there, you need to create a text file named “PID.txt” and make sure to follow the exact format given below:
[PID]
Value=xxxxx-xxxxx-xxxxx-xxxxx-xxxxx
Note: “xxxxx” is the KEY to your Windows version.
- Next, you need to create the ISO again or bootable media that will repack everything and then create the Media file. You can use the Media Creation tool for this.
Note: Windows will check the key during the installation and will figure out the right version of Windows.
Option 3 – Contact Microsoft Support for assistance
If you’re at your wits’ end in trying to update your Windows 10 computer, you should consider contacting Microsoft Support for help as they can offer you various options that would make fixing Windows Activation Error 0xC004F212 a lot easier and faster.
Read More
The touchscreen feature inside Windows 11 is a pretty good thing but sometimes can be very impractical. The screen can easily and constantly get dirty due to fingers touching it all the time and there are users that do not wish or want to have this feature at all.

If you are one of the mentioned users and for any reason, you do not wish to have a touchscreen-enabled then sit back and relax, we have you covered in this tutorial on how to fully disable touchscreen inside Windows 11.
Turn off touchscreen via device manager
- Click on the Windows Search icon in the taskbar
- Type Device Manager
- Click on Device Manager from the list of results
- Inside locate Human Interface Devices and click on the right arrow
- In the list, find HID-Compliant Touch Screen and select Disable Device
- Click on Yes to confirm
Disable it via Windows Terminal
- Right-click on the Windows icon in the taskbar
- Click on Windows Terminal (admin)
- Inside run this command: Get-PnpDevice | Where-Object {$_.FriendlyName -like ‘*touch screen*’} | Disable-PnpDevice -Confirm:$false
Conclusion
No matter which method you prefer, both of them will disable the touch screen inside Windows 11. Thank you for reading trough article and I hope to see you again. Take care.
Read More
NoteHomepage (by MyWay) is a browser extension that may be bundled with other free software that you download off of the Internet, or delivered via other advertising means. When installed NoteHomepage will set the homepage and search engine for your web browser to http://search.myway.com.
While installing this extension will gather information from your browsing sessions, including website visits, clicked links, and sometimes even private information, that it later sends back to display unwanted ads into your browser.
Several anti-virus scanners have marked this extension as a Browser Hijacker and are therefore not recommended to keep on your computer. It is considered potentially unwanted, and many users wish to remove it, so it is flagged for optional deletion.
About Browser Hijackers
Browser hijacking is a form of unwanted software program, usually a web browser add-on or extension, which then causes modifications in the web browser’s settings. Browser hijacker malware is developed for many different reasons. Generally, browser hijacking is utilized for earning advertising revenue from forced advert mouse clicks and site visits. Even though it might seem harmless, these tools are designed by malicious individuals who always look to take full advantage of you, so that they can earn money from your naivety and distraction. Some browser hijackers are programmed to make certain modifications beyond the browsers, like altering entries on the system registry and letting other malware further damage your machine.
Find out how to identify a browser hijack
Below are some signs and symptoms that suggest your browser has been hijacked: the home page of your browser is changed unexpectedly; your browser is constantly being redirected to adult websites; the default search engine is changed; you are getting browser toolbars you have never noticed before; never-ending pop-up advertisements show up and/or your web browser popup blocker is disabled; your web browser gets sluggish, buggy, crashes regularly; Inability to navigate to certain websites, particularly anti-malware and also other security software websites.
So how exactly does a browser hijacker infect a computer?
Browser hijackers might use drive-by downloads or file-sharing networks or an e-mail attachment in order to reach a targeted PC. They could also come from add-on programs, also called browser helper objects (BHO), web browser plug-ins, or toolbars. Browser hijackers sneak into your computer in addition to free software application downloads also that you unknowingly install alongside the original. A good example of some infamous browser hijackers includes Babylon, Anyprotect, Conduit, SweetPage, DefaultTab, Delta Search, and RocketTab, however, the names are regularly changing.
Browser hijackers will affect the user’s web surfing experience severely, track the websites frequented by users and steal personal information, cause difficulty in connecting to the web, and eventually create stability problems, causing software programs and systems to crash.
Learn how to remove browser hijackers
Some hijackers can be removed by just uninstalling the corresponding freeware or add-ons through the Add or Remove Programs in the Windows control panel. But, many browser hijackers are difficult to get rid of manually. No matter how much you try to get rid of it, it might keep returning again and again. Additionally, manual removals demand in-depth system knowledge and thus can be a very difficult job for novices.
Industry experts always suggest users remove any malicious software including browser hijacker with an automatic malware removal tool, which is easier, safer, and quicker than the manual removal method. Employ a PC optimizer along with your anti-malware software to solve various registry issues, remove computer vulnerabilities, and boost your computer performance.
Download the software in Safe Mode with Networking
If the malware is set to run immediately when Windows starts, stepping into safe mode may block the attempt. Just minimal required applications and services are loaded whenever you start your laptop or computer in Safe Mode. To launch your Windows XP, Vista, or 7 PCs in Safe Mode with Networking, follow the instructions below.
1) At power on, hit the F8 key before the Windows splash screen begins to load. This would invoke the “Advanced Boot Options” menu.
2) Select Safe Mode with Networking with arrow keys and press ENTER.
3) As soon as this mode loads, you should have an internet connection. Now, get the malware removal software you want by utilizing the web browser. To install the program, follow the directions in the installation wizard.
4) Immediately after installation, run a full scan and let the software remove the threats it discovers.
Switch over to an alternate browser
Some viruses may target vulnerabilities of a particular web browser that obstruct the downloading process. If you’re not able to download the anti-virus software program using Internet Explorer, this means malware is targeting IE’s vulnerabilities. Here, you need to switch to a different internet browser such as Firefox or Chrome to download the antivirus program.
Run anti-virus from a pen drive
To successfully get rid of the malware, you have to approach the problem of installing anti-malware software on the affected computer system from a different perspective. Adopt these measures to run the anti-virus on the affected computer system.
1) Download the anti-malware software on a virus-free computer.
2) Plug the USB drive into the clean computer.
3) Double click on the downloaded file to open the installation wizard.
4) Select flash drive as the location when the wizard asks you exactly where you wish to install the application. Follow the on-screen instructions to finish the installation process.
5) Remove the flash drive. Now you can utilize this portable anti-malware on the affected computer.
6) Double-click the anti-malware software EXE file on the USB drive.
7) Press the “Scan” button to run a full computer scan and remove viruses automatically.
Technical Details and Manual Removal (Advanced Users)
To eliminate NoteHomepage manually, navigate to the Add or Remove programs list in the Windows Control Panel and select the program you want to get rid of. For web browser plug-ins, go to your web browser’s Addon/Extension manager and choose the add-on you want to disable or remove. You might also want to reset your home page and search providers, as well as clear your web browser cache and cookies.
Finally, check your hard disk for all of the following and clean your Windows registry manually to remove leftover application entries after uninstalls. Please be aware that this is for professional users only and could be challenging, with incorrect file removal resulting in additional PC errors. In addition to that, certain malware is capable of replicating or preventing deletion. You’re advised to do this procedure in Windows Safe Mode.
Files:
C:\Users\%USERNAME%\AppData\Local\Google\Chrome\User Data\Default\Extensions\lamecoaceiheggdhlnjnmciaonfdamlg.600.11.14900_0
C:\Users\%USERNAME%\AppData\Local\Google\Chrome\User Data\Default\Local Extension Settings\lamecoaceiheggdhlnjnmciaonfdamlg
C:\Users\%USERNAME%\AppData\Local\Google\Chrome\User Data\Default\Sync Extension Settings\lamecoaceiheggdhlnjnmciaonfdamlg
C:\Users\%USERNAME%\AppData\Local\NoteHomepageTooltab
C:\Users\%USERNAME%\AppData\Roaming\Mozilla\Firefox\Profiles\profile\extensions\[email protected]
C:\Users\%USERNAME%\AppData\Roaming\Mozilla\Firefox\Profiles\profile\extensions\[email protected]\chrome
C:\Users\%USERNAME%\AppData\Roaming\Mozilla\Firefox\Profiles\profile\extensions\[email protected]\META-INF
C:\Users\%USERNAME%\AppData\Roaming\Mozilla\Firefox\Profiles\profile\notehomepage_j
Registry:
HKLM\SOFTWARE\Classes\AppID\NoteHomepage Toolbar.exe
HKEY_LOCAL_MACHINE\SOFTWARE\Microsoft\Internet Explorer\Extensions
HKEY_LOCAL_MACHINE\Software\Microsoft\Windows\CurrentVersion\Explorer\Browser Helper Objects
HKEY_LOCAL_MACHINE\Software\Microsoft\Internet Explorer\Toolbar
HKEY_LOCAL_MACHINE\SOFTWARE\Google\Chrome\Extensions
HKEY_LOCAL_MACHINE\SOFTWARE\Mozilla\Firefox\Extensions
HKEY_CURRENT_USER\Software\Opera Software\Explorer\Main\Start Page Redirect=http://random.com
HKEY_LOCAL_MACHINE\SOFTWARE\Microsoft\Windows NT\CurrentVersion\NoteHomepage
HKEY_CURRENT_USER\Software\Microsoft\Windows NT\CurrentVersion\Winlogon Shell = %AppData%\IDP.ARES.Generic.exe
HKEY_CURRENT_USER\Software\Microsoft\Windows\CurrentVersion\Run Random
HKEY_LOCAL_MACHINE\Software\Microsoft\Windows NT\CurrentVersion\Random.
HKEY_CURRENT_USER\Software\Microsoft\Internet Explorer\Main
HKEY_CURRENT_USER\Software\Microsoft\Windows\CurrentVersion\Uninstall\NoteHomepageTooltab Uninstall Internet Explorer
HKEY_CURRENT_USER\Software\NoteHomepage
Read More
WeatherBlink is an extension for google chrome, Mozilla, and internet explorer. It allows users to check out the weather anywhere in the world at any time. This might seem like a convenient feature, however, this toolbar also displays unwanted ads, hijacks your browser home page, collects personal data about your web surfing habits, visits, and clicks.
From the author: Access local weather forecasts, weather radar, allergy, and pollen reports, and worldwide weather news – all in one convenient spot!
This extension configures your New Tab page to WeatherBlink™ to provide these features.
Be prepared with instant weather forecasts. Access FREE and accurate weather forecasts with one click!
About Browser Hijackers
Browser hijack is a very common type of online fraud where your web browser settings are modified to make it do things you do not intend. Browser hijackers can do more than simply modifying home pages. It redirects you to the sponsored internet sites and inserts ads on the internet browser that helps its creator generate ad revenue. A lot of people assume that these kinds of websites are legitimate and harmless but that is not true. Nearly every browser hijacker poses an actual threat to your online safety and it is necessary to classify them under privacy dangers. In a worst-case scenario, your internet browser could be hi-jacked to open up your computer to a host of additional computer infections.
Indications of browser hijack
Below are some symptoms that indicate you’ve been hijacked:
1. the browser’s home page is changed
2. bookmark and the new tab are also modified
3. default online search engine is modified
4. you see unwanted new toolbars added
5. you notice a lot of pop-ups on your computer screen
6. web pages load very slowly and often incomplete
7. you’ve disallowed entry to particular web pages, for example, the website of an antimalware software firm like SafeBytes.
So how exactly does a browser hijacker infect a computer?
A browser hijacker could be installed on your PC when you go to an infected website, click an email attachment, or download something from a file-sharing website. They also come from add-on applications, also referred to as browser helper objects (BHO), browser extensions, or toolbars. Sometimes you may have mistakenly accepted a browser hijacker as part of a software program bundle (usually freeware or shareware). Typical examples of browser hijackers include CoolWebSearch, Conduit, RocketTab, OneWebSearch, Coupon Server, Searchult.com, Snap.do, and Delta Search.
Tips on how to remove browser hijackers
Certain browser hijacking can be easily stopped by discovering and eliminating the corresponding malware application from your control panel. However, certain hijackers are more difficult to find or eliminate as they might get themselves associated with certain crucial system files that enable it to work as a necessary operating-system process. You should think about carrying out manual repairs only if you’re a tech-savvy person because there are possible risks associated with fiddling around with the system registry and HOSTS file.
How One Can Eliminate Malware that is Blocking Websites or Preventing Downloads
Malware could potentially cause several different types of damage to PCs, networks, and data. Certain malware goes to great lengths to prevent you from downloading or installing anything on your PC, especially anti-malware applications. If you’re reading this, you probably have got infected by a virus that prevents you from downloading security software like Safebytes Anti-Malware. There are a few fixes you could try to get around with this issue.
Start Windows in Safe Mode
Safe Mode is actually a unique, basic version of Windows where just essential services are loaded to counteract malware as well as other problematic programs from loading. In the event the malware is blocking access to the internet and affecting your PC, launching it in Safe Mode enables you to download anti-virus and run a diagnostic scan while limiting possible damage. To start the computer into Safe Mode, hit the “F8” key on your keyboard right before the Windows logo screen comes up; Or after normal Windows boot up, run MSCONFIG, check Safe Boot under Boot tab, and click Apply. Once you restart into Safe Mode with Networking, you may download, install, as well as update anti-malware software from there. At this point, you could run the anti-malware scan to eliminate computer viruses and malware without any interference from another application.
Switch over to an alternate browser
Some malware may target vulnerabilities of a specific browser that block the downloading process. The most effective solution to avoid this problem is to pick a browser that is renowned for its security features. Firefox has built-in Phishing and Malware Protection to help keep you secure online.
Install antivirus on a thumb drive
To effectively remove the malware, you have to approach the problem of running an anti-malware software program on the affected computer from a different angle. Adopt these measures to run the anti-virus on the affected computer.
1) Download Safebytes Anti-Malware or Windows Defender Offline onto a virus-free computer system.
2) Plug the USB drive into the clean PC.
3) Double-click the Setup icon of the anti-malware program to run the Installation Wizard.
4) When asked, choose the location of the USB drive as the place in which you would like to store the software files. Follow activation instructions.
5) Unplug the flash drive. You may now utilize this portable anti-virus on the infected computer.
6) Double-click the Safebytes Anti-malware icon on the flash drive to run the program.
7) Press the “Scan Now” button to begin the virus scan.
SafeBytes Anti-Malware: Lightweight Malware Protection for Windows Computer
Do you want to install the best anti-malware software for your computer system? There are plenty of applications available in the market which comes in paid and free versions for Microsoft Windows computers. A few of them are good, some are ok types, while some will damage your computer themselves! You need to be careful not to select the wrong application, particularly if you purchase a paid application. On the list of recommended software programs is SafeBytes AntiMalware. SafeBytes has a very good track record of top-quality service, and customers seem to be very happy with it.
SafeBytes can be described as a powerful, real-time anti-spyware application that is made to assist the common computer end user in safeguarding their PC from malicious internet threats. Using its cutting-edge technology, this application can assist you to get rid of multiples types of malware which include computer viruses, PUPs, trojans, worms, ransomware, adware, and browser hijackers.
SafeBytes has a variety of features that can help you protect your PC from malware attacks and damage. Below are a few of the great ones:
Antimalware Protection: With a critically acclaimed anti-malware engine, SafeBytes gives multi-layered protection which is intended to find and eliminate viruses and malware that are concealed deep in your computer’s operating system.
Real-time Threat Response: SafeBytes provides round-the-clock protection for your PC restricting malware intrusions in real-time. It’ll regularly monitor your laptop or computer for hacker activity and also gives users sophisticated firewall protection.
Quick Multi-threaded Scanning: SafeBytes’s high-speed malware scanning engine lessens scan times and extends the life of the battery. At the same time, it’ll effectively detect and get rid of infected computer files or any internet threat.
Internet Security: Safebytes allots all sites a unique safety score that helps you to get an idea of whether the website you’re just about to visit is safe to browse or known to be a phishing site.
Low CPU/Memory Usage: SafeBytes is well known for its minimal influence on computer resources and great detection rate of numerous threats. It works quietly and efficiently in the background so you are free to utilize your computer or laptop at full power all the time.
24/7 Customer Support: You will get 24/7 technical support to promptly resolve any problem with your security tool.
Technical Details and Manual Removal (Advanced Users)
To remove WeatherBlink manually, go to the Add or Remove programs list in the Control Panel and select the program you want to get rid of. For internet browser plug-ins, go to your browser’s Addon/Extension manager and select the plug-in you want to remove or disable. You will probably also want to reset your internet browser.
Finally, examine your hard drive for all of the following and clean your registry manually to remove leftover application entries after uninstallation. Please remember that only experienced users should try to manually edit the registry because incorrect file deletion results in a major problem or perhaps a PC crash. Furthermore, certain malware is capable of replicating or preventing deletion.
Carrying out this malware-removal process in Safe Mode is recommended.
Files:
C:Program FilesWeatherBlink
C:ProgramDataWeatherBlink
C:UsersYOUR_USERAppDataRoamingWeatherBlink
Registry:
Key HKLMSOFTWAREClassesWeatherBlink.DynamicBarButton
Key HKLMSOFTWAREClassesWeatherBlink.FeedManager
Key HKLMSOFTWAREClassesWeatherBlink.HTMLMenu
Key HKLMSOFTWAREClassesWeatherBlink.HTMLPanel
Key HKLMSOFTWAREClassesWeatherBlink.MultipleButton
Key HKLMSOFTWAREClassesWeatherBlink.PseudoTransparentPlugin
Key HKLMSOFTWAREClassesWeatherBlink.Radio
Key HKLMSOFTWAREClassesWeatherBlink.RadioSettings
Key HKLMSOFTWAREClassesWeatherBlink.ScriptButton
Key HKLMSOFTWAREClassesWeatherBlink.SettingsPlugin
Key HKLMSOFTWAREClassesWeatherBlink.SkinLauncher
Key HKLMSOFTWAREClassesWeatherBlink.SkinLauncherSettings
Key HKLMSOFTWAREClassesWeatherBlink.ThirdPartyInstaller
Key HKLMSOFTWAREClassesWeatherBlink.ToolbarProtector
Key HKLMSOFTWAREClassesWeatherBlink.UrlAlertButton
Key HKLMSOFTWAREClassesWeatherBlink.XMLSessionPlugin
Key HKLMSOFTWAREMicrosoftWindowsCurrentVersionExplorerBrowser Helper Objects9b9dcae3-be34-424c-8d73-75e305a9e091
Key HKLMSOFTWAREMicrosoftWindowsCurrentVersionExplorerBrowser Helper Objectsdc9051c2-8f55-479a-97a4-747980d9047f
Key HKLMSOFTWAREMicrosoftWindowsCurrentVersionUninstallWeatherBlinkbar Uninstall Firefox
Key HKLMSOFTWAREMicrosoftWindowsCurrentVersionUninstallWeatherBlinkbar Uninstall Internet Explorer
Key [email protected]/Plugin
Key HKLMSOFTWAREWeatherBlink
Key HKLMSOFTWAREMicrosoftWindowsCurrentVersionRunValue: WeatherBlink Search Scope Monitor Data: C:PROGRA~1WEATHE~2bar.bingcsrchmn.exe
Key HKLMSOFTWAREMicrosoftWindowsCurrentVersionRunValue: WeatherBlink Browser Plugin Loader Data: C:PROGRA~1WEATHE~2bar.bingcbrmon.exe
Read More
Runtime Error 5 — What Is It?
Runtime Error 5 is one of those errors that Windows users encounter at least once in their life.
Generally, when Runtime Error 5 occurs, the message that appears says ‘Invalid Procedure Call or Argument’. Runtime Error 5 occurs because the Quality Analyst function that resides within the Operating System behaves in an abnormal manner and the user receives a warning.
Solution
Error Causes
As explained above, Runtime Error 5 is caused because of the unexplained behavior of the Quality Analyst function.
The problem occurs when the function is lost and is not mapped to any drive. As a result, Windows is unable to find and load it and displays the error message. Runtime Error 5 is also caused by other reasons listed below as follows.
- When files of programs like Visual Basic use bad entries in the registry.
- When a user attempts to load Internet Explorer and a global cash of browser occurs, this also causes Runtime Error 5.
Since these types of errors can easily be fixed, it is strongly advised that a user takes the necessary actions to keep them from occurring in the future.
Further Information and Manual Repair
Some instructions for users to fix Runtime Error 5 as soon as it appears are listed below as follows.
- Users are recommended to restart their computers. However, prior to doing so, it is advised that any programs that are opened are closed and work is saved to prevent data loss. Once the computer restarts, users should load the program that triggered Runtime Error 5 once again to determine whether or not the error recurs.
- If the problem persists, the best approach is to uninstall the program causing the error. This can be accomplished by going to the ‘Control Panel’ and selecting the ‘Add/Remove programs’ option if one is using Windows XP or Windows 95. However, if a user is running Windows 7, the same task can be accomplished in the ‘Program and Features’ option. If there’s an option that allows you to clear personal settings and preferences, the box should be checked.
- Now reinstall the program using the latest version of the installer to stop encountering this error. Use any patch for the program if available. Run installer while following the instructions on the screen. Check the default settings as well. It is suggested to instantly install any patches if available.
- Another piece of advice is to simultaneously press ‘Ctrl, Shift, and Esc’. Windows task manager will appear. Go to the “processes” tab and select a process that doesn’t look familiar to you. Note the filename and click on the ‘End Process’ button. Load the program again and find out if the error occurs. Once the program causing the error is identified, the user can perform the steps listed above to resolve the problem.
Read More
The Winload.efi file is an Extensible Firmware Interface or EFI file. EFI files are executable files for the firmware of the computers that are mainly based on UEFI and execute the tasks of loading the files to the bootloader of the computer. They are used for a specific set of tasks such as turning on the computer, installing Windows, restarting the computer or resetting it, and so on. This is why the Winload.efi file is a significant file so if it gets corrupted, lost, or damaged, it would be impossible for the Windows operating system to proceed.
Here are some errors you can encounter that are related to the Winload.efi file:
- efi is missing
- efi cannot be found
- efi is missing or contains errors
- This program can’t start because winload.efi is missing from your computer
- This application requires the file winload.efi, which was not found on this system.
- There was a problem starting [path]winload.efi. The specified module could not be found.
In addition, the 0xc0000225 , 0xc00000e and 0xc0000001error codes are also associated with the Winload.efi file.
Before you start troubleshooting the problem, you can try to perform System Restore first. This will help undo any changes you’ve made in your computer that might have triggered the Blue Screen error. To perform System Restore, here’s what you have to do:
- First, press the Win + R keys to open the Run dialog box.
- After that, type in “sysdm.cpl” in the field and tap Enter.
- Next, go to the System Protection tab then click the System Restore button. This will open a new window where you have to select your preferred System Restore point.
- After that, follow the on-screen instructions to finish the process and then restart your computer and check if the problem is fixed or not.
If System Restore didn’t help in fixing the Blue Screen error, now’s the time for you to resort to the troubleshooting tips provided below but before you get started, make sure that your create a System Restore point first.
Option 1 – Try rebuilding the Boot Configuration Data (BCD) and repairing MBR
- Once you get to the Welcome Screen part, click on Next.
- Afterwards, click on the Repair your computer option located on the bottom-left part of the window.
- Then click on Troubleshoot.
- Next, select the Advanced Options and then Command Prompt.
- Once Command Prompt has been pulled up, the following commands to rebuild BCD files and repair MBR. Don’t forget to hit Enter right after you type each command.
- bootrec /repairbcd
- bootrec /osscan
- bootrec /repairmbr
- Once the command line is successful in finding out a Windows installation, hit Y to let it boot from the list which will successfully rebuild BCD.
- Now type “exit” to close Command Prompt and then restart your computer to successfully apply the changes made.
Option 2 – Disable the Secure Boot in the BIOS
Disabling the Secure Boot in the BIOS settings is definitely recommended to resolve errors related to the Winload.efi file. To disable Secure Boot, here’s what you have to do:
- First, boot your computer into Windows 10.
- Next, go to Settings > Windows Update. From there, check if there is anything that you have to download and install if you see any available updates. Usually, OEMs send and update the list of trusted hardware, drivers, and operating systems for your computer.
- After that, go to the BIOS of your computer.
- Then go to Settings > Update & Security > Advanced Startup options. If you click on Restart Now, it will restart your computer and give you all the advanced options.
- Next, select Troubleshoot > Advanced Options. As you can see, this screen offers you further options including System restore, Startup repair, Go back to the previous version, Command Prompt, System Image Recovery and UEFI Firmware Settings.
- Select the UEFI Firmware Settings which will take you to the BIOS.
- From there, go to Security > Boot > Authentication tab where you should see Secure Boot. Note that every OEM has its own way of implementing the options so it varies.
- Next, set Secure Boot to Disabled and set Legacy Support to On or Enabled.
- Save the changes made and exit. Afterward, your computer will reboot.
Option 3 – Run System File Checker scan
You might also try running the System File Checker or SFC scan to fix the error. System File Checker is a command utility built into your computer that helps restore corrupted files and missing files. Refer to the following steps to run it:
- Hit the Win + R keys to launch Run.
- Type in cmd in the field and tap Enter.
- After opening Command Prompt, type in sfc /scannow
The command will start a system scan which will take a few whiles before it finishes. Once it’s done, you could get the following results:
- Windows Resource Protection did not find any integrity violations.
- Windows Resource Protection found corrupt files and successfully repaired them.
- Windows Resource Protection found corrupt files but was unable to fix some of them
- Reboot your computer.
Option 4 – Disable the Early Launch Anti-Malware Protection
- You need to restart your computer in the Start Menu first while holding down the Shift key on your keyboard.
- After that, it will restart your computer to Startup Settings.
- Now ensure that the 8th option is labeled as “Disable early launch anti-malware protection.
- Then tap the F8 key since the aforementioned option above is listed at number 8. This should launch and load Windows on your PC with the Early Anti-malware protection disabled for that session only when you try to carry out the same task and then check if the error related to the Winload.efi file is now fixed.
Read More
The Get Coupons Fast Toolbar is a Browser Extension for Google Chrome developed by Mindspark Inc. This extension allows quick access to the most popular coupon websites available. While this might look like a good useful idea, keep in mind that it has been classified as a Browser Hijacker by Several anti-virus applications.
When installed this extension will hijack your new tab page, changing it to a customized version of Search.MyWay.com. While active It records user browser activity, this data is later used to better target ads.
While browsing the internet with this extension installed you will see additional pop-up ads, sponsored content, and injected ads into your browser search results and pages. GetCouponsFast usually comes bundled with other PUP-s or Browser Hijackers that may harm your computer and it is recommended you remove it from your PC.
About Browser Hijackers
Browser hijacking means that a malicious code has taken control over and altered the settings of your internet browser, without your permission. They are created to disrupt browser functions for various reasons. It redirects you to the sponsored sites and inserts ads on your internet browser that assists its developer to generate revenue. While it might seem harmless, these tools were created by malicious people who always look to take advantage of you, so that they could make money from your naivety and distraction. They did not just ruin your browsers, but browser hijackers can also modify the system registry, making your computer or laptop susceptible to various other types of attacks.
Signs of browser hijacker infection
There are plenty of signs that indicate the web browser has been highjacked:
1. you notice unauthorized modifications to your web browser’s home-page
2. you find re-directed to internet sites you never intended to visit
3. the default browser configurations have been modified and/or your default web engine is altered
4. you’ll see many toolbars on your browser
5. you might see never-ending pop-up adverts on your computer screen
6. your browser has become unstable or starts running slowly
7. you are blocked to access the websites of antivirus solution providers.
How does a computer get infected with a browser hijacker?
Browser hijackers might use drive-by downloads or file-sharing networks or an email attachment in order to reach a targeted computer system. They could also come from add-on applications, also known as browser helper objects (BHO), web browser extensions, or toolbars. Some internet browser hijackers spread in user’s computers using a deceptive software distribution method called “bundling” (often through freeware and shareware).
Browser hijackers will affect the user’s web browsing experience severely, monitor the websites visited by users and steal sensitive information, cause difficulty in connecting to the web, and eventually create stability problems, making programs and systems freeze.
Removal
Some hijackers can be simply removed by deleting the free software they were included with or by deleting any add-ons you have recently added to your browser. Unluckily, the majority of the software applications utilized to hijack an internet browser are deliberately designed to be difficult to detect or get rid of. And there is no denying the very fact that manual repairs and removal can certainly be a difficult task for a novice PC user. Moreover, there are various risks connected with tinkering around with the system registry files.
Installing and running anti-malware software on the affected computer will automatically erase browser hijackers as well as other unwanted programs. In order to get rid of persistent browser hijackers effectively, install the award-winning Anti-Malware tool Safebytes Anti-Malware. Employ a pc optimizer (such as Total System Care) along with your anti-malware to repair various computer registry problems, remove computer vulnerabilities, and improve your computer performance.
How To Get Eliminate Virus That Is Blocking Antivirus Downloads?
Malware could cause all sorts of damage once they invade your computer, starting from stealing your private details to erasing data files on your computer system. Some malware is created to hinder or block things that you wish to do on your PC. It may not permit you to download anything from the net or it will prevent you from accessing a few or all of the websites, in particular the anti-virus sites. If you are reading this article right now, you may have perhaps realized that a malware infection is a reason for your blocked internet connectivity. So what to do if you want to download and install an anti-virus application like Safebytes? There are some steps you can take to circumvent this problem.
Boot Windows in Safe Mode
Safe Mode is actually a unique, simplified version of Windows in which just bare minimum services are loaded to prevent malware and also other troublesome programs from loading. If the malicious software is set to load automatically when the PC starts, shifting into this mode may prevent it from doing so. In order to enter into Safe Mode or Safe Mode with Networking, press the F8 key while the system is booting up or run MSCONFIG and find the “Safe Boot” options under the “Boot” tab. Once you are in safe mode, you can attempt to install your anti-malware program without the hindrance of the malicious software. Right after installation, run the malware scanner to remove standard infections.
Use an alternate web browser to download security software
Web-based malware can be environment-specific, aiming for a particular browser or attacking particular versions of the browser. The best solution to avoid this issue is to choose an internet browser that is known for its security features. Firefox contains built-in Malware and Phishing Protection to keep you secure online.
Run anti-virus from a pen drive
Another option would be to make a portable anti-malware program onto your USB flash drive. To run anti-virus using a pen drive, follow these simple measures:
1) Download Safebytes Anti-Malware or Windows Defender Offline onto a virus-free PC.
2) Plug the USB drive into the clean computer.
3) Double-click the Setup icon of the anti-malware program to run the Installation Wizard.
4) Select thumb drive as the place when the wizard asks you where you wish to install the application. Follow the directions to complete the installation process.
5) Unplug the flash drive. Now you can utilize this portable anti-virus on the infected computer.
6) Double click the Safebytes Anti-malware icon on the pen drive to run the application.
7) Click the “Scan Now” button to start the virus scan.
SafeBytes Anti-Malware Overview
Want to download the best anti-malware application for your desktop? There are many applications on the market that comes in free and paid versions for Windows systems. Some are very good ones, some are ok types, while some are just fake anti-malware programs that will damage your personal computer themselves! While looking for an antimalware program, pick one that offers reliable, efficient, and total protection against all known viruses and malware. On the list of recommended software is SafeBytes AntiMalware. SafeBytes has a good history of quality service, and customers appear to be happy with it.
Safebytes is among the well-established PC solutions companies, which provide this all-inclusive anti-malware application. With its outstanding protection system, this tool will automatically detect and remove most of the security threats, which include adware, viruses, browser hijackers, PUPs, trojans, worms, and ransomware.
SafeBytes possesses a variety of wonderful features that can help you protect your computer from malware attacks and damage. Listed below are a few of the great ones:
Real-time Protection: SafeBytes provides round-the-clock protection for your computer restricting malware intrusions in real-time. They are very efficient in screening and getting rid of numerous threats because they’re regularly improved with new updates and alerts.
Robust Anti-malware Protection: Built on a highly acclaimed antivirus engine, this malware removal tool has the capacity to find and remove various stubborn malware threats such as browser hijackers, PUPs, and ransomware that other common antivirus programs will miss.
Web protection: SafeBytes checks the hyperlinks present on a webpage for possible threats and tells you if the website is safe to explore or not, through its unique safety rating system.
Minimal CPU and Memory Usage: SafeBytes is a lightweight and simple to use antivirus and anti-malware solution. As it utilizes very low computer resources, this software leaves the computer power exactly where it belongs: with you.
24/7 Customer Service: Support service is available 24 x 7 x 365 days via chat and email to answer your queries.
Overall, SafeBytes Anti-Malware is a solid program since it has lots of features and could identify and remove any potential threats. Now you may realize that this tool does more than just scan and delete threats on your computer. So when you need advanced forms of protection features and threat detections, purchasing SafeBytes Anti-Malware could be well worth the dollars!
Technical Details and Manual Removal (Advanced Users)
If you don’t want to use malware removal software and prefer to eliminate GetCouponsFast manually, you could do so by going to the Windows Add/Remove Programs menu in the control panel and deleting the offending program; in cases of browser extensions, you can remove it by visiting the browser’s Add-on/Extension manager. Additionally, it is advised to reset your web browser settings to their default state.
Lastly, check your hard disk for all of the following and clean your registry manually to remove leftover application entries after uninstallation. Please keep in mind that only advanced users should attempt to manually edit the system files since deleting any single vital registry entry results in a serious problem or even a PC crash. Moreover, certain malicious programs are capable to defend against its removal. It is recommended that you do the removal process in Windows Safe Mode.
Files:
%LOCALAPPDATA%\Google\Chrome\User Data\Default\Extensions\iadmakoacmnjmcacmhlcjcameijgcopj
%UserProfile%\Local Settings\Application Data\Google\Chrome\User Data\Default\Extensions\iadmakoacmnjmcacmhlcjcameijgcopj
%UserProfile%\Local Settings\Application Data\GetCouponsFastTooltab
%LOCALAPPDATA%\GetCouponsFastTooltab
Registry:
HKEY_LOCAL_MACHINE\Software\[APPLICATION]\Microsoft\Windows\CurrentVersion\Uninstall..Uninstaller
Read More
Copyright © 2023, ErrorTools. All Rights Reserved
Trademark: Microsoft Windows logos are registered trademarks of Microsoft. Disclaimer: ErrorTools.com is not affiliated with Microsoft, nor claims direct affiliation.
The information on this page is provided for information purposes only.
В данной статье показаны действия, с помощью которых можно скрыть или показать строку состояния в Проводнике Windows.
Строка состояния отображается в нижней части проводника и показывает общее количество элементов содержащихся в текущей открытой папке, а также количество выбранных элементов.
При необходимости можно скрыть или показать строку состояния в Проводнике Windows.
Настройка строки состояния является глобальным параметром, который применяется ко всем папкам, а не только к текущей папке.
Как скрыть или показать строку состояния используя Параметры Проводника
Чтобы скрыть или показать строку состояния в Проводнике Windows, откройте классическую панель управления, в выпадающем списке Просмотр выберите Мелкие значки и затем выберите Параметры Проводника.

В окне «Параметры Проводника», перейдите на вкладку Вид, а затем снимите или установите флажок опции Показывать строку состояния и нажмите кнопку OK.
Как скрыть или показать строку состояния используя файл реестра
Данный способ также позволяет скрыть или показать строку состояния в Проводнике Windows, с помощью внесения изменений в системный реестр Windows посредством файла реестра.
Прежде чем вносить какие-либо изменения в реестр, настоятельно рекомендуется создать точку восстановления системы
Все изменения производимые в реестре отображены ниже в листингах файлов реестра.
Чтобы скрыть строку состояния, создайте и примените файл реестра следующего содержания:
Windows Registry Editor Version 5.00.
[HKEY_CURRENT_USER\\Software\\Microsoft\\Windows\\CurrentVersion\\Explorer\\Advanced].
«ShowStatusBar»=dword:00000000
Чтобы показать строку состояния, создайте и примените файл реестра следующего содержания:
Windows Registry Editor Version 5.00.
[HKEY_CURRENT_USER\\Software\\Microsoft\\Windows\\CurrentVersion\\Explorer\\Advanced].
«ShowStatusBar»=dword:00000001
Используя рассмотренные выше действия, можно скрыть или показать строку состояния в Проводнике Windows.

Windows 10 File Explorer Missing Status Bar
In this post, we will be taking a look at how you can get the status bar back at the bottom of File Explorer on your Windows 10 PC or laptop.
So if the bar is missing on your computer or you simply want to know how to show or hide the File Explorer status bar in Windows 10 then you have come to the right guide.
The status bar is used to let you know how many items are within a folder or how many items you have selected, and lots of other useful information.

But if you have accidentally changed a setting or maybe Windows 10 for some weird reason has changed it for you then this can remove the status bar. Below we have listed the steps for bringing back the status bar at the bottom of File Explorer.
Why has my status bar disappeared in Windows 10 Explorer?
The disappearance of the status bar in Windows 10 Explorer is usually caused by one thing, and that is a simple setting not being enabled within the Windows 10 Explorer settings.

How To Bring Back Status Bar In Windows 10 File Explorer:
1. Open File Explorer
2. In the top ribbon of File Explorer click View > Now click “Options“

3. Click the “View” tab > Now tick “Show status bar” then “Apply” and “OK“
Final Thoughts
There you have it that is how you bring back the status bar in Windows 10 File Explorer. If the above did not bring it back for you then make sure you have the latest Windows 10 updates installed, and if you do then try creating a new user account and see if that fixes the issue.