
Table of contents
- How to Set Dual Monitor Wallpaper on Windows 10
- Option 1: How to set up one background image for multiple monitors
- Option 2: How to set different wallpaper for each monitor
- How to Set Dual Monitor Wallpaper on Windows 11
- Option 1: How to set the same wallpaper for dual monitors in Windows 11
- Option 2: How to extend wallpaper across the two Windows 11 monitors
- How to Set Up Dual Monitor Wallpaper on Windows 10/11 Using Third-Party Software
- How to Set Dual Monitor Wallpaper: Fully Explained
- FAQ
Setting a dual monitor wallpaper can transform your workspace. You can be looking at a nice background when working and also keep things more organized. But how do you set a dual monitor wallpaper on Windows 10 or 11 ?
Also read:Windows 10’s End of Life Is Near: What You Need to Consider?
In this guide, we’ll walk you through the simple steps to easily spread your wallpaper across two screens.
Also read: How to Download and Install Windows 11: The Most Up-to-Date Information
How to Set Dual Monitor Wallpaper on Windows 10
Option 1: How to set up one background image for multiple monitors
The first thing you can do is set up one wallpaper for several monitors. This is easy to do:
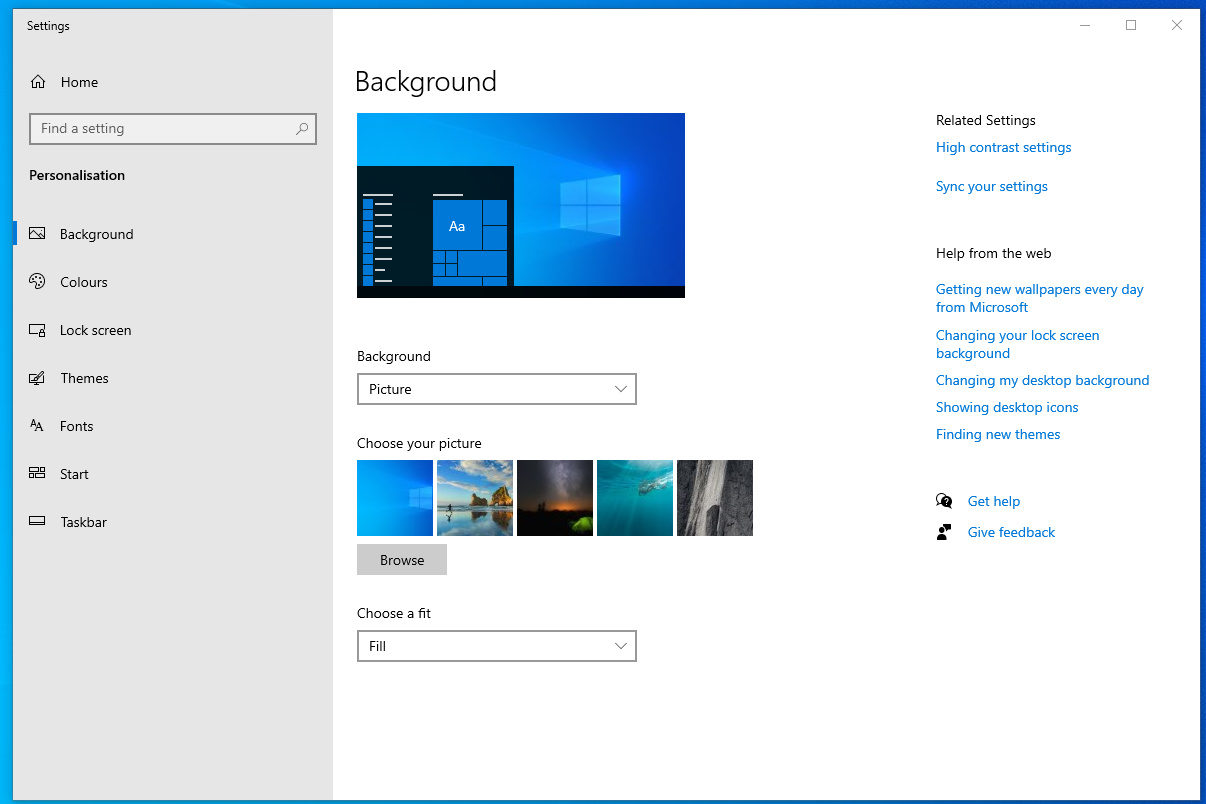
- Launch the Settings app by pressing Windows key + I on your keyboard.
- Once you’re inside the Settings app, select Personalization .
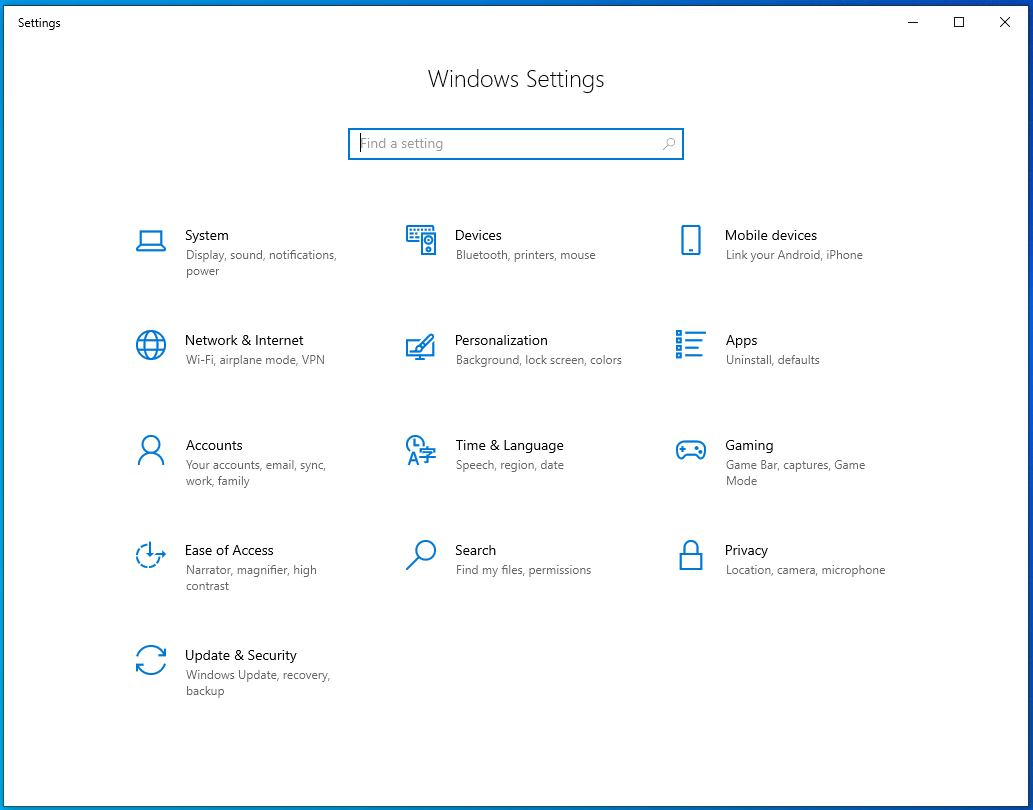
- On the left-pane menu, click Background .
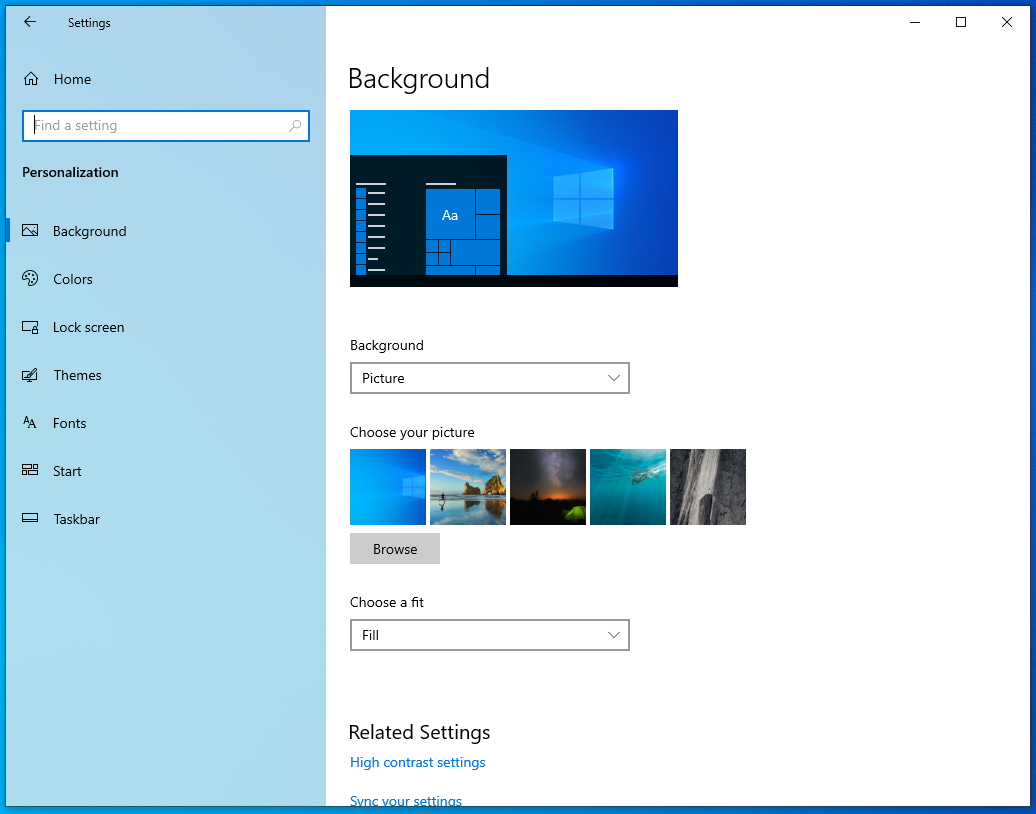
- Move to the right pane, then scroll down to the Choose your picture section.
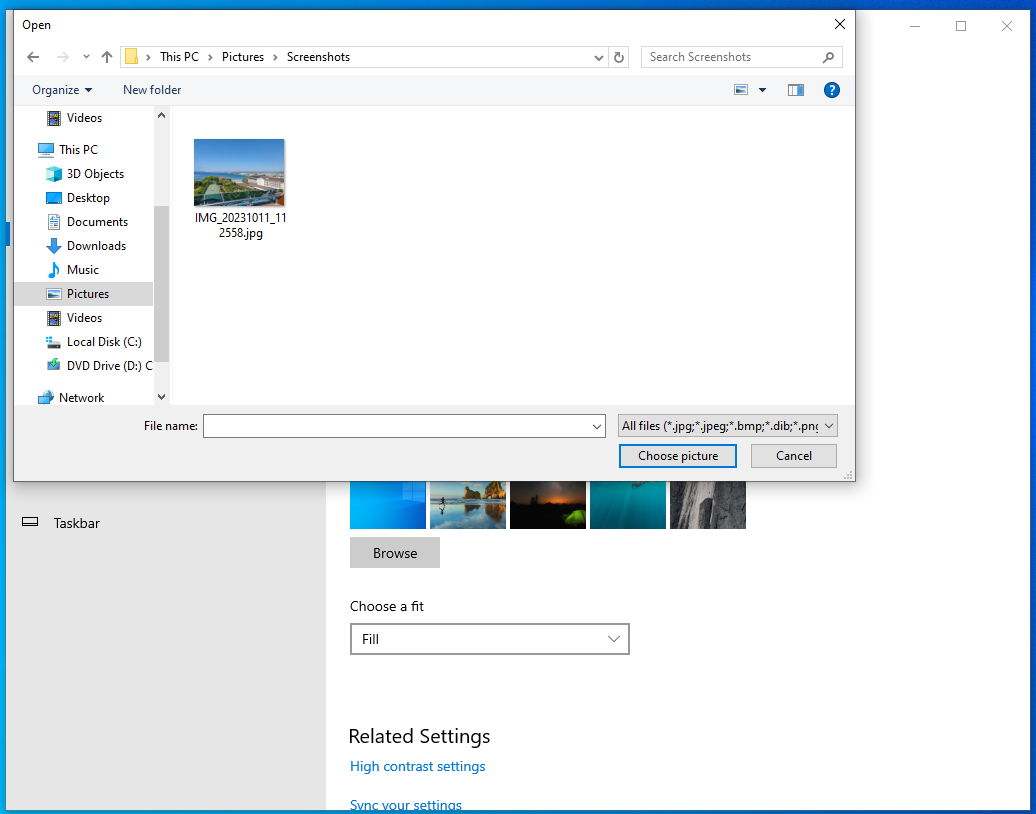
- Select a photo for your background, and if you don’t find what you like in the quick list, you can click the Browse button.
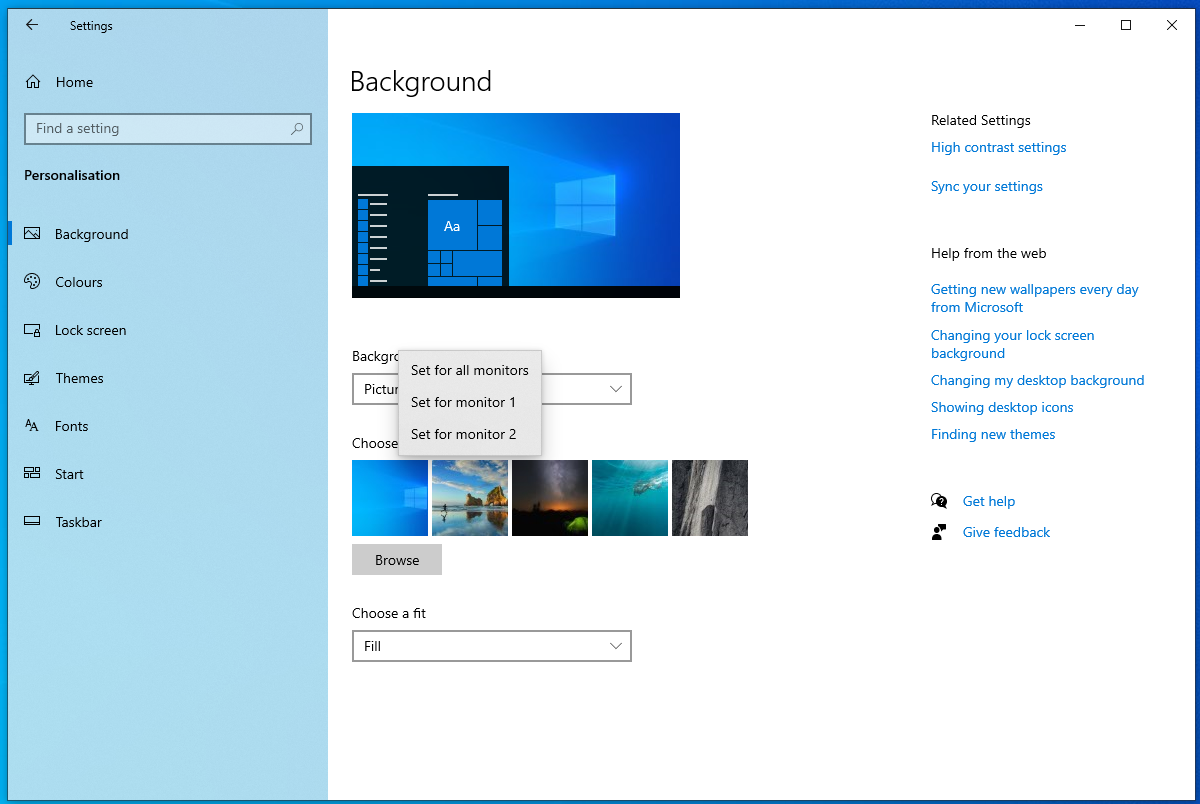
- Right-click the photo you selected from the list.
- Now, you will see three options:
- Set for all monitors
- Set for monitor 1
- Set for monitor 2

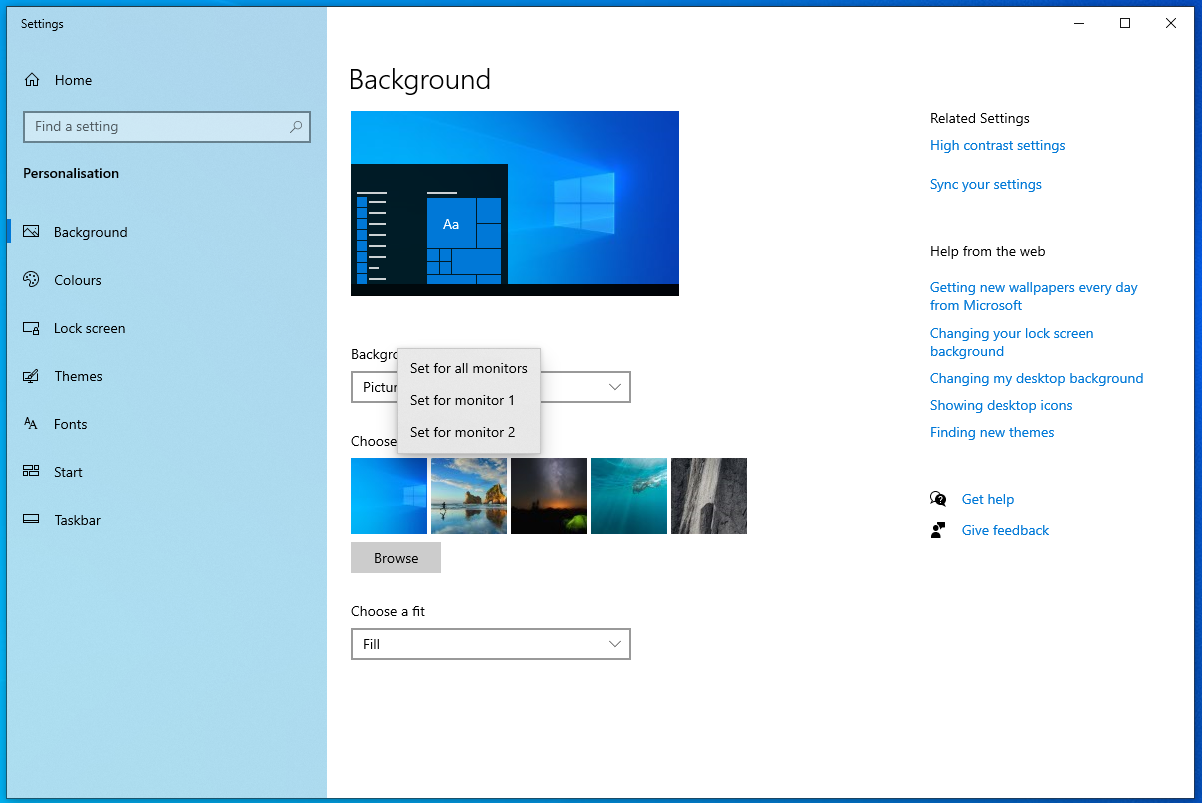
- If you want to use a single image for both monitors, select the Set for all monitors option.
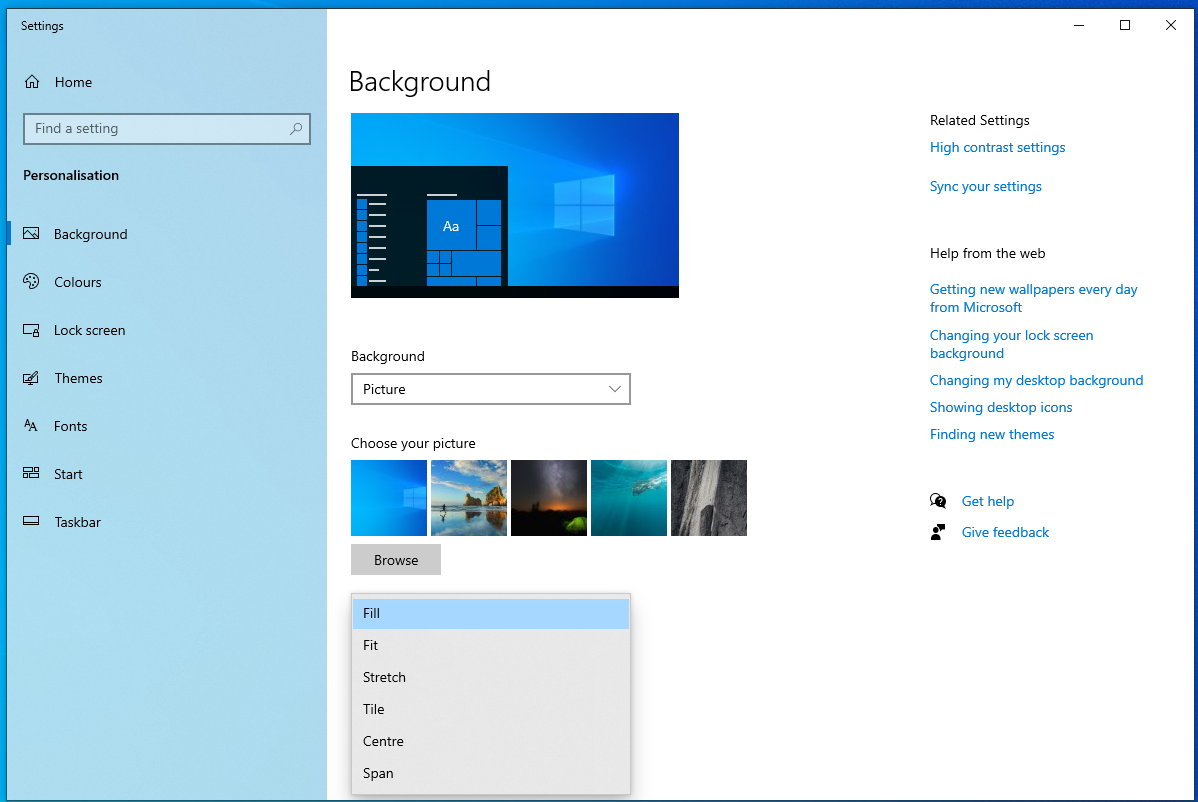
- You may notice that the image fills each of the monitors you have. If you want it to span across two displays, you can click the drop-down list under Choose a fit , then select Span .
Download Auslogics BoostSpeed
Your one-stop PC maintenance and optimization tool, this program will clean, speed up, repair, and tweak your system to ensure maximum speed and efficiency.
Also read: Monitor Goes Black Randomly? Here’s What to Do!
Option 2: How to set different wallpaper for each monitor
But what if you want to have a different wallpaper on each monitor? We understand that there are users who prefer different images for their monitors. So, we’ll also share how you can configure this. Older Windows operating systems allow you to do this via the Control Panel . However, this feature was removed from Windows 10. Instead, you can set up the images via the Settings app. It’s true that the Control Panel offers more options for configuring wallpapers. That said, the Settings app still allows you to use different images for multiple displays. Here’s how to set up the wallpaper for dual-screen PCs. Follow the instructions below:
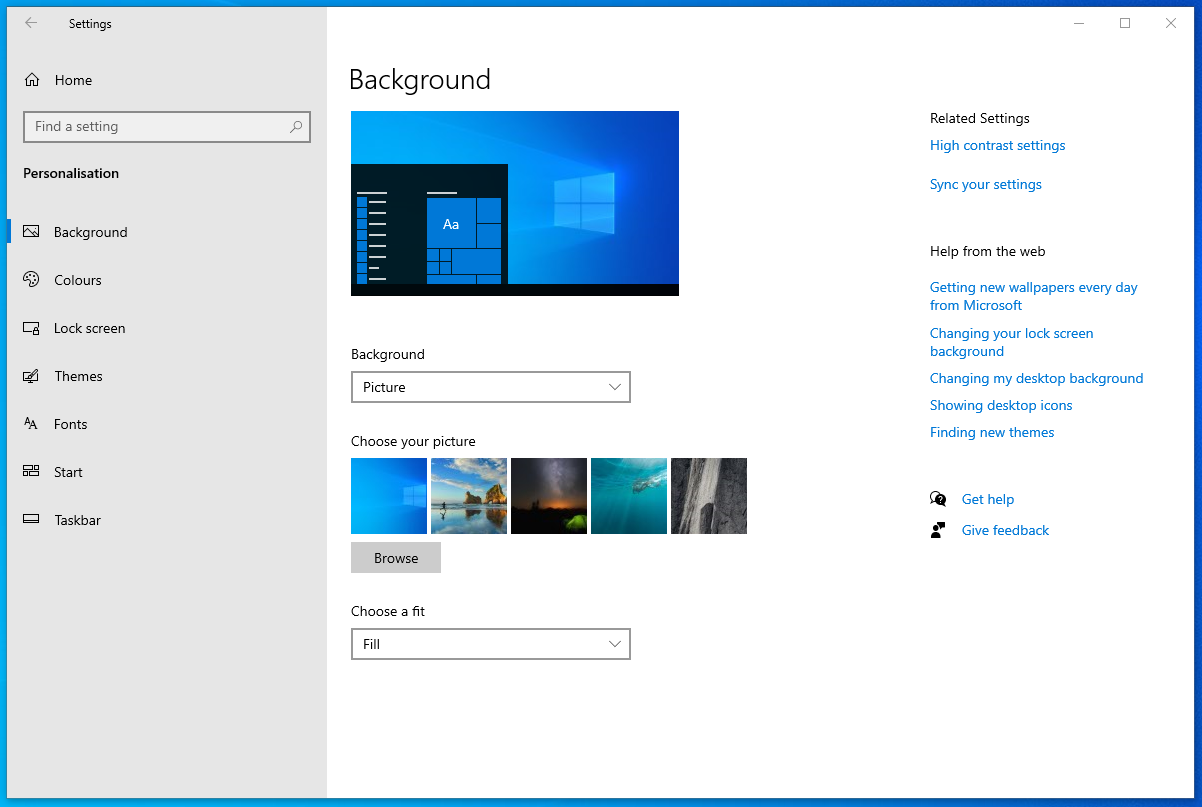
- Go to your taskbar, then click the Windows icon.
- Click the gear icon to open the Settings app.
- Select Personalization , then click Background from the left-pane menu.
- Now, select an image from the Choose your picture section. You can also click Browse to locate the photo you like.

- After selecting your background image, right-click it from the list, then select Set for monitor 1 or Set for monitor 2 .

- To set up the background photo for the other monitor, repeat steps 4 and 5.
Also read:[FIXED] Second Monitor Not Detected on Windows 10 PC
How to Set Dual Monitor Wallpaper on Windows 11
A dual-monitor setup can increase your productivity at home or office. If you’re using a Windows 11 dual-monitor setup, you already benefit from this productivity boost. However, you might not know that you can set different wallpapers for each monitor.
Windows 11 comes preinstalled with several themes and photos. These themes are available within the Personalization tab of the Settings app, and you can even create a custom theme . So, you can use different wallpapers to spice up your dual-monitor setup. However, note that to use personal images for your dual-monitor setup, you’ll need to set them up first.
Option 1: How to set the same wallpaper for dual monitors in Windows 11
Let’s start with the same wallpaper arrangement as we did with Windows 10:
- To access Settings , simultaneously press the Windows + I keys.
- When on the Settings screen, click Personalization and pick Personalize your background to display image options.
- Scroll down to access the Choose a photo or Browse photos option.
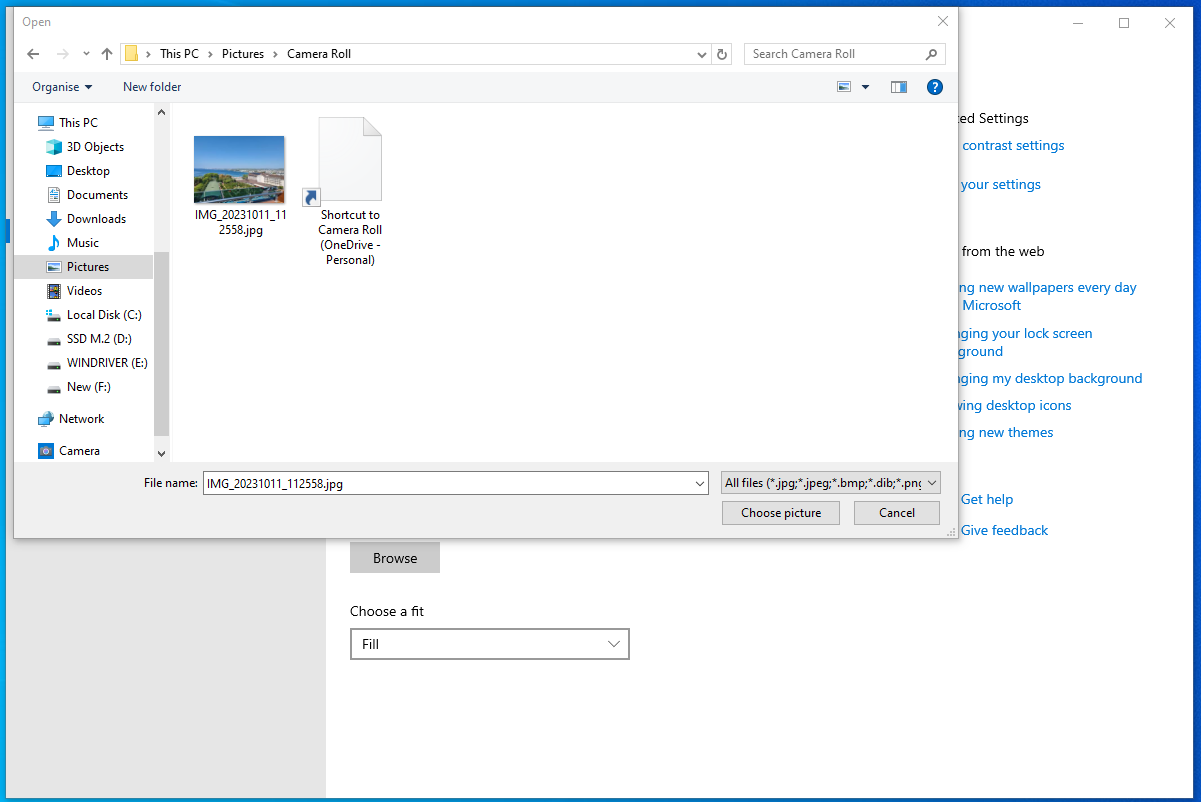
- From Browse photos , select an image in your storage and right-click on it.
- Next, choose Set for all monitors , and you’re done.
The second method to use is copying files to the Windows directory . Follow these steps:
- Select the images you want to use as a background and copy them.
- Next, open your File Explorer and navigate to:
C:/Windows/Web/Wallpaper/Windows
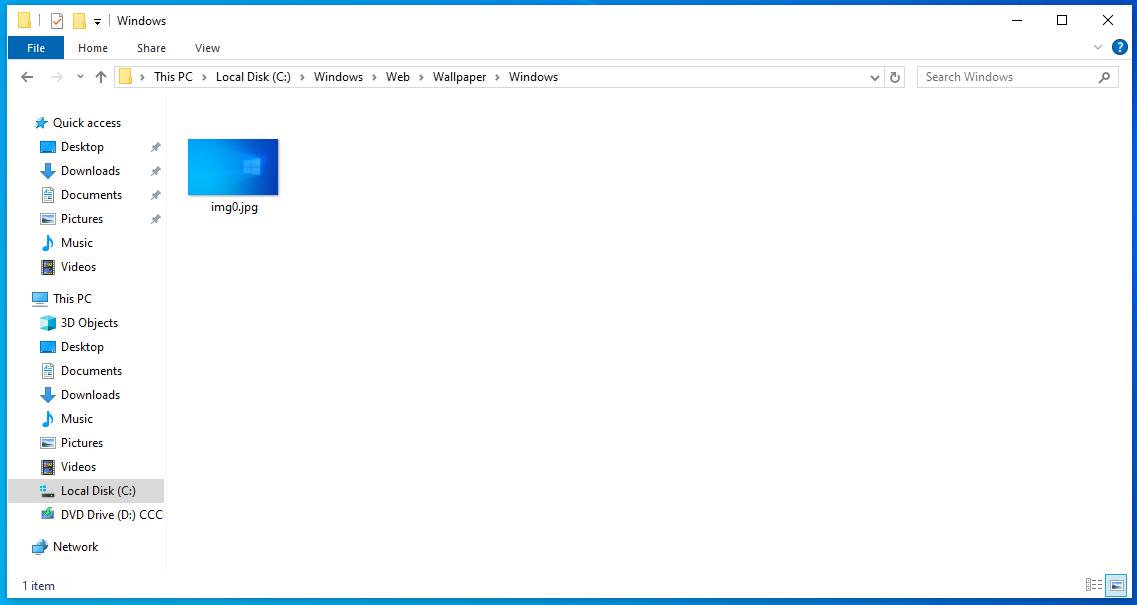
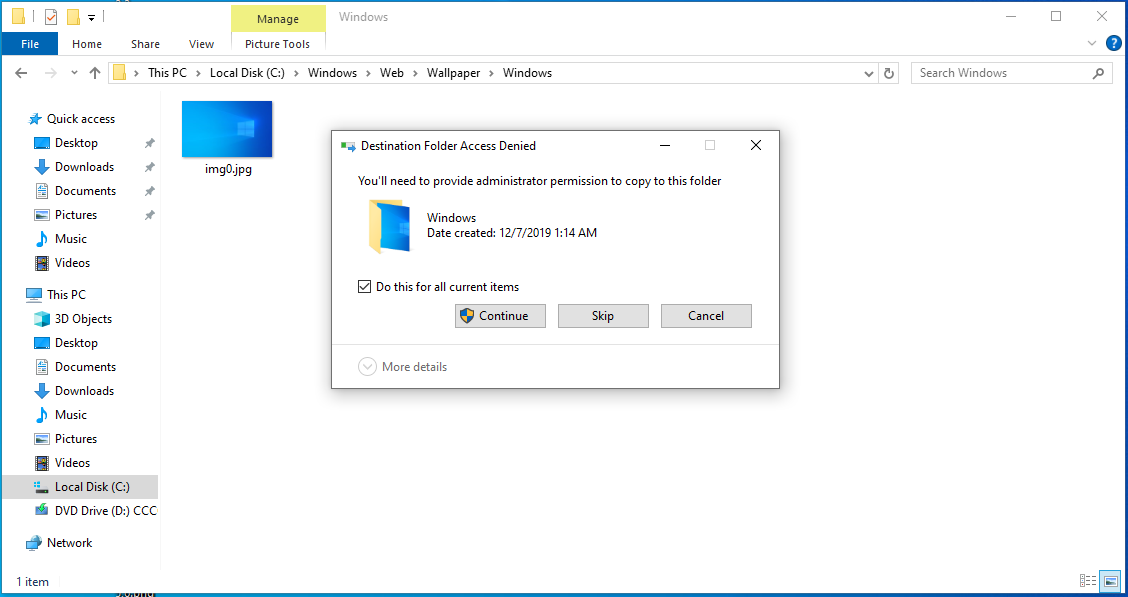
- Right-click on this window and paste the copied images.
- A pop-up window appears. From it, select Do this for all current items , then Continue .
- Next, go to Settings .
- Pick Personalization from the left navigation bar.
- Choose Background , right-click on the added image, pick Set for all monitors , and restart your PC to implement the changes.
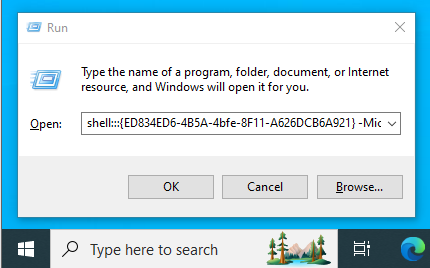
Alternatively, you can use the Run command dialog to set your wallpapers. Here is a simple guide:
- Access the command prompt window by pressing the Windows + R combination.
- Key in the following command in the dialog box, then press OK :
shell:::{ED834ED6-4B5A-4bfe-8F11-A626DCB6A921} -Microsoft.PersonalizationpageWallpaper
- Select Desktop Background from the options at the bottom of your screen.
- Choose a preferred wallpaper, right-click on it and pick Set for all monitors .
- Restart your PC.
Further reading:Windows Command Prompt: 28 Most Useful CMD Commands [with Examples]
You can also choose to set different images for your monitors. Here is how to set wallpaper for dual-screen on Windows 11:
- Press the Win + I combination to open your Settings .
- Select Personalization and Background from the left sidebar to access wallpaper settings.
- To choose your favorite wallpaper, pick the Browse photos option next to Choose a photo in the Background section.
- Next, right-click on the image you prefer from the Recent images tab and choose Set for monitor 1 from the options.
- Further, repeat the process by right-clicking on a different image and selecting Set for monitor 2 to set it as the second monitor’s wallpaper.
- You’ve successfully set a unique wallpaper on each monitor in Windows 11, and you’ll be able to see your images for each monitor.
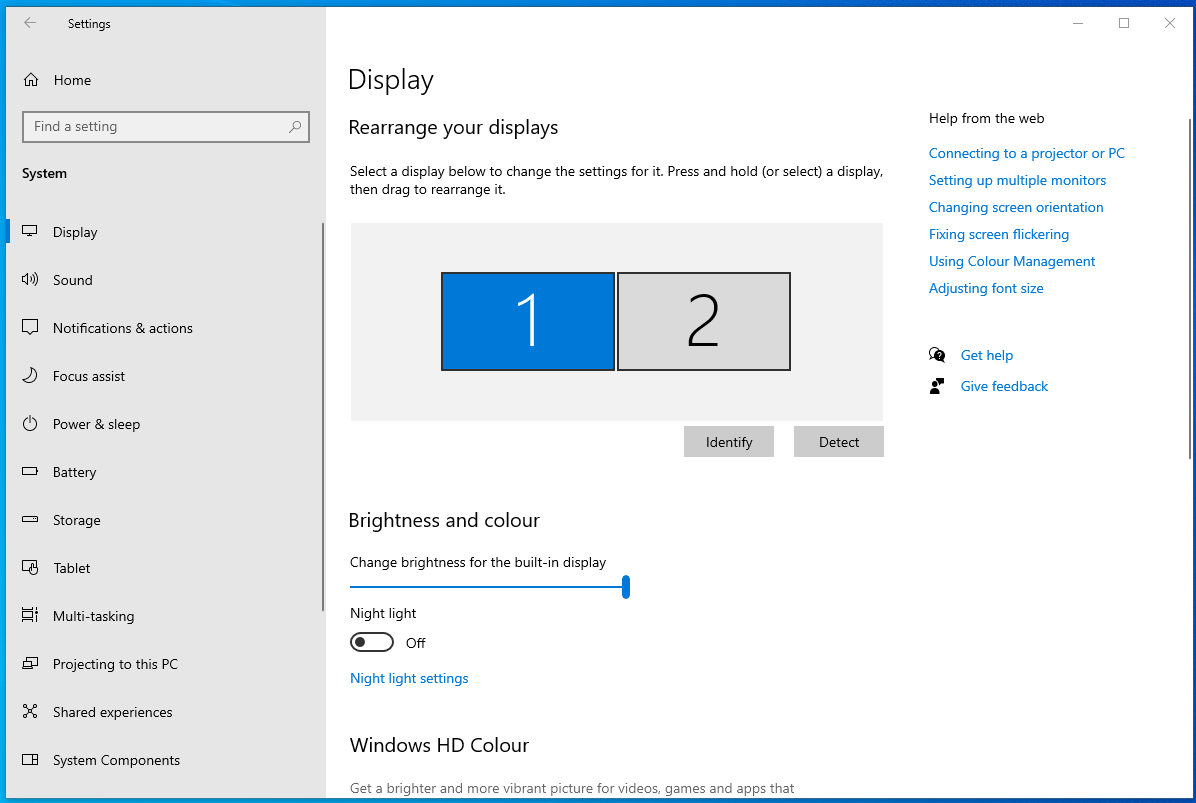
- Before setting the wallpapers, ensure you know the monitor numbers. If you don’t, you can go to System from your Settings , select Display , then click on the Identify button. The monitor number will appear at the bottom-left corner of the screen.
Also read:[FIXED] Windows 10 Display Is Too Big for a Monitor
Option 2: How to extend wallpaper across the two Windows 11 monitors
You might also want your wallpaper to span across all your monitors for a unified look. There is a feature available for extending your wallpaper to both monitors. Here’s how it works:
- Press the Windows + I keys at the same time to access Settings .
- Select the System option from the left navigation and then click on Display to access the display menu.
- Pick the Advanced display option.

- Next, select Extend from the drop-down menu to extend the wallpaper to both monitors.
PRO TIP
When dealing with high-resolution images, you need to ensure that your computer is in tip-top shape.
Otherwise, you will notice that there are delays when you’re switching to different background images. To ensure that your PC is in its optimal condition, we recommend that you use Auslogics BoostSpeed .
This tool has an efficient cleaning module that can safely sweep out all types of computer junk.
What’s more, you can use it to tweak non-optimal system settings, allowing processes and services to run at a faster pace.
How to Set Up Dual Monitor Wallpaper on Windows 10/11 Using Third-Party Software
If, for any reason, you don’t want to go through the steps above, you can also set up your dual monitor wallpaper using third-party software. There are quite a few programs online that can help you manage dual monitors. Some popular options include: DisplayFusion will let you easily customize wallpaper on both monitors. Plus, there are additional features on board—you can manage windows, split your monitor, control your monitor remotely, and more. Ultramon is another option. You will be able to set wallpapers for your monitors, plus there are options to manage apps on dual monitors and control app positioning. Dual Monitor Tools is a collection of tools for managing dual monitors on Windows. You will want to download DMT Wallpaper Changer, but there are lots of other useful instruments like DMT Screensaver, DMT Screen Swap, and others. Once you’ve picked your tool, download it and follow the instructions for setting your wallpaper. Most third-party dual monitor management tools will let you use one image stretched across both monitors or set different images for each monitor.
How to Set Dual Monitor Wallpaper: Fully Explained
Setting up dual monitor wallpapers on Windows 10 and 11 can be great for enhancing your desktop experience. It can not only make your workspace more personal and visually appealing but also increase productivity. You may actually be more efficient when you can customize your desktop and pick the colors that help you focus.
As we’ ve explained in this article, you can use built-in settings in Windows or third-party software to set up wallpaper on dual monitors. Let us know in the comments below which of the methods above has worked the best for you!
FAQ
To extend the screen on Windows 11, go to Settings > System > Display. When you see the Multiple displays section, select to Extend these displays from the drop-down menu.
You can adjust the resolution on your monitor by going to Settings > System > Display. Select each monitor and choose the recommended resolution for each one.
If your dual monitor wallpaper looks too blurry or stretched, check if the wallpaper resolution matches the combined resolution of both monitors. You can also adjust the fit settings by going to Settings > Personalization > Background and selecting a different fit option like Span or Fit.
Make sure your settings are saved correctly. Sometimes, third-party software like DisplayFusion can help maintain settings across reboots. Also, check for any Windows updates that might address this issue.
If you are looking to set a slideshow, go to Settings > Personalization > Background. Under Background, select Slideshow. Next, choose the folder that houses your images. Set the desired interval for changing images, and ensure Shuffle is checked if you want a random order.
[yasr_overall_rating] [yasr_visitor_votes]
Wintermelon is a C# Program that emulates the Lock Screen on multiple displays connected to Windows 10 / 11 systems.
The Lock Screen is displayed when you lock your system by pressing ‘Windows Key + L’ combination or by pressing ‘Ctrl + Alt + Del’ and selecting ‘Lock’ on the menu that pops up.
Earlier, Lock Screens were always emulated on multiple monitors in Windows 7 based systems, but the feature has since been discontinued. In Windows 10 / 11 systems, the Lock Screen appears on multiple displays only if the projection mode (Win + P) is set to ‘Duplicate’. If the projection mode is set to ‘Extend’, the Lock Screen is displayed only on the Primary or the Main display and all the other Secondary displays go black.
How it Works?
Wintermelon provides a workaround for this issue. It schedules the following two tasks namely that monitor your system for Lock / Unlock events.
Lock save window position clone display: When it detects a Lock event, the projection mode is switched to ‘Duplicate’ so that the Lock Screen is displayed across all the Secondary Displays. At the same time, the position of all the active application windows on the desktop is recorded so that it can be restored later.
Unlock extend display restore window: When an Unlock event is triggered, the projection mode reverts to ‘Extend’ and the positions of the running application windows that that was recorded earlier, are retrieved so that all of them can return to their original state.
Technical Details:
It listens for Windows log on and log off events in the even viewer with IDs 4800 and 48001 respectively.
Steps for Installing/Setting Up Wintermelon:
Enabling Auditing of Windows Log on and Log Off Events:
Wintermelon listens for log on and log off events which are not audited by default. You need to first enable their auditing. To do that, you can use Group Policy Editor. Here are the steps to enable it.
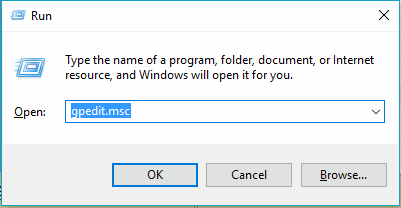
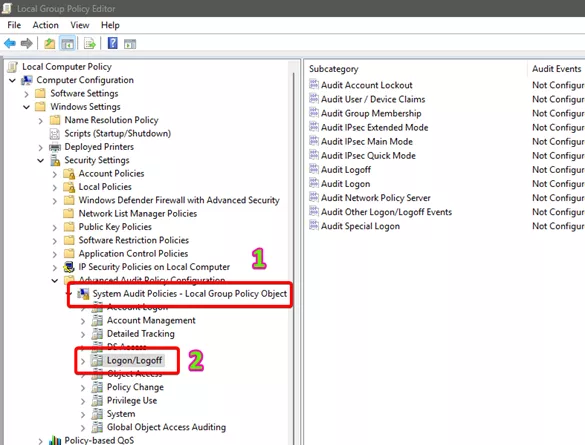
- In Run, type gpedit.msc or, you can search for Group Policy Editor in the Start.

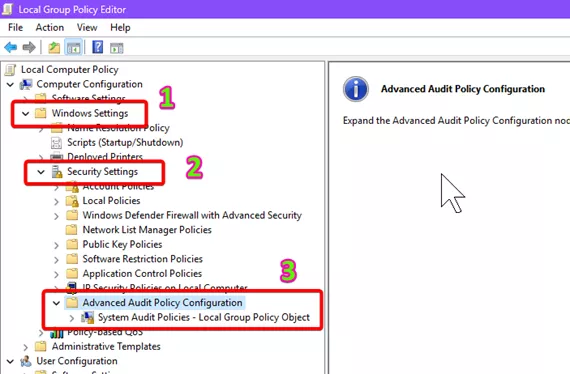
- Go to Windows Settings > Security Settings > Advanced Audit Policy Configuration. Expand this advanced audit policy configuration.

- Go to System Audit Policies – Local Group Policy Object. Click Logon/Logoff.

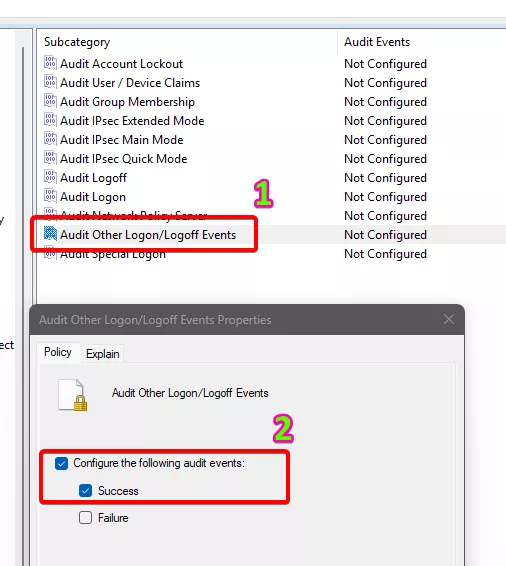
- Double click Audit Other Logon/Logoff Events and then check “Configure the following events” and then check “Success“.

- Done.
Running the Installation Script:
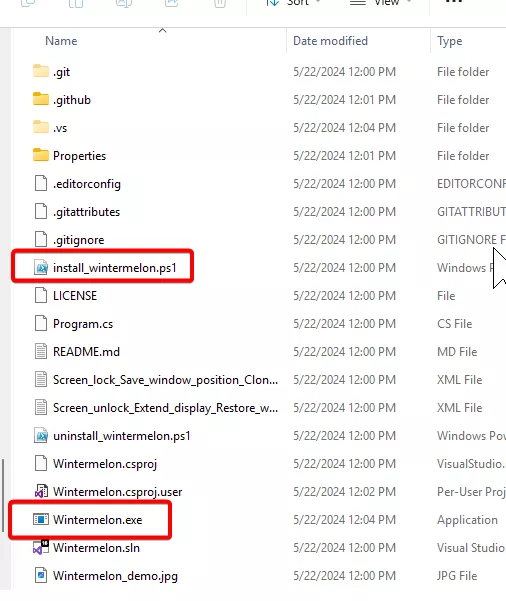
1. Download the program from the links provided at the end of this article. You must download Wintermelon.zip as well as Source code (Zip) and unzip both of them in some folder.
2. Move all the files from the source code to the unzipped/extracted Wintermelon folder. The folder structure now will look like this. It has all the scripts as well as Wintermelon.exe file.
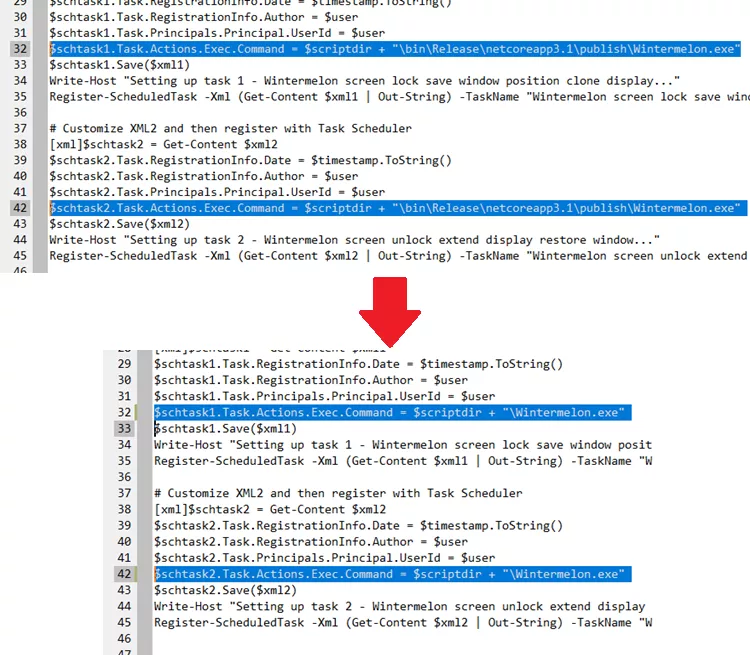
3. Now, with any code/text editor, you need to edit the install_wintermelon.ps1 file. In the line 32 as well 42, you have to make some changes. Edit the path in the double quotes from “\bin\Release\netcoreapp3.1\publish\Wintermelon.exe” to just “/Wintermelon.exe”. You can see this in the screenshot below.
4. Run PowerShell as administrator. For that, just right click on Start and run Terminal(Admin).
5. In Terminal, change directory to the folder where Wintermelon.exe is.
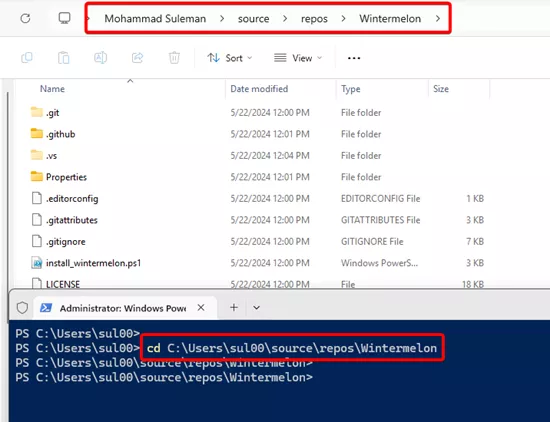
6. In terminal, issue this command: Set-ExecutionPolicy Unrestricted
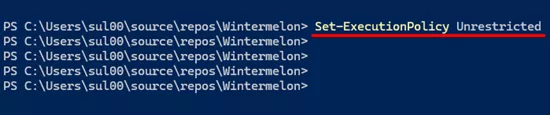
7. Now, run the installation script. Just type this and press enter: ./install_wintermelon.ps1

Press R if it asks for running the task once otherwise, just proceed as you are done.
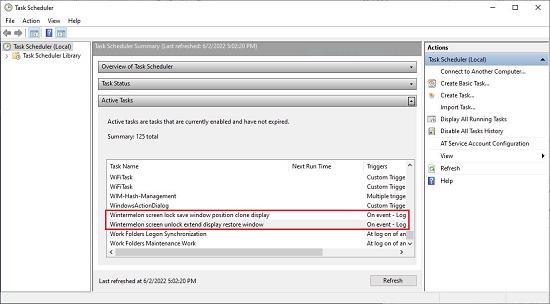
8. Run Task Scheduler and verify the occurrences of the two tasks in the list of Active Tasks.
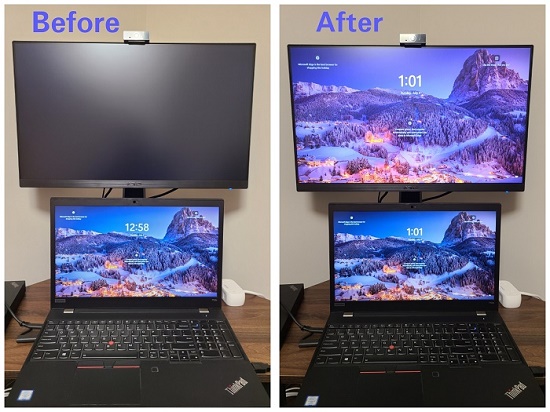
9. Now, Lock your system and the Lock Screen will be visible on all the Secondary Displays. Unlock your PC and all the running Application windows will be restored to their original locations on the multiple monitors.
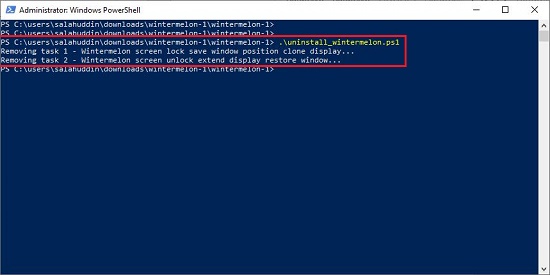
10. To remove the tasks from the scheduler, use the command .\uninstall_wintermelon.ps1
Verdict:
After testing Wintermelon, I found that it works successfully, and the Lock Screen is displayed on all the Secondary Displays apart from the Primary one.
Go ahead and give it a try. Click here to download Wintermelon.zip and Source code (Zip). Remember to unzip both of them in a specified folder.
Привет, друзья. Тема этой публикации — как поменять экран блокировки на Windows 10. Создатель операционной системы — компания Microsoft – не особо щедра в реализации штатных пользовательских возможностей по настройке экрана блокировки, но кое-что немногое изменить в нём мы можем. Кстати, если он вам не нужен, вы можете его вообще отключить, а как это сделать, смотрите в статье сайта «Как отключить экран блокировки в Windows 10». Если же нужен, давайте разбираться с теми немногими настроечными возможностями, которые доступны для него. А это смена картинки, запуск слайд-шоу фотографий, настройка сведений приложений, настройка фона входа пользователя в Windows 10.

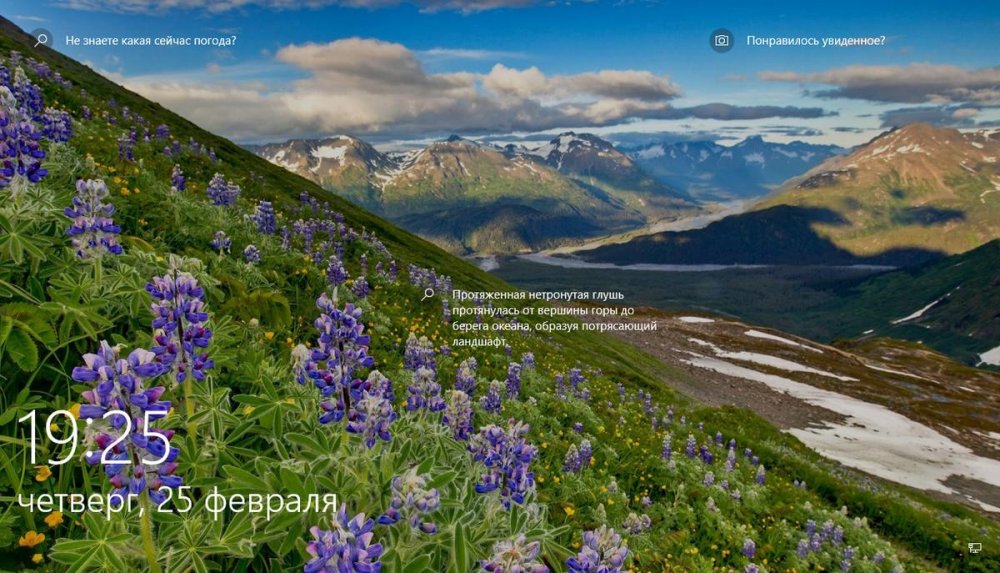
Итак, друзья, экран блокировки Windows 10. Это системная среда вне пользовательских учётных записей, среда, где пользователи операционной системы выполняют вход в свои учётные записи и имеют доступ к некоторым системным функциям. И сделана эта среда на фоне приятных картинок живописных пейзажей, показываемых нам в рамках по умолчанию активной функции «Windows: Интересное».
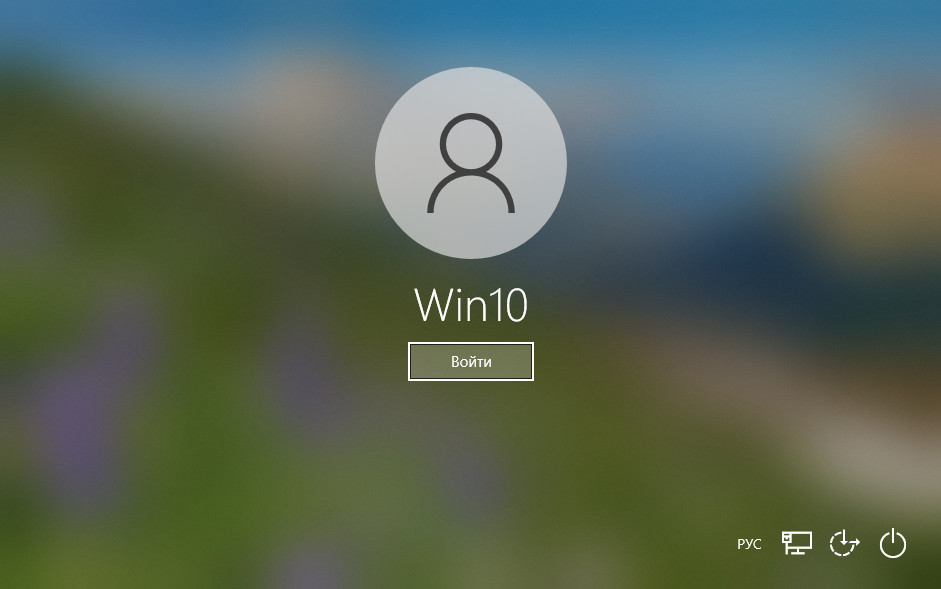
При клике по экрану блокировки фон заблюривается, и мы получаем доступ ко входу в наши учётные записи, а также к функциям смены языковой раскладки, настройки Интернета и выключения компьютера.
Настраивается экран блокировки в системных настройках персонализации Windows 10. А чтобы настройки персонализации были доступны, ваша операционная система, друзья, должна быть активирована. На рабочем столе вызываем контекстное меню и выбираем «Персонализация».
В самих настройках персонализации идём в радел «Экран блокировки». И вот что нам здесь доступно.
По умолчанию в качестве фона экрана блокировки Windows 10 показываются разные картинки в рамках активной функции «Windows: Интересное», она же Windows Spotlight. Эта функция подтягивает с ресурсов Microsoft эффектные пейзажи и меняет их каждый день. Кроме того, на самих картинках отображаются различные занимательные факты о местностях, изображённых на картинках. А иногда отображаются советы по работе с Windows 10 и продуктами Microsoft.
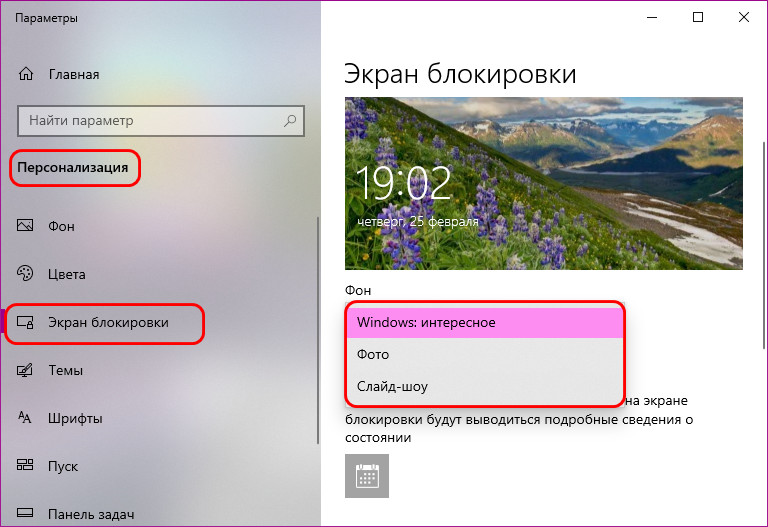
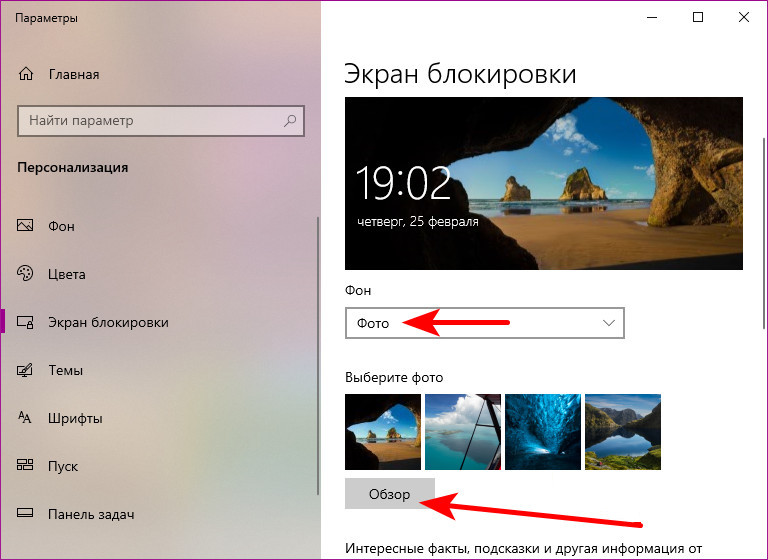
Если вы хотите на экране блокировки видеть свои изображения – свои пейзажи, иные картинки, свои фото, выбираем в качестве фона «Фото» и с помощью кнопки обзора указываем на изображение на диске компьютера.
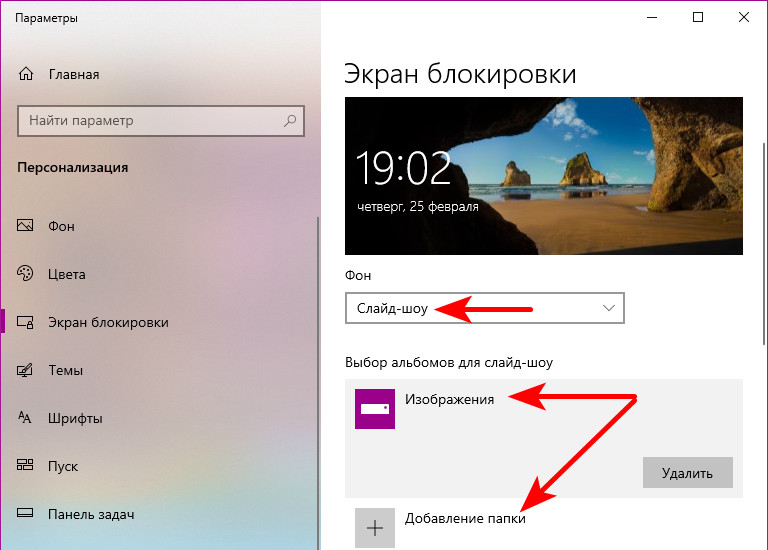
Третий вариант фона при настройке экрана блокировки Windows 10 – слайд-шоу. Этот вариант не меняет главное изображение экрана блокировки, но добавляет на экран воспроизведение слайд-шоу картинок из добавленных папок. Выбираем в качестве фона «Слайд-шоу» и добавляем папку с картинками на компьютере.
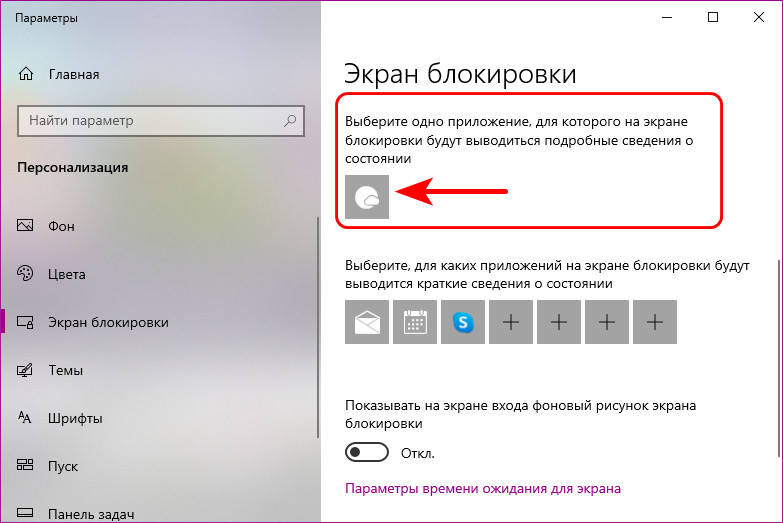
В настройках экрана блокировки Windows 10 можем выбрать современные универсальные приложения, которые будут выводить на экран какие-то сведенья – число новых писем или сообщений, пропущенные звонки по Скайпу, задачи планировщика и т.п. Одно приложение можно настроить для подробных сведений, а семь приложений — для кратких сведений. Конечно, у каждого свои приоритеты, но наверняка для многих актуальным будет отображение погоды на экране блокировки. Для этого нужно указать приложение «Погода» в качестве того одного, для которого будут отображаться подробные сведения.
И последняя настройка экрана блокировки Windows 10 – настройка экрана входа в учётную запись. Для него при желании можно отключить фоновый рисунок, применяемый к экрану блокировки.

И лицезреть просто однотонный фон из акцентного системного цвета.

Друзья, есть ещё одна возможность настроить экран входа в учётную запись Windows 10, не предусмотренная настройками персонализации – возможность убрать эффект блюра (размытия). Т.е. сделать так, как было в системе до версии 1903, которая и привнесла такое дизайнерское решение. Для этого нужно кое-что подправить в системном реестре. Запускаем его, вводим в системный поиск:
regedit
Раскрываем путь:
Компьютер\HKEY_LOCAL_MACHINE\SOFTWARE\Policies\Microsoft\Windows\System
Создаём 32-битный параметр DWORD.
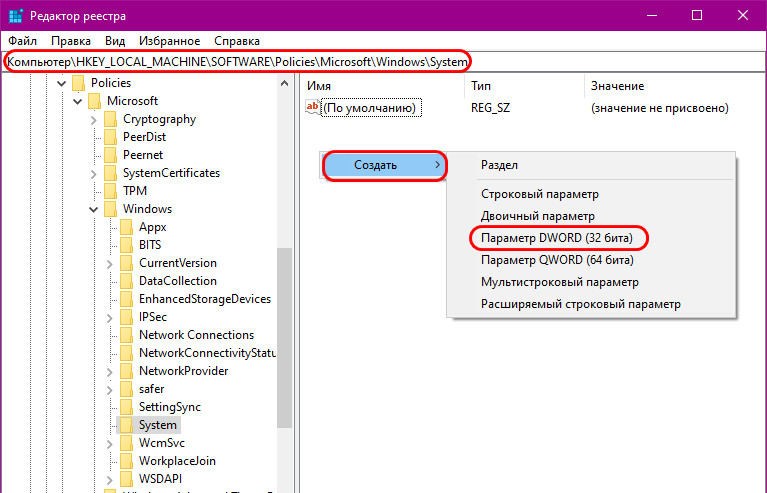
Называем его:
DisableAcrylicBackgroundOnLogon
Устанавливаем его значение 1.
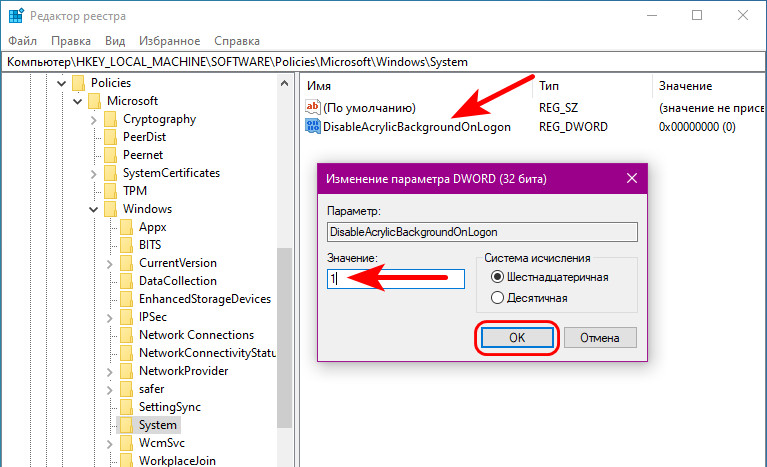
Если нужно будет впоследствии вернуть эффект блюра, просто удаляем этот параметр.
Вот это, друзья, как поменять экран блокировки на Windows 10: системные настроечные возможности в этом плане весьма скромны, но в общем-то более и не нужно. У Microsoft есть ещё много непаханых полей…
In Windows 8 or later, we have default lock screen image whenever we sign out from our account. Actually this default lock screen image appears when each user sign outs from his/her account. However this default image wallpaper may vary from build to build, but the fact is that “there is a default lock screen image at all” which comes into play when you switch accounts on your system.
You can’t change this image from the PC Settings -> Personalize -> Lock Screen page. Thus if you’re looking to change this default lock screen wallpaper, then this article is for you. The method will be also beneficial for those users, who’re facing Lock screen error – Setting the lock screen failed. Please try again issue.
How To Change Default Lock Screen Image For Multiple Users
1. Make sure you’re have enable hidden items in the File Explorer. Navigate to following folder:
C:\ProgramData\Microsoft\Windows
Substitute C: with your system root drive.
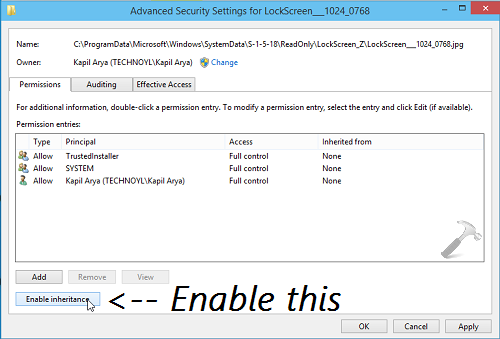
2. In the Windows folder, there should be a folder named SystemData, take its ownership using the way mentioned here.
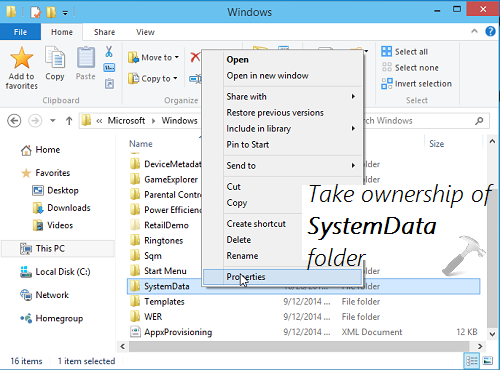
3. After taking ownership, right click SystemData folder and select Properties. Switch to Security tab and click Advanced option, you’ll be taken to below shown window, where you’ve to click Enable inheritance.
4. Next, move to following folder:
C:\ProgramData\Microsoft\Windows\SystemData\S-1-5-18\ReadOnly\LockScreen_Z

Here you’ll see the default lock screen image which appears whenever any one sign outs from his/her account. All you need to do is to replace this image with your desired image with same name. Please note that the resolution of this default lock screen image is 1024×768 pixels, hence its obvious that your desired image should have the same resolution and extension i.e. .jpg. Once you’ve replaced the image, log out of your account, and your desired lock screen will appear now.
Hope you enjoyed the trick, Good luck!
RELATED ARTICLES
Все способы:
- Способ 1: Переключение типа фона экрана блокировки
- Способ 2: Смена региона на США (только для региона Россия)
- Способ 3: Удаление кеша обоев экрана блокировки
- Способ 4: Очистка временных файлов
- Способ 5: Замена системных файлов
- Способ 6: Редактирование локальной групповой политики
- Способ 7: Редактирование реестра
- Способ 8: Повторная регистрация пакетов
- Вопросы и ответы: 0
Способ 1: Переключение типа фона экрана блокировки
Пользователь может столкнуться с проблемами автоматического изменения экрана блокировки в том случае, если нужные настройки изначально не были заданы или по каким-то причинам сбились. Поэтому в первую очередь всегда рекомендуем заглянуть в «Параметры» и проверить там установленное значение.
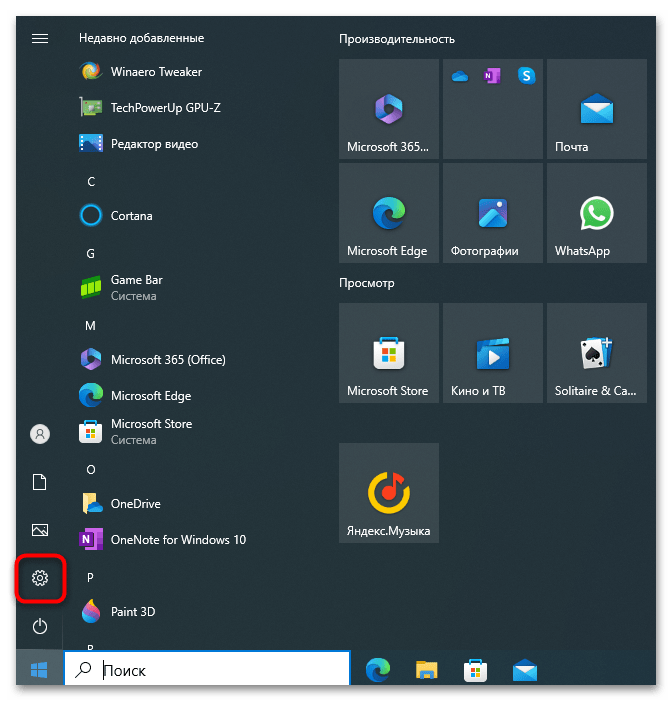
- Для этого в меню «Пуск» на панели слева нажмите по значку с шестеренкой.
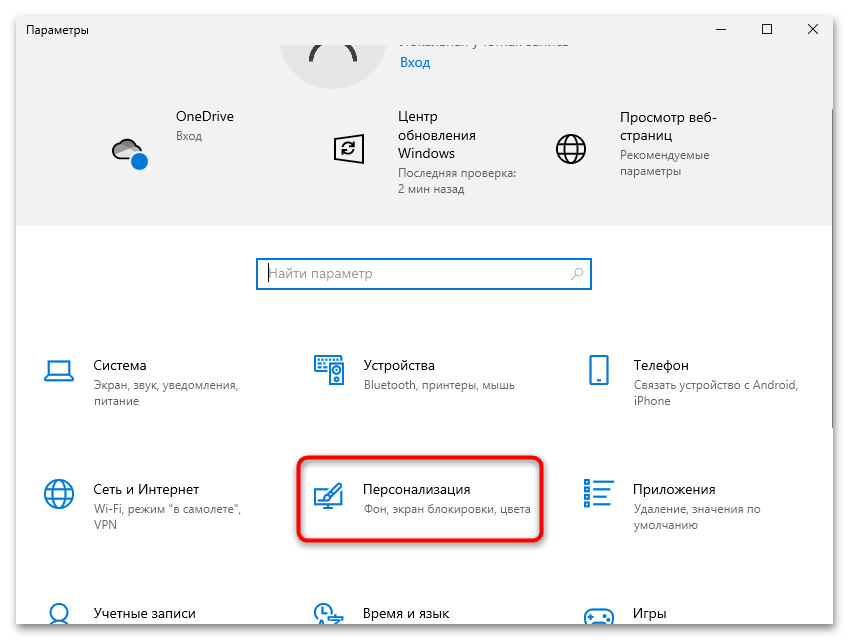
- Перейдите в раздел «Персонализация», кликнув по плитке с соответствующим названием.
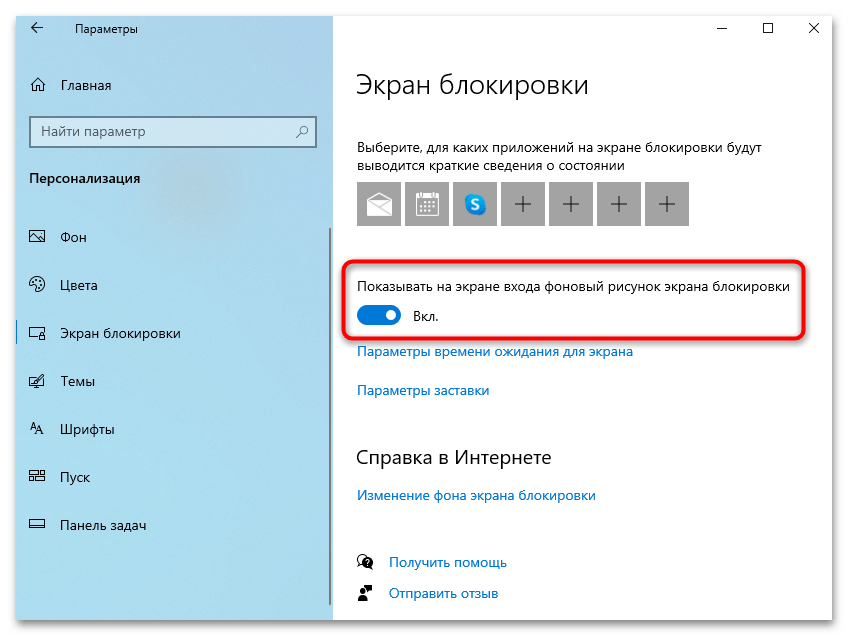
- Слева выберите категорию «Экран блокировки», затем проверьте установленное значение для «Фон». Если выбрана обычная фотография, то она никогда изменяться не будет. Нужно указать «Windows: интересное» или «Слайд-шоу», если самостоятельно выбираете папку со снимками, отображение которых будет чередоваться.
- Вместе с этим можете активировать параметр «Показывать на экране входа фоновый рисунок экрана блокировки», если хотите видеть такие же изменения фона при включении ПК до тех пор, пока не была выполнена авторизация в профиле.

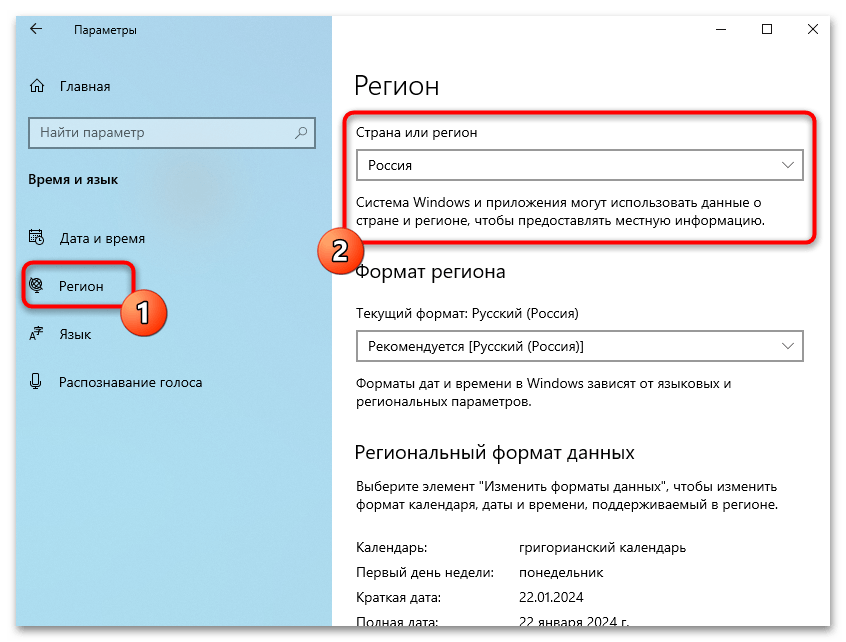
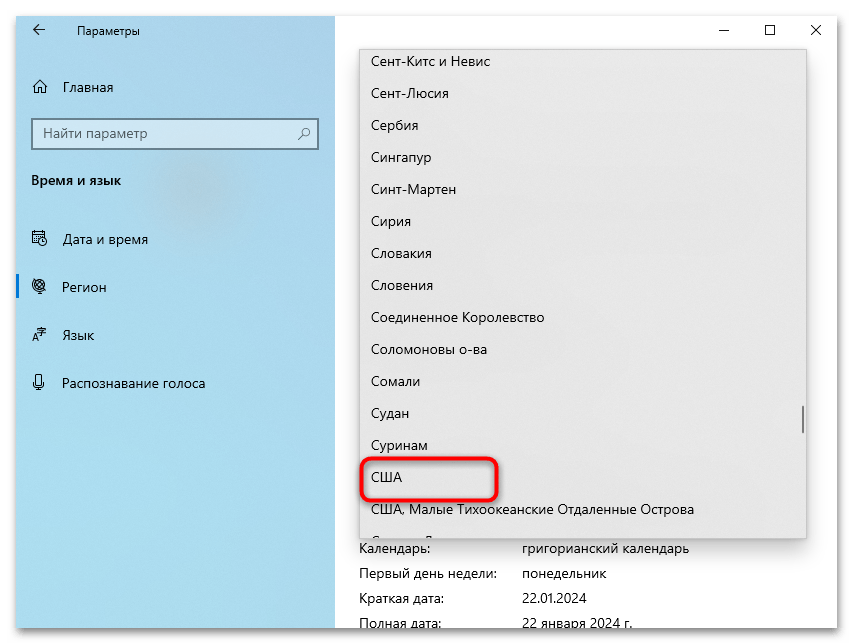
Способ 2: Смена региона на США (только для региона Россия)
Компания Microsoft больше не поддерживает некоторые продукты в России. В связи с этим могут наблюдаться проблемы с автоматическим изменением экрана блокировки, если он выбран как «Windows: интересное». В данном случае пользователю понадобится сменить регион на «США», что может разблокировать некоторые ранее недоступные функции и есть вероятность возвращения корректного отображения экрана блокировки.
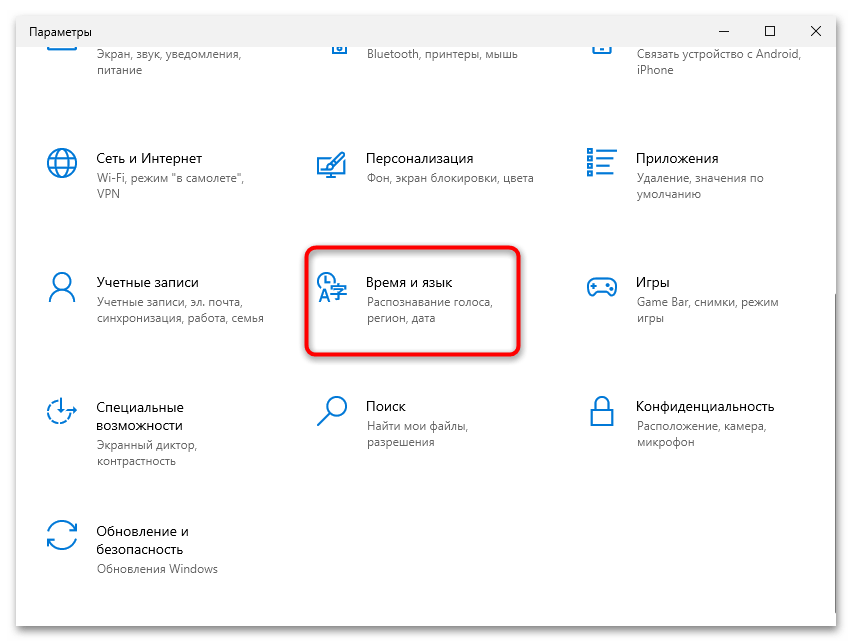
- В «Параметрах» выберите раздел «Время и язык».
- Через панель слева перейдите к категории «Регион», затем разверните список «Страна или регион».
- Из него выберите «США», и можете закрыть данное окно.
- Для вступления изменений в силу потребуется отправить компьютер на перезагрузку. Сделайте это любым удобным для вас методом.

Способ 3: Удаление кеша обоев экрана блокировки
Каждое изображение на экране блокировки имеет свой файл с кешем. Он нужен для быстрой загрузки содержимого при следующем показе данного кадра. Так повторяется со всеми изображениями, поэтому в отдельной системной папке хранится довольно много разных файлов. Их удаление позволяет решить некоторые сбои и заставить Windows 10 заново загружать эти элементы персонализации, что как раз может исправить ситуацию с их автоматическим изменением.
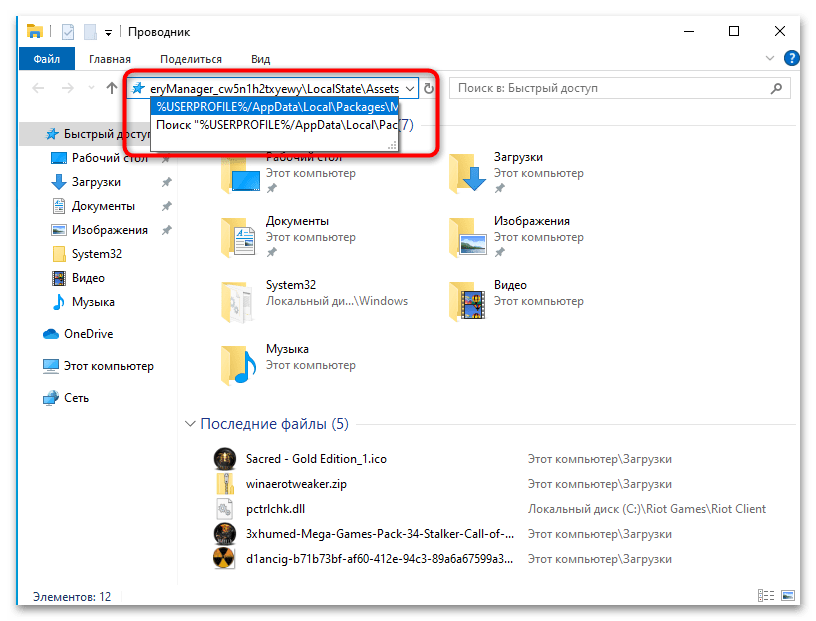
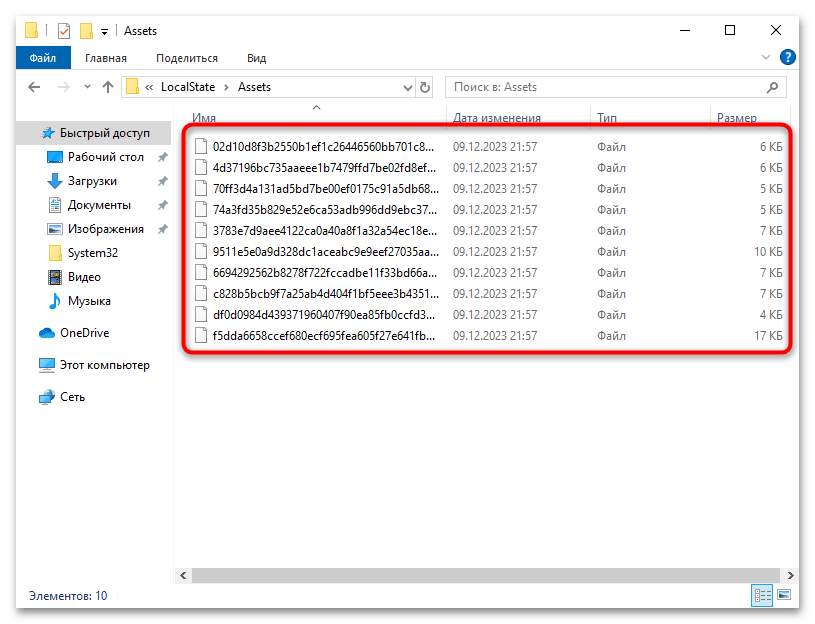
- Откройте «Проводник» и в адресную строку сверху вставьте путь
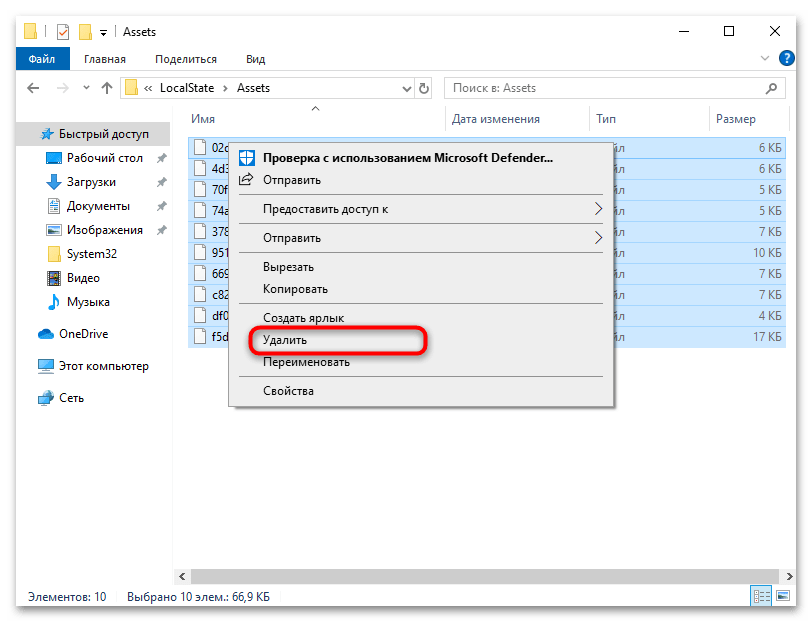
%USERPROFILE%/AppData\Local\Packages\Microsoft.Windows.ContentDeliveryManager_cw5n1h2txyewy\LocalState\Assets, затем перейдите по нему. - Выделите абсолютно все хранящиеся тут файлы, затем нажмите по любому из них правой кнопкой мыши.
- Из контекстного меню выберите пункт «Удалить» и подтвердите действие. Можете отправить ПК на перезагрузку или заблокировать его, чтобы проверить, как происходит смена кадров на экране блокировки.
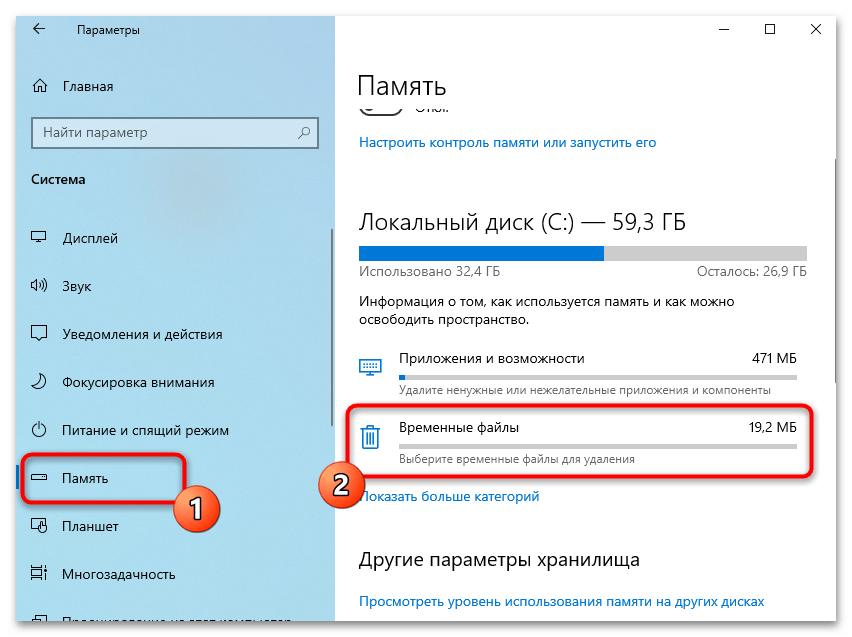
Способ 4: Очистка временных файлов
Примерно по такому же принципу работает метод с очисткой временных файлов, однако он позволит удалить и другие накопившиеся элементы, относящиеся к кешу. Если предыдущий метод не помог, предлагаем воспользоваться этим. Не спешите скачивать сторонние программы для очистки ПК от мусора, поскольку с удалением временных файлов вполне справляется встроенное в Windows 10 средство.
Способ 5: Замена системных файлов
Системные файлы, используемые для экрана блокировки «Windows: интересное», создаются в Windows 10 автоматически. Если такой режим не используется, то и файлы не задействованы. При обращении к ним могут возникнуть проблемы, если вдруг в коде возникли какие-то сбои или файлы были созданы некорректно. Решить эту ситуацию можно их заменой, то есть потребуется удалить текущие файлы конфигурации, чтобы они далее создались автоматически повторно.
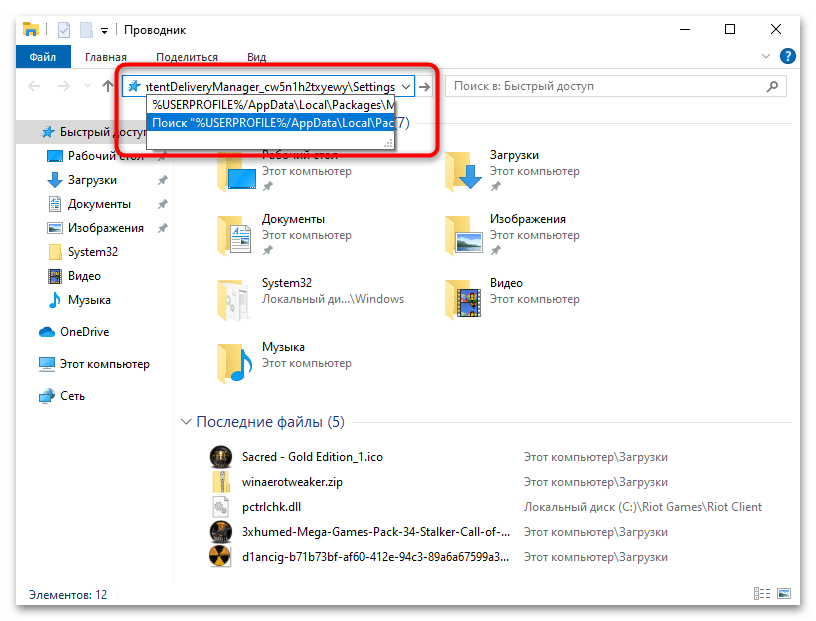
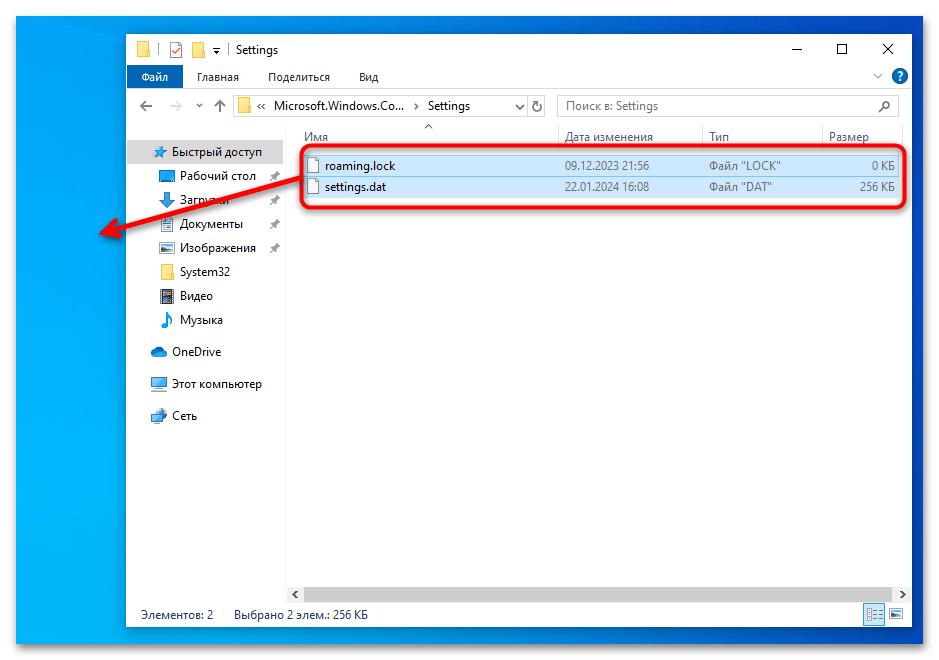
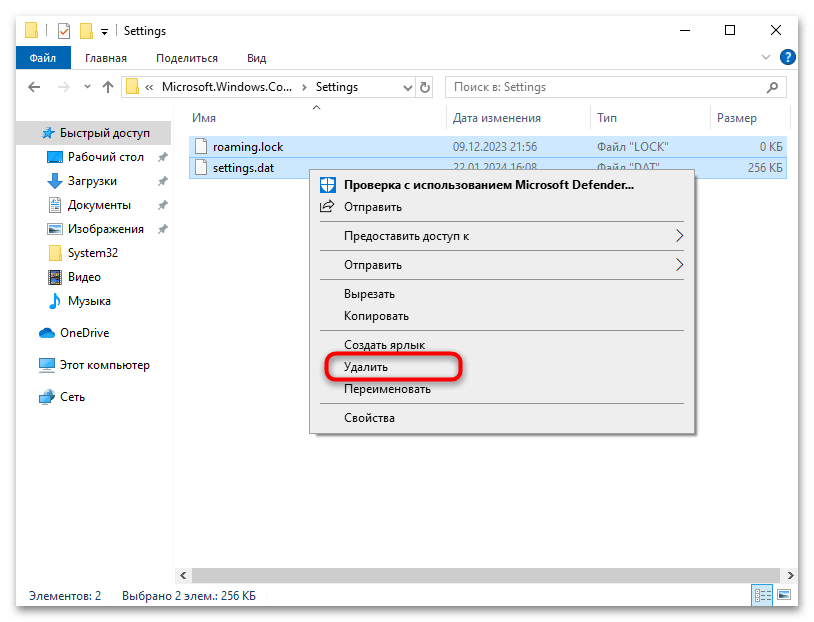
- В «Проводнике» перейдите по пути
%USERPROFILE%/AppData\Local\Packages\Microsoft.Windows.ContentDeliveryManager_cw5n1h2txyewy\Settings. - Отыщите тут файлы «roaming.lock» и «settings.dat». Сначала скопируйте их в любое удобное расположение на ПК, чтобы иметь возможность восстановить в случае надобности. Проще всего перенести их на рабочий стол.
- Оригинальные файлы удалите через контекстное меню, перезагрузите ПК и проверьте результат использования данного метода.
Способ 6: Редактирование локальной групповой политики
Если у вас на компьютере установлена Windows 10 Pro, появляется возможность использовать «Редактор локальной групповой политики». В нем присутствуют сотни настроек для пользователей и всего ПК. В рамках этой статьи будет рассмотрен только один параметр. Необходимо проверить его состояние и отключить, если по каким-то причинам он будет активен. Параметр отвечает за отключение изменения изображений для экрана блокировки, а его поиск и настройка выглядят так:
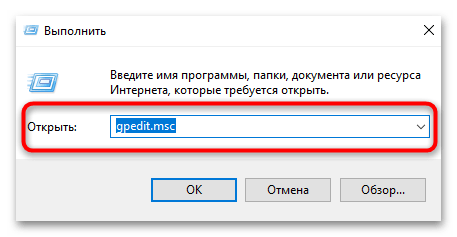
- Щелкните правой кнопкой мыши по «Пуску» и из контекстного меню выберите пункт «Выполнить».
- Введите команду
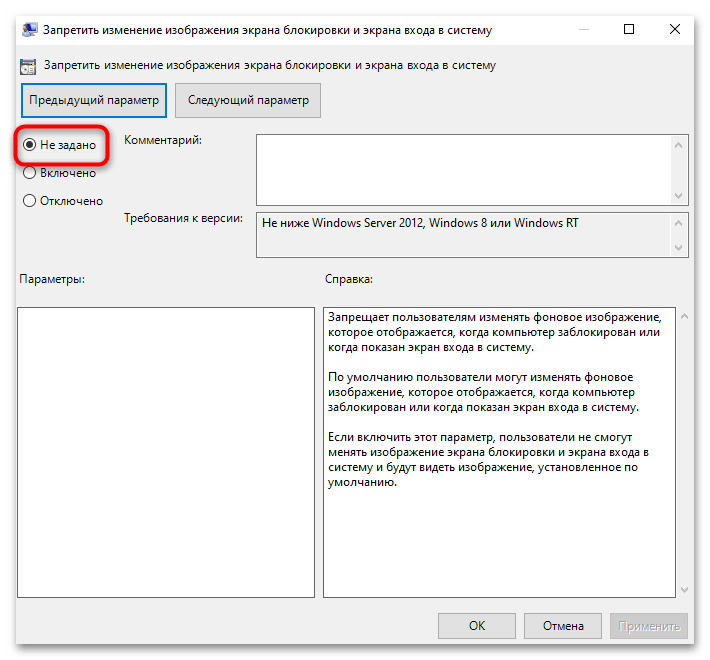
gpedit.mscи нажмите Enter для ее применения. - В окне «Редактора локальной групповой политики» разверните ветку «Конфигурация компьютера», далее перейдите в «Административные шаблоны» — «Панель управления» — «Персонализация».
- Дважды кликните по политике «Запретить изменение изображения экрана блокировки и экрана входа в систему», чтобы открыть ее «Свойства».
- Смените значение на «Не задано» или «Отключено». Примените изменения и перезагрузите компьютер.


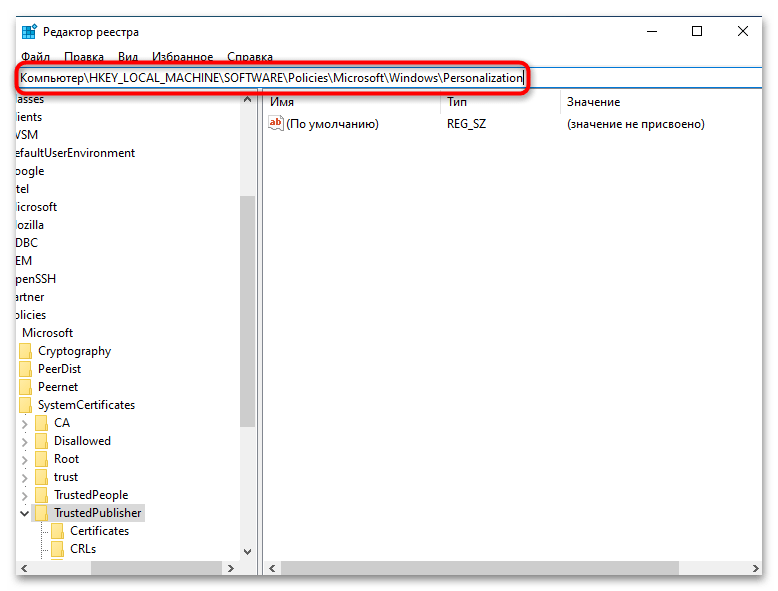
Способ 7: Редактирование реестра
Редактирование реестра можно использовать, если в вашей Windows 10 нет «Редактора локальной групповой политики» или же до сих пор решение найдено не было. Понадобится отыскать всего один параметр, который может быть связан с ограничением на изменение экрана блокировки. Для него необходимо установить значение на отключение или просто удалить, что приведет к такому же результату.
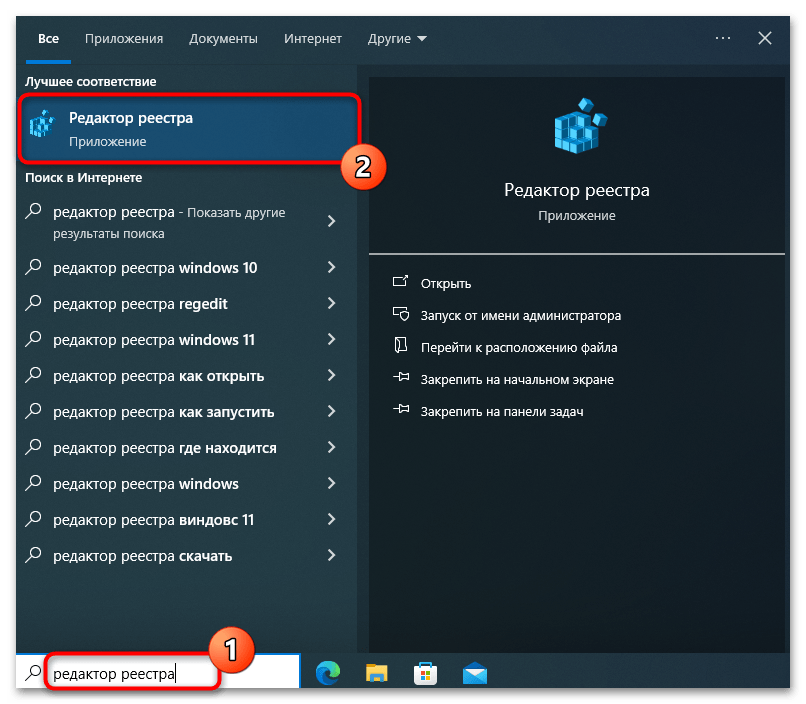
- Откройте «Пуск», отыщите «Редактор реестра» и запустите данное приложение.
- В нем перейдите по адресу
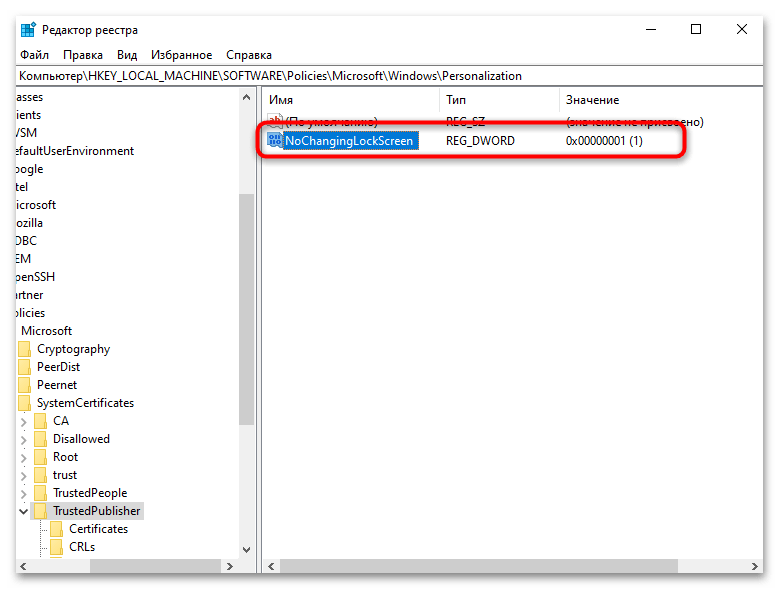
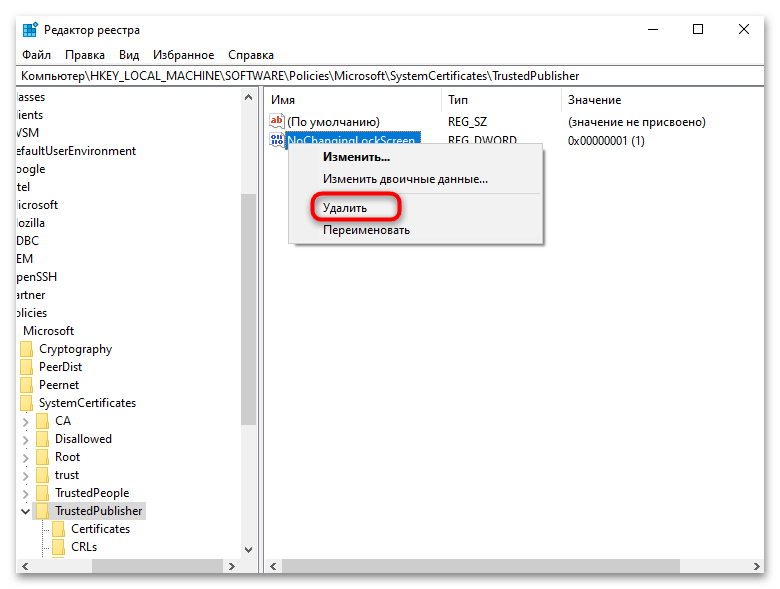
HKEY_LOCAL_MACHINE\SOFTWARE\Policies\Microsoft\Windows\Personalization, вставив этот путь в верхнюю строку. - Если справа присутствует параметр «NoChangingLockScreen», то как раз его и нужно изменить. Щелкните по нему дважды, чтобы открыть «Свойства».
- Задайте значение «0» для отключения ограничения на изменение экрана блокировки.
- Того же самого эффекта можно добиться и удалением этого параметра, поскольку он больше не нужен. Изменения в реестре вступают в силу только после перезагрузки компьютера.
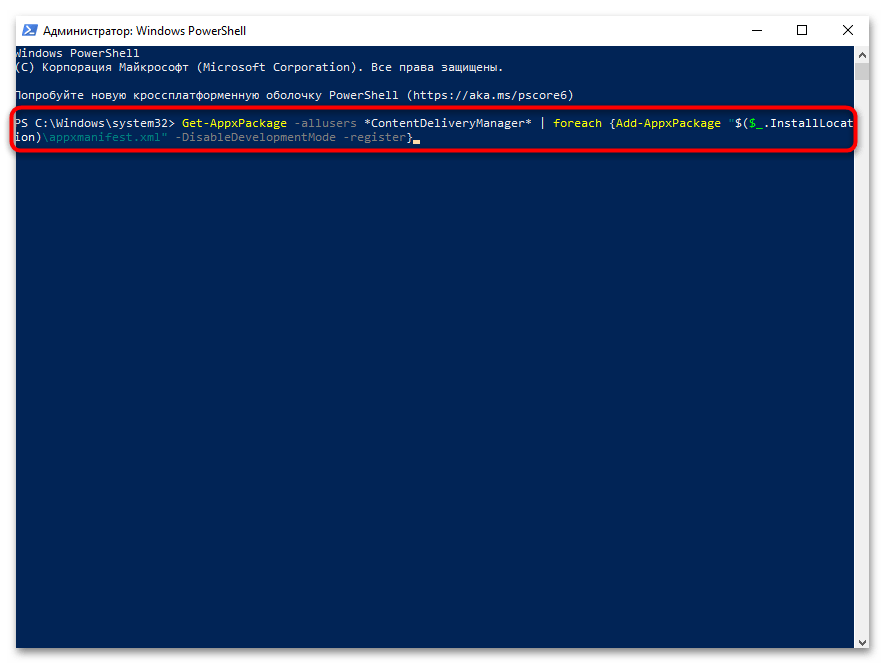
Способ 8: Повторная регистрация пакетов
Если ничего из перечисленного выше не помогло исправить ситуацию с экраном блокировки в Windows 10, попробуйте повторно зарегистрировать пакеты со стандартными файлами. Они нужны как для отображения изображений на экране блокировки, так и их смены при выборе режима «Windows: интересное». Весь процесс заключается во вводе и активации специальной команды.
- Щелкните правой кнопкой мыши по «Пуску» и из появившегося контекстного меню выберите пункт «Windows PowerShell (администратор)».
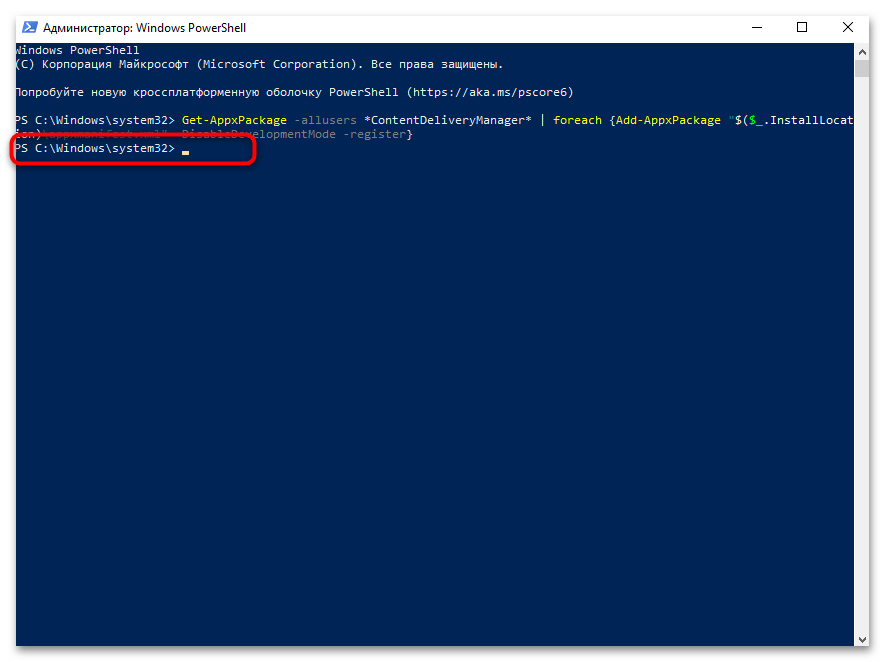
- Введите команду
Get-AppxPackage -allusers *ContentDeliveryManager* | foreach {Add-AppxPackage "$($_.InstallLocation)\appxmanifest.xml" -DisableDevelopmentMode -register}и активируйте ее нажатием по клавише Enter. - Начнется процесс проверки и скачивания файлов. Через несколько секунд должна отобразиться следующая строка ввода без каких-либо уведомлений. Это означает, что действие завершилось успешно.
Наша группа в TelegramПолезные советы и помощь