PowerShell scripts take a little setting up if you want them to run automatically at a given time. It takes more than using just a scheduled task as the script won’t run in PowerShell as an action. If you’re not looking to automatically run these scripts and instead are looking to run PowerShell scripts with keyboard shortcuts, you can do just that. There are some limitations to this process but nothing that makes the process tedious to use.
The first thing you need is the PowerShell script. Go ahead and create it. Move it somewhere you know you won’t delete it by accident. Once you’ve done that, go to your desktop and right-click on an empty area. From the context menu, select New>Shortcut.
In the location field, enter the following and make sure you replace “path-to-script” with the complete path to the PowerShell script you want to run with a keyboard shortcut.
%SystemRoot%\system32\WindowsPowerShell\v1.0\powershell.exe -ExecutionPolicy Bypass -File "path-to-script"
Example
%SystemRoot%\system32\WindowsPowerShell\v1.0\powershell.exe -ExecutionPolicy Bypass -File "C:\Users\fatiw\Desktop\toastNotification.ps1"
Click Next, and enter a name for the shortcut. If you want, you can also change the icon that the shortcut uses. By default, it will use the PowerShell icon.
After you’ve created the shortcut, right-click it and select Properties from the context menu. Go to the Shortcut tab, click inside the ‘Shortcut key’ field, and record the keyboard shortcut that you want to use to run the app.
You only need to enter a letter or number. The Ctrl+Alt keys are added by default and will be part of all keyboard shortcuts for running apps/shortcuts to apps.
That should do the trick. You can now run the script with the shortcut that you recorded.
Limitations
I mentioned earlier that this method has limitations, though they’re not very restricting. The limitation is that the shortcut, the one you created, must be placed on the desktop or added to the Start Menu. If you move the shortcut anywhere else, e.g., to a different drive on your PC, or nest it inside a folder, the keyboard shortcut will not be able to run the script.
Keeping the script on your desktop is really the most reliable way to run scripts with a keyboard shortcut. It seems that using the Pin to Start option in the shortcut’s menu doesn’t really do the trick and neither does adding it to the Start Menu folder. It may have to do with the script I tested this out on so go ahead and try it out for yourself. If adding the shortcut to the Start Menu won’t work, you’re going to have to place it on your desktop.

Fatima Wahab
Fatima has been writing for AddictiveTips for six years. She began as a junior writer and has been working as the Editor in Chief since 2014.
Fatima gets an adrenaline rush from figuring out how technology works, and how to manipulate it. A well-designed app, something that solves a common everyday problem and looks
F1 |
Editing text(Script pane) Help. Important: You can specify that F1 help comes from the TechNet Library on the web or downloaded Help (see Update-Help). To select, click Tools, Options, then on the General Settingstab, set or clear Use local help content instead of online |
Ctrl + C |
Editing text(Script pane, Command Pane, Output Pane) Copy |
Ctrl + X |
Editing text(Script pane) Cut |
Ctrl + M |
Editing text(Script pane) Expand or Collapse Outlining |
Ctrl + F |
Editing text(Script pane) Find in Script |
F3 |
Editing text(Script pane) Find Next in Script |
↑ Shift + F3 |
Editing text(Script pane) Find Previous in Script |
Ctrl + ] |
Editing text(Script pane) Find Matching Brace |
Ctrl + V |
Editing text(Script pane, Command Pane) Paste |
Ctrl + Y |
Editing text(Script pane, Command Pane) Redo |
Ctrl + H |
Editing text(Script pane) Replace in Script |
Ctrl + S |
Editing text(Script pane) Save |
Ctrl + A |
Editing text(Script pane, Command Pane, Output Pane) Select All |
Ctrl + J |
Editing text(Script pane, Command Pane) Show Snippets |
Ctrl + Z |
Editing text(Script pane, Command Pane) Undo |
Ctrl + N |
Running scriptsNew |
Ctrl + O |
Running scriptsOpen |
F5 |
Script debuggingRun/Continue |
F8 |
Running scriptsRun Selection |
Ctrl + Break |
Running scriptsStop Execution. Ctrl + C can be used when the context is unambiguous (when there is no text selected). |
Ctrl + ⭾ Tab |
Windows PowerShell tabsNext Windows PowerShell tab. This shortcut works only when no files are open on any Windows PowerShell tab |
Ctrl + ↑ Shift + ⭾ Tab |
Windows PowerShell tabsPrevious PowerShell tab. This shortcut works only when no files are open on any Windows PowerShell tab |
Ctrl + D |
Customizing the viewGo to Command (v2) or Console (v3 and later) Pane |
Ctrl + ↑ Shift + O |
Customizing the viewGo to Output Pane (v2 only) |
Ctrl + I |
Customizing the viewGo to Script Pane |
Ctrl + R |
Customizing the viewHide Script Pane |
Ctrl + 1 |
Customizing the viewMove Script Pane Up |
Ctrl + 2 |
Customizing the viewMove Script Pane Right |
Ctrl + 3 |
Customizing the viewMaximize Script Pane |
Ctrl + + |
Customizing the viewZoom In |
Ctrl + - |
Customizing the viewZoom Out |
F11 |
Script debuggingStep Into |
F10 |
Script debuggingStep Over |
↑ Shift + F11 |
Script debuggingStep Out |
Ctrl + ↑ Shift + D |
Script debuggingDisplay Call Stack |
Ctrl + ↑ Shift + L |
Script debuggingList Breakpoints |
F9 |
Script debuggingToggle Breakpoint |
Ctrl + ↑ Shift + F9 |
Script debuggingRemove All Breakpoints |
↑ Shift + F5 |
Script debuggingStop Debugger |
C |
Script debuggingContinue |
S |
Script debuggingStep Into |
V |
Script debuggingStep Over |
O |
Script debuggingStep Out |
⤶ Enter |
Script debuggingRepeat Last Command (for Step Into or Step Over) |
K |
Script debuggingDisplay Call Stack |
Q |
Script debuggingStop Debugging |
L |
Script debuggingList the Script |
H |
Script debuggingDisplay Console Debugging Commands |
? |
Script debuggingDisplay Console Debugging Commands |
Ctrl + W |
Windows PowerShell tabsClose PowerShell Tab |
Ctrl + T |
Windows PowerShell tabsNew PowerShell Tab |
Alt + F4 |
Starting and exitingExit |
Ctrl + ↑ Shift + P |
Starting and exitingStart PowerShell.exe (Windows Powershell console) |
PowerShell shortcuts streamline your command-line experience by allowing you to execute common tasks efficiently with concise commands.
Here’s a simple example of a PowerShell shortcut that retrieves the current directory:
Get-Location
Understanding the PowerShell Command Line Interface
PowerShell has grown to encompass a robust command line interface promoting automation and simplified management of tasks in Windows environments. To get started, it’s crucial to understand the environments available, notably the PowerShell console, Integrated Scripting Environment (ISE), and third-party editors like Visual Studio Code.
PowerShell Console vs ISE and VSCode
While the PowerShell console focuses on command execution, ISE provides a more visual approach with features like syntax highlighting and integrated debugging tools. Visual Studio Code, on the other hand, extends beyond PowerShell with significant plugins that enhance coding experience with IntelliSense and Git integration.
Basic Navigational Shortcuts
Mastering basic navigational shortcuts significantly improves efficiency when interacting with PowerShell.
Using Tab for Autocomplete
One of the most valuable shortcuts is the use of the Tab key, which allows users to autocomplete commands. For instance, typing `Get-` and hitting Tab will toggle through available cmdlets that start with those letters, saving crucial time and reducing typographical errors.
Using the Up and Down Arrow Keys
Navigating through your command history with the Up and Down arrow keys will enable you to quickly access previous commands. This feature becomes particularly useful during extensive scripting sessions where retyping commands can become redundant.
Clear-Host Command
At times, your console may become cluttered with output. The `Clear-Host` command can be employed to quickly clean the console for improved readability. Simply type:
Clear-Host
Executing this command provides a fresh workspace, which is especially helpful when working with numerous commands and outputs.
Essential Keyboard Shortcuts in PowerShell
Keyboard shortcuts streamline command editing and console navigation.
Editing and Navigation Shortcuts
Utilizing the Home and End buttons enables quick movement to the start or end of a command line, creating a smoother workflow when editing or correcting commands.
Ctrl + A: Select All
The shortcut Ctrl + A allows users to select all text in the console. This is particularly useful for copying code snippets or outputs that you want to manipulate further.
Ctrl + C/Ctrl + V: Copy/Paste
In most contexts, copying and pasting text before executing commands is straightforward. However, PowerShell emphasizes using Ctrl + Shift + C to copy and Ctrl + Shift + V to paste. This differentiation prevents conflicting with the default behavior of these shortcuts in other applications.
Ctrl + Up/Down Arrow
Scrolling through previous output with Ctrl + Up/Down Arrow will enable quicker analysis of results without the need to rerun commands.
Frequently Used PowerShell Cmdlets
Alias Overview
In PowerShell, an alias is a shorthand reference to a cmdlet or function, effectively reducing the typing burden on users. Through the use of aliases, users can navigate and execute commands more fluidly.
Commonly Known Aliases
PowerShell comes with many predefined aliases, enhancing command expediency. For example:
-
`ls` for `Get-ChildItem`
Typing `ls C:\` will display the contents of the C drive, much like using the traditional `dir` command in CMD. -
`cp` for `Copy-Item`
To copy a file quickly, using `cp file.txt C:\Backup\` allows for a straightforward transfer without the verbose syntax.
Creating Your Own Aliases
Crafting personalized aliases can further optimize your workflow. You can use the following code to create a simple alias:
Set-Alias -Name gs -Value Get-Service
This allows you to type `gs` instead of the full command, making repeated calls to check service status much quicker. You can ensure these aliases persist across sessions by adding them to a PowerShell profile.
Shortcuts for Command Execution
Piping and Redirection Shortcuts
PowerShell leverages powerful piping functionality allowing the output of one command to be passed as input to another. The pipe (`|`) is instrumental in building efficient one-liners. For example, you can filter for CPU-intensive processes as follows:
Get-Process | Where-Object { $_.CPU -gt 100 }
Output redirection is another fundamental command. By using the `>` operator, you can dump the results of a command into a file:
Get-Process > Processes.txt
Utilizing `>>` allows appending results to an existing file, preserving previous information.
Best Practices for Efficient Scripting
Script Optimization Techniques
Creating functions for repetitive tasks can elevate your scripting capabilities. For instance, the following simple function helps to retrieve the latest file in a directory:
function Get-LatestFile {
    param([string]$path)
    Get-ChildItem $path | Sort-Object LastWriteTime -Descending | Select-Object -First 1
}
This function optimizes repeated actions and makes scripts cleaner and more maintainable.
Using Parameters for Flexibility
Incorporating parameters allows you to customize the function further. For example, you can extend `Get-LatestFile` to accept file types or limits on the number of files returned, making it a robust utility.
Utilizing Integrated Scripts with Shortcuts
Combining the use of shortcuts and functions can lead to highly efficient scripting practices, minimizing redundancy and enhancing maintainability.
Common Mistakes and How to Avoid Them
Mistakes Beginners Make
Often, beginners neglect the importance of thorough documentation, leading to confusion in complex scripts. Additionally, a reliance on memorization of commands can hinder learning.
Best Practices to Mitigate Errors
To avoid these pitfalls, it’s highly recommended to frequently refer to official PowerShell documentation and surrounding community support. Testing and breaking down scripts can expose errors early, leading to more successful automation efforts.
Conclusion
Enhancing your workflow with PowerShell shortcuts can transform your command line interactions into a streamlined, efficient experience. Your ability to leverage autocomplete features, keyboard shortcuts, and commands will improve your productivity significantly. Regular practice and exploration of advanced commands and scripting techniques will yield greater results and deeper comprehension of the PowerShell environment.
Additional Resources
For those looking to deepen their knowledge, several resources can be invaluable. Explore the official PowerShell documentation for comprehensive cmdlet listings and advanced functionalities. Engaging with the PowerShell community and forums can provide additional insights, troubleshooting advice, and support during your learning journey. Consider online courses to gain structured knowledge and hands-on practice for mastery of PowerShell.
Command Prompt and PowerShell are two essential tools for a command-line user on Windows PCs. If you access these tools frequently, you can add the Command Prompt and PowerShell shortcuts to your desktop to quickly access them.
You can even assign a keyboard shortcut to these apps.
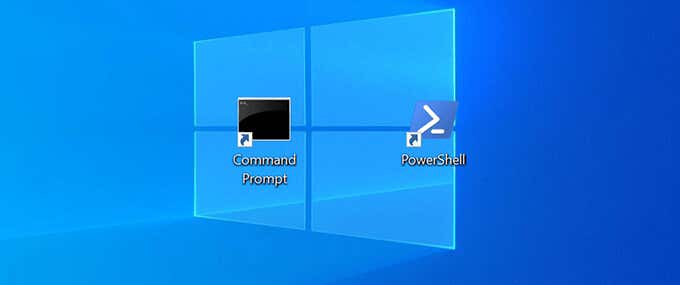
Create a Command Prompt Desktop Shortcut on Windows 10
You can add a Command Prompt shortcut to your desktop the same way you add any other shortcut. Once the shortcut is added, you can change its name and icon to your liking.
To start:
- Open the Start menu and search for Command Prompt.
- Right-click Command Prompt in the search results and select Open file location.
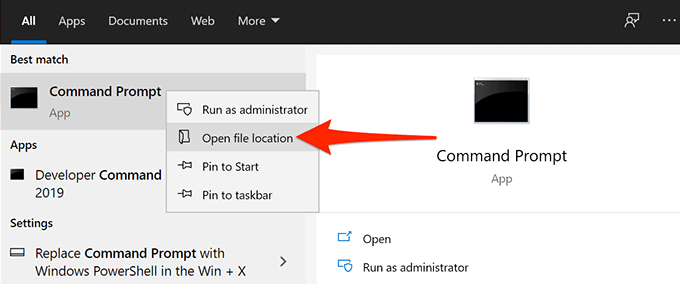
- A File Explorer window opens with a Command Prompt shortcut. Here, right-click the Command Prompt shortcut again and select Open file location.
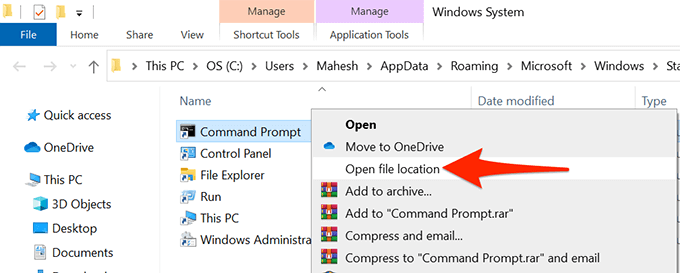
- You should now see a file called cmd.exe, which is the Command Prompt executable file. Right-click the cmd.exe file and select Send to > Desktop (create shortcut).
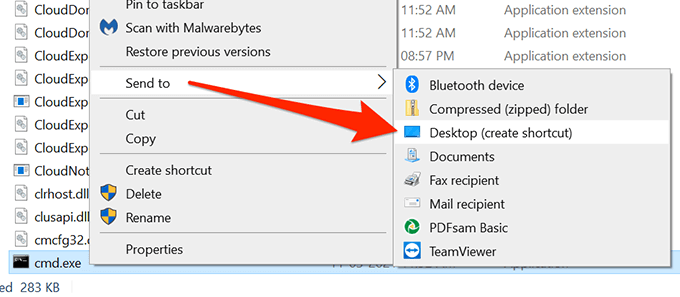
- Access your desktop, and you should find a new shortcut called cmd.exe – Shortcut there. Double-click this shortcut to open Command Prompt.
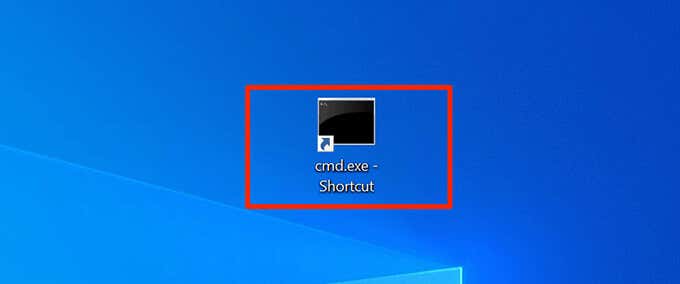
- To rename the shortcut, right-click the shortcut, select Rename, enter a new name, and press Enter.

Run the Command Prompt Shortcut With Admin Rights
To run certain commands, you’d need admin privileges in Command Prompt. You can configure your desktop Command Prompt shortcut so that it always opens the tool with admin privileges.
To do this:
- Right-click the Command Prompt shortcut on your desktop and select Properties.
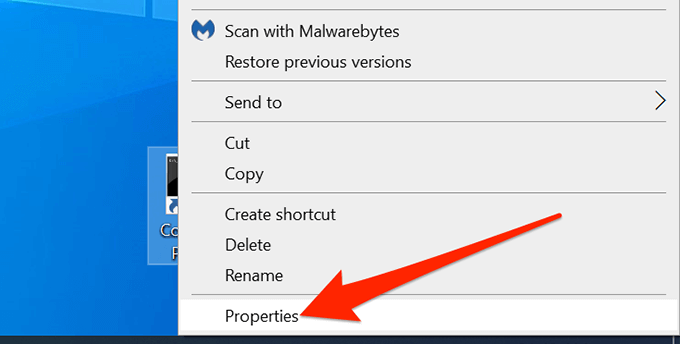
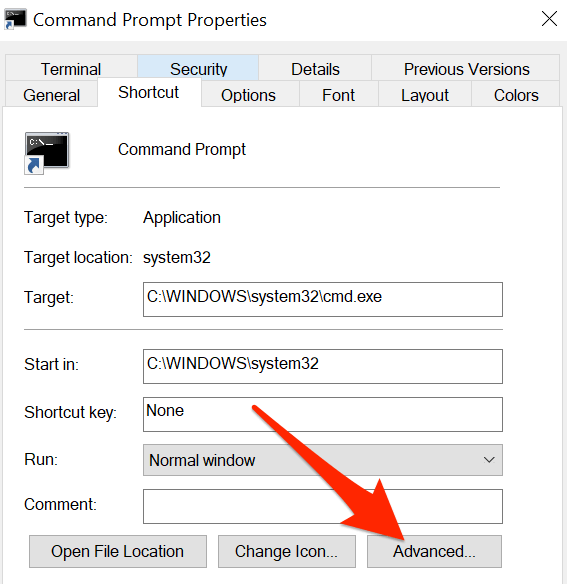
- On the Properties window, select the Shortcut tab at the top.
- In the Shortcut tab, select the button that says Advanced.
- A new window opens on your screen. Here, enable the Run as administrator checkbox and select OK at the bottom.
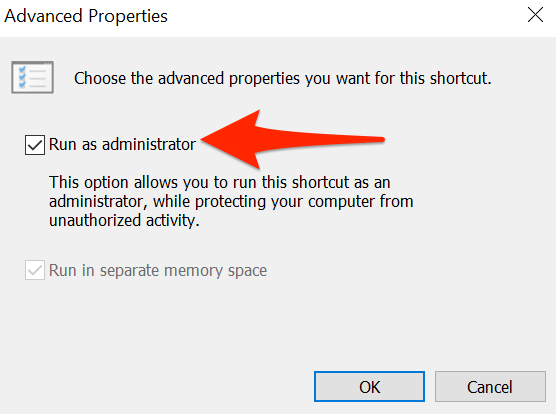
- Go back to the Properties window, select Apply and then select OK at the bottom.
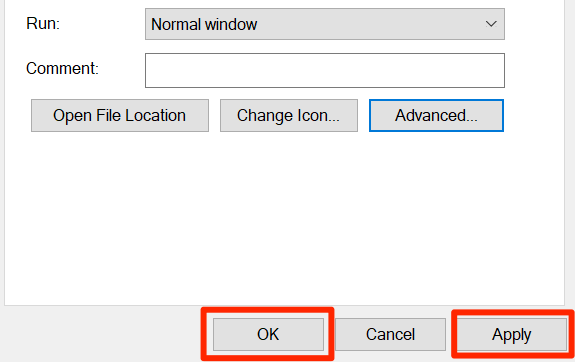
- Double-click the Command Prompt shortcut, and it should now open with admin privileges.
Create a Keyboard Shortcut to Launch Command Prompt
You can make opening Command Prompt even easier by assigning a keyboard shortcut to the tool’s desktop shortcut. Windows allows you to choose a custom combination of keys for the shortcut.
To assign a shortcut:
- Right-click the Command Prompt shortcut on your desktop and select Properties.
- Select the Shortcut tab at the top of the Properties window.
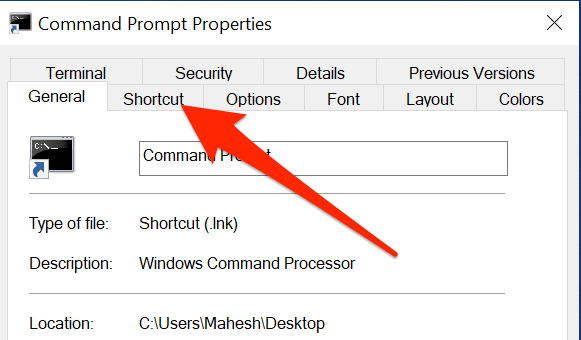
- In the Shortcut tab, select the Shortcut key field. Know that whatever keyboard shortcut you assign here, Windows will prefix it with Ctrl + Alt.
- Press the key that you want to assign to the Command Prompt shortcut. For example, press C. The Shortcut key field should display Ctrl + Alt + C.
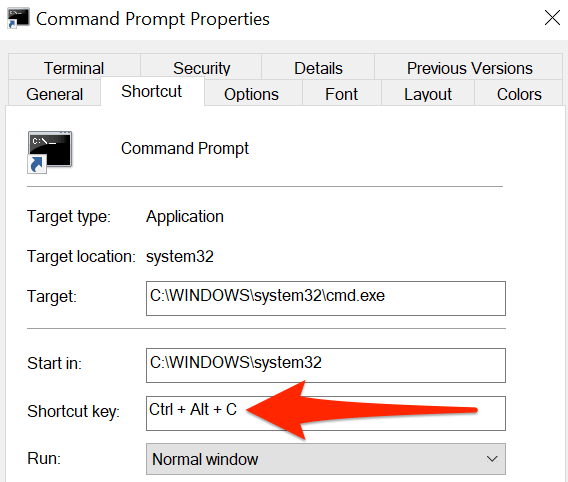
- Then, select Apply followed by OK at the bottom to save your changes.
Add the Command Prompt Shortcut to the Windows Taskbar
You may want to pin Command Prompt to your taskbar to open the tool with a single click:
- Right-click the Command Prompt shortcut on your desktop and select Pin to taskbar.
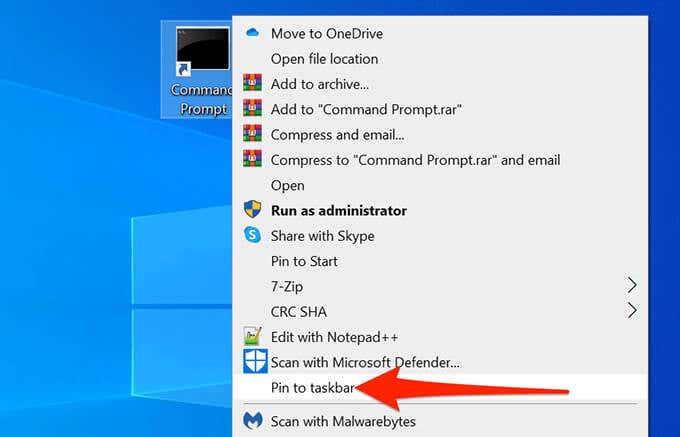
- The tool is now on your taskbar.
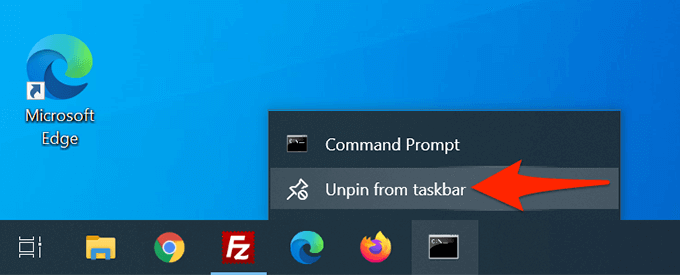
- To remove this taskbar shortcut, right-click the shortcut and select Unpin from taskbar.
Create a PowerShell Desktop Shortcut on Windows 10
If you use PowerShell, adding PowerShell’s shortcut to your desktop is as easy as adding any other app’s shortcut.
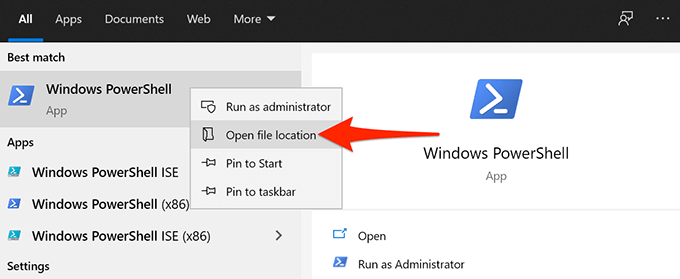
- Launch the Start menu and search for Windows PowerShell.
- Right-click Windows PowerShell in the search results and select Open file location.
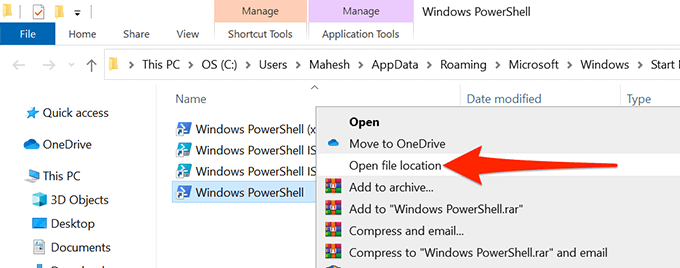
- On the following screen, right-click Windows PowerShell and select Open file location.
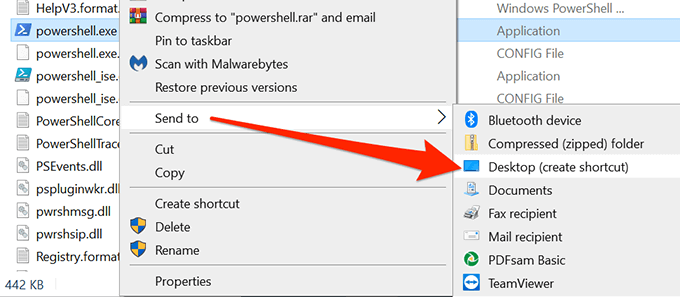
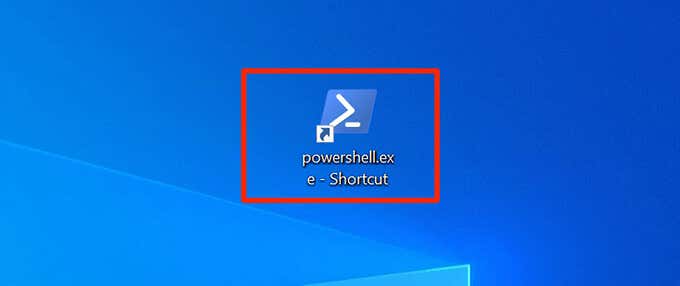
- You should now see powershell.exe. Right-click this file and select Send to > Desktop (create shortcut).
- You now have a PowerShell shortcut on your Windows desktop.
Run the PowerShell Shortcut With Admin Rights
If you run commands that require admin privileges, configure the PowerShell shortcut to always open the tool with admin rights.
- Right-click the PowerShell shortcut on your desktop and select Properties.
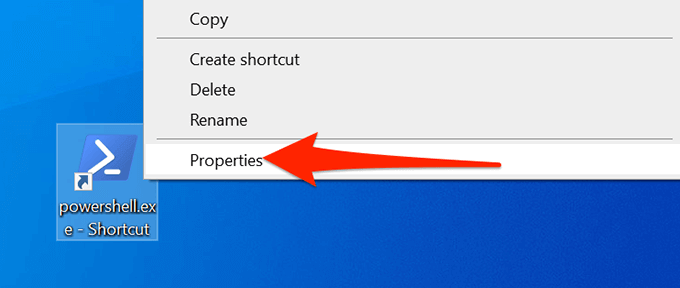
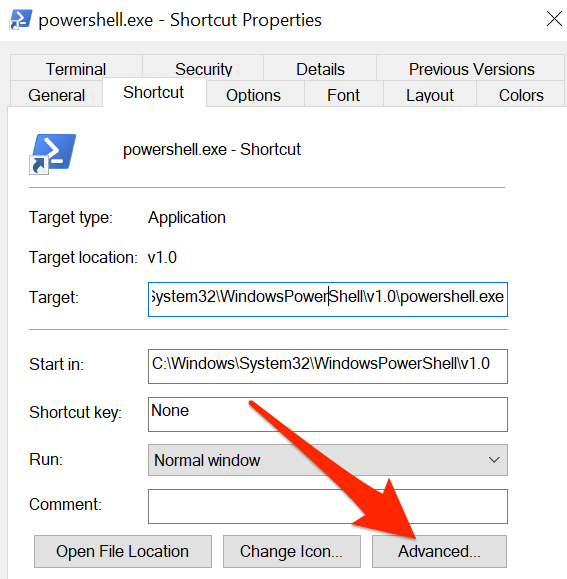
- Select the Shortcut tab in Properties.
- Select the Advanced button in the Shortcut tab.
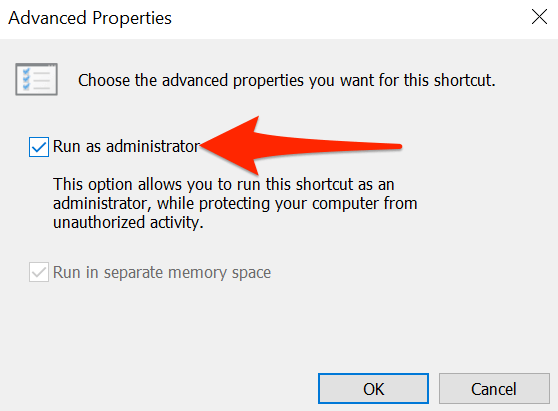
- In the Advanced Properties window that opens, activate the Run as administrator box and then select OK at the bottom.
- Select Apply and then select OK at the bottom of the window.
- Your PowerShell shortcut will now always open with admin rights.
Create a Keyboard Shortcut to Launch PowerShell
You can assign a shortcut to the PowerShell desktop so that the tool opens with a keystroke.
- Right-click the PowerShell shortcut on your desktop and select Properties.
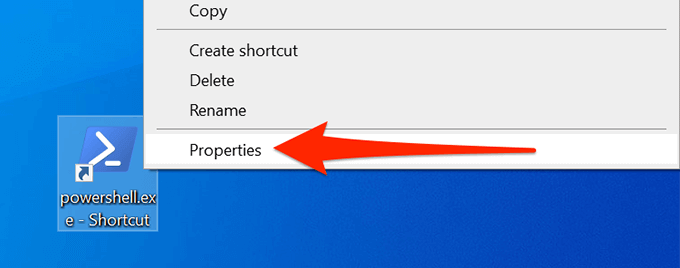
- Select the Shortcut tab in Properties.
- Select the Shortcut key field and type the keyboard shortcut you want to use. Keep in mind that your shortcut will be prefixed with Ctrl + Alt.
- For example, if you assign P, Windows will treat it as Ctrl + Alt + P.
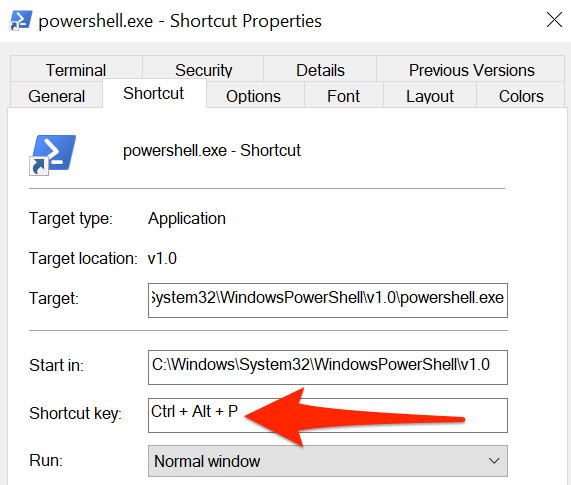
- Select Apply and then select OK at the bottom to save your shortcut.
Add the PowerShell Shortcut to the Windows Taskbar
For quick access, you can add the PowerShell shortcut to your taskbar.
- Right-click the PowerShell shortcut on your desktop and select Pin to taskbar.
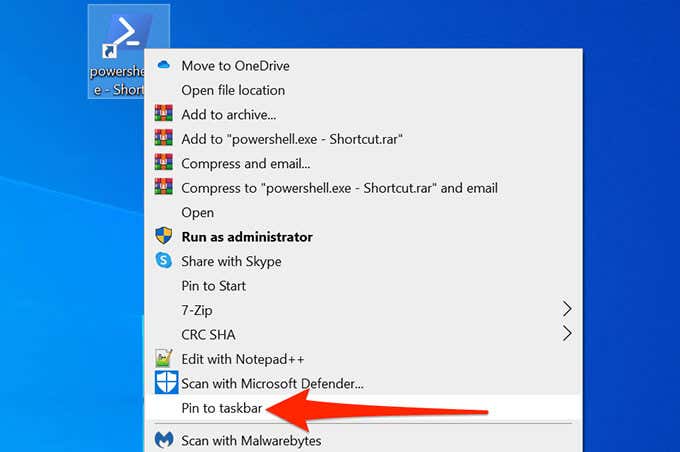
- A PowerShell icon is now added to your taskbar.
- To remove this shortcut, right-click the shortcut on the taskbar and choose Unpin from taskbar.
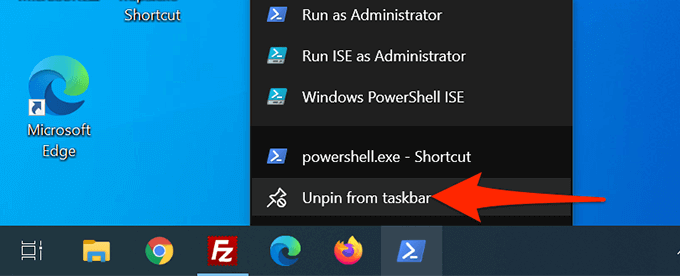
Bonus Tip: Open Command Prompt or PowerShell’s Taskbar Shortcut With a Keyboard Shortcut
By default, Windows 10 assigns a keyboard shortcut to each app on the taskbar. These shortcuts use a numeric system. Here, the app on the farthest left side of the taskbar is numbered one, and then two, three, and so on.
To use this shortcut, you’d press the Windows key and then the number of your app on the taskbar. For example, if Command Prompt is the fifth numbered shortcut on the taskbar, you’d use Windows + 5 to open the utility.
You can drag the icons on the taskbar in any direction (left or right), and their shortcuts will change accordingly.
Related Posts
- How to Fix a “This file does not have an app associated with it” Error on Windows
- How to Fix an Update Error 0x800705b4 on Windows
- How to Resolve “A JavaScript error occured in the main process” Error on Windows
- How to Fix the Network Discovery Is Turned Off Error on Windows
- How to Change Folder Icons in Windows
