
После подключения компьютера с Windows 11 к внешним дисплеям вы можете настроить параметры для каждого из них.
Перед началом работы
Перед изменением параметров внешних мониторов обеспечьте правильное подключение. Вот что можно сделать:
-
Правильно подключите кабели к компьютеру или док-станции.
-
Проверьте наличие обновлений Windows. Чтобы проверить наличие обновлений, выберите Пуск , затем найдите параметры. Выберите Параметры > Центр обновления Windows > Проверить наличие обновлений.
Совет: Если вы используете адаптер беспроводного дисплея, подключите адаптер к порту HDMI на новых телевизорах, а затем подключите к нему компьютер по беспроводной сети. После подключения адаптера беспроводного дисплея к телевизору перейдите на Windows 11 компьютер, нажмите клавишу с логотипом Windows+ K, чтобы открыть приведение, а затем выберите адаптер беспроводного дисплея.
Изменение порядка мониторов
Этот параметр отображается, если Windows обнаруживает несколько мониторов. Каждый монитор будет пронумерован для упрощения идентификации.
Идентификация монитора
Чтобы узнать, какой номер соответствует дисплею, выберите Пуск , а затем найдите параметры. Выберите Параметры > Система > Дисплей > Идентифицировать. На экране монитора появится номер, который ему назначен.
Обнаружение монитора
Если вы подключили другой дисплей и он не отображается в настройках, выберите Пуск > Параметры > Система > Дисплей > Несколько дисплеев > Обнаружить.
Подключение беспроводного дисплея
Если вы подключили беспроводной дисплей и он не отображается в разделе Параметры, выберите Пуск > Параметры > Система > Дисплей > Несколько дисплеев > Подключиться.
Упорядочение мониторов
Если у вас несколько мониторов, вы можете изменить их порядок. Это удобно, если вы хотите, чтобы ваши мониторы соответствовали их настройке у вас дома или в офисе. В разделе параметров «Дисплей» выберите и перетащите монитор, куда хотите. Проделайте это для всех мониторов, которые нужно переместить. После получения нужного расположения нажмите Применить. Протестируйте свое новое расположение, перемещая указатель мыши на разных мониторах, чтобы убедиться в их правильной работе.
Совет: Используйте параметр Определить при упорядочении дисплеев, чтобы увидеть номер дисплея на экране.
Несколько параметров отображения
При отстыковке компьютера окна на внешнем мониторе сворачиваться. При повторной закреплении компьютера к монитору Windows помещает все точно так же, как раньше.
Чтобы настроить это поведение, выполните следующие действия:
-
Выберите Пуск > Параметры > Отображение системных >.
-
Прокрутите вниз и выберите Несколько дисплеев , чтобы развернуть этот раздел.
-
Установите флажки в соответствии со своими предпочтениями:
-
Запоминать расположения окон на основе подключения монитора
-
Свертывание окон при отключении монитора.
-
Изменение параметров мониторов
-
Изменение яркости и цвета дисплея
-
Изменение разрешения, масштабирования и макета дисплея
-
Изменение частоты обновления отображения
Выбор варианта отображения
Чтобы изменить то, что отображается на дисплеях, нажмите клавишу с логотипом Windows+ P. Вот параметры, которые можно выбрать.
|
Если необходимо: |
Выберите |
|
Просматривать элементы только на одном мониторе. |
Только экран компьютера |
|
Просматривать одинаковые элементы на всех мониторах. |
Повторяющийся |
|
Просматривать рабочий стол на нескольких экранах. При расширении мониторов вы можете перемещать элементы между двумя экранами. |
Расширить |
|
Просматривать все только на втором мониторе. |
Только второй экран |
Все способы:
- Способ 1: Приложение «Параметры»
- Способ 2: «Панель управления NVIDIA»
- Способ 3: Сторонние программы
- NirCmd
- Monitor Profile Switcher
- Вопросы и ответы: 0
Способ 1: Приложение «Параметры»
Проще всего изменить порядок подключенных к компьютеру мониторов в стандартных настройках приложения «Параметры».
- Кликните правой кнопкой мыши по рабочему столу и выберите из контекстного меню пункт «Параметры экрана» либо перейдите в приложении «Параметры» в раздел «Дисплей» или «Экран».
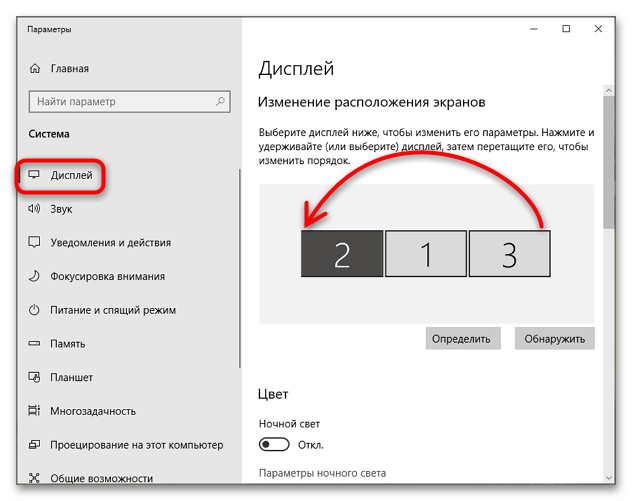
- В области «Выбрать дисплеи и изменить их порядок» захватите мышкой тот дисплей, который хотите сделать основным, и перетащите его влево.
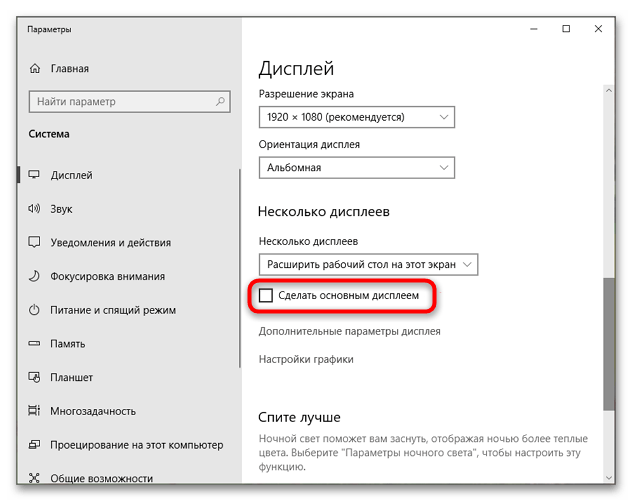
- Прокрутите содержимое окна немного вниз, найдите и активируйте опцию «Сделать основным дисплеем».
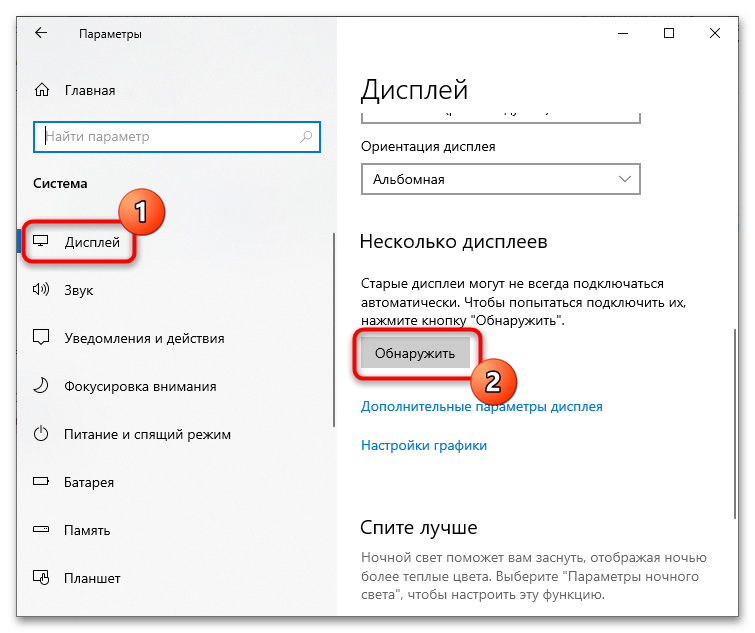
Если один из мониторов не обнаруживается, что может быть со старыми устройствами вывода видеоизображения, в разделе «Дисплей» в блоке «Несколько дисплеев» нажмите кнопку «Обнаружить».
Способ 2: «Панель управления NVIDIA»
Если на компьютере имеется дискретная видеокарта от производителя NVIDIA, изменить порядок дисплеев можно в настройках панели управления видеокартой.
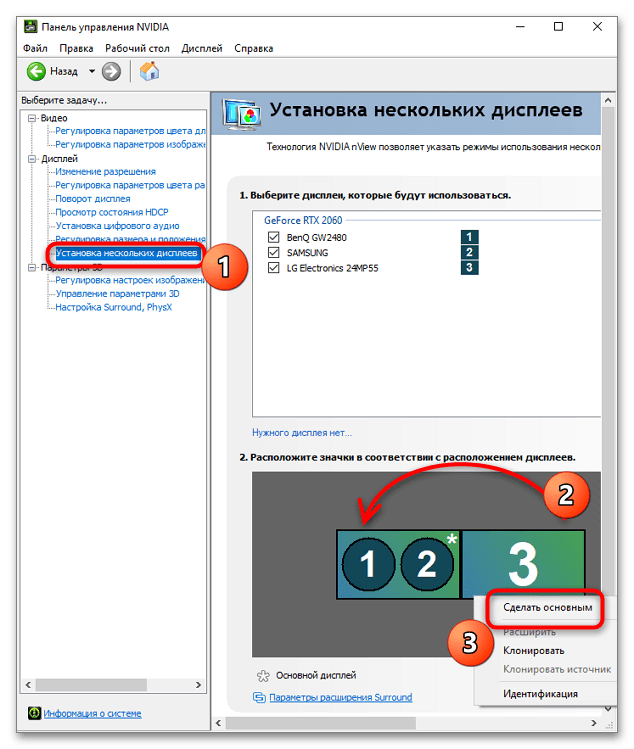
- Кликните правой кнопкой мыши по рабочему столу и выберите из контекстного меню пункт «Панель управления NVIDIA».
- Перейдите в раздел «Дисплей» → «Установка нескольких дисплеев», расположите перетаскиванием значки дисплеев в нужном порядке, а затем нажмите правой кнопкой мыши по монитору, который хотите сделать основным. Через контекстное меню задайте ему статус «Сделать основным».
Способ 3: Сторонние программы
Если менять порядок расположения мониторов приходится часто, удобнее использовать для переключения между ними сторонние приложения.
NirCmd
NirCmd – это небольшая бесплатная утилита, предназначенная для выполнения различных команд с использованием интерфейса классической «Командной строки».
Скачать NirCmd с официального сайта
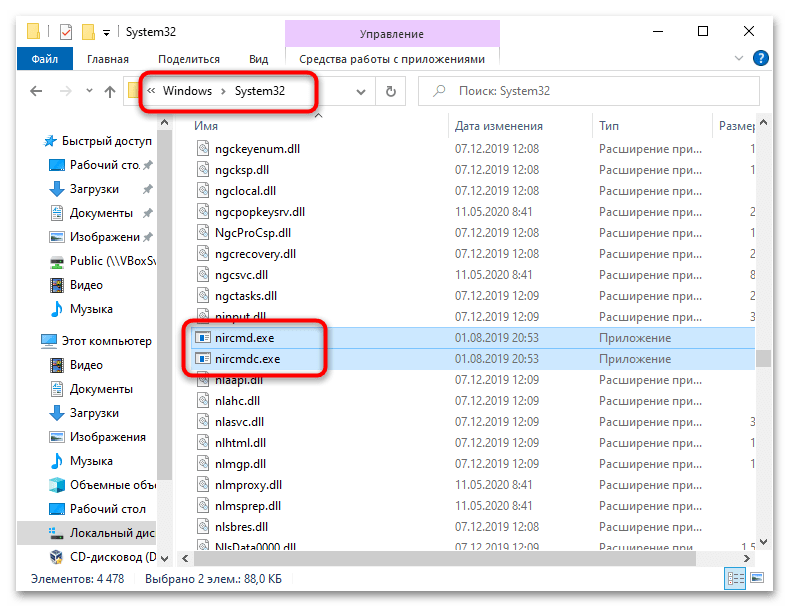
- Скачайте архив с утилитой с официального сайта и распакуйте в расположение
C:\Windows\System32. - Чтобы переключить экран, вызовите нажатием клавиш Win + R окошко быстрого выполнения команд, введите в него команду
nircmdc setprimarydisplay 1и нажмите клавишу ввода. «1» в данном примере – это номер монитора, который нужно сделать основным.
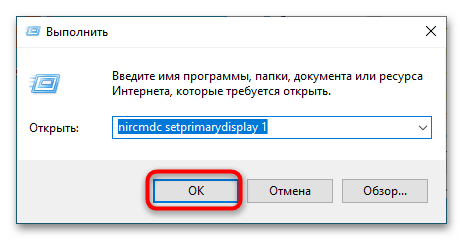
Посмотреть номера подключенных к компьютеру мониторов можно в разделе «Дисплей» или «Экран» приложения «Параметры».
Monitor Profile Switcher
Еще один бесплатный инструмент, предназначенный для быстрого переключения между мониторами. Утилита позволяет сохранять конфигурации мониторов в виде профилей и переключаться между ними из системного трея.
Скачать Profile Switcher с официального сайта
- Посетите страницу разработчика на проекте GitHub и кликните там ссылку загрузки утилиты «v0700 Download from Sourceforge.net».
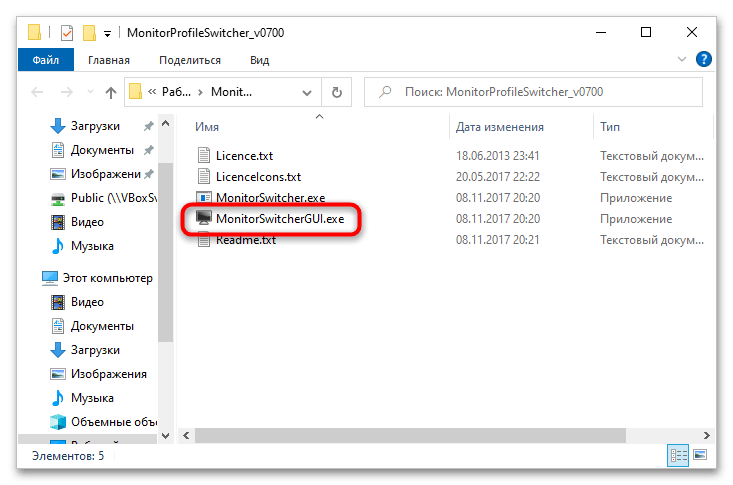
- Распакуйте архив с утилитой и запустите исполняемый файл MonitorSwitcherGUI.exe.
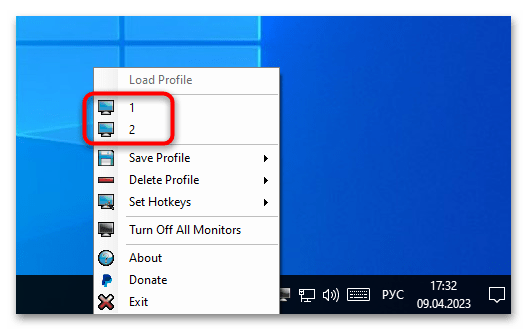
- Кликните правой кнопкой мыши по иконке приложения в области системного трея и выберите опцию «Save Profile» → «New Profile».
- В открывшемся диалоговом окошке дайте создаваемому профилю любое имя и нажмите «OK».
- Переключитесь средствами Windows 10 на другой экран и точно так же создайте второй профиль со своим именем.
- Используйте контекстное меню значка Monitor Profile Switcher для быстрого переключения между профилями, то есть мониторами.

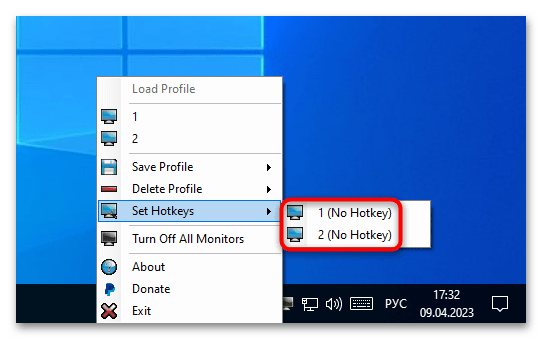
При желании каждому профилю можно назначить горячие клавиши, чтобы иметь возможность переключаться между мониторами с клавиатуры. Сделать это можно в подменю «Set Hotkeys».
Если переключаться между мониторами приходится часто, есть смысл добавить утилиту в автозагрузку.
Подробнее: Добавление программ в автозагрузку Windows 10
Наша группа в TelegramПолезные советы и помощь
To boost workflow efficiency and experience significant advantages, many users prefer to use two or more monitors. In Windows 10, setting up multiple monitors is pretty easy as you are allowed to connect a decent number of virtual desktops without taking the help of any third-party software. Such setup doesn’t only look great but significantly improves productivity moreover keeps the PC organized.
Multi-monitor setup is more efficient when you know how to switch between monitors in Windows 10 furthermore configure them properly. By dragging your mouse, pressing a particular hotkey, and adjusting settings, you can easily switch between the screens plugged into your GPU.
Switch between monitors windows 10
Here is how to switch between monitors windows 10 –
1] Using the mouse
The most convenient approach to switch between screens is using the mouse pointer. By moving the cursor toward the right or left edge of your main screen, you can shift from one display to another. Before you can use the mouse to move between displays, you must know if the second monitor is on the right edge or left. For that –
- Press – Windows + I.
- Click – System.
- Select – Display.
- From the right-pane hover and click the display as you want to switch.
- Click – Apply.
2] Keyboard shortcut to switch monitors
- Press – Windows + P.
- From the Project menu, choose the display you want to keep active. For example, PC screen only or Second screen only.
- Now, you will see the image on opted screen only.
3] Adjust Display settings
You can switch between monitors windows 10 through the Windows settings app too. To do so –
- Press – Windows + D.
- Right-click on an empty space and choose – Display settings.
- Move to the right-hand side.
- Click the drop-down list present beneath Multiple displays.
- Pick the display you want to work with.
See – How to Use SensorExplorer 2.0 to Check Dual Screen in Windows 10.
Methods list:
1] Move between monitors using mouse
2] Make use of keyboard shortcut
3] Adjust Display settings
That’s all!!!
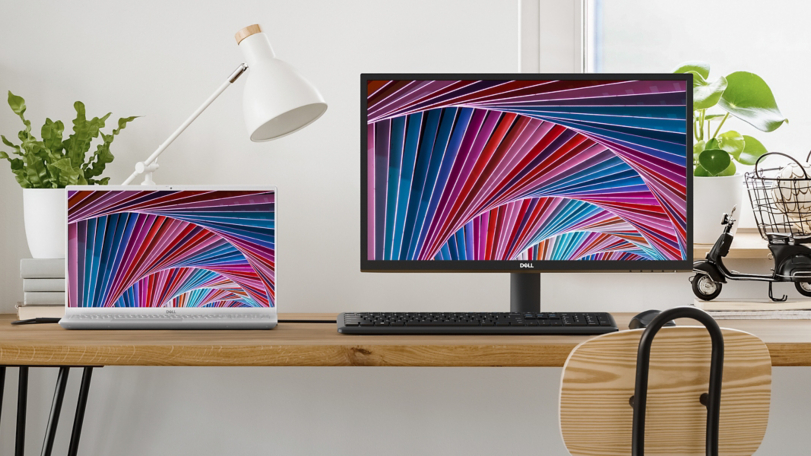
(Image credit: Dell)
If you’re a content creator, programmer, data analyst, or gamer, a system with multiple monitors not only looks great but can significantly improve productivity when multitasking with more than one app. However, a multi-monitor setup is only practical if you configure it correctly.
Windows 10 has several features and settings to support one, two, three, four, and even more monitors without needing third-party software for the best experience.
In this how-to guide, I’ll provide tips on configuring and using a multi-monitor setup, whether you’re connecting an external display to your laptop or two, three, or more monitors to your workstation.
Before configuring a multi-monitor setup
Before configuring multiple monitors on your computer, ensure the required cables are connected to the monitors and the computer. This includes connecting power and video signals using VGA, DVI, HDMI, or DisplayPort (recommended) cables.
If you’re unsure, confirm the monitor’s make and model (usually from a sticker on the back) and search online for the manufacturer’s manual to understand better how to connect the display.
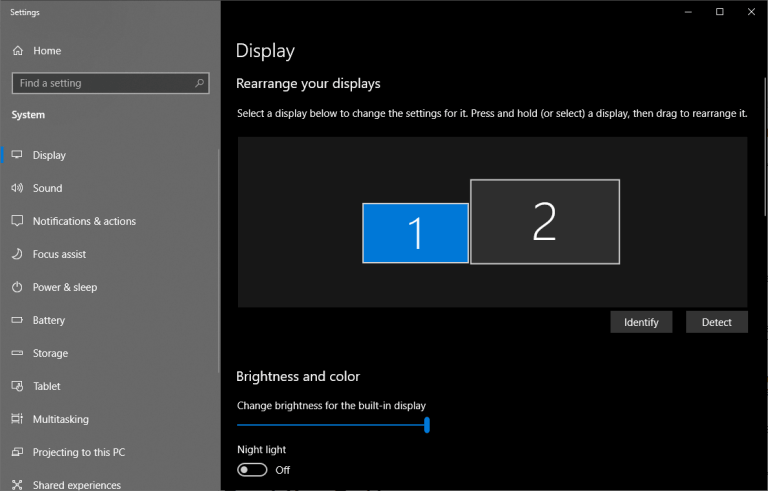
How to rearrange multiple displays on Windows 10
While you can connect a monitor to any of the available video ports on the graphics card, it’s easy to plug them in the wrong order when setting up a dual-monitor or triple-monitor setup. Although they will still work, you may run into issues using the mouse and running applications until you rearrange them correctly.
To rearrange monitors on Windows 10, use these steps:
All the latest news, reviews, and guides for Windows and Xbox diehards.
- Open Settings.
- Click on System.
- Click on Display.
- Drag and drop each display to rearrange them according to their physical layout on your desktop under the «Rearrange your displays» section.

- Quick tip: When rearranging monitors in the «Display» settings page, ensure all monitors align at the top perfectly. Otherwise, you’ll have problems moving the mouse cursor between monitors from the corners.
- Click the Apply button.
Once you complete the steps, Windows 10 will save the physical layout, and you can work across each display and run apps without issues.
If you’re unsure which monitor you’re selecting, click the «Identify» button. If one of the monitors isn’t showing up, ensure it’s receiving power and connected correctly, and click the «Detect» button. If you still have problems, reset the connections (or restart the computer) and try the «Detect» button again.
How to adjust displays scale and layout on Windows 10
Windows 10 does a pretty good job detecting and configuring the most optimal settings when connecting one or multiple displays to a computer. However, depending on your requirements, you may need to adjust each monitor’s scaling, resolution, and orientation.
Select correct scale
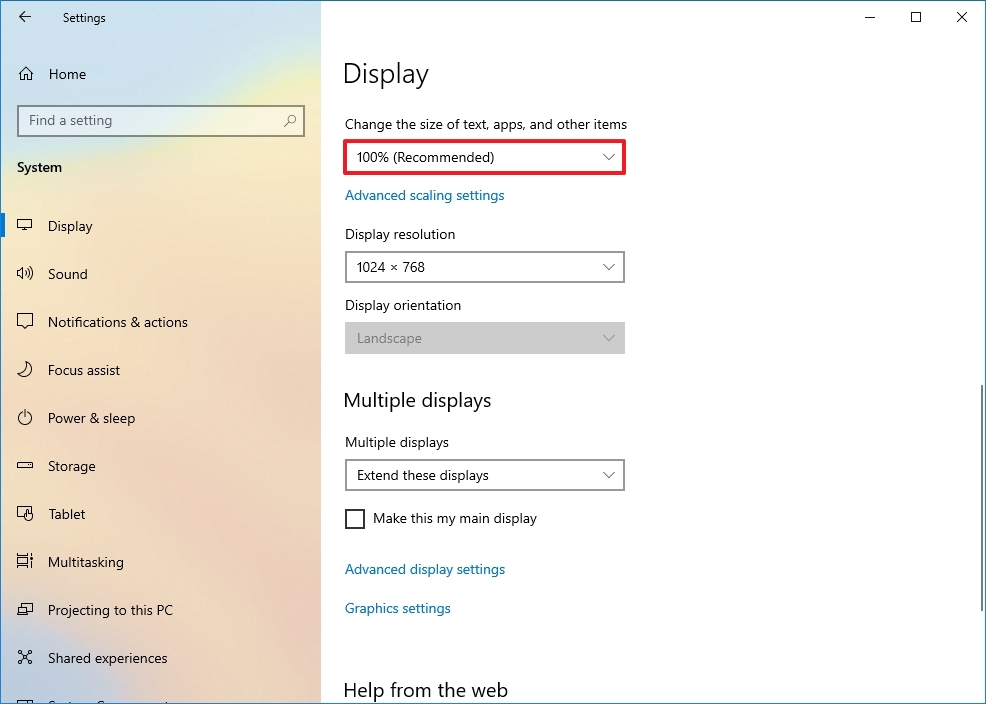
Windows 10 includes settings to adjust scaling, which is useful when setting up various monitors of different sizes and screen resolutions to make text, apps, and other items look the same size across the displays. For example, if you have a 4K display, adjusting the scale settings can help make items bigger and more readable.
To select the correct scale setting that suits your requirements, use these steps:
- Open Settings.
- Click on System.
- Click on Display.
- Select the monitor to adjust under the «Rearrange your displays» section.
- Select the appropriate scale option from the «Change the size of text, apps, and other items» drop-down menu.
After you complete the steps, you may need to repeat steps 4 and 5 to change the scaling settings on the other monitors and then click the Sign-out option to apply the changes.
While you can adjust the scaling settings per monitor, it’s always best to use the same make and model of monitors with the same configuration when possible. Otherwise, you may run into issues, and the operating system may have problems scaling elements.
Custom scaling
To specify a custom scaling value, use these steps:
- Open Settings.
- Click on System.
- Click on Display.
- Select the monitor to adjust under the «Rearrange your displays» section.
- Click the «Advanced scaling settings» option under the «Scale and layout» section.

- Specify the scaling size between 100 and 500 percent under the «Custom scaling» section.

- Click the Apply button.
After completing the steps, sign out of your account and back in to test the new settings. If the new scaling configuration doesn’t look right, repeat the same steps and try a different value until you find a comfortable setting.
If you want to switch to the predefined scale settings, you must first turn off custom scaling and sign out. Otherwise, the option will be grayed out.
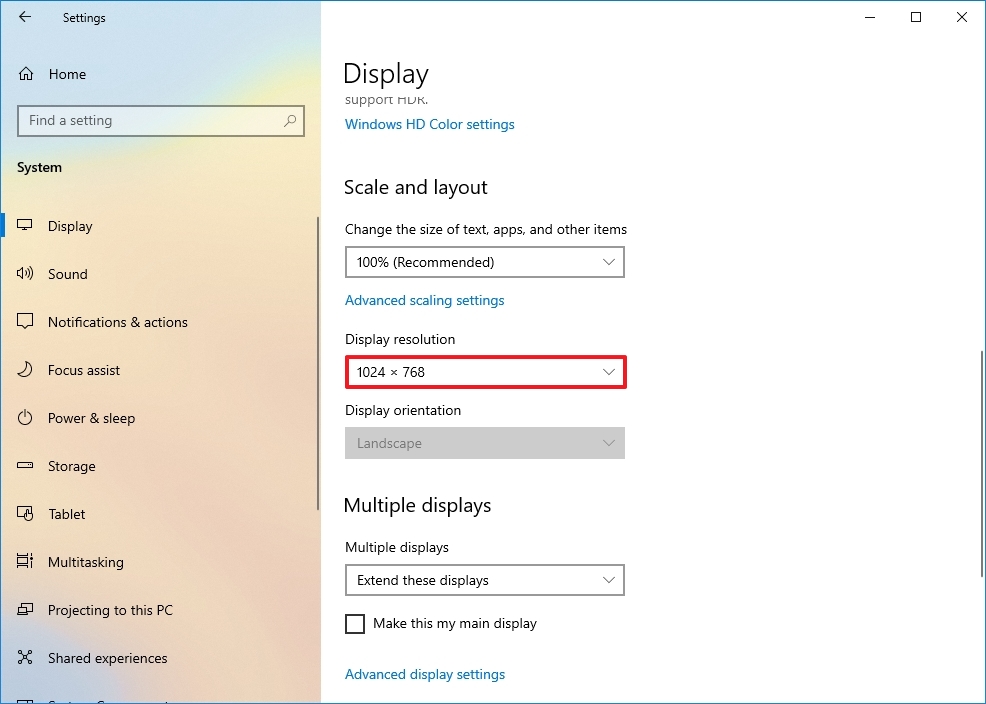
Select correct resolution
Usually, after connecting a monitor, Windows 10 will set the recommended pixel resolution automatically, but you can also change the resolution manually with these steps:
- Open Settings.
- Click on System.
- Click on Display.
- Select the monitor that you want to adjust under the «Rearrange your displays» section.
- Use the Resolution drop-down menu to select the correct pixel resolution under the «Scale and layout» section.
Once you complete the steps, repeat steps 4 and 5 to change the resolution on the remaining monitors.
If you want to make text and other items bigger on the screen, you should change the scaling settings, not the display resolution.
Select correct orientation
Windows 10 also allows you to rotate the screen horizontally or vertically, which is particularly useful when you have monitors with stands that rotate, and you want to use them with a different orientation for reading or coding.
To change the orientation per-monitor, use these steps:
- Open Settings.
- Click on System.
- Click on Display.
- Select the monitor that you want to adjust under the «Rearrange your displays» section.
- Use the Orientation drop-down menu to select the mode under the «Scale and layout» section:
- Landscape.
- Portrait.
- Landscape (flipped).
- Portrait (flipped).
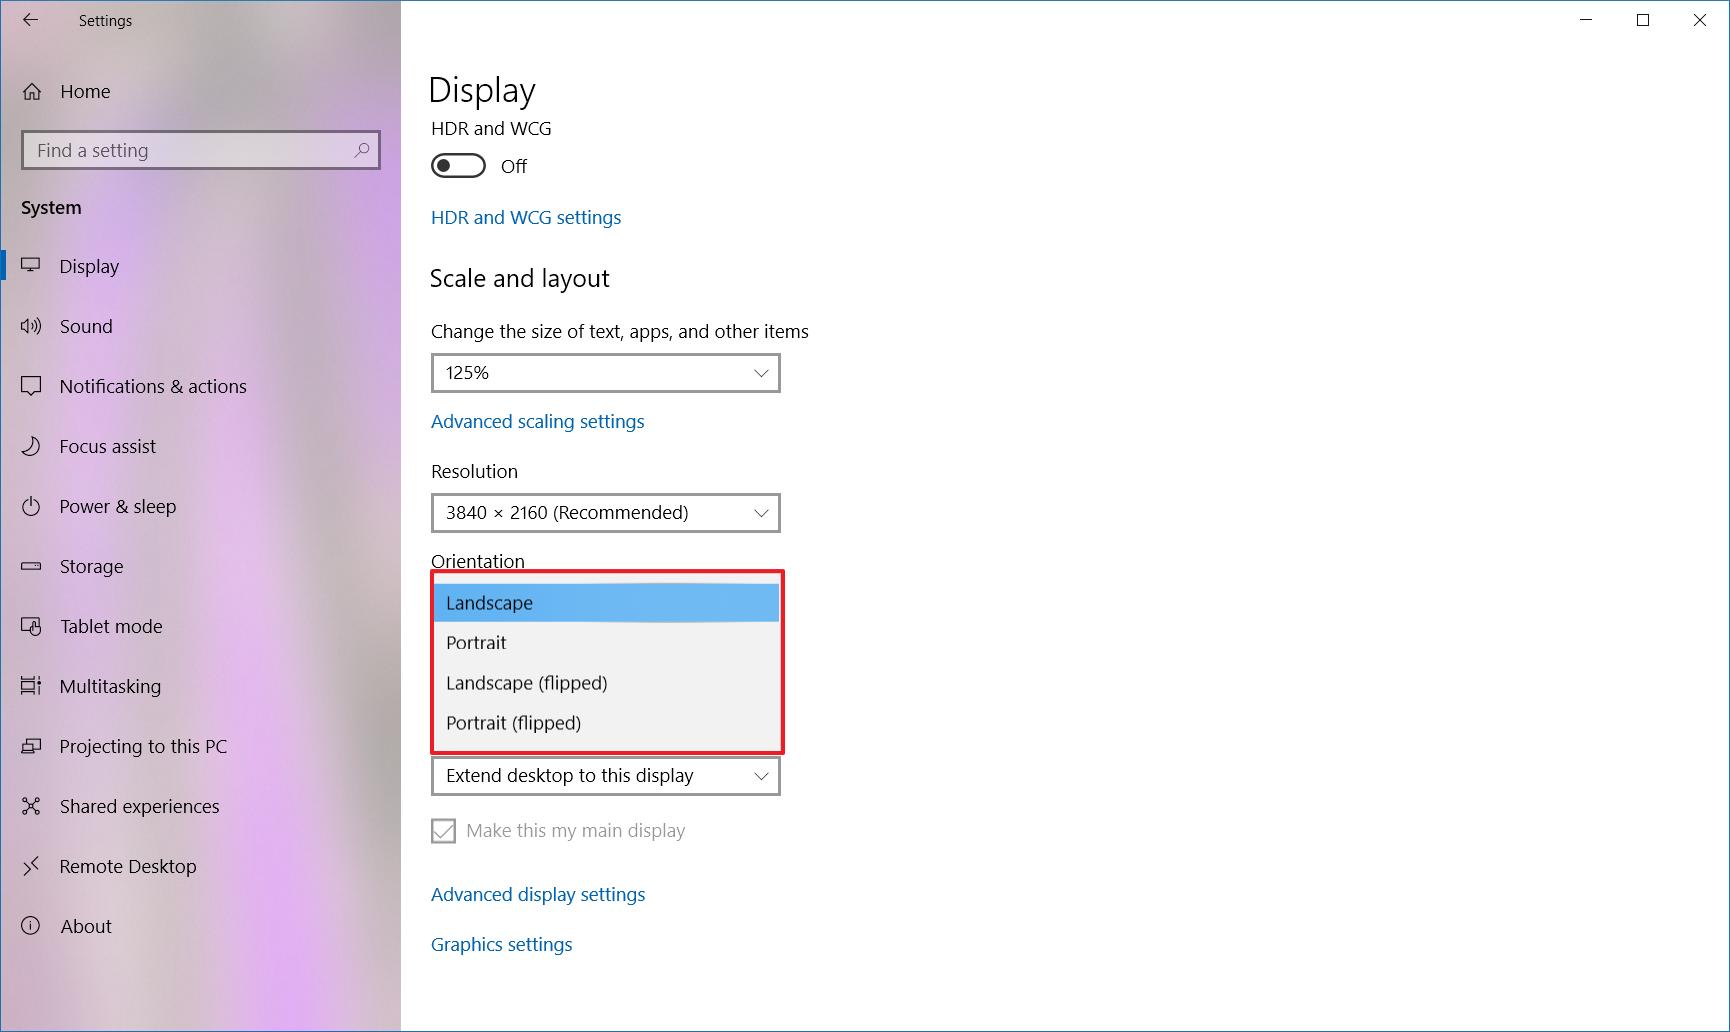
Once you complete the steps, the display will shift to the orientation you selected.
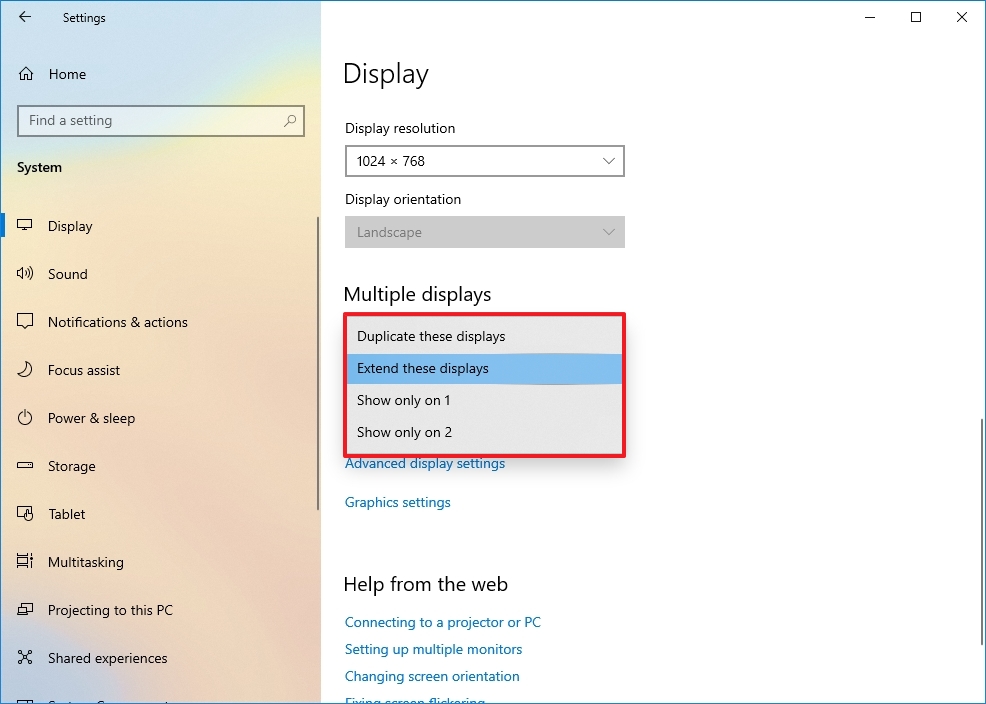
How to select multiple displays viewing mode on Windows 10
You can also choose the viewing mode for your displays using the available settings. For example, if you’re using a second monitor, you can expand the main screen to the new display, or you can mirror both monitors, which is ideal when showing a presentation. If you’re using a laptop with an external monitor, you can even disable the main display and only use the second monitor as your primary.
To change the viewing mode on Windows 10, use these steps:
- Open Settings.
- Click on System.
- Click on Display.
- Select the monitor that you want to adjust under the «Rearrange your displays» section.
- Use the drop-down menu to set the appropriate viewing mode under the «Multiple displays» section:
- Duplicate desktop — Shows the same desktop on both displays.
- Extend — Expands the primary desktop to the secondary display.
- Disconnect this display — Turn off the selected monitor.
After you complete the steps, you may need to repeat steps 4 and 5 to set the display mode on the remaining monitors. Also, note that using these settings, you can make any of the monitors your primary display.
Switch display modes with shortcut
In addition to using the Settings app, Windows 10 allows you to switch display modes on the fly using the «Project» feature, which you can access with the «Windows key + P» keyboard shortcut.

Once you invoke the shortcut, a flyout will open from the right side with four options, including:
- PC screen only — Only the primary display is used.
- Duplicate — Secondary displays will mirror the primary monitor.
- Extend — Both screens are combined to offer an extended desktop.
- Second screen only — Only the secondary displays are used.
Typically, when using a multi-monitor setup on a desktop or laptop, you want to use the «Extend» option. This allows you to use the primary and secondary monitors normally at their native resolution, creating a single large canvas.
«Duplicate» is a good option when using a second monitor or projector to show a presentation. In contrast, the «Second screen only» option is great when you want to close the lid on a laptop and work only with the external monitor.
How to manage advanced display settings on Windows 10
Although it’s not always recommended to modify your advanced display settings because not all monitors are created equal, sometimes, you may need to make a few adjustments to improve color accuracy and remove screen flickering.
Important: I recommend adjusting the advanced settings only if you have a rough idea of what you want to do. Typically, you should be fine with the default display settings.
Set a custom color profile
If your monitors aren’t rendering the colors accurately, you can use a custom color profile to improve color accuracy using these steps:
- Open Settings.
- Click on System.
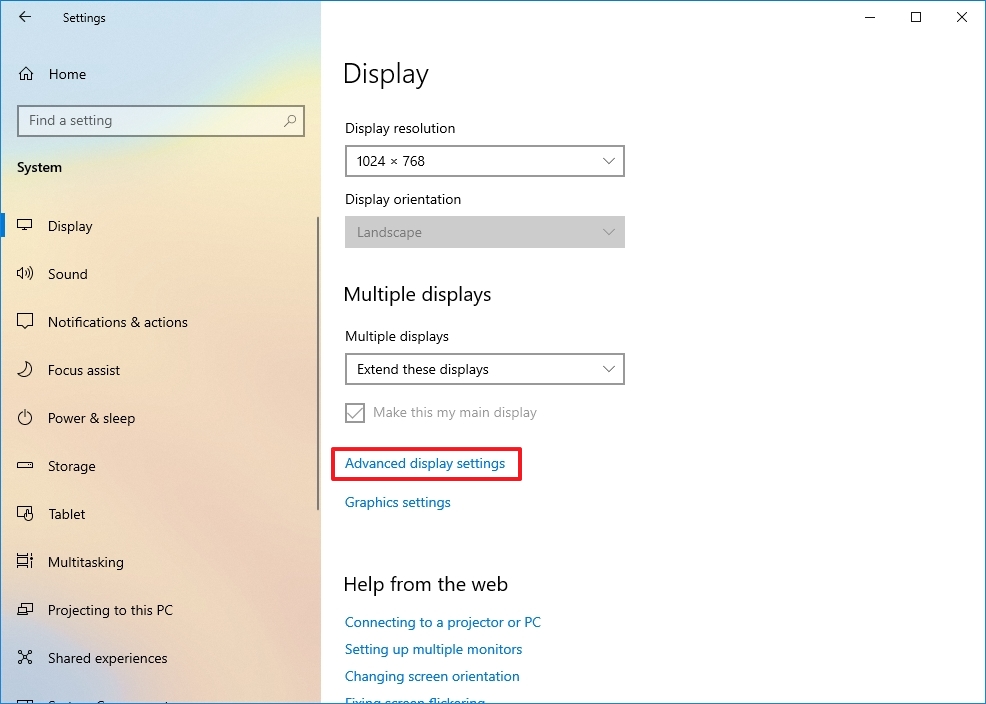
- Click on Display.
- Click the «Advanced display settings» option.
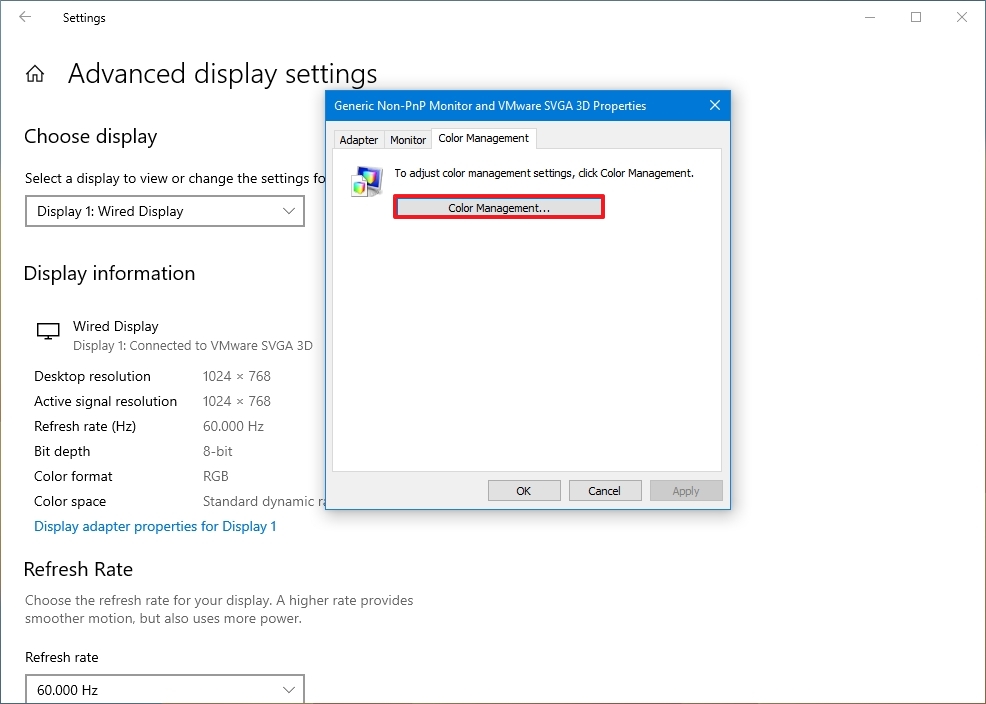
- Click the «Display adapter properties» option for the display you want to set a custom color profile.

- Click the Color Management tab.
- Click the Color Management button.
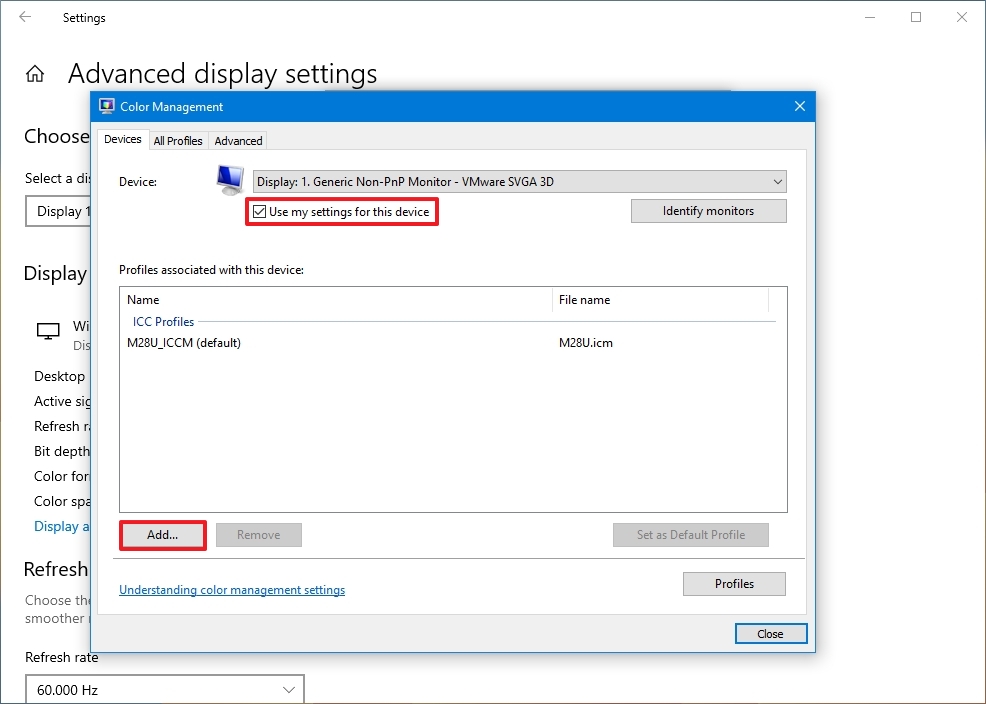
- Click the Devices tab.
- Select a display from the list.
- Check the «Use my settings for this display» option.
- Click the Add button.
- On the «Associate Color Profile» page, click the Browse button and locate the new color profile.
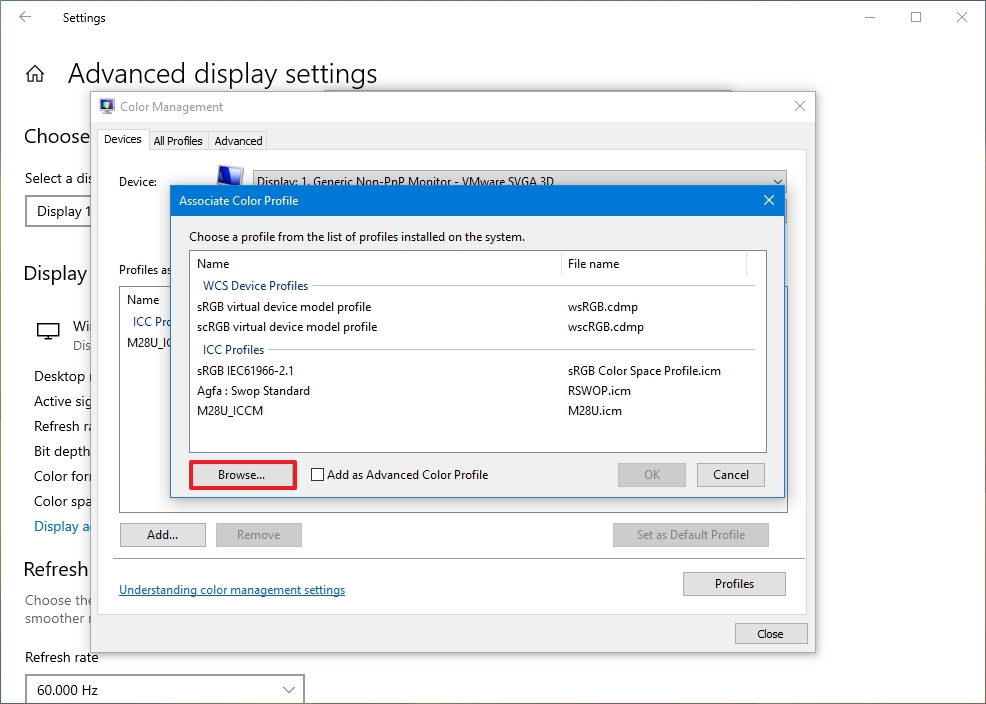
- Double-click the «.icm» file to install the new profile.
- Click the Close button.
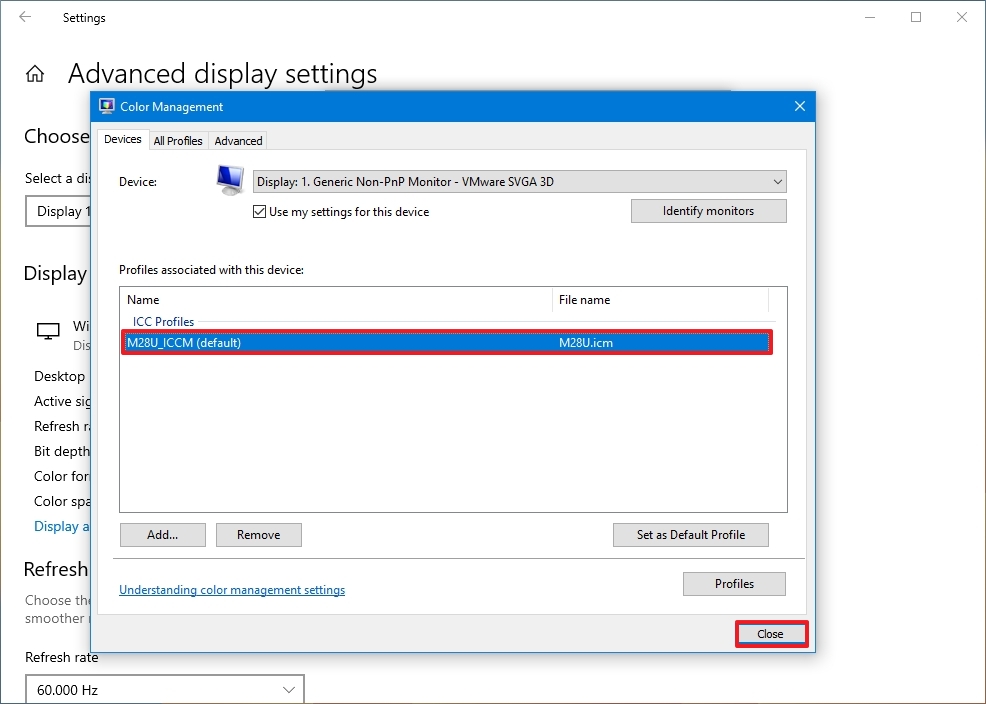
Once you complete the steps, you may need to repeat steps 9 through 13 to set a custom profile for the other monitors.
When configuring a custom color profile, use those created by your display manufacturer or from a trusted source. If you’re not sure, you can use these steps to download the correct color profile for your monitors.
Change the refresh rate
Usually, a refresh rate (frames per second) of 59Hz or 60Hz is more than enough to operate a computer, though you’ll want to look at the best monitors for Xbox Series X and Series S if you plan to game at higher framerates. However, if you’re noticing screen flickering or if you have monitors that support a higher refresh rate, bumping the settings can provide a better and smoother viewing experience — especially for gamers.
To adjust the refresh rate of a monitor, use these steps:
- Open Settings.
- Click on System.
- Click on Display.
- Click the «Advanced display settings» option.
- Use the drop-down menu to set the correct refresh rate under the «Refresh Rate» section.

After you complete the steps, you may need to repeat them to change the refresh rate on the remaining monitors.
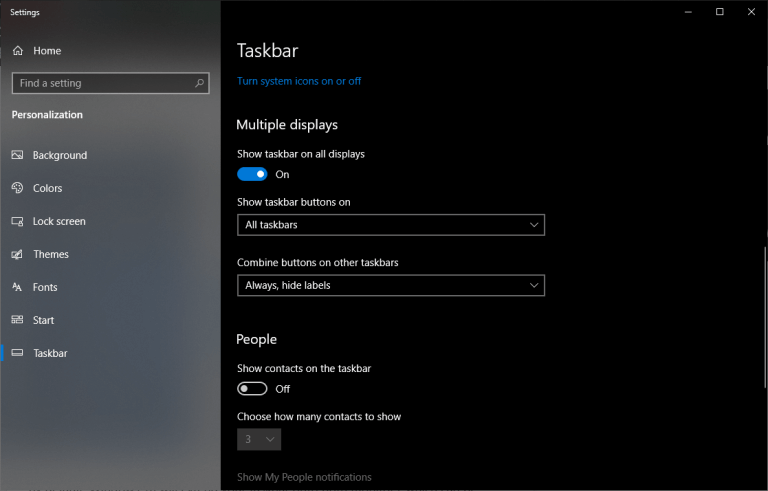
How to show taskbar across multiple displays on Windows 10
On a multi-monitor setup, the taskbar by default will appear only in the main display, but you can change the settings to show it across all the displays using these steps:
- Open Settings.
- Click on Personalization
- Click on Taskbar.
- Turn on the «Show taskbar on all displays» toggle switch under the «Multiple display» section.

If you want to control in which Taskbar the buttons for running apps should appear, then use the «Show taskbar button on» the drop-down menu and select one of the available options:
- All taskbars.
- Main taskbar and taskbar where window is open.
- Taskbar where window is open.
You can also use this guide to optimize the space on the Taskbar to pin even more apps or to keep it as minimal as possible.
How to change background on multiple displays on Windows 10
Windows 10 offers many settings to adjust the look and feel of the desktop, but when using multiple monitors, setting up different background images on each display is one of the most significant customizations you can make to personalize your experience.
To show different wallpapers on a multi-monitor setup using a slideshow, use these steps:
- Open Settings.
- Click on Personalization.
- Click on Background.
- Use the «Background» drop-down menu and select the Slideshow option.

- Click the Browse button.
- Select a folder with a collection of images that you’d like to display on the monitors.
- Click the Choose this folder button.
- Select the rotation frequency using the «Change picture every» drop-down menu.
- Turn on the Shuffle toggle switch.
- (Optional) If you’re using images with different sizes, use the Choose a fit drop-down menu and select the Fill option.
Once you complete the steps, the images will rotate on the desktop background using your selected rotation frequency.
Customize each monitor with a different background
If you want to set a different background image for each monitor, use these steps:
- Open Settings.
- Click on Personalization.
- Click on Background.
- Use the «Background» drop-down menu and select the Picture option.

- Click the Browse button.
- Select the wallpaper and click the Choose picture option.
- Right-click the image and select the monitor you want the wallpaper to show.
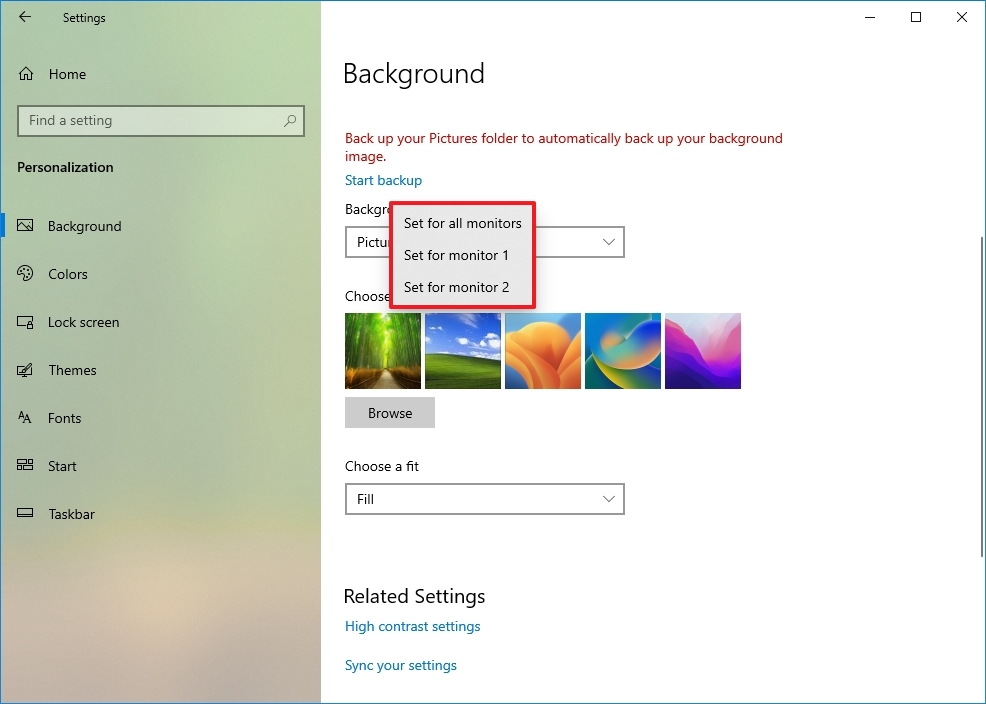
- Repeat steps 5, 6, and 7 to set a custom background for another monitor.
After you complete the steps, each monitor will display a custom wallpaper.
In addition to the instructions outlined above, here are a few additional tips to remember when setting up a computer with multiple monitors. For example, unless it’s a laptop, you shouldn’t try to adjust the brightness or color using Windows 10 or another application. Instead, you should use the controls built into the monitor.
If the second monitor isn’t detected in Windows 10 or Windows 11, check its connections and use the «Detect» button in the Settings app. If you still have issues, use our guide linked above to troubleshoot and fix common problems.
Finally, when using one or multiple monitors, you may encounter a black screen, typically a video driver-related problem. If you’re not sure how to fix this issue, follow these steps to resolve it.
It’s worth noting that recent updates to the operating system also added the ability to show dynamic wallpapers with the «Windows Spotlight» feature.
More resources
For more helpful articles, coverage, and answers to common questions about Windows 10 and Windows 11, visit the following resources:
- Windows 11 on Windows Central — All you need to know
- Windows 10 on Windows Central — All you need to know
Mauro Huculak has been a Windows How-To Expert contributor for WindowsCentral.com for nearly a decade and has over 15 years of experience writing comprehensive guides. He also has an IT background and has achieved different professional certifications from Microsoft, Cisco, VMware, and CompTIA. He has been recognized as a Microsoft MVP for many years.
Если вы используете два монитора или более, то для вас существует несколько способов оптимизировать настройки компьютера.
Независимо от того, усердно ли вы работаете или много играете, несколько мониторов дают вам больше пространства для реализации возможностей. Составляйте документ на одном экране, просматривая веб-страницы на другом, или играйте на одном, общаясь в чате на другом. Но не стоит просто подключать второй монитор и останавливаться — эти советы помогут сделать так, чтобы многомониторная установка работала на вас.
Обеспечьте соответствие дисплеев
Если ваши мониторы одинаковой марки и модели, вы можете пропустить этот раздел, потому что после подключения обоих мониторов, «Windows» автоматически расширит рабочий стол по горизонтали. Просто отрегулируйте подставку каждого монитора так, чтобы они идеально совпадали, и можно приступать к работе.
Однако если у вас два разных монитора, вам, возможно, придется приложить немного больше усилий, чтобы синхронизировать работу дисплеев. Например, вы подключаете ноутбук к внешнему монитору и используете их бок о бок, или у вас один монитор 4K стоит рядом с монитором с расширением 1080p. Это может создать проблемы, но их легко исправить.
Щелкните правой кнопкой мыши на рабочем столе и выберите «Настройки дисплея». В разделе «Перенастроить дисплеи» нажмите и установите прямоугольники так, чтобы они соответствовали ориентации мониторов на рабочем столе; скажем, если один из них находится немного ниже другого. Таким образом, при перемещении курсора влево он будет появляться в том же месте на левом мониторе, а не скакать вверх или вниз по экрану. Возможно, вам придется немного поработать методом проб и ошибок, чтобы добиться их правильного расположения.
Прокрутите вниз до раздела «Масштаб и расположение«, чтобы настроить разрешение каждого монитора и его масштабирование. Так, если один монитор имеет разрешение 4K, а другой — 1080p, вы можете установить для каждого монитора его собственное разрешение, но увеличить масштаб на мониторе с более высоким разрешением, чтобы открываемые окна имели одинаковый размер на каждом из мониторов (Если вы хотите настроить монитор в портретном режиме, вы можете сделать это и здесь).
Далее, кроме этого, вы можете использовать встроенные настройки каждого монитора для регулировки яркости и цвета, чтобы они максимально совпадали. После того как вы настроите все эти параметры, дисплеи ваших мониторов станут более идентичными, что сделает перемещение окон между ними более простым и приятным занятием
Настройте панель задач
По умолчанию Windows 10 расширяет панель задач на оба монитора, что может быть удобно, хотя вы можете настроить ее по своему вкусу. Щелкните правой кнопкой мыши на панели задач и выберите «Параметры панели задач«. Здесь есть много полезных опций, но если вы прокрутите колесико мыши вниз до раздела «Несколько дисплеев«, вы увидите то, что нас интересует.
Первый переключатель убирает панель задач с вашего дополнительного дисплея. Лично я предпочитаю использовать несколько мониторов именно таким образом, так как это позволяет разместить все ярлыки в одном месте.
Однако если вы решите сохранить панель задач на обоих мониторах, вы можете выбрать, где будут отображаться отдельные значки: на обоих мониторах, на основной панели задач и на панели задач, где открыто окно приложения, или только на активном мониторе, где установлено приложение. Вы также можете выбрать, будут ли кнопки панели задач иметь ярлыки в стиле Windows XP.
Ищите обои с сверхшироким расширением
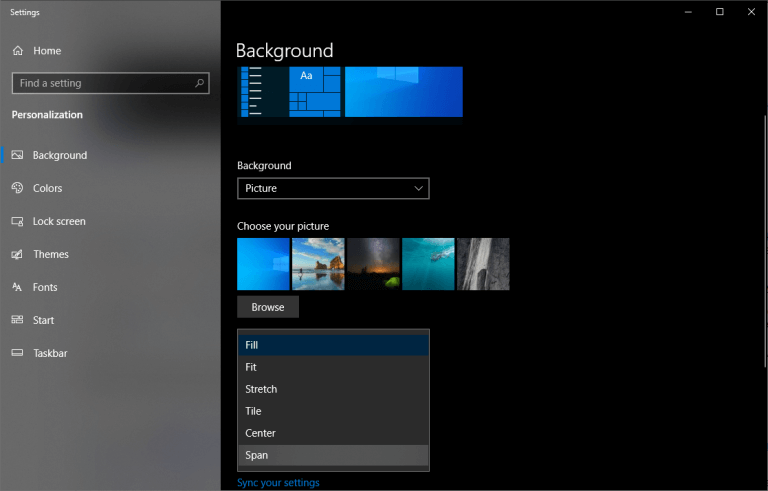
Хотя модные обои не повысят вашу производительность, они являются одной из самых приятных составляющих наличия нескольких мониторов, поэтому мы должны включить их сюда. Хотя на большинстве сайтов обоев есть варианты для нескольких мониторов, несколько из них специализируются на сверхшироких обоях, включая Dual Monitor Backgrounds.
Как только вы найдете обои (или коллекцию обоев), которые вам нравятся, щелкните правой кнопкой мыши на рабочем столе и выберите «Персонализировать«. Найдите нужное изображение или папку и выберите «Span», чтобы заполнить пространство на всех дисплеях.
Изучите свои ярлыки
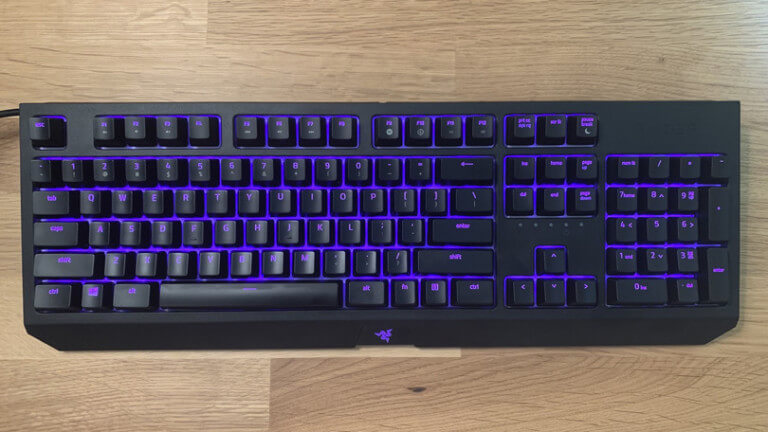
Прелесть нескольких мониторов — особенно по сравнению с ультраширокими и сверхширокими мониторами — заключается в возможности «пристыковывать» окна к краям каждого дисплея, что позволяет легко просматривать множество окон одновременно. Хотя вы всегда можете перетаскивать окна и изменять их размер с помощью мыши, это трудоемко и занимает много времени.
Поэтому в Windows 10 есть несколько горячих клавиш, которые могут помочь, в том числе:
— Win+Left и Win+Right: Привязывают активное окно к левой или правой стороне текущего монитора. Вы можете нажать клавиши еще раз, чтобы переместить окно между мониторами или вернуть его в исходное положение.
— Win+Up и Win+Down: максимизация или минимизация текущего окна. Если окно в данный момент закреплено, это также изменит размер окна из закрепленного положения.
— Shift+Win+Left и Shift+Win+Right: Переместить активное окно на следующий монитор, не привязывая его к краю.
— Shift+Win+Up: Максимально развернуть окно по вертикали, что особенно полезно, если у вас нет панели задач на дополнительном мониторе.
— Win+Home: Свернуть все окна, кроме того, над которым вы работаете, чтобы избавиться от отвлекающих факторов. Нажмите ее снова, чтобы вернуть все окна обратно.
Большинство этих сочетаний клавиш работают и при наличии только одного монитора, но чем больше мониторов вы добавляете, тем полезнее они становятся.
Исправьте «блуждающий курсор»
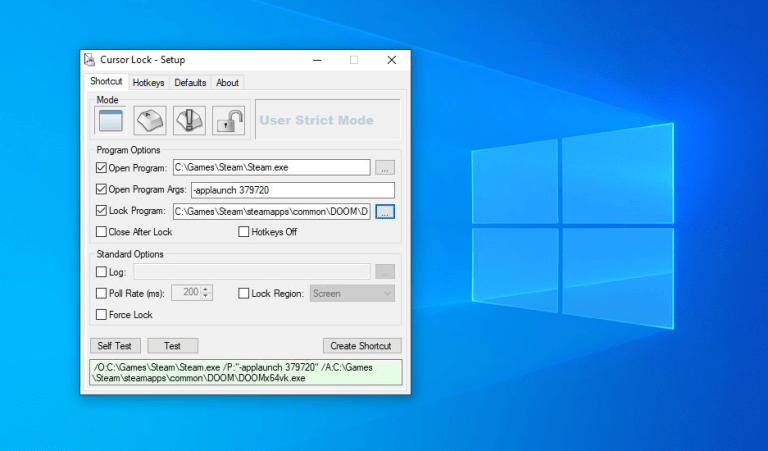
Хотя тройные мониторы позволяют охватить игрой все дисплеи — с помощью настроек Nvidia Surround или AMD Eyefininity — двойные мониторы не очень хорошо подходят для сверхширокоформатной игры, поскольку перекрестие будет находиться прямо на ободках мониторов. Однако вы можете играть на одном мониторе, одновременно просматривая пошаговое руководство, окно чата или монитор графического процессора на другом.
Большинство игр могут проходить таким образом без сбоев, но вы можете обнаружить, что в некоторых случаях ваш курсор может «переместиться» на другой монитор, пока вы все еще находитесь в игре. У меня это случалось с несколькими ниграми, включая «Ведьмак», «Дум» и «Метро: Последний свет».
К счастью, один предприимчивый разработчик решил устранить эту проблему с помощью инструмента под названием «Блокировка курсора», и, по моему опыту, он прекрасно работает. Запустите программу, установите флажок «Открыть программу», а затем введите путь к исполняемому файлу игры. Это создаст для вас новый ярлык для использования.
Теперь, когда вы запускаете игру с помощью этого ярлыка, ваш курсор должен оставаться «заблокированным» в окне игры, если вы не разблокируете его при помощи Alt + Tab. Если это не сработает, для рассматриваемой игры может потребоваться несколько дополнительных опций, о которых вы можете узнать в видеоуроке по блокировке курсора.