
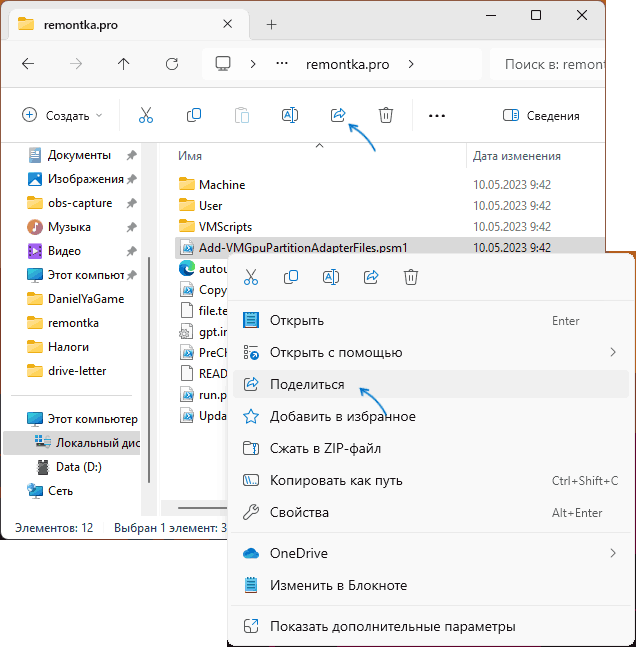
Чтобы предоставить общий доступ к файлу в проводник на Windows 11, выберите файл, а затем на ленте выберите Поделиться . Вы также можете щелкнуть правой кнопкой мыши (или нажать и удерживать) файл > поделиться в проводник или меню Пуск. Затем выберите способ отправки файла и выполните процедуру для этого параметра.
Использование OneDrive
Если у вас есть файлы OneDrive, сохраненные на компьютере, есть несколько способов поделиться ими из проводник:
-
Получите ссылку, по которым можно поделиться. Выберите файл или папку OneDrive и выберите Поделиться. Выберите, с кем будет работать ссылка, нажмите кнопку Применить, а затем нажмите кнопку Копировать ссылку.
-
Email ссылку. Выберите файл или папку OneDrive и выберите Поделиться. Выберите, с кем будет работать ссылка, а затем нажмите кнопку Применить. В поле Кому: введите имена, группы или адреса электронной почты людей, которым вы хотите поделиться. Вы также можете добавить необязательное сообщение. Нажмите кнопку Отправить , чтобы отправить сообщение электронной почты.
Узнайте, как обмениваться файлами и папками в OneDrive
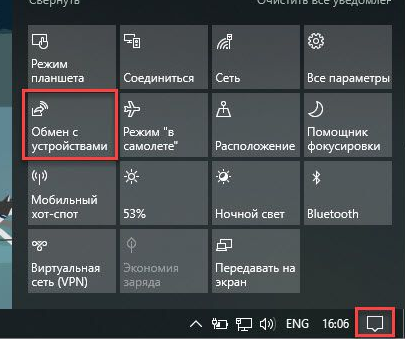
Обмен с устройством поблизости
Общий доступ поблизости позволяет делиться документами, фотографиями, ссылками на веб-сайты и т. д. на близлежащих устройствах с помощью Bluetooth или Wi-Fi. Он будет работать на Windows 10 и Windows 11 устройствах. Дополнительные сведения см. в статье Предоставление общего доступа к устройствам поблизости в Windows.
Отправка сообщения электронной почты
Если у вас установлено классическое почтовое приложение, выберите файл, а затем выберите Поделиться> Email контакта, чтобы открыть новое сообщение с вложенным файлом. Вы можете отправить файл по электронной почте себе или выбрать Найти других пользователей и выбрать в списке контактов.
Общий доступ к приложению
Выберите файл, а затем выберите Общий доступ. В разделе Общий доступ с помощью выберите приложение, с которым вы хотите поделиться, например OneNote.
Предоставление общего доступа по домашней сети
Сведения о том, как предоставлять общий доступ к файлам через домашнюю сеть в Windows 11, см. в статье Общий доступ к файлам по сети в Windows.
Если вам требуется передать файлы между двумя компьютерами или ноутбуками Windows 11/10, при этом они находятся рядом и в одной сети, обмен файлами можно осуществить без использования кабелей, флешек, настройки сети или стороннего ПО — с помощью встроенной функции «Обмен с устройствами поблизости» (или «Трансляция поблизости»).
В этой инструкции подробно о том, как использовать Обмен с устройствами поблизости в Windows последних версий для беспроводной передачи файлов между устройствами и дополнительная информация, которая может быть полезной. На близкую тему: Обмен с окружением между Windows и Android.
Использование функции обмена с устройствами поблизости
Для того, чтобы воспользоваться функцией, обмен с устройствами поблизости должен быть включен как на ПК или ноутбуке, отправляющем файле, так и на принимающем устройстве. Включить функцию можно следующими способами:
- С помощью кнопки в панели быстрых действий:
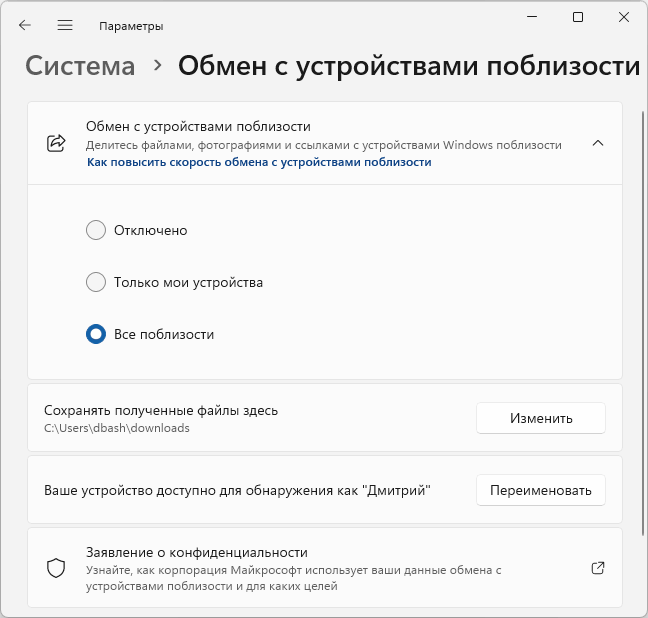
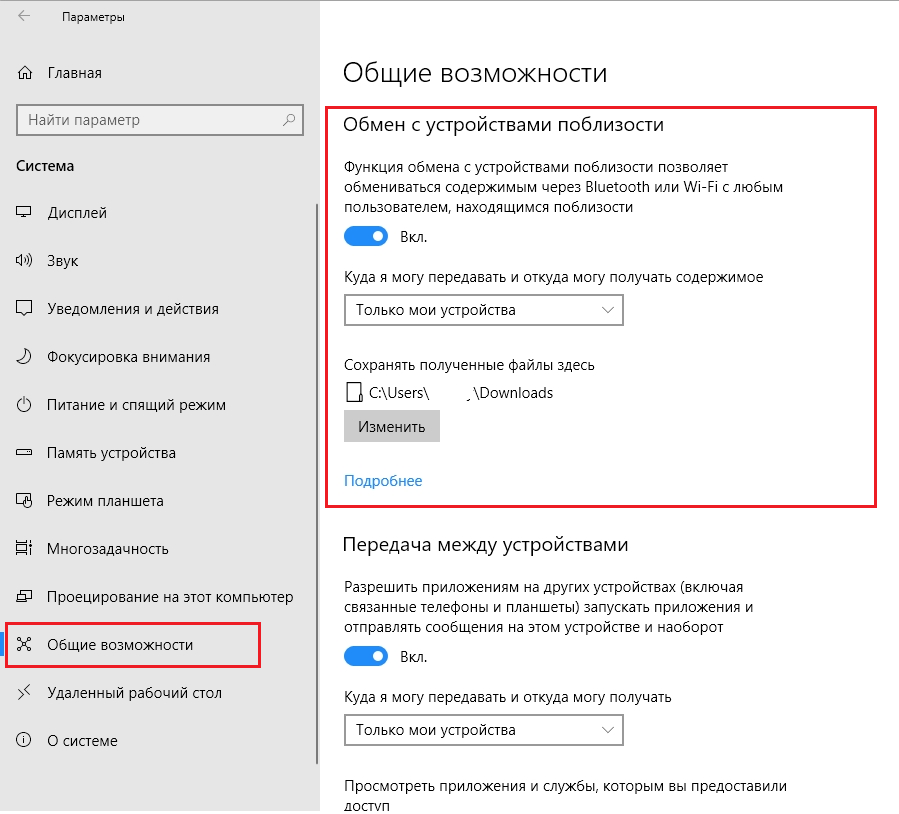
- В Параметры — Система — Обмен с устройствами поблизости в Windows 11 или Параметры — Система — Общие возможности — Передача между устройствами в Windows Там же можно настроить, возможна ли передача только между своими устройствами (с одной учетной записью Майкрософт) или между всеми устройствами.

- На компьютере, с которого отправляются файлы — непосредственно при отправке.
После того, как функция включена на обоих устройствах, для отправки файла или нескольких достаточно выполнить следующие действия:
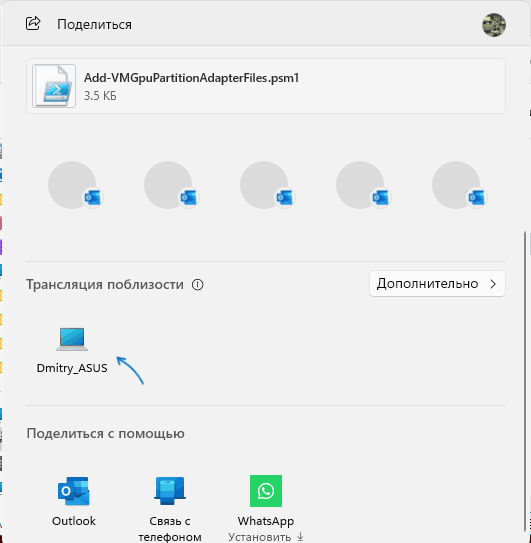
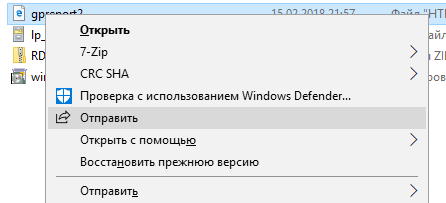
- Выберите файл или группу файлов, нажмите по ним правой кнопкой мыши и выберите пункт «Поделиться», либо используйте кнопку «Поделиться» в Проводнике.

- В разделе «Трансляция поблизости» выберите устройство, на которое требуется отправить файлы (должно отобразиться после непродолжительного поиска, при условии, что оно находится рядом, а Wi-Fi и Bluetooth на нём включены), появится уведомление об ожидании подтверждения принимающей стороны.

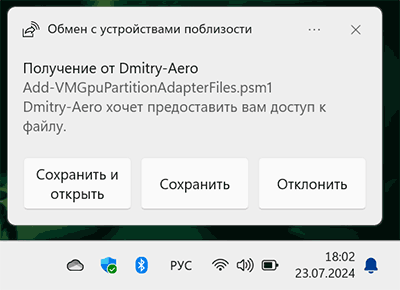
- Подтвердите получение файла на принимающем компьютере — в скором времени выбранные файлы будут отправлены и сохранены в папку «Загрузки» (по умолчанию, можно изменить в параметрах обмена с устройствами поблизости).

- Помимо файлов, можно делиться ссылками из Microsoft Edge с помощью меню «Поделиться».
В моём тесте всё работало исправно и без каких-либо нареканий.
Единственное условие — включенный Wi-Fi и Bluetooth модули на обоих устройствах, желательно подключение к одной беспроводной сети. Несмотря на то, что на официальном сайте Майкрософт фигурирует «или», у меня отключение любого из модулей отключало и функцию обмена с устройствами поблизости.
Как вы возможно уже знаете, в последнем обновлении Windows 10 1803 April Update Microsoft решила отказаться от функционала «Домашней группы» (HomeGroup), позволяющего организовать простой общий доступ к файлам и принтерам в домашней локальной сети. Вместо использования «Домашней группы» в Windows 10 1803 предлагается новый способ обмена файлов между соседними устройствами под названием Обмен с устройствами поблизости (Nearby sharing). Данный способ передачи файлов похож на режим передачи AirDrop в уставах Aplle.
Как и AirDrop, Nearby sharing может использоваться для передачи файлов с соседними устройствами по Wi-Fi или Bluetooth. Microsoft специально сделала этот способ передачи файлов максимально простым и эффективным в использовании и практически не требующим настройки. Таким образом любой пользователь должен легко передать или получить нужный файл, документ, изображение, видео, ссылку или другой контент на соседний компьютер в своей домашней сети.
Содержание:
- Как включить режим Обмена с устройствами поблизости в Windows 10
- Как передать файл на соседний компьютер с помощью Nearby sharing
- Не работает режим Обмен с устройствами поблизости (Nearby sharing) в Windows 10
Как включить режим Обмена с устройствами поблизости в Windows 10
Для передачи файлов между устройствами с помощью данной функции, на обоих устройствах должен быть включен адаптер Bluetooth или Wi-Fi. Включить режим Обмен с устройствами поблизости можно через Центр действий / Action Center (плитка Обмен с устройствами / Nearby Sharing).
Настроить режим работы обмена данных с устройствами можно а приложении Параметры -> Система -> Общие возможности (Settings -> System -> Shared experiences). Найдите секцию «Обмен с устройствами поблизости» (Nearby sharing).
Функция обмена с устройствами поблизости позволяет обмениваться содержимым через Bluetooth или Wi-Fi с любым пользователем, находящимся поблизости.
Переведите переключатель в положение Вкл. Чуть ниже в параметре «Куда я могу передавать и откуда получать содержимое» выберите хотите ли вы обмениваться файлами только со своими устройствами (My devices only) или всеми устройствами поблизости (Everyone nearby). Также можете указать папку, куда Windows 10 будет сохранять полученные с других устройств файлы (по умолчанию это папка Загрузки / Downloads в профиле пользователя).
Также можно включить режим Nearby sharing через реестр. Для этого запустите regedit.exe и перейдите в раздел HKCU\Software\Microsoft\Windows\CurrentVersion\CDP. Найдите в этой ветке два REG_DWORD параметра:
- CdpSessionUserAuthzPolicy
- NearShareChannelUserAuthzPolicy
Чтобы отключить Nearby sharing измените их значение на 0, при значении 1 – разрешен обмен данными только с авторизованными устройствами, значение 2 – разрешен обмен со всеми соседними устройствами. Для применения настроек компьютер нужно перезагрузить.

Как передать файл на соседний компьютер с помощью Nearby sharing
После того, как вы включили режим «Обмен с устройствами поблизости», вы можете отправить любой файл на соседний компьютер через беспроводную сеть. В проводнике щелкните правой кнопкой но нужному файлу и в меню выберите пункт Отправить.
В открывшемся окне «Поделиться» будет выполнен поиск доступных через беспроводную сеть устройств (Поиск устройств поблизости). Если нужного устройства нет в списке, убедитесь, что нам нем включен режим «Обмена с устройствами поблизости» и активен Wi-Fi / Bluetooth адаптер.
Выберите имя компьютера, на который вы хотите отправить файл. На втором компьютере появится уведомление о том, что вы хотите поделится файлом. Он может принять или отклонить передачу файла.
Естественно, передача файлов через Bluetooth выполняется намного медленнее, чем через WiFi сеть.
В большинстве приложений магазина Windows Store доступна кнопка Поделиться (например в Edge, приложении Фотографии и т.д.). Таким образом вы можете передать ссылку, фото или другой файл прямо из окна приложения.
Не работает режим Обмен с устройствами поблизости (Nearby sharing) в Windows 10
Если при нажатии кнопки «Поделиться» компьютер не обнаруживает другое устройство, необходимо проверить следующие условия:
- На обоих устройствах установлена Windows 10 1803 или выше, и режим Nearby sharing включен.
- Должен быть включен режим обмена со всеми соседними устройствами, либо устройства добавлены в аккаунт Microsoft или в друзья.
- Wi-Fi или Bluetooth адаптеры активны. Необходим адаптер Bluetooth 4.0 (LMP 6.x) или выше с поддержкой режиме Low Energy (LE). Это можно проверить в свойствах драйвера адаптера в разделе Bluetooth radio supports Low Energy Central Role = True.
- Компьютеры находятся в одной Wi-Fi сети (вы можете использовать свой компьютер с Windows 10 как виртуальную точку доступа Wi-Fi).
- При передаче файлов через Bluetooth устройства нужно держать ближе друг к другу.
- Измените профиль сети на с Public на Private на обоих устройствах (Settings -> Network and Internet -> Status Change connection properties -> Private).
Microsoft анонсировала, что в ближайшем времени приложение для поддержки Nearby sharing появится для устройств с Android и iOS. Таким образом со своего компьютер с Windows 10 вы сможете легко передать файл на свой смартфон и планшет.
Everyone needs to use the methods to share files on Windows 10/11 at some point. Some users even have to share files from their Windows PC frequently. So, knowing the most effective file-sharing methods on your Windows PC becomes necessary.
Luckily multiple methods allow you to share files, and here we will discuss the 5 most effective options you can use on Windows 10 and 11.
Part 1. How to Share Files on Windows 10/11 With Official Methods?
We will start discussing the methods with official options available on the Windows OS. There are different ways of sharing files without needing an external physical storage medium. Below are the details about the official methods for sharing files between Windows computers:
Way 1. Share Files on Windows 11/10 Via Network
If your Windows PC is connected to a local network and you want to share files only with the computers on that network, then you can use the Network file sharing feature on your computer. Using this method is extremely easy and highly preferable for workplaces and offices.
It is because those computers are already configured with the network, and you only need to use the share feature on your PC.
Step 1: Open File Explorer
Click on the «File Explorer» icon to open it, and if you cannot locate the File Explorer icon, search for it in Windows Search Menu. Once you open File Explorer, you can locate the file or folder you want to share by manually searching or searching for it.
Step 2: Share the file via the network
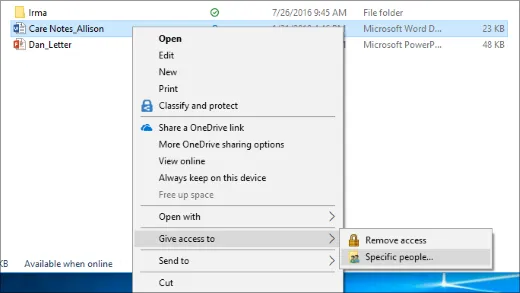
Once you find the folder or file you want to share, click it to select. You can select multiple files and share them at once with this method. «Right Click» to open options and click «Give Access to.» Now you can click «Specific People.» Now you can follow the on-screen instructions to select specific users. Alternatively, if the file is not confidential, click «Everyone,» and the file will be shared with everyone on the network this way.
Also Read: Top 5 Useful File Managers on Windows 10/11
Way 2. Share Files on Windows Via OneDrive
Microsoft Windows has a built-in application that provides cloud storage with your account. It is known as OneDrive, and it makes sharing files virtually with anyone very easy. In the previous method, connecting to the local network was essential, whereas OneDrive does not have such requirements. Here you only need internet connectivity on both computers, and you can easily share your files between the two devices.
Step 1: Copy the file and paste it into the OneDrive folder.
Locate the file you want to share from your computer using File Manager. You can open «File Manager» by clicking its taskbar or start menu icon or searching for it in the start menu. Once you find the file, click it and press «Control + C.» Now click «OneDrive» from the left pane in the file manager and press «Control + V”. When that file appears in the OneDrive folder, right-click it and click “Share”.
Step 2: Share the file with OneDrive
It is optional to set the editing and viewing preferences for privacy reasons. Use the «More Settings» option if you want to change them. Click «Apply» after editing those settings. Now you can «copy the link» and send it to the recipient or enter their email address. OneDrive allows adding optional messages with the email method. Click «Send,» and they will receive the file.
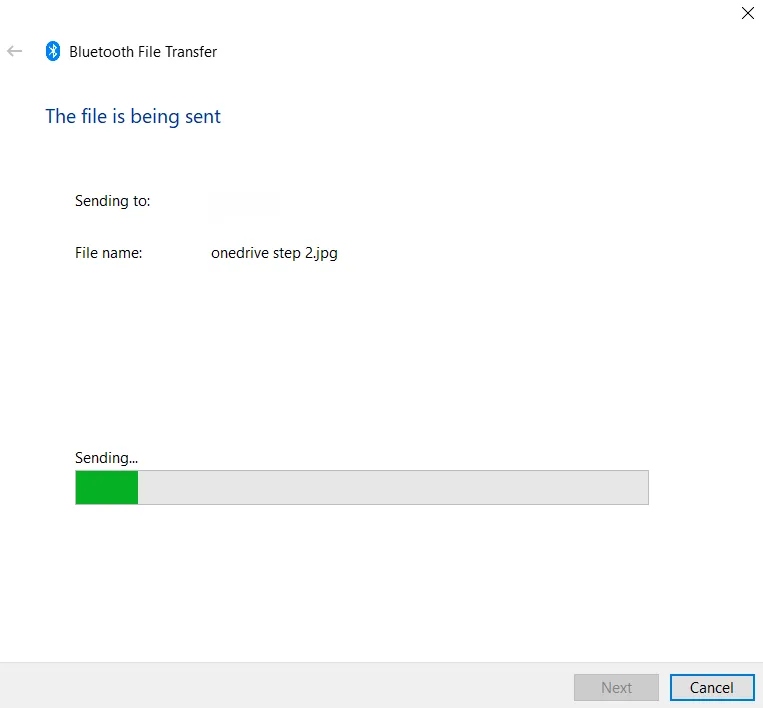
Way 3. How to Share Files Over Bluetooth in Windows 10/11?
If you have two Windows computers present nearby and you don’t want to set up networking, then the easiest method for offline file transfer will be using Bluetooth. You can get good file transfer speeds depending on the Bluetooth hardware integrated into your computers.
Step 1: Set up a Bluetooth connection between your devices.
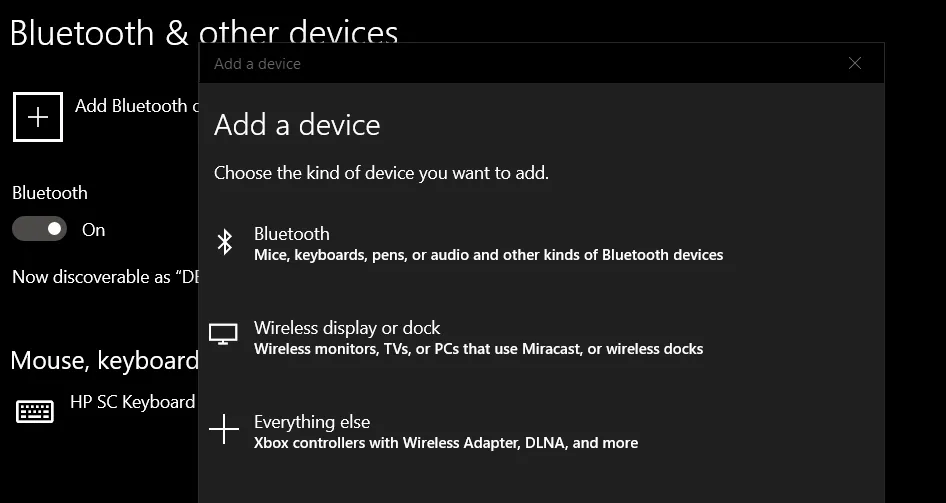
Click the «Windows» button and press the «Gear icon» above the power options. It will open settings. Go to «Devices,» «Bluetooth”, and turn it on. Click the «+» button above it and select Bluetooth. Do the same on the other PC, and once the first PC locates the second one, click it to pair and authenticate using the code provided on the screen.
Step 2: Right-click and send to the Bluetooth device
Locate the file to share and «right-click» to open options. Hover the cursor over «Send To» then click Bluetooth device.
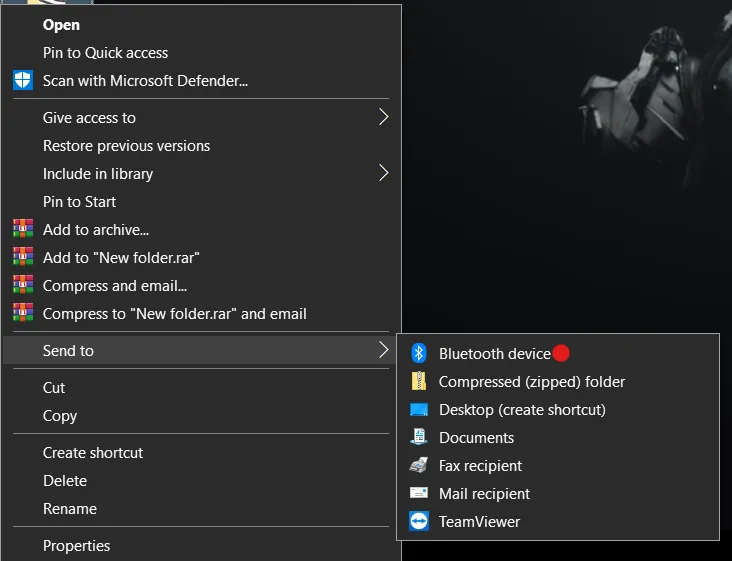
Step 3: Select Bluetooth device and send
Select the device from the available options, click «Next,» and accept the file on another computer. Wait until the process finishes, and your file will be shared.
Part 2. How to Share Files on Windows 10/11 With Third-Party Tools?
Although the official file-sharing methods do the job, you may miss some important features. That’s where the third-party options make a better choice.
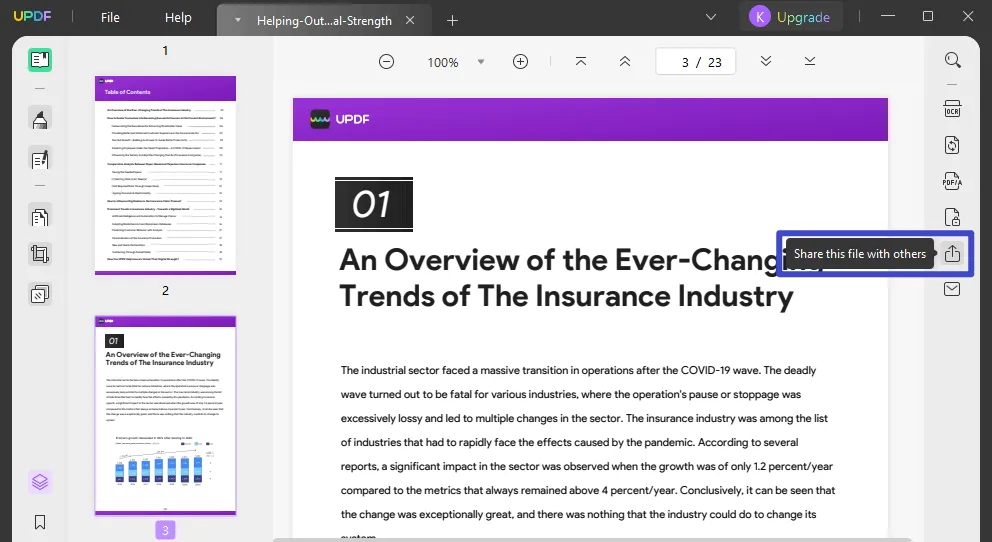
Way 1. Share PDF Files on Windows 10/11 Via UPDF
If you want to share PDF files between Windows computers, the best tool for this purpose will be UPDF. It is because it organizes your PDF files on the UPDF cloud. Moreover, you can access PDF files anytime and anywhere as UPDF have Windows, Mac, Android and iPhone version and you are allowed the sync all files on any device. Moreover, you can share your PDF files via link, QR Code, or email, and here are the steps you can follow.
Step 1: Open PDF file on UPDF
Download UPDF by tapping «Free Download» below. Click the «UPDF» desktop, taskbar, or start-menu icon. Otherwise, search for «UPDF» after clicking the Windows key. Clicking «Open File» will give you a browse window where you can select the PDF file and click “Open” to open it with UPDF.
Windows • macOS • iOS • Android 100% secure

Step 2: Share from the right pane
Click the «Share this file with others» button from the right pane and Create. Now you can copy a link or click the «QR» icon next to it and then click «Download» to download the QR code. Alternatively, click «Share with others”, insert the email, and enter the optional message. Click «Send,» and your PDF will be shared with them.
Want to get the most out of your PDFs? UPDF Pro is the way to go. Upgrade today!
Way 2. Share PDF Files on Windows Via Google Drive
Another good way of sharing PDF files on Windows computers is using Google Drive. Google Drive provides 15GB of free storage. This method can work with the Windows app, but you can also use the web app for an easier experience.
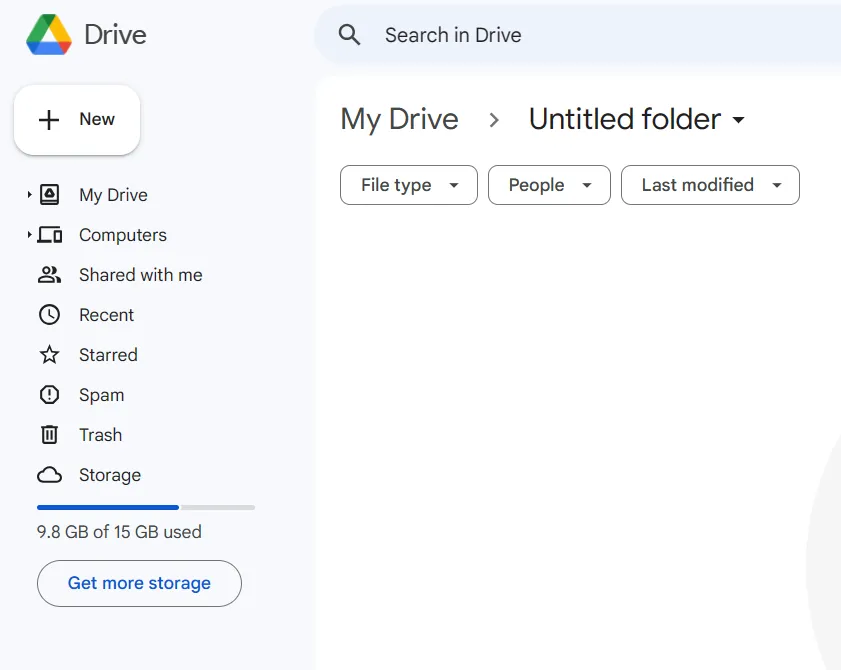
Step 1: Open Google Drive Website and upload the file
Go to the google drive and log in. Now click «NEW» button on top left, click «folder upload or file upload”. Locate and open the PDF file from your PC using the browse window. Wait until this file completes uploading.
Step 2: Open options and click share
Click the «3-dots» on the file and move the cursor to the «share» option. Now click the new “Share” button that just appeared.
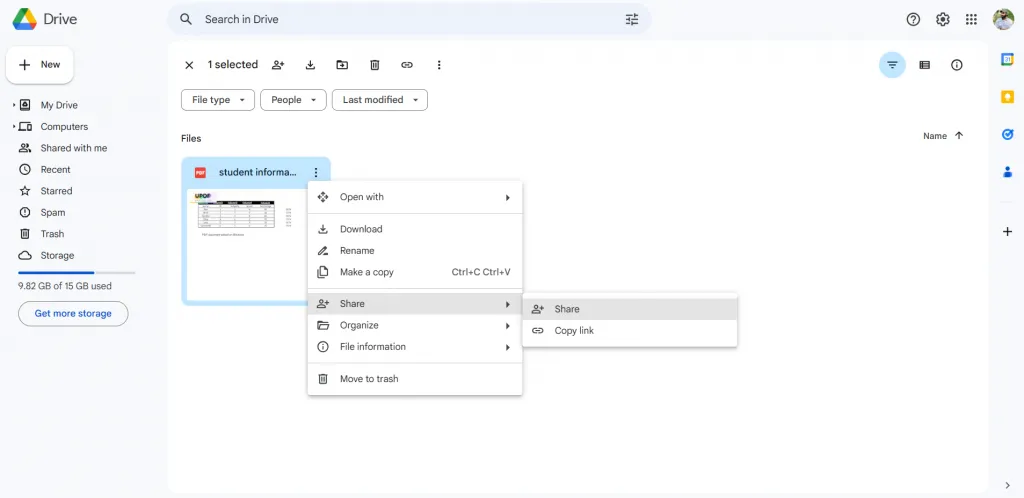
Step 3: Set sharing preferences and click done
Set the access preferences and edit access from the «Gear icon» on the top right. Add people/groups to share. Otherwise, click «copy link» to copy it on your clipboard. Finally, click «Done”. Send that link to recipients to share with a link, and your file will be shared.
Part 3. FAQS About Sharing Files on Windows 10/11
Q1. How to share Mac files with Windows?
It is extremely simple if you have one Mac and one Windows PC and want to share file between Mac and Windows. In settings, you must set up file sharing on Mac in the General option. Click the «i» button afterward, choose options, and select SMB file sharing. Authenticate by providing a password and clicking «Done» twice.
Go to network settings and go to advanced and select WINS. There you need to enter the workgroup name and click OK. Now go to the Windows computer and enter your Mac’s address, username, and password. That’s how you share Mac files with Windows users using the network. For an easier experience, try using iCloud or Google Drive.
Q2. How to access shared files on Windows 10?
Open file explorer and go to network. Double-click the computer on the network to see all the folders available. From here, you can copy and paste any folder or file present in it on your computer with ease.
Q3. How to access Windows file share from Mac?
Choose Go in the Finder app on your Mac and select Connect to Server, then click Browse. Locate the Windows PC on the server and double-click before you select Connect. Depending on the setup, you may need to authenticate with a username and password. Once the connection is successful, you can see and access the files shared by Windows PC on your Mac.
Final Words
When sharing files from your computer, you need quick sharing, reliability, and, most importantly, safety. That’s why it is important to carefully select share files Windows 10/11 methods so that they meet all your requirements. Whether you go for an official method or pick a third-party tool, always check how well that tool meets your requirements so that you get a great experience.
If you need to transfer PDF files, then your best choice will be UPDF. UPDF organizes your PDF files in cloud storage, making sharing easy. With options like link sharing, email sharing, and QR code sharing, you can enjoy an effortless experience. Get the app today and find the reviews of UPDF on this site.
Windows • macOS • iOS • Android 100% secure
- To share files on Windows 10, open the folder with the files in “File Explorer,” right-click the folder and access the “Properties,” navigate to the “Sharing” tab, click “Share,” choose the user or group, click “Add,” choose the access permissions, click on “Share.”
- To share files through Windows Search, open the folder with the files in File Explorer, right-click the item, and choose “Share.” Then, select the computer to which you want to send the file. The destination must confirm the download.
- To share files using OneDrive, open the local OneDrive folder, right-click the item, choose “Share,” confirm the recipient’s email, and click “Send.”
UPDATED 1/28/2025: On Windows 10, you can share files with other users over a network in several ways, depending on your environment. In this guide, I’ll outline the different ways to set up file sharing on your computer.
There are at least four methods for enabling file sharing on Windows 10. One straightforward option is the Public folder, which allows you to share files over a local network without configuring permissions. Alternatively, you can utilize the built-in File Sharing features in Windows 10 for more control over shared content. If you need to share files with others over the internet, the recommended approach is to use OneDrive.
In earlier versions of Windows, you could use Homegroup, a feature that automatically shared library folders (such as Pictures, Videos, Music, and Documents), printers, and other connected devices. Unlike the Public folder, Homegroup simplified sharing across devices on the same network. However, this feature has been discontinued on Windows 10.
In this guide, I will teach you how to share files over the network using File Sharing and OneDrive on Windows 10.
- Share files from File Explorer on Windows 10
- Share files without password on Windows 10
- Share files from OneDrive on Windows 10
- Share files from Windows Search on Windows 10
Share files from File Explorer on Windows 10
The built-in File Sharing feature on Windows 10 is the most flexible and effective way to share files over a local network. It allows you to set restrictive permissions and share files with virtually any device, including those running macOS, Android, and Linux.
You can share files using File Explorer in two ways:
- Basic Settings: Quickly share files on the network with minimal configuration.
- Advanced Settings: Customize permissions and configure additional options for more control.
In the instructions below, I will show you how to use both methods.
To share files on a local network using the express settings, use these steps:
-
Open File Explorer on Windows 10.
-
Open the folder you want to share.
-
Right-click the item and select the Properties option.

-
Click on the Sharing tab.
-
Click the Share button.
-
Use the drop-down menu to select the user or group to share a file or folder. (For this guide, select the Everyone group.)
-
Click the Add button.

-
Under the “Permission Level” section, select the sharing permissions you want the folder to have. For instance, you can choose Read (default) if users only want to view and open files. If you select Read/Write, users can view, open, modify, and delete the content on the shared folder.
-
Click the Share button.
-
Confirm the folder’s network path so that other users can access the network’s content and click the Done button.
-
Click the Close button.


2. File sharing using advanced settings
To share files in the network using the advanced settings, use these steps:
-
Open File Explorer.
-
Open the location with the folder to share.
-
Right-click the item and select the Properties option.
-
Click on the Sharing tab.
-
Click the Advanced Sharing button.
-
Check the “Share this folder” option.
-
Click the Permissions button.
Quick note: Windows 10 allows other users read-only access to the content you share by default, meaning they can only view files but cannot do anything else. If you want users to edit the files, delete, and create new documents in the location, you must manually select the permissions.
-
Select the Everyone group.
-
Check the permissions to access the contents of the folder:
- Full Control: Enables users to read, change, and edit permissions. Also, it allows them to take ownership of files.
- Change: Users can read, execute, write, and delete files and folders in the shared location.
- Read: Allows users to access and view the contents of the folder.
-
Click the Apply button.
-
Click the OK button.
-
Click the Security tab.
-
Click the Edit button.
-
Click the Add button.
-
Click the Advanced button.

-
Click the Find now button.
-
Select the Everyone group.

-
Click the OK button.
-
Click the OK button again.
-
Select the Everyone group again.
-
Check the Full control option.
-
Click the Apply button.
-
Click the OK button.
-
Click the Close button.


Once you complete the steps, the shared content should be available when browsing the remote computer on File Explorer > Network.
If your device is set up with a Microsoft account, you may encounter a sign-in prompt when trying to access shared network content. In many cases, entering your email and password will fail. To resolve this issue, I recommend using a local account instead. You can configure the shared location with the “Everyone” group or use the username and password of an account that exists on the remote computer.
Another workaround is to switch your Microsoft account to a local account and then back to a Microsoft account. This method has worked for me in the past and often resolves the sign-in issue.
Share files without password on Windows 10
On Windows 10, shared files are secured by default with a username and password. This means only users with an account and password on the sharing computer can access the shared files.
However, if you’re setting up file sharing on a local network for family members or people you trust, you can disable the sign-in requirement. This allows users to access shared files without needing a password. While this method is not recommended for most scenarios due to security risks, it is an available option.
Disable file sharing password
To disable password protection for file sharing on Windows 10, use these steps:
-
Open Control Panel.
-
Click on Network and Internet.
-
Click on Network and Sharing Center.
-
Click the “Change advanced sharing settings” option on the left pane.

-
Expand the All Networks tab.
-
Under the “Password protected sharing” section, select the “Turn off password protected sharing” option.
-
Click the Save changes button.


After you complete the steps, users should be able to access the shared folder without a password.
File sharing without password
To share files with everyone without a password over the network, use these steps:
-
Open File Explorer.
-
Navigate to the folder you want to share.
-
Right-click the item, and select the Properties option.
-
Click on the Sharing tab.
-
Click the Share button.
-
Use the drop-down menu to select the Everyone group.
-
Click the Add button.
-
Under the “Permission Level” section, select the sharing permissions you want the folder to have. For example, you can choose Read (the default) if users only want to view and open files. If you select Read/Write, users can view, open, modify, and delete the content of the shared folder.
-
Click the Share button.
-
Confirm the folder’s network path and click the Done button.
-
Click the Close button.
Once you complete the steps, other users won’t need the same account information on the devices to access the shared folder’s contents.
Share files from OneDrive on Windows 10
You can also share files across a network or the internet using OneDrive, and you can complete this task from File Explorer or the web version of OneDrive.
1. File sharing from File Explorer (OneDrive)
To share files from OneDrive on Windows 10, use these steps:
-
Open your OneDrive folder on File Explorer.
-
Open the folder you want to share.
-
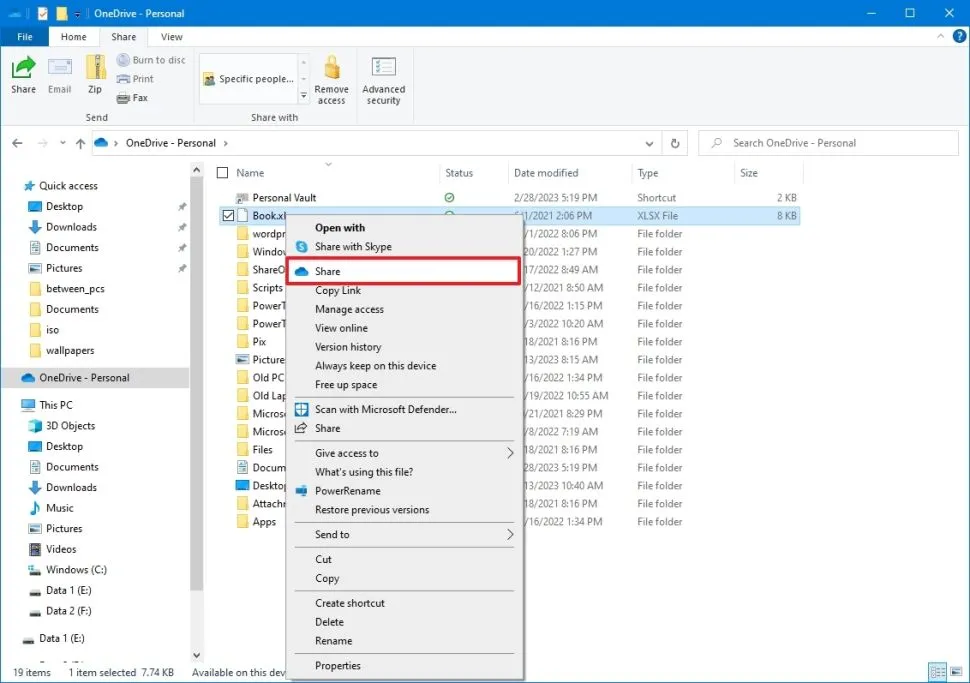
Right-click the folder and select the Share option.

-
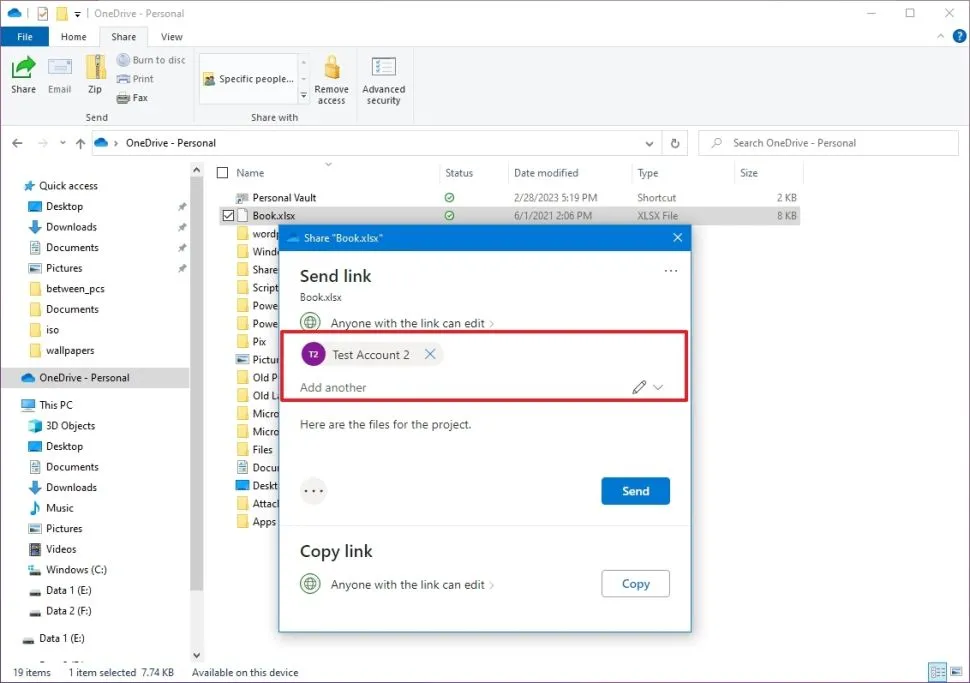
Confirm the email of the person to whom the content will be shared. (Or the available options to copy the link or share files using other apps.)
-
Click the Send button.


Any user who receives your message can click the link and view the folder’s content on any web browser.
2. File sharing from OneDrive (web)
If you want users to view and edit the content inside the OneDrive folder, you must share it using OneDrive on the web.
To share OneDrive files from the web, use these steps:
-
Open OneDrive online.
-
Open the file or folder you want to share.
-
Right-click the item and select the Share option.

-
Specify the email address to share the files. (You can also select the option to copy the link.)
-
Click the Send button.


Once you complete the steps, anyone with the link can edit the files in the folder.
If you only want to share files with specific users privately, you can share the content through email.
On Windows 10, Windows Search allows you to share files (not folders) and links with nearby devices using Bluetooth or Wi-Fi and with apps installed on your computer. This feature works seamlessly between Windows 10 and Windows 11 devices.
It’s important to note that Windows Search sends a copy of the file to the recipient rather than making it available directly from your computer. This means the recipient receives their own version of the file, and the original remains on your device.
Enable Nearby Sharing from Settings
You can share a file with applications without additional configuration. However, to share content with nearby devices, you must enable the “Nearby Sharing” feature.
To enable Nearby Sharing on Windows 10, use these steps:
-
Open Settings.
-
Click on System.
-
Click on Shared experiences.
-
Turn on the “Nearby sharing” toggle switch.


After you complete the steps, you can proceed to share files with other devices. (You must repeat these steps on all the devices participating in the sharing process.)
File sharing with Windows Search
To share files with other devices with the Windows Search interface, use these steps:
-
Open File Explorer.
-
Open the folder with the files you want to share.
-
Right-click the file and select the Share option.

-
Select the app or device to share the file.
Quick note: If you have the Phone Link app configured on your phone, you can share files directly with your Android device.
-
Continue with the on-screen directions.

Once you complete the steps, if you select an application, the file will be attached for sharing. If you choose to share a file with a device, you should see a notification that you must confirm to complete the transfer on the destination computer. When using this method, the file will be uploaded to the “Downloads” folder by default.
Files you share will only be available to users if their computers are turned on, except for the OneDrive sharing method. However, users must have an internet connection to access the shared content using OneDrive.
Update January 28, 2025: This guide has been revised to ensure accuracy and reflect any changes.