
После выхода Windows 10 меня раз за разом спрашивают, где скачать DirectX 12, почему dxdiag показывает версию 11.2, несмотря на то, что видеокарта поддерживается и о подобных вещах. Постараюсь ответить на все эти вопросы.
В этой статье — подробно о текущем состоянии дел с DirectX 12 для Windows 10, почему эта версия может быть не задействована на вашем компьютере, а также о том, где скачать DirectX и зачем это нужно, с учетом того, что этот компонент уже имеется в ОС.
Как узнать версию DirectX в Windows 10
Сначала о том, как посмотреть используемую версию DirectX. Для этого достаточно нажать клавиши Windows (которая с эмблемой) + R на клавиатуре и ввести dxdiag в окне «Выполнить».
В результате будет запущено Средство диагностики DirectX, в котором на вкладке «Система» можно увидеть и версию DirectX. В Windows 10 вы с большой вероятностью увидите там либо DirectX 12 либо 11.2.

Последний вариант не обязательно связан с неподдерживаемой видеокартой и точно не вызван тем, что вам нужно предварительно скачать DirectX 12 для Windows 10, поскольку все основные необходимые библиотеки уже имеются в ОС сразу после обновления или чистой установки.
Почему вместо DirectX 12 используется DirectX 11.2
Если в средстве диагностики вы видите, что текущая версия DirectX 11.2, это может быть вызвано двумя основными причинами — неподдерживаемая видеокарта (причем, возможно, она будет поддерживаться в будущем) или устаревшие драйвера видеокарты.

Важное обновление: в Windows 10 Creators Update в главном dxdiag всегда отображается 12-я версия, даже если она не поддерживается видеокартой. О том, как узнать поддерживаемую, см. отдельный материал: Как узнать версию DirectX в Windows 10, 8 и Windows 7.
Видеокарты, которые поддерживают DirectX 12 в Windows 10 на настоящий момент:
- Интегрированная графика Intel процессоров Core i3, i5, i7 Haswell и Broadwell.
- NVIDIA GeForce серий 600, 700, 800 (частично) и 900, а также видеокарты GTX Titan. NVIDIA также обещает поддержку DirectX 12 для GeForce 4xx и 5xx (Fermi) в ближайшем будущем (следует ожидать обновленных драйверов).
- AMD Radeon серий HD 7000, HD 8000, R7, R9, а также интегрированные графические чипы AMD A4, A6, A8 и A10 7000, PRO-7000, Micro-6000 и 6000 (здесь также есть поддержка у процессоров E1 и E2). То есть Kaveri, Millins и Beema.
При этом, даже если ваша видеокарта, казалось бы, попадает в этот список, может оказаться, что конкретная модель пока не поддерживается (производители видеокарт все еще работают над драйверами).
В любом случае, одно из первых действий, которое следует выполнить, если вам требуется поддержка DirectX 12 — установить последнюю версию драйверов для Windows 10 вашей видеокарты с официальных сайтов NVIDIA, AMD или Intel.
Примечание: многие столкнулись с тем, что драйвера видеокарты в Windows 10 не устанавливаются, выдавая различные ошибки. В этом случае помогает полное удаление старых драйверов (Как удалить драйвера видеокарты), а также программ наподобие GeForce Experience или AMD Catalyst и установка их по-новому.
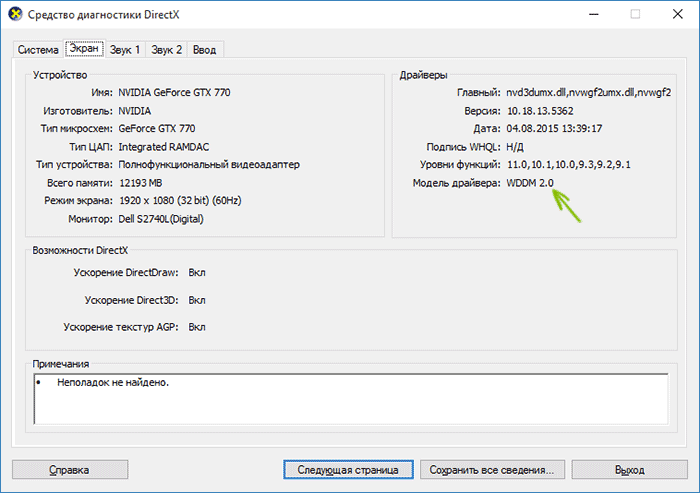
После обновления драйверов, посмотрите в dxdiag, какая версия DirectX используется, а заодно и версию драйвера на вкладке экран: для поддержки DX 12 должен быть драйвер WDDM 2.0, а не WDDM 1.3 (1.2).
Как скачать DirectX для Windows 10 и зачем это нужно
Несмотря на то, что в Windows 10 (также, как и в двух предыдущих версиях ОС) основные библиотеки DirectX присутствуют по умолчанию, в ряде программ и игр вы можете столкнуться с ошибками наподобие «Запуск программы не возможен, поскольку d3dx9_43.dll отсутствует на компьютере» и другими, связанными с отсутствием отдельных библиотек DLL предыдущих версий DirectX в системе.
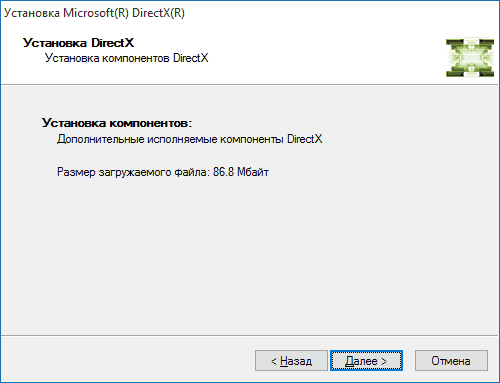
Чтобы избежать этого, рекомендую сразу скачать DirectX для Windows 10. После загрузки Веб-установщика, запустите его, и программа автоматически определит, каких библиотек DirectX не хватает на вашем компьютере, загрузит и установит их (при этом не обращайте внимания, что заявлена поддержка лишь Windows 7, в Windows 10 все функционирует точно так же).
Applies ToWindows 8.1 Windows 8.1 Enterprise Windows 8.1 Pro Windows 8 Windows 8 Enterprise Windows 8 Pro Windows RT Windows 7 Enterprise Windows 7 Home Basic Windows 7 Home Premium Windows 7 Professional Windows 7 Starter Windows 7 Ultimate Windows Server 2008 R2 Datacenter Windows Server 2008 R2 Enterprise Windows Server 2008 R2 for Itanium-Based Systems Windows Server 2008 R2 Standard Windows Vista Business Windows Vista Enterprise Windows Vista Home Basic Windows Vista Home Premium Windows Vista Starter Windows Vista Ultimate Windows Server 2008 Datacenter Windows Server 2008 Enterprise Windows Server 2008 for Itanium-Based Systems Windows Server 2008 Standard Microsoft Windows XP Service Pack 3 Microsoft Windows Server 2003 Service Pack 1 Microsoft Windows Server 2003 Service Pack 2 Windows 10
Что такое DirectX?
DirectX — это набор компонентов в Windows, который позволяет программному обеспечению, в первую очередь и особенно играм, работать непосредственно с видео- и аудиоустройством. Игры, использующие DirectX, могут более эффективно использовать встроенные в оборудование функции мультимедийного акселератора, что улучшает общий мультимедийный интерфейс.
Определение версии DirectX, установленной на компьютере
Инструмент DxDiag представляет подробную информацию о компонентах и драйверах DirectX, которые установлены в вашей системе и доступны к использованию.
-
Нажмите кнопку «Пуск», введите в поле поиска запрос dxdiag, затем нажмите клавишу «ВВОД».
-
Выберите элемент dxdiag в списке результатов поиска
-
Проверьте строку версия DirectX на первой странице отчета в разделе Информация о системе.
-
Проведите пальцем от правого края экрана к центру и коснитесь кнопки «Поиск». Введите запрос dxdiag в поле поиска. Или введите запрос dxdiag в строку поиска в меню «Пуск».
-
Выберите элемент dxdiag в списке результатов поиска
-
Проверьте строку версия DirectX на первой странице отчета в разделе Информация о системе.
-
Нажмите кнопку «Пуск» и введите в поле поиска запрос dxdiag.
-
Выберите элемент dxdiag в списке результатов поиска
-
Проверьте строку версия DirectX на первой странице отчета в разделе Информация о системе.
Версии DirectX и обновления через операционную систему
В этих версиях Windows DirectX 11.3 и 12 предустановлены.
Обновления будут доступны через Центр обновления Windows. Отдельного пакета данных версий DirectX не существует.
-
DirectX 11.1 входит в состав Windows 8, Windows RT и Windows Server 2012. Отдельного пакета обновления для DirectX 11.1 не существует. Эту версию DirectX можно установить только через клиентский компонент Центра обновления Windows в Windows 8, Windows RT и Windows Server 2012.
-
DirectX 11.2 предустановлен в системах Windows 8.1, Windows RT 8.1 и Windows Server 2012 R2. Отдельного пакета обновлений для DirectX 11.2 не существует. Эту версию DirectX можно установить только через Центр обновлений Windows в системах Windows 8.1, Windows RT 8.1 и Windows Server 2012 R2.
Примечание.Для дальнейшего обновления DirectX вам необходимо обновить операционную систему.
-
DirectX 11.0 предустановлен в системы Windows 7 и Server 2008 R2. Отдельного пакета обновлений для данной версии не существует. Вы можете обновить DirectX, установив пакет обновлений, а также обновления, перечисленные ниже.
-
DirectX 11.1 доступен для Windows 7 с пакетом обновления 1 (SP1) и Windows Server 2008 RS с пакетом обновления 1 (SP1) с обновлением платформы для Windows 7 и Windows Server 2008 (KB2670838).
Примечание. Для дальнейшего обновления DirectX вам необходимо обновить операционную систему.
-
DirectX 10 предустановлен в системах Windows Vista. Отдельного пакета обновлений для данной версии не существует. Вы можете обновить DirectX, установив пакет обновлений, а также обновления, перечисленные ниже.
-
DirectX 10.1 предустановлен в системах Windows Vista с пакетом обновления 1 (SP1) или более поздней версии и Windows Server с пакетом обновления 1 (SP1) или более поздней версии. Отдельного пакета обновлений для данной версии не существует. Вы можете обновить DirectX, установив пакет обновлений, а также обновления, перечисленные ниже.
-
DirectX 11.0 доступен для Windows Vista с пакетом обновления 2 (SP2) и Windows Server 2008 с пакетом обновления 2 (SP2) с установленными KB971512.
Примечание. Для дальнейшего обновления DirectX вам необходимо обновить операционную систему.
DirectX 9.0c доступен для Windows XP и Windows Server 2003 путем установки DirectX 9.0c End-User Runtime.
Некоторые приложения и игры требуют наличия DirectX 9. Тем не менее, на вашем компьютере установлена более поздняя версия DirectX. Если вы установили и запустили приложение или игру, для которой требуется DirectX 9, может появиться сообщение об ошибке, например «Запуск программы невозможен, так как на компьютере отсутствует d3dx9_35.dll. Попробуйте переустановить программу».
Чтобы устранить эту проблему, установите DirectX End-User Runtime.
Примечания.
-
При запуске этот пакет не вносит изменения в версию DirectX, Direct3D 9, Direct3D 10.x, Direct3D 11.x, DirectInput, DirectSound, DirectPlay, DirectShow и DirectMusic.
-
Для дальнейшего обновления DirectX необходимо обновить операционную систему.
Нужна дополнительная помощь?
Нужны дополнительные параметры?
Изучите преимущества подписки, просмотрите учебные курсы, узнайте, как защитить свое устройство и т. д.
How To Install DirectX 12 On Windows 11 and Windows 10 [Tutorial]
DirectX is a set of application programming interfaces (APIs) created by Microsoft that allows software, primarily games, to interface with graphics hardware. DirectX 12, in particular, is known for its advanced features that enhance performance and enable rendering of complex graphics, making it a critical component for modern gaming and graphic design applications. This guide will provide a detailed tutorial on how to install DirectX 12 on Windows 10 and Windows 11.
Understanding DirectX 12
Before we delve into the installation process, it’s vital to understand why DirectX 12 is important. This version of DirectX includes several enhancements over its predecessors, including:
-
Performance Improvements: DirectX 12 allows developers to have more control over the hardware, reducing CPU overhead, which can lead to higher frame rates and better utilization of multi-core processors.
-
Low-Latency Graphics: It supports less latency between CPU and GPU, allowing for a more fluid and responsive gaming experience.
-
Advanced Features: DirectX 12 includes features such as DirectX Raytracing for more realistic lighting and shadows, Variable Rate Shading to optimize rendering workloads, and better support for asynchronous compute operations.
-
Broad Compatibility: DirectX 12 is designed to work seamlessly with a wide array of hardware, making it compatible with both new and older systems.
Checking Your DirectX Version
Before you begin the installation process, it’s a good idea to check which version of DirectX is currently installed on your system. To do this:
- Press
Windows + Rto open the Run dialog. - Type
dxdiagand hit Enter. This will open the DirectX Diagnostic Tool. - In the tool, check the “DirectX Version” field near the bottom. If it says “DirectX 12”, your system is already equipped with the latest version.
If it shows a version lower than DirectX 12, follow the steps below to install or upgrade DirectX.
Prerequisites for Installing DirectX 12
DirectX 12 is included natively in Windows 10 and Windows 11, meaning you don’t need to install it manually as a separate package. However, the key to ensuring it works correctly lies in keeping your Windows operating system updated. Here are the prerequisites to consider:
- Operating System: Ensure you are running Windows 10 (Version 1507 or later) or Windows 11.
- Windows Updates: Make sure your OS is up-to-date by checking for and installing Windows Updates, as DirectX updates are often rolled out through these updates.
- Hardware Requirements: Ensure your GPU supports DirectX 12. You can check the specifications of your graphics card from the manufacturer’s website.
Installing or Updating DirectX 12
Step 1: Update Windows
The most reliable way to ensure that DirectX 12 is installed is by updating Windows. Here are the steps to do so:
- Click on the Start menu or press the Windows key.
- Go to Settings (the gear icon).
- Navigate to Update & Security.
- Click on Windows Update.
- Click on the Check for updates button. If there are updates available, Windows will start downloading and installing them.
After the update process is complete, you’ll likely have the latest version of DirectX installed.
Step 2: Install the DirectX End-User Runtime Web Installer
If in some cases, Windows Update does not install the DirectX components that some programs may require, you might need to manually download and install the DirectX End-User Runtime Web Installer. Here’s how:
- Open your preferred web browser and visit the official Microsoft DirectX download page.
- Click on the Download button to get the DirectX End-User Runtime Web Installer.
- Once downloaded, navigate to the folder where you saved the installer and double-click the setup file to begin the installation.
- Follow the installation prompts:
- Accept the End User License Agreement (EULA).
- The installer will check your system for missing DirectX components and download them from the internet.
- After the installation process is complete, restart your computer for the changes to take effect.
Step 3: Verify the Installation
After completing the installation or update, it’s a good practice to verify that DirectX 12 is indeed installed and functioning as expected:
- Open the Run dialog again using
Windows + R. - Type
dxdiagand hit Enter to launch the DirectX Diagnostic Tool. - Under the “DirectX Version” field, confirm that it displays “DirectX 12.”
Troubleshooting Installation Issues
If you encounter issues while installing or if DirectX 12 is not functioning correctly, consider the following troubleshooting steps:
Check for Software Conflicts
Sometimes third-party applications can interfere with the installation. Make sure to close all running applications, especially game clients, before attempting the installation.
Reinstall Graphics Drivers
Incompatibility with older graphics drivers can cause problems with DirectX 12. Reinstalling or updating your graphics drivers may resolve these issues:
- Press
Windows + Xand select Device Manager. - Expand the Display drivers section.
- Right-click on your graphics card and select Update driver. You can choose to search automatically for updated driver software.
Run Windows Troubleshooter
Windows has built-in troubleshooters that can help diagnose and fix common problems:
- Go to Settings.
- Navigate to Update & Security > Troubleshoot.
- Click on Additional troubleshooters and run the relevant troubleshooter.
DirectX Repair Tool
Although not an official Microsoft tool, some third-party applications claim to repair DirectX components. Ensure that you download such tools from reputable sources if you choose to go this route.
Conclusion
Installing DirectX 12 on Windows 10 or Windows 11 is a straightforward process that primarily involves keeping your operating system updated. Given its critical importance to modern gaming and graphics applications, ensuring that you have DirectX 12 can significantly enhance your computing experience.
Whether you’re a gamer seeking better performance or an application developer creating graphics-intensive software, DirectX 12 offers several advantages that make it worth having on your system. By following the above tutorial and troubleshooting steps, you should be well-equipped to install and configure DirectX 12 successfully.
Keep an eye on updates and regularly check your DirectX version to ensure that your system continues to deliver optimal performance. Happy gaming!
If you want to have the ultimate gaming experience on your Windows 10 PC, then you absolutely must ensure that your hardware supports DirectX 12 Ultimate. DirectX is a collection of Application Programming Interfaces (APIs) that have been created to enhance your multimedia experience, which includes streaming, gaming, and audio to the maximum.
Currently, DirectX 12 Ultimate is the latest and most advanced API technology by Microsoft which promises to give you an overall experience whilst gaming like you have never before.
However, simply installing DirectX 12 Ultimate is not sufficient. You need to ensure that your hardware, which is your computer, supports it as well. This article discusses how you can make sure whether your PC supports it, or buy the one that does.
What DirectX 12 Ultimate offers
Microsoft calls DirectX 12 Ultimate the “new gold standard for gaming graphics.” It is said to provide visual graphics that are as good as movies, significantly improve the framerates through Variable Rate Shading, and improves the overall performance through quick processing and faster response rates.
Together with the Xbox Game Bar in Windows 10 and DirectX, a computer becomes the ultimate gaming tech that you would ever need for first-person shooting and other games in the best quality.
You can read more about DirectX 12 Ultimate in this blog post.
How to check if your PC supports DirectX 12 Ultimate
If you are going to purchase a new PC, Microsoft recommends that you get the one that supports DirectX 12 Ultimate.
If you are upgrading your gaming PC or buying a new one, look no further than “DirectX 12 Ultimate” on the product page or retail boxes!
Microsoft
The best way to ensure that your hardware supports this technology is by looking for it on either the retail box or by checking out the support on the manufacturer’s website.
However, if you already own a Windows 10 PC, you can check whether it supports DirectX 12 Ultimate through Xbox Game Bar. The Game Bar now automatically performs a test and lets you know whether your hardware is DirectX 12 Ultimate compatible or not.
Simply launch the Xbox Game Bar by pressing the Windows key + G shortcut keys. Then, click on Settings and the settings window will popup below it. Navigate to the Gaming features tab from the left of the window, and you will now see the DirectX 12 Ultimate status on the right, as shown in the image below:

If you find that the above features are not available on your Xbox Game Bar, we suggest that you try updating it through the Microsoft Store.
Supported hardware for DirectX 12 Ultimate
Microsoft has also shared a broad spectrum of supported graphics cards for DirectX 12 Ultimate. If you have any of the following hardware, then you should have no problem experiencing the best multimedia on your PC:
- AMD Radeon RX 6000 series
- NVIDIA GeForce RTX 30 series
- NVIDIA GeForce RTX 20 series
Closing words
Previously, Microsoft was releasing DirectX as a separate entity. However, it is now available and regularly updated through the Windows Update feature. Therefore, if you are a hardcore gamer, then you no longer need to worry about DirectX being up to date, and focus on which GPU and PC to upgrade to for the optimum multimedia experience.
In this guide, we’ll explore how to fix “DX12 is Not Supported on Your System: Try Running Without the DX12 or D3D12 Command Line Argument”.

If you’ve encountered the error message “DX12 is not supported on your system. Try running without the DX12 or D3D12 command line argument” while trying to launch a game or application, it can be incredibly frustrating. This error is often tied to DirectX 12 (DX12), a technology used to enhance the graphical performance of games. Luckily, there are several ways to resolve this issue.
What is DirectX 12?
DirectX 12 is the latest version of Microsoft’s API designed to improve multimedia experiences, particularly in gaming. It optimizes resource management for your GPU, allowing for better graphics and smoother gameplay. Many newer games require DX12 for their advanced visual effects and performance enhancements. However, not all systems are fully compatible, which is where the “DX12 is not supported” error comes in.
Common Causes of the DX12 Error
There are several reasons why you may see “DirectX 12 is not supported on your system” or the related message “Try running without the DX12 or D3D12 command line argument.” These include:
- Outdated Hardware: Not all GPUs are compatible with DirectX 12. If your graphics card is old, it may not support DX12 or D3D12.
- Outdated Drivers: Even if your hardware supports DX12, outdated drivers can lead to compatibility issues.
- Unsupported Operating System: DirectX 12 is only available on Windows 10 and above. If you are using an older version of Windows, you’ll need to upgrade.
- Corrupt DirectX Installation: Sometimes, issues with your DirectX installation can trigger this error.
Here’s how to troubleshoot and resolve the “DX12 is not supported” error.

1. Check Your System for DX12 Compatibility
Before anything else, verify whether your system can support DirectX 12.
- Check DirectX Version:
- Press
Windows + Rto open the Run dialog box. - Type
dxdiagand press Enter. - In the DirectX Diagnostic Tool, check the version number listed under the “System” tab. If it’s lower than 12, you will need to update your system.
- Press
- Check GPU Compatibility: Visit the website of your GPU manufacturer (e.g., NVIDIA, AMD, or Intel) to see if your graphics card supports DX12 or D3D12.
2. Update Your Graphics Drivers
Outdated drivers are one of the most common causes of this error. To fix this:
- For NVIDIA Users: Visit the NVIDIA driver page to download the latest drivers for your GPU.
- For AMD Users: Go to the AMD support page and update your drivers.
- For Intel Users: Download the latest drivers from the Intel Driver & Support Assistant.
Once your drivers are updated, restart your system and try launching the game or application again.
3. Update Windows to the Latest Version
DirectX 12 is supported on Windows 10 and above. If you’re running an older version of Windows, upgrading to the latest OS version is necessary for DX12 support.
- Go to Settings > Update & Security > Windows Update, and click Check for updates.
- Install any available updates and restart your PC.
4. Reinstall DirectX 12
If the issue persists, reinstalling DirectX may help.
- Visit the official Microsoft site to download the DirectX End-User Runtime Web Installer.
- Install the latest version of DirectX and restart your computer.
Alternatively, you can also download DirectX 12 from trusted sites like Inzoi, but ensure they are legitimate.
5. Use Command Line Arguments
In some cases, developers provide a workaround where you can run the game or application without the DX12 or D3D12 arguments:
- Modify Launch Options: For Steam games, right-click the game in your library, select Properties, and then in the Launch Options box, type:
-dx11or-d3d11to force the game to use DirectX 11 instead of DX12 or D3D12.
This can help if your system isn’t fully compatible with DirectX 12.
6. Upgrade Your Hardware (If Necessary)
If your GPU or system is outdated, upgrading might be your only option to support DirectX 12. Some GPUs known to support DX12 include:
- NVIDIA GeForce RTX Series (e.g., RTX 3060, RTX 3080)
- AMD Radeon RX Series (e.g., RX 6600, RX 6900 XT)
Ensure your hardware is capable of running DirectX 12, especially if you’re playing resource-intensive games like Lords of the Fallen, which often trigger the “DX12 is not supported on your system” error.
Frequently Asked Questions
Q1: Can I fix the “DX12 is not supported” error without upgrading my hardware?
Yes, you can try running the game or application with DirectX 11 or D3D11 by using the command line arguments -dx11 or -d3d11 as mentioned above.
Q2: Why do I get the error “Try running without the DX12 or D3D12 command line argument”?
This error typically occurs if your system doesn’t meet the minimum requirements to run DirectX 12. This can be due to an incompatible GPU or outdated drivers.
Q3: Is DirectX 12 available on Windows 7 or 8?
No, DirectX 12 is only supported on Windows 10 and later versions. If you’re using an older version of Windows, upgrading is necessary to resolve this issue.
Q4: What games commonly show this error?
Some high-performance games like Lords of the Fallen or The Casting of Frank Stone are known to trigger the DX12 is not supported error due to their high system requirements.
Conclusion
Encountering the “DX12 is not supported on your system” error can be frustrating, but following the steps above will help you resolve the issue. Whether it’s updating your drivers, reinstalling DirectX, or upgrading your hardware, these solutions should get your games and applications running without a hitch.
By ensuring your system is up to date and meets the hardware requirements, you can avoid the DX12 is not supported on your system error and enjoy seamless performance in your favorite games.
Visit Our Post Page: Blog Page