
Если нужно настроить регулярную (по определенному расписанию) перезагрузку или выключение Windows компьютера (сервера), проще всего создать задание в планировщике задач.
Содержание:
- Задание планировщика для автоматической перезагрузки (выключения) Windows
- Перезагрузка (выключение) Windows компьютеров с помощью групповых политик
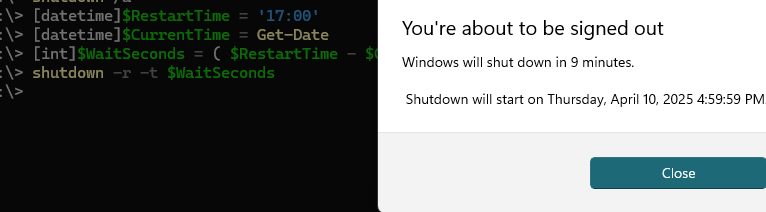
Чтобы разово перезагрузить компьютер в определенное время, можно создать задание отложенной перезагрузки с помощью PowerShell скрипта:
 [datetime]$RestartTime = '17:00'
[datetime]$CurrentTime = Get-Date
[int]$WaitSeconds = ( $RestartTime - $CurrentTime ).TotalSeconds
shutdown -r -t $WaitSeconds
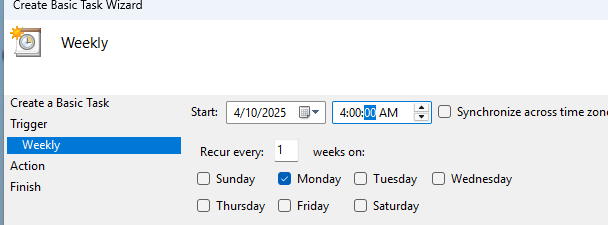
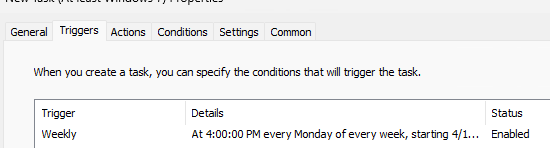
Но чаще всего используются запланированные задания перезагрузки. Например, вам нужно создать задание, которое будет автоматически перезагружать сервер каждый понедельник в 04:00 утра.
Задание планировщика для автоматической перезагрузки (выключения) Windows
Откройте консоль Task Scheduler (
taskschd.msc
) и запустите мастер создания задания: Action -> Create Basic Task.
Задайте имя задания: RebootMonday
Настройие расписание запуска задания. В нашем примере это еженедельное задание (Weekly), которое запускается каждый понедельник.
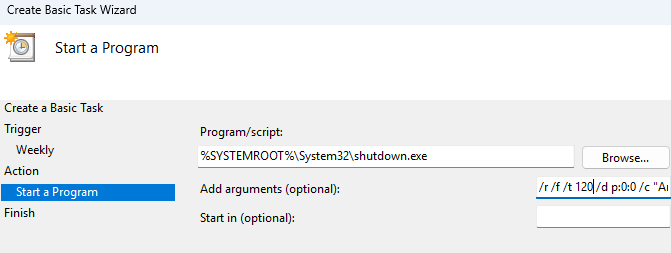
Выберите Start a program. Будем запускать встроенную команду shutdown.exe для перезагрузки с параметрами:
Program:
%SYSTEMROOT%\System32\shutdown.exe
Add arguments (optional):
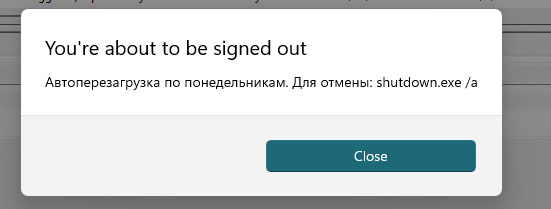
/r /f /t 120 /d p:0:0 /c "Автоперезагрузка по понедельникам. Для отмены: shutdown.exe /a"
-
/r
— перезагрузка -
/f
– принудительно завершить все приложения -
/t 120
– таймаут перед перезагрузкой -
/d p:0:0
— добавить в Event Viewer плановую причину перезагрузки: Other (planned) -
/с
– вывести информационное сообщение пользователям компьютера перед перезарузкой
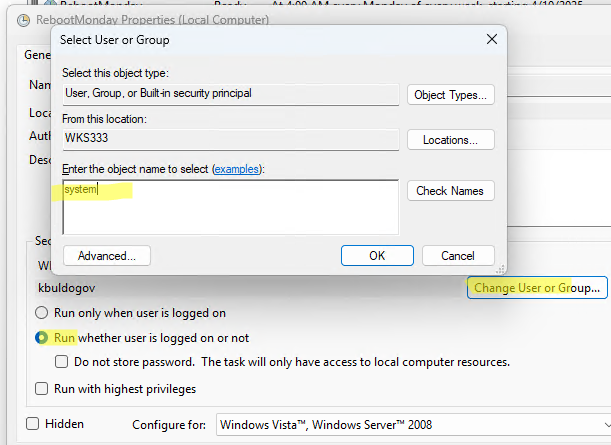
Чтобы задание запускалось автоматически, независимо от наличия активной сессий пользователя на компьютере:
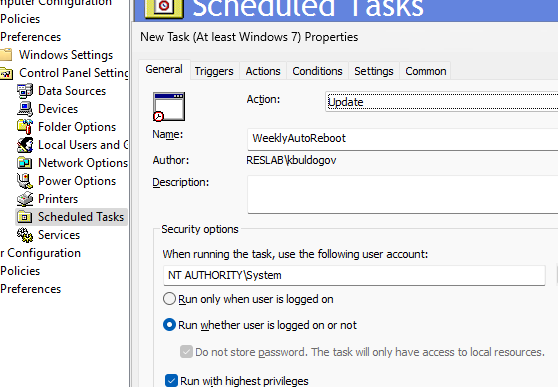
- Откройте свойства задания в консоли Task Scheduler
- Выберите опцию Run whether user is logged or not
- Нажмите кнопку Change User or Group и укажите System

- Теперь задание будет запускаться от имени NT AUTHORITY\SYSTEM.
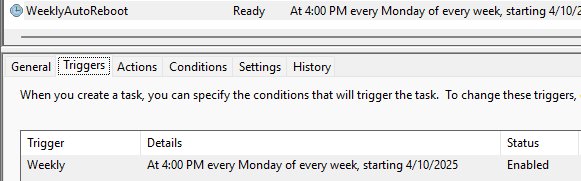
- Проверьте, что задание включено.
Теперь данный компьютер будет автоматически перезагружаться в запланированное время, выводя уведомление перед рестартом.
С помощью PowerShell можно быстро создать такое задание планировщика с командой перезагрузки:
$taskName = "WeeklyAutoReboot"
$taskDescription = "Automatically reboots the server every Monday at 04:00 AM"
$action = New-ScheduledTaskAction -Execute "shutdown.exe" -Argument "/r /f /t 120 /d p:0:0 /c `"Автоперезагрузка по понедельникам. Для отмены: shutdown.exe /a`""
$trigger = New-ScheduledTaskTrigger -Weekly -DaysOfWeek Monday -At 4:00am
$principal = New-ScheduledTaskPrincipal -UserId "SYSTEM" -RunLevel Highest
Register-ScheduledTask -TaskName $taskName -Action $action -Trigger $trigger -Principal $principal
Перезагрузка (выключение) Windows компьютеров с помощью групповых политик
Если нужно настроить выключение (перезагрузку) по расписанию нескольких компьютеров в домене AD, такое задание планировщика можно создать с помощью групповых политик.
- Откройте консоль управления доменными GPO (
gpmc.msc
), создайте новую GPO и назначьте ее на OU с компьютерами, которые нужно перезагружать/выключать по расписанию. - Отредактируйте новую GPO и перейдите в раздел Computer Configuration -> Preferences -> Control Panel Settings -> Scheduled Tasks;
- Создайте новое задание: New -> Scheduled task (At least Windows 7);
- Задайте имя задания и запуск от имени SYSTEM (как описано выше)

- На вкладке Triggers добавьте расписание для задания

- На вкладке Actions добавьте запуск команды shutdown.exe с параметрами

- Сохраните задание
- Обновите настройки GPO на клиенте, и проверьте что в планировщике задания появилось задание запланированной перезагрузки Windows.


Если нужно привязать задание автоматической перезагрузки/выключения компьютера к завершению другого задания (например, перезагрузиться после успешного окончания бэкапа), см. пример реализации в статье Как запустить задание планировщика Windows после завершения другого задания?
Одна из самых неприятных вещей в Windows 10 — автоматическая перезагрузка для установки обновлений. Несмотря на то, что она не происходит непосредственно в то время, когда вы работаете за компьютером, он может перезагрузиться для установки обновлений, если, к примеру, вы отправились на обед.
В этой инструкции — несколько способов настроить или полностью отключить перезагрузку Windows 10 для установки обновлений, оставив при этом возможность самостоятельного перезапуска ПК или ноутбука для этого. См. также: Как отключить обновление Windows 10.
Примечание: если ваш компьютер перезагружается при установке обновлений, при этом пишет, что Нам не удалось завершить (настроить) обновления. Отмена изменений, то используйте данную инструкцию: Не удалось завершить обновления Windows 10.
Настройка перезапуска Windows 10
Первый из способов не предполагает полного отключения автоматической перезагрузки, а позволяет лишь настроить то, когда она происходит, стандартными средствами системы.
Зайдите в параметры Windows 10 (клавиши Win+I или через меню «Пуск»), перейдите к разделу «Обновления и безопасность».
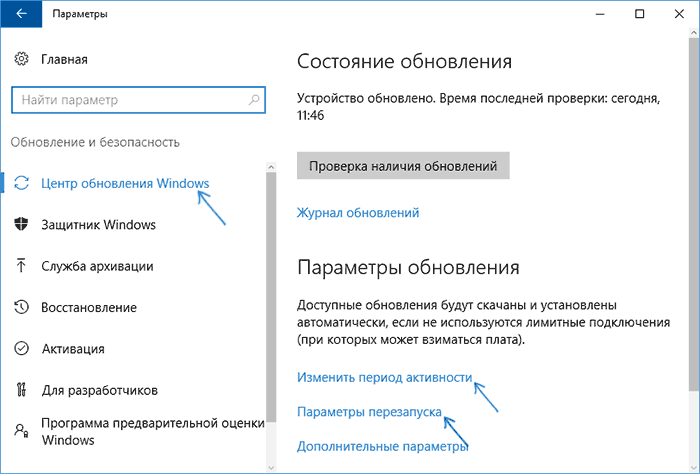
В подразделе «Центр обновления Windows» вы можете настроить параметры обновления и перезапуска следующим образом:
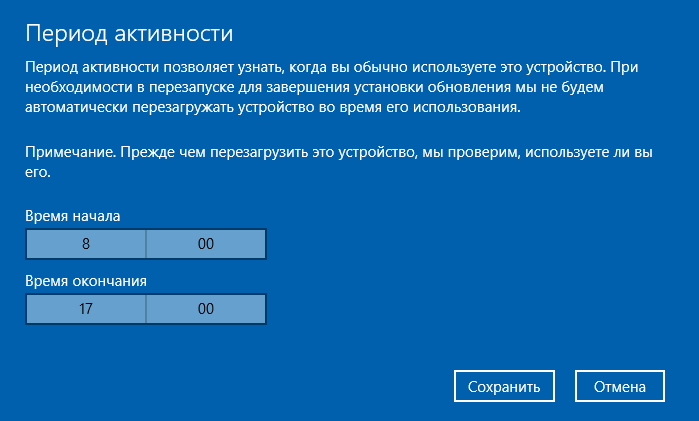
- Изменить период активности (только в версиях Windows 10 1607 и выше) — задать период продолжительностью не более 12 часов, в течение которых компьютер не будет перезагружаться.

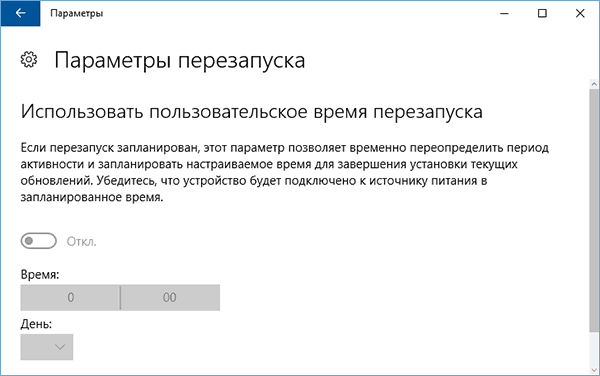
- Параметры перезапуска — настройка активна только если обновления уже загружены и перезапуск запланирован. С помощью этой опции вы можете изменить запланированное время автоматической перезагрузки для установки обновлений.

Как видите, полностью отключить эту «функцию» простыми настройками не получится. Тем не менее, для многих пользователей описанной возможности может оказаться достаточно.
С помощью редактора локальной групповой политики и редактора реестра
Этот способ позволяет полностью отключить автоматическую перезагрузку Windows 10 — с помощью редактора локальной групповой политики в версиях Pro и Enterprise или в редакторе реестра, если у вас домашняя версия системы.
Для начала шаги для отключения с помощью gpedit.msc
- Запустите редактор локальной групповой политики (Win+R, ввести gpedit.msc)
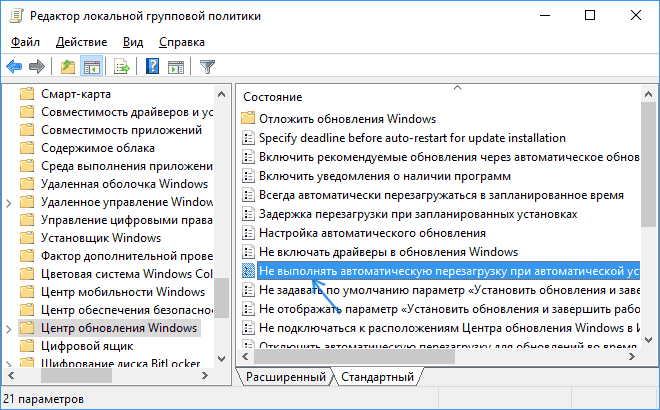
- Перейдите к разделу Конфигурация компьютера — Административные шаблоны — Компоненты Windows — Центр обновления Windows и дважды кликните по параметру «Не выполнять автоматическую перезагрузку при автоматической установке обновлений, если в системе работают пользователи».

- Установите значение «Включено» для параметра и примените сделанные настройки.

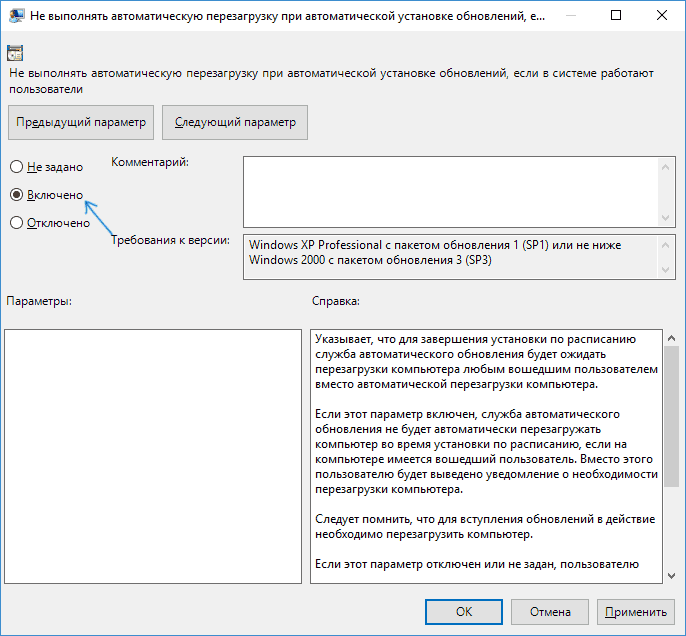
Можно закрыть редактор — Windows 10 не будет автоматически перезагружаться, если есть пользователи, которые вошли в систему.
В Windows 10 домашняя то же самое можно выполнить в редакторе реестра
- Запустите редактор реестра (Win+R, ввести regedit)
- Перейдите к разделу реестра (папки слева) HKEY_LOCAL_MACHINE\ SOFTWARE\ Policies\ Microsoft\ Windows\ WindowsUpdate\ AU (если «папка» AU отсутствует, создайте ее внутри раздела WindowsUpdate, кликнув по нему правой кнопкой мыши).
- Кликните в правой части редактора реестра правой кнопкой мыши и выберите создать параметр DWORD.
- Задайте имя NoAutoRebootWithLoggedOnUsers для этого параметра.
- Кликните по параметру дважды и задайте значение 1 (один). Закройте редактор реестра.


Сделанные изменения должны вступить в силу без перезагрузки компьютера, но на всякий случай можно и перезапустить его (так как не всегда изменения в реестре сразу вступают в силу, хоть и должны).
Отключение перезагрузки с помощью планировщика заданий
Еще один способ выключить перезапуск Windows 10 после установки обновлений — использовать планировщик заданий. Для этого запустите планировщик заданий (используйте поиск в панели задач или клавиши Win+R, и ввод control schedtasks в окно «Выполнить»).
В планировщике заданий перейдите к папке Библиотека планировщика заданий — Microsoft — Windows — UpdateOrchestrator. После этого кликните правой кнопкой мыши по задаче с именем Reboot в списке задач и выберите «Отключить» в контекстном меню.
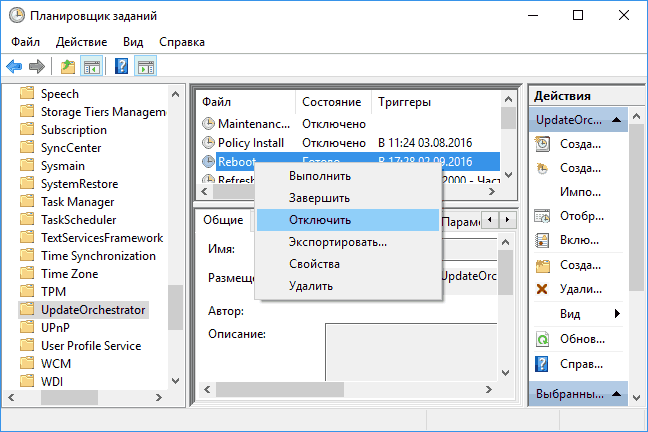
В дальнейшем автоматическая перезагрузка для установки обновлений происходить не будет. При этом, обновления будут устанавливаться при перезагрузке компьютера или ноутбука вручную.
Еще один вариант, если выполнять всё описанное вручную для вас сложно — использовать стороннюю утилиту Winaero Tweaker для отключения автоматической перезагрузки. Опция находится в разделе Behavior в программе.
На данный момент времени — это все способы отключения автоматической перезагрузки при обновлениях Windows 10, которые я могу предложить, но, думаю, их окажется достаточно, если такое поведение системы доставляет вам неудобства.
Scheduling automatic reboots on Windows can keep your system running smoothly and prevent common performance issues. Over time, computers can slow down or encounter glitches if they stay on without restarting, especially after updates or high-usage periods.
By setting up regular reboots with Windows Task Scheduler, you can automate this process, ensuring your system stays efficient without needing manual restarts.
In this guide, we’ll show you how to use Task Scheduler to schedule automatic reboots on Windows in five simple steps. This approach minimizes downtime, keeps your system in top shape, and is ideal for both personal and professional setups.
Disclaimer: This option is available on Windows 10, Windows 8, Windows 7, and Windows XP.
IN THIS GUIDE
Why Use Task Scheduler for Automatic Reboots?
Prerequisites and Compatibility
Step-by-Step to Schedule Automatic Reboots Using Task Scheduler Reboot
Advanced Options for Automatic Reboots on Multiple Systems
Security and Maintenance Considerations
FAQs about Automatic Reboot in Windows 10, Windows 8, or Windows 7
Recommended Method: Simplify Automatic Reboots and System Management with V2 Cloud
WordPress Table of Contents by Topic
Why Use Task Scheduler for Automatic Reboots?
Using Task Scheduler for automatic reboots is a simple yet powerful way to maintain your Windows system’s performance. Here are three key benefits:
- Improve System Performance: Regular reboots clear out temporary files, refresh system resources, and free up memory. This helps your system run smoothly and reduces the risk of lag, freezes, or crashes, especially if you use demanding applications or leave your computer on for long periods.
- Optimize Updates and Maintenance: Many updates and software patches require a restart to take full effect. Scheduling reboots allows these updates to install smoothly without disrupting your workday. It’s also a convenient way to apply maintenance routines at times when the computer isn’t actively being used.
- Automation Benefits: Once set, Task Scheduler handles reboots automatically according to your preferences. This ensures your system restarts at optimal times, without the need for manual input. Automation is especially useful for remote or unattended systems where you want regular maintenance but can’t restart the computer manually.
Setting up automatic reboots through Task Scheduler is a proactive way to keep your system performing well with minimal effort.
Prerequisites and Compatibility
To set up automatic reboots using Task Scheduler, there are a few key prerequisites to ensure compatibility and functionality:
- System Compatibility: This method works on most Windows versions, including Windows 10, Windows 8, Windows 7, and Windows XP. If you’re using a different version, check your Task Scheduler settings, as some options may vary slightly.
- Administrative Access: To schedule automatic reboots, you need administrator privileges on the computer. This access is essential for creating, modifying, and managing tasks in Task Scheduler. If you don’t have admin access, contact your IT administrator or request permission on your device.
- Frequency and Timing Recommendations: Choosing the right frequency and time for scheduled reboots is important. For most users, a weekly reboot is enough to refresh system resources. If you’re managing a server or high-use workstation, consider a daily reboot at off-peak hours, such as late at night or early morning, to prevent disruptions during working hours.
Step-by-Step Guide to Schedule Automatic Reboots Using Task Scheduler Reboot
Follow these steps to configure an automatic reboot using Task Scheduler on your Windows system.
This guide ensures your system restarts regularly, maintaining optimal performance without requiring manual intervention.
Step 1: Access Task Scheduler
- Open Task Scheduler: Press the Win + R keys to open the Run dialog box.
- Launch Task Scheduler: Type taskschd.msc in the Run box, then press Enter. This command opens Task Scheduler, a tool designed to help you automate and manage scheduled tasks on your computer.
Step 2: Create a New Task Folder
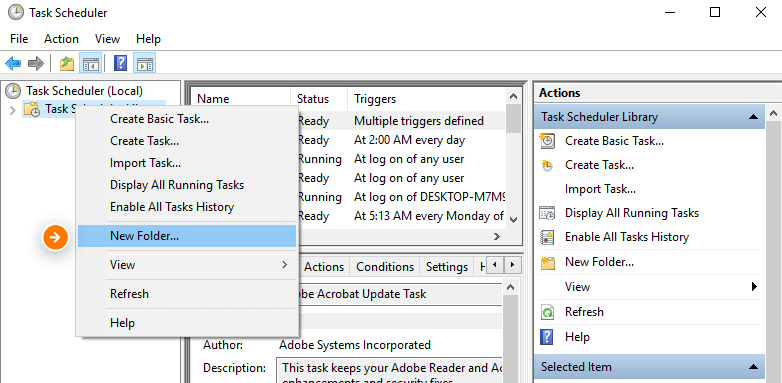
- Create a Task Folder for Organization: In Task Scheduler, look at the left panel and find Task Scheduler Library. Right-click on it and select New Folder.
- Name Your Folder: Enter a name that clearly identifies your task, such as Scheduled Reboots, and click OK. Organizing tasks in folders helps you easily locate and manage them in the future.
Step 3: Set Up the Task
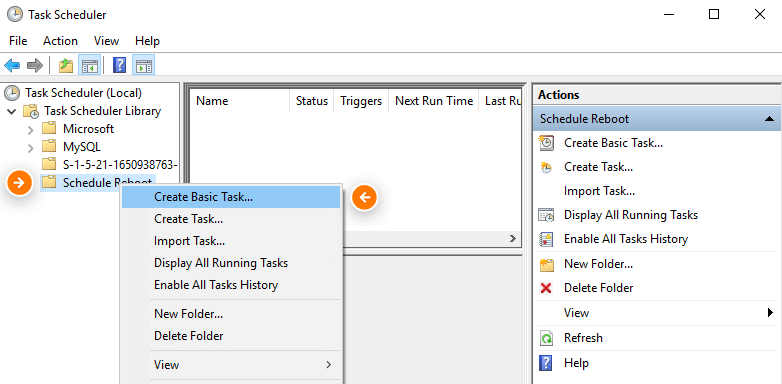
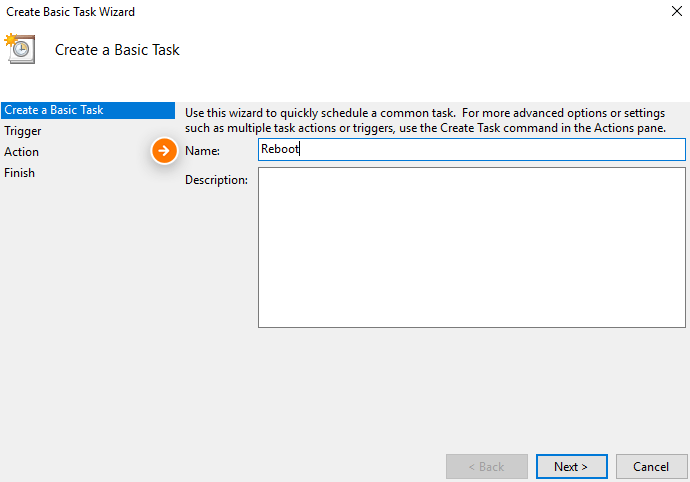
- Start Creating the Task: Inside the folder you created, right-click and select Create Basic Task from the menu.
- Name Your Task: In the Name field, enter a straightforward title like Reboot or Scheduled Restart. This title will appear in Task Scheduler’s list of tasks.
- Provide a Description (Optional): You can add a description to remind you of the task’s purpose, such as “Automatically restart the system every week to refresh resources.”
- Proceed to Next Step: Click Next to continue.
Step 4: Define the Task Trigger
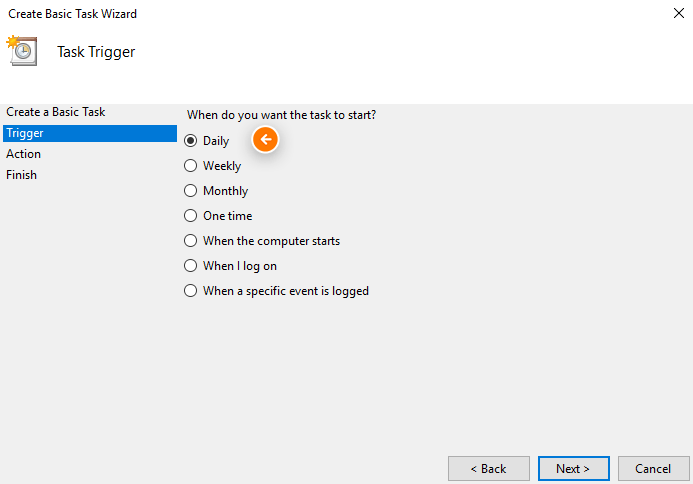
- Choose Frequency: Task Scheduler will prompt you to select how often the task should run. For routine maintenance, choose Daily or Weekly as a trigger, depending on your needs. A Daily reboot is ideal for systems that run continuously or handle high workloads, while Weekly might be sufficient for less demanding use.
- Set the Time: Specify the exact time for the reboot. Select a time when the computer is least likely to be in use, such as late at night or early in the morning, to minimize disruptions.
- Confirm Trigger Settings: After setting the frequency and time, click Next to proceed to the next configuration step.
Step 5: Specify the Task Action
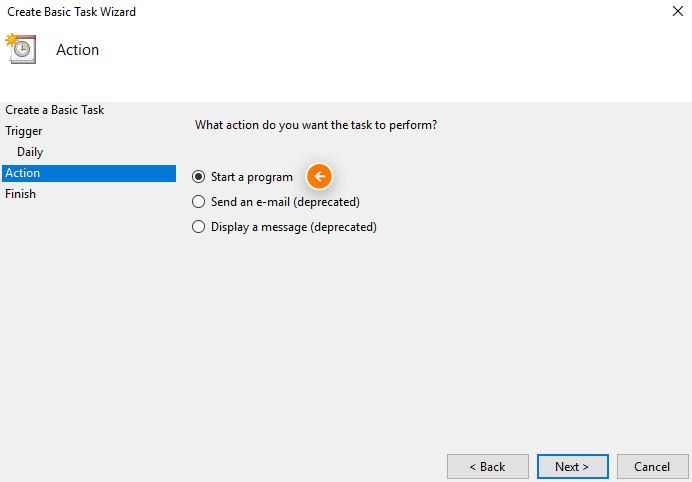
- Define the Action Type: In the Action screen, choose Start a program as the action. This setting allows Task Scheduler to initiate a command that will trigger the reboot.
- Enter the Reboot Command: In the Program/script field, type shutdown. In the Add arguments (optional) field, enter /r to set the task to restart the computer. The /r command tells Windows to perform a full restart.
- Optional Additional Arguments: You can use other shutdown commands if needed. For instance, adding /f forces applications to close, and /t 0 sets a 0-second delay for immediate execution. So, a complete command could look like shutdown /r /f /t 0.

- Click Next to Continue: Verify the command details, then proceed to the final configuration steps.
Step 6: Review and Finish Setup
- Review All Settings: Task Scheduler will display a summary of your configured task. Review the name, frequency, time, and action details to ensure everything is set up correctly.
- Complete the Task Setup: Click Finish to confirm and save the task. Task Scheduler may prompt you to enter administrator credentials to finalize the scheduled task.
- Grant Permissions if Prompted: If Windows asks for admin permissions to schedule the task, click Yes or Continue to authorize it.
Advanced Options for Automatic Reboots on Multiple Systems
If you manage multiple computers within a network, scheduling automatic reboots individually can be time-consuming. Windows Server’s Group Policy feature allows you to set up a scheduled reboot across multiple machines in a single step, ensuring all computers stay updated and in sync.
Follow these steps to configure automatic reboots for multiple systems using Group Policy:
Step 1: Open Group Policy Management Console (GPMC)
- Access GPMC: On a Windows Server, press Win + R, type gpmc.msc, and hit Enter. This opens the Group Policy Management Console, where you can create and manage Group Policy Objects (GPOs) for computers across your network.
- Create a New GPO: In GPMC, right-click on the Group Policy Objects folder, select New, and name the GPO something identifiable, like Scheduled Reboots Policy.
Step 2: Edit the Group Policy Object (GPO)
- Edit the GPO: Right-click on the GPO you just created and select Edit. This opens the Group Policy Management Editor, where you’ll define the settings for scheduled reboots.
- Navigate to Scheduled Tasks: In the editor, go to Computer Configuration > Preferences > Control Panel Settings > Scheduled Tasks. Here, you can create and customize tasks that will apply to all selected computers within the network.
Step 3: Set Up a New Scheduled Task for Reboots
- Create a New Task: Right-click on Scheduled Tasks, select New > Scheduled Task (At least Windows 7). This opens the configuration menu for creating a scheduled task.
- Configure General Settings:
- Name the Task: Enter a descriptive name, such as Network Reboot Task.
- Run with Highest Privileges: Check the box for Run with highest privileges to ensure the reboot task has sufficient permissions.
- Choose Task Frequency and Timing: Set a schedule that aligns with your organization’s downtime or non-working hours to minimize disruptions. Configure the task to run Daily or Weekly at a specific time, such as late at night.
Pro tip: Manually scheduling reboots works, but managing multiple machines can be time-consuming. V2 Cloud simplifies this with built-in automation, letting you schedule reboots, updates, and backups effortlessly in a secure cloud environment.
Skip the hassle—try V2 Cloud for free now.
Step 4: Define the Task Action to Reboot the System
- Specify the Action: Under the Actions tab, click New to add an action.
- Choose Start a Program: Select Start a program as the action type.
- Enter Reboot Command: In the Program/script field, type shutdown, and in the Add arguments field, add /r /f /t 0. This command will restart the computer immediately (/r for restart, /f to force close applications, and /t 0 to set a zero-second delay).
- Save the Action: Click OK to confirm the action settings.
Step 5: Link the GPO to the Targeted Organizational Unit (OU)
- Link the GPO: In the Group Policy Management Console, right-click on the Organizational Unit (OU) that contains the computers you want to target and select Link an Existing GPO.
- Select Your GPO: Choose the Scheduled Reboots Policy GPO you created earlier, and click OK. This links the policy to the selected OU, applying the scheduled reboot task to all computers within it.
Step 6: Refresh Group Policy and Confirm
- Force a Group Policy Update: To apply the new scheduled task immediately, open Command Prompt on a client computer and type gpupdate /force, then press Enter. This command forces the client computer to apply the new Group Policy settings.
- Verify the Task: Check the Task Scheduler on a target computer to confirm that the reboot task is listed and configured according to your settings.
Security and Maintenance Considerations
When scheduling automatic reboots on Windows systems, prioritizing security and maintenance is essential. Here are some best practices to ensure that the reboot tasks are secure and don’t introduce vulnerabilities to your system or network.
1. Limit Access to Task Scheduler and Group Policy
- Restrict Permissions: Only grant access to Task Scheduler or Group Policy to trusted administrators. Limiting permissions reduces the risk of unauthorized users creating, modifying, or deleting scheduled tasks.
- Use Role-Based Access Control (RBAC): Implement role-based access controls to assign permissions based on specific roles within your organization. This ensures that only authorized personnel can adjust critical system tasks.
2. Implement Multi-Factor Authentication (MFA) for Administrator Accounts
- Add an Extra Layer of Security: Enabling multi-factor authentication (MFA) for administrator accounts adds an extra verification step for accessing sensitive tools like Task Scheduler or Group Policy Management Console.
- Protect Remote Access: MFA is especially important for administrators managing systems remotely, as it reduces the risk of unauthorized access due to compromised credentials.
3. Audit and Log Task Scheduler and Group Policy Activity
- Enable System Logging: Ensure that logging is enabled on systems to track all activity related to scheduled tasks and Group Policy changes. Task creation, modifications, and deletions should all be recorded.
- Regularly Review Logs: Administrators should review logs periodically to detect any unusual or unauthorized changes. Look for unexpected task edits or deletions, which could signal a security risk.
4. Apply System and Security Updates Regularly
- Keep Software Updated: Regularly updating your operating system and security software protects against vulnerabilities that could be exploited by unauthorized users.
- Automate Updates Where Possible: Use Windows Update or centralized management tools like Windows Server Update Services (WSUS) to automate patching. Scheduling automatic reboots can also ensure that critical updates are applied without delay.
5. Configure Reboot Tasks with a Graceful Shutdown Command
- Use Force Only When Necessary: When setting up the shutdown command in Task Scheduler, use the /f (force) option only if absolutely necessary. Forced shutdowns can cause data loss if files are open, so consider implementing a warning prompt to notify users before the restart.
- Set a Delay When Needed: Adding a delay (e.g., /t 60 for 60 seconds) to the shutdown command provides users with a countdown, allowing them to save work before the system reboots. This is especially important in environments where users may be working on unsaved tasks.
Frequently Asked Questions about Automatic Reboot in Windows 10, Windows 8, or Windows 7
1. Can I schedule automatic reboots specifically for Windows updates?
Yes, you can set up automatic reboots specifically for Windows updates, ensuring your system applies updates without manual intervention.
Windows Update settings allow you to specify “Active Hours” to avoid reboots during peak times, or you can use Task Scheduler to create a reboot task aligned with update cycles.
For larger networks, Windows Server Update Services (WSUS) allows administrators to automate update deployment and reboots across multiple systems.
Pro tip: With V2 Cloud, you can automate updates and reboots effortlessly in a secure cloud environment—no need for complex task scheduling. Start a free trial now!
2. How can I cancel or modify an existing scheduled reboot task?
- Open Task Scheduler: Press Win + R, type taskschd.msc, and press Enter to open Task Scheduler.
- Locate the Task: Navigate to Task Scheduler Library (or the specific folder where you created the task).
- Modify or Delete: Right-click the reboot task to edit its schedule, timing, or actions. To remove it entirely, select Delete and confirm. This will immediately cancel future reboots configured by that task.
These steps make it easy to adjust or cancel scheduled reboots if you need to change your system maintenance routine.
3. Are there any security risks with automatic reboots, and how can I minimize them?
Scheduling automatic reboots has minimal risk if managed properly. However, unauthorized access to Task Scheduler or Group Policy settings could lead to unscheduled reboots or misuse. Minimize risks by:
- Restricting access to Task Scheduler: Limit access to administrators and use role-based controls.
- Enabling MFA (Multi-Factor Authentication) for administrator accounts.
- Logging Task Scheduler activity to detect unauthorized changes.
These measures help secure scheduled tasks and prevent any misuse of reboot settings.
4. Can I schedule automatic reboots for multiple computers in a network environment?
Yes, automatic reboots can be configured across multiple computers using Group Policy.
In a Windows Server environment, you can create a Group Policy Object (GPO) that applies scheduled reboot tasks to all computers within a selected organizational unit (OU). This is ideal for managing consistent reboots across multiple systems in a business environment.
Simply set up the reboot task within the GPO, and link it to the targeted OU, ensuring the task propagates across all designated systems.
5. Is it possible to set a warning notification before the scheduled reboot occurs?
Yes, you can configure the reboot command to give users advance warning before the system restarts.
In the Add arguments field of the Task Scheduler’s action setup, you can add a countdown timer by including /t followed by the number of seconds, such as /t 300 for a 5-minute warning.
The full command would look like shutdown /r /f /t 300. This setup notifies users with a countdown, allowing them to save work before the reboot.
Recommended Method: Simplify Automatic Reboots and System Management with V2 Cloud
Managing scheduled reboots and system maintenance across multiple computers can be challenging, especially for remote teams or large organizations.
V2 Cloud’s Virtual Desktop Infrastructure (VDI) provides an ideal solution, simplifying system management and improving reliability through a centralized, cloud-based platform.
Here’s how V2 Cloud can help streamline and enhance your system maintenance routine:
- Centralized Control: With V2 Cloud, admins can set up reboots and maintenance tasks across all virtual desktops from a single dashboard, ensuring consistency and saving time.
- Automated Maintenance: Schedule reboots and apply updates during off-hours to keep systems optimized without interrupting user workflows.
- Enhanced Security: V2 Cloud supports multi-factor authentication and detailed activity logs, securing access and ensuring that only authorized personnel can modify reboot schedules.
- Ideal for Remote Work: V2 Cloud’s VDI supports remote teams with easy access to virtual desktops, enabling secure, remote management of reboots and other system tasks.
Talk to a Cloud Expert Today to simplify your system management and keep your desktops running smoothly!
If you are a Windows user, you most likely have encountered your PC automatically restarting on you in the middle of working. Yes, updates for our computers are essential in keeping it running efficiently. When a restart happens without us knowing, though, it can be quite frustrating. Here’s how to set up a restart schedule for your Windows 10 computer.
With the current version of Windows, your PC automatically downloads updates and installs them when your PC detects that you are not using your computer for a period of time. This happens when your Windows Update has been set to “automatic” – it will work the same way as it has in the previous Windows by waiting until your PC is idle.
However, idle does not mean you allow your PC to be restarted. There may be instances when you just happen to leave your PC for a moment while working on a paper that is due hours from now. Next thing you know, your PC is automatically restarting! We do not want this to happen so Microsoft has given us the option to schedule a specific start time. With this, you now have a measure of control and it is time for you to be proactive with it! No more “Remind me later” pop-ups when you can customize your restarting schedules.
How to set up a restart schedule
- Click on the Start menu and open the Settings option.
- Select Update & Security > Windows Update. You will see two options wherein the first one is a schedule chosen by your computer. The other option is for you to select a specific restart time.
The first option shows a specific time your PC has chosen for you (e.g. 2:30 in the morning). If you want a specific time and date, click on Select a Restart Time and choose a Time and Day. For Time, tap on the box and hover over each part of the time (minutes, hours, and AM/PM) until you can choose your desired schedule. For the Day, you are given dates of the next few days for you to select which one you prefer most.
If you want updates to start immediately, you can choose the Restart Now option at the bottom of the page. Know that Windows schedules its own reboot first and you will have to override it through the Settings page to adjust it to your own schedule.
Go through those easy and simple steps and you no longer have to worry about your computer restarting whenever there is a need for you to leave it for a short period of time. It is also important for users to be notified when the system needs to reboot. You can control this option by following these steps:
- Click on Advanced Options at the bottom part of the Windows Update page.
- Go to the top of the screen and tap on Choose how updates are installed.
- Click the drop down and select the option to Notify to schedule restart.
This way, you will no longer find the need to keep checking the Settings menu if updates have already been installed. You will now receive prompts whenever updates require a restart of your PC. If you happen to be a Windows Insider, you can set your active hours for 18 hours with an option to choose when the OS should finish its updates. You can also set additional notifications before your system restarts to give you more time to save your work.
Once done, you can return to the previous screen by hitting the back button on the upper left. Now you can be notified ahead of time before your computer starts to install updates and restart its system.
How important are updates and scheduling restarts?
Wondering why Microsoft added this feature? With the new system, Microsoft has evolved to the notion of “Windows as a service.” This means that Windows is an on-going product with constant updates and patches. There will be new features every time which will depend on the needs of the users via the Windows Insider program.
It is a new way for Microsoft to develop and release software with a goal to continuously grow. Its aim is to adjust to what the world needs. Since updates have already become mandatory, Microsoft cares about how this could affect the users. Scheduling a restart can make it more convenient for them and could avoid interruptions during hours when they rely on the PC the most.
Microsoft has made it easier for users to work especially for individuals with different or shifting schedules. So if you are a person who works most at night, you can schedule your active hours during the day while you are away from your computer. Now you no longer have to worry about your PC installing updates in the middle of your working schedule!
Now that you know how to set up a restart schedule for your Windows 10 computer, check out our guide on how to reset your Windows 10 computer.
You can use the Task Scheduler to restart on schedule in both Windows 11 and Windows 10. Here’s how.
If you generally use your system all day, every day, and cannot restart it without disrupting the workflow, having the ability to schedule a restart is very useful. For example, maybe the system is functioning as a media server, connected to a medical device, 3D printer, or an industrial machine. Whatever your specific use case is, if you need it, you can restart your computer on schedule using the built-in Task Scheduler app.
One of the biggest advantages of restarting Windows regularly is that fix frees up RAM, may improve performance, solves a lot of system & software glitches, and more.
So, without further ado, let me show you how to schedule restart Windows using Task Scheduler in simple steps. Let’s get started.
Note: If you are looking to restart your system automatically to install Windows updates, make sure the Active Hours feature is enabled instead. No need to use the Task Scheduler.
- Open the Start menu.
- Search for “Task Scheduler” and click “Open“.
- Click the “Create task” option on the right panel.
- Type “Schedule Restart” in the “Name” field.
- Go to the “Triggers” tab and click “New“.
- Select “On a schedule” from the first drop-down menu.
- Select the “Daily” under “Settings”.
- Set the date and time.
- Type “1” in the “Recur every” field to run the task every day.
- Click “OK“.
- Go to the “Actions” tab and click “New“.
- Select “Start a program” from the first dropdown menu.
- Type “%SystemRoot%\system32\shutdown.exe” in the “Program/Script” field.
- Type “-r -f -t 10” in the arguments field.
- Click “OK“.
- (Optional) Go to the “Conditions” tab and select the “Start the task only if the computer is idle” checkbox. That way, the system will only restart if it is idle. i.e., not doing anything. Click “OK“.
- That’s it. From now on, Windows restarts on schedule.
Detailed Steps (With Screenshots)
First, open the Task Scheduler. To do that, open the Start menu by pressing the Windows key, search for “Task Scheduler” and click the “Open” option. Once it opens, click the “Create Task” option on the right sidebar.

The above action opens the task creation wizard. Here, type “Schedule Restart” in the “Name” field.

Go to the “Triggers” tab and click the “New” button at the bottom.

Select “On Schedule” from the “Begin the task” dropdown menu. Next, select the “Daily” option under “Settings”. After that, set the start date & time and the number of days you want the task to recur in the “Recur every” field. For example, to run the task every day, you can enter 1, to run the tasks on alternate days, you can enter 2, etc.
Click the “OK” button.
Note: You can also select other schedule options such as Weekly or Monthly depending on your use case.

Go to the “Actions” tab and click the “New” button at the bottom.

In the “New Action” window, configure the options as shown below:
- Action > Start a program.
- Program/script:
%SystemRoot%\system32\shutdown.exe - Add arguments:
-r -f -t 10
Click the “OK” button.

Go to the Conditions tab and select the “Start the task only if the computer is idle for:” checkbox, set the dropdown next to it to “10 minutes“, and click “OK“.

That’s it. You’ve created a scheduled task to restart Windows. You can find it in the middle of the Task Scheduler window.

From now on, Windows will reboot automatically on schedule as per the task configuration. Right before restarting, it will show a little message giving any active users a chance to save the work.

Good to know: How to display a popup message using a task scheduler.
Wrapping Up — Scheduling System Restart in Windows 11 & 10
As you can see, thanks to the Task Scheduler app, you can easily configure a custom scheduled task to restart Windows on schedule. If you ever want to disable the automatic scheduled restart, simply disable the scheduled task. To do that, open the Task Scheduler, find & right-click on the task, and select the “Disable” option.
Good to know: How to start programs on delay at startup using the task scheduler.
If you have any questions or need help, comment below. I’ll be happy to assist.