
Windows Task Scheduler holds all the tasks which were created by an application to periodically check for updates or by you to send an email when somebody logs in. If you need to create the same task on another Windows 10 computer or need them back after reinstallation, there is away. Task Scheduler gives you an option to export them one by one but not all of them together. In this tutorial, I will tell you a trick on how you can mass export Tasks from Windows Task Scheduler, and import it back to Windows.
All the Tasks created in Windows 10 are available in a Task Folder. It is available in the Windows System Directory which in my case is C:\Windows\System32\Tasks.
- Navigate to Tasks Folder. You will be prompted for admin permission.
- Here you will see a couple of folders with some files inside it. They represent the same folder structure of the Task Scheduler and files too have the same name.

- Copy the task files to the machine you want to export. You can also use it to back up your tasks in case your computer needs a reinstallation. It saves time as you don’t have to create them again.
- Rename the files with extension as “.XML”. It is the same extension Task Scheduler uses when you export the tasks.
- Once renamed, now use the Task Scheduler Import task feature to import them one by one. Windows will not recognize them if you drop them directly into the Tasks Folder of Windows.

I wish the mass export and import feature in Windows 10. It will be helpful for many people, especially in Enterprise.
Video Tutorial to mass export Tasks from Windows Task Scheduler
It’s an excellent way to import and export tasks, especially if you want to run the same tasks on multiple PC. Also, it opens up the option to keep a copy of all the tasks when you are reinstalling Windows. All you need to do is copy it again, and it restores all the tasks.
Be aware that if Tasks have file paths it may change when switch computers. Make sure to visit each task, and fix the path, and program names as required.
I hope the post was easy to follow, and you were able to mass export Tasks from Windows Task Scheduler, and later import it back to the same Windows 10 PC or any other PC.
Task Scheduler on Windows 10 allows you to quickly create and run tasks automatically. Using this tool, you can launch apps, run scripts, or execute commands at a particular day and time, or even during a specific event.
If you already created one or multiple scheduled tasks, another benefit of Task Scheduler is the ability to quickly export and import your tasks in at least three different ways using the console, Command Prompt, and PowerShell. This is particularly useful when moving to a new installation of Windows 10, to prevent having to recreate them from scratch, or to save time when you need to deploy the same job on many computers in your organization.
In this Windows 10 guide, we’ll walk you through the steps to export and import scheduled tasks to the same or different computer.
- How to export and import scheduled tasks using Task Scheduler
- How to export and import scheduled tasks using Command Prompt
- How to export and import scheduled tasks using PowerShell
How to export and import scheduled tasks using Task Scheduler
The easiest way to export and import scheduled tasks on Windows 10 is to use Task Scheduler and the instructions below.
Exporting tasks with Task Scheduler
To export a scheduled task using Task Scheduler, use these steps:
- Open Start.
- Search for Task Scheduler, and click the top result to open the experience.
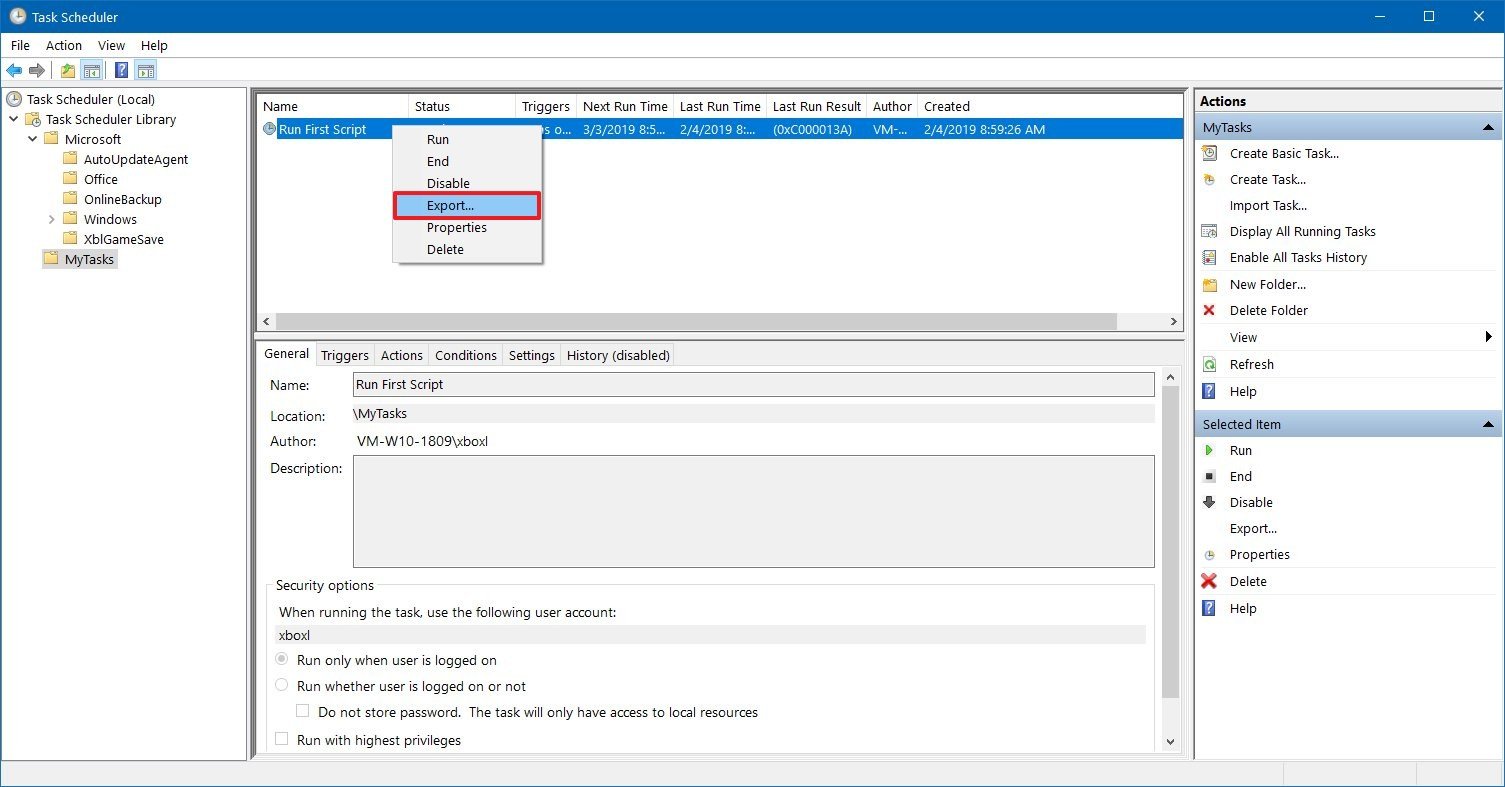
- Browse to the location of the scheduled task that you want to export.
- Right-click the item, and select the Export option.
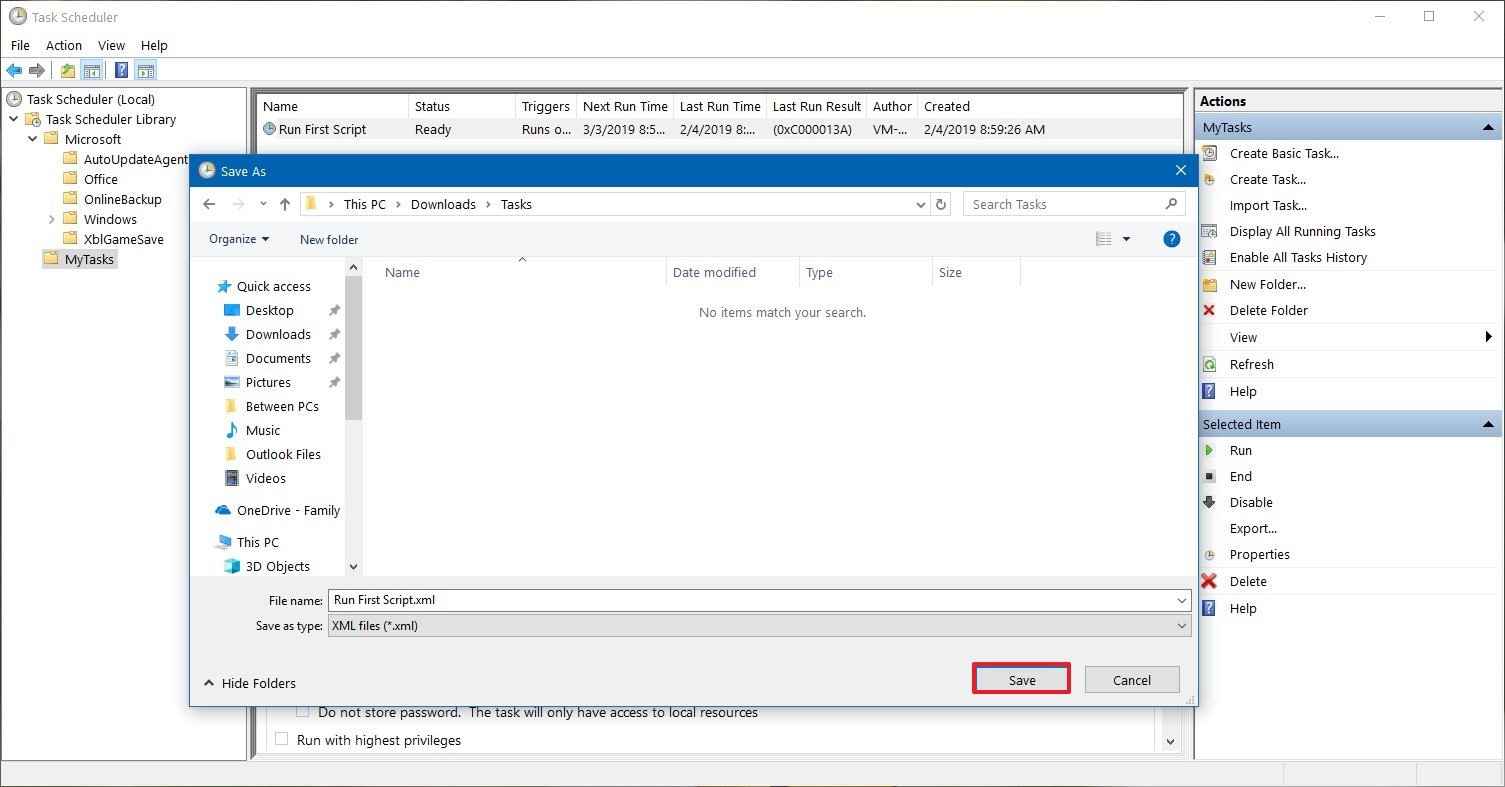
- Browse and open the folder to export the task.
- Click the Save button.
Once you complete these steps, you’ll end up with a .xml file that you can then import to another machine or another installation of Windows 10.
Using Task Scheduler, you can only export (or import) one task at a time, as such you’ll need to repeat the steps to export additional scheduled tasks.
All the latest news, reviews, and guides for Windows and Xbox diehards.
Importing tasks with Task Scheduler
To import a scheduled task on Windows 10, use these steps:
Important: This option will only restore the task; it’ll not restore the script or application that the task will execute. If you’re importing a task that runs a script or starts an application, you need to make sure that those resources exist on the device before proceeding with the steps below. Otherwise, the scheduled task will fail.
- Open Start.
- Search for Task Scheduler, and click the top result to open the experience.
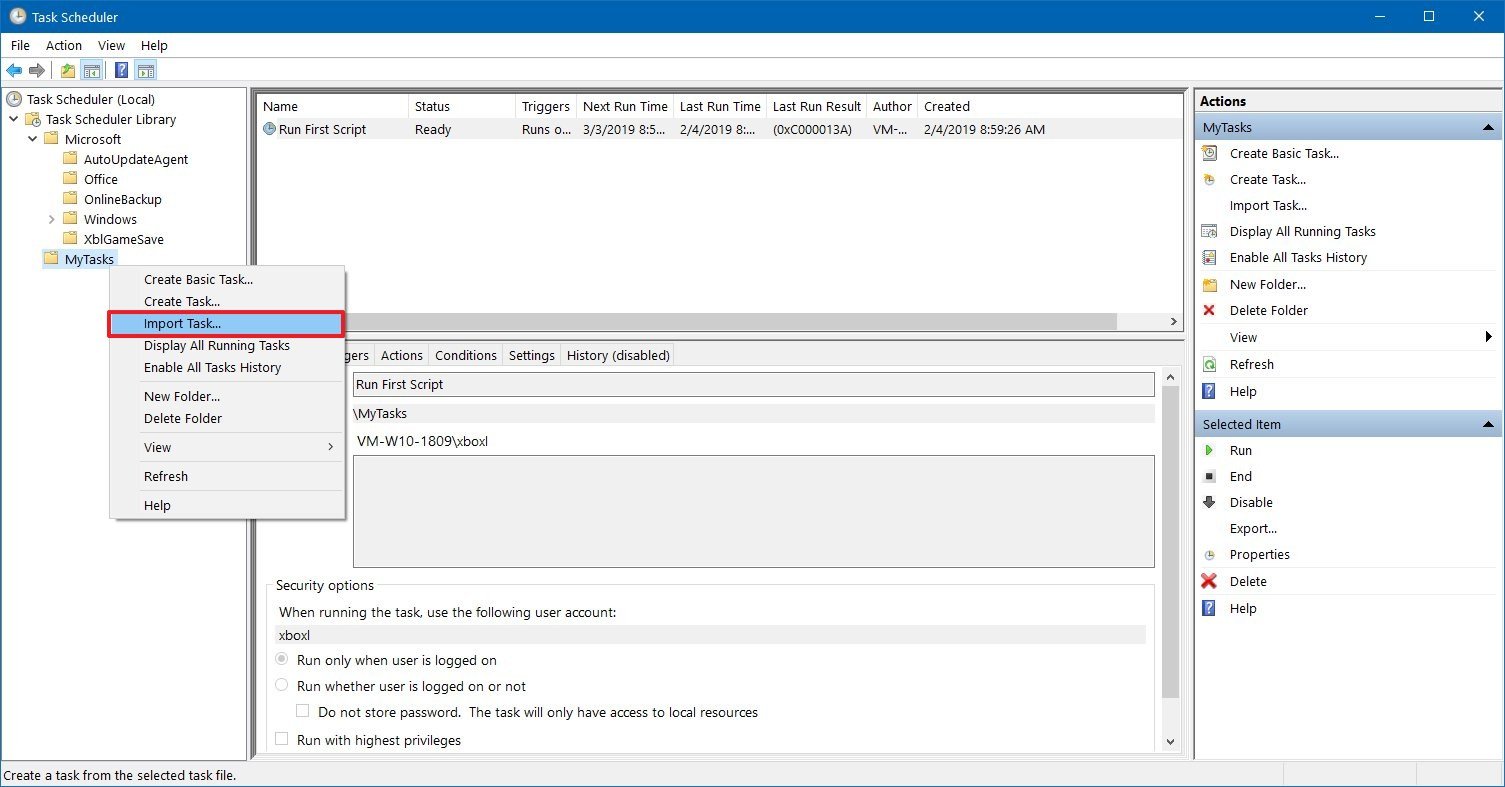
- Browse to the import location.
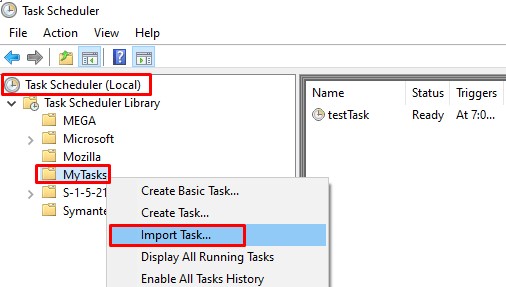
- Right-click the folder, and select the Import Task option.
- Browse and open the folder with the scheduled task.
- Select the task.
- Click the Open button.

- Optional: Update the scheduled task settings as necessary.
- Click the OK button.
After completing the steps, the task will import automatically on your device.
How to export and import scheduled tasks using Command Prompt
Alternatively, you can also use Command Prompt to export and import scheduled tasks, which could be a better option when working with multiple computers.
Exporting tasks with Command Prompt
To export a task using Command Prompt on Windows 10, use these steps:
- Open Start.
- Search for Command Prompt, right-click the top result, and select the Run as administrator option.
- Type the following command to export a scheduled task and press Enter:
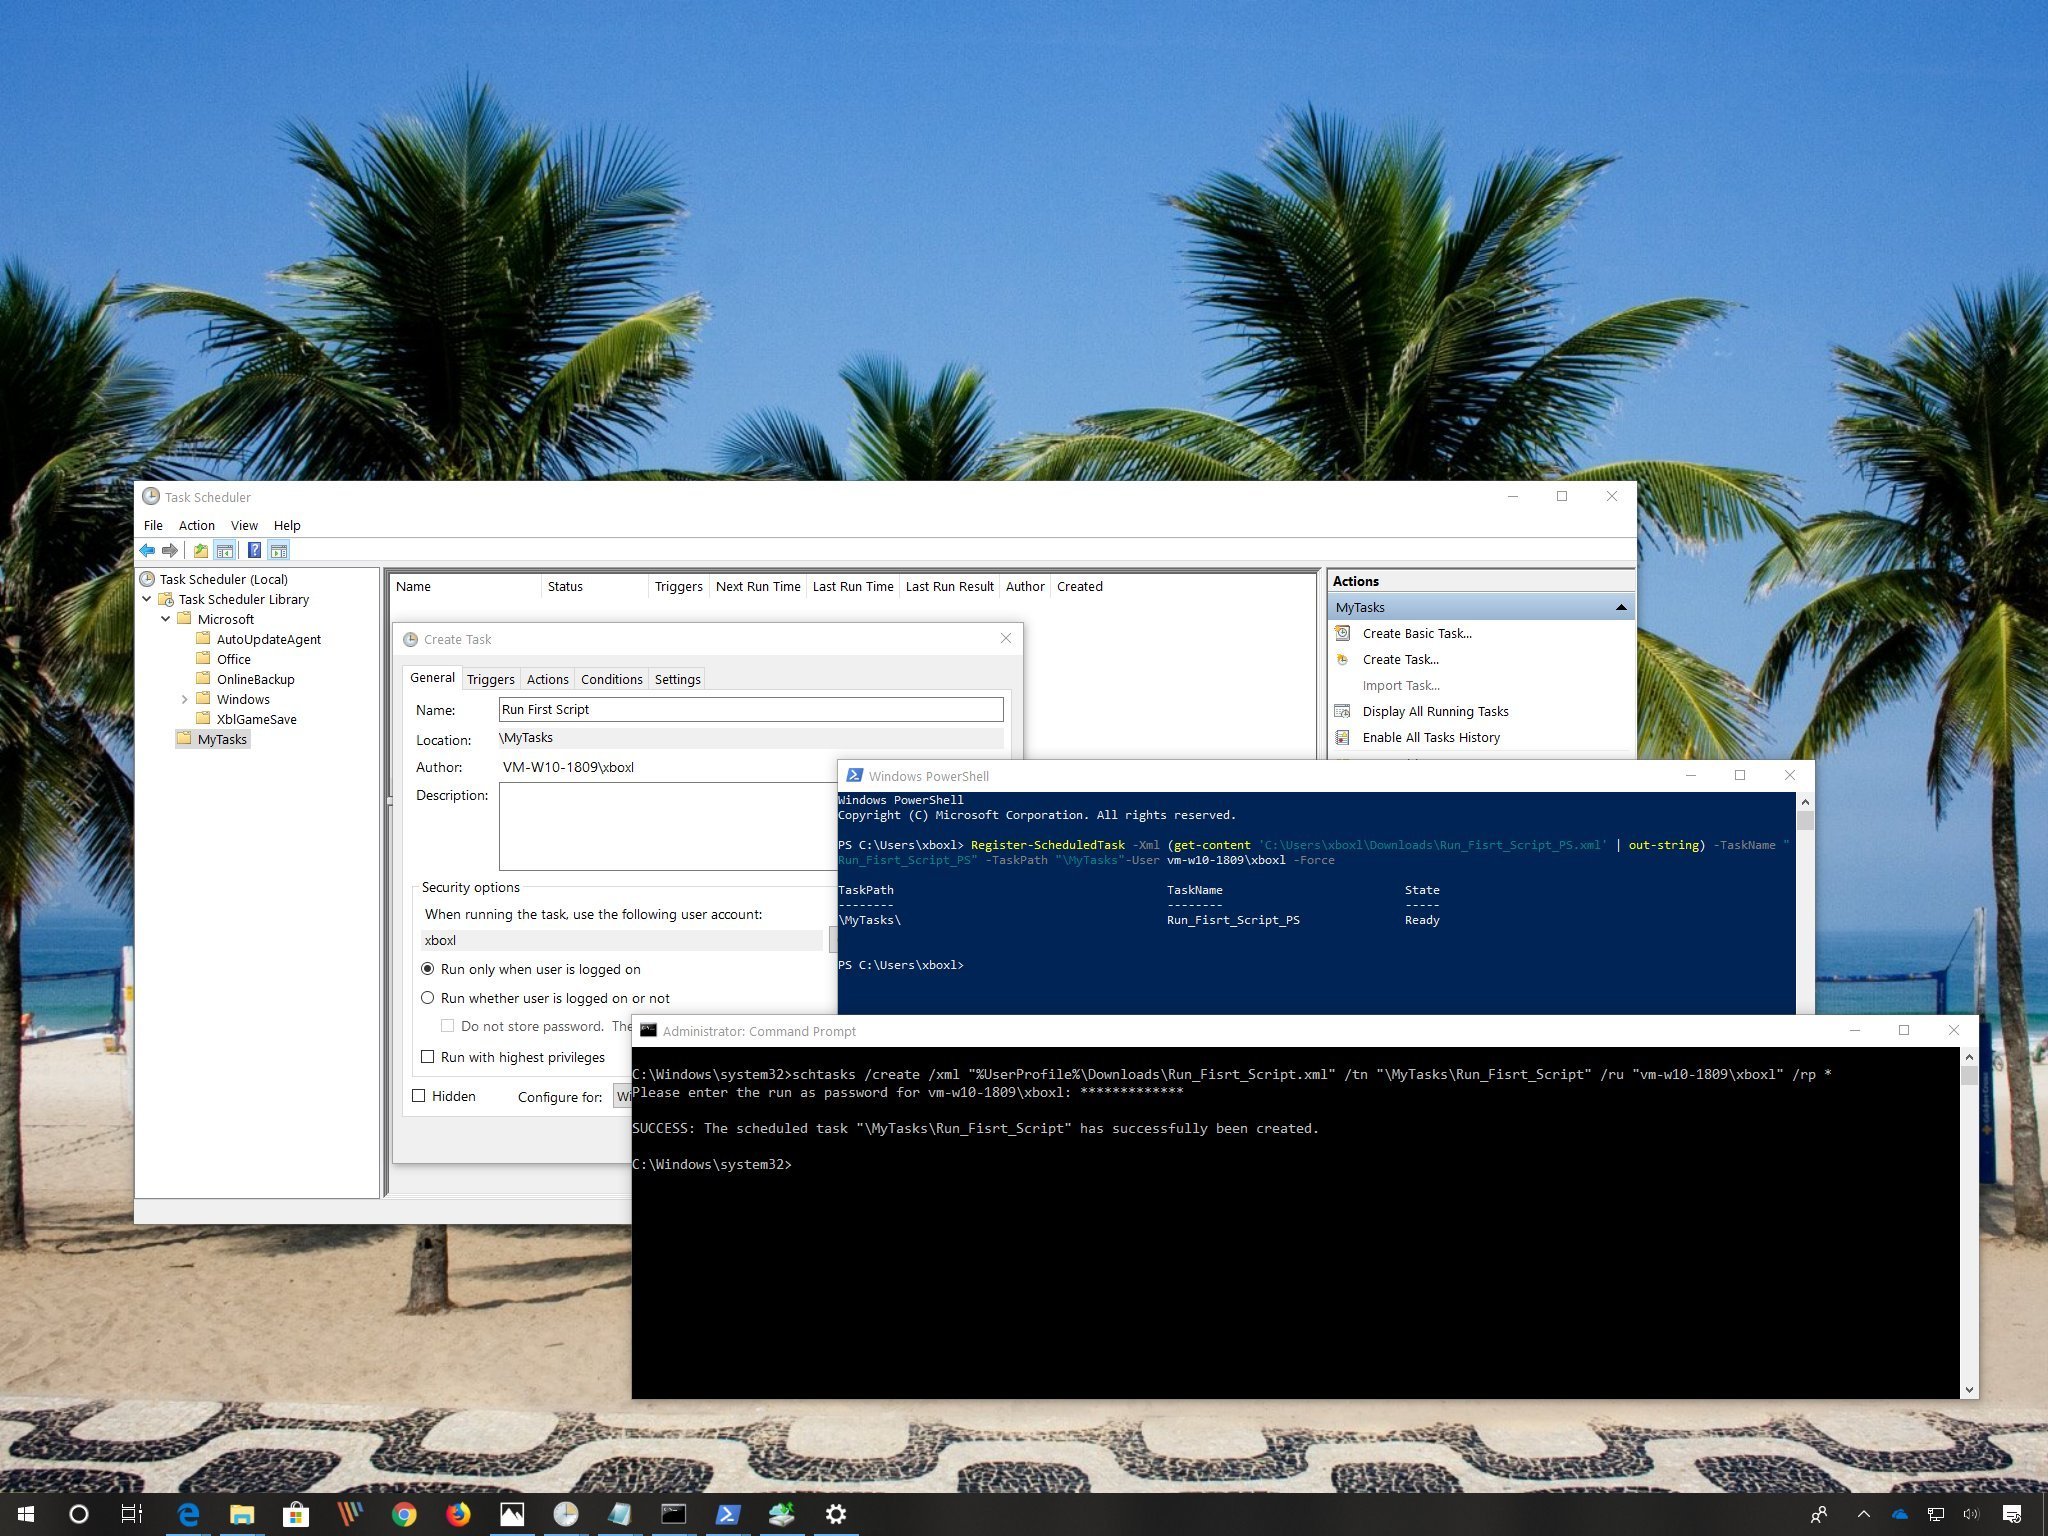
schtasks /query /xml /tn "\TASK-PATH-TASKSCHEDULER\TASK-NAME" > "%UserProfile%\EXPORT-FOLDER-PATH\TASK-EXPORT-NAME.xml"In the command, make sure to update the command («\TASK-PATH-TASKSCHEDULER\TASK-NAME,» «%UserProfile%\EXPORT-FOLDER-PATH\TASK-EXPORT-NAME.xml) with your device details.
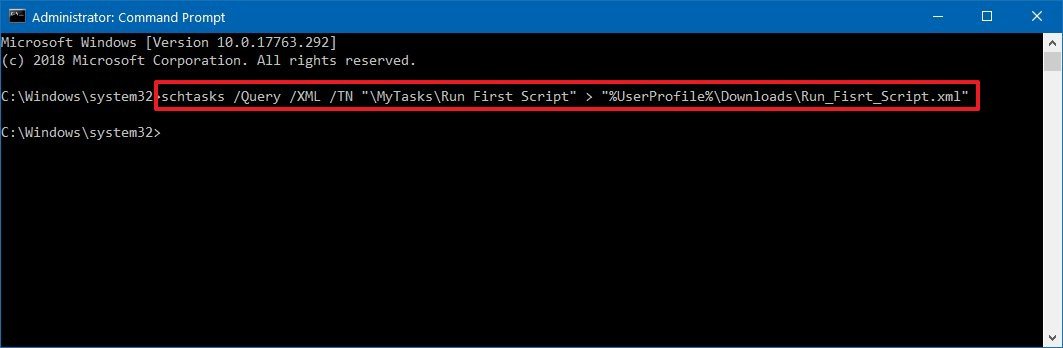
Once you complete the steps, the task will be exported as a .xml file in the location you specified.
Import tasks with Command Prompt
Command Prompt does not offer an import option. Instead, you’ll need to use the «create» flag to create and schedule a new task using the exported settings in the .xml file.
To import a task, use these steps:
- Open Start.
- Search for Command Prompt, right-click the top result, and select the Run as administrator option.
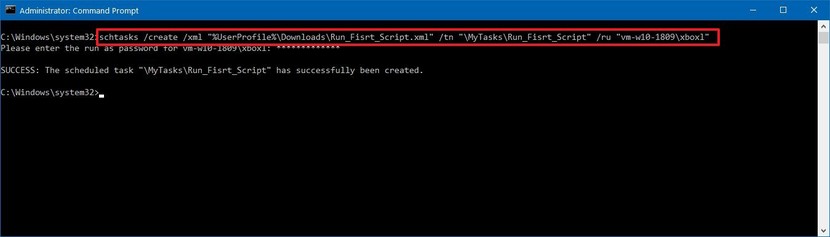
- Type the following command to import a scheduled task and press Enter:
schtasks /create /xml "%UserProfile%\IMPORTED-FOLDER-PATH\TASK-INPORT-NAME.xml" /tn "\TASKSCHEDULER-FOLDER-PATH\TASK-INPORT-NAME" /ru "COMPUTER-NAME\USER-NAME"In the command, make sure to update the command («%UserProfile%\IMPORTED-FOLDER-PATH\TASK-INPORT-NAME.xml,» «\TASKSCHEDULER-FOLDER-PATH\TASK-INPORT-NAME,» «COMPUTER-NAME\USER-NAME») with your device details.Quick tip: If the command fails or you don’t want to enter the password manually, make sure to append the/rp ACCOUNT-PASSWORD(replacing «ACCOUNT-PASSWORD» with your actual password) after specifying the «COMPUTER-NAME\USER-NAME» parameters.

- Type your account password and press Enter.
After you complete the steps, the new scheduled task will be created using the exported settings in the location you specified in Task Scheduler.
How to export and import scheduled tasks using PowerShell
Similar to the Command Prompt option, you can also export and import tasks using PowerShell.
Exporting tasks with PowerShell
To export a scheduled task with PowerShell, use these steps:
- Open Start.
- Search for PowerShell, right-click the top result, and select the Run as administrator option.
- Type the following command to export a scheduled task and press Enter:
Export-ScheduledTask -TaskName "TASK-NAME" -TaskPath "\TASK-PATH-TASKSCHEDULER\" | out-file C:\PATH\TO\EXPORT-FOLDER\TASK-EXPORT-NAME.xmlIn the command, make sure to update the command («TASK-NAME,» «\TASK-PATH-TASKSCHEDULER\,» «C:\PATH\TO\EXPORT-FOLDER\TASK-EXPORT-NAME.xml») with your device details.
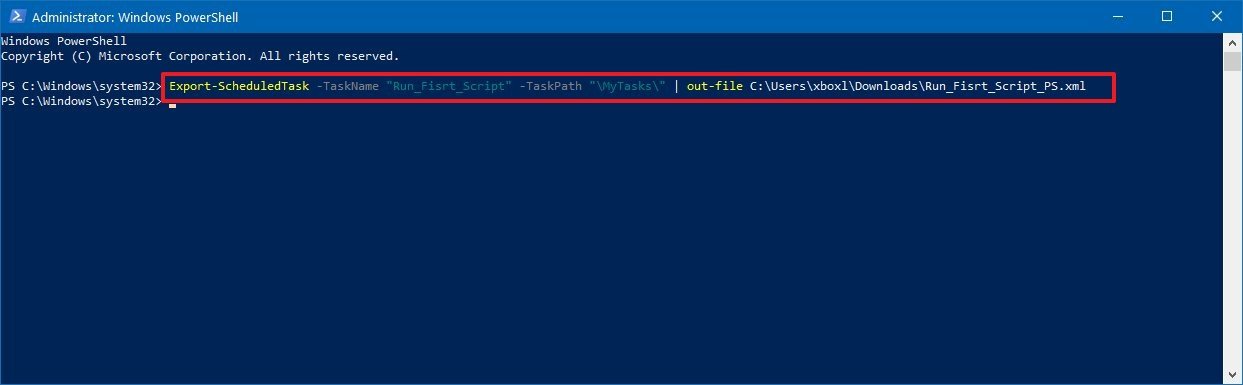
Once you complete these steps, the task will export into a file using a .xml extension, which you can then use to import the same task on the same or another computer or installation.
Importing tasks with PowerShell
Although there is an «Export» cmdlet, you won’t find an «Import» cmdlet variant using PowerShell. Instead, you’ll need to register a new task that will import the same settings included in the exported .xml file.
To import a task with PowerShell, use these steps:
- Open Start.
- Search for PowerShell, right-click the top result, and select the Run as administrator option.
- Type the following command to import a scheduled task and press Enter:
Register-ScheduledTask -xml (Get-Content 'C:\PATH\TO\IMPORTED-FOLDER-PATH\TASK-INPORT-NAME.xml' | Out-String) -TaskName "TASK-IMPORT-NAME" -TaskPath "\TASK-PATH-TASKSCHEDULER\" -User COMPUTER-NAME\USER-NAME –ForceIn the command make sure to update the command («C:\PATH\TO\IMPORTED-FOLDER-PATH\TASK-INPORT-NAME.xml,» «TASK-IMPORT-NAME,» «\TASK-PATH-TASKSCHEDULER\,» «COMPUTER-NAME\USER-NAME») with your device details.Quick tip: If the command fails or you don’t want to enter the password manually, make sure to append the-Password ACCOUNT-PASSWORD(replacing «ACCOUNT-PASSWORD» with your actual password) after specifying the «COMPUTER-NAME\USER-NAME» parameters.
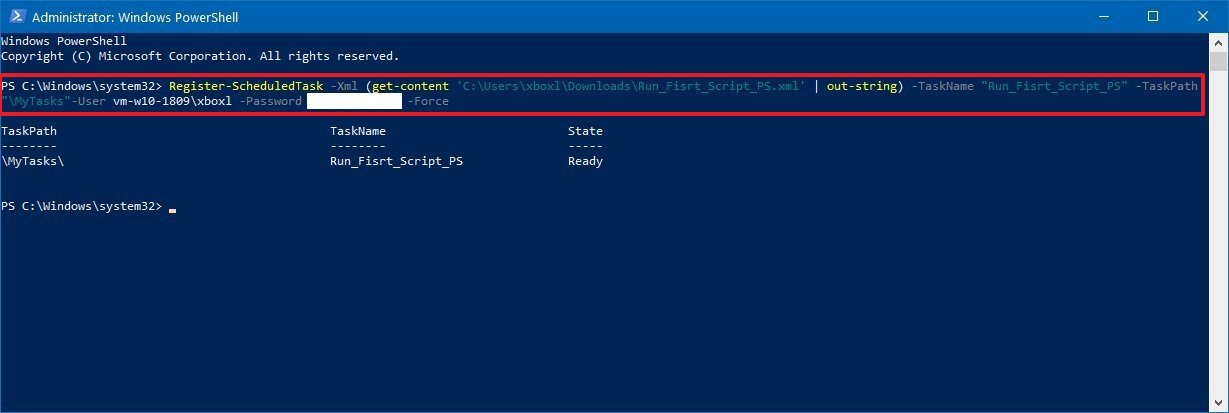
After completing these steps, the exported scheduled task will be imported to the location you specified in Task Scheduler.
While this guide is focused on Windows 10, the ability to export and import scheduled tasks has been around for a long time, and you can also refer to these instructions if you’re running Windows 8.1 or Windows 7.
More Windows 10 resources
For more helpful articles, coverage, and answers to common questions about Windows 10, visit the following resources:
- Windows 10 on Windows Central – All you need to know
- Windows 10 help, tips, and tricks
- Windows 10 forums on Windows Central
Mauro Huculak has been a Windows How-To Expert contributor for WindowsCentral.com for nearly a decade and has over 15 years of experience writing comprehensive guides. He also has an IT background and has achieved different professional certifications from Microsoft, Cisco, VMware, and CompTIA. He has been recognized as a Microsoft MVP for many years.
We often make use of scheduled tasks for many of the automation tips featured on AddictiveTips. On Windows 10, Task Scheduler is a stock app that can schedule tasks with all sorts of triggers. It’s easy to use but works just as well for more complicated automation setups.
Tasks in task scheduler have to be set up, but if you can also import and export them. If you’ve created a task on a PC and would like to use it on another one, you don’t necessarily have to create it again. You can simply export it from one PC and import it on the other.
You must already have the task all set up on your system before you can export it.
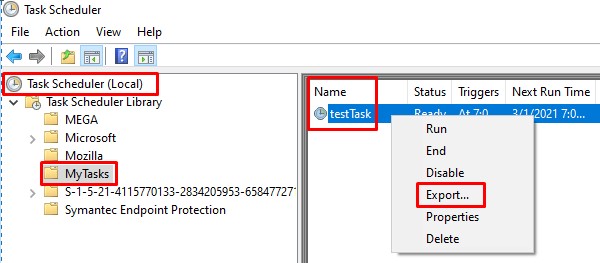
- Open Task Scheduler.
- Go through the library of scheduled tasks and select the one you want to export.
- In the Actions column, click Export.
- A save dialog box will open. Save the file with the same name as the task or with a different name. It will save as an XML file.
- The XML file is what you need to transfer to the PC you want to import the task on. You can use any means to transfer it; email, cloud drives, USB disks.
Import tasks from Task Scheduler
Before you can import a task, you first need the task file. It’s going to be an XML file. You can delete the file once you’ve imported the task, so you don’t have to worry too much about where it’s saved while you’re importing it.
- Open Task Scheduler.
- In the Actions column on the right, click Import.
- Select the XML file.
- The task will be imported and open for editing.
- Go through the different tabs and change anything you need to e.g., if the task has to run an executable, you have to select it on your system, and the path for it will be different.
- Once you’re done, make sure the task is enabled, and you’re all set. It’s a good idea to run the task once to make sure it has been set up correctly.
Importing and exporting tasks rarely involve any permissions that you have to manage; however, you may need to enable admin rights for some tasks. The test run should tell you if something isn’t working right, so don’t skip it. If you’re running scripts as an action, make sure the script has the permissions it needs to run.

Fatima Wahab
Fatima has been writing for AddictiveTips for six years. She began as a junior writer and has been working as the Editor in Chief since 2014.
Fatima gets an adrenaline rush from figuring out how technology works, and how to manipulate it. A well-designed app, something that solves a common everyday problem and looks
Dear followers of Get-ITsolutions.com, as you may now we have started a series of article helping you discover the powers of using PowerShell creating scheduled task. In our today’s guide we will cover three different ways on how to export and import scheduled tasks. You can import and export scheduled task using Command Prompt or PowerShell. If you are new to Windows Task scheduler we recommend you to check on our previous article in here.
What is Windows Task Scheduler?
For fully automation needed to be scheduled for automatic running. The Task Scheduler allows you to create all kinds of automated tasks in Windows. The graphic interface of Taskschd.msc console is used to create Windows Task Scheduler jobs. The Task Scheduler is a useful tool that has been around for several years, and it provides a friendly graphical interface to create automated routines. By using this tool, you can automate tasks to launch applications, run specific commands, or execute scripts at a selected schedule or once a condition is met.
In our previous article we have already created PowerShell scheduled task so another benefit of Task Scheduler is the ability to quickly export and import your tasks using different ways. You can import scheduled task using PowerShell; you can import scheduled task using Command Line. But also you play around in your daily job as sysadmin and export scheduled tasks using PowerShell or export scheduled tasks using Command Line. Keep in mind that all the actions mentioned above can be also done manually by exporting and importing scheduled tasks using Task Scheduler also.
How to export and import scheduled tasks using Task Scheduler
You can manually exporting and importing scheduled tasks using Task Scheduler also by following the guide below.
Export scheduled tasks using Task Scheduler
To export a scheduled task using Task Scheduler, use these steps:
- Open Start.
- Search for Task Scheduler, and click the top result to open the experience.
- Browse to the location of the scheduled task that you want to export.
- Right-click the item, and select the Export option.

Export scheduled tasks using Task Scheduler
- Browse and open the folder to export the task.
- Click the Save button.
Once you complete these steps, you’ll end up with a .xml file that you can then import to another computer. Using Task Scheduler, you can only export (or import) one task at a time, as such you’ll need to repeat the steps manually in order to export additional scheduled tasks.
Import scheduled tasks using Task Scheduler
To import a scheduled task using Tasks Scheduler use these steps:
Note: By using this option you can only restore the task but you cannot restore the script or application that the task will execute. If you’re importing a task that runs a script or starts an application, you need to make sure that those resources exist on the device before proceeding with the steps below. Otherwise, the scheduled task will fail.
- Open Start.
- Search for Task Scheduler, and click the top result to open the experience.
- Browse to the import location.
- Right-click the folder, and select the Import Task option.
- Browse and open the folder with the scheduled task.
- Select the task.
- Click the Open button. Note: You can also update the scheduled task settings as necessary.
- Click the OK button.
- After completing the steps, the task will import automatically on your device.
Import scheduled tasks using Task Scheduler
How to export and import scheduled tasks using Command Line
For fully automation you can import and export scheduled task using Command Line
Export scheduled tasks using Command Line
To export a scheduled task using Command Prompt use these steps:
- Open Start.
- Search for Command Prompt, right-click the top result, and select the Run as administrator option.
- Type the following command to export a scheduled task and press Enter. In the command, make sure to update the command (“\TASK-PATH-TASKSCHEDULER\TASK-NAME,” “%UserProfile%\EXPORT-FOLDER-PATH\TASK-EXPORT-NAME.xml) with your device details.
- Once you complete the steps, the task will be exported as a .xml file in the location you specified.
- If required make sure to type your administrator or account password and press Enter
- After you complete the steps, the new scheduled task will be created using the exported settings in the location you specified in Task Scheduler.
schtasks /query /xml /tn "\TASK-PATH-TASKSCHEDULER\TASK-NAME" > "%UserProfile%\EXPORT-FOLDER-PATH\TASK-EXPORT-NAME.xml"

Export scheduled task using command line
Import scheduled tasks using Command Line
Command Prompt does not offer an import option. Instead, you’ll need to use the “create” flag to create and schedule a new task using the exported settings in the .xml file.
To import a scheduled task using Command Line, use these steps:
- Open Start.
- Search for Command Prompt, right-click the top result, and select the Run as administrator option.
- Type the following command to import a scheduled task and press Enter. In the command, make sure to update the command (“%UserProfile%\IMPORTED-FOLDER-PATH\TASK-INPORT-NAME.xml,” “\TASKSCHEDULER-FOLDER-PATH\TASK-INPORT-NAME,” “COMPUTER-NAME\USER-NAME”) with your device details.
schtasks /create /xml "%UserProfile%\IMPORTED-FOLDER-PATH\TASK-INPORT-NAME.xml" /tn "\TASKSCHEDULER-FOLDER-PATH\TASK-INPORT-NAME" /ru "COMPUTER-NAME\USER-NAME"
Note: If required make sure to type your administrator or account password and press Enter
Import scheduled task using command line
How to export and import scheduled tasks using PowerShell
Similar to the Command Prompt option, for fully automation you can import and export scheduled task PowerShell.
Export scheduled tasks using PowerShell
To export a scheduled task using PowerShell use these steps:
- Open Start.
- Search for PowerShell, right-click the top result, and select the Run as administrator option.
- Type the following command to export a scheduled task and press Enter. In the command, make sure to update the command (“TASK-NAME,” “\TASK-PATH-TASKSCHEDULER\,” “C:\PATH\TO\EXPORT-FOLDER\TASK-EXPORT-NAME.xml”) with your device details.
Export-ScheduledTask -TaskName "TASK-NAME" -TaskPath "\TASK-PATH-TASKSCHEDULER\" | out-file C:\PATH\TO\EXPORT-FOLDER\TASK-EXPORT-NAME.xml

Export scheduled task powershell
Once you complete these steps, the task will export into a file using a .xml extension, which you can then use to import the same task on the same or another computer or installation.
Import scheduled tasks with PowerShell
Although there is an “Export” cmdlet, you won’t find an “Import” cmdlet variant using PowerShell. Instead, you’ll need to register a new task that will import the same settings included in the exported .xml file.
To import a scheduled task using PowerShell use these steps:
- Open Start.
- Search for PowerShell, right-click the top result, and select the Run as administrator option.
- Type the following command to import a scheduled task and press Enter. In the command make sure to update the command (“C:\PATH\TO\IMPORTED-FOLDER-PATH\TASK-INPORT-NAME.xml,” “TASK-IMPORT-NAME,” “\TASK-PATH-TASKSCHEDULER\,” “COMPUTER-NAME\USER-NAME”) with your device details.
- After completing these steps, the exported scheduled task will be imported to the location you specified in Task Scheduler.
- Note: If the command fails or you don’t want to enter the password manually, make sure to append the
-Password ACCOUNT-PASSWORD(replacing “ACCOUNT-PASSWORD” with your actual password) after specifying the “COMPUTER-NAME\USER-NAME” parameters.
Register-ScheduledTask -xml (Get-Content 'C:\PATH\TO\IMPORTED-FOLDER-PATH\TASK-INPORT-NAME.xml' | Out-String) -TaskName "TASK-IMPORT-NAME" -TaskPath "\TASK-PATH-TASKSCHEDULER\" -User COMPUTER-NAME\USER-NAME –Force
Conclusions
In our today’s guide we covered three different ways on how to export and import scheduled tasks. We showed you three different way how to do it by using Task Scheduler, Command Prompt and PowerShell.
We like to migrate all the scheduled tasks to another server or computer. Instead of exporting the scheduled tasks individually in Task Scheduler, running a PowerShell script is better to bulk export all tasks for you. It’s also excellent to run the script and save the scheduled tasks for backup purposes. In this article, you will learn how to export scheduled tasks with PowerShell.
Table of contents
- Export scheduled task in Task Scheduler
- Export all scheduled tasks with PowerShell
- Download Export-SchedTasks PowerShell script
- Run Export Scheduled Tasks PowerShell script
- Verify Scheduled Tasks XML files
- Conclusion
Export scheduled task in Task Scheduler
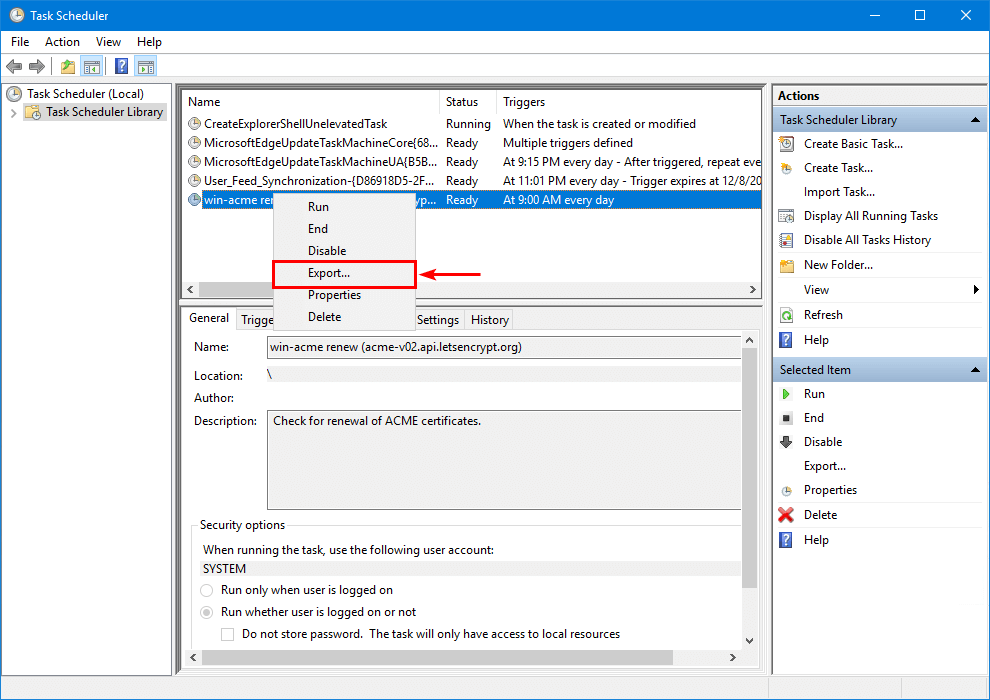
There is no way to export multiple or all scheduled tasks from the Task Scheduler program. It’s only possible to export a single Task schedule.
Select all the tasks in the Task Scheduler, and there is no option to export.
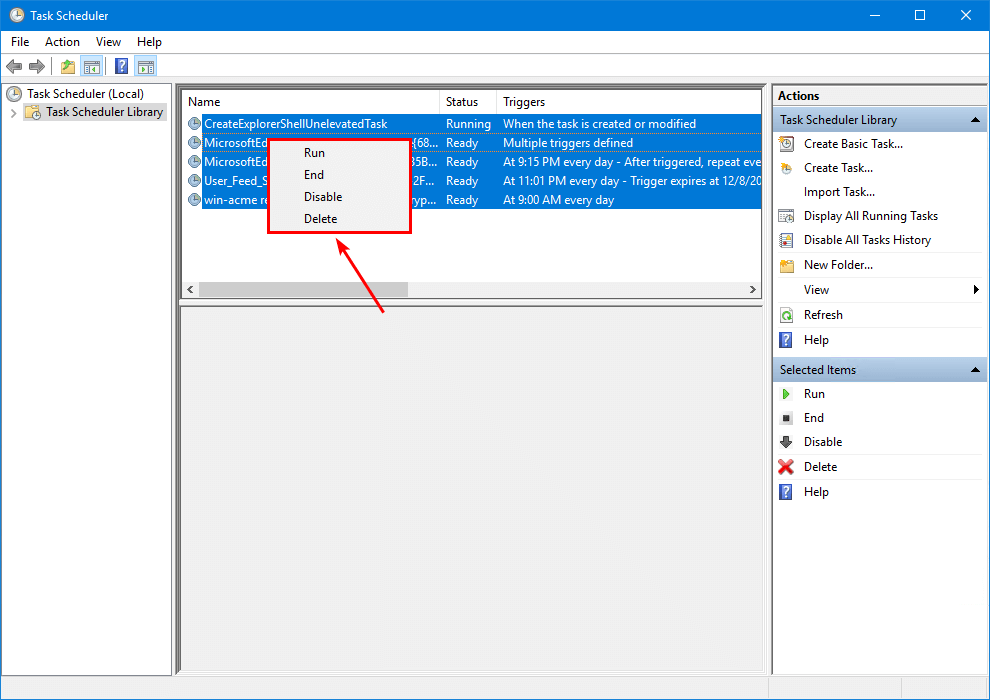
Select a single task in Task Scheduler, and you can export that task.
If you have many scheduled tasks, this can be highly time-consuming. So, what is a better approach? PowerShell to the rescue.
To export all the scheduled tasks, we will use the Get-ScheduledTask PowerShell cmdlet to retrieve them and the Export-ScheduledTask PowerShell cmdlet to export them.
Let’s look into that in the next step.
Download Export-SchedTasks PowerShell script
Create two folders on the (C:) drive:
- Scripts
- Tasks
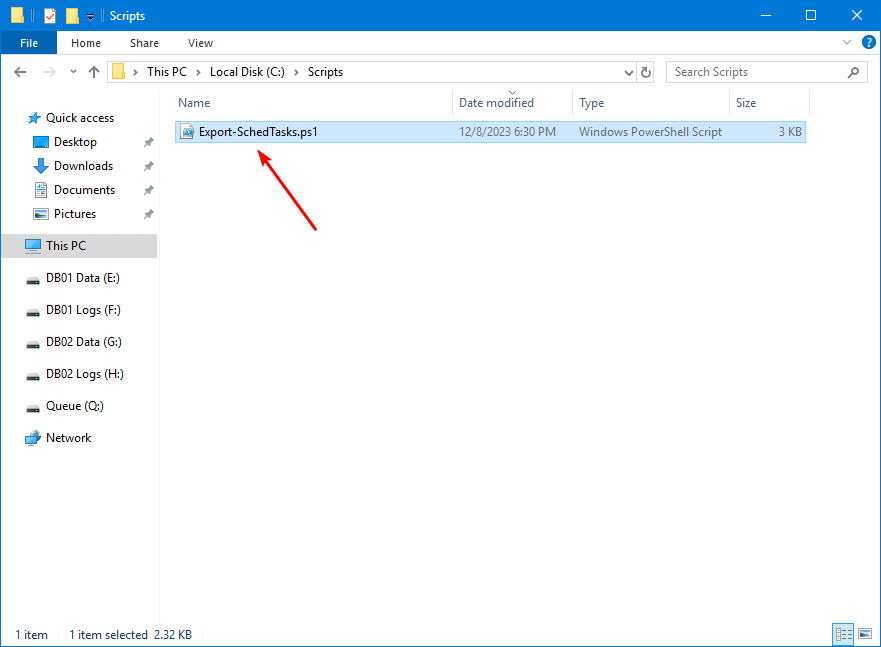
Download and place Export-SchedTasks.ps1 PowerShell script in the C:\Scripts folder. The script will export all the scheduled tasks to the C:\Tasks folder.
Note: It will not export the Microsoft folder that contains scheduled tasks because they are default tasks.
Ensure the file is unblocked to prevent errors when running the script. Read more in the article Not digitally signed error when running PowerShell script.
Another option is to copy and paste the code below into Notepad. Give it the name Export-SchedTasks.ps1 and place it in the C:\Scripts folder.
<#
    .SYNOPSIS
    Export-SchedTasks.ps1

    .DESCRIPTION
    Export Windows Scheduled Tasks on Windows Server and Windows Clients for backup purposes.

    .LINK
    www.alitajran.com/export-scheduled-tasks-powershell/

    .NOTES
    Written by: ALI TAJRAN
    Website:    www.alitajran.com
    LinkedIn:   linkedin.com/in/alitajran

    .CHANGELOG
    V1.00, 12/08/2023 - Initial version
#>

# Define the backup path
$backupPath = "C:\Tasks"

# Get the unique task folders from the scheduled tasks
$taskFolders = (Get-ScheduledTask).TaskPath | Where-Object { ($_ -notmatch "Microsoft") } | Select-Object -Unique

# Start exporting of scheduled tasks
Write-Host "Start exporting of scheduled tasks." -ForegroundColor Cyan

# Check if the backup path exists
if (Test-Path -Path $backupPath) {
    Write-Host "Folder already exists: $backupPath" -ForegroundColor Yellow
}
else {
    # Create the backup path if it doesn't exist
    New-Item -ItemType Directory -Path $backupPath | Out-Null
    Write-Host "Backup path created: $backupPath" -ForegroundColor Green
}

# Loop through each task folder
foreach ($taskFolder in $taskFolders) {
    Write-Host "Task folder: $taskFolder" -ForegroundColor Cyan

    # Check if the task folder is not the root folder
    if ($taskFolder -ne "\") {
        $folderPath = "$backupPath$taskFolder"

        # Create the task folder in the backup path if it doesn't exist
        if (-not (Test-Path -Path $folderPath)) {
            New-Item -ItemType Directory -Path $folderPath | Out-Null
        }
        else {
            Write-Host "Folder already exists: $folderPath" -ForegroundColor Yellow
        }
    }

    # Get the tasks in the task folder
    $tasks = Get-ScheduledTask -TaskPath $taskFolder -ErrorAction SilentlyContinue

    # Loop through each task in the task folder
    foreach ($task in $tasks) {
        $taskName = $task.TaskName

        # Export the task and save it to a file
        $taskInfo = Export-ScheduledTask -TaskName $taskName -TaskPath $taskFolder
        $taskInfo | Out-File "$backupPath$taskFolder$taskName.xml"
        Write-Host "Saved file $backupPath$taskFolder$taskName.xml" -ForegroundColor Cyan
    }
}

# Exporting of scheduled tasks finished
Write-Host "Exporting of scheduled tasks finished." -ForegroundColor Green
This is how it looks.
Run Export Scheduled Tasks PowerShell script
Run the Export-SchedTasks.ps1 PowerShell script to get all the Task Scheduled tasks and export them to XML files in the C:\Tasks folder.
C:\scripts\.\Export-SchedTasks.ps1The output shows:
Start exporting of scheduled tasks.
Backup path created: C:\Tasks
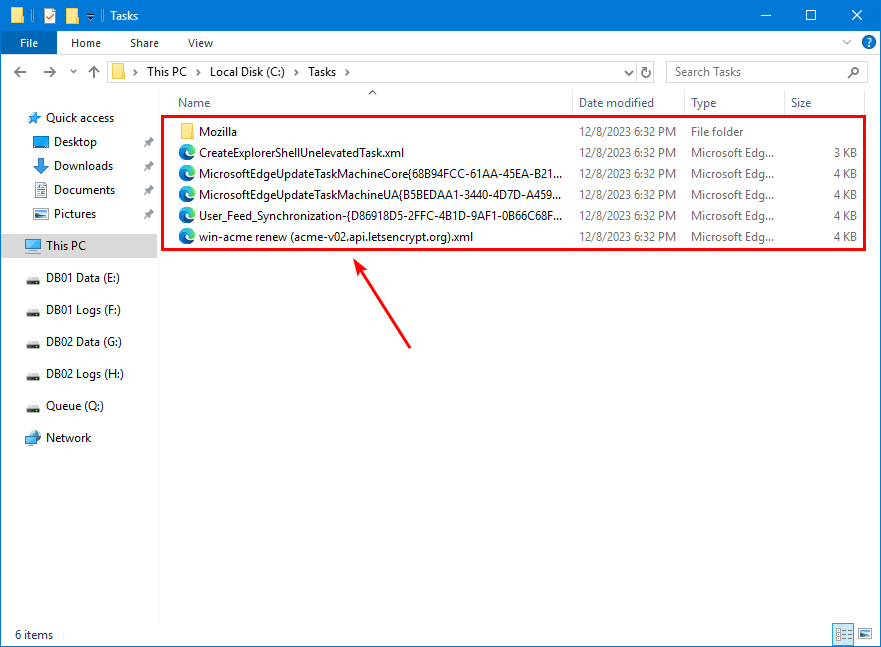
Task folder: \
Saved file C:\Tasks\CreateExplorerShellUnelevatedTask.xml
Saved file C:\Tasks\MicrosoftEdgeUpdateTaskMachineCore{68B94FCC-61AA-45EA-B214-C666C5A7C344}.xml
Saved file C:\Tasks\MicrosoftEdgeUpdateTaskMachineUA{B5BEDAA1-3440-4D7D-A459-0A8C98600F11}.xml
Saved file C:\Tasks\User_Feed_Synchronization-{D86918D5-2FFC-4B1D-9AF1-0B66C68F64B2}.xml
Saved file C:\Tasks\win-acme renew (acme-v02.api.letsencrypt.org).xml
Task folder: \Mozilla\
Saved file C:\Tasks\Mozilla\Firefox Background Update 308046B0AF4A39CB.xml
Saved file C:\Tasks\Mozilla\Firefox Default Browser Agent 308046B0AF4A39CB.xml
Exporting of scheduled tasks finished.Verify Scheduled Tasks XML files
The Export-SchedTasks.ps1 PowerShell script bulk exports all tasks to XML files. Find the XML files in the path C:\Tasks.
Open the XML file with your favorite application. For example, Microsoft Edge, Notepad, or Notepad++.
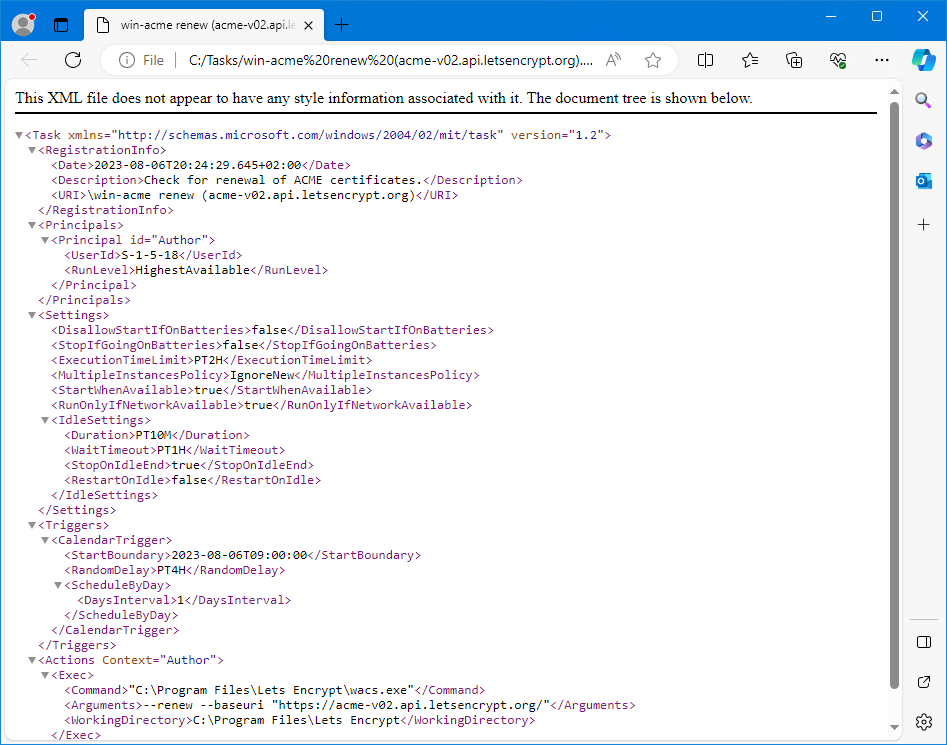
The XML file looks excellent.
Did this help you to back up the scheduled tasks with PowerShell to XML files?
Read more: Create scheduled task with PowerShell »
Conclusion
You learned how to export scheduled tasks with PowerShell. First, run the Export-SchedTasks PowerShell script. Next, go to the export folder to check all the exported scheduled tasks in XML files. The script works for Windows Server and Windows Clients.
Did you enjoy this article? You may also like Windows Server post-installation configuration. Don’t forget to follow us and share this article.
ALI TAJRAN is a passionate IT Architect, IT Consultant, and Microsoft MVP. He started Information Technology at a very young age, and his goal is to teach and inspire others. Read more »